Chapter 4: Cryptography—The basics
Keywords
Cryptography; Ciphers; Hashes; Encryption; Security; mbedTLS; Symmetrical encryption; Block cipher; Message authentication code; Random number generator; Entropy; Deterministic random bitstream generator
Introduction
This chapter will provide an introduction to current cryptographic algorithms that are used for secure communications and to secure stored data within an IoT node. Before we begin, it is important to lay down a few rules about developing a cryptographic system.
First, do not try to develop your own algorithm. While it may seem like a good idea to have your own patented algorithm it is highly unlikely you will get it right. It is also highly likely that someone will be able to break it and gain access to your system and/or data. Don’t. Just don’t. Stick to standard well-known algorithms that are under constant review by researchers. Any weaknesses or vulnerabilities will be found along with mitigations or migration to an improved algorithm. As a corollary to this rule, do not use a nonstandard algorithm provided by a third party. It is very likely that somebody's “secret sauce” will suffer from the same problems and should be treated as snake oil.
Secondly, do not try to code a standard algorithm. This may seem a bit extreme, particularly if you are a professional software developer. However, any code you do produce will only be used and reviewed by a small number of developers who are unlikely to be experienced cryptographers. Instead, use a standard library with a large user base whose source code is maintained and open for review. One of the guiding rules of cryptography is known as Kerkhoff’s Principle, which states “The security of a cryptosystem must lie in the choice of its keys only; everything else (including the algorithm itself) should be considered public knowledge” or as Claude Shannon put it, “The enemy knows the system.” Somewhat ironically secrecy about your software design and algorithms is ultimately the enemy of security; open discussion encourages better security.
Now that I have got that off my chest let's press on!
Table 4.1 defines acronyms for agencies and standards that are often quoted within microcontroller datasheets and user manuals.
mbedTLS
The mbedTLS cryptographic library is a component of the mbedOS IoT operating system developed by Arm but is available as a stand-alone modular library. mbedTLS library was originally a commercial product developed by a Canadian company called Polar. Arm purchased Polar and the mbedTLS library in 2011 and released mbedTLS as a free-to-use resource for commercial and noncommercial projects. mbedTLS is provided under an Apache v2.0 noncontributory license. Due to its prominence as part of Arm's IoT firmware, mbedTLS is subject to a lot of research and scrutiny. The mbedTLS library is maintained under continued development with regular updates along with security alerts to notify you of discovered vulnerabilities and patches. A security center is maintained on the Trusted Firmware website.
If you use mbedTLS in a project, you should also join the mbedTLS security alerts mailing list.
There is an additional cryptographic library called mbedCrypto, which is derived from mbedTLS. The mbedCrypto library is designed to run as a security service as part of the PSA Trusted Firmware. We will see how to use mbedCrypto in the second half of this book.
Exercise: Install and verify mbedTLS
The mbedTLS source code can be downloaded from gitHub or installed as a software pack as shown below.
- If you have not done so already, open the pack installer, select the Packs tab, and install the generic::mbedTLS software pack (Fig. 4.1).
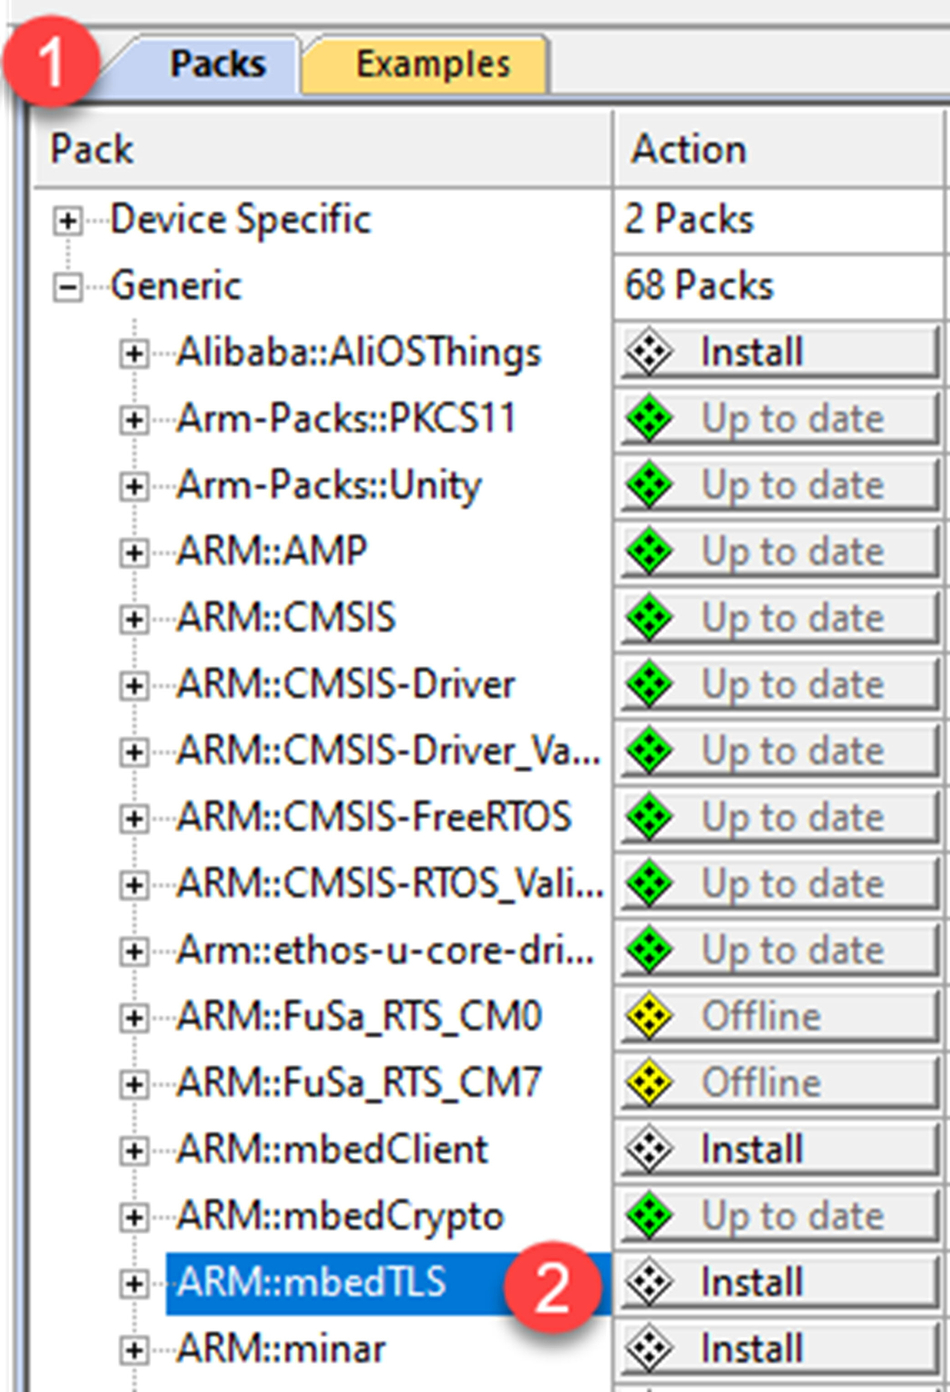
Fig. 4.1 mbedTLS software pack. Installing the mbedTLS software pack. No permission required.
Once installed, our first mbedTLS project will build the library with its self-test option enabled so that we can verify its operation on our target hardware.
- Open the pack installer select project 4.1 and press the copy button.
This is a fully configured project with the mbedTLS source code modules added. The mbedTls library is designed as a very modular library so it can be compiled with the minimal functionality required for a given project.
- Open the file mbedTLS_Config.h. (Fig. 4.2).

Fig. 4.2 mbedTLS configuration file. No permission required.
The config file contains all the configuration switches used to select the features and modules within the mbedTLS library. The config file is divided into three sections (Table 4.2).
| Configuration section | Description |
|---|---|
| System support | Defines the system resources available to the library |
| Feature support | Configures features within a cryptographic algorithm |
| Modules | Enables a module containing a given cryptographic algorithm |
In the current project, all of the cryptographic algorithms are enabled but the SSL (TLS) protocol is disabled. The MBEDTLS_SELF_TEST option is enabled so we can ensure that all the supported algorithms can be run on our hardware.
- Build the project and start the debugger.
- Place a formatted SD card in the evaluation board card holder.
- Start Tera Term and connect to the virtual serial port at 115200 baud.
- Run the code and the self-test results will be printed to the console window (Fig. 4.3).

Fig. 4.3 mbedTLS self-test results. No permission required.
Now when you run the code, the self-test functions for each algorithm will execute and the results will be printed to the debugger console window.
The self-test functions execute a test suite of 26 test groups that cover the algorithms in the library. The set of tests for the random number generator will fail as this algorithm requires further configuration. We will fix this later. The project also creates a large file called “Hello_big.txt” on the evaluation board SD card. Keep this file as we will use it in future projects.
- Open the RTE.
- Click on the mbedTLS documentation link (Fig. 4.4).

Fig. 4.4 mbedTLS library. The mbedTLS documentation is available from within the RTE. No permission required.
The documentation is provided as a Doxygen file, and the main documentation is available in the “usage and description” section (Fig. 4.5).

Very importantly and deserving of its own paragraph, the description of each configuration option is available in the documentation files/config.h page. This describes the purpose of each configuration #define and also any dependencies it requires.
The mbedTLS_config.h file also includes a check config file. This will report any configuration errors and give us a quick if slightly kludgie way to find the missing dependencies.
#include "mbedtls/check_config.h
- Open mbedTLS_config.h and comment out the following option:
line 124 //#define MBEDTLS_AES_C
- Rebuild the project.
The compiler will report that there is a missing dependency:
#error "MBEDTLS_CTR_DRBG_C defined, but not all prerequisites"
- Click on the compiler error to locate the source code that caused it.
Here, we can see the possible missing #defines and can go back and enable the necessary options in the mbedTLS_config.h file.
- #if defined(MBEDTLS_CTR_DRBG_C) && !defined(MBEDTLS_AES_C)
- #error "MBEDTLS_CTR_DRBG_C defined, but not all prerequisites"
- #endif
Information assurance
We want to use a cryptographic library to protect both the integrity of our IoT device and the data it produces or consumes. This is known as “information assurance” and it has four main pillars.
Confidentiality
The most obvious feature of our cryptographic library is to provide confidentiality of private information. Any data in our system must only be accessible to authorized individuals and must not be disclosed to unauthorized individuals.
Integrity
In addition to confidentiality, it is also necessary to validate the integrity of any data received from outside the bounds of our IoT node. This ensures that information and programs are only changed in a specified and authorized manner.
Availability
Any cryptographic system should work promptly and service must not be denied to authorized users.
Nonrepudiation and authentication
This feature of a cryptographic system allows us to prove both the integrity and the origin of the data. This means that we can prove who sent the message and that it has not been tampered with. It also means that the sender cannot deny (repudiate) that they are the originator.
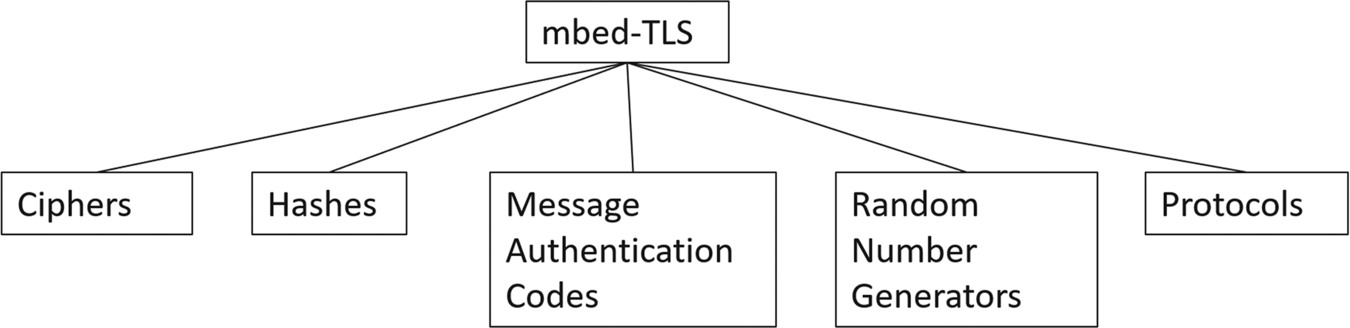
Security services
It is the role of a cryptographic library to provide a range of security algorithms that achieve these information assurance aims. The scope of these security services is shown in Fig. 4.6.
Ciphers
Ciphers are used to ensure the confidentiality of information both when it is “in flight” during a communication session and when it is stored or “at rest” in the memory of a microcontroller.
Hashes
A cryptographic hash is used to validate the integrity of a block of data. You can pass data of arbitrary size into a hashing algorithm and it will return a (large) number called a Message Digest (MD) that is unique to that data. You can think of a Message Digest as a cryptographic checksum or fingerprint of the data.
Message authentication code (MAC)
A message authentication code (MAC) is like a hash in that it returns a unique number called a Tag, but this number depends on the input block of data and a password in the form of a numeric key. To regenerate the MAC Tag you need both the original data and the key. Thus, a MAC Tag can be used both to validate the data that have been received and also authenticate its origin to any member of a group that knows the key.
Authenticated encryption
In a communication protocol, we need to ensure the confidentiality and integrity of data in flight. It is common to encrypt a block of data with a cipher and also use a message authentication code so that a receiving station can validate its integrity and origin.
Random number generator (RNG)
A cryptographic system will also include a random number generator (RNG). This may come as a surprise as an RNG is vital to the successful performance of a cryptographic system. For example, encryption keys can be generated with random data, and the higher layer communication protocols require a stream of random numbers to establish a secure communication channel. The quality of your RNG is as important as the security of your cipher keys.
In this chapter, we are going to introduce each of the key services that provide the foundation for secure communication and see how they are supported in mbedTLS. Then in the next chapter, we will look at how to use these algorithms to establish a secure communication session.
Ciphers
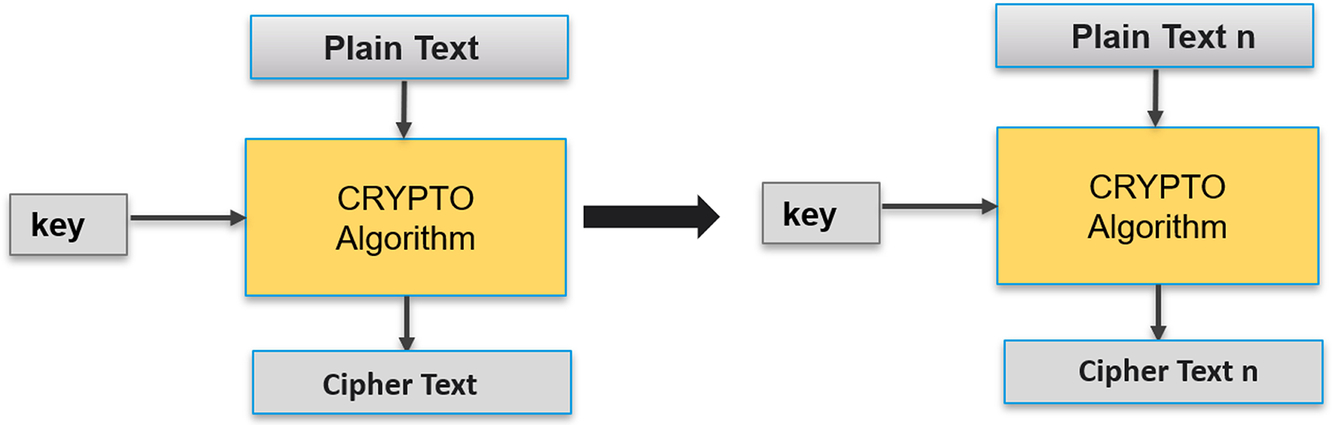
We are all familiar with how a cipher works probably from using simple codes as children. The basic premise is simple—take our unencrypted text known as plain text and pass this through our cipher algorithm in combination with a cipher key. The output is then our encrypted text known as ciphertext. We can decrypt the ciphertext back to the plain text by running the ciphertext and the encryption key back through the cipher algorithm (Fig. 4.7).

There are two main categories of cipher algorithm. These are symmetrical key and asymmetrical key algorithms. A symmetrical key cipher uses the same key to encrypt and decrypt the plain text. This means that the key must be known by both the sending and receiving station and must be shared by an initial secure channel. This makes it impossible to establish secure communications over an insecure channel such as the internet without having previously agreed on a cipher key through a separate secure channel. The second class of ciphers, known as asymmetrical ciphers, helps solve this problem. An asymmetrical cipher system has two keys: a public key and a private key. The public key is used for encryption and does not have to be kept secret; the private key is used for decryption and must be kept secret. In this chapter, we will look at symmetrical ciphers, and in the next chapter, we will look at asymmetrical ciphers and how to use them in a real system.
When considering a cipher system's security, a cipher is said to be “broken” when the ciphertext can be decrypted by an attack that exploits a weakness in the algorithm. If a cipher is not broken and you don’t have access to the key, then the only way to decrypt the message is to try every key combination until you hit the correct key. This “brute force” approach can only be used successfully if the cipher key size is small enough to allow the resulting keyspace to be searched in a reasonable amount of time. As available computing power increases, we need to have larger key sizes to make brute force searches unfeasible.
Symmetrical ciphers
The family of symmetrical ciphers can split into two broad categories of streaming ciphers and block ciphers.
A streaming cipher encrypts one symbol at a time to create a stream of ciphertext that can then be decrypted symbol by symbol. A block cipher operates on a group of bytes to encrypt or decrypt multiple bytes at a time. While both types of cipher can be used to protect internet traffic, a block cipher works well with UPD and TCP packets.
Streaming ciphers
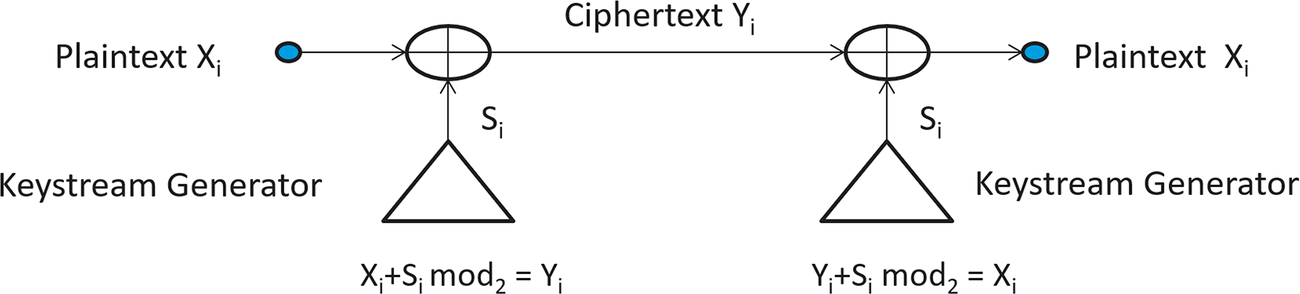
In a theoretical streaming cipher, each symbol will be a single bit. Each bit in the plain text stream will be combined with a bit from a random bitstream known as a keystream. The resulting stream of ciphertext can be decrypted by performing the same addition with a synchronized keystream (Fig. 4.8).
The process of combining the bitstream and the keystream is a mod2 addition which, when we look at the resulting truth table, can be performed by a single XOR gate (Fig. 4.9).
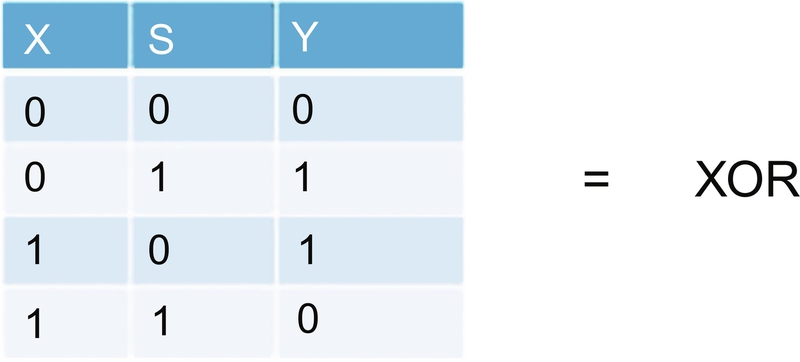
Therefore, a streaming cipher is potentially fast and simple to implement. The resulting encrypted bitstream provides a very high encryption level that is nigh on impossible to break. However, in practice, it is impossible to create a random keystream that never repeats itself and can be synchronized between the source and destination. There are a number of practical streaming ciphers that overcome these limitations. mbedTLS supports the ARC4 streaming cipher. This cipher was originally developed by Ron Rivest at the RSA Corporation and is called Rivest Cipher 4 (RC4). RC4 was sold as a commercial cipher. However, it was never patented, and at some point, the source code was posted on the internet. This gave rise to the Almost Rivest Cipher 4 (ARC4), which is now mostly considered to be in the public domain except, of course, by the RSA Corporation. While it is used in many commercial products and is included in mbedTLS, its legal basis is a bit of a gray area. Since the source code was posted, security researchers have found multiple vulnerabilities in ARC4, and it is considered an insecure algorithm. While it forms part of the WiFi security protocols WEP and WAP, its use was removed from TLS in 2015.
The ARC4 cipher generates a keystream from a pseudo-random bitstream generator. This consists of a secret internal state, which is an array of 256 bytes (Fig. 4.10).
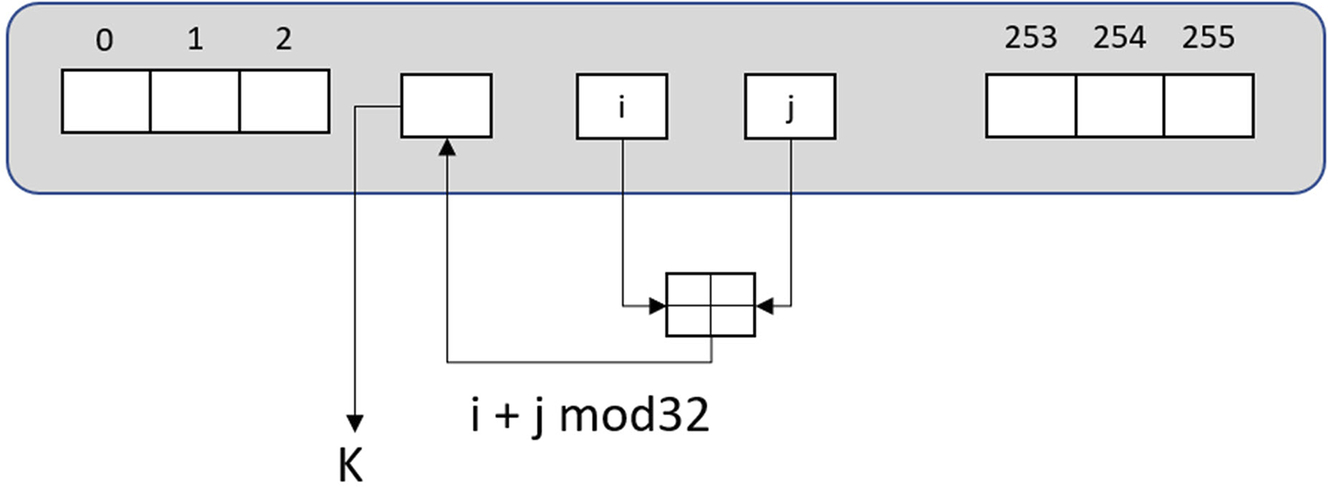
The state array is initially filled with the values 0–255.
The state values are modified with an initial permutation shown below. The secret key has a length of between 1 and 256 bytes. The key should not be used for repeated sessions in a practical system. Instead, you must devise a protocol to derive a unique key for each session from a shared master key.
The keystream value K is then produced by the following pseudo-random process.
Exercise: ARC4
This exercise configures mbedTLS to use the ARC4 cipher and then encrypts and decrypts the Hello_Big.txt file, which was created in the first exercise. Table 4.3 provides a summary of the mbedTLS ARC4 functions.
- Open the pack installer, select Project 4.2 and press the copy button.
| Function | Description |
|---|---|
| mbedtls_arc4_crypt | Encrypt/decrypt data for a given context |
| mbedtls_arc4_free | Clear the ARC4 context |
| mbedtls_arc4_init | Initialize the ARC4 context |
| mbedtls_arc4_setup | Setup the encryption key |
mbedTLS ARC.
In this exercise, we will encrypt the hello_big.txt file 1000 times and then decrypt it back to the original plain text. This is a standard way to “stress test” the implementation of any encryption algorithm.
- Open main.c
The file access and encryption routine is held in the ARC4_crypt() function.
Because the ARC4 cipher is performing an XOR with a random bit stream we can use the same function to encrypt and decrypt the data in our file.
When using an algorithm in mbedTLS, you first need to declare a context variable to hold the working values for a given instance. Within the ARC4_crypt() function, we declare and initialize an ARC4 context and then setup the cipher key.
static const unsigned char arc4_test_key[8] ={ 0x01, 0x23, 0x45, 0x67, 0x89, 0xAB, 0xCD, 0xEF }; mbedtls_arc4_context ctx; mbedtls_arc4_init( &ctx ); mbedtls_arc4_setup( &ctx,arc4_test_key, 8 );// Add the key
Here, we are storing the key in the source code, which is exactly the wrong thing to do! We will look at a hardware-based key store in Chapter 11 and key management in Chapter 13. Now we can call the main encrypt/decrypt function.
mbedtls_arc4_crypt( &ctx, dataCount, ibuf, obuf );
- Run the code.
This will encrypt the hello big file 1000 times and then decrypt it 1000 times before checking that the final decrypted file is the same as the original.
Block cipher
A block cipher is a second form of cipher, which operates over a group of bytes. A block cipher algorithm uses two tactics to achieve a strong level of encryption. These tactics are confusion (which substitutes one symbol for another) and diffusion (which spreads one plain text symbol over many ciphertext symbols). Changing one bit in the plaintext of a block cipher can change up to 50% of the ciphertext bits.
Data Encryption Standard (DES)
The Data Encryption Standard (DES) is a block cipher and was introduced by NIST in 1974. It has a 56-bit key size that makes it vulnerable to brute force attacks with current computing power, so while DES is still in use and is part of the TLS cipher suite, the DES cipher is not recommended for use new in designs. So while it is best to consider DES as deprecated it is still widely used. So, we can use it as a starting point to see how a modern cipher is structured (Fig. 4.11).

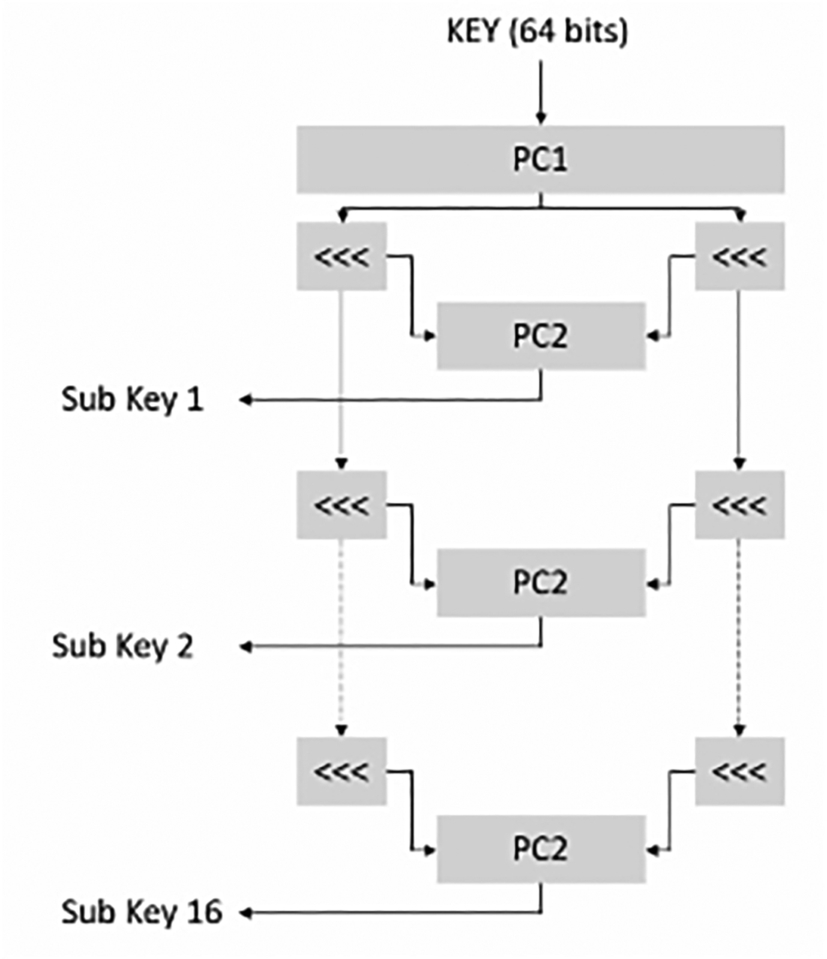
Block ciphers perform an encryption algorithm on a block of data. This is termed an “encryption round.” The resulting encrypted block of data will then be run through further encryption rounds. In the DES algorithm, there will be up to sixteen rounds. Each encryption round has its own encryption key known as a subkey. The subkeys are derived from the initial encryption key, which is 56 bits long plus an additional 8 bits of parity. In block ciphers, the algorithm used to derive the subkeys is known as the key schedule (Fig. 4.12).
The DES algorithm has a Feistel structure (named after its designer) (Fig. 4.13), where the 64 bits of input data are split into two 32 bit words. The lower word is fed through the encryption algorithm, and the output is then XORed with the upper word.
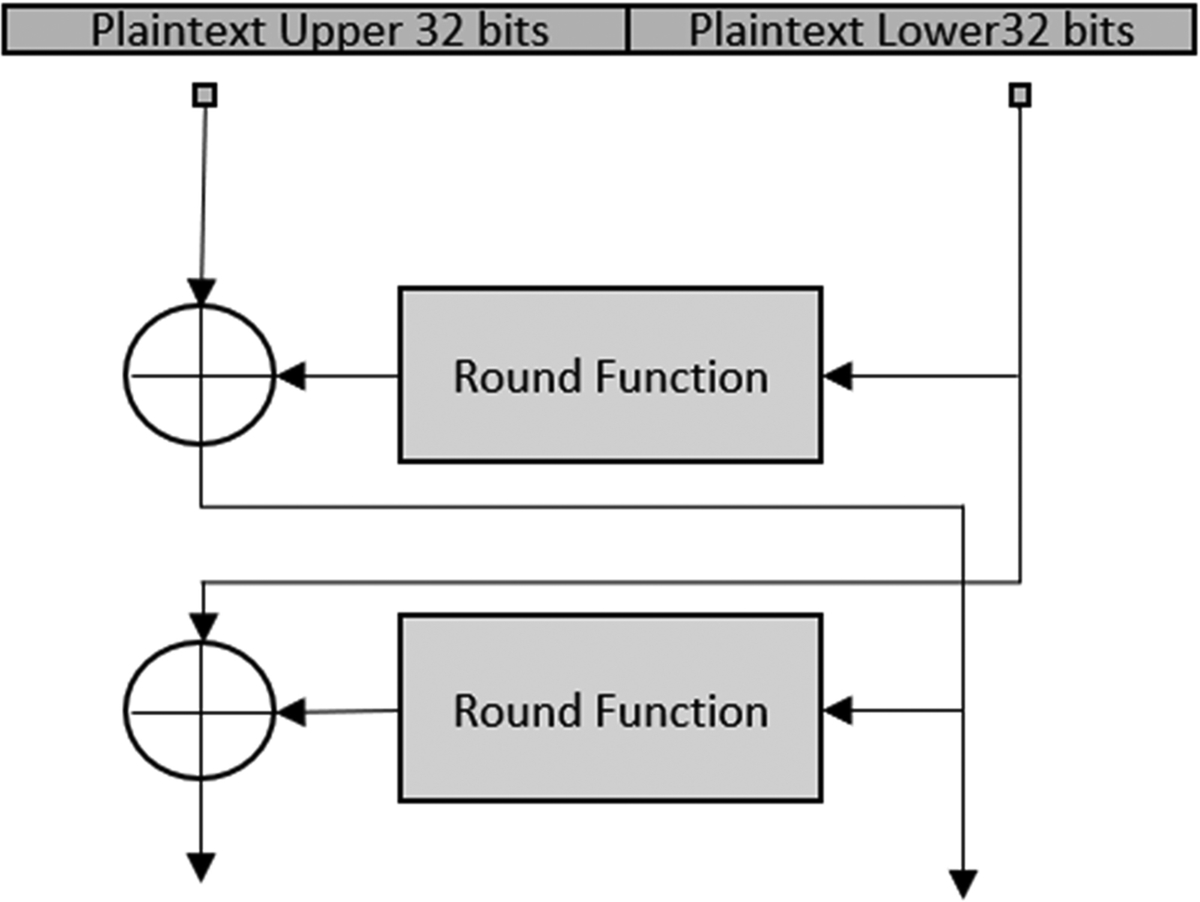
Since the encryption algorithm's output will be a pseudo-random transform, the XOR operation is a further layer of encryption. The resulting encrypted word is passed to the next encryption round, where it is again passed into the encryption algorithm. The original lower word is passed into the next round and becomes the upper word. The DES encryption function is shown in Fig. 4.14.

Here, the 32-bit word block is passed through an expansion function where it is extended to 48 bits. The expanded data is then XORed with a 48-bit round subkey. The DES algorithm then provides confusion by splitting the 48-bit word into eight groups of six bits. Each six-bit group looks up a four-bit symbol in a dedicated substitution box or S box. Each S box performs a nonlinear transformation of the input data to create a 32-bit output word. This word's data are then diffused by a final permutation before they are XORed with the upper 32-bit word and passed to the next round. Repeat for a total of 16 rounds.
As stated at the beginning of this section, DES is considered an insecure algorithm, and there have been several demonstrations of brute-forcing key discovery. In 2006, an FPGA-based system called COPACABANA was developed, which took 7 days to find the key for an encrypted message. Since then, the time taken to brute force DES has fallen dramatically.
Double encryption
At first sight, using two layers of encryption would seem like an easy way to increase the security of a cipher with a small keyspace. If the key length is k, a brute force attack would be required to try every possible key until the correct one was found. This would take a maximum of 2k steps. If we used two layers of encryption, you might expect an attacker would have to try every possible combination of keys until the right pair was found, taking a maximum of 22k steps. Sadly this is not the case, provided the attacker has access to a portion of the plaintext and matching ciphertext. They can use a technique called a “meet in the middle” attack, as shown in Fig. 4.15.
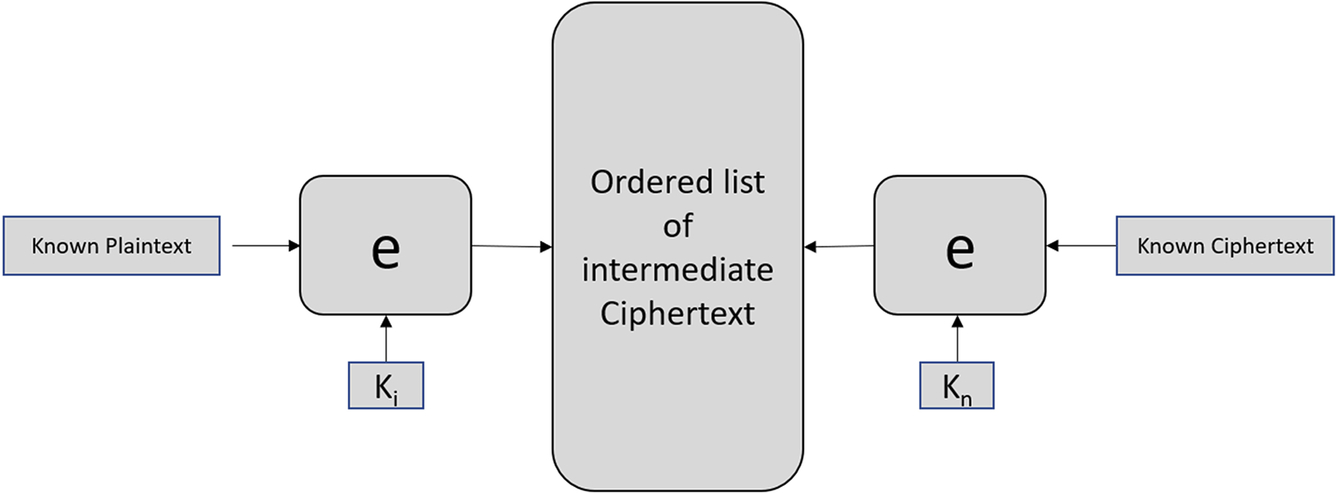
First, the attacker would encrypt the known plaintext with every key to produce an intermediate list of ordered ciphertext; this would take 2k steps. Next, they would take ciphertext and decrypt it with k0, then check if the resulting plaintext matches any entry in the intermediate ciphertext table. If there is no match, we increment the key and try again until a match is found. This process takes a total of 2k + 2k or 2k + 1, the equivalent of increasing the key size by just one bit.
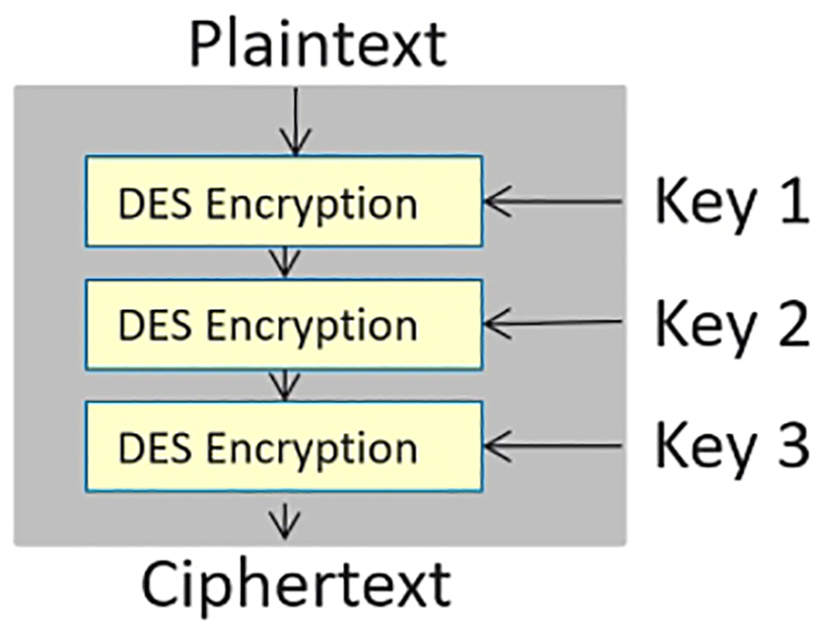
Triple DES
While two layers of encryption does not provide much of a security improvement, adding a third gives us significant benefits. An attacker using the meet in the middle attack would have to calculate the lookup table after either the first or second encryption layer. In either situation, they would be faced with 2k × 2k steps of encryption to generate the lookup table or the same number of decryption steps to test keys against the lookup table. This is why three runs of the DES cipher are used to extend its key size. Because of the meet in the middle attack, the effective key length is 2k or 112 bits, not the expected 3k (Fig. 4.16).
In a practical implementation the middle layer may be a decryption layer so that:
If we use three different keys we have 3DES but if K1 = K2 then we are back to standard DES:
This approach is known as Encrypt Decrypt Encrypt or EDE.
DES-X
Another approach to strengthening the DES algorithm is key whitening. Here, we use three keys. The first key is XORed with the data. The resulting block is then passed through the DES algorithm, which uses the second key. The third key is XORed with the DES output packet as shown in Fig. 4.17.

This approach is much faster than 3DES and has an apparently larger key size. Key1 and Key3 are the input data block's size, which is 64 bits. This gives a total size of the key material of 119 bits. However, the overall security strength can be as low as 88 bits if an attacker has access to the multiple plaintext and ciphertext pairs for cryptoanalysis.
Exercise: DES and triple DES
This exercise will use the DES and 3DES algorithms to encrypt and decrypt the hello_big.txt file that was generated in the first exercise.
- Open the pack installer, select project 4.3 and press the copy button.
In main.c, we are calling a the function DES_Crypt() to encrypt and decrypt the helloBig.txt file. If you need it, a copy of the file is included in the exercise directory.
Inside the DES_Crypt() function, we first create the DES context and initialize it. The set of 3DES keys are then provided for further encryption or decryption.
static const unsigned char des3_test_keys[24] =
{0x01, 0x23, 0x45, 0x67, 0x89, 0xAB, 0xCD, 0xEF,0x23, 0x45, 0x67, 0x89, 0xAB, 0xCD, 0xEF, 0x01,0x45, 0x67, 0x89, 0xAB, 0xCD, 0xEF, 0x01, 0x23 }; mbedtls_des_context ctx;mbedtls_des_init( &ctx );mbedtls_des_setkey_enc( &ctx, des3_test_keys );mbedtls_des_setkey_dec( &ctx, des3_test_keys );
Once the keys have been provisioned we can encrypt/decrypt with the DES or3DES functions:
mbedtls_des_crypt_ecb( &ctx, ibuf, obuf );
Before leaving the function the context must be released:
- Build the code.
- Start the debugger and run the code.
- Examine the resulting files generated on the SD card.
Advanced Encryption Standard (AES)
Today, the Advanced Encryption Standard (AES) is the algorithm of choice for most applications. It is also implemented in most hardware accelerators found within today's microcontrollers. The algorithm has no known vulnerabilities, and the only way for an attacker to decrypt a message is to try every encryption key. Unless you are the owner of a swanky new quantum computer a brute force attack on this scale would take many years.
Like other symmetrical ciphers, the AES algorithm is performed as a set of rounds depending on key size, which may be 128, 192, 256, or 512 bits.
Each round is comprised of four operations called layers that encrypt the data block using diffusion and confusion techniques to achieve a high-security level (Table 4.4 and Fig. 4.18).
| Key size in bits | Encryption rounds |
|---|---|
| 128 | 10 |
| 192 | 12 |
| 256 | 14 |
The number of encryption rounds varies with key size.

Finite fields
Much of the mathematics in each layer of the AES cipher relies on finite field arithmetic. While you do not need to understand finite field math to get an appreciation of the AES, you are likely to see it mentioned in any further reading about cryptographic algorithms. A finite field also called a Galois field (GF()). This is a set of elements in a modulo ring where the number of elements is equal to a prime number. The smallest finite field is GF(2) = {0,1} or as we know it a “bit.” As we saw with the streaming cipher GF(2), modulo math maps to Boolean logic gates where an addition becomes an XOR and multiply is an AND operation. We can also create an “extension field,” which is an array of GF(2) fields. For example, GF(28) is an array of 8 GF(2) fields or, as we know it, a byte. We can then perform arithmetic operations on each of the GF(2) fields, which maps to bitwise Boolean logic. This allows us to use finite field math to design and verify our cipher and then efficiently implement it using logic gates.
AES algorithm
The AES algorithm accepts an input block of data that is 16 bytes long. The plaintext data are arranged as a four by four matrix for the algorithm. The data matrix is known as the algorithm state (Fig. 4.19).

The first layer of each round is a confusion layer. It performs a byte orientated substitution similar to the S-Box in the DES algorithm (Fig. 4.20).

The DES algorithm has a different S-Box for each round. Each of these substitution boxes is essentially filled with random values. In the AES algorithm, one pair (encrypt and decrypt) of S-Boxes (Fig. 4.21) are used for all rounds, and the values are carefully selected to perform a two-step mathematical process. The first step uses a GF(2) inversion to perform a highly nonlinear transform, while the second step removes the algebraic structure of the transform through an “Affine” transform (a column multiplication of fixed constants), making the ciphertext more resistant to cryptoanalysis.
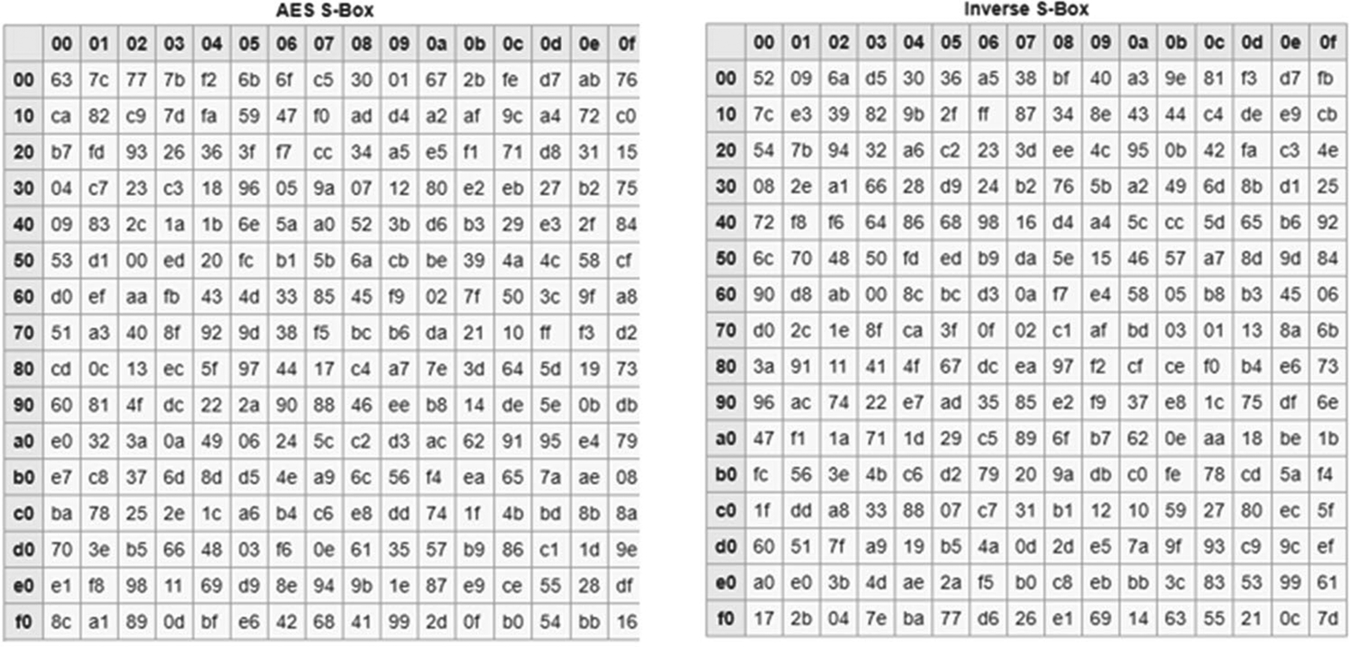
There are two S-Boxes: one for encryption and an inverse box used for decryption. In a practical algorithm, the boxes can be stored as lookup tables or calculated on the fly.
The next two layers, shift rows and mix columns are used to provide diffusion of the state matrix data.
The second layer performs a shift rows operation. Each row of the state matrix is rotated by a different number of places. The first row is left in place while each subsequent row is shifted by 1, 2, and 3 places, respectively (Fig. 4.22).

The second diffusion layer is the mix columns layer. Here, each column of the state matrix is treated as a vector and is multiplied by a 4 × 4 matrix of fixed terms to give a resulting output vector results column (Fig. 4.23).
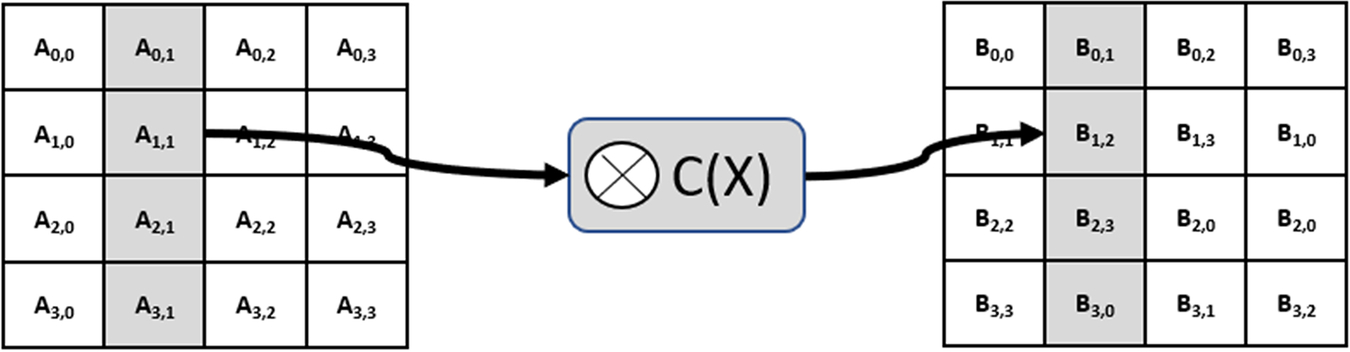
This ensures that every input byte influences four output bytes, and after only three rounds, every byte of the resulting state matrix depends on all 16 plaintext bytes. If you change one of the plaintext bytes, roughly 50% of the final cyphertext will change.
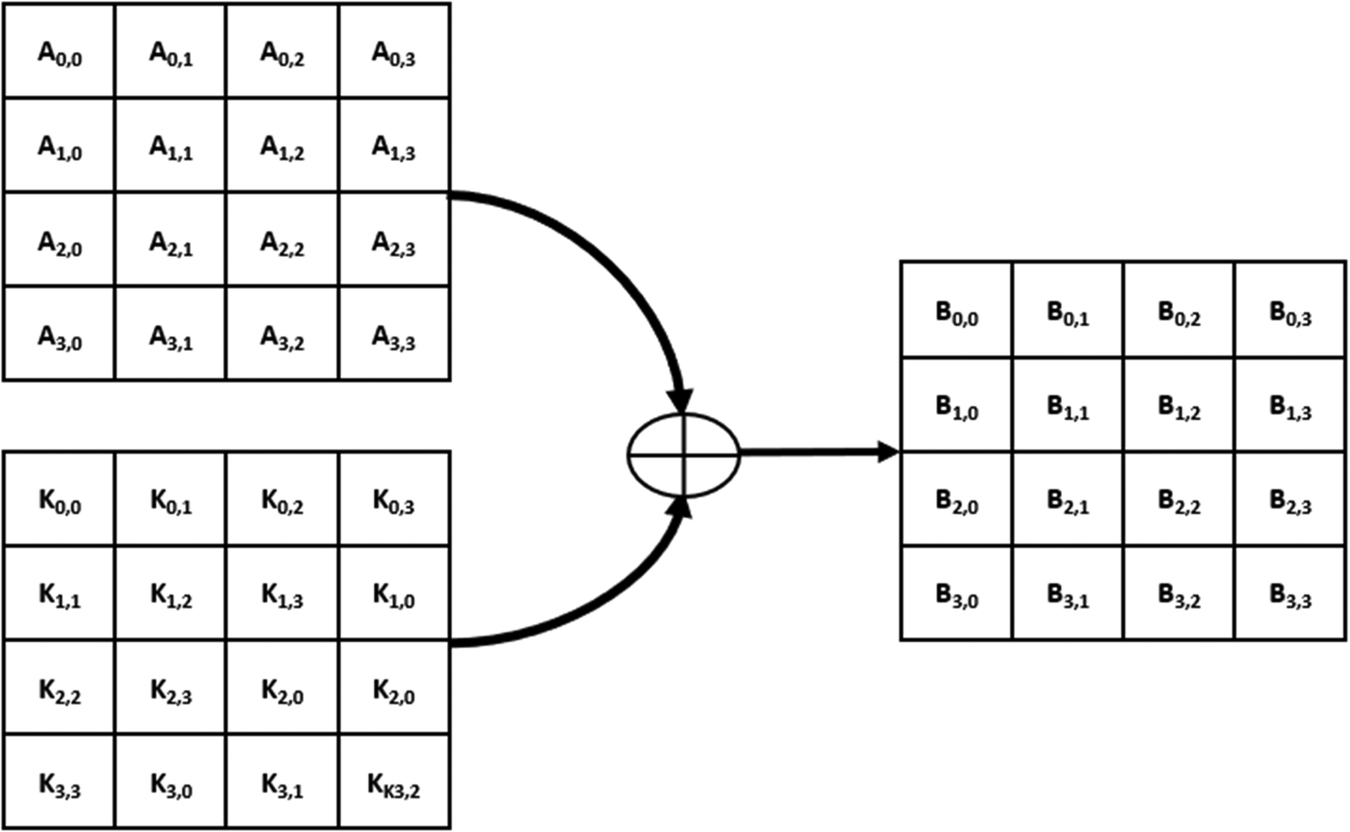
The final layer adds the round key for the next round of operations. Each byte of the round key is XORed with the matching byte of the state matrix (Fig. 4.24).
Like the DES algorithm, the AES cipher derives a set of round keys from the original input key. We need to derive one subkey for each round plus one key for an initial add key operation. A 128 bit AES has 10 rounds and requires 11 subkeys (Fig. 4.25).

The key schedule generates the round keys for each layer. The input key is considered as a set of 32-bit words arranged in four groups. High-order words are passed through a round function (G) and then XORed with the low order group. Each group is XOR'ed with its neighboring higher-order group in turn. At the end of this process, we have our round subkey. This subkey is used as an input to the same algorithm to generate the next round subkey.
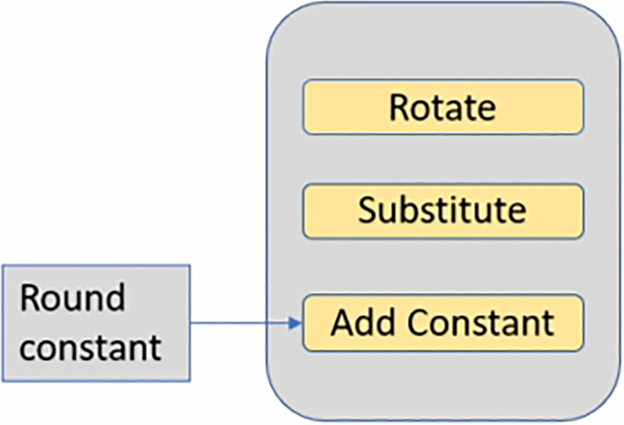
The key schedule round function performs a wordwise rotate, followed by a substitution box and a final XOR of a round constant (Fig. 4.26).
The mbedTLS library supports the AES cipher with a set of functions shown in Table 4.5.
| Function | Description |
|---|---|
| mbedtls_aes_crypt_cbc | Encrypt/decrypt in cipher block chaining mode |
| mbedtls_aes_crypt_cfb128 | Encrypt/decrypt in cipher feedback mode 128 bits |
| mbedtls_aes_crypt_cfb8 | Encrypt/decrypt in cipher feedback mode 8 bits |
| mbedtls_aes_crypt_ctr | Encrypt/decrypt in counter mode |
| mbedtls_aes_crypt_ecb | Encrypt/decrypt in electronic code book mode |
| mbedtls_aes_decrypt | Decryption function (internal) |
| mbedtls_aes_encrypt | Encryption function (internal) |
| mbedtls_aes_free | Free the context |
| mbedtls_aes_init | Initialize the context |
| mbedtls_aes_setkey_dec | Set the decryption key—126,192,256,512 bits |
| mbedtls_aes_setkey_enc | Set the encryption key—126,256,512 bits |
The AES cipher can be optimized for your application through a number of defines in the feature section of the mbedTLS_config.h file. Once the cipher is enabled, there are two key switches that define if the S-Boxes are implemented as lookup tables or calculated on the fly (Table 4.6).
| Configuration option | Type | Description |
|---|---|---|
| MBEDTLS_AES_C | Module | Enable use of the AES cipher |
| MBEDTLS_AES_ROM_TABLES | Feature | Use lookup tables in ROM |
| MBEDTLS_AES_FEWER_TABLES | Feature | Calculates the smaller AES tables during runtime to minimize RAM usage (save 6K RAM) |
The mbedTLS configuration header allows you to define how the AES algorithm is implemented.
Exercise: Advanced Encryption Standard
In this exercise we will again encrypt the helloBig.txt file, this time using the AES algorithm.
- Open the pack installer, select Project 4.4 and press the copy button.
- Open Thread.c
In the AESencrypt() function, we declare an array and initialize it with our key value that no one will ever guess.
Then we declare and initialize the context and set the key for both encryption and decryption.
mbedtls_aes_context ctx; mbedtls_aes_init( &ctx ); mbedtls_aes_setkey_enc( &ctx,key,256); fileIn = fopen("HelloBig.txt","r"); fileOut = fopen("HelloAES.txt","w"); while (fread(bufIn,1,16,fileIn)> 0) {mbedtls_aes_crypt_ecb( &ctx,MBEDTLS_AES_ENCRYPT,bufIn,bufOut );fwrite(bufOut,1,16,fileOut);memset(bufIn,0,16); }
Decryption follows a similar process.
- Build the code.
- Start the debugger and run the code.
This will perform our standard test of encrypting 1000 times and then decrypting back to the original.
Streaming block ciphers
At the time of writing, the AES is the gold standard for commercial-grade encryption. If the AES algorithm is correctly implemented, there is no published method to break the encrypted ciphertext except by a brute force attack. If correctly implemented, AES is secure against an attack by an adversary with bounded computing power. However, we still have to be careful with a real-world implementation. At its core, a cipher is a translation from plain text to a pseudo-random ciphertext. If you put in the same text pattern, you will get the same ciphertext out. This can cause some information about the plain text to “leak” from the ciphertext. For example, if we encode data that has large areas of repeated values, then a shadow of this data will be visible in the ciphertext and may help an adversary to gain an insight into the contents of the message (Fig. 4.27).

The use of a block cipher to simply encrypt data block after block is called an electronic code book (ECB) (Fig. 4.28).
In practice, we would never use a cipher in this fashion. In the real world, a block cipher that is used to stream data or encrypt bulk data would require a chaining method to fully obscure the plaintext.
Chaining modes
The mbedTLS library supports three chaining modes, which can be used with the AES algorithm (Table 4.7).
| Chaining mode | Description |
|---|---|
| CBC | Cipher block chaining |
| CFB | Cipher feedback mode |
| CTR | Counter mode |
| GCM | Galios counter mode (see AEAD) |
Cipher block chaining (CBC)
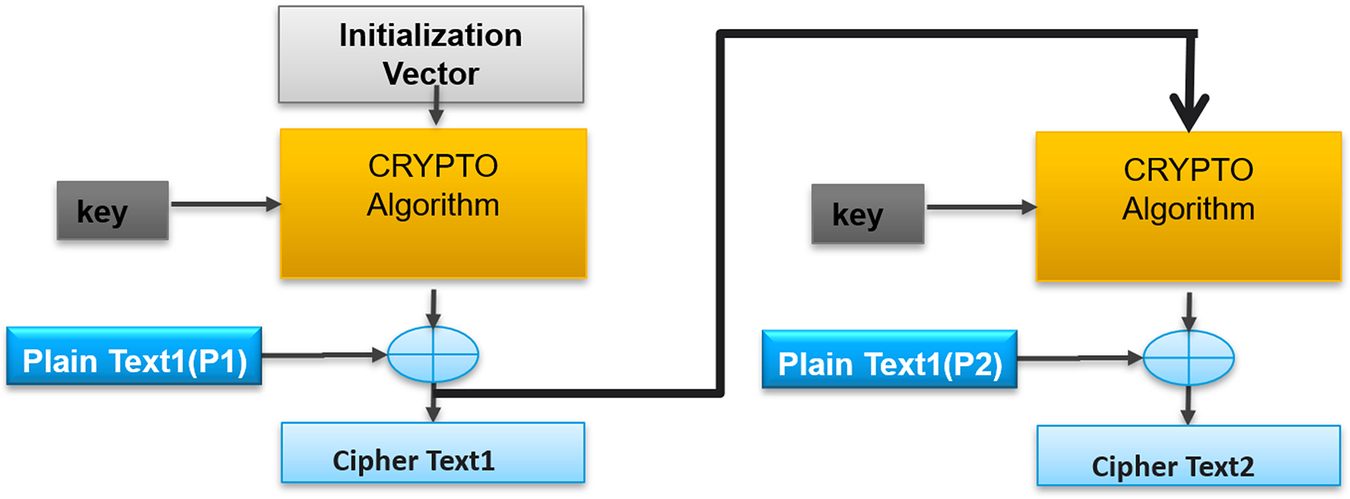
A commonly used chaining mode is called Cipher Block Chaining (CBC). We encrypt a block of data and then XOR the output ciphertext with the next plain text block before running the resulting block through the encryption algorithm. This process can then be continued for any number of plain text blocks. At the start of the process, the initial plain text block is XORed with a random block of data called the Initialization Vector (IV). The IV does not have to be kept secret and can be sent as plain text to the receiving station. In this scheme, each encrypted block is dependent on all of the preceding blocks (Fig. 4.29).

Cipher feedback mode
In cipher feedback mode, the previous block's ciphertext is fed into the symmetrical cipher (Fig. 4.30). This effectively creates a random block that is XORed with the next block of plaintext. Again, to start the process, we use a random Initialization Vector.
Counter mode (CTR)
The final chaining mode supported in mbedTLS is counter mode (CTR). This mode's advantage is that multiple blocks may be encrypted in parallel (Fig. 4.31). This mode is particularly useful for achieving fast encryption in hardware accelerators.
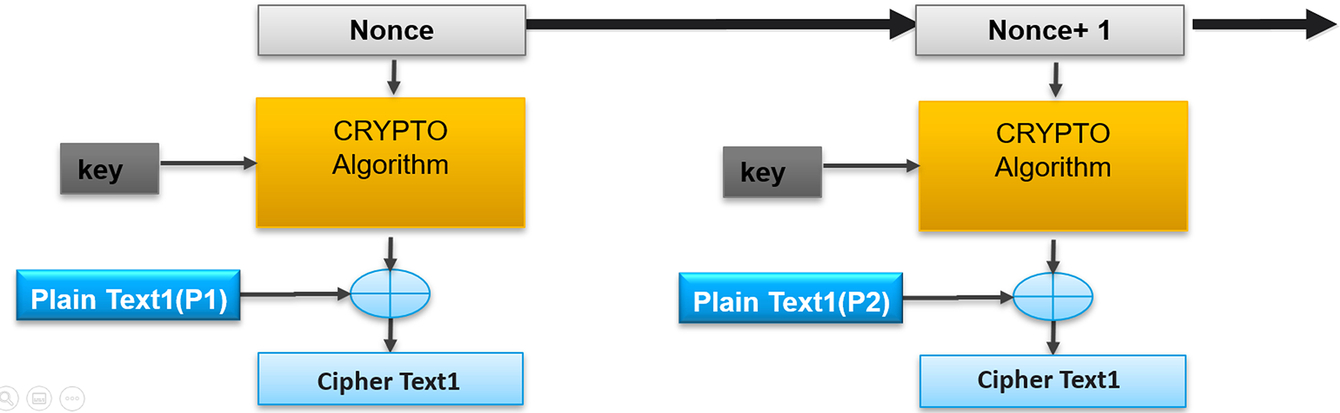
In CTR mode, the IV is chosen to be smaller than the cipher block size and the remaining bitfield is used as a counter, which is incremented for each block. The counter value is known as a nonce or number once and should be unique for each session. The resulting value is encrypted before being XORed with the plaintext block. If the IV is known in advance, then the nonce encryption for each block can be calculated in advance. When using this mode, it is important to realize that if an IV is reused and an attacker has one of the plaintexts, it is possible to recreate the keystream and decrypt any further messages using the same IV.
Exercise: Chaining modes
This example is based on the first AES example but this time we are using cipher block chaining to encrypt the helloBig.txt file.
This time we declare an initialization vector:
unsigned char vector[16] = {1,2,3,4,5,6,7,8,9,10,11,12,13,14,15,16};
In this example we will use cipher block chaining:
By changing the define to MBEDTLS_AES_DECRYPT the same function can be used for decryption.
- Build the project and then run the code in the debugger.
- Compare the ECB and CBC encrypted files for repeating patterns.
Cipher abstraction layer
While AES is the recommended cipher to use in a real-world system, the Transport Layer Security (TLS) protocol lists a range of ciphers that can be used during a communication session. In addition to DES and AES, mbedTLS provides a number of additional ciphers, so depending on your requirements and the server you are communicating with, you may need to include additional cipher support.
To support this range of ciphers, mbedTLS has a cipher abstraction layer (Table 4.8), which allows you to list the range of ciphers available and select a cipher to use.
| Cipher | Type | Description |
|---|---|---|
| ARC4 | Streaming | Weak: do not use. |
| DES | Block | Obsolete: provided as legacy support. |
| 3DES | Block | Slow. |
| AES | Block | Use this one! |
| Blowfish | Block | A contestant to be the AES algorithm. Developed by Bruce Schnier. You really should read his blog. |
| Camellia | Block | Developed by Mitsubishi and NTT of Japan. With a similar level of security to AES. |
| Cha Cha 20 | Block | An alternative the AES designed to run more efficiently on a general purpose 32 bit processor. |
| XTEA | Block | eXtended Tiny Encryption Algorithm, requires minimal resources to implement. |
mbedTLS supported ciphers.
A generic set of API calls then allow you to write code independent of the actual cipher in use. The function groups are outlined in Table 4.9.
| Abstract function group | Description |
|---|---|
| Initialize | Select a cipher and prepare it for use |
| Cleanup | Remove a cipher and cleanup its resources |
| Get cipher information | List the set of available ciphers and their feature sizes (key size, block size, context info, name, and type) |
| Set a Key | Set the encryption or decryption key and operating mode |
| Encrypt a message | Encrypt a message, includes subfunctions reset, update, and finish |
| Decrypt a message | Decrypt a message includes subfunctions reset, update, and finish |
Exercise: Cipher abstraction layer
In this exercise, we will use the cipher abstraction layer to encrypt and decrypt the hello_big.txt file using the cipher abstraction layer.
- In the pack installer select Exercise 4.6 and press the Copy button.
- Open main.c
The code provides two functions: abstractEncrypt() and abstractDecrypt().
Each function contains code based on the cipher abstraction layer and the actual algorithm to use is passed as part of the function call.
- Examine the two abstraction functions.
First we create the context for the cipher and also a cipher_info object to hold the underlying cipher features:
Next we can initialize the cipher context and list the available ciphers:
We can now use a text string to select an available cipher and set the context to use the selected cipher:
cipher_info = mbedtls_cipher_info_from_string( "AES-128-CBC" );mbedtls_cipher_setup( &cipher_ctx, cipher_info);
The cipher can now be readied for encryption or decryption with an appropriate key and if available, a message digest (we will look at this class of algorithm in the next section).
We must also set the IV and get the plaintext block size:
Now we can encrypt the data by resetting the cipher and using the cipher update function to stream blocks of data:
We can write our final block with the finish function:
mbedtls_cipher_finish( &cipher_ctx, output, &olen );
When we have finished using the cipher we can wipe the memory. Here, the key is wiped but all objects must be cleared:
mbedtls_platform_zeroize( key, sizeof( key ) );
Finally the context is released:
mbedtls_cipher_free( &cipher_ctx );
- Run the code so that it creates files that are encrypted and then decrypted using each supported algorithm.
- Examine the SD card and the generated files.
Hash functions
A cryptographic hash function is an algorithm that takes an arbitrary block of data and calculates a fixed-size string called a message digest (MD). A hash is a form of one-way encryption in that, given the plain text, you can recreate the message digest, but if you only have the message digest, there is no way to recreate the original plain text (Fig. 4.32).

The typical usage of a Hash is to validate a block of data's integrity. If we receive a block of data (plain text or ciphertext) and a message digest, we can recreate the message digest from the received data. If it matches the received message digest, we know that the received data are genuine and have not been tampered with. However, there are problems with this. We can select from an infinite variety of arbitrary input data to generate a message digest, but we only have a finite number of message digest values. So, it follows that different input data can generate the same message digest value. This is known as a collision. When designing a hashing algorithm, we need to ensure that the algorithm is computationally efficient and collision-resistant (Table 4.10).
| Hash collisions | Description |
|---|---|
| Preimage Resistance | Given a hash Z it is infeasible to calculate the plain text X |
| Second Preimage Resistance | Given plaintext X1 we cannot find X2 such that h(x1) = h(x2) |
| Collision Resistance | If X1 != X2 then we should not find that h(x1) = h(x2) |
This is harder than it may initially seem because of a probability theorem called The Birthday Paradox. This theorem is concerned with the probability of finding two people in a group who share the same birthday (a collision). If we include the 29th of February, there are a possible 366 birthdays. With a sample population of 367, we can be 100% sure of at least one shared birthday. Surprisingly, we can be 99.9% sure of a shared birthday with just 70 people and 50% sure with just 23 people (Fig. 4.33).
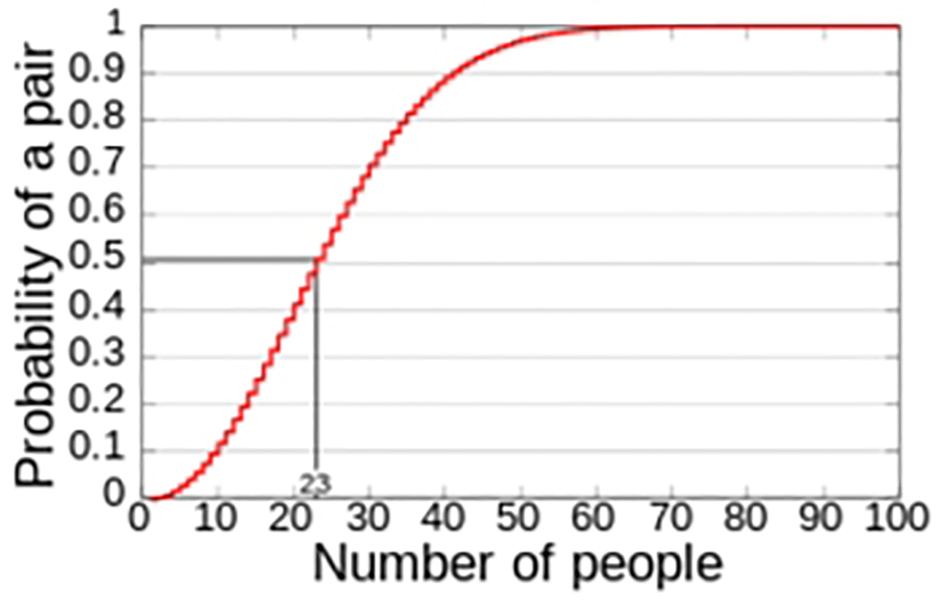
This is a problem for our theoretical hashing algorithm. The birthday paradox means that the number of inputs required to get a collision is roughly equal to the number of output values' square root. We need our hashing algorithm to output message-digest bit size of 2X bits for a security level of X bits.
Like ciphers, there are many hashing algorithms, both dedicated algorithms and hashing systems designed from other cryptographic algorithms, principally block ciphers (Fig. 4.34).

The most widely used hash algorithms are the original message digest (MD) family developed by Ron Rivest at The RSA Corporation and the Secure Hash Algorithm (SHA), which is maintained as a FIPS standard.
Message digest 5 (MD5)
The MD5 hash algorithm is widely used for image verification and is part of the TLS protocol. However, it is now considered very insecure, and engineering collisions can be done in seconds, even with a low spec PC. For some applications of hashes, this is not a problem. For example, we do not need collision resistance for key generation or password storage. For the purposes of this book, MD5 should be considered deprecated.
Secure Hashing Algorithm (SHA)
The Secure Hash Algorithms (SHA) were developed by the NSA and . They are the family of algorithms recommended by the Federal Information Processing Standards. The SHA-1 algorithm is widely used, but both Google and Microsoft have demonstrated that it is possible to engineer collisions. It is recommended to use SHA-2 in new designs.
To understand how the SHA works, we can first examine the SHA-1 algorithm. The SHA family of hashes is based on an algorithm called a Merkle-Damgard construct shown in Fig. 4.35. The algorithm accepts message data in blocks of 512 bits and will support a total message size of up to 264 bits. This is somewhat like a block cipher, but the message data x is applied in place of the key where it is stretched into a set of round keys’ w0–w80. In place of the plaintext, the hash algorithm accepts the previously calculated message digest H. In the first pass, a set of standard round constants H0 is used in place of the output hash. When the final message block has been processed, the resulting message digest H(x) will be output as a fixed length of 160 bits.
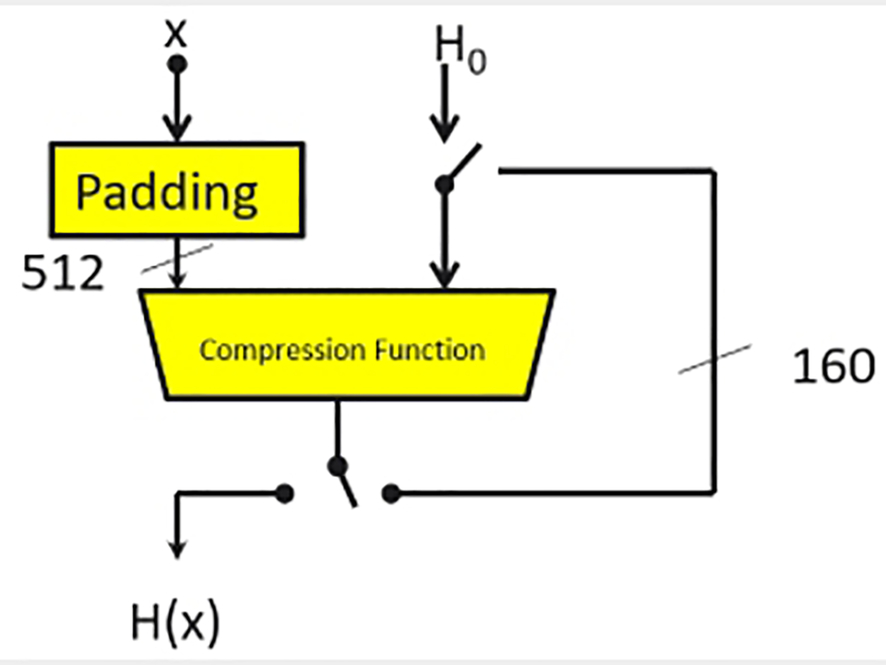
Before the message data are passed into the SHA-1 compression function, they are first preprocessed. The input block of data is split into chunks of 512 bits and input into the algorithm in turn. The final data packet will typically be less than 512 bits and must be padded by adding a logic 1s to the end of the message string. Then, extend any unused bits with logic zero. Finally, the length of the message data is written at the end of the packet, as shown in Fig. 4.36.

The SHA algorithm consists of 80 rounds of processing, which are split into 4 stages of 20 rounds. The input block of 512 bits is first fed into a message schedule, which stretches the data into 80 subwords of 32 bits, one for each round, as shown in Fig. 4.37.

Each of the 80 rounds are processed in turn. The first stage takes the previous hash result (or the initial round constants H0) and applies a set of logical operations in a generalized Feistel structure, as shown in Fig. 4.38. The round word Wt and a stage constant Kt provide the round data input. Each stage has a dedicated round function F, which performs a further set of logical operations.

Once the round has completed, constants (A–E) will be passed to the next round. After the final round, the round constants will be fed back to round zero, and the next block of message data will be processed. When all of the message data has been processed, the final round constants will be output as the calculated message digest.
The general form of the SHA-2 algorithm is the same as SHA-1 but with a more complex round function and an expanded set of round constants. The SHA-2 algorithm provides hashing algorithms with different sizes of input message block and output message digest. Consequently, each SHA-2 algorithm is named after its blocksize as follows SHA-244, SHA-256, SHA-384, and SHA-512.
Salt
When designing a cryptosystem using hashes, it is always important to consider the input vector space's size. If your input data have a known length and a limited character set, you may be vulnerable to adversaries precalculating lookup tables, which can be used to reverse the hash. For example, it is common to store user passwords as Hashes. If an adversary acquires the password message-digest, they cannot decrypt the hash to find the password. They are faced with selecting a password generating its message digest, and checking if it matches the target message digest. However, poorly designed passwords can have a limited character set, leading to a small range of possible user passwords. This allows an adversary to develop a precalculated hash table known as a rainbow table as a test for commonly used passwords. To prevent this style of attack, we can add a “salt” to our input data. The salt is a string of random numbers that completely change the hash's output value. The salt can be stored in plain text alongside the resulting message digest. This makes a rainbow table useless, and if you use a different salt for each password, then two users with the same password will have different message digests.
The input data can be directly combined with the salt:
Or added to a message digest of the input data:
Exercise: SHA-2 hash
In this exercise, we will compute the SHA-2 hash of the HelloBig.txt file using the mbedTLS library and compare this to an SHA-2 Hash computed using a PC app.
- Download and install the HashCalc utility from the link below:
- In the pack installer select Exercise 4.7 and press the Copy button.
- Make sure the SD card is in the evaluation board and contains the helloBig.txt file.
- Build the program and start the debugger.
- Run the code.
In the calculateHash function, we prepare the hash algorithm by declaring and initializing the SHA-256 algorithm and then call the start function:
The main function loop opens the helloBig file and reads 512 byte chunks of the data, which are fed into the SHA algorithm using the sha256_update() function:
- file = fopen("HelloBig.txt","r");
- if(file != NULL) {
- while(!feof(file)){
- memset(imageBlock,0x0,512);
- wordsRead = fread(&imageBlock,
- sizeof(unsigned char),
- 512,
- file);
- mbedtls_sha256_update( &ctx,
- (const unsigned char *)imageBlock,
- wordsRead );
- }
When we reach the end of the file, the sha256_finish() function is called to calculate the final hash value and then the context is released:
   mbedtls_sha256_finish( &ctx, sha256sum );mbedtls_sha256_free( &ctx );printf(" Calculation finished.
");fclose(file);
The code then prints the hash value to the debug console screen (Fig. 4.39).
- Place the SD card in your PC and start the HASH CALC app.
- Select the HelloBig.txt file.
- Check the SHA256 box and make sure the HMAC box is unchecked.
- Press the Calculate button and compare the PC calculated hash to the value in the debugger console window.

Since both hashes match we can be sure that the file has not been modified as we plugged the card into the PC. Note the message digest values shown may differ from the ones created by your file.
Message authentication code (MAC)
A message authentication code (MAC) performs a similar operation to a hashing algorithm. However, unlike a hash, a MAC has two inputs: a block of arbitrary data and a secret key.
The MAC algorithm will combine the two inputs to produce a fixed-length output string called a MAC TAG, which is unique to the two input values. In order to recreate the MAC TAG, you must have both the data and the key. A MAC can validate the integrity of the data and help to authenticate the sender as its MAC TAG can only be generated by someone who knows the key (Fig. 4.40).

A MAC algorithm can be developed from existing cipher or hash algorithms. A newer standard not supported by mbedTLS allows a MAC algorithm to be developed from a random number generator.
Hash-based MAC
At first sight, it should be easy to create a MAC algorithm from a hash algorithm. All you would have to do is concatenate the data block with the secret key and run the result through the hash algorithm.
The output message digest can only be reproduced by someone who has both the data block and the key. Unfortunately, this approach has a number of vulnerabilities and cannot be used.
Creating a MAC from a hash algorithm requires a more rigorous method of combining the key and data block. To create the MAC algorithm, we need two arrays of 64 bytes, which act as processing buffers. The first of these arrays is called the i_pad (inner pad), and the second is called the o_pad (outer pad). At the start of the process, both of these arrays are filled with a standard byte pattern and then XORed with the MAC key (Fig. 4.41).

Where the block size is the same length as the underlying hash message digest, if the input key is longer than the block size, we can shorten it by taking its hash which will give a message digest equal to the blocksize.
To calculate the MAC tag first the i_key pad array is appended to the beginning of the message data and its hash is calculated to give md_ipad.
- md_ipad = H(i_key_pad ∥ message)
The o_key_pad is then concatenated with the md_ipad. The resulting data block is hashed again to give the final MAC TAG.
- HMAC = H(o_key_pad ∥ md_ipad)
Within mbedTLS MAC functions are derived using hash and cipher functions and accessed through an abstraction layer.
Hash abstraction layer
Like the cipher module mbedTLS provides an abstraction layer that has a standard API for hash and MAC functions (Table 4.11).
| Abstraction function group | Description |
|---|---|
| Get Hash Information | Lists a description of the available Hash and MAC functions and their features. |
| Calculate HASH | Functions used to calculate the HASH, reset, start, update, and finish |
| Calculate HMAC | Functions used to calculate the HMAC, reset, start, update, and finish |
Exercise: HASH and MAC abstraction layer
This exercise demonstrates calculating a HMAC using the mbedTLS abstraction layer.
- In the pack installer select Exercise 4.8 and press the Copy button.
- Build the project and start the debugger.
We create and initialize the context for the message digest abstraction layer and an information object to hold the selected HMAC algorithm:
Then select the hash algorithm to use as a basis for the HMAC:
md_info = mbedtls_md_info_from_string("SHA256" );
The abstraction layer allows us to setup the SHA-256 Hash:
ret = mbedtls_md_setup( &ctx_md, md_info, 1 );
Then call functions to set the key which is set to ten ASCII “1” characters:
mbedtls_md_hmac_starts( &ctx_md, key, keylen );
We can then process the test vector and produce a result:
mbedtls_md_hmac_update( &ctx_md, testVector, sizeof(testVector) ); mbedtls_md_hmac_finish( &ctx_md, outputHMAC );
We can then print the computed tag outputHMAC to the debugger console window.
- Place the SD card in your pc and this calculate the MAC using the hashcalc app.
- This time check the HMAC box, set the Key Format to text string and enter ten numeral “1” as the key (Fig. 4.42).
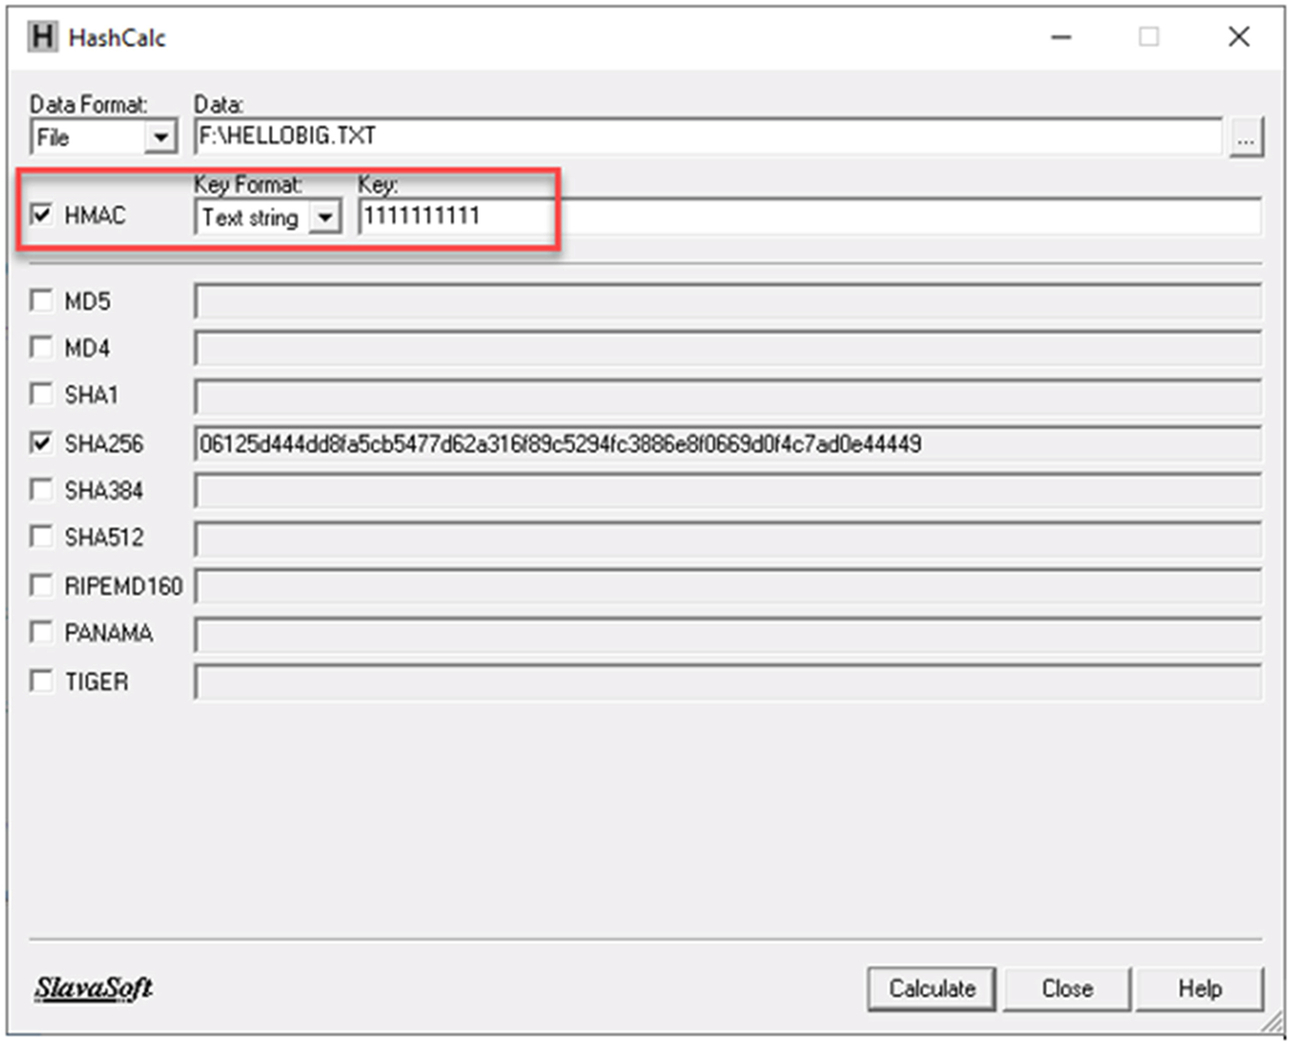
Fig. 4.42 Recalculate the MAC with HashCalc. No permission required. - Press the calculate button and check the two HMAC's match. The tag value may be different from the one shown in the illistration.
Authenticated encryption
It is a common requirement to both encrypt a message and generate its MAC to provide confidentiality and proof of integrity and the ability to authenticate the origin of the message. We can use a block cipher and MAC to do this in a variety of ways:
- Encrypt then Mac (EtM)
In this scheme, the plain text is first encrypted and then a MAC is created from the ciphertext. Separate keys must be used for the encryption and MAC algorithms. The ciphertext and MAC are sent alongside each other. This method provides the highest level of security and is used in the IPSec protocol and more recently TLS. - Encrypt and MAC (E&M)
The E&M Scheme uses a single key. A MAC is created from the plaintext, the plaintext is then encrypted without the MAC, and the two are sent alongside each other. This has lower security than EtM and is used in applications such as Secure Shell (SSH). - MAC then Encrypt (MtE)
A MAC of the plaintext is calculated, and then the plaintext and the MAC are encrypted together. A single key is used for both operations. This is the default method used by the TLS protocol.
Authenticated Encryption with Associated Data (AEAD)
When we are sending communication packets, we need the payload to be encrypted while the packet header will be sent as plaintext. However, we also need to ensure integrity and authentication for the whole packet to prevent an attacker from substituting the ciphertext with previously recorded valid ciphertext. AEAD is a technique that allows us to encrypt a block of data and generate a MAC over the encrypted block plus and additional block of associated data. In our case, this allows us to encrypt the packet payload and then generate a MAC over the payload and the plaintext header, which is the associated data. This binds the ciphertext to the packet frame. The most efficient way to implement this scheme is a chaining mode based on finite field math called Galois counter mode (GCM) (Fig. 4.43).

CGM uses AES to encrypt the plaintext using counter mode(CTR) chaining, where the cipher must have a minimum block size of 128 bits. The starting counter value is derived from the initial IV and a constant data item such as a serial number. We can encrypt blocks of data using the cipher Ek():
If we know the IV in advance it is possible to pre calculate the counter values Ek(CTRi).
It also computes a Hash based on the plaintext and the associated data which will be the unencrypted packet payload and header data.
We can generate the MAC tag by first calculating using GF(2128) multiplication:
where:
- gi − 1 = the previous tag block
- yi = the current encrypted block
- H = Ek(0128) and is known as the Hash subkey
- Where 0128 an all zero input vector to the encryption cipher Ek().
- To get things rolling, we need an initial g0 block and this is calculated using the associated data.
- g0 = AAD X H
- Where AAD is the associated data that is held as plaintext, for our purposes, this will typically be the TCP/IP packed header.
The final MAC tab is generated by:
where gn is the final intermediate tag calculation.
AES-GCM is a very fast and efficient algorithm for encrypting streaming data and generating a MAC tag. It can be implemented on low-cost resource-constrained microcontrollers. However, as noted at the beginning of this section, you must be very careful to use a fresh IV for each session, or the resulting ciphertext will be vulnerable to cryptoanalysis. A variant of AES-GCM is called AES-GCM-SIV, where SIV stands for Synthetic Initialization Vector. This algorithm is designed to be misuse resistant in the event of an IV NONCE being reused. Currently, this mode is not supported in mbedTLS.
Exercise: AEAD in mbedTLS
The mbedTLS library provides support for AES-GCM as shown in Table 4.12.
- In the pack installer select Exercise 4.8 and press the Copy button.
- Open main.c
| Function | Description |
|---|---|
| mbedtls_gcm_auth_decrypt | GCM Authenticated Decryption |
| mbedtls_gcm_crypt_and_tag | GCM Encryption/Decryption and Authentication |
| mbedtls_gcm_finish | Wraps up the stream and generates the tag |
| mbedtls_gcm_free | Free the context |
| mbedtls_gcm_init | Initializes the context |
| mbedtls_gcm_setkey | Sets the key |
| mbedtls_gcm_starts | GCM Stream start function |
| mbedtls_gcm_update | GCM Update function |
We first declare the AEAD context and the cipher ID:
An array with the additional data is also created:
unsigned char associatedData[20] = {0x31,0x32,0x33,......};
We next initialize the AEAD context then set the key and the underlying cipher:
Next start the first round of encryption with the IV and additional data:
mbedtls_gcm_starts( &ctx,MBEDTLS_GCM_ENCRYPT,vector,sizeof(vector),associatedData,sizeof(associatedData) );
We can now encrypt further blocks of data.
Once all the data has been encrypted we can finish off by creating the MAC tag:
mbedtls_gcm_finish( &ctx, tag_buf, 16 );
and then release the context.
- mbedtls_gcm_free( &ctx);
- Build the project and download to the debugger.
- Run the project.
The code will encrypt a file of data and store the cipher text along with the Additional Authentication Data in plain text.
The project will also decrypt the and recreate the MAC tag so it can be compared to the original.
Random numbers
In the preceding sections, we have seen a need for random numbers to be used as Initialization Vectors and NONCE numbers. Ideally, we will also generate cipher and MAC keys by a random process. In the next chapter, we will look at secure communications protocols which have further uses for random numbers. In real-world cryptosystems, a cryptographically strong RNG is an essential component and cornerstone of our system's security. Any weakness in the RNG would create predictability and lead to an adversary being able to access confidential data or subvert your entire system. You should consider that the RNG in your system is as important as the security of your cryptographic keys.
Entropy
In cryptography, the term entropy is a measure of uncertainty of a random variable. In information theory, the information content Hx of a value x, which has a probability Pr[x] of occurring is given by:
Then, the entropy of a random source is the expected information content of its output symbol:
This gives us the expected uncertainty of x measured in bits. In practice, this will mean that the entropy of a string may be less than its total bit length. Low entropy data are well structured and easily guessable, for example, seed data based on time and date values. The important thing to remember when choosing a random source is the number of bits of entropy available. A 128-bit key generated from a source with 20 bits of entropy is only as good as a 20-bit key.
Random number generation
Random number generators come in two types: a true random number generator (TRNG) and a pseudo-random number generator (PRNG). In a typical system, a PRNG is implemented using an algorithm called a deterministic random bitstream generator (DRBG). In systems that need a high bandwidth of random numbers, it is necessary to use the output of a TRNG as seed data for the DRBG. The TRNG data is stored in a buffer called an Entropy Pool. This allows us to gather true random data during quiet periods. Values in the Entropy Pool can be accessed as required by the DRBG and expanded into an unpredictable bitstream (Fig. 4.44).

True random number generator (TRNG)
A typical “plain old microcontroller” does not contain a TRNG, and various approaches have been developed to create sources of random data. Typically, these use noise from analogue conversions or random timing sources, but these all risk being subverted by an attacker. However, new microcontrollers designed to be used as IoT devices will incorporate a TRNG as part of their security assistive structure. In Chapter 11, we will look at a Cortex-M33 based microcontroller that contains a FIPS-certified RNG.
Entropy Pool
The mbedTLS library provides functions to create an Entropy Pool in the microcontroller heap space. We can also specify one or more entropy sources that can be used to gather random data into the pool using the functions shown in Table 4.13. The Entropy Pool then acts as a buffer to supply true random data to a deterministic random bitstream generator (DRBG).
| Function | Description |
|---|---|
| mbedtls_entropy_add_source | Add an entropy source to poll |
| mbedtls_entropy_free | Free the context |
| mbedtls_entropy_func | Retrieve entropy from the accumulator |
| mbedtls_entropy_gather | Trigger an extra gather pool for the accumulator |
| mbedtls_entropy_init | Initialize the context |
| mbedtls_entropy_update_manual | Add data to the accumulator manually |
| mbedtls_entropy_update_seed_file | Read and update a seed file |
| mbedtls_entropy_write_seed_file | Write a seed file |
Deterministic random bitstream generator (DRBG)
Random numbers are used for many purposes outside of cryptography, for example, simulation and modeling. Here pseudo-random number generators are used to create fast streams of random data. However, within a cryptographic system, we need the same stream of random data, but additionally, it needs to be unpredictable. If an attacker knows a random value or values created by our system, it should not be possible to calculate future values or values in the past, provided that the initial seed value is secret. For our purposes, we must use a subset of pseudo-random number generators, which are cryptographically strong pseudo-random number generator. These are known as deterministic random bitstream generators (DRBG).
Testing for randomness
Once we have set up our random generator, how do we know it is working correctly? Fortunately, there are a number of test suits available that can be used to analyze a bitstream to determine if it is actually random. An open-source test suite is published by NIST and can be accessed via the link below:
The NIST test suite provides fifteen statistical tests to analyze a random bitstream. The test suite uses a Chi-Squared test to provide a confidence level that the bitstream is truly random.
Exercise: Random generation
In this exercise, we will configure the TRNG within the LPC55S69 microcontroller and also add an Entropy Pool to feed a DRBG. We will then use a test from the NIST test suite to check for randomness.
- In the pack installer select Exercise 4.9 and press the Copy button.
- open main.c
We can initialize an entropy pool and add an entropy source, ideally a true Random number generator provided by the microcontroller.
RNG_Init(RNG); //MCU driver function mbedtls_entropy_init( &entropy ); mbedtls_entropy-_add_source( &entropy, entropy_source, //callback for entropy gathering NULL, RANDOM_BLOCK_SIZE, MBEDTLS_ENTROPY_SOURCE_ SOURCE);
The entropy callback function is used to collect a block of random data defined by RANDOM_BLOCK_SIZE to add to the entropy pool.
int entropy_source( void *data, unsigned char *output, ize_t len, size_t *olen ){uint32_t index;((void) data);RNG_GetRandomData(RNG, output,len);*olen = len;return( 0 );}
Now we can initialize the DRBG and add the entropy pool. The mbedtls_entropy_func( ) function is used to gather entropy from the pool.
mbedtls_hmac_drbg_init( &ctx ); mbedtls_hmac_drbg_seed( &ctx, md_info,mbedtls_entropy_func, (void *)&entropy,NULL, 0 ) ;
It is also possible to enable prediction resistance; this will cause the DRBG to reseed itself for every call to acquire random data.
Once the DRBG is configured we can use it as a source of random data.
mbedtls_hmac_drbg_random( &ctx, buf, OUTPUT_LEN ) ;
Once we have some random data we can use the NIST Frequency test to analyze the bitstream. Here we are looking for a random mix of ones and zeros. The frequency test uses a statistical method called a Chi-Squared test to give a confidence that the bitstream is random.
When we are finished with the DRBG we must free the context
mbedtls_hmac_drbg_free( &ctx );
- Run the code.
The results of the Chi Squared test will be displayed in the terminal window. The NIST test suite provides a battery of tests which should be used in addition to the Frequency test to gain a confidence that you have a good source of Random values.
Managing keys
This is your big problem. We must be able to create, store, rotate, and put keys beyond use. Ideally, they must be unique to a device and be immutably bound to that device.
At the beginning of this chapter, we saw from Kerchoffs Law that our system's security depends on keeping the cipher keys secret. These are critical assets that must be protected to prevent our system from being compromised. This is a real challenge for a practical IoT system where they will be a fleet of devices distributed over a wide area and open to both software and physical attacks.
Just adding encrypted communication and storing the keys in FLASH memory or worse in the actual source code is a job done badly. Unfortunately, this was and still is a widely used practice in current IoT devices. In the second half of this book, we will look at the PSA Security Model that defines a software architecture that is resistant to malicious attacks. This includes the Arm Trusted Firmware to protect device secrets from a network attack. We will also look at hardware approaches to key storage within the LPC55S69 assistive security peripherals.
Creating keys
Ideally, when we generate an encryption key, it should be created within the IoT device and never be exported from the device. It should be created using a cryptographically strong random data source to avoid users selecting a weak key or password. Some keys cannot be created in the system, so we will also have to provide a well-defined key provisioning system. Above all, we want to try and avoid any common or global keys that would allow an attacker to “break once use many.” In our IoT device, we will have a range of keys that are used for different functions (Table 4.14).
| Key name | Abbreviation | Description |
|---|---|---|
| Data Encryption Key | DEK | Encrypts data in a communication channel |
| Transmission Encryption Key | TEK | Encrypts the communication channel |
| Master Encryption Key | MEK | A master secret that can be used to derive fresh keys |
| Storage Encryption Key | SEK | Encrypts data at rest |
| Key Encryption Key | KEK | A key used to encrypt (wrap) other keys in a system. May also be called a wrapping key |
| Root of Trust Key | RoTKpub | A public key used to validate the signature of an image. Anchored to a device by a hash stored in immutable memory |
Storing keys
We can store all of our encryption keys in a file that is secured by the Key Encryption Key (KEK). This now gives us a single secret, which is the key to the kingdom. This now needs to be secured against two main types of attack: a software attack where an adversary can use a software vulnerability to steal secrets from our system, or a physical attack where an adversary has direct access to our device and can tamper with the hardware to extract the executable image and secrets.
We can mitigate against software attacks in two complementary ways. First, we can develop our firmware to have no software vulnerabilities (aka bugs), which can be used by an attacker. Since this is very difficult to do, the second is to architect our code to isolate the security functions from the main application code. This is a chief concern of the PSA Security Model and the purpose of the Cortex-M33 TrustZone security peripheral.
Microcontrollers designed for use as IoT devices will generally have an assistive security structure that includes a secure key store and defenses against hardware tampering. We will have a closer look at the type of features provided by such a device in Chapter 11.
Using keys
Once we have created a key, it must only be used for the cryptographic process for which it was created as it is bound to the device and cryptographic service. Ideally, this will be enforced by a policy within the key storage system. It is also important that most keys have a fixed lifetime known as the crypto period. When this expires, the key must be changed or “rotated.” This can be done by using the initial key provisioning process or by keeping a master key from which we can create fresh keys using a key derivation function. A typical device will have a range of keys that are “bound” to a specific function and a device with both a usage policy and a fixed lifetime. When a key reaches the end of its life, it must be destroyed and “put beyond use” to prevent its reuse.
Key derivation functions (KDF)
In some cases, a user may need to provide a password from which we derive a strong encryption key. User passwords have a relatively small keyspace, so it is necessary to provide a salt to prevent the use of lookup tables, as discussed earlier in this chapter. The mbedTLS library provides some standard key derivation functions, which are defined in PKCS-5. This standard describes two derivation functions, one based on a hashing algorithm and one based on a cipher (Table 4.15).
Exercise: KDF
In this exercise, we will use the mbedTLS KDF functions to generate a set of encryption keys from a password string and a salt.
- In the pack installer select Exercise 4.10 and press the Copy button.
- open main.c
The code declares strings for the password and the salt, and an array for the key:
unsigned char password[32] = "password"; //well of courseunsigned char salt[40] = "saltSALTsaltSALTsaltSALTsaltSALTsalt";unsigned char key[64];
Next, we declare and initialize the context:
We need to select the hashing algorithm to use with the KDF
info_sha1 = mbedtls_md_info_from_type( MBEDTLS_MD_SHA2 );
Then we can generate a key using the HMAC KDF function:
- Build the project then start the debugger and run the code.
The generated key will be displayed in the console window.
Conclusion
In this chapter, we have looked at a range of cryptographic algorithms used to provide data confidentiality, integrity, and assurance. For the most part, these are symmetrical algorithms where any associated key is used for both the encryption and decryption process. This is fine for local data storage and a trivial communication system where a key can be easily agreed by both the sending and receiving stations. In the next chapter, we will look at how to establish secure communication over an insecure channel, where an adversary can watch and read all our message data. To make this work, we need a new family of asymmetrical algorithms and a wider supporting infrastructure.