DevOps cycles also take infrastructure management and operations into account. If you need to automate different aspects of the software development lifecycle, you’ll need to apply automation throughout. In the previous chapter, we discussed the basics of DevOps and build pipelines. Starting in this chapter, we will explore the complete DevOps pipelines, starting from the inception or “issues” phase of a project, feature, or a bug. We will discuss the different steps necessary for a project to succeed. You might have heard different terms with the word “code” in them. One is Infrastructure as Code (IaC). Many vendors also use Security as Code to market their software packages that take automated security checks into account.
Distributed and centralized code repositories
Continuous integration and continuous delivery for each commit on every branch of the repository
Automated testing of the packages to verify the stability and performance of the application, as well as the security loopholes and their solutions
Creating, managing, assigning, and collaborating on the team issues
Defining build pipelines and adding alerts and managers for branches
Playing the blame game with git blame
Provisioning future releases and deployment environments
I devote most of this chapter to build pipelines and release configurations. We have a special chapter dedicated to build environment security and to fine-tuning the release environments. This chapter will lay the foundation and explain the concepts necessary to understand how we can improve the overall quality of the solutions.
I will start with the explanation of version control and its importance in the DevSecOps environment. You are welcome to use the previously created projects, but I recommended that you create a new project and look at its different phases and stages in a DevSecOps lifecycle.
Version Control and Audit
Version control has always been a crucial part of software engineering teams. A version control program manages the different versions or states of a project. Initially, they were designed to track the changes in the source code of a project. The purpose of a version control system is to track the changes in a file, a directory, or a system. In software engineering practices, they are applied to a project directory, the source file, and the other files within it. Version controls are also used to track changes users make. Your organization wants to see transparency across projects. Version control systems not only provide tracking and transparency, but they also allow you to roll back any unnecessary changes. Most version control systems ship with the features that are specific to a department or field. Hosted solutions, especially integrated modules, provide such offerings. BitBucket, for example, does not have issue boards and can be used by teams that only work on source code and CI/CD. As a team administrator, you are responsible adding Jira for ticketing and issue management, Trello for Kanban boards, and so on. You can purchase Jira only and manage the projects that do not require source code version control and automation of builds and deployments.
With .NET Core, there is no limitation when it comes to version control systems. You can use any version control program that you prefer.
Local version control systems
Centralized version control systems
Distributed version control systems
As a software engineer, you might have experienced all these types of version control systems. But if you are new to version control, then this section is important, as most DevSecOps stages depend on version control. Among the types of version controls, I will not talk about the local version control systems, as they will be covered automatically.
From this point, I refer to a project/directory as a repository in terms of version control. Files, build artifacts, and others are called, well, files or build artifacts.
It is important to understand the difference between a centralized and a distributed version control system before diving into version control protocols and hosting platforms.
Centralized Version Control Systems
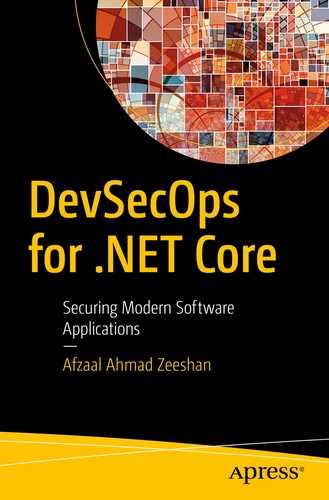
Centralized version control systems hold the repository and resources on a single server (or a web farm) and provide access to internal and external users to work. Collaboration in this environment is easy and the project is always used as the source of truth
Centralized control over the repository. The owning organization can always enforce their own policies and do not have to wait for all the parties to accept them.
The “original” code copy is maintained on a single server, so it is easy to manage.
User account policies can be easily controlled on the server. A user can be granted access to a repository and then revoked from the server. There is no need to keep track of the machines.
An organization’s user accounts database (active directory) can be used for authentication. This enables IT Ops to control the user accounts management.
It enables the owning party to provide infrastructure costs for build servers. A centralized datacenter can be used to build and release the software.
It prevents the tampering of the test suites and other policies on code standards. If a code standard fails on the server, it means the user must verify and apply the necessary changes before the code is accepted.
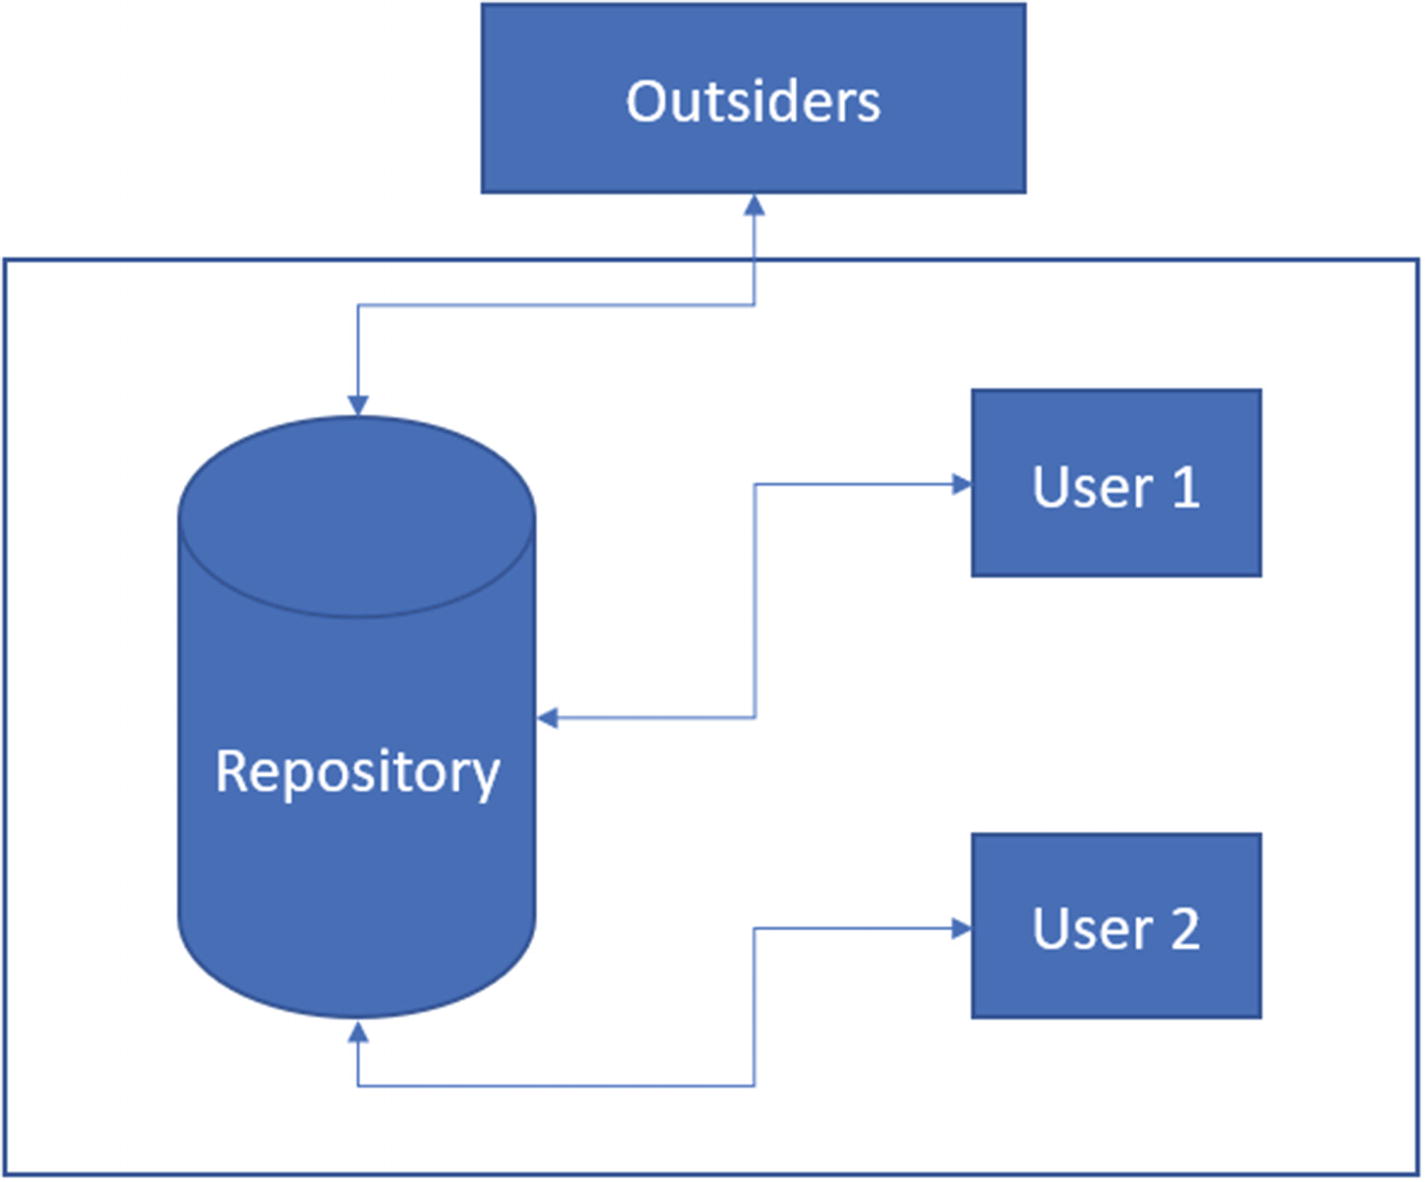
In centralized version control, users request access to a file. Other users cannot make changes to this file while a user holds the lock. As soon as the user leaves their lock on the file, other users can continue working. This prevents conflicts
Multiple users exist on the repository database, but only a single user can make any changes. This requires every other user to wait for the first user to release their lock on the file. When a user checks in the changes, the next users can check the file out to make their own changes. This design prevents conflicts in the source code.
The most prominent and well-known service that uses this method of version control is Team Foundation Server (TFS) by Microsoft. TFS is powerful and available on-premises as a source version control system.
Do not confuse TFS with the online hosted source control systems provided by Microsoft. The hosted platforms are known as Visual Studio Team Services (formerly known as Visual Studio Online). TFS is a protocol as well as the software that provides support for the TFS protocol.
TFS was the default protocol used by Microsoft for their internal projects as well as projects created and worked on in Visual Studio. More recently, Microsoft has started recommending (and providing support for) Git version control system in Visual Studio as well as their hosted products. Git is a distributed version control system, which we explore in the next section.
Distributed Version Control Systems
A distributed version control system , as its name suggests, is a version control system that is distributed across machines, networks, and regions. Unlike centralized VCS, distributed VCSs enable anyone to work on the repository without being provisioned by a central server.
In this book, I use the distributed version control system called Git. You can explore other options such as TFS as well, as most of the concepts are similar. To a single user, the differences are not obvious. You will only feel the differences in these two version control systems when you work in a team environment.

Distributed version control systems use separate copies of the repository. Each copy can act as the source of truth. Each user is free to work on their own repository separately
Each user can have their own copy of the repository. There is no direct link linking to the “original” repository. Each user is free to make their own changes and start the project from there. This is a concept called forking. In forking, we create a clone of the repository and work on the clone separately. Note that the original and the clone are two different repositories, but since they have a similar history tree, we can merge them later if we approve the contributions. Every repository can be a source of truth, and every repository can be a temporary repository for a new feature addition or for testing.
The code base and its copies are distributed across multiple machines and networks. There is no central repository to share or track the changes with.
A distributed version control system also supports user accounts and authentication policies and rules.
Policies and control are managed per repository.
Since each repository can be a source of truth, every repository needs to manage its own set of policies.
This step configures the Git version control to share the author details with each commit. Git also takes security measures and provides support for SSH. SSH is secure shell access that uses public/private certificates to authenticate and secure the traffic. This protects the data that you are transferring to and from the remote3 repositories.
In a distributed environment , you are not required to wait for other users to finish their work. You can work on your projects on your own machine, independently. This applies to everyone on the network as well as off the network. Git keeps a history of the changes that are made on each repository and on the clone of the repository. Each user (along with their user details) then commits their changes to the remote repositories to publish them.
Note that there is no concept of a central project, but a well-known remote repository is used to keep the track of the “master” state of the repository. Several well-known projects use Git version control deployed either on-premises or using one of the hosted code storage facilities offered by third-party vendors.
The Git protocol is used by GitHub and GitLab (it’s a part of their name and the service that they provide) to manage project resources, track changes, and version the state of the project.
Branches
Hooks
Staging areas
Workflows
Some of these features (like workflows) are supported in other version control systems too. These features make it easier for the software engineering teams to manage the lifecycle of a project. Branches, for example, can support feature addition and feature try-outs. You can create a new branch, add the code that must be tested, and run a DevOps pipeline on it. A branch is an abstraction layer that can be used to create two copies of your code. Similarly, you can create hooks that process the incoming commits, and also manage the workflows for your contributions.
You can check out another book published by Apress, Pro Git, which explores the Git version control in more detail. For more version control options and features, please consult that book, as I will not discuss how Git and its commands work internally.
GitOps
The Git protocol does one job, and does it so well, that they named the complete design and flow of the development to deployment lifecycle after it: GitOps. The term is a bit interesting in that it uses Git-based operations to perform a complete lifecycle. The lifecycle does not have to be of software development. Many website developers, blog authors, and magazine and book publishers use GitOps for their regular operations as well.
Designing and decision making
Authoring and development phase
Building, proofreading, auditing stages
Testing, reviewing, and other steps
Releasing, publishing, restarting
Git as software helps all these stages. GitHub, GitLab, and several other online hosting solutions provide support for tasks management and code building using Git. Let’s start by reviewing some of the features of Git, to understand how it can be used to manage the lifecycle of our projects.

Visual Studio Code showing the default C# file created and staged in the Git repository. The bottom-left corner shows the currently active branch

Visual Studio Code showing the changes in the repository added to the master branch and committed

Visual Studio Code’s GUI features for Git version control give control over branch creation and branch selection for the repository
Likewise, you can create the branches from here. This gives you good control over the environment that you are working with.
Coming back to the source code, the active branch will also revert to its original state. Remember that we did not make any changes to the master branch after creating the test branch. This helps us keep the master branch free from all changes that might be made. If we are not happy with our new features, we can simply change the branch and continue working from where we left off. Git tracks the changes to each file and resource. Thus, at every step we know what changes are made, and who made those changes to our repository. GitOps also enables owners to apply different policies to external contributors to prevent unauthorized access and actions to be taken on the resources. This helps owners prevent external contributors from triggering a production release on a change that is not yet verified, or code that is not yet reviewed by peers. GitOps is something that we can come up with once we have introduced security and performance automation to our DevOps; the end goal of this guide.
Other benefits of GitOps include the capability to verify the infrastructure design. I will talk more about that in the later section, Infrastructure as Code. GitOps is a pattern that uses Git software to automate project development and delivery, while also supporting transparency and audit of the contributions.
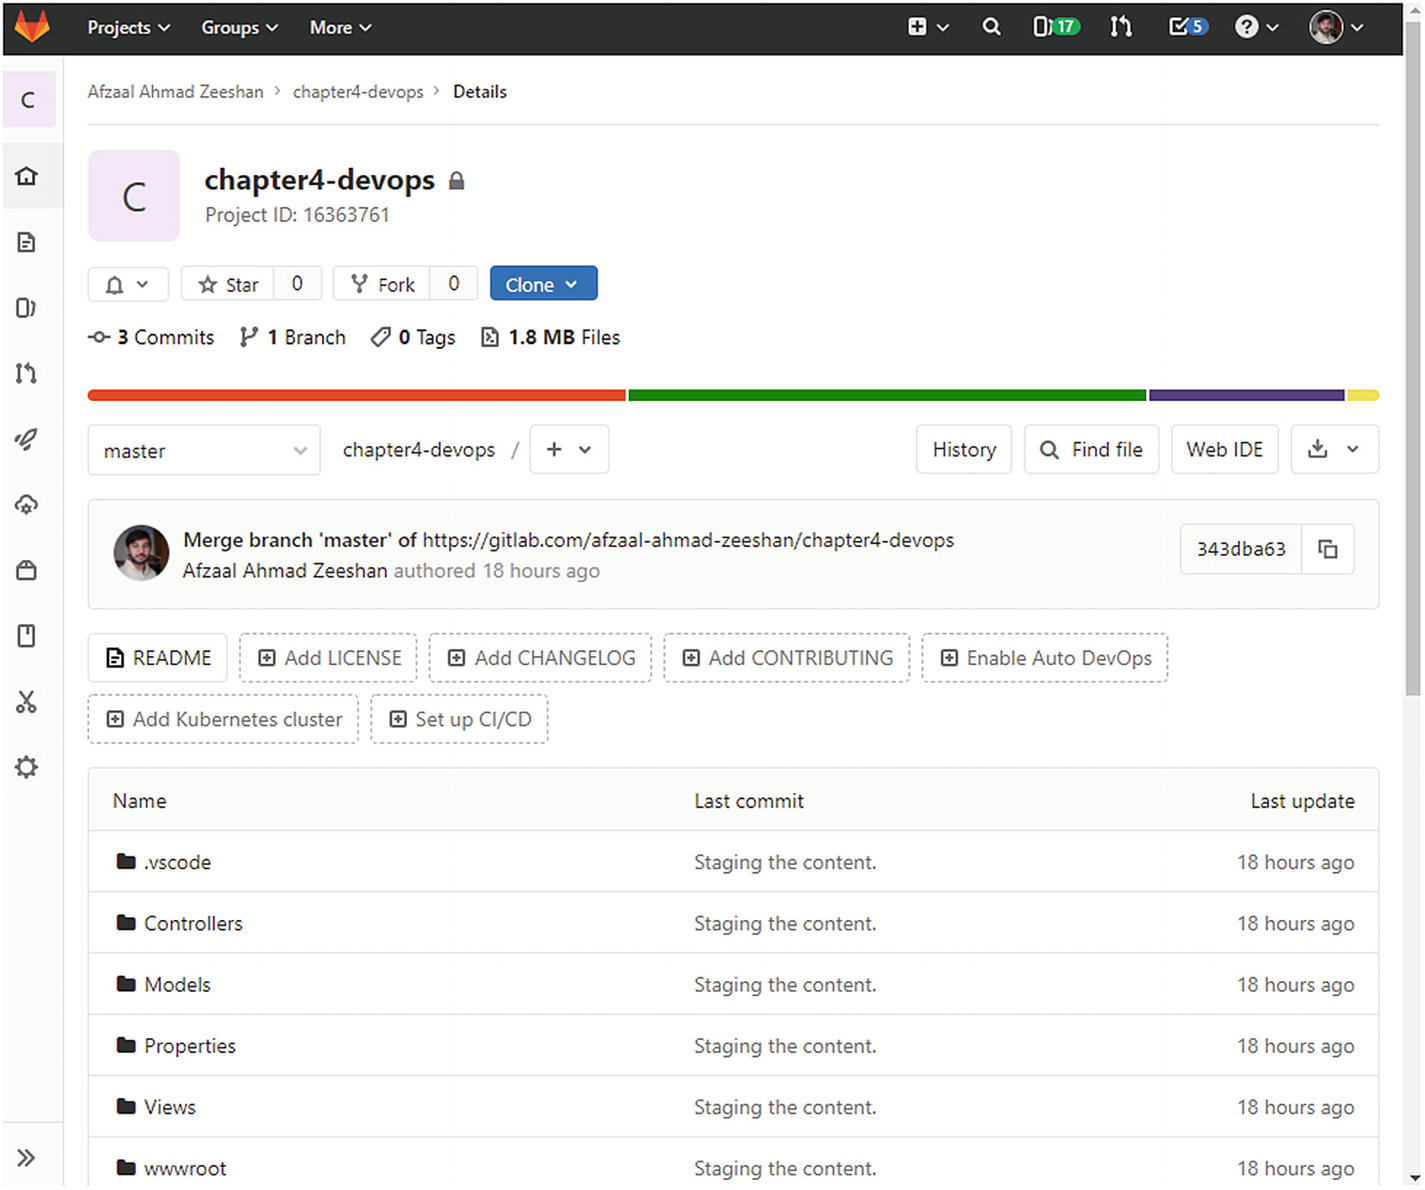
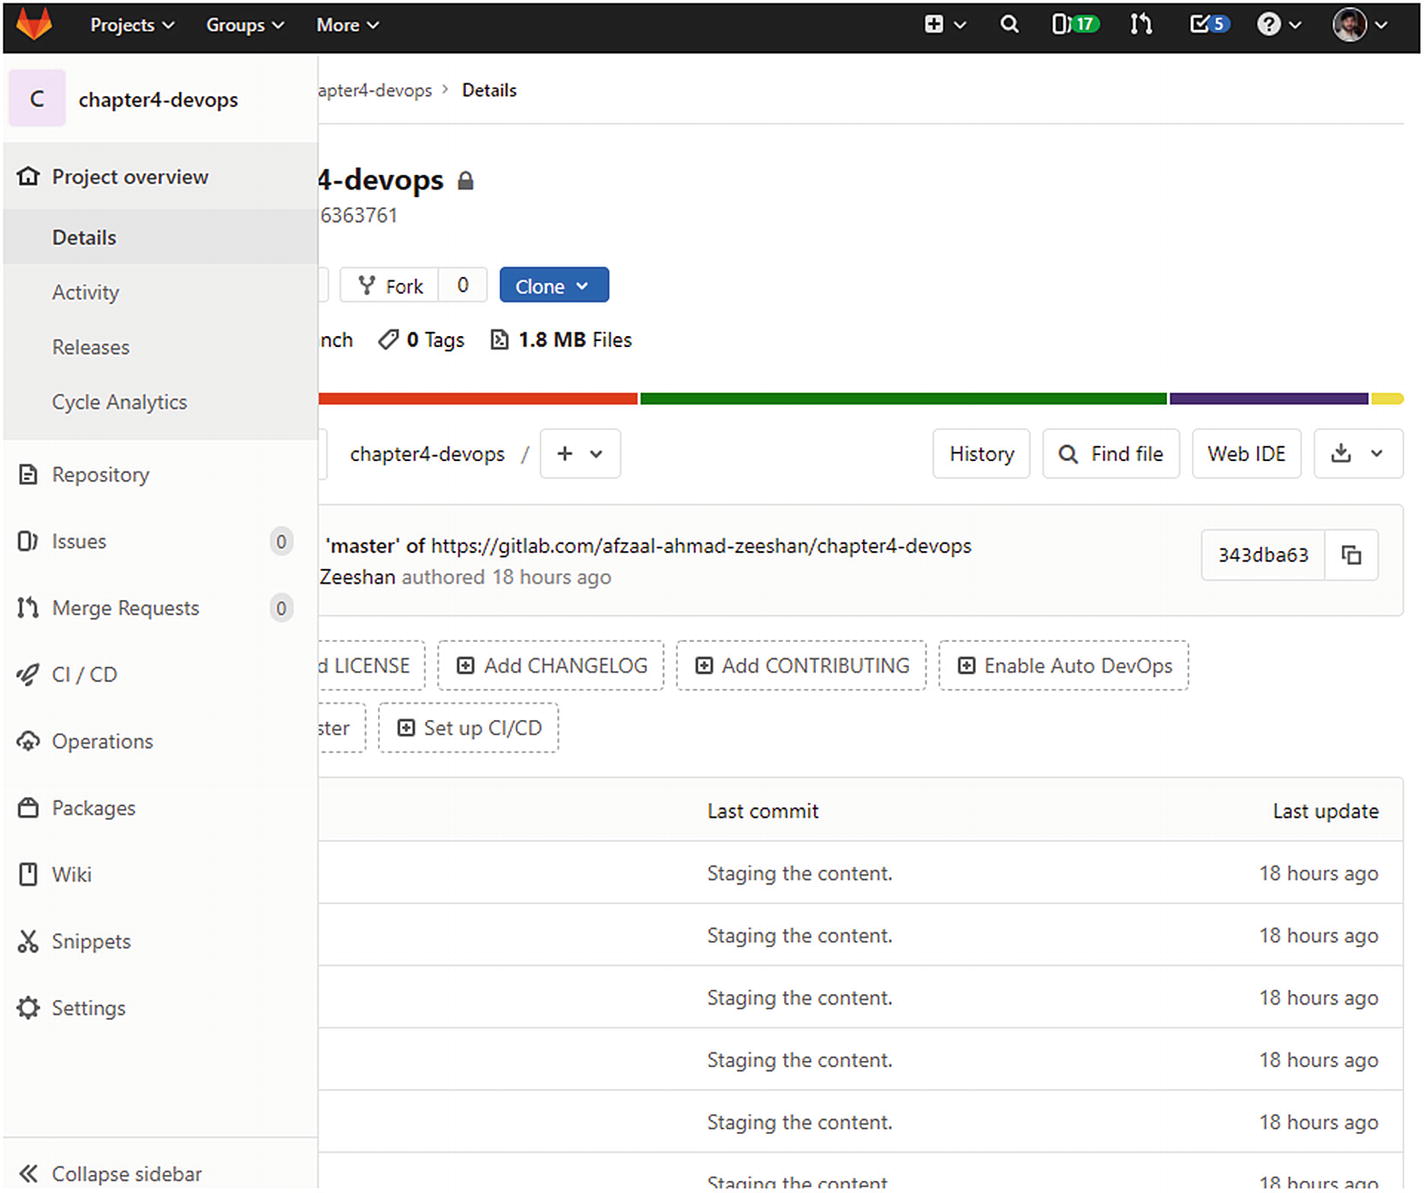
Hosted Code Storage
One of the best solutions made available to software engineers is the suite of code hosting solutions. GitHub, GitLab, Azure DevOps, you name it. The benefit of hosted code storage is that we get to use a cloud-hosted space to store our projects and their source code. This lets our teams connect to, work on, and modify the projects at their own pace. Code hosting is free. As a customer, we only pay for the resources that we consume. It also depends on the service provider, as some providers such as GitLab or GitHub charge per user in the subscription. But the jobs that are run on the code—including build time, test minutes, and release environments—are charged separately.
Several other methods and means of code hosting are also available. You can create your own code servers—TFS, Azure DevOps on-premises, Jenkins, and so on, are all means of creating your own repositories.
Hosted code storage options also come with user account management and policy management settings. You can also grant public access to your repositories or prevent access to your repositories altogether. Enterprise version managers also provide support for custom user accounts databases, such as Active Directory.
Infrastructure as Code (IaC)
For decades, software engineers have seen the power of plain-text information and have learned how to control different aspects of it. One of these aspects is version control. Now our software programs can be made rock solid against unwanted (or poor quality) changes. We have written tests that verify the quality of our solutions and our engineers can quickly verify the code quality. We have static code analysis tools that can tell us when our code is missing a policy enforcement so our engineer can make the changes. But what about our infrastructure/ What about the virtual machines and web servers that run the programs? Even if our programs are ~100% tested to work perfectly, if our infrastructure or the hosting environment is not working well, we cannot ensure a good quality service.
How can you prevent unwanted failures?
How can you redeploy the infrastructure? How quickly?
What if your IT engineer quits?
What if the code breaks on production and causes your infrastructure to crash?
What if everything was fine before you deployed the recent change? How can you revert the most recent changes?
How do you know it was your changes that broke the infrastructure? What if it was the end user? Why not the cloud provider?
How long does a deployment need to wait before it can be deployed to a production environment?
By the time that you answer these questions (25-100 seconds), your customers would be long gone to your competitors. Therefore, you need to think proactively and not reactively. Infrastructure as Code is a way of doing that. The name is somewhat confusing, but it simply means that you write down the structure and architecture of your infrastructure as source code. Just like a blueprint of source code for your software, your infrastructure is written down as a blueprint. There are special software tools that are used to verify the validity of your infrastructure drafts, its state, quality, and responsiveness to your performance load. Every organization defines their own set of principles and steps that are followed to create the resources on the cloud. But if a company is using hybrid cloud solutions, then it becomes difficult to manage the infrastructure. Despite supporting all features on the cloud, some vendors provide a different selection of compute power for their customers. For example, every virtual machine profile on Microsoft Azure might not be available on AWS.
A resource template can help with this. You can create a resource template for a cloud platform and then use it to deploy the resources on the cloud. This has a direct connection to how version-controlled software is deployed. If you have a software package, you know it will compile to the same binary and provide the same output. Regardless of the number of times we build the package, the result is always the same. Similarly, once your infrastructure is designed as a version-able resource, you can deploy it any number of times and the result will always be similar. This will be easier to understand with an example, so let’s look at an example of the Azure Resource Manager as an IaC toolkit for .NET Core applications.
Once again, a quick heads-up. Microsoft Azure’s Resource Manager and the Resource Manager Templates (here onward also called ARM Templates) are available free of cost to subscribers of Microsoft Azure. Therefore, I am using ARM Templates. You can use other cloud products; Alibaba Cloud Resource Orchestration Service is a good option. I will discuss other software, such as Ansible, Terraform, and so on, later. You can also check out my article where I contrast the two products for IaC by Microsoft and Alibaba Cloud, at https://afzaalahmadzeeshan.com/articles/managing-infrastructure-as-code-with-alibaba-cloud-ros-vs-microsoft-azure/.
Azure Resource Manager as an IaC Toolkit
Name of the resource group
Location where the resources are to be deployed
Subscription to use for billing purposes
That is it. You can include other information such as the tag information with a resource group, but that is not necessary. A resource group defines where your resources will be created. Resource groups also help manage the quota for your subscription and region.
I assume that you have a Microsoft Azure subscription from this point onward. If you do not have an active Azure subscription, you can always create a free account with Microsoft Azure. You’ll get free credits to try out the services and follow along with this book.

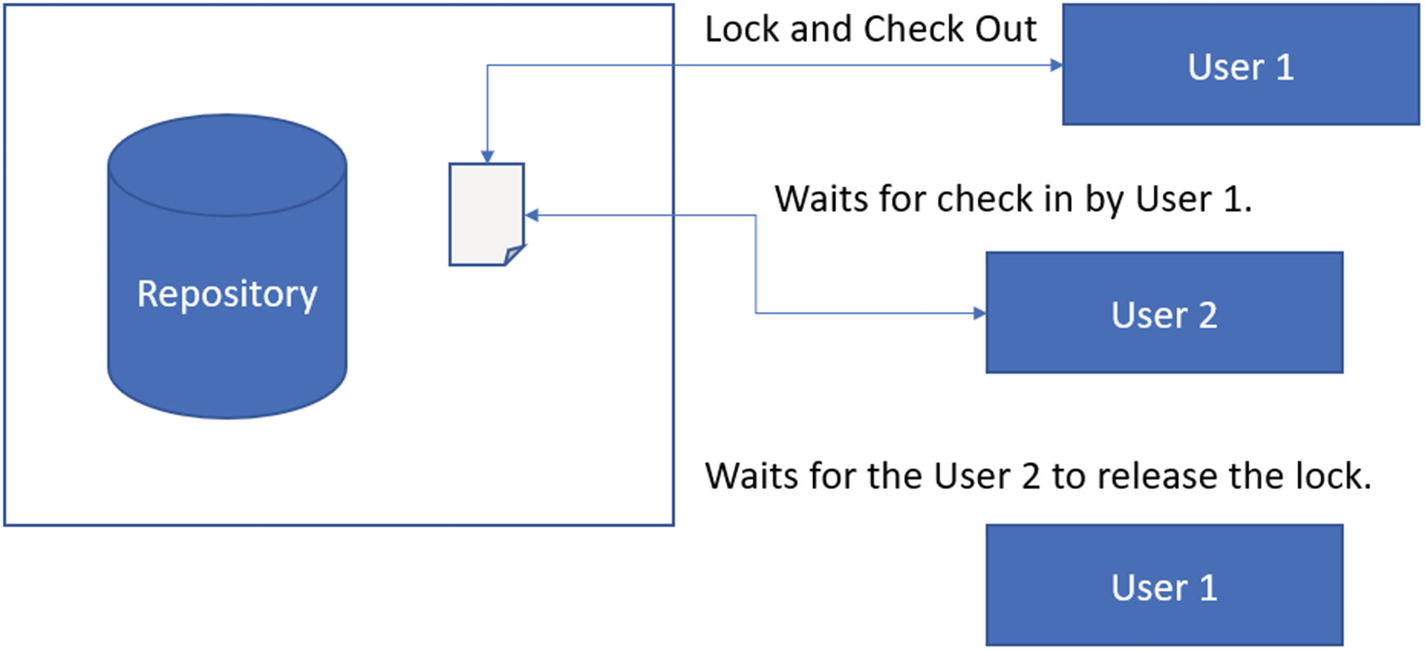
The Azure portal shows the list of available services. We are searching for the “research group” resource to be created in our subscription
A new resource group being created in the Azure portal named Chapter4-RG in the Central US region
The form asks for the subscription to use to create this resource group. It also asks for a name (I am naming it Chapter4-RG to keep things simple; RG stands for resource group) and lastly it asks for the region for this resource group. Note that the region is used to deploy your resources in a specific datacenter. You need to determine which location to select. Here is a quick rule of thumb—if you are testing the environment, then this location does not matter much. If you are deploying a production release on the server, then you need to make sure that the region is as close to your customers as possible. This region is physical datacenter location where your web applications will exist. If the distance from this region to your customers is far, then your customers will face latency and other performance issues. These issues cannot be fixed through software improvements, rather they require a redeployment of the web servers to a closer region.
If you cannot redeploy your web servers to provide better performance to your customers, then you can use CDNs (content delivery networks). A content delivery network takes a static resource—such as an image, a stylesheet, or an HTML web page—and replicates a copy of this page across the globe. This way, the data is replicated and made available to your customers closer to them. You only pay for the traffic and not the online resources, such as the hard disks and compute power. CDNs are very easy to configure and almost every cloud provider supports a CDN profile. You can create a new profile in seconds and have your static content replicated in minutes. One downside however is that CDNs only work with static data. If your web application generates dynamic content based on user profiles and sessions, CDNs cannot provide support to your business model. Instead, you need to create distributed web service deployments.
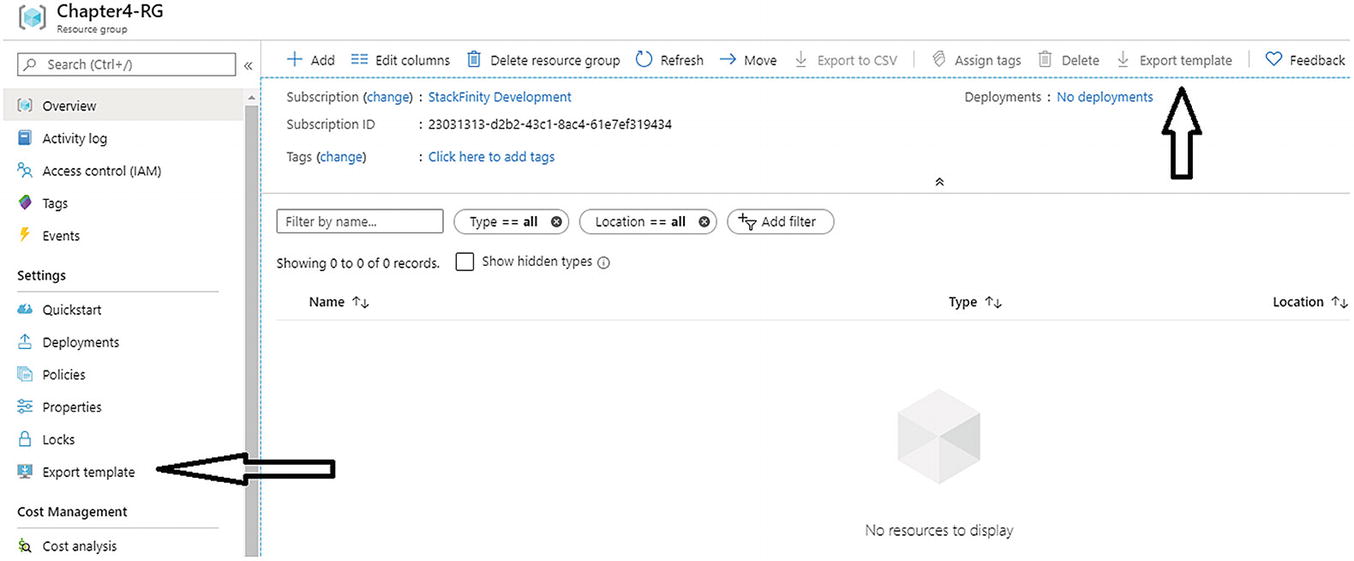
The Azure portal shows the options to download the automation template for IaC. The Export Template option generates the templates and provides it to the user

The Azure portal showing an empty resource template for a resource group. There are no resources in this group, which is why the template is empty
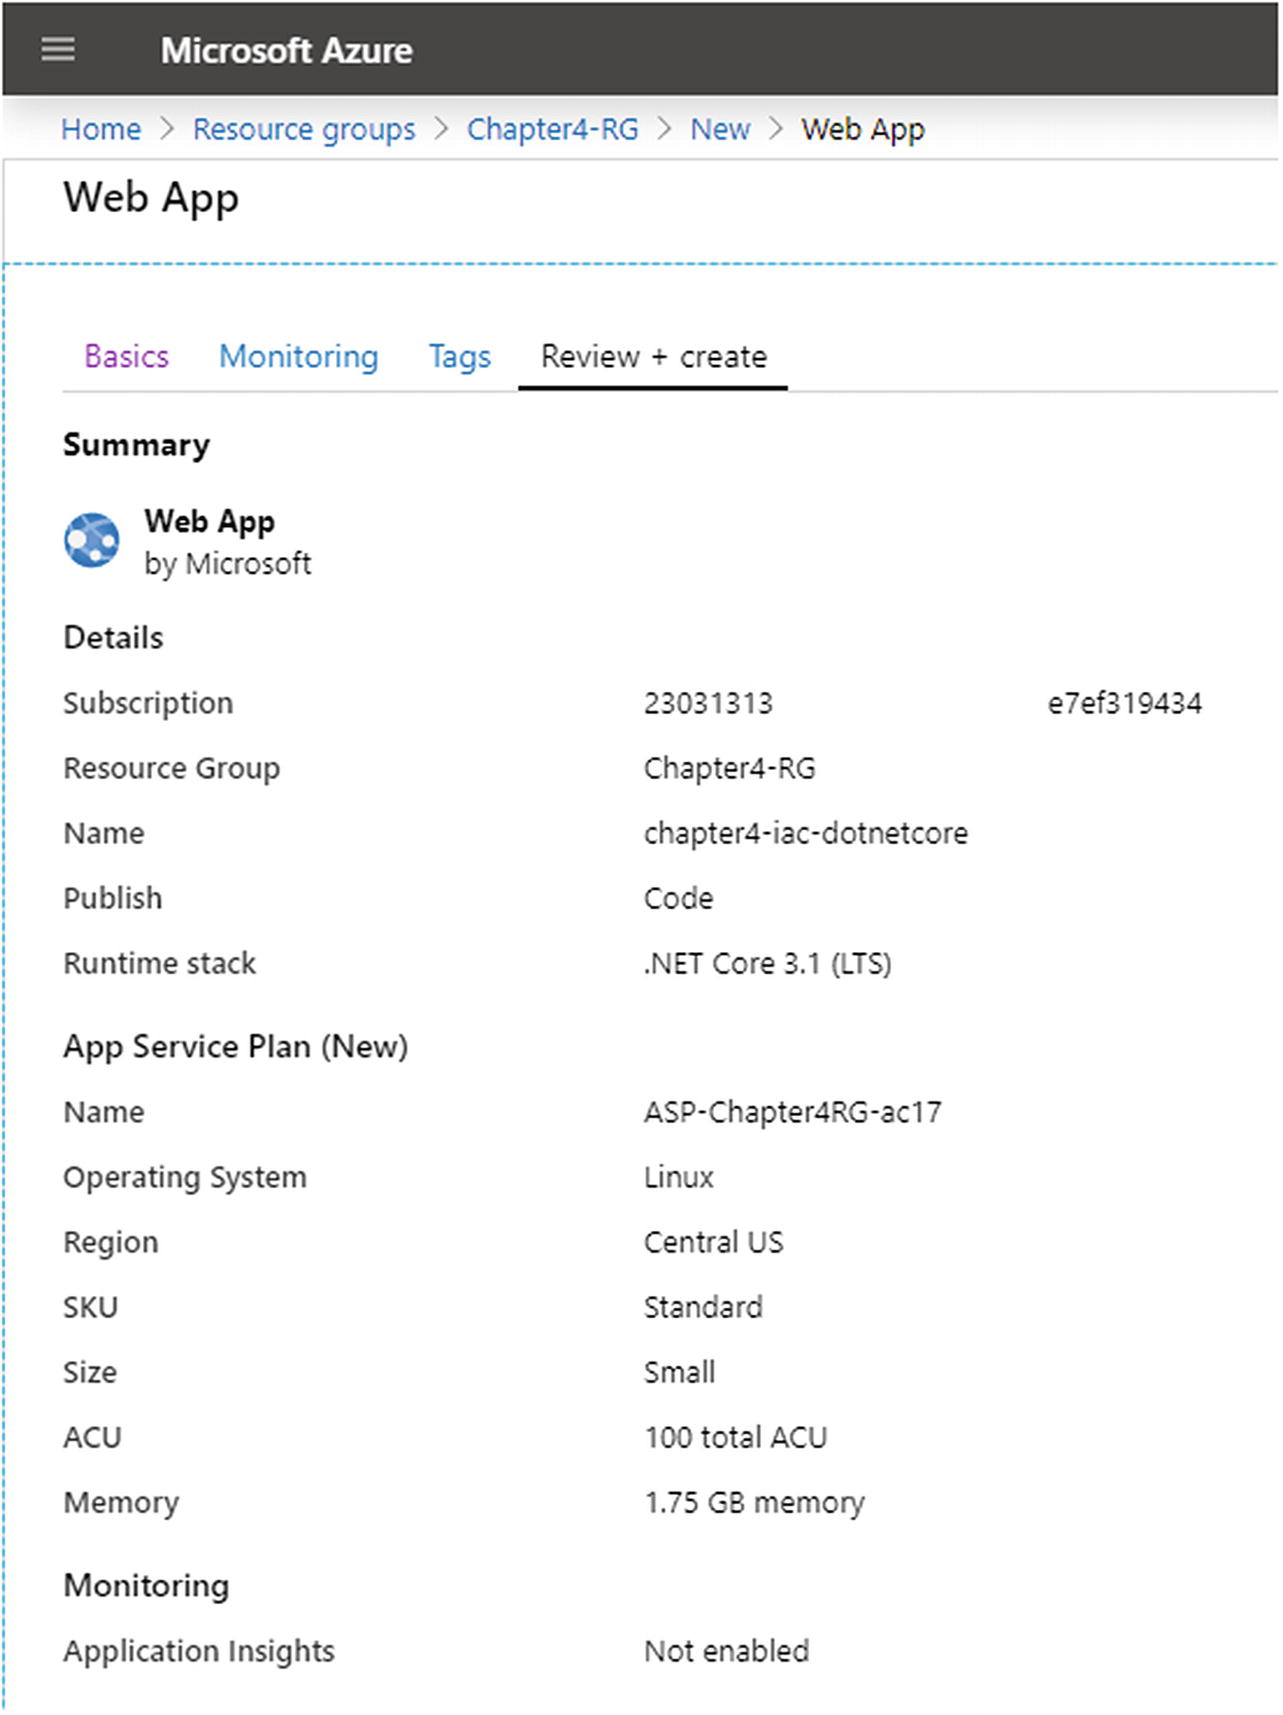
Azure App Service resource being created in the Azure portal with the .NET Core 3.1 LTS runtime

After resource creation, Azure shows the resources in the resource template

Azure provides support to download or store the template for later use with automation tools, such as Microsoft PowerShell

The Azure portal showing the resource template deployment with the default values filled in from the template shown in Figure 4-12
As shown in Figure 4-14, the exact details of our infrastructure were fed into the portal by the template. This shows how a template can be reused to deploy resources. My resource was a simple web server. If I had created a virtual machine, it would have used the IP address, network address, hostname, and other details as the template parameters and reused them during the resource deployment phase. You can use this script in PowerShell with Azure CLI to automate the deployments of your projects.
It is important to note that resources can be deployed for testing and QA purposes as well. You can create a profile known to be used for production and spin up resources on the cloud with one template. This would help your testers quickly create test environments and run test suites on your application.
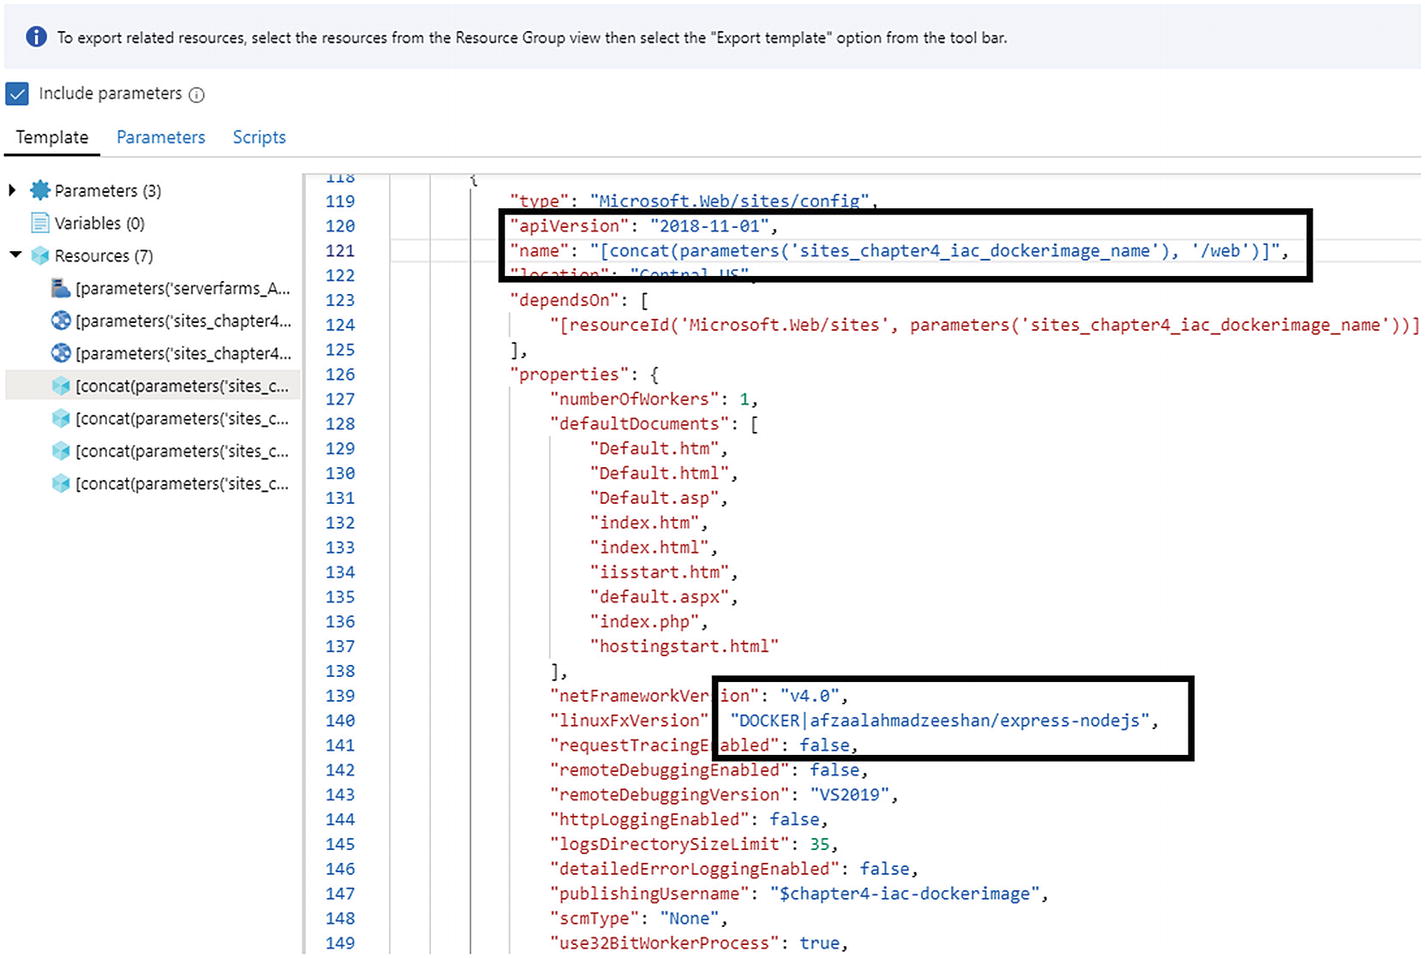
The resource template showing the Docker image name that I use by default
The first highlighted box shows the property name (…dockerimage_name…) and the second one shows the value for this property. There is a lot more to an Azure Resource Group than what we have covered, such as the virtual network setups and IP address mapping to your virtual machines, but they are off-topic for this book.
Ansible, Terraform, and More
Third-party organizations also provide support for IaC management. There are products by Red Hat (Ansible), HashiCorp (Terraform), Chef, and so on. These tools aim to solve a similar problem in a different manner.
Automation of development deployment cycles
Configuration and environment variable management
Automated testing of the suites
Staging and QA environment creation for testing and package verification
Most of the time when you create a resource or resource template with these tools, you will also inject the software programs that you run. This is the place where Docker and Kubernetes come in to play. You create a resource as a Docker image and use it as a resource in the infrastructure. Each time you deploy the resources, your Docker images are pulled and created on the cloud environment.
Ansible, Terraform, and other DevOps tools enable you to create resource templates that contain all the values as they should be on the cloud. When you execute the programs (with the template files as a parameter), they create the resources on the cloud. Therefore, a complete DevOps tool utilizes these platforms. I will demonstrate the use of Azure DevOps, GitHub, and GitLab in later sections and throughout the book. For a developer who must work with hybrid cloud solutions, Terraform and other third-party tools are recommended because they support all the cloud platforms.
Automating Code Building and Deployment
A build pipeline will also run test suites against a software project. There are multiple ways in which you can add the security verification phase to a pipeline. For a .NET Core application, the easiest way is to use NuGet packages and add the build steps. In previous chapters, we added the NuGet packages to the projects and ran static code analysis for the code. We can do the same thing here, and a build pipeline will automatically run the tests against our code.
If you do not wish to create a new project, you can use the template project created by Microsoft on Azure DevOps for you. Check their website to learn more about this service at https://azuredevopsdemogenerator.azurewebsites.net/?name=WhiteSource-Bolt&templateid=77362.
Regardless of the service8 you use, you can always create a build pipeline and create the artifacts that your hosting platforms will receive. I will use the example of Azure DevOps, because it integrates smoothly with Microsoft Azure. The guides for this are available on the Azure DevOps documentation website.9 I will try to explain how the automation aspects of Azure DevOps work, and how you can control the pipelines. I assume that you have a .NET Core project created and a Git repository initialized with a Azure DevOps repository.
You will find supportive CLI commands as well as documentation to guide you to connect your local repository with a remote. If you still cannot figure it out, I explained an example in the previous chapter that you can revisit. Remember that in the git remote, you can add the URL for your Azure DevOps project repository. Once you have connected, you can use git pull and git push easily.
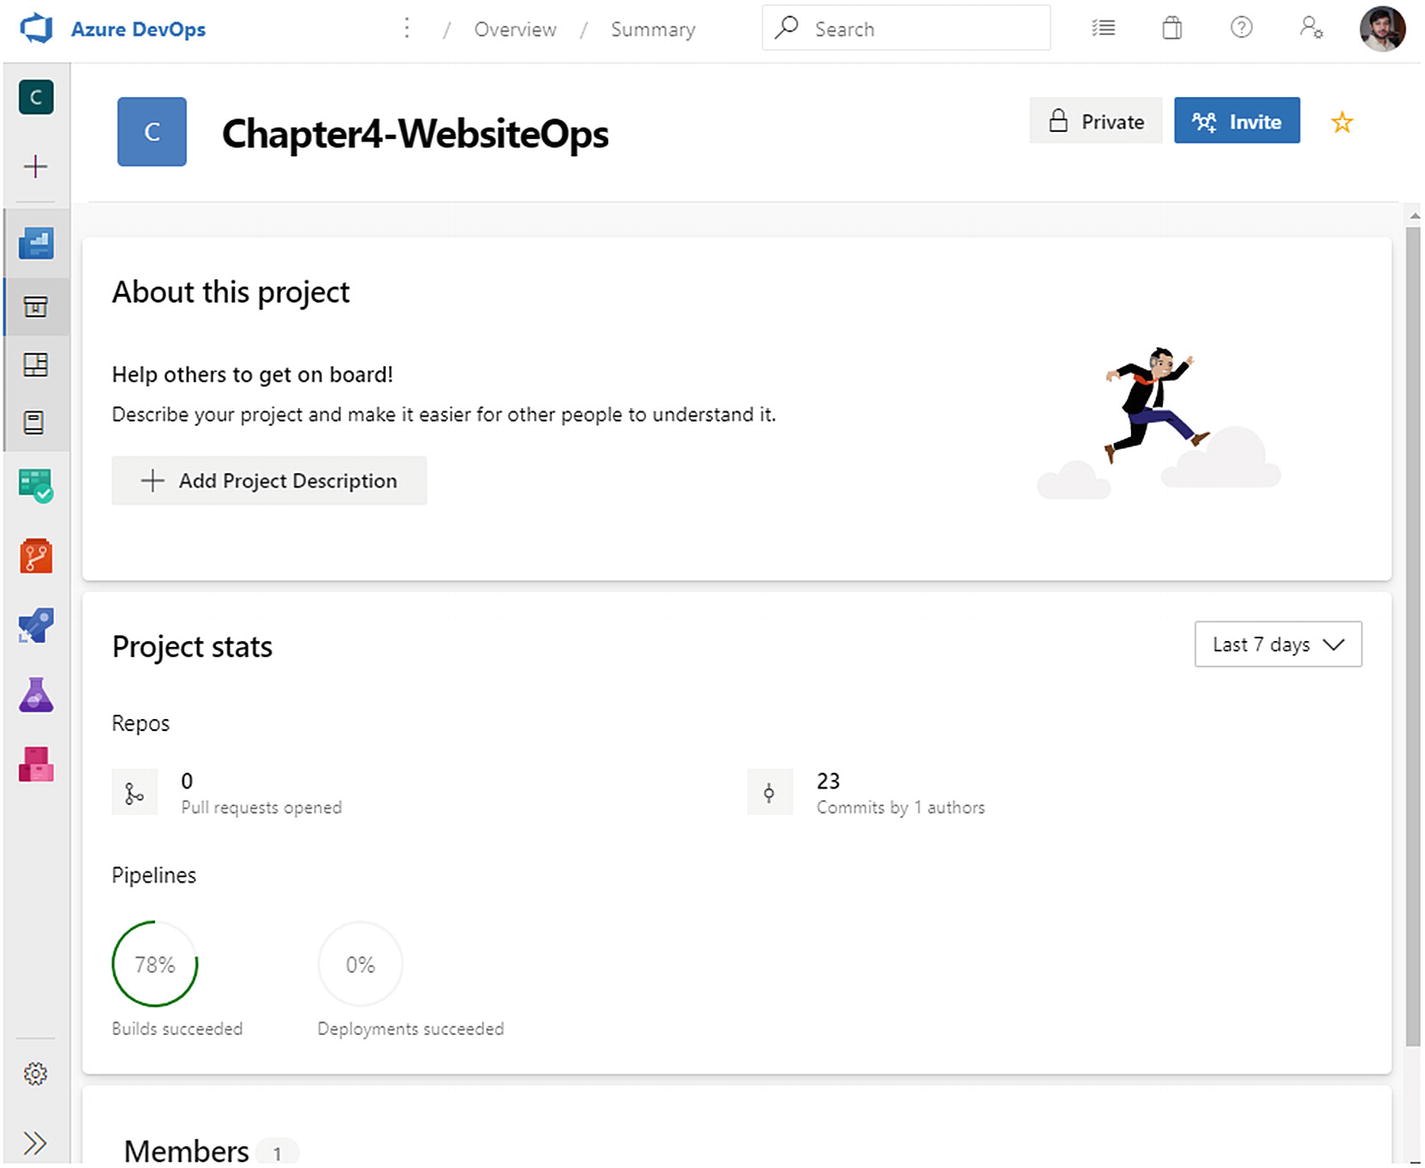
The Azure DevOps project dashboard page. This page shows several stats about the project, such as the number of commits and the pipeline build success ratio
GitLab default page shows similar information for the projects
The GitLab options available for the projects to perform DevOps, manage the bugs and feature requests, and create Wikis for users and the Docker repository
Boards: Used to manage issues, user stories, and features. Also used to create and define sprints in the Agile teams.
Repos: Used to store the code base for the project. You can create any number of repositories in Azure DevOps.
Pipelines: Used to create and manage the continuous integration, delivery, and deployment pipelines. They also hold the deployment environments for your continuous deployment.
Test Plans: Used to create and execute test suites for your application. They offer online and hosted VMs to run tests in.
Artifacts: Used to store the build and release artifacts for your project.

Azure DevOps shows the boards for user stories in the browser for a project. The boards are drag-and-drop supporting
You can create new issues as they are needed. Stakeholders are provided with different controls that allow them to read the state of the projects. A team can collaborate on these issues to work toward a solution. Scrum runs can help keep the team focused on the issues with a deadline. Issue boards help the teams organize what is important and what features to work on.
The benefit of having DevOps tools is that they provide a complete set of solutions to help develop the project. You can drag-and-drop the features from one list to another. You can create repositories against this too. Most issues and bugs can be assigned to the developers that are directly responsible for working on them. Azure Active Directory can help automate this process of user identity management.
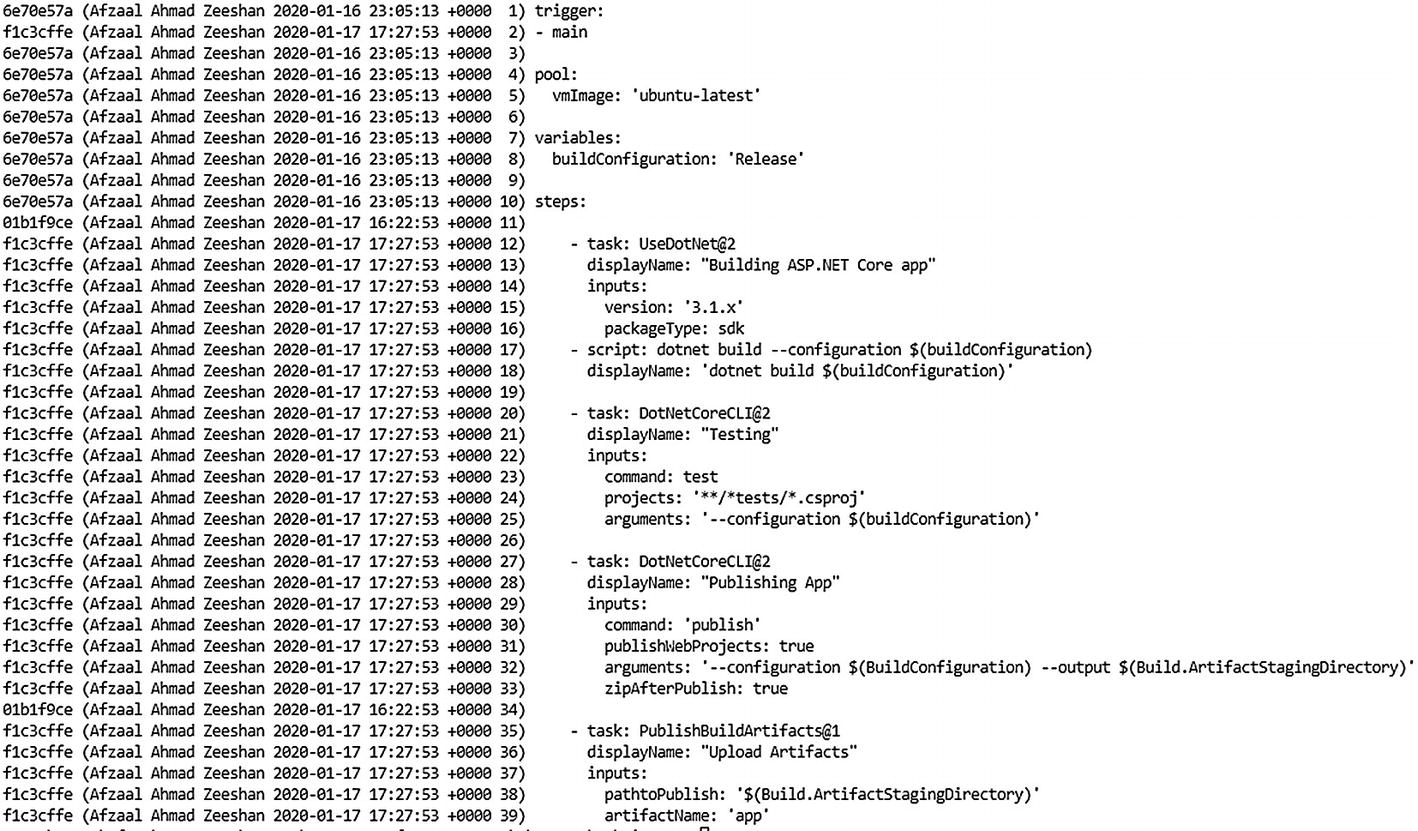
Creating Build Pipelines
This is the complete pipeline for my continuous integration. It specifies the .NET Core version to use.
As mentioned previously, you do not need to copy anything from this book. The reason is that Microsoft has been changing the specification for .NET Core as well as the CLI. Other products that they offer are also in the same category. Within a span of five years, users have seen Visual Studio Online change to Visual Studio Team Services to Azure DevOps to a new brand of Visual Studio Online. Therefore, I am recommending that you learn the best practices from this book and use the tools and scripts available at the time of reading (not this writing) to execute the tasks. I will try my best to keep the GitHub repository fresh with the latest scripts and project samples.
Rest assured, the samples are tested for validity with multiple user accounts and sample projects.

Azure DevOps job showing the results of the job
The job dashboard shows the VM used as well as information about the job state. You can click these items to preview more information about them.
So far, we have only created the integration part. We have not yet deployed the artifacts on the cloud. That is where the Release phase comes in.
A typical DevOps pipeline contains three phases:
Continuous integration
Continuous delivery
Continuous deployment
Continuous integration is the start of what is known as the DevOps pipeline. When you commit the project’s changes, your code is automatically built to verify the status of the code changes. Some developers include the testing phase of a software package in the CI phase. I believe the distinction can be used to simplify DevOps. For me, the testing phase is part of the continuous delivery phase. Your disagreements are welcome. Continuous delivery is the phase that ensures that you are “delivering” the package that has good quality UX and policies.
The last of these is continuous deployment. Once your package has been tested against bugs and vulnerabilities—note that a simple build cannot do that, so integration alone cannot support this requirement of DevOps—you will need to provide the software to customers. You can do that manually by uploading the artifacts to the web servers, which is fine in DevOps. If you automate this step, then you have continuous deployment. The goal of DevOps is to simplify the process for the teams, take what you want from the buffet of best practices, and leave what you cannot afford.
This job will also upload our artifacts for the next step. After this, we will have our Release stage automatically deploy it. This process can be done automatically from the pipeline or it can be done with a web hook10. In my Azure DevOps project, I handled this within the pipeline because my project was a .NET Core based deployment and not a Docker image.

Azure pipelines showing the Release status and the actions performed

Browser showing the app deployed and running on Azure
Visual Studio Code terminal showing the Git blame status of the file. The commit ID, contributor name, and time are shown in the file output
You can easily review who made a change and whether that change was approved. Integrated solutions in the DevOps tools can help control these changes further by introducing issues and bug boards. Good team collaboration can improve the velocity of software deployment because your teams will quickly have their changes accepted and deployed.
In a nutshell, you see how an automated pipeline can help your team achieve more, in less time. It also shows how you can get insight into the contributions of external users and control the access of internal members. Every DevOps tool provides access to testing suite execution, application quality analysis, bugs and issue boards, and platform- or license-specific features.
Utilizing a Bug Database
A bug database is a database that contains the known bugs, code smells, and vulnerabilities of a framework, runtime, language, or deployment platform. One can be created manually by the organization based on their experience with the platform, or it can be purchased as a subscription from a security organization.

The Azure DevOps build pipeline showing the warnings for a project’s structure, code standards, and possible suggestions to improve the code quality
You can configure the build systems to terminate the process if there are any warning messages. This is entirely dependent on the company policies for the code. We explore the usefulness as well as false positives of the code analysis plugins. Based on that, it is good for your teams to discuss how to apply these changes to your tools.
Compliance and Policies
Organizations need to comply with the rules and regulations of the governments where they do business and the platforms that they use. Most solution providers are cloud-based, which means that their cloud resources as well as the user data can reside anywhere on the planet (albeit in their own control). Compliance is a legal need of the hour to protect companies against millions in fines. GDPR is one modern example of compliance and regulations. GDPR, the European standard, does not require a company to be registered within Europe. GDPR only requires you to be providing services to a citizen of Europe.
From a developer’s standpoint, each API and SDK that you integrate also comes with a license. In the past, the .NET Framework was a Windows-only framework. At that time, it only required you to have a licensed copy of Microsoft Windows OS. Right now, with .NET Core, the framework is cross-platform and has hundreds of libraries and SDKs available on GitHub and NuGet. As a fast-moving organization, you need to have license check in place too. Several online DevOps tools provide support for reviewing the licensing that is added to your software.
Risk and Bugs Analysis
DevOps requires that your teams enforce policies to prevent risk and bugs. A risk can come in different ways, but most notably it comes with a new feature addition. Most common bugs and code problems arise when a new feature has been rolled out. A new feature can bring a new set of problems, including code-related issues, but also problems that relate to the infrastructure and the online hosting resources. Imagine that you develop a new feature that your customers have been requesting. You know that this feature is important, and that many active users will try to access it. If you do not run an infrastructure load or stress test on the feature, it could lead to failure since the resource might not be ready to accept the traffic load. Infrastructure as Code comes in handy in this regard, because you can run the tests on the infrastructure before they go live.
There are other ways to solve this problem, some include that you roll out the software feature in percentages. Some teams also try to develop features and them release them to individual regions, like the United States first, then to Europe, then Asia, and so on. But how do you manage this in your software? One common practice is to write the software in a branch (branches that we discussed earlier in this chapter) and then merge the branches with a production branch to deploy the changes on the server. Do you see the problem here?
The problem is the lack of control over the environment, as well as the software state. You cannot predict the time it will take for the build environment to finish building your project. Similarly, it does not guarantee that your build will succeed at the 11th hour. What’s real is that it might fail when the time comes. This sort of approach to deploying an application also leads to a poor UX since your users might not get the best software they were expecting. Software you have tested for code quality does not ensure a stable execution on the Internet. Your testers and engineers only tested the code based on their knowledge and experience.
Here is a joke some tell.
A real customer walks into the bar, orders one beer, and the bar bursts into flames.
Although it’s hypothetical scenario, it illustrates neatly how important it is to validate your packages from all angles. Sometimes the bugs are obvious and could be prevented, as they are hiding in plain code.
One way to perform these code checks is using feature flags. A feature flag is a conditional block in your application, written to abstract the underlying code.
Feature Flags
A feature flag is provided by the DevOps tools, pipelines, and cloud providers, and it can be developed manually by a team as well. The story of a feature flag is as simple as a basic if...else block in the code that controls whether to grant access to a feature or not. Feature flags can be hardcoded features or soft conditional blocks that prevent access to a specific feature for a time.
Imagine a scenario where you must broadcast an update to your customers for a New Year or Black Friday deal. You cannot expect the customers to wait until the update has been pushed out to the online Android or iOS app stores to download and then use the discounts. Your users expect the benefits to be unlocked once the clock ticks 12. Another major problem is that the clock does not tick 12 across the globe at the same time. There are different time zones that the software needs to consider, and many other similar problems. With feature flags, we can easily control the values for the discounts from an external server. This server acts as the hosting platform for the configuration values. After all, a feature flag is just a configuration value that is hosted elsewhere.
I have used several platforms that support feature flags. I personally like Alibaba Cloud Application Configuration Manager12 for its simplicity, features, and pricing model.
Do not overdo the feature. Use a manageable number of feature flags in your system. Your operations team needs to manage and remove the flags that are not necessary.
Feature flags should be used to hide or abstract features that are meant to be staged. A feature flag should not be a replacement for conditional blocks for license checks. You should use the store-provided license services, such as Google Play Licensing for Xamarin.
Feature flags should be removed as soon as their underlying features are released to the public. This housekeeping task will help in the long run and produce maintainable results.
You should use general configuration values and process their relative information on the client side. For example, you should use UTC time zones in the date and time values. This will enable your application to check whether to unlock a feature or apply a discount at runtime.
You should listen to changes in the feature flag’s value asynchronously in the background. This will help you update the UI as soon as the changes are reflected in the online configuration storage.
You should introduce percentage rollout to control the behavior more. Percentage rollouts can help you decrease the load on servers and test your features before all of your user base tries the feature.
Note that if you do not wish to use Alibaba Cloud Application Configuration Manager, you can use an online resource storage service.14 Google Drive, OneDrive, and other online storage options are also valid. You can create a simple JSON file that holds the data that your application connects to. This data can contain the configuration information for that instance in time.
Summary
Automation is the core of DevOps and it helps teams reach their goals of publishing features quickly. This chapter was about the ways in which teams can achieve scalable automation. There are no best solutions, only useful solutions in the DevOps market. In this chapter, I used Azure DevOps to demonstrate a few steps in DevOps, but you can use any other DevOps solution, such as GitLab or Jenkins.
The introduction of version control systems was necessary to understand how a DevOps pipeline gets triggered on changes. The most important aspect of DevOps is IaC, which is a way to control the infrastructure deployments. We looked at Azure Resource Manager, but there are several other options, like Alibaba Cloud ROS.
We also discussed the automation pipelines and the stages of DevOps and CI/CD. We created a new pipeline in Azure DevOps. Then we connected our repository to DevOps and triggered a new build pipeline. We also created a new Release pipeline to deploy the solution to Microsoft Azure. DevOps build pipelines can also be used to analyze code for bad code standards or for code that is ignoring the code policies of an organization.
Feature flags were also introduced. They can help development teams deploy features at their own pace and help operations teams control access to the features themselves. One thing you might notice is that I did not talk much about security in this chapter. Security is not the cherry on the top, instead it should be the DNA of the software, build servers, and production environments. That is what I focus on in the next chapter. I talk about security for build systems, and how you can verify that the deployment environments are safe from external access. I use several concepts introduced earlier and some new interesting topics as well.