
In the software and machine learning world, it’s very important to learn and try the latest tools. If you don’t know how to use these productivity tools, you may waste a lot of time. This chapter will introduce the tools Apple provides to build ML applications easily for iOS developers. The frameworks and tools introduced in this chapter are Vision, VisionKit, Natural Language, Speech, Core ML, Create ML, and Turi Create. We will learn what capabilities these tools have to offer and what kind of applications we can build using them.
Vision
The Vision framework deals with images and videos. It offers a variety of computer vision and machine learning capabilities to apply to visual data. Some capabilities of the Vision framework include face detection, body detection, animal detection, text detection and recognition, barcode recognition, object tracking, image alignment, and so on. I will mention the main features and methods considering some hidden gems of iOS that you may not have heard of. As this book focuses on text processing, it won’t cover the details of image processing. If you need more information related to computer vision algorithms, you can find the details and sample projects on the Apple Developer website.
Face and Body Detection
Vision has several request types for detecting faces and humans in images. I will mention some of the requests here to recall what Apple provides with built-in APIs. VNDetectFaceRectanglesRequest is used for face detection which returns the rectangles of faces detected in a given image yaw angle. It also provides a face’s yaw and roll angles. VNDetectFaceLandmarksRequest gives you the location of the mouth, eyes, face contour, eyebrow, nose, and lips. VNDetectFaceCaptureQualityRequest captures the quality of the face in an image that you can use in selfie editing applications. There is a sample project, namely, “Selecting a Selfie Based on Capture Quality,” which compares face qualities across images.
VNDetectHumanRectanglesRequest detects humans and returns the rectangles that locate humans in images.
Face Detection Request
Image Analysis
With the built-in image analysis capabilities, you can create applications that understand what is in the image. You can detect and locate rectangles, faces, barcodes, and text in images using the Vision framework. If you want to dig deeper, Apple offers a sample project where they show how to detect text and QR codes in images.
Apple also offers a built-in ML model that can classify 1303 classes. It has many classes from vehicles to animals and objects. Some examples are acrobat, airplane, biscuit, bear, bed, kitchen sink, tuna, volcano, zebra, and so on.
Built-in Image Classes
Image Classification
Create a Feature Print of an Image
Feature Print

Comparing Image Distances
You can find the full code sample of the Swift playground in the link found in the corresponding footnote.2
Text Detection and Recognition
To detect and recognize text in images, you don’t need any third-party framework. Apple offers these capabilities with the Vision framework.
You can use VNDetectTextRectanglesRequest to detect text areas in the image. It returns rectangular bounding boxes with origin and size. If you want to detect each character box separately, you should set the reportCharacterBoxes variable to true.
The Vision framework also provides text recognition (optical character recognition) capability which you can use to process text from scanned documents or business cards.

Text Recognition Results
Text Recognition
Text recognition request has a recognitionLevel property which is used to trade off between accuracy and speed. You can set it accurate or fast.
Other Capabilities of Vision
Image Saliency
Horizon detection lets us determine the horizon angle in the image. With this request (VNDetectHorizonRequest), you can get the image angle and the CGAffineTransform required to fix the image orientation. You can also use VNHomographicImageRegistrationRequest to determine the perspective warp matrix needed to align two images.
Another capability of Vision is object recognition. You can use the built-in VNClassifyImageRequest to detect objects, or you can create a custom model using Create ML or Turi Create if you want to train on your own image dataset.
VisionKit
- 1.
Present the document camera as shown in Listing 2-8.
Instantiate Document Camera
- 2.
Implement the VNDocumentCameraViewControllerDelegate to receive callbacks as shown in Listing 2-9. It returns an image of each page with the following function.
Capture Scanned Document Images
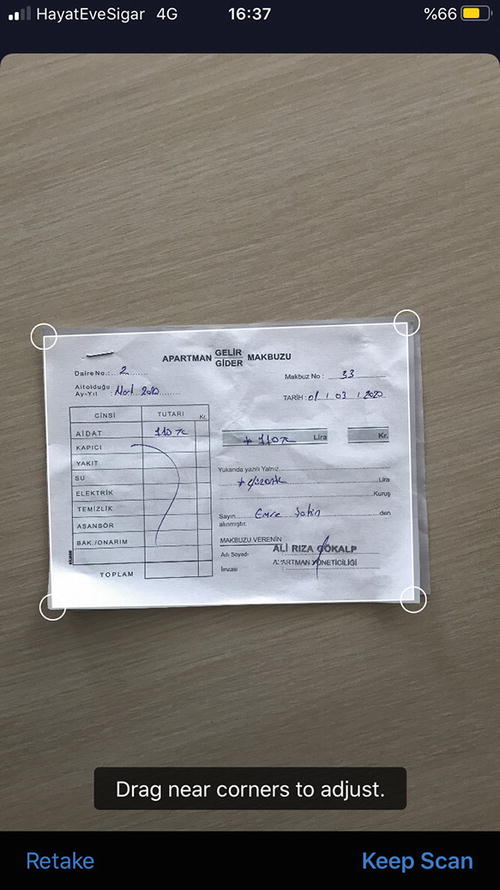
Built-in Document Scanner
Natural Language
The Natural Language framework lets you analyze text data and extract knowledge. It provides functions like language identification, tokenization (enumerating words in a string), lemmatization, part-of-speech tagging, and named entity recognition.
Language Identification
Language Recognition
Tokenization
Enumerating Words

Tokenization
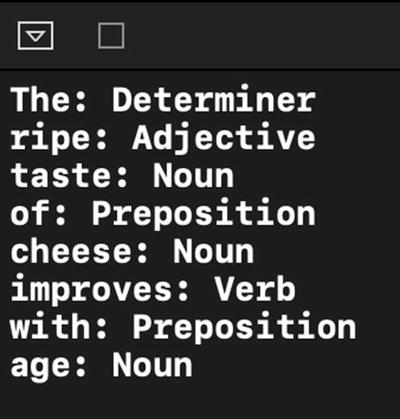
Part-of-Speech Tagging
To understand the language better, we need to identify the words and their functions in a given sentence. Part-of-speech tagging allows us to classify nouns, verbs, adjectives, and other parts of speech in a string. Apple provides a linguistic tagger that analyzes natural language text called NLTagger.
Word Tagging
Determining Word Types
When using NLTagger, depending on the type that you want to detect, you can specify one or more tag schemes (NLTagScheme) as a parameter. For example, the tokenType scheme classifies words, punctuations, and spaces; and the lexicalClass scheme classifies word types, punctuation types, and spaces.
While enumerating the tags, you can skip the specific types (e.g., by setting the options parameter). In the preceding code, the punctuations and spaces options are set to [.omitPunctuation, .omitWhitespace].
NLTagger can detect all of these lexical classes: noun, verb, adjective, adverb, pronoun, determiner, particle, preposition, number, conjunction, interjection, classifier, idiom, otherWord, sentenceTerminator, openQuote, closeQuote, openParenthesis, closeParenthesis, wordJoiner, dash, otherPunctuation, paragraphBreak, and otherWhitespace.
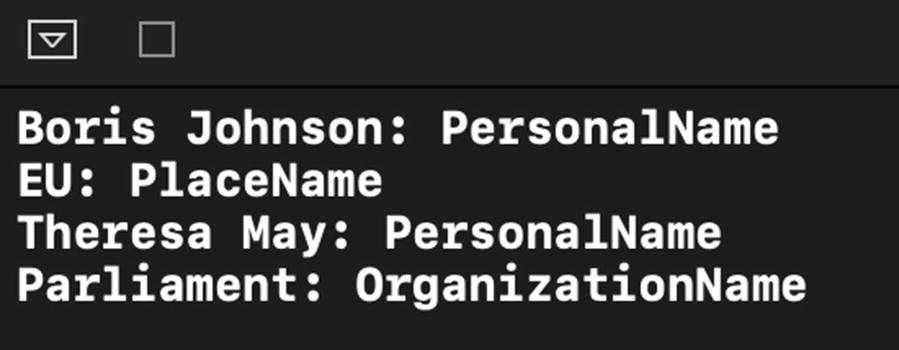
Identifying People, Places, and Organizations
NLTagger also makes it very easy to detect people’s names, places, and organization names in a given text.
Finding this type of data in text-based apps opens new ways to deliver information to users. For example, you can create an app that can automatically summarize the text by showing how many times these names (people, places, and organizations) are referred to in that text (via blog, news article, etc.).
Identify People and Places
Here we use NLTagger again, but this time we set another option called joinNames, which concatenates names and surnames. To filter personal names, places, and organizations, we create an NLTag array.
Identifying People and Places
As you can see, we can deduce specific knowledge from text using iOS’s Natural Language framework.
NLEmbedding
Embedding in ML is used for mathematical representation of the given data. Here in Natural Language, it’s used for vector representation of a word. After you convert the word to a vector, you can do arithmetic calculations on it. For example, you can calculate the distance between words or sum them up. Calculating the distance between words lets you find similar words.
Measuring Distance Between Words
In the preceding code, we use wordEmbedding and specify its language. Distance calculation is done using distance function. The distance between “movie” and “film” is 0.64 and between “movie” and “car” is 1.21. As you see, similar words have less distance between them. With this distance calculation, you can create apps that cluster words according to similarity or create recommendation apps that can detect similar texts or titles. You can even create custom embeddings for any kind of string. For example, you could make embeddings of news titles and recommend new articles based on the previous interest of your users. To create custom embeddings, you can use Create ML’s MLWordEmbedding and export it as a file to use in your Xcode project. This will be covered later in the book after we learn Create ML.
Speech
The Speech framework provides speech recognition on live or prerecorded audio data. Using this framework, you can create transcriptions of spoken words in your apps. iOS built-in dictation support also uses speech recognition to convert audio data into text.
With this framework, you can create applications that understand verbal commands like Siri or Alexa. Apple says on-device speech recognition is available for some languages, but always assume that performing speech recognition requires network connection because this framework relies on Apple’s servers for speech recognition.
Speech Recognition
If you want the result block to be called with partial transcription results, you can set recognitionRequest.shouldReportPartialResults to true.
Core ML
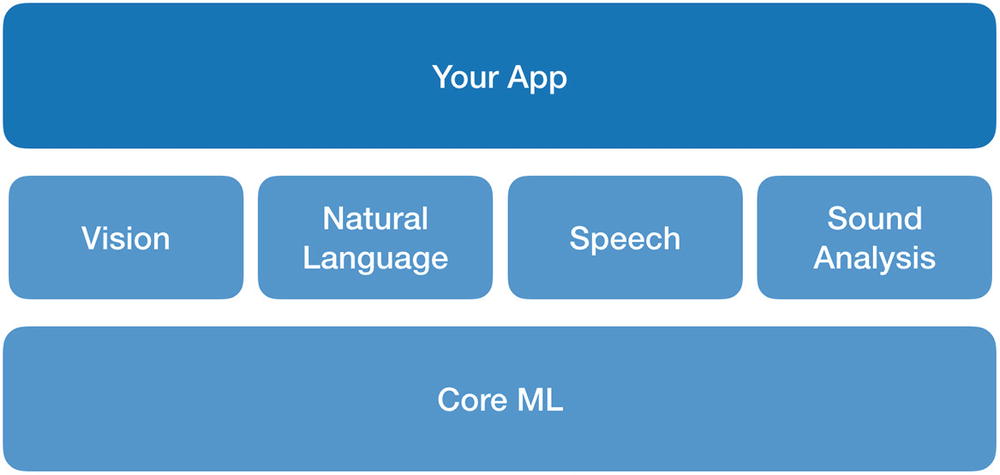
Core ML
As shown in Figure 2-7, Core ML is the underlying framework that powers Vision, Natural Language, Speech, and Sound Analysis frameworks.
A Python framework called coremltools was also made available to convert deep learning models from popular frameworks like Keras, Caffe, and scikit-learn to Core ML format.
To use coremltools, one needs to know Python. This created a learning barrier for iOS developers. To lower this barrier, Apple announced a simpler machine learning tool called Create ML in WWDC 2018.
Create ML
Create ML is a separate developer application like Xcode. It lets us create ML models easily, be it image classification, text classification, or sound classification. Thanks to this tool, iOS developers have fewer excuses for not developing smart iOS apps right now. Create ML and Xcode provide an end-to-end machine learning solution so developers can create their solutions all in Apple’s ecosystem.

Create ML
Create ML has ready-to-use templates to make training custom models easier. These templates include image classifier, object detector, sound classifier, activity classifier (motion classifier), text classifier, word tagger, tabular regressor, tabular classifier, and recommender. You can use Create ML as a separate application or as a framework in Swift Playgrounds.
Turi Create
To simplify the process of ML model training for developers, many decisions are done behind the scenes in Create ML. ML models have parameters that you can fine-tune to achieve better accuracy. If you are not satisfied with the choices Create ML offers and want more freedom over your ML models, you can use Turi Create.
In August 2016, Apple acquired Turi, a machine learning software startup, and open sourced and developed its library Turi Create. Turi Create is a Python framework that simplifies the development of custom machine learning models. You can export models from Turi Create for use in iOS, macOS, watchOS, and tvOS apps.
It supports a variety of data types: text, image, audio, video, and sensor data. You can create many different types of custom ML models using Turi Create. Some of them are text classification, image classification, object detection, regression (prediction of numeric values), clustering, activity classification, style transfer, and so on.
For text classification, it offers some preprocessing methods to clean the text data before training. For example, you can remove some words that have a small frequency or remove common words, for example, “and,” “the,” and so on (generally called stop words in the ML world).
When we say text classification, often sentiment analysis comes to people’s minds, but there are many use cases. For instance, you can train a model on App Store app reviews and categorize the reviews as a feature request, complaint, compliment, and so on. Or you can determine the author of a piece of writing by training a model with writings. Anything you can imagine and have enough text samples of, you can train a classifier.
Another text processing capability of Turi Create is text analysis which lets us understand a large collection of documents. We can create “topic models” which are statistical models for text data. They represent documents with a small set of topics and can create a probability of any word to occur in a given “topic.” This way we can represent large documents with five to ten words or find words that likely occur together. We will learn how to use Turi Create to train text classification models or to create topic models in the next chapters.
In this chapter, we covered the tools and frameworks Apple provides for ML. We looked at how to use the Vision framework to recognize text, VisionKit to scan documents, Natural Language to understand a text, Core ML and Create ML to train custom models, and finally Turi Create to train models with more advanced techniques. In the next chapters, we will dive deeper and create intelligent applications using Natural Language.