In addition to third-party libraries that are written in C# and C/C++, MonoTouch can utilize libraries and code written in Objective-C. This makes MonoTouch extremely powerful, because you can draw functionality from a plethora of sources.
In this chapter, we're going to take a look at how to bind Objective-C libraries for use in MonoTouch using btouch, a tool that simplifies the binding process. In the process, your're going to get some real-world experience by walking through the process of binding the open source Tapku library.
The general process of binding Objective-C code for use in MonoTouch applications involves creating MonoTouch DLLs that "bind" the native code. This means creating C# classes to represent the Objective-C classes that invoke the underlying Objective-C selectors, wrap properties, and so on via the MonoTouch.Foundation classes and attribute syntax.
There are two ways to accomplish this. The first is the hard way, which involves writing all the binding classes and code by hand. You can find documentation on how to do this here http://monotouch.net/Documentation/Binding_New_Objective-C_Types/Binding_Details.
I'm not going to cover that in this book, though, because there's a much easier way to bind Objective-C libraries: using btouch.
The easiest way to use Objective-C libraries is to use a utility tool created by the MonoTouch team called btouch. It works by automatically generating a MonoTouch DLL that wraps the library for you based on an API Definition File that you create to describe the binding. You can also provide to it C# source files of any additional helper classes, enums, and the like that you write to expand the binding and make it easier to use.
Once you have generated your wrapped DLL, you can then reference it in your project, along with the original .a file that contains the Objective-C library, and use it as you would any other .NET library. See Figure 22-1.

You can find really good documentation on creating API Definition Files and using btouch at http://monotouch.net/Documentation/Binding_New_Objective-C_Types.
Instead of duplicating the coverage that the team gives there on btouch, this chapter instead serves as a practical companion to understanding the process of using the rules described in the documentation.
The workflow of this process generally involves the following steps:
Compile library in Xcode: If the library isn't already built, you need to open it in Xcode and build it. The resulting assembly is a static library (.a) file.
Create API definition: Create the API definition file as well as any helper classes, enums, and so on that will make up the MonoTouch usable DLL.
Run btouch: btouch will create a DLL from the source files and API definition that you give it.
Add the Objective-C library to your project: Copy the .a file(s) into the project.
Reference the DLL: Add the btouch-generated DLL as a reference in your project.
Configure build: Add special compiler flags to the build that load the Objective-C library as a source.
Let's examine this process step by step by actually binding a library. In this case, we're going to use btouch to create a MonoTouch usable library of Tapku.
Before we get too far along in this process, it's important to get a basic Objective-C overview. It's a very different language than C# (or even C/C++ for that matter), and binding it is a lot easier if you know a little bit about it.
The intent of this primer is to give you enough of a background in Objective-C to be able to bind it, but it is by no means exhaustive. For a complete Objective-C primer, check out Learning Objective-C: A Primer in the development documentation, or at http://developer.apple.com/library/mac/#referencelibrary/GettingStarted/Learning_Objective-C_A_Primer/_index.html.
Additionally, Wikipedia has a great article on Objective-C that compares its syntax to C and C++. You can find it at http://en.wikipedia.org/wiki/Objective-c.
There are three types of files in Objective-C (and by extension, Xcode iOS projects). They are defined in Table 22-1.
Table 22.1. Objective-C File Types
I mention C and C++ because sometimes in iOS projects you'll those languages in addition to Objective-C.
Typically, you'll see a 1:1 relation between .h and .m files, because the .h files define what's in the .m files. This separation between definition and implementation is a legacy feature of the C language.
Objective-C has a class construct, just like C#, though it looks pretty different. As I mentioned earlier, classes are defined in header files.
Class definitions in Objective-C are preceded with an @interface declaration and are concluded with an @end declaration. There is typically then a code block delineated with brackets ("{" and "}"), which contain member variables. After the member variables, methods are declared, outside of the bracketed code block. Consider the class definition in Figure 22-2.

Objective-C looks a little strange if you're used to C, C++, or C#, but underneath it all it's not all that different.
Objective-C has both strong-typing (definitive/known types) of variables, and weak-typing. In Figure 22-2, the data variable is weakly-typed, which is signified by the id type. Just like in C#, there are both value types and reference types. Reference types are passed via pointer, which is what the asterisk ("*") after the NSString means. Weakly-typed variables are also passed via pointer reference, with the id type implying a pointer reference.
You very rarely need to look at the actual implementation when binding Objective-C methods, because really what you're interested in is the definition of classes, and the like.
Let's take a look at the method declarations next.
Methods are where the syntax of Objective-C really starts to diverge from traditional C-based languages. This is due to its legacy from NeXTSTEP OS (which Apple bought), which, in turn, owes a lot of its syntax from Smalltalk.
Instead of always calling methods on objects, most of the time in Objective-C, you pass messages to objects. This, while strange to those coming from C-based backgrounds, actually adds a tremendous amount of power to Objective-C, because it allows it to be more dynamic.
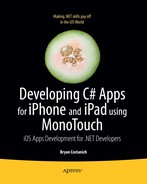
Consider the Objective-C method declaration in Figure 22-3.
As you can see, rather than grouping things together, Objective-C splits everything apart. To build the selector name for this method, we need to concatenate all of the method name keywords together, including the colons. So, for the previous method, the selector name would be what you see in Listing 22-1.
Figuring out the selector name is very important, because, as we'll see in moment, when exposing methods to C#, we must know the selector name of the Objective-C method.
When exposing this method as a C# method, it would literally translate to Listing 22-2.
Example 22.2. A literal translation of 22-4 into C#
public void InsertObjectAtIndex(NSObject anObject, uint index);
However, we would likely clean it up (following the .NET framework guidelines) and expose it as Listing 22-3.
Example 22.3. A sensible translation of 22-4 into C# following the .NET framework guidelines
public void Insert(NSObject item, int index);
I'm going to delve into this deeper in just a bit, but the important thing to grasp here is that when wrapping Objective-C, you need to know how to derive the selector name from the method declaration, and then you'll want to expose that via a sensible name in C# that fits to the .NET guidelines.
Instance methods are preceded with a dash ("-") and static methods are preceded with a plus ("+").
Remember, in Objective-C, you message objects rather than invoke their methods. Messages are wrapped in brackets ("[" and "]") and the object to be messaged is on the left side, and the message package is on the right.
For example, to call the previous method on an object called myArray, you would do the following (see Listing 22-4).
Example 22.4. Invoking an Objective-C method via a message
[myArray insertObject:someObject atIndex:0];
Objective-C also allows you to chain messages together to pass the result of messages in as parameters of other messages, as in Listing 22-5.
Unlike C#, Objective-C doesn't have true properties. Instead, it has getter and setter methods that can be auto generated by the compiler. For example, if you wanted a count property, you (or the compiler) would implement a count method for retrieval (getter), and a setCount method for persistence (setter). These pseudo-properties are declared, like any other method, in the header file, and are in the form "@property (optional attributes) Type name," as in Listing 22-6.
Example 22.6. Property declarations in Objective-C
@property BOOL flag;
@property (copy) NSString *nameObject;  // Copy the object during assignment.
@property (readonly) UIView *rootView;  // Declare only a getter method.
Properties can be given attributes that describe their behavior. Attributes fall into the following three categories:
Access level
Memory management
Thread-safety
There are two access-level properties, readwrite and readonly, which specify whether the property is readable and writeable (has both a getter and setter), or if it's only readable.
There are also three memory management attributes - assign, retain, and copy - that specify the semantics of how the memory is handled when the property is set.
Finally, the last attribute is NonAtomic, which specifies that the property does not do any thread-safe locking.
Later on, when we bind the Tapku library, we'll look at how these attributes are important; for now, we just need to be aware of them.
Property retrieval is performed with dot-notation, as in Listing 22-7.
However, setting a property can be performed either via a setter method (in the form of a message) that takes the form of setPropertyName, or dot-notation, as in Listing 22-8.
Example 22.8. Setting a property in Objective-C using a message and a dot-notation, respectively
[myObject setCount:5];
myObject.count = 5;
The compiler can generate the property getter and setter methods for you. To do this, you use the @synthesize keyword in your class implementation, as shown in Listing 22-9.
We covered protocols in the first section of this book, but as a quick review, protocols are similar to Interfaces in C#, with the following differences:
Protocols do not define instance variables.
Method declarations in protocols can be optional.
Protocols that a class conforms to (implements) are specified after the class name declaration in angle brackets < and >. For example, the class in Listing 22-10 implements the UIApplicationDelegate and AnotherProtocol protocols.
Example 22.10. Specifying that a class implements certain protocols
@interface MyClass : NSObject >UIApplicationDelegate, AnotherProtocol> {
}
@endProtocols are declared via the @protocol keyword. For example, Listing 22-11 defines a protocol for XML serialization.
Example 22.11. Declaring a protocol
@protocol MyXMLSupport
- initFromXMLRepresentation:(NSXMLElement *)XMLElement;
- (NSXMLElement *)XMLRepresentation;
@end
By default, any methods declared in a protocol are required, but you can also specify that a method be optional with the @optional keyword, as in Listing 22-12.
Example 22.12. Required and optional methods in a protocol
@protocol MyProtocol
- (void)requiredMethod;
@optional
- (void)anOptionalMethod;
- (void)anotherOptionalMethod;
@required
- (void)anotherRequiredMethod;
@end
Protocols are one of the most extensive features in Objective-C, and you may find while binding an Objective-C library that a protocol is more complicated than the rules presented here. In that case, I recommend reviewing the section on protocols in Apple's Objective-C programming language documentation at http://developer.apple.com/library/mac/#documentation/Cocoa/Conceptual/ObjectiveC/Chapters/ocProtocols.html.
Now that we're seasoned Objective-C experts (sarcasm), let's look at actually compiling an Objective-C library so that we can use it in MonoTouch.
The first step in the process of binding an Objective-C library to use in MonoTouch is to actually build the library. Objective-C libraries that you use in the iOS have their roots in Unix, and compile down to Static Object Code Library files. These files have an "a" file extension.
When doing iOS development, you actually need three .a files. One file should be built for the i386 architecture (instruction set). This file will be used by the iOS Simulator. The other files should be built for the ARMv6 and ARMv7 architecture, which will be used by the actual devices (older devices only run v6, whereas the new devices run v6 and v7).
Note
ARCHITECTURE? WHAT? Different CPUs have different sets of instructions that they understand. Each common set of instructions is called an architecture. Most computers these days use the i386 instruction set, which has remained unchanged since the Intel 386 CPU. However, mobile devices typically use a smaller, optimized set of instructions that allow the chips to be smaller and draw less power. iDevices are no different in this respect; for example, the iPhone 3G and earlier only understand the ARMv6 instruction set, whereas the iPhone 4 and iPad and iPad 2 can run both ARMv6 and ARMv7 code. However, Apple throws a bit of a monkey wrench into the situation even more by requiring ARMv7 code be run on newer devices, even though they support ARMv6.
If you just have some Objective-C code, and don't have an Xcode library project, then you'll need to create one. You can find instructions on how to create Xcode library projects in the Xcode developer documentation at http://developer.apple.com/library/ios/#documentation/ToolsLanguages/Conceptual/Xcode4UserGuide/Introduction/Introduction.html.
We are going to use the Tapku library, which can be download from Github at https://github.com/devinross/tapkulibrary. Click the Downloads button to have Github assemble and zip the source code into an archive.
When you download and unzip the file, you should see two folders: src and universaldemo. The src folder contains the library project that we'll compile, and the universaldemo folder contains a sample iOS application that demos the library.
Open the TapkuLibrary.xcodeproj file in the src folder. Xcode should open up and you should see something like Figure 22-4.

In the upper left, you can set your current build target. If you click on it and don't have the options you see in Figure 22-5, you probably need to change the SDK target to be the iOS SDK.
To change the base SDK target, click on the Project menu and then choose Edit Project Settings. Then, in the Base SDK setting, choose Latest iOS..., as shown in Figure 22-6.

This will set the library to build against the iOS SDK (as opposed to the Mac OSX SDK, which is usually the default). Due to a bug in Xcode, you may have to close the project and re-open it, for the SDK changes to go into effect.
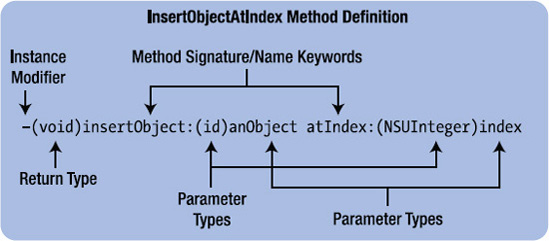
Once the SDK is set, we need to build the library. First we need to set our build options (via the dropdown shown in Figure 22-7).
We'll want to change the Active Configuration to Release, since it's smaller and faster (and, at this point, the Objective-C code should already be tested and stabilized).
In the case of the Tapku library, we also need to change the Active Target to the TapkuLibrary. There is a second target called TapkuLibraryExtra, which will build another library with extra features in addition to the base library. For the purposes of this example, we only need the main library.
Finally, make sure that armv6 is selected, and then choose Device. Your build options should now look like Figure 22-7.

We're now ready to build. You can either select the Build menu, then Build, or you can just press Command(
When the build is complete, there should be a new folder called "build" in the src folder. In it will be the build outputs arranged into folders named per the configuration. You should see a folder called "Release-iphoneos," and in it, a file called libTapkuLibrary.a.
We want to also build for armv7, but unfortunately it'll put the .a file into the same output directory as the armv6 build, so rename this directory Release-iphoneos armv6 and copy it to a folder somewhere, then change your build version to armv7, and repeat the build steps. Then, rename the output directory Release-iphoneos armv7 and copy that folder to the same place you put the armv6 folder. Now you have both device architectures built.
Now that we have the library built for the device architectures, we also want to build one for the simulator, so change the build option to Simulator and rebuild. You should now see a Release-iphonesimulator folder in the build folder, along with the new library.
Now that we have our library built for all of our architectures, we need to stitch them all together into one single .a file. Mac OSX ships with a command utility called LIPO that allows you to combine multiple architectures of a library into a single "fat" assembly.
LIPO can be executed via a terminal window. To use LIPO to combine builds, use the -create argument and pass an -arch [archtype] [sourcefilename] argument for each architecture you want to include, and specify an -output [filename] argument to specify the output file. For example, the following command will combine an i386, ARMv6, and ARMv7 build into one library, as in Listing 22-13.
Example 22.13. Using LIPO to combine different architecture builds of a library into one
lipo -create -arch i386 "../Release-iphonesimulator/libTapkuLibrary.a"
        -arch armv6 "../Release-iphoneos armv6/libTapkuLibrary.a"
        -arch armv7 "../Release-iphoneos armv7/libTapkuLibrary.a"
        -output ./libTapkuLibrary.a
For more information on LIPO, check out the documentation at http://developer.apple.com/library/mac/#documentation/Darwin/Reference/ManPages/man1/lipo.1.html.
An API definition file is just a C# file that contains a set of interfaces that define the contracts that the btouch tool will use to create your wrapper DLL that calls the underlying Objective-C library.
For example, the API definition file in Listing 22-14 is pulled from the btouch how-to on the MonoTouch.net site and provides a contract for the Cocos2D.Camera object.
Example 22.14. A sample API definition file to build a wrapper for the Cocos2D Camera class
using MonoTouch.Foundation;
namespace Cocos2D
{
        //---- Camera class contract
        [BaseType (typeof (NSObject))]
        interface Camera
        {
                //---- Property Definitions
                [Static, Export ("getZEye")] float ZEye { get; }
//----- Method Contracts
[Export ("restore")] void Restore ();
[Export ("locate")] void Locate ();
[Export ("setEyeX:eyeY:eyeZ:")] void SetEyeXYZ (float x, float y
, float z);
[Export ("setMode:")] void SetMode (CameraMode mode);
}
}When you run btouch, it will look at this API definition file and create a Camera class in the Cocos2D namespace and implement a read-only property called ZEye, and a number of methods. The property and methods will automatically call or invoke the appropriate items in the Objective-C library based on the attribution defined in the Interface.
As I mentioned before, the MonoTouch team has written a very good reference on how to write API Definition Files, which you can find at http://monotouch.net/Documentation/Binding_New_Objective-C_Types. Instead of rehashing their excellent work, I'm going to stick to a high-level look at the process and cover the practicalities of how to do this in practice. I recommend having that page open and, as we go through the exercise of binding the Tapku library, read the appropriate section for the type of item we are binding. That will serve as a reference for the discussion that will follow.
There's one thing missing in the previous example. Notice that the SetMode method takes a CameraMode type. I mentioned earlier that, in addition to the API definition file, you might want to write some extra code to help create a more useful binding to use. In this case, we would want to create a CameraMode enumeration that describes the camera mode that we pass to SetMode. So for instance, we might create an enums.cs file and place the Listing 22-15 in it.
Example 22.15. Creating an enumeration to use in addition to the API definition file
public enum CameraMode
{
        FlyOver,
        Back,
        Follow
}
We could create a CameraMode.cs file rather than an enums.cs file, but we'd have to pass all our extra files btouch via command-line arguments when we execute it, so it's easier to just create one file for all enumerations.
In addition to enumerations, you might also need to define any other types, structs, and so on.
Additionally, you often need to add functionality to the classes that are generated via the API definition file. However, since the API definition file can only contain interfaces, not implementation, you can add functionality by creating a partial class definition. For instance, if we wanted to add a ToString method to the Cocos2D.Camera class, we could create write the following, and put it in a classes.cs file, as in Listing 22-16.
Example 22.16. Creating a partial class definition to expand on the classes automatically generated
namespace Cocos2D
{
        public partial class Camera
        {
                //---- Provide a ToString method
                public override string ToString ()
                {
                        return String.Format ("ZEye: {0}", ZEye);
                }
        }
}
As with the enums.cs file, we would pass our classes.cs file as an argument when we run btouch, and it would get compiled into our assembly.
Tip
Partial classes are also a good place to put triple-slash documentation, since btouch will ignore any documentation you put in the API definition file.
Now that we have a good understanding of how the pieces fit together, let's look at the practical exercise of actually creating the API definition file and associated code.
Wrapping an Objective-C library can be a big undertaking, especially if the library is large. For this reason, it's best to undertake it in stages. I recommend starting with just the pieces that you need. Let's start with Tapku's Coverflow control (TKCoverflowView).
In order to create an API definition file, you have to figure out what you're wrapping. In fact, this is the trickiest part of binding to Objective-C libraries. Even with good documentation, you almost always have to look at the source. We'll see an example of this in just a bit. Let's start with the documentation. You can find the Tapku documentation at https://github.com/devinross/tapkulibrary/wiki/. If you click on "Coverflow" under the "Classes Overview" section, it gives you a rundown of what constitutes the TKCoverflowView class.
Compared to most, this is actually pretty good documentation.
The first thing we want to do is create an interface for the TKCoverFlowView class; however, in looking at the documentation, it doesn't say what it derives from. Off to the code we go. If you open up the TKCoverflowView.h file in Xcode, you'll see that it has the declaration shown in Listing 22-17.
Example 22.17. The TKCoverflowView declaration in the TKCoverflowView header file
@interface TKCoverflowView : UIScrollView <UIScrollViewDelegate>
From this, we see that TKCoverflowView derives form UIScrollView, and implements the UIScrollViewDelegate protocol. So we can start our Tapku.cs API definition file as shown in Listing 22-18.
Example 22.18. The beginnings of a Tapku API definition file
using System;
using MonoTouch.Foundation;
using MonoTouch.CoreFoundation;
namespace Tapku
{
        [BaseType(typeof(UIScrollView))]
        interface TKCoverFlow
        {

        }
}
By the way, if you haven't taken a look at the documents on creating an API definition file at http://monotouch.net/Documentation/Binding_New_Objective-C_Types, now is a good time to do so.
As you bind a class, you'll find that you often have to bind other things first. Tapku's cover flow control is no different. If we go back to the TKCoverflowView documentation, it looks like there are the following several other classes that we'll need to create before we finish the TKCoverflowView binding:
TKCoverflowViewDelegateTKCoverflowViewDataSourceTKCoverView
TKCoverView is pretty straightforward; it just has a couple of properties. However, the delegate and data source are a bit different. We want to be sophisticated, so we want to expose the delegate's methods as events on the TKCoverflowView class. Additionally, the data source is a protocol, so that's a little different as well.
Let's start with TKCoverView. We need to figure out what it derives from, which isn't in the docs. If we pop back over to Xcode and try to find a TKCoverView.h file, there isn't one. It turns out the docs are wrong, and there is in fact a TKCoverflowCoverView class, rather than TKCoverView, and it derives from UIView (which makes sense). As you can see, while docs are good at giving you an idea of how to bind (or even use) a library, you really have to look at the source for an authoritative, accurate, answer.
Furthermore, if we look at the TKCoverflowCoverView.h file, we see the property declarations shown in Listing 22-19.
Example 22.19. TKCoverflowCoverView property declarations
@property (retain,nonatomic) UIImage *image;
@property (assign,nonatomic) float baseline;
I mentioned earlier in the Objective-C primer that properties can be decorated with attributes that describe their behavior, and that there were three categories of property attributes; access level, memory management, and thread-safety. When binding, we only care about the first two.
Access level attributes describe whether the property is read- only. By default, unless a property is attributed with the read-only attribute, it's both readable and writeable, so we should declare both a get; and a set; for it. If it's read-only, we should only declare a get;.
The memory-management attributes specify how the memory is managed when the property is set. When wrapping Objective-C properties, we should use the ArgumentSemanticAttribute to describe how to wrap the properties. The ArgumentSemanticAttribute has three values that map to the Objective-C attributes: Assign, Retain, and Copy.
In the case of Listing 22-19 the properties have the retain and assign keywords, respectively. Those aren't in the docs, but as I just mentioned, they're important for binding. This is another example of why we need to look at the source to do a proper binding.
According to the API definition file documentation, this class should translate to what you see in Listing 22-20.
Example 22.20. (Mostly) complete TKCoverflowCoverView API definition
// @interface TKCoverflowCoverView : UIView
[BaseType(typeof(UIView))]
interface TKCoverflowCoverView
{
        // @property (retain,nonatomic) UIImage *image;
        [Export("image", ArgumentSemantic.Retain)]
        UIImage Image { get; set; }

        // @property (assign,nonatomic) float baseline;
        [Export("baseline", ArgumentSemantic.Assign)]
        float Baseline { get; set; }
}
I've put in the original Objective-C definitions to show what has been bound where.
This class looks finished, but there is one thing that's missing here. When you run btouch on an interface it creates a class, and in that class it creates the following standard constructors for you:
Foo ()Foo (NSCoder coder)Foo (IntPtr handle)Foo (NSEmptyFlag t)
This is great, but classes that derive from UIView should also generally implement a constructor that takes a RectangleF frame parameter so you can set the frame when you initialize the view.
For this reason, we need to also add Listing 22-21 to our TKCoverflowCoverView interface.
Example 22.21. UIViews generally should get an initWithFrame constructor
[Export("initWithFrame:")]
IntPtr Constructor(RectangleF frame);
Our completed TKCoverflowCoverView API Definition should now look something like Listing 22-22.
Example 22.22. Complete TKCoverflowCoverView API definition
// @interface TKCoverflowCoverView : UIView
[BaseType(typeof(UIView))]
interface TKCoverflowCoverView
{
        [Export("initWithFrame:")]
        IntPtr Constructor(RectangleF frame);

        // @property (retain,nonatomic) UIImage *image;
        [Export("image", ArgumentSemantic.Retain)]
        UIImage Image { get; set; }

        // @property (assign,nonatomic) float baseline;
        [Export("baseline", ArgumentSemantic.Assign)]
        float Baseline { get; set; }
}
Now that we've got the TKCoverflowCoverView bound, let's bind the TKCoverflowDataSource.
TKCoverflowDataSource is a fairly straightforward class to bind. It has only one method, coverAtIndex, which passes a reference to the coverflow control that is calling it, and an index parameter (as in integer) and expects a coverflowView in return. Once again, I've included the original Objective-C definitions as comments in the API definition for clarity (see Listing 22-23).
Example 22.23. Complete TKCoverflowDataSource API definition
// @protocol TKCoverflowViewDataSource <NSObject>
[BaseType (typeof (NSObject))]
[Model]
interface TKCoverflowViewDataSource
{
        // @required
        // - (TKCoverflowCoverView*) coverflowView:(TKCoverflowView*)coverflowView
                coverAtIndex:(int)index;
        [Export("coverflowView:coverAtIndex:"), Abstract]
        TKCoverflowCoverView GetCover(TKCoverflowView coverflowView, int index);
}
Remember from our Objective-C primer, earlier in the this chapter, that the selector name is actually the combination of the method keywords. For instance, we need to derive the selector from Listing 22-24.
Example 22.24. Sample Objective-C method signature
- (TKCoverflowCoverView*) coverflowView:(TKCoverflowView*)coverflowView coverAtIndex:(int)index
Therefore, the full name of the selector would be what you see in Listing 22-25.
Example 22.25. Objective-C method signature translated to a selector name
coverflowView:coverAtIndex:
As you can see, even though the selector that we're wrapping is coverflowView:coverAtIndex:, we've exposed it as GetCover in order to be consistent with the .NET framework design guidelines. As a by-product, we're also more consistent with the MonoTouch framework; for example, UITableViewDataSource is a similar class and has a get GetCell method.
There's also one other thing that's interesting in there. I've provided an Abstract attribute. Because the method in the prototype is marked as @Required, we need btouch to actually create an implementation for the method. The Abstract attribute tells btouch to mark the method as abstract, which will force the user of the wrapper DLL to actually implement a method body.
Let's take a look at the delegate next.
TKCoverflowViewDelegate is a little more complicated. It has two methods: coverAtIndexWasBroughtToFront: and coverAtIndexWasDoubleTapped: We want to rename these methods to get rid of the redundancy of AtIndex, and we also want to expose them as events on the TKCoverflowView class.
Renaming is easy enough - we can name them whatever we want as long as the ExportAttribute is correct. However, exposing them as events is a two-part process. When we finish binding TKCoverflowView, we're going to add some special attribution to tell it to look to the delegate interface to see what to expose as events. This means that, on our delegate interface, we need to specify what kind of event args the methods will use when they're turned into events.
By specifying the EventArgsAttribute, we do just that. For example, by adding EventArgs("Foo"), btouch will create a FooEventArgs class. For a more in-depth discussion, see the btouch documentation at http://monotouch.net/Documentation/Binding_New_Objective-C_Types.
Following our binding rules, our TKCoverflowViewDelegate API definition should then look something like Listing 22-26.
Example 22.26. Complete TKCoverflowViewDelegate API definition
// @protocol TKCoverflowViewDelegate <NSObject>
[BaseType (typeof (NSObject))]
[Model]
interface TKCoverflowViewDelegate
{
        // @required
        // - (void) coverflowView:(TKCoverflowView*)coverflowView
                coverAtIndexWasBroughtToFront:(int)index;
        [Export("coverflowView:coverAtIndexWasBroughtToFront:"), EventArgs ("Coverflow")
                , Abstract]
        void CoverWasBroughtToFront(TKCoverflowView coverflowView, int index);

        // @optional
        // - (void) coverflowView:(TKCoverflowView*)coverflowView
                coverAtIndexWasDoubleTapped:(int)index;
        [Export("coverflowView:coverAtIndexWasDoubleTapped:"), EventArgs ("Coverflow")]
        void CoverWasDoubleTapped(TKCoverflowView coverflowView, int index);

}
Notice that only the required method gets the Abstract attribute.
Also, by specifying the "Coverflow" as the value to the EventArgs attribute, btouch will automatically declare those events as you see in Listing 22-27.
Example 22.27. Event declarations generated by btouch
public event EventHandler<CoverflowEventArgs> CoverWasBroughtToFront;
public event EventHandler<CoverflowEventArgs> CoverWasDoubleTapped;
The CoverflowEventArgs are automatically generated based on the parameters in the method declaration. So in this case, they'll get generated as you see in Listing 22-28.
Example 22.28. Custom EventArgs generated by btouch
public class CoverflowEventArgs : EventArgs
{
        public CoverflowEventArgs (int index);
        public int Index { get; set; }
}
As you can see, btouch is extremely powerful and saves you lots of work from hand-binding APIs.
Okay, now that we have the peripheral classes bound, we can finish our TKCoverflowView binding.
I mentioned before that exposing delegate methods as events is a two-part process. We've already seen the first part, which actually defines the events and custom EventArgs; now we're going to look at the second part: telling btouch to which class those events should actually be attached to.
To do this, we attribute a class with an Events attribute that expects an array of Type objects of what classes to look for the event methods in. It then adds the events that it finds to whatever class that Events attribute is on. For instance, we want to expose the methods in TKCoverflowViewDelegate on our TKCoverflowView class, we would add the attribute in Listing 22-29 to the TKCoverflowView interface.
Example 22.29. Specifying what classes to look into to create events from their methods
Events=new Type [] { typeof (TKCoverflowViewDelegate)}With that in mind, and what we've learned with the other classes, we can now bind our TKCoverflowView class. See Listing 22-30.
Example 22.30. Complete TKCoverflowView API definition
// @interface TKCoverflowView : UIScrollView <UIScrollViewDelegate>
[BaseType(typeof(UIScrollView), Delegates=new string [] { "Delegate" }
        , Events=new Type [] { typeof (TKCoverflowViewDelegate)})]
interface TKCoverflowView
{
        //==== constructors
        [Export("initWithFrame:")]
        IntPtr Constructor(RectangleF frame);


        //==== Properties

        // @property (nonatomic, assign) CGSize coverSize; // default 224 x 224
        [Export("coverSize", ArgumentSemantic.Assign)]
        SizeF CoverSize { get; set; }

        // @property (nonatomic, assign) int numberOfCovers;
        [Export("numberOfCovers", ArgumentSemantic.Assign)]
        int NumberOfCovers { get; set; }

        // @property (nonatomic, assign) float coverSpacing;
        [Export("coverSpacing", ArgumentSemantic.Assign)]
        float CoverSpacing { get; set; }

        // @property (nonatomic, assign) float coverAngle;
        [Export("coverAngle", ArgumentSemantic.Assign)]
        float CoverAngle { get; set; }


        //==== Methods

        // - (TKCoverflowCoverView*) dequeueReusableCoverView;
        [Export("dequeueReusableCoverView")]
        TKCoverflowCoverView DequeueReusableCoverView();

        // - (TKCoverflowCoverView*) coverAtIndex:(int)index;
        [Export("coverAtIndex:")]
        TKCoverflowCoverView GetCover(int index);

        // - (int) indexOfFrontCoverView;
        // bind this as a read-only property
        [Export("indexOfFrontCoverView")]
int FrontCoverIndex { get; }
// - (void) bringCoverAtIndexToFront:(int)index animated:(BOOL)animated;
[Export("bringCoverAtIndexToFront:animated:")]
void BringCoverToFront(int index, bool animated);
//==== Prototype properties
// @property (nonatomic, assign) id <TKCoverflowViewDelegate> delegate;
// hides the underlying delegate property, so we need to add the new attribute
[Export("delegate", ArgumentSemantic.Assign), New]
TKCoverflowViewDelegate Delegate { get; set; }
// @property (nonatomic, assign) id <TKCoverflowViewDataSource> dataSource;
[Export("dataSource", ArgumentSemantic.Assign)]
TKCoverflowViewDataSource DataSource { get; set; }
}Most of this is pretty straightforward; there are really only two new things here. The first is shown in Listing 22-31.
Example 22.31. Exposing a method as a read-only property
[Export("indexOfFrontCoverView")]
int FrontCoverIndex { get; }
indexOfFrontCoverView is a method, but we expose it as a read-only property, since it has no parameters and really seems like a property more than a method. I liken this to SelectedItem in a dropdown or something like that.
The second thing we did differently here is to use a New attribute on the Delegate property, as in Listing 22-32.
Example 22.32. Using a New attribute to mark an implementation with the new keyword
[Export("delegate", ArgumentSemantic.Assign), New]
TKCoverflowViewDelegate Delegate { get; set; }
UIView already has a Delegate property, so the New attribute tells btouch to mark the property with the new keyword when it generates it.
This is as far as you need to take the binding to get it to work. However, if you want maximum flexibility in how to wire up the delegate methods in MonoTouch, you should follow the weak-delegate pattern. I cover the pattern extensively in Chapter 6, but briefly, it allows the consumers of the library to either assign a strongly-typed-delegate on the object, or use any class that has the appropriate methods.
Following the weak-delegate pattern is very easy; we just have to do the following tweaks:
For example, our delegate property declarations following the weak-delegate pattern would look like Listing 22-33.
Example 22.33. Implementing the weak-delegate pattern
[Export ("delegate", ArgumentSemantic.Assign), New][NullAllowed]
NSObject WeakDelegate { get; set; }

[Wrap ("WeakDelegate"), New]
TKCoverflowViewDelegate Delegate { get; set; }
Very simple!
That seemed like a lot, because I narrated the process fairly thoroughly, but the entire binding necessary for a complete Tapku Coverflow usage is now done. I've included it here to show the entire thing altogether. I've stripped out the comments for brevity (see Listing 22-34).
Example 22.34. The complete binding necessary to use the Tapku Coverflow control
using System;
using System.Drawing;
using MonoTouch.UIKit;
using MonoTouch.ObjCRuntime;
using MonoTouch.Foundation;
using MonoTouch.CoreFoundation;

namespace Tapku
{
        [BaseType(typeof(UIScrollView), Delegates=new string [] { "Delegate" }
                , Events=new Type [] { typeof (TKCoverflowViewDelegate)})]
        interface TKCoverflowView
        {
                [Export("initWithFrame:")]
                IntPtr Constructor(RectangleF frame);

                [Export("coverSize", ArgumentSemantic.Assign)]
                SizeF CoverSize { get; set; }

                [Export("numberOfCovers", ArgumentSemantic.Assign)]
                int NumberOfCovers { get; set; }

                [Export("coverSpacing", ArgumentSemantic.Assign)]
                float CoverSpacing { get; set; }

                [Export("coverAngle", ArgumentSemantic.Assign)]
                float CoverAngle { get; set; }

                [Export("dequeueReusableCoverView")]
                TKCoverflowCoverView DequeueReusableCoverView();
[Export("coverAtIndex:")]
TKCoverflowCoverView GetCover(int index);
[Export("indexOfFrontCoverView")]
int FrontCoverIndex { get; }
[Export("bringCoverAtIndexToFront:animated:")]
void BringCoverToFront(int index, bool animated);
[Export ("delegate", ArgumentSemantic.Assign), New][NullAllowed]
NSObject WeakDelegate { get; set; }
[Wrap ("WeakDelegate"), New]
TKCoverflowViewDelegate Delegate { get; set; }
[Export("dataSource", ArgumentSemantic.Assign)]
TKCoverflowViewDataSource DataSource { get; set; }
}
[BaseType(typeof(UIView))]
interface TKCoverflowCoverView
{
[Export("initWithFrame:")]
IntPtr Constructor(RectangleF frame);
[Export("image", ArgumentSemantic.Retain)]
UIImage Image { get; set; }
[Export("baseline", ArgumentSemantic.Assign)]
float Baseline { get; set; }
}
[BaseType (typeof (NSObject))]
[Model]
interface TKCoverflowViewDataSource
{
[Export("coverflowView:coverAtIndex:"), Abstract]
TKCoverflowCoverView GetCover(TKCoverflowView coverflowView, int index);
}
[BaseType (typeof (NSObject))]
[Model]
interface TKCoverflowViewDelegate
{
[Export("coverflowView:coverAtIndexWasBroughtToFront:")
, EventArgs ("Coverflow"), Abstract]
void CoverWasBroughtToFront(TKCoverflowView coverflowView, int index);
[Export("coverflowView:coverAtIndexWasDoubleTapped:")
, EventArgs ("Coverflow")]
void CoverWasDoubleTapped(TKCoverflowView coverflowView, int index);
}
}Now that we have a completed binding, lets run btouch to generate our DLL.
Actually running btouch is very easy. It's a command-line executable that can be found in the /Developer/MonoTouch/usr/bin/ directory. To run it, open a terminal window (open Spotlight and type Terminal, or find it in the Applications directory), change directories to where your API Definition File is, and execute the following:
/Developer/MonoTouch/usr/bin/btouch [API Definition File Name]
    -s:[any other source file names]
For instance, if you've named the API Definition File for Tapku, tapku.cs, your command line instruction would look like Listing 22-35.
If btouch doesn't have any errors, it will exit silently, as shown in Figure 22-8.:

The dll will be output to the current directory, and will have the same name as the API definition file, except with a ".dll" extension. For btouch command help, you can run btouch -h.
Once you've built the library and the wrapper DLL, you need to add them to your project. Let's look at adding the library first.
Earlier, we built three versions of the Tapku Library: two for the device and one for the simulator, and then used LIPO to stick them all into a single .a file. In order to use it, we need to add it to our project. See Figure 22-9.

As you can see, I've created a TapkuLib folder and in it I have added both the library and the wrapper dll. I've added the wrapper dll to the project just to keep track of it.
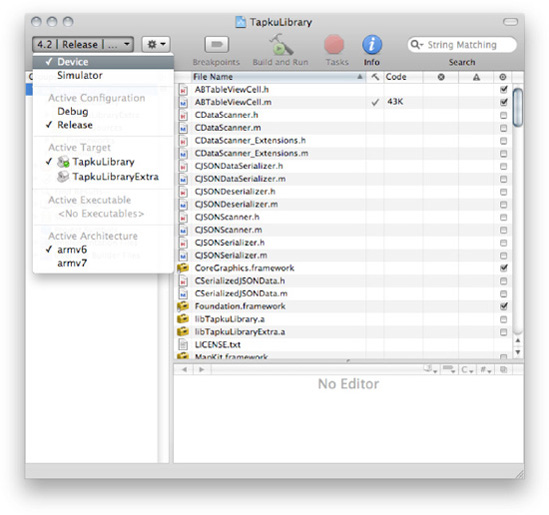
Next, we need to reference the DLL we generated with btouch.
You can reference the btouch-generated wrapper DLL as you would any other MonoTouch library. Just follow these steps:
Right-click on the References folder and choose Edit References.
In the dialog, choose the .NET Assembly tab and browse to the Tapku.dll file that we copied to the TapkuLib folder.
Double-click on the DLL, and it should show up in the Selected references pane shown in Figure 22-10.
Once you've referenced the DLL, you're almost ready to use it. There is one final step.
Even though you've added the Objective-C library to the project, it won't actually get compiled unless you tell the MonoTouch compiler to look for it and load it.
To do this, you need to edit the iPhone Build options in the Project Options dialog (right-click on the project and choose options).
We're going to add some information to the Extra Arguments field to let the MonoTouch compiler know that we'd like it to load our Objective-C library, and where to find it.
We need to specify the extra arguments for each build configuration and platform. See Figure 22-11.

We're going to use the arguments in Listing 22-36.
Example 22.36. Arguments to load the simulator version of the Tapku library
-v -v -v -gcc_flags "-framework QuartzCore -L${ProjectDir}/TapkuLib -lTapkuLibrary
        -force_load ${ProjectDir}/TapkuLib/libTapkuLibrary.a"
Note that ${ProjectDir} is a macro that that evaluates to the project directory on disk.
Let's break down the arguments:
-v -v -v: This isn't strictly needed; it turns on extra verbose mode in the build process, which will give you helpful errors in the build output if something were to go wrong.
-gcc_flags: This tells the compiler that what follows are special flags that determine how the compiler should behave.
-framework QuartzCore: Tapku needs the QuartzCore iOS feature in order to work properly; however, MonoTouch doesn't have any knowledge of the library that we're including (and therefore its need for QuartzCore), so we have to add this ourselves.
-L${ProjectDir}/TapkuLib -lTapkuLibrary: This tells MonoTouch to link against the library called TapkuLibrary ("lib" turns into "l"), and specifies where to find it.
-force_load ${ProjectDir}/TapkuLib/libTapkuLibrary.a: This tells the compiler to load that particular library without removing any code that isn't used.
Now that we have all that out of the way, we can finally use our library.
Once we have our library wrapped, it's time to use it. Using our library is like using any other MonoTouch library. The TKCoverflowView is a lot like a UITableView; we need to create a data source class (see Listing 22-37).
Example 22.37. An example of a TKCoverflowViewDataSource implementation
/// <summary>
/// Our data source for the cover flow. It works pretty much just like a UITableView's data source
/// </summary>
public class CoverFlowDataSource : TKCoverflowViewDataSource
{
        /// <summary>
        /// A List of images we'll show
        /// </summary>
        protected List<UIImage> _coverImages = null;


        public CoverFlowDataSource(List<UIImage> images) : base()
        {
                this._coverImages = images;
        }

        /// <summary>
        /// GetCover is just like GetCell on a UITableView DataSource.
        /// </summary>
        public override TKCoverflowCoverView GetCover (TKCoverflowView coverflowView
                , int index)
        {
                //---- try to dequeue a reusable cover
                TKCoverflowCoverView view = coverflowView.DequeueReusableCoverView();
                //---- if we didn't get one, create a new one
                if(view == null)
                {
                        view = new TKCoverflowCoverView(new RectangleF(0, 0, 244, 244));
                        view.Baseline = 224;
                }

                //---- set the image
                view.Image = this._coverImages[index];

                //---- return the cover view
                return view;
        }

}
Creating and then assigning the data source is also as one would expect (see Listing 22-38).
Example 22.38. Populating and assigning a data source
List<UIImage> images = new List<UIImage>();
images.Add(UIImage.FromBundle(
        "Images/Covers/Cover_DeathCabForCutie_PhotoAlbum_Resized.jpg"));
...
images.Add(UIImage.FromBundle(
        "Images/Covers/Cover_Stars_SetYourselfOnFire_Resized.jpg"));
this._coverflowDataSource = new CoverFlowDataSource(images);

//---- assign the datasource to the cover flow
this._coverflow.DataSource = this._coverflowDataSource;
We can also consume our events that we've exposed (see Listing 22-39).
Example 22.39. Handling events
//---- wire up a handler for when a cover is brought to the front
this._coverflow.CoverWasBroughtToFront += (object s, CoverflowEventArgs e) => {
        Console.WriteLine("Cover [" + e.Index.ToString() + "], brought to front");
};
//---- wire up a double tap handler
this._coverflow.CoverWasDoubleTapped += (object s, CoverflowEventArgs e) => {
        new UIAlertView("Coverflow", "Cover [" + e.Index.ToString() + "] tapped."
                , null, "OK", null).Show();
};
To see the entire code (and the coverflow in action), check out the Example_Tapku companion code and application.
In this chapter we discussed how to incorporate Objective-C code and libraries into our project for use in MonoTouch. We covered how we need to create an intermediary C# layer that wraps the Objective library and exposes the underlying Objective-C library to our MonoTouch project. We also looked a bit at Objective-C and how to build Objective-C libraries. Then we discussed btouch, the MonoTouch tool that can generate these bindings for us, and we walked through using it with the Tapku library.
The knowledge of how to use btouch opens up a huge world of possibilities by enabling you to use any number of the Objective-C libraries for the iOS available out there.