In the first chapter, we created our first application using MonoTouch for the iOS. We used outlets and actions, got to know the basic application structure, and made a simple user interface. However, it had a couple major flaws, one of which is that it only had one screen. In this chapter, we're going to look at how to create multi-screened applications in the iOS using Views and View Controllers.
Specifically, we'll use the UINavigationController to navigate to two different pages/screens in our application. Before we begin, however, we need to briefly review an important design pattern that Cocoa Touch uses, called the Model-View-Controller (MVC) pattern.
Cocoa Touch uses the MVC pattern to handle the display of their GUI. The MVC pattern has been around for a long time (since 1979, specifically) and is intended to separate the burden of tasks necessary to display a user interface and handle user interaction.
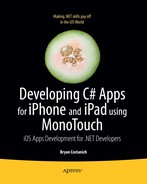
As the name implies, the MVC has three main parts, the Model, the View, and the Controller, as shown in Figure 3-1.
The Model is a domain-specific representation of data. For instance, let's say we were making a task-list application. You might store these in a DB, an XML file, or even pull them from a Web service. The MVC pattern isn't specifically interested in where/how they're persisted, or even if they are. Rather, it deals specifically with how they're displayed and how users interact with them.
If we are persisting the Task items to some sort of storage, one approach might be to create a TaskManager class that handles persistence and retrieval of them for us via methods such as TaskManager.Save(Task item) or TaskManager.Get(int itemID). Or perhaps we might take a different approach and simply add the retrieval and persistence logic to the Task items themselves via Task.Save() and Task.Get(int itemID).
In the MVC pattern, it doesn't matter which approach we choose, the only thing that is important to understanding it is that we have a model representation of our data, in this case, a Task object.
The View is the class or item that is responsible for how our data (or Model) is actually displayed. In our hypothetical task application, we might display these tasks on a web page (in HTML), or a WPF page (in XAML), or in a UITableView in an iOS application. If a user clicks a specific task, say to delete it, typically the view raises an event, or makes a callback to our Controller.
In many frameworks, views actually contain a hierarchy of other views. For instance, the page/screen itself is often a view, and it contains a number of controls that are also views. In this instance, the top-level view is referred to the root view, and the entire set of views is referred to as the view-hierarchy.
iOS is no different in this regard, the main page view is the root view, and it can contain many different controls such as buttons, which are themselves views.
The Controller is the glue between the Model and the View. It's the Controller's job to take the data in the model and tell the View to display it. It is also the Controller's job to listen to the View when our user clicks the task to delete it, and then either delete that task from the Model, by calling some sort of manager object, or tell the Model to delete the task itself.
By separating the responsibilities of displaying data, persisting data, and handling user interaction, the MVC pattern tends to create code that is easily understood. Furthermore, it encourages the decoupling of the View and the Model, so that the Model can be reused. For example, if in your app you had both a web-based interface and a WPF interface, you could still use the same code for your Model for both.
In an iOS application, you only ever have one window, but you can have lots of different screens. This is accomplished by creating different views that you display when appropriate.
In Apple's Cocoa Touch UI framework (also known as the UIKIT), controllers are usually called ViewControllers, so if you see a class like UIViewController, it's actually a controller.
A single controller can manage many different root views, but typically, in order to keep controller code manageable, they only manage one root view. If the controller does manage different root views, they're typically simple derivatives of the other views it manages. For example, you might have a single view controller that manages four different views for the different orientations of the device. We'll explore that in more depth in Chapter 5 when we examine handling rotation on the device.
In MonoTouch, views are represented by the UIView class, and nearly all controls inherit from this class. Views handle user interaction and notify their controller via events. For example, a button raises a TouchDownInside event when a user puts their finger on it, and a TouchUpInside when the user releases their finger. To make a rough analogy, this relationship is slightly similar, to the ASP.NET or WPF model, in which the user interface is defined in HTML or XAML, and then a code-behind page handles events such as clicks, etc.
In this chapter's sample application, we're going to use a specialized controller called the Navigation Controller (UINavigationController) to manage our different screens. The UINavigationController manages a stack of view controllers, each of which represents a screen. When you want to display a new screen, you push a view controller onto the navigation stack that the navigation controller manages. The navigation controller then renders a navigation bar control that allows users to click a button to move backwards through the hierarchy, by removing the top most (visible) controller from the navigation stack.
The UINavigationController is seen in many of the stock iOS applications. For example, when you're viewing a list of your text messages, if you click one, the top bar gets a left arrow tab at the top that takes you back a view to the message list, as shown in Figure 3-2.

It's worth noting that, in this application, we're only going to be dealing with views and controllers. The model portion is not strictly necessary in the MVC pattern, despite its inclusion in the pattern name. It's really only used when you want to display data, and in this case, we're going to be exploring the navigation hierarchy, and not data.
Now that we understand how multiple screens work in concept, let's actually create an application that utilizes them.
First, create a new
MonoTouch iPhone solutionin MonoDevelop and name itExample_HelloWorld_iPhone_MultipleScreens(refer to the first chapter if you've forgotten how to do this).Next, create create three
View Controllers. To do this, right-click your project and choose Add
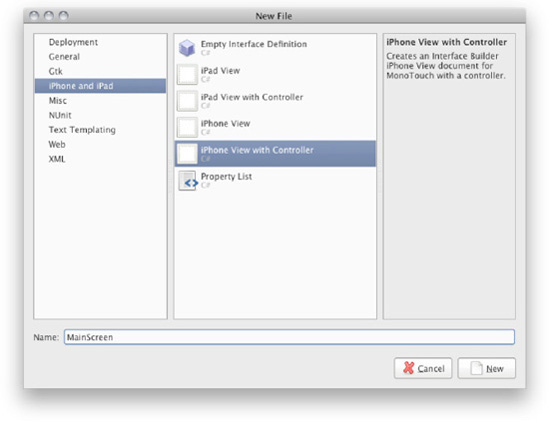
Name your three view controllers:
MainScreenHelloWorldScreenHelloUniverseScreen
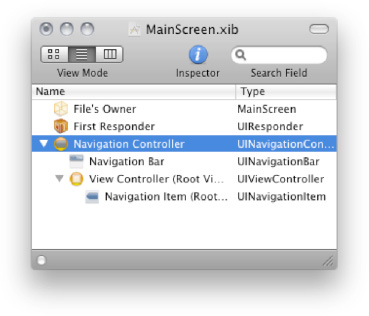
Once you have your screens created, open up the MainScreen.xib in Interface Builder. This is going to be the main screen of our application and will have our Navigation Controller on it.
Navigation controllers need to be the root controllers in a screen, so let's delete the view from this screen. To do this, select the view object in the document window and either press the delete key or select the view and choose Edit
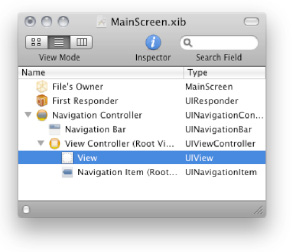
Next, drag a Navigation Controller item from the library window onto the document. Your document window should look like Figure 3-4 (I've expanded the tree to show the full hierarchy).
As I mentioned before, the
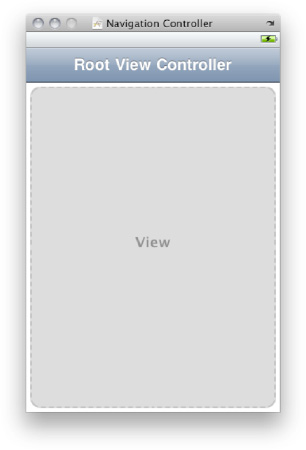
UINavigationController actually contains a number of different items. Now look at your Designer window, where you'll see the newly added Navigation Controller (Figure 3-5).While the Navigation Controller comes with a number of controllers and views, it doesn't actually contain a view to house your content, so we need to add one. Simply drag a
UIViewcontrol from the Library window onto the View placeholder in the Designer window, or onto the View Controller in the Document window. Once you've done that, your screen should look like Figure 3-6, and your Document window should look like Figure 3-7.You can change the Root View Controller text by double-clicking it. In this case, let's just change it to Hello World. After you've changed that text, add two buttons to the view and set their text to Hello World Screen, and Hello Universe Screen, respectively. Once you're done, your screen should resemble Figure 3-8.
Next, create three outlets:
btnHelloWorldbtnHelloUniversenavMain
Wire the
btn*outlets up to their respective buttons, and wirenavMainup to theNavigation Controller. See Chapter 2 if you forgot how to make outlets and wire them up.Once you've got your outlets created and wired up, save your work.


Now we're ready to do the two sub views, so let's get started.
Open up the
HelloWorldScreen.xibfile in Interface Builder and drop a label on to the screen that says Hello World!, as shown in Figure 3-9.Since this screen will actually have a navigation bar at the top, you can make the
Designerwindow show one as well, by selecting TopBarThe
Designerwill now show a simulated top bar when you're designing your screen. Have a look and you can see how much room you have, as shown in Figure 3-11.Once you've finshed the
Hello Worldscreen, do the same thing with the Hello Universe screen, except set the text of the label to beHello Universe!.When you're done, save your work, and head back over to MonoDevelop.


Now that we've got our screens created in Interface Builder, let's modify the code in the MainScreen controller to handle our button clicks and show our different screens.
Open up the MainScreen.xib.cs file in MonoDevelop. This file is our controller class for our main screen. The first thing we're going to do is change our default constructor to load our view (as defined in our .xib file) synchronously. The template, in MonoDevelop, for a UIViewController has the following default constructor, shown in Listing 3-1.
Example 3.1. Default UIViewController constructor when the view is defined in a .xib file
public [ControllerClassName] () : base("[ControllerClassName]", null)
{
    Initialize ();
}
This calls the base class's default constructor and passes the name of the Nib file where we created our view. The base class then deserializes and loads the view from that file. Unfortunately, however, the base class implementation loads the view asynchronously. That is, the actual controls and content on that view aren't available immediately. This is typically not a problem, because the UIViewController has a method called ViewDidLoad that is called once the view has fully loaded.
We'll see in a moment, when we look at our AppDelegate class, why this can be a problem, but for now, replace that constructor with the following, shown in Listing 3-2, which does the same exact thing, but loads the view synchronously (LoadNib doesn't return until the view is loaded).
Example 3.2. Default UIViewController constructor that loads the .xib synchronously
public MainScreen ()
{
        Initialize ();
        NSBundle.MainBundle.LoadNib("MainScreen", this, null);
        this.ViewDidLoad();
}
We made one other change in here that's important to note as well. If you manually call LoadNib, the ViewDidLoad method will not be called. Instead, we need to call it ourselves, after the view has been loaded.
Next, add the following method, shown in Listing 3-3.
Example 3.3. Wiring up event handlers in the ViewDidLoad method
public override void ViewDidLoad ()
{
        base.ViewDidLoad ();
        this.btnHelloUniverse.TouchUpInside += (s, e) => {
                this.navMain.PushViewController (new HelloUniverseScreen (), true); };
        this.btnHelloWorld.TouchUpInside += (s, e) => {
                this.navMain.PushViewController (new HelloWorldScreen (), true); };
}
The ViewDidLoad method is called by the view controller after the view is loaded and fully initialized. We'll examine the controller and view lifecycle in more detail in Chapter 5, but ViewDidLoad is a good place to wire up your event handlers because it is only called after your controls are instantiated, and is only called once in a view's lifecycle.
The UINavigationController manages a stack of navigation items, which are typically controllers. To show a new screen, we can simply push a view controller onto the stack via the PushViewController method. Our event handler code does exactly that, when a user clicks one of our buttons.
Next, we need to make our Navigation Controller accessible from our AppDelegate class, so that we can add the view it manages to our window. Let's add a property to do just that, as shown in Listing 3-4.
Example 3.4. Exposing our navigation controller
public override UINavigationController NavigationController
{
    get { return this.navMain; }
}
You'll notice this property is an override. That's because the UIViewController class already exposes a NavigationController property. This property will return a UINavigationController only if this View Controller is currently on a navigation stack. In our case, our MainScreen.xib actually contains the Navigation Controller. So we override this property for simplicity.
Next, we're going to change our AppDelegate class to load our main screen when the application starts up.
Open up the Main.cs file in MonoDevelop and add the following declaration to your AppDelegate class, as shown in Listing 3-5.
Note
We've declared a reference to our MainScreen as a class-level variable. This is extremely important. The garbage collector in MonoTouch is very aggressive, and in a moment we're going to instantiate our MainScreen in a method and then add it to the navigation stack. If we declared it within the scope of the method, it could get garbage collected when the method returns. If this were to happen, if we were to try to do anything with it (like handle a button click), the application would crash with a null-reference error.
Then, in the FinishedLaunching method, add the code shown in Listing 3-6.
Example 3.6. Declaring our MainScreen as a class-level variable
this._mainScreen = new MainScreen ();
window.AddSubview (this._mainScreen.NavigationController.View);
The UINavigationController is unique, in terms of controllers, in that you can push other controllers onto it. It then adds the view of the controller onto its view hierarchy. However, with most other controllers, and also with the Window, you have to add views instead.
The code we added to our AppDelegate class does just that. It creates a new MainScreen controller, and then adds the Navigation Controller's view onto it.
It's important to note here, if we didn't change our constructor in our MainScreen class to be synchronous, our NavigationController property would likely be null when we called the window.AddSubview, and the application would error on starting.
Now, when we run our application, we should see our main screen load, as shown in Figure 3-12.

If you click the Hello World Screen button you should get something like Figure 3-13.
