
Chapter Five: The DOM
The web began as text. Style—at first via presentational HTML like the font element—followed, but with the exception of links and simple forms, there was little real interactivity in the browser, because there was no way of making content interactive on the client side. Any processing—form validation, for example—had to be done on the server, which meant that whole pages had to be refreshed if a single element such as a required form element wasn’t filled in.
In 1996, Netscape 2 debuted and brought with it a new programming language, JavaScript (which, despite its name, has little in common with Java). And JavaScript brought with it real interactivity in the browser.
DOM Level 0
Of course, JavaScript in a browser is useless unless it has some way of interacting with the page and its elements—form fields, links, images, and so on. So, along with JavaScript, Netscape 2 implemented an application programming interface (API), which let developers access some of the parts of a web page and change their properties using JavaScript. It also enabled developers to write JavaScript that was sent notifications when certain events occurred (for example the mouse was being hovered over a link) and then respond to these events. This API is the document object model, or DOM. Compared with modern DOMs, the Netscape 2 DOM was very limited. Only a small subset of the elements in a document (links, images, and form elements) could be accessed, and only some of their properties accessed and changed. These DOMs were typically used for client-side form validation, and most commonly, image rollover effects.
Internet Explorer 3 introduced its own version of JavaScript (JScript) and the DOM later in 1996. These early DOMs are technically referred to as the Legacy, or Level 0 DOM.
Intermediate DOM
The release of Internet Explorer 4 and Netscape 4 in 1997 saw widespread and usable if somewhat flawed support for CSS, and entirely new—though maddeningly incompatible—DOMs in each browser. Like DOM Level 0, these DOMs, now commonly referred to as Intermediate DOMs, were never standardized by the W3C. Nevertheless, they did introduce the capabilities that enable today’s Ajax-based websites and web applications: the ability to change an element’s CSS programmatically and the ability to access any element and almost any property of any element via JavaScript. It’s fair to say that, along with CSS, these DOMs introduced modern web development as we still know it.
Level 1 DOM
After the success of CSS 1 and HTML 4, the W3C turned its attention to standardizing the unruly DOMs. Although Netscape chose Ecma International as the standards body that would standardize JavaScript (hence JavaScript’s official name, “EcmaScript”—JavaScript is a trademark of Sun), the W3C brought together Netscape, Microsoft, and other member organizations to develop a standard DOM. DOM Level 1 was published in 1998.
Level 2
The Level 2 DOM introduced the modern event model of the DOM, which developers use to handle user interaction and other events. DOM Level 2 was published in 2000, and has widespread though not perfect support in all modern browsers.
Level 3
DOM Level 3 extends DOM Level 2, but as of this writing, it is not widely supported in browsers. Some aspects of DOM Level 3 are widely supported and used, however, and are a core aspect of DOM scripting.
The level of the DOM to which a specific feature belongs to is not particularly important, as JavaScript libraries are increasingly becoming the most common way in which developers interact with the DOM.
In this chapter, we’ll focus on the DOM itself, and won’t discuss JavaScript in detail. The DOM and JavaScript are intimately associated, so this separation may seem odd, but there are two reasons I’ve taken this approach. The first is that the DOM is defined in a language-neutral way. Languages other than JavaScript may be used—in theory, and to some extent in practice—to access and change the DOM. The second is that JavaScript as a language is far too large a topic to address in a general book such as this one, and it’s also been addressed very well elsewhere. From this chapter, you’ll gain a solid understanding of what the DOM is, what it does, what you can do with it, and core best practices and techniques for working with it. You’ll find resources for learning a lot more about JavaScript itself at the end of the book.
The DOM Tree
An HTML document is made of text that the browser parses into an internal model it uses for rendering pages, responding to user interactions such as clicks, taps, and keystrokes. The DOM standardizes this internal model, making it much easier for developers to interact with a page—for example, we might want to find the label for a form element, and to change its text and background color if the associated element isn’t correctly filled out. Let’s take a look at a simple HTML document, and how the browser might model it internally using the DOM.
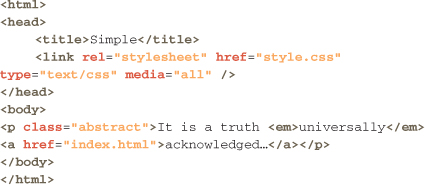
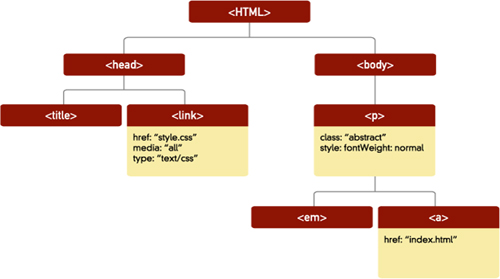
The browser takes each of the elements, and creates a family tree of objects in which an element contained within another element (for example the a element) is a child of that element. In this example, p is the parent of the a element, while the em and a elements are siblings. These objects may have properties; some of these properties are the attributes of the element, such as an href, or media type, while others, such as the style, are a consequence of the browser’s application of a style sheet, or of other factors outside the element and outside the attributes defined in the HTML. The DOM specifications define the properties of any particular type of DOM object. Figure 5.1 shows how this document might be represented as a tree of objects, with various properties.
5.1 The HTML document as a tree of DOM objects
In addition to properties, which developers can get (or read), and usually but not always set (or write)—some properties are read only—DOM objects have methods. A method defines something an object can be asked via JavaScript to do—for example to take the keyboard focus or return a value that is not directly one of its properties, but which it can easily calculate. Understanding and using the methods of DOM objects is the heart of working with the DOM.
Let’s take a quick look at some example DOM code, using JavaScript, before looking at the most commonly used DOM objects, their properties, and their methods. Now, if you’ve never really seen any JavaScript before, don’t panic! It’s not as baffling as it may first appear.
Suppose we’ve got hold of the a element in the example paragraph (we’ll learn how to do so in a moment), and we want to access its URL property. We do this with dot notation, like so:
theLink.href
See, not scary at all. We simply add a dot, then the name of the property as defined by the DOM specification. We can change the href of this link by setting it with an = sign, like so:
theLink.href="http://westciv.com"
Or to get the value—here we’ll show the value in an alert window using a built-in alert method of the window object—we’ll use this:
window.alert(theLink.href)
from which we can note that we also use the methods of an object in the same way that we access its properties.
Core DOM Objects and Methods
Now we’ve got an overview of the core concepts of the DOM, let’s take a look at some of the most commonly used DOM objects, and their methods and properties.
Window
The window object gives access to the properties and methods of the window containing the document. Getting the window object with JavaScript is straightforward: just use the word window. The window object has quite a few built-in properties that can be read, and sometimes changed, using JavaScript. These include how far the page is currently scrolled horizontally or vertically (window.scrollX and window.scrollY), the width and height of the content area of the window, (window.innerWidth and window.innerHeight), and a good deal else besides.
JavaScript and the DOM are case sensitive, which means that accessing window.innerwidth instead of window.innerWidth will cause an error. Note the format of DOM property and method names—where the initial letter of the first “word” is in lowercase, and subsequent “words” are in uppercase. This is referred to as camel case, and is the naming convention for all DOM methods and properties, making it easy to remember exactly how these names are written (provided you remember the name of course).
In addition to properties, like all DOM objects, window also provides a number of methods that a script can invoke to get the window to do things like move, resize, or ask for user input via various built-in dialogs like Alert, Prompt, and Confirmation. For example, we can stop the window from loading, perhaps to let the user stop loading a particularly long page, using window.stop.
Some methods take arguments, and may return results that can be used later in the script. For example, here, we can use the built-in window method prompt to ask a user for some input, and place the response in a variable called answer.
answer=window.prompt("What is 3+2");
We might also use another window method, alert, to display the user’s response:
window.alert(answer)
OK, so that’s a perfectly pointless thing to do, and likely to be really annoying, but it’s a good basic illustration of how the DOM works.
You’ll often see the use of window methods like alert by themselves, like this:
alert(theLink.href)
(Window methods are special in the DOM—you can refer to them without explicitly adding window to your code.)
Document
The document object gives developers access to the contents of the HTML document, and has a number of its own methods and properties that can be particularly useful when DOM scripting. For example, we can get (or set) the title, get the URL, and get a list of all the form elements in the document. The document object is also an element, which is the next main type of DOM object we’ll look at—this means that in addition to its own methods and properties, document objects also have all the methods and properties of other elements. To put it technically, the document object implements the element interface in addition to the document interface.
Element
Every element in an HTML document is represented in the DOM by an element object. Elements have numerous properties, such as className, id, its location with respect to its containing element (offsetLeft and offsetTop), its current width and height (offsetWidth and offsetHeight), and much else. There are numerous methods we can use as well, such as retrieving the value of a given attribute (getAttribute) or even all child elements of a particular type (getElementsByTagName).
One thing we may well want to do is get or change the style of an element, and there are several ways of doing this, which we’ll turn to now.
Style
If we simply want to directly change the style of an element, for example its background color, we can get the style property of the element, which returns a style object. We can then directly set the backgroundColor property of this object to the color we want.
Suppose we have a paragraph in a variable called thePar. We can change its background color like this:
thePar.style.backgroundColor="red"
There are a few things going on here. Note how we’ve chained our properties—we get the style property of the paragraph, which is a style object. Then we set the backgoundColor property of this object to red (we can use any color value we’d use in CSS as the value of the background color). The style object has a property for every possible CSS property, though it uses slightly different names for these. Dashes, like those in CSS’s background-color and text-align are removed, and the resultant name is converted to camel case, so in the preceding example, we have backgroundColor and textAlign.
The style object only contains the inline style of an element, not those from any linked or embedded style sheet. So, if we get the value of this property, we’ll only get the CSS properties set via inline CSS or set directly on the style using the DOM. If we set a CSS property via the DOM using the style object, this is the same as using inline CSS.
If we want all the style properties currently set on an element (including those set via style sheets), we need a function of the window object called getComputedStyle. After getting an element from the document using a method like getElementById, we pass the element whose styles we want to the getComputedStyle method. The getComputedStyle method then returns a style object that contains all the CSS properties of the element:
theStyle=window.getComputedStyle(thePara, null)
The object returned as the value of the variable theStyle is the same type of object as the style property of an element, but the new object contains all the currently set values of all the CSS properties for that element, whether from the default style sheet, the user style sheet, any linked or embedded style sheets, or inline styles. (Note that we can’t set an element’s styles with this object—we just get the currently computed values, then use the style property of the element to make any changes. We use the style property to set CSS properties on an element via the DOM.)
GetElementsByTagName
It might be necessary to get all the elements of a given kind—for example, all the links or all the input elements in a document or inside a particular element. We can use the getElementsByTagName method on any element object, or on the document—remember, the document is an element itself—to return a list of these elements. To find all input elements, in the document we would use this:
allInputs=document.getElementsByTagName("input")
We can iterate through this list using a JavaScript standby, the for loop, to perform various actions—more on this when we get to event handlers. (Want to know more about the for loop? Check out the JavaScript resources at the end of the book.)
GetElementById
One of the simplest and most common DOM methods is locating an element by its id value. Because ids are meant to be unique, we can very quickly find the element with an id of a given value. If more than one element on a page has a given id value (which shouldn’t be the case), this method will probably return the first such element, but that’s not guaranteed.
The GetElementById method is only a method of the document object, unlike getElementsByTagName. So, to locate an element with the id value site-navigation, we’d use: theElement=document.getElementById ("site-navigation").
One very common gotcha with this method is the capitalization of Id in GetElementById—the d must be lowercase and the I uppercase.
Now that we’ve taken a look at some of the most common objects you’ll work with when DOM scripting, we’ll turn to how we bring together user interaction (like typing, tapping, and clicking) with our document and scripts using an important part of the DOM called events.
Events
So far, we haven’t seen how to tell if a user is interacting with our page—or how a script can know anything has happened at all, let alone respond to it. DOM events let us do all these things.
The browser sends an event object to the object that is associated with the user interaction or other event when a user:
• Clicks an element
• Moves the mouse over or off an element
• Types a character
Or when:
• A document finishes loading
• A window is resized or scrolled
• And in many other instances
For example, when you click a link, a click event is sent to the a element, and when you scroll a window, a scroll event is sent to the window object. All this happens automatically, without intervention from developers—but to take advantage of these events, we need to add event listeners that listen for events of a particular type on a particular element, and event handlers to respond to events.
Event Listeners
Most web developers have had at least a little exposure to JavaScript and the DOM, even if only through copying and pasting example script into a page. If you’re one of those developers, you’ll have seen markup like this:
![]()
This is an inline event handler. It tells this particular a element what to do when it receives a click event–it calls a function called linkClicked, with a reference to itself (this) as the argument. If that’s getting too far out of your JavaScript comfort zone, don’t worry about this part. What’s important is that this is an inline event handler. We’ll see in a moment that these inline event handlers, like inline CSS, are no longer recommended as the best way to respond to events. Rather, we can attach event listeners to any element using the DOM method addEventListener. So instead of using the above inline event listener, we’d add a listener to this element to accomplish the same thing like so:
document.getElementById("home").addEventListener("click",
"linkClicked", true)
What we’ve done is found the element with an id of home in the document, then added an event listener for click events. The event listener will then pass the event to a function we’ve written called linkClicked (we can ignore the “true” argument for now, but we’ll get to it in a moment).
You might be thinking that this has gone a bit too easily so far. We haven’t mentioned a single browser bug or inconsistency yet, after all. And the bad news is that just as with CSS, we do have browser bugs and inconsistencies to deal with. The good news is that there are many libraries and other resources that largely make these browser inconsistencies go away as though by magic, and we’ll look at them soon. In the meantime, just note that Internet Explorer doesn’t support the addEventListener method, and so we need to separately add an event listener for that browser using an IE-specific method. (Don’t worry—we’ll cover all of this soon, and you don’t need to think about it now.)
Event Propagation
We can add event handlers for the same type of event to many elements in a document, and we can add event handlers for different types of events to the same element. But what happens when you click on an element which has a click handler, and whose parent element also has a click handler? Which element “gets” the click event? Do they both get the click event? And if so, in which order?
Welcome to the labyrinth.
Capturing and Bubbling Events
There are two event flow models in the DOM. The first model, in which an event is handled initially by the parent and then by the child element (and so on further into the tree if there are further descendants with event listeners for the same type of event) is called event capturing. All browsers other than Internet Explorer support this event flow model.
The second model, in which the descendants receive the event first before the event “bubbles up” to the parent and further ancestor elements, is called event bubbling. Internet Explorer supports only this event flow model. All other modern browsers support both models, and choose between them based on that third argument in the addEventListener method we just saw. If this argument is “true,” the capture model is used; otherwise, the bubbling model is used. The implications and differences can be subtle, but far-reaching. Though the fine points are outside the scope of this chapter and aren’t always important, they’re something to be aware of as a developer.
Best Practices in Modern Standards-Based DOM Scripting
Now that we’ve discussed the key concepts of the DOM—objects, properties, methods, and events—we’ll turn to best practices in DOM scripting. We’ve already touched on one, the idea of separating scripting such as event listeners from our markup, but there are several others to keep in mind. If you are new to the DOM, you won’t need to “unlearn” out-of-date habits and techniques that other developers may have acquired when these were more generally considered to be acceptable. If you are a more experienced DOM developer, it’s my hope that this chapter will either confirm that you’re doing things in the best way, or reveal that some of your practices may need tuning—in which case, the DOM scripting resources at the end of the book will help you polish up your techniques.
Unobtrusive Scripting
Unobtrusive scripting refers to a set of techniques that are intended to ensure that sites and applications built with JavaScript and the DOM work well for users even in the absence of good JavaScript and DOM support. Support might be missing because a user has chosen (or been forced by their IT department) to disable JavaScript. It might also be missing because a particular device or browser just has limited DOM or JavaScript support, as is the case with many mobile devices (even the iPhone has JavaScript limitations).
The underlying philosophy of unobtrusive scripting is that even when users have no JavaScript support at all, a site’s main information and functionality should still be available. If you’re thinking this looks a lot like progressive enhancement with CSS, you’re spot on. Unobtrusive scripting should enhance the experience for users with more sophisticated browsers without becoming a barrier to those with less sophisticated browsers.
Is JavaScript Really Needed?
The first step in unobtrusive scripting is to consider whether JavaScript is really needed at all. Many techniques that might once have required JavaScript to implement are now possible using CSS and HTML alone. Rollover techniques, for example, once required JavaScript, but have been possible with CSS for many years now. The same thing is true of table-row zebra striping, which until recently could only be achieved by using additional markup on tr elements, or by using JavaScript to dynamically add this markup. As we’ll see in Chapter 12, CSS3 structural selectors now allow us to “stripe” table rows without using JavaScript or touching our HTML markup.
Separation of Behavior from Presentation and Markup
Just as we always want to separate structured, semantic content (in our markup) from presentation (via CSS), we also want to separate our behavioral code (DOM scripting) from our CSS and markup. One important way in which we can achieve this is to use event listeners, which we can add to elements using JavaScript after a page has loaded, thus allowing us to avoid inline event handlers that entangle behavior and content.
Usually, we’ll want to wait until the document model for the page is ready (which happens when a page finishes loading) before attaching the event listeners. When a page finishes loading, an onload event is fired for the window object. We can add an event handler for onload events to the window in our JavaScript, which then calls an “initializing” function, which adds all the event listeners.
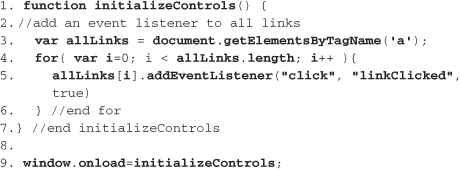
Again, don’t let the JavaScript put you off if you are new to it. This snippet of code tells the browser that when the page is finished loading, the browser should perform the function initializeControls on line 9. That function (which is defined on line 1 and onward) collects all the links in the document in a variable called allLinks (line 3). It then iterates though the entries in this collection (lines 4 through 6, the “for” loop), and adds the event listener to each entry (line 5).
With this technique, we’ve now separated our event handlers out from our HTML.
Forms and Links
There are two places where we need to take special care when it comes to using the DOM, if we want to ensure our pages are usable without JavaScript. Links must allow the user to follow them to their destination when JavaScript is disabled. This is a particular challenge when the link reveals hidden content via JavaScript, as in figure 5.2.
5.2 JavaScript associated with a link reveals additional content when the link is followed. Above the link has not been clicked, while below, the content is revealed by clicking the link.
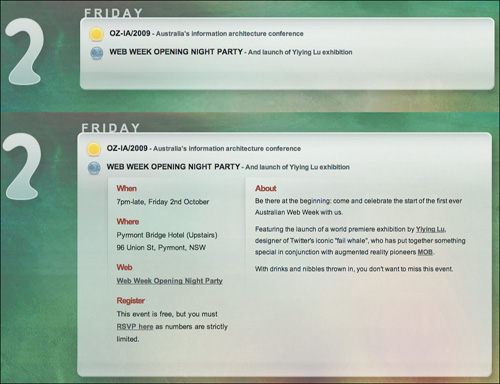
One solution is to make all the hidden content visible initially, and then hide it in an initialization function once the page is loaded. Whatever the solution, which will vary from situation to situation, it’s important to consider what happens when JavaScript is not enabled.
A similar caution applies to form elements. Client-side form-field validation can be very helpful, but the form must still be able to be sent to the server even if fields could not be validated because of the absence of JavaScript. And for security purposes, regardless of any client-side validation, user-entered data must always be validated on the server as well.
Browser Incompatibilities
We’ve mostly avoided the elephant in the living room so far, but yes, Virginia, there are browser inconsistencies when it comes to the DOM. Not every browser supports even all of the Level 2 DOM, while Internet Explorer has a good many DOM-like features that aren’t entirely compatible with the standard DOM. This is bad news, because it makes it much harder to write cross-browser DOM scripts, but the good news is that it is almost always possible to find equivalents across all browsers of various DOM features. Until the last couple of years, this essentially meant any DOM scripter needed to be familiar with the intricacies and idiosyncrasies of all the major browsers. (Joy!) But recently, several wonderful libraries that provide a common layer of functionality for developers to access, and which hide the inconsistencies between browsers, have emerged. Before looking at these libraries, let’s briefly consider how best to address the situation when one or more browsers don’t support a standard DOM feature.
There are two strategic responses to dealing with a browser that doesn’t support a feature widely supported in other browsers we want to also target:
• We can use the progressive enhancement approach of simply not providing that feature for browsers that lack the relevant capabilities, but in many cases, this is not feasible—particularly because the most commonly troublesome browser is Internet Explorer, which is still the market-share leader.
• We can write JavaScript that addresses different browsers in different ways.
To do the latter, we need to distinguish between browsers. For example, if we know that Internet Explorer 8 and older versions don’t support addEventListener, but do support attachEvent, then we can use the latter with IE, and the former with other browsers. But this could get complicated very quickly: What do we do about IE 9? What do we do about obscure, or new browsers that support attachEvent but not addEventListener (for example)? We can try to “sniff” for the user agent of the browser using the userAgent property of the navigation property of the window object, but as we’ll see several times in other chapters, browser sniffing, or “user agent sniffing” is a fragile and undesirable practice. Browsers frequently identify themselves as other browsers, and they also improve between versions—IE 9 might support a feature that IE 8 does not. Plus, the matrix of even just current browsers and their DOM support is enormous. Do you really want to test and track all of the DOM support in all of the commonly used browsers and their different versions? (Clearly, you don’t.)
Luckily, with the DOM, you don’t need to.
With the DOM, we can test for the presence of features, rather than for a particular browser. That way, we only need to handle a small number of cases—for example the presence of support for addEventListener or attachEvent—rather than the many different possible browsers. Here’s how we do it: using JavaScript, we ask if a method like addEventListener is supported by invoking the method without any arguments in a Boolean expression, like so:
(window.addEventListener)
Note that in JavaScript, Boolean expressions are contained within parentheses. If the method is supported, this expression will be true; otherwise it will be false. We can then use this information to separately target browsers that support addEventListener, browsers that support attachEvent, and browsers that support neither. Our code will look something like this:
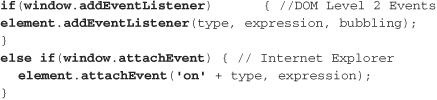
Detecting feature support, rather than browser versions, is a far more robust and “future proof” method. It only causes problems when a browser incorrectly claims to support a feature—that is, when a browser returns “true” in the Boolean test expressions. Such instances are very uncommon, though Firefox has been known to report support for some CSS properties in the style object even when it doesn’t really provide that support.
innerHTML vs. DOM methods
One of the more polarizing debates among DOM scripters is the issue of whether or not to use innerHTML. The innerHTML property is an as-yet unstandardized element property (though it is part of the draft HTML5 standard) that can set or get the HTML of all descendent elements of a given element as a string. You can easily create all the descendants of an element as follows:
![]()
The browser takes the string value ("this is the text of the paragraph" and so on), parses it as it would an HTML document, then adds the resultant elements (a link and a strong element, along with the rest of the content) as the descendants of the thePara element, replacing any current descendants of that element.
The innerHTML property is polarizing in large part because it is non-standard, and thus poses philosophical problems for many developers. But in practical terms, the lack of standardization means that there are differences in innerHTML implementations across browsers. It’s a very powerful property, because it lets you take any text, which may or may not be valid HTML, and pass it to innerHTML, and rely on the browser turning this into part of the DOM. Note that this includes removing all of the existing descendent elements of the element. As a consequence, in particular when using it to create HTML, innerHTML needs to be used very carefully.
The alternative is to use DOM methods like createElement and setAttribute. With this approach, each element and attribute is explicitly created by the JavaScript, rather than inside the blackbox of innerHTML, making the results more predictable. Methods like createElement will return exceptions if they fail—for example, if they try to add an href attribute to a p element, which isn’t allowed. This makes it easier to handle invalid markup without having to write a parser of your own in JavaScript to ensure sensible markup is passed to the browser via innerHTML.
The downside of DOM methods is they are currently far slower than innerHTML. So where performance is an issue, innerHTML is superior in that respect. Additionally, creating DOM-based solutions requires considerably more effort than simply passing a string to a method. It’s possible to make innerHTML more robust by preprocessing the input, but that will affect performance and ease of implementation as well.
You should decide which of these approaches is appropriate for your projects by considering whether robustness is more or less important than performance and ease of implementation. In reality, you might find yourself using either of these approaches, depending on the situation at hand.
Security
Browsers are designed to be as secure as possible, and typically implement policies and approaches that attempt to ensure that malicious code can’t execute outside a web page, interact with the local system, or grab information from other open browser windows. Nevertheless, the incentives for malicious coders are so great that we can’t simply rely on the browser to ensure security. And as websites become more like applications and increasingly rely on server-side databases and processing, we have another vector for malicious code. While the issue of DOM and JavaScript security merits entire chapters and indeed books, it’s worth focusing on one fundamental principle that all DOM scripters should be aware of.
Don’t Trust User Data
Every time a user is able to input data, there are potential security risks—particularly when that data is to be stored on the server in a database. These risks can be mitigated by:
• Validating the data on the client using JavaScript (but keep in mind JavaScript may be disabled). A simple example is to not allow <script> elements within user input, which may then be executed by the browser.
• Validating the data on the server (far more secure). Even if data is validated on the browser, it should always be validated on the server.
• Encoding user input (for example, encoding < and > as > and <).
If you are interested in knowing more about JavaScript and DOM security issues—and you should be—you’ll find plenty of resources at the end of this book.
The Rise of the Libraries
The last two or three years have seen the meteoric rise of JavaScript libraries as a core part of web development. Initially many developers were skeptical about libraries, seeing them as valuable prototyping tools that were not to be relied on in production environments—or as a dangerous trend that puts, as one developer (in)famously said at the 2006 @media Conference, “guns in the hands of children” by giving developers with little JavaScript and DOM knowledge too much power (something many other developers think may actually be a good thing). Other concerns are that libraries are typically quite large and involve downloading additional files, both of which have performance implications for a site. There’s also the concern that, given the complexity of much of the code used in libraries, it is much more difficult for developers to diagnose and address problems caused by the libraries themselves.
These debates have largely subsided as it has become apparent that the underlying code of these libraries is usually very good, and that they provide very helpful functionality. Rather than having to write all the cross-browser code it takes to have DOM scripts work in all common browsers, developers can use libraries to do the heavy lifting. The major libraries are also quite well documented, and are being adopted as part of development environments such as Visual Studio, which incorporates support for the JQuery library (www.jquery.com), and Palm’s new webOS, which features the Prototype library (www.prototypejs.org). Additionally, many libraries are supported by thriving communities, which means that support and bug fixes are readily available. Meanwhile, performance issues can be addressed by “minifying” and compressing the library files, and by amalgamating them into a single file.
Just as no one would consider developing desktop applications without using an application development framework, it’s likely that, within a very short time, little serious web development work will be done using the DOM without using at least one major JavaScript library.
There are different types of JavaScript libraries. Some, like JQuery, are general purpose—essentially an entire platform that enable plug-ins to extend the functionality of the library. Others, like qooxdoo (www.qooxdoo.org), are “widget libraries,” providing a number of JavaScript-based controls (like data grids, tree lists and so on). Still others, like Moo.fx (moofx.mad4milk.net), are effects libraries, providing easy to use cross-browser effects like element zooming, fading, and so on. There are also numerous small libraries that help manage cookies, browser history, graphics, and much else besides. We’ll list some of the most commonly used libraries here, and there are references to many other libraries at the end of this book.
As mentioned earlier, all these libraries are widely used, and almost all of them are developed by a core team of full-time, paid developers. Most are open source, and most have thriving communities of developers and users. Each is well worth considering, depending on your needs. But keep in mind that once you’ve chosen a library for a project, replacing it with another will typically require a lot of work, so choose wisely.
Choosing a Library
High-profile developer Brian Reindel has compiled a widely referenced series of questions to help developers decide which library to choose. Some of the criteria Reindel raises include:
• Does the framework support A-Grade browsers?
• Is there a core team of developers?
• How mature is the framework?
• How often are updates publicly released?
• How friendly is the documentation?
• Is there an active community?
• Are benchmark tests performed regularly?
• How extensible is the framework?
• Do you like the API style?
It’s well worth checking out the whole list at blog.reindel.com/2007/10/30/how-to-choose-a-javascript-framework.
JQuery
The increasingly popular JQuery has recently gained the backing of Microsoft, which has built support for the library into the ASP.NET Ajax Framework, and from Nokia, which has incorporated JQuery into its Widget Development Platform for the S60.
JQuery is highly modular, with a plug-in architecture that enables third-party developers to easily extend the library’s functionality. JQuery has a thriving community, and is open source. It is considered to be one of the best-performing and most compact of popular general purpose libraries.
Prototype
Prototype, which has close ties with Ruby on Rails, was one of the earliest general purpose libraries to gain prominence. It provides core DOM functionality, with libraries such as MooFx and Script.aculo.us built on top of it to provide effects and widgets. Prototype is an open source library with a strong community of developers and users.
Script.aculo.us
Script.aculo.us provides effects and widgets on top of Prototype. It too is widely used, is open source, and has a strong community. It adds animation, controls, and drag and drop functionality among other things to Prototype.
Yahoo User Interface Library (YUI)
From Yahoo Developer Network, YUI is a core set of DOM functionality, along with effects and widgets such as datatables, menus, color pickers, and calendars. It also features utilities for cookie management, history management, and much more. YUI is widely used by Yahoo sites.
Inspecting the DOM
These days, most browsers ship with or have as extensions very powerful debugging tools that can help inspect the DOM, and otherwise debug your web development. Here’s a very brief overview of some of the most widely used tools for popular browsers.
IE Developer Toolbar for IE 6 and 7
The IE developer toolbar, which can be downloaded and installed for IE 6 and 7, has the ability to inspect the DOM, validate HTML and CSS, check accessibility and much more. For developing and debugging in Internet Explorer, it’s a must-have.
Internet Explorer 8 Developer Toolbar
IE 8 has built-in developer tools, accessible from the tools button menu (F12 opens these tools). The IE developer tools have similar features to the IE 6 and 7 toolbar, and once again is indispensible for developing and debugging with IE 8.
Firefox Firebug and Web Developer Toolbar
www.chrispederick.com/work/web-developer
These two Firefox extensions are essential tools for web developers using Firefox. The Web Developer toolbar is similar to the IE developer toolbar, while Firebug provides a huge array of functionality for debugging and developing HTML, CSS, and JavaScript, including a sophisticated DOM inspector.
DragonFly for Opera
DragonFly is a developer extension from Opera Software for the Opera browser, and features a rich DOM inspector in addition to other script, HTML, and CSS development tools.
Safari Web Inspector
Apple’s Safari browser for Windows and Mac OS features the Web Inspector, which is similar to DragonFly, Firebug, and the IE 8 developer tools, and it includes a DOM inspector.
With each of these browsers and the developer tools mentioned above you can select an element in the DOM, inspect its properties, such as current CSS, and traverse the DOM (going up to inspect parent elements, sideways to inspect sibling elements, or down to inspect child elements). For example, figure 5.3 shows the DOM as a collapsible tree on the left, with the properties for the selected element on the right. These DOM inspectors can help you quickly determine the structure of a document, which can greatly aid in the development of DOM scripts (and their debugging when they don’t work).
5.3 Safari’s Web Inspector in DOM inspection mode

Until recently, DOM and JavaScript debugging were very poorly supported in browsers. Though these web development tools still lack the sophistication of those available to desktop application developers, we’re making huge strides.
Ajax?
In many ways, Ajax is really a brand name for rich browser-based interfaces. Although the A stands for asynchronous and refers to the ability (via the clumsily named XMLHTTPRequest DOM object) to update only part of a web page rather than requiring a full page refresh as would have been the case a few years ago, many Ajax interfaces don’t in fact use this capability. Interestingly, XMLHTTPRequest, introduced by Microsoft in IE 5, is still unstandardized, although it is supported across all modern browsers and is currently in the process of standardization by the W3C.
While the term Ajax has served a great purpose as a brand name for dynamic rich browser-based experiences, I suspect in time the term will become less common, as we’ll come to expect rich browser-based user experiences from web sites and applications.
The Wrap
This chapter has been a whirlwind tour through the DOM. If you are already familiar with the DOM and JavaScript, I hope the chapter has helped solidify your understanding and introduce you to practices you may not be aware of. If you are brand new to the DOM and scripting, it’s my hope you’ll see that it’s not nearly as daunting as you may have imagined, and you are now keen to learn more. If so, you’ll find (as always) resources outlined at the end of the book to help.
Much of modern web development is heading away from static, page-based designs toward more dynamic, interactive, application-like experiences, and the key to developing these experiences is the DOM. So, like it or not, the DOM is something we’re going to have to learn to live with... and, hopefully, to love.