Chapter 9 BackgrounDRb
I started developing Ruby on Rails apps in late 2005. Rails was still pre-1.0 and had a lot of rough edges. One of those edges was the fact that it was single-threaded. I was willing to look past that minor limitation, at least for a little while, because I had just come from writing these enormous Java/JSP/Struts apps. Writing applications with Rails, even with its flaws, was like coding heaven compared to the Java world I had just come from. I assumed (and you know what happens when you do that) the ability to run Rails in a multithreaded environment would come with the 1.0 release.
Well, the 1.0 release came and went with no multithreaded support. This single-threaded limitation was really starting to become a problem—not only for me, but for a lot of people in the community. If you were doing a file upload, or some other hefty task, Rails would just sit there queuing up requests behind it, because it did not allow multiple threads, or processes, to be run so that you could handle all your requests.
I know I wasn’t alone in my desire to offload heavy tasks to the background, because in 2006, Ezra Zygmuntowicz released the first version of BackgrounDRb.1 BackgrounDRb is now being maintained by Hemant Kumar.2
The goal of BackgrounDRb was to have an easy-to-use mechanism to send these tasks to an alternative process so that they could be processed asynchronously from the main application process. Ezra chose DRb as the mechanism for passing off these tasks to the other process. This chapter looks at how to use this plugin for Ruby on Rails to perform these hefty tasks.
Installation
Before we jump into installing and configuring BackgrounDRb, let me state that I’m assuming you are already familiar with Ruby on Rails, its structure and layout, what a Rails plugin is, and other such generalities.
BackgrounDRb is installed as a plugin for Ruby on Rails. However, before we can install the plugin, we must install a few dependencies for it. BackgrounDRb requires two gems, in addition to Rails, to be installed first:
$ gem install chronic packet
That should install the prerequisite gems we need:
Successfully installed chronic-0.2.3
Successfully installed packet-0.1.15
With our gems now installed, let’s create a new Rails project to work with:
$ rails bdrb
This spouts a bunch of Rails code-generation statements that I don’t think I need to reproduce here. Most important, it creates a new directory called bdrb. Make sure you are in that directory from this point on. Now let’s install the plugin:
$ ruby script/plugin install git://github.com/gnufied/backgroundrb.git
This creates a lot of files in our RAILS_ROOT/vendor/plugins/backgroundrb folder. Now that we have the plugin installed, we need to create the necessary database tables so that BackgrounDRb can do its thing. We can create and run the migrations we need by running the following Rake tasks:
$ rake backgroundrb:setup
$ rake db:migrate
You should see, among some other output, the following:
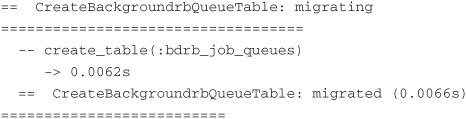
This tells us that the migration has been generated and run and has created a table named bdrb_job_queues.
Offloading Slow Tasks with BackgrounDRb
Thankfully we have fully installed BackgrounDRb into an application, and here is why. We have an application that creates widgets for us. The problem is that widget creation takes 30 seconds. When we try to create a widget via the web browser, it times out because it takes too long. Hopefully BackgrounDRb can solve our problem.
Let’s take a step back and look at what we did to get ourselves into this situation. First we created our scaffolded model and controller with the following command:
$ ruby script/generate scaffold widget name:string body:text
$ rake db:migrate
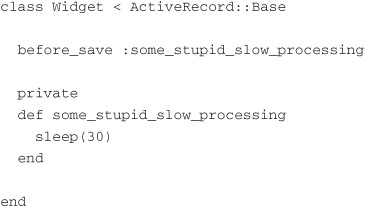
Then in our model we added a before_save callback to do some essential processing:
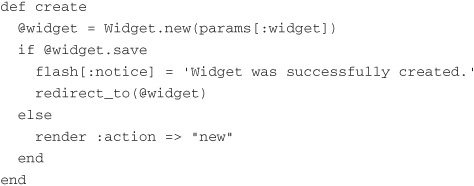
The create action method in our WidgetsController class looks like this:
If we were to create a new widget with our current code and look in the log file, we would see something similar to the following:
Completed in 30050ms (DB: 1)
As you can see, the request took over 30 seconds to complete. This is unacceptable in the real world. We can’t have end users waiting for 30 seconds to create a new widget. Perhaps it would be better to push this task to the background and let the user know that we will be building his new widget and will let him know when it’s ready.
Now that we understand the problem, how do we solve it? Let’s take a look at how we can use BackgrounDRb to help.
BackgrounDRb has a concept called workers. These workers, well, do the work. We create a new worker class for each type of processing we want to do. Each worker has a method or series of methods that we can call asynchronously and pass parameters to that will eventually perform the processing offline. Later a background service will process each of those tasks and perform them. The application calls and passes parameters to these asynchronous background methods through DRb.
In our case we want to create a worker that will create our widgets for us. Thankfully BackgrounDRb has a built-in Rails generator to help us quickly create these new workers:
$ ruby script/generate worker widget
This command should output the following:
exists lib/workers/
create lib/workers/widget_worker_worker.rb
If we open widget_worker.rb, we see a class definition that looks like this:
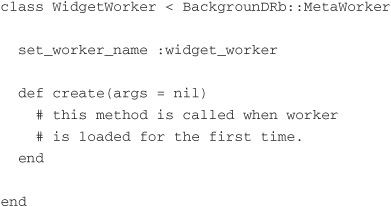
Let’s examine what our base worker class looks like. First, notice that WidgetWorker extends BackgrounDRb::MetaWorker, which handles almost all of the heavy lifting in terms of connecting to the background DRb service and running the asynchronous methods. Next we notice that we are calling a class method, set_worker_name, and passing it the value of :widget_worker. This is done so that we can easily identify the worker later in our code. At no point in our code will we explicitly instantiate an instance of WidgetWorker. Instead, we will use a MiddleMan class and give it the name of the worker we are interested in calling. But we don’t want to get ahead of ourselves, so we will get to that shortly.
Finally, we have a method called create. The create method is called when the WidgetWorker is first initialized. This is similar to the initialize method we are used to in Ruby. You can use this method to configure variables and other items necessary for a successful worker instance. Because this method is called only once, it is not a good place for us to put our code to create new widgets. However, just so that we can see the life span of our WidgetWorker class, let’s put a log statement in the create method so that we can see that it does in fact get called only once:

So if the create method is not a good place for us to place our new widget-creation code, where should we place it? Let’s create a new method called create_new_widget and place it in there:

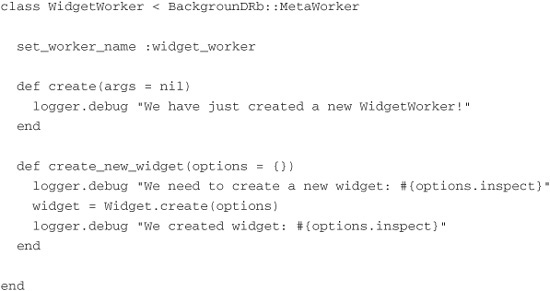
Our create_new_widget method takes a Hash of options that we can then pass to the built-in Rails method create on our Widget class. That is our unfortunate method that takes a whole 30 seconds to complete. I’ve added a few log statements to the method to help illustrate the flow through this method. So with these changes our WidgetWorker class now looks like this:
We have created our worker class, WidgetWorker, which will handle the offline, asynchronous creation of our new widgets. But how do we call this code and tell it to do just that? We must change the create action in the WidgetsController class. We should update it to look like this:
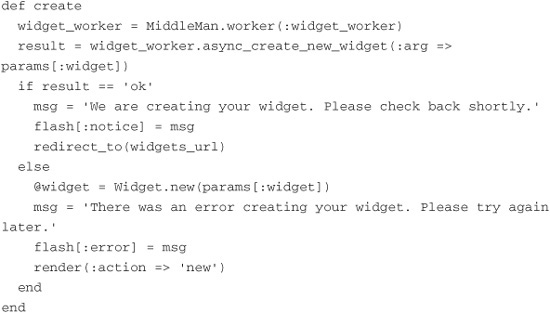
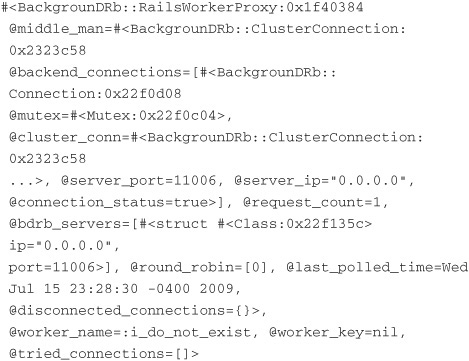
This is quite a big change from our original create action. Let’s work through it so that you understand what is happening. First we make a call to that mysterious MiddleMan class I referred to earlier. The MiddleMan class does just what its name says—it acts as a middleman between your application and the BackgrounDRb server. Without it you would have to write a lot of code to make those connections. On the MiddleMan class we call the worker method and pass it the name of the worker we are looking for. In our case we are looking for :widget_worker. The worker method looks up a reference to our WidgetWorker and returns it to us so that we can interact with it. With that said, we don’t get back an actual instance of our worker class. Instead, we get a proxy class that mimics the worker class. If we were to call the inspect method on our widget_worker variable, we would see something like the following:
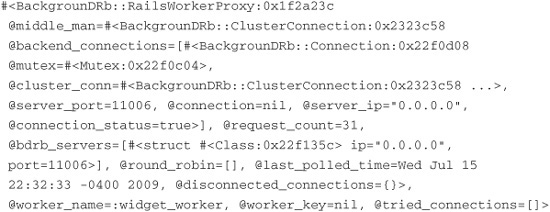
We are actually returned an instance of a class called BackgrounDRb::RailsWorkerProxy and not WidgetWorker, as you might have thought. It is on this proxy that we will register a call to our create_new_widget method, passing in the Hash that represents the widget we want created. This proxy then generates a message and places it on a queue over DRb so that a background process can pop that message off the queue and process it for us. We create that message like this:
![]()
What Happens if No Worker Exists?
We have seen that when we call the worker method on the MiddleMan class, we are returned a BackgrounDRb::RailsWorkerProxy instance and not an instance of the actual worker class we have written. What happens if the worker we request does not exist? Let’s see.
First, let’s try to find a worker that does not exist:
ww = MiddleMan.worker(:i_do_not_exist)
This returns successfully. We get another instance of BackgrounDRb::RailsWorkerProxy. I would have expected this to either return nil or raise an exception, but it doesn’t. The reason, as I understand it, is that the background process that is performing the tasks may or may not have the worker the application is requesting. The only way to find out is to make a remote method call and ask. But because that is somewhat expensive, it is just assumed that the worker you requested exists.
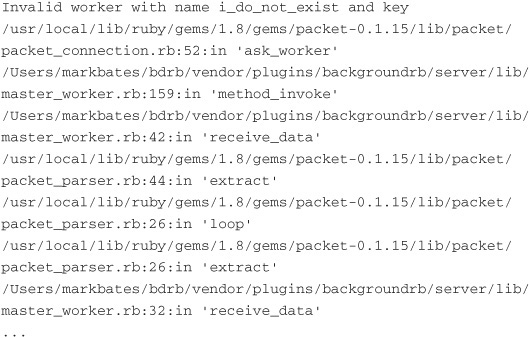
If we print the inspect method on our nonexistent worker, we see that it looks similar to the worker we retrieved earlier in the chapter:
If we were to try to call a method on our nonexistent worker, we would be returned a nil instead of our successful status of ok.
The moral of this story is to always be sure to check the return status and handle it appropriately.
You can see that on our widget_worker variable we call a method we have never seen before, async_create_new_widget. This type of method is sometimes called a “magic” method. It’s “magic” because it does not exist anywhere in the source code. BackgrounDRb::RailsWorkerProxy captures calls to methods that do not exist on it and interprets them as messages that need to be created on the queue. So why do we append async_ to our create_new_widget method name? Well, by doing so we are telling BackgrounDRb that the create_new_widget method should be processed asynchronously and not inline. We also could have called the create_new_widget method on the proxy class, but that would have had the unfortunate downside of taking 30 seconds to process.
When we call our “magic” async_create_new_widget method, we pass in a Hash of options. The option we are most interested in, at least at this point, is :arg. The value of the :arg option is passed into the create_new_widget method on the WidgetWorker class.
When we call the async_create_new_widget method, we are returned a result code. If we get a result code of ok, we know that our message has been received successfully, and we can let the end user know too. It is worth pointing out that this status does not mean that our new widget has been successfully created. It simply means that the message was successfully received, stating that we want to call the create_new_widget method on the WidgetWorker class with a certain set of parameters.
With an ok result status we create a nice flash message letting the end user know that we are working on creating her widget and that it will be ready shortly. We then redirect the user to the widgets index page. If the result status is anything but ok, we return the end user to the widget creation screen. We present her with a message telling her that a problem has occurred and that she should try again later.
Why don’t we run this and try it out? Before we fire up our Rails application, we need to start a BackgrounDRb server:
$ ruby script/backgroundrb start
You should see the following:
Starting BackgrounDRb ....
Then the console returns to you. We can monitor the logging statements we put in our code by tailing the log file that BackgrounDRb creates for you:
$ tail -f log/backgroundrb_11006.log
You should immediately see our first logging statement get printed:
We have just created a new WidgetWorker!
Now let’s start our application:
$ ruby script/server
Now let’s navigate to http://localhost:3000/widgets. We should be presented with no widgets, so let’s create one. Click the “New widget” link or go to http://localhost:3000/widgets/new. Give your widget a name and a body, and click the Create button. You should be taken back to the widgets index page and shown the following pleasant message:
We are creating your widget. Please check back shortly.
You should notice that the widget you just submitted is not listed on the page. Now if you go back and look at the log file we were tailing, you should see something like the following:
Then, about 30 seconds later, you should see the following message:
![]()
If you refresh the widgets index page, you will see your widget listed on the page. Congratulations! You have built a new worker, configured it, and updated your code to call your asynchronous method in your worker.
Configuring BackgrounDRb
Now that we have managed to sort out our slow-widget-creation problem, let’s take a look at how we can configure BackgrounDRb. When we ran the backgroundrb:setup Rake task, one of the files that was generated was named backgroundrb.yml in the config directory of our Rails project. If we were to open this file, we would see the following configuration settings:
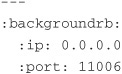
This is the most basic configuration that BackgrounDRb needs to run. As you can probably guess from the settings, this configuration binds the BackgrounDRb process to 0.0.0.0:11006. However, this is not where the configuration of BackgrounDRb ends. A backgroundrb.yml file that has all its configuration parameters listed would look something like this:
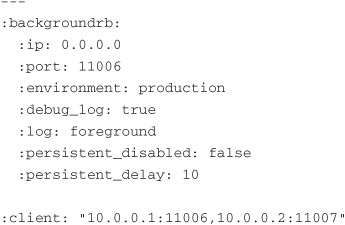
Let’s look at each of these configuration settings. We’ve already seen the :ip and :port settings, so we can skip those. The :environment setting tells BackgrounDRb which Rails environment to run in. The default for the :environment setting is development.
The :debug_log setting tells BackgrounDRb whether to write debug statements to a separate log file. By default this setting is true. Here is an example of what you would find in the debug log:
The :log setting tells BackgrounDRb where to log to. The default is to write to a log file in the log directory, where the naming scheme is backgroundrb_port.log. You can also set this to foreground, which writes log statements to STDOUT.
The :persistent_disabled setting disables the persistent storing of tasks in the database. The advantage of turning off persistence, as in all other queue mechanisms, is speed. Without having to persist tasks to a database, file, or other storage, the system performs at a much faster rate. The disadvantage, however, is that should some unforeseen incident occur and your BackgrounDRb processes die and need to be restarted, you lose any tasks that were waiting in the queue to be processed. This is definitely a business choice you need to make. There may be times when losing these tasks is perfectly acceptable, and other times when it is not.
The :persistent_delay setting tells BackgrounDRb how often, in seconds, it should check the database for new tasks to process. The default setting is 5 seconds. You need to fine-tune this setting to better match your environment. If you make it too often, you will process more often and therefore will create a heavier load on your systems. If you make it too seldom, the latency of processing these tasks can become quite noticeable to your end users.
The last setting we see is the :client setting. This is a comma-separated list of BackgrounDRb servers you have running. The point is to create clusters of BackgrounDRb servers that can have the load of tasks spread among them. BackgrounDRb uses round-robin4 to pass tasks to each of the BackgrounDRb servers listed. If a server stops responding, BackgrounDRb stops sending tasks to that server until that server comes back online.
Persisting BackgrounDRb Tasks
We originally solved our slow-creating widget using an asynchronous background process that built the widgets for us after we had returned a pleasant message to the end user. This worked great. The user got a quick response from the server instead of having to wait 30 seconds for the widget to generate. There was, however, a small problem we neglected to mention: The widget-generation tasks were not being persisted. If the BackgrounDRb server crashed before it processed all the tasks, those tasks would be lost. For this situation, that might not be a problem, but what if we start to sell widgets? We can’t take people’s money if we never create their widgets.
Enter our new Amazing Widget product. The Amazing Widget slices, dices, juliennes, chops, and programs your DVR, all for the affordable price of only $19.99! Because we plan to start selling these new widgets, we want to make sure that in case of a problem we still can generate the widgets when the server starts working again. To do that, we need to start persisting our tasks.
First, let’s set up our new Amazing Widgets. A quick little Rails scaffolding will get us most of the way to where we need to be:
$ ruby script/generate scaffold amazing_widget name:string body:
text price:decimal
Now we need to run our newly created migration so that we can build the amazing_widgets database table:
$ rake db:migrate
We also need to tweak our AmazingWidget class to be a subclass of the Widget class:
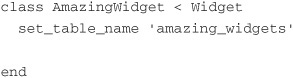
You’ll notice that we have to tell ActiveRecord to use the amazing_widgets table via the set_table_name method. If we didn’t do that, it would try to use the widgets table we created earlier.
With all that set up, we should be able to start our server, go to http://localhost:3000/amazing_widgets/new, and create a new Amazing Widget. If you did that, you would see that we have the same problem we had earlier—it takes 30 seconds to create a new Amazing Widget. That won’t help us sell a lot of widgets, so let’s place them in a queue and let BackgrounDRb handle it for us offline.
First, let’s create a new worker to process these new widgets:
$ ruby script/generate worker amazing_widget
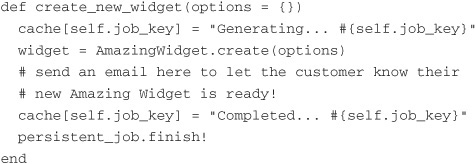
Now let’s edit the file lib/workers/amazing_widget_worker.rb to do the processing we need:
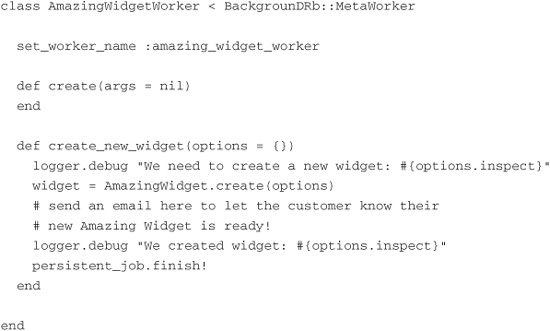
As you can see, this is pretty much identical to the WidgetWorker class we created earlier.5 In the create_new_widget method we create our new AmazingWidget. We also have a note in there about emailing the customer when the widget is ready; you get that added perk for your $19.99. Finally, we call the finish! method on the persistent_job6 method. This call tells BackgrounDRb to mark the record in the database as finished so that it doesn’t again pull the task from the database and attempt to run it.
With our AmazingWidgetWorker written, all we need to do is hook it up to our controller, in much the same way we did with the WidgetWorker earlier. To do that, let’s rewrite the create action in AmazingWidgetsController to look like this:
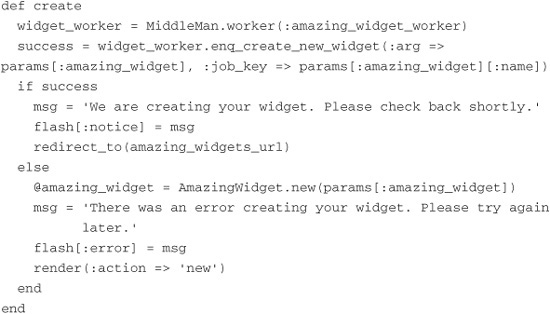
Let’s step through what is different this time around in comparison to our earlier asynchronous version. Obviously, wherever we referenced :widget_worker or widget, we need to replace it with :amazing_widget_worker or amazing_widget. The biggest difference between persistent and asynchronous calls can be found in this line:
success = widget_worker.enq_create_new_widget(:arg =>
params[:amazing_widget], :job_key => params[:amazing_widget][:name])
When we wanted to call the create_new_widget method asynchronously, we called it using the “magic” method async_create_new_widget. Now that we want to use a persistent queue, we use the “magic” method enq_create_new_widget. The enq portion of the “magic” method tells BackgrounDRb to enqueue (put) the task into the persistent queue for processing.
In addition to the :arg parameter, which is a Hash containing the information we need to create a new AmazingWidget, we have to pass a unique :job_key. Here I am using the name of the widget as the :job_key parameter, but it can be anything you’d like, as long as it’s unique.
It is worth pointing out that the enq “magic” method returns true or false depending on whether it can persist the record. This differs from the async “magic” method, which returns ok or nil depending on whether it was successful.
With everything in place, we can now request that BackgrounDRb create a new AmazingWidget offline using the bdrb_job_queues table to persist that request.
Before we start the BackgrounDRb server to handle these new tasks, let’s create an AmazingWidget and briefly look at what the database entry looks like for our request. Start the Rails application and create a new AmazingWidget. Now, open your database in your favorite database viewer, and let’s look at a few of the fields in our newly created record. The columns that are of importance to us are worker_name, worker_method, job_key, started_at, finished_at, and args:
• The worker_name column represents the name of the worker that is to be used for this task. In our case this value should be amazing_widget_worker. The worker_method column holds the name of the method we want to call on the aforementioned worker, so for us this value should be create_new_widget. The job_key column holds the unique identifier for the task. If you remember, earlier I used the name of the widget as the job_key, so the value I see in this column is My Amazing Worker.
• The started_at and finished_at columns should be fairly obvious. They tell you what time the task started processing and what time it finished. Right now these columns should both be NULL. Because we haven’t started the BackgrounDRb server, the task has yet to start, so it cannot be finished. When we start our BackgrounDRb process and refresh this table, we see that these columns both get updated and that the difference between them should be just over 30 seconds, because our widgets take 30 seconds to build.
• The args column is an encrypted version of the arguments that we passed into the enq_create_new_widget method. This column is encrypted to protect the contents of the arguments, because they may contain sensitive data such as passwords, email addresses, or other such personal details.
Let’s fire up our BackgrounDRb server:
$ ruby script/backgroundrb start
I also like to tail the log file so that I can see how things are progressing:
$ tail -f log/backgroundrb_11006.log
After a while we should see our log file spit out the following:

If we refresh the row in the bdrb_job_queues table that represents the task we just processed, we see that it has been updated. My started_at column has the value 2009-07-19 22:52:26, and the finished_at column has the value 2009-07-19 22:52:56. As we predicted earlier, they are 30 seconds apart.
If you’re observant, you will notice that a few other columns also got updated, including the job_key column. The value of my job_key column is now finished_1248043976_My Amazing Widget. BackgrounDRb updates this column and prepends the word “finished” as well as the timestamp of completion to the key we supplied. Because of this we now can reuse the job_key, should we so desire. This is useful if you have recurring tasks that happen periodically.
So with those few simple changes to the controller, and the generation of our new worker, we quickly got database persisted tasks working. Now we can feel confident when we go out and sell all those Amazing Widgets!
Caching Results with Memcached
As you’ve seen, offloading heavy and/or slow processes to BackgrounDRb can make your application a lot more useable and user-friendly. We can easily fire and forget these tasks and just let them complete in their own time. But how do we find out the current status of those tasks? What if we want to get the final result of some long-running calculation? What if we just want to let the user know via some fancy AJAX on the page when his or her widget has finished being generated? Well, BackgrounDRb has you covered.
BackgrounDRb supports the popular caching system Memcached.7 Using Memcached we can easily place updates for and results of our tasks in the cache so that other services can come along, query, and take appropriate action based on what is in the cache.
Using the hooks to Memcached is easy. First we need to update our backgroundrb.yml file to tell BackgrounDRb where to find the Memcached servers:
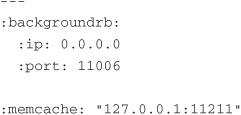
Just like earlier, when we discussed the :client configuration parameter, the :memcache parameter also accepts a comma-separated list of Memcached servers. In our example we are just running a single Memcached server on host 127.0.0.1:11211. This is all that is required to tell BackgrounDRb to use Memcached for its caching mechanism. If we do not specify this, BackgrounDRb uses its own internal caching scheme. This can prove problematic, so you should avoid it if you are planning on using caching.
With our application now configured to use Memcached, let’s update our AmazingWidgetWorker class and put some information in there so that we can query it from the Rails console and see how our task is going. All we need to do is update the create_new_widget method in the AmazingWidgetWorker class:
I’ve replaced the logging statements we’ve previously had in the create_new_widget method with calls to the cache method. The cache method returns an instance of the Memcache class that holds a connection to the Memcached servers we configured earlier. The Memcache class presents itself much like the Hash class does. Because of this we can use the familiar [] syntax we are used to with a Hash.
Remember that earlier we had to create a unique job_key when we created a new task to be assigned to the AmazingWidgetWorker. Here we are using the unique job_key as the key with which we will store our messages in Memcached. Then we simply set two messages—one at the beginning of the process, stating that we are working on this task, and another at the end of the process, saying that we completed the process.
Earlier I mentioned updating the user via some fancy AJAX, but for our simple example we will just use the Rails console to find out the status of our widget task. I’ll leave the building of that fancy AJAX to you, the reader, as a fun little add-on to this chapter. For now, let’s see how this all works.
As we have been doing, fire up both the Rails server and the BackgrounDRb server so that we can create a new AmazingWidget. You also need to have a Memcached server running. This can easily be accomplished, assuming that you have Memcached installed, like this:
$ memcached -d
This runs an instance of Memcached in the background.
Finally, let’s open an instance of the Rails console so that we can check the cache and find out how things are going:
$ ruby script/console
I know that this is a lot of different servers to start and get running, but trust me, it’s definitely worth it. Go ahead and create a new AmazingWidget as we did earlier. Then go to the Rails console and run the following:
$ puts MiddleMan.worker(:amazing_widget_worker).ask_result(’MC Widget’)
I created my new AmazingWidget with the name of “MC Widget,” so that is also the job_key. Replace that as the parameter to the ask_result method if you created your AmazingWidget with a different name. We have not seen ask_result before. Simply put, the ask_result method takes the key you used to store your messages into Memcached and then queries Memcached to get back the result.
Chances are, if you were quick enough, you probably got back nil from that statement. That is because BackgrounDRb had yet to start processing that task. Keep rerunning that command, and eventually you will see it start printing the following:
Generating... MC Widget
When you see that, you can wait 30 seconds and run it one last time. You should then see the following:
Completed... MC Widget
That’s it! We quickly updated our application to allow BackgrounDRb to store results into Memcached. From there it was a stone’s throw to actually using those results in our application.
Conclusion
BackgrounDRb is a very stable and mature library that has been around for quite a few years. This means that it has a good-sized installation base, a plethora of documentation, and plenty of quick support on the web. It allows you to easily offload your heavy and/or slow processing tasks to the background and move on, in a rather nice fire-and-forget sort of way.
Like most DRb-based libraries, BackgrounDRb suffers from a scalability problem: DRb, as a whole, quickly becomes too cumbersome, slow, and unstable when you start to outgrow a small installation.8 This means that using the clustering aspects of BackgrounDRb, while cool, could prove to be more trouble than it’s worth. What I might recommend is maintaining a one-to-one ratio of application servers to BackgrounDRb servers. This means having a dedicated BackgrounDRb server for each of your servers. That way you don’t have to try and send a lot of data across the wire, and things should scale a little better.
Overall, BackgrounDRb is strong and reliable. It has some quirks, and there are times when I wish a few different architectural choices had been made. As a side note, having to type BackgrounDRb this many times has nearly driven me crazy. Be thankful that you have to type it only a few times when you are actually using the library!
As you will see in the next chapter, there are alternatives to BackgrounDRb, so be sure to explore them as well.
Endnotes
1. http://backgroundrb.rubyforge.org/
3. http://github.com/collectiveidea/delayed_job/tree/master, http://www.hoptoadapp.com/. Also see Chapter 10, “Delayed Job.”
4. http://en.wikipedia.org/wiki/Round-robin_scheduling
5. Obviously if this were a real-world application, I would have cleaned up all the redundancies between Widget and AmazingWidget. But for the sake of these examples, it’s just easier to demonstrate them as separate classes and systems.
6. This is what the documentation on BackgrounDRb has to say about the persistent_job method: “persistent_job is a thread local variable and will refer to currently running queued task can be used from thread pool as well.” To clarify this point, this call is thread-safe.
7. http://www.danga.com/memcached/. Also see Chapter 6, “Politics.”
8. Your mileage may vary, but for me, after about 20 servers, things can start getting pretty hairy as far as DRb services are concerned.