Chapter 4 Starfish
Starfish1 bills itself as “a utility to make distributed programming ridiculously easy.” I think that is a bit of an overstatement, but Starfish certainly can make distributed programming easier. The library was built by Lucas Carlson of the website http://mog.com, who also co-wrote Ruby Cookbook (O’Reilly Media, Inc., 2006).2
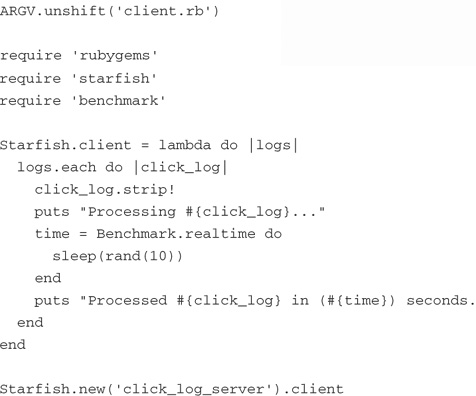
Starfish sets out to fulfill two different, but useful, roles in the distributed programming world. In its first role Starfish sets out to play the part of a facilitator, setting up quick servers and clients that can be used to call and execute distributed code. In its second role Starfish implements a Ruby version of the popular MapReduce3 distributed computing paradigm.
This chapter first looks at how to use Starfish to facilitate communication between distributed programs. Then you’ll find out more about how we can use it to write MapReduce functions.
Installation
Starfish was built on DRb and Rinda as well as Lucas’s own MapReduce library. To install Starfish we can use RubyGems:
$ gem install starfish
You may have to run this command with root privileges, depending on your environment. After installation you should see a message similar to the following:
Successfully installed starfish-1.2.1
Getting Started with Starfish
The documentation for Starfish gives a simple piece of sample code to get us into the flow of the library:
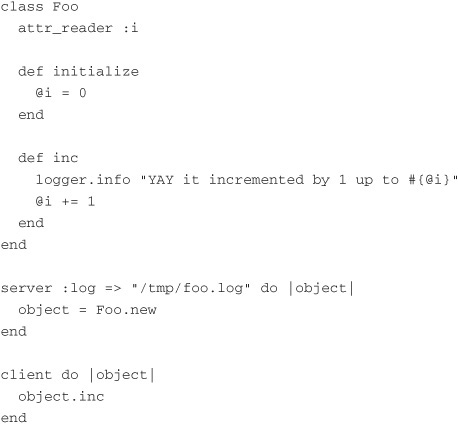
The documentation then tells us to run this code using the starfish binary. So assuming that we saved this file using the rather original filename of foo.rb, we would execute this code like this:
starfish foo.rb
At this point you see something like the following printed on the screen:
server started for #<Foo:0x184e774 @i=0>
After that you will see nothing. I recommend killing the process quickly so that you don’t fill up your hard drive. If we examine the code, we see that the inc method on the Foo class is writing to the log file we created at /tmp/foo.log. That is why we didn’t see anything print to the screen after we executed our file. Looking at our log file, we should see something like the following:
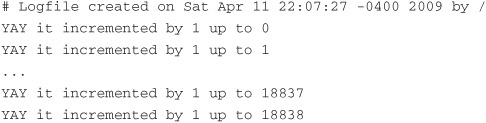
It’s good to know that the library works. Now let’s take a closer look at how it works, and then we’ll try to make it do a few interesting things:
The magic server and client methods appear courtesy of the starfish binary (more on that in a minute). Each of these methods takes a Hash of options. As you see with the call to the server method, we are telling it where to write the log file. The other parameter these methods take is a block. It is this block that forms the basis of the implementation of our server and clients.
In the case of the server method the block yields an Object. This Object needs to be set to the instance of whatever object you want to set up. As we talked about in Chapter 2, “Rinda,” you can serve up only instances of Objects, not a pointer to the Class itself. With the client method we are yielded the instance of the Object we set up in the server method.
One quick point that I think is important to note, and you may have already figured this out by the log file, is that the block you use for the client will be run forever. It is called within an infinite loop and stops only if you raise an exception or exit the system. This is definitely something to be wary of. The client would run forever and keep asking the server if it had any messages that needed attention. If messages are found, the client processes them and then asks for more. We’ll see a better example of this later in the chapter.
“Hello World” the Starfish Way
Let’s look at how we can implement our standard “Hello World” application using Starfish. We’ll start with writing it using the starfish binary that comes bundled with the gem. Then we’ll look at what we would need to do to get the same application to work without the help of the binary.
Using the Starfish Binary
In the brief example that comes with Starfish, we saw the server and client both written in the same file. Although that is great in a sample file, in real life we would most likely want to have those in two separate files, potentially even running on different machines. So let’s first look at what we would want our server file to look like:
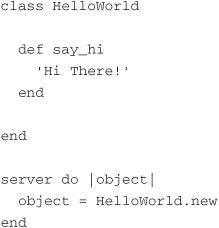
As you can see, our “Hello World” server is not that much different from the sample code that ships with Starfish. We have a HelloWorld class, and in our server block we create a new instance of that HelloWorld class and assign it to the object yielded by the server block. Assuming that this was in a file called server.rb, we would run it from the Terminal window like this:
starfish server.rb
However, when we run this, we receive the following error:
You must specify a client
To fix this error we have to modify our server slightly:
Notice that we added client {} to the bottom of the server file. The reason for this appears to be a bug or flaw in the Starfish architecture. Starfish expects to see both a server and a client declared in the same file when it is run with the starfish binary. It is easy enough to work around, but, as you’ll see shortly, a few workarounds must be carried out, making Starfish a less-than-stellar way to accomplish the task at hand. But it does have its benefits, which is why we are going to keep pushing on.
Now when we run this, we should see the following output:
server started for #<HelloWorld:0x184a764>
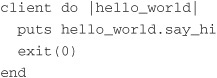
Now we can turn our attention to the client for our “Hello World” application:
Now we can run this as follows:
starfish client.rb
What happens when we run this? We see an oddly familiar, yet different, error message:
You must specify a server
We saw something similar earlier with our server. All we should need to do is add server {} to our client, and we should be all set. Right? Well, let’s see what happens if we add that bit of code and rerun our client:

Oops! That certainly didn’t have the outcome we expected. In fact, it seemed to make matters worse. This appears to be one of the biggest quirks with Starfish. When you use the binary it comes with, it names the “server” after the filename. So, in our example the server that is hosting our “Hello World” application is named server.rb, because that’s what the file it was started on was called. Because our client is called client.rb, it is searching for a server with that name, which doesn’t exist.
So how do we solve this problem? Well, we can rename client.rb to server.rb, but most file systems, at least the ones I know of, don’t like to have two files in the same location named the same thing. Plus, it would be weird to have a “client” named server.rb. We’ll just have to find a better way.
Here’s how we fix it:
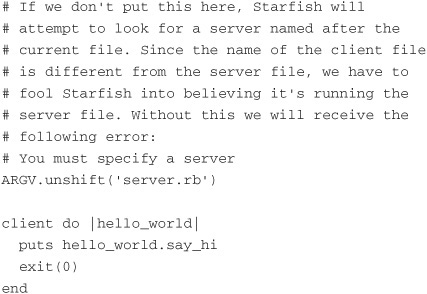
To solve the problem, we need to trick the starfish binary into thinking it is running a file called server.rb. That’s why we added the following line:
ARGV.unshift(’server.rb’)
This is certainly not the most elegant solution, but it definitely gets the job done. We can confirm this by running the file. We should get the following:
Hi There!
Well, that is definitely better. Although still not great, it is definitely better in that it actually runs and gives us our desire output.
Saying Goodbye to the Starfish Binary
Although using the starfish binary is great for these examples, we might want to embed these servers and clients into a standard Ruby client. So how would we go about doing that? Well, let’s start by seeing what happens when we run our “Hello World” server using the standard ruby binary:
ruby server.rb
We get the following exception:
server.rb:9: undefined method ’server’ for main:Object (NoMethodError)
This isn’t terribly surprising, because at the very least we need to include the Starfish libraries. So let’s add the following to the top of our server.rb file:
require ’rubygems’
require ’starfish’
Now when we run it, we get an error similar to the following:
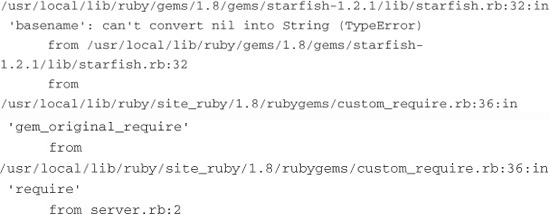
So what is going on here? Well, it appears to be another decision made in the Starfish architecture. When we require starfish, it executes the following code:
@@options = {
:log => “#{Dir.tmpdir}/#{File.basename(ARGV.first)}.log”
}
As you can see, it is trying to get the basename of the first argument passed into the binary. This works great when you are using the starfish binary, because it is the receiver of the ARGV list. However, because we are using the ruby binary, we don’t have access to that information.
So how do we fix this? We fix it in a similar way to how we fixed the error we were getting with our “client” earlier. Before our require statements, we need to add the following line:
ARGV.unshift(’server.rb’)
Again, this fools Starfish into thinking it is running from a file called server.rb. Now let’s try to run our “server” again:
server.rb:13: undefined method ’server’ for main:Object (NoMethodError)
Now we’re back to the error we had earlier when we started trying to run our “server” without the starfish binary. Why is that? The reason is simple. When we use the starfish binary, it creates a server and client method on Kernel, which is how we can use these methods without error. However, since we are not using the binary, we have to alter our “server” a little more:
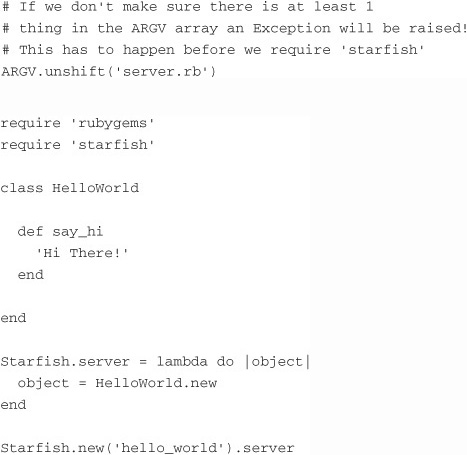
Because we no longer have access to a server method on Kernel, we need to call it from the Starfish class directly and assign it a lambda to use for the “server.”
After we create our server lambda, we can start the server itself with this line:
Starfish.new(’hello_world’).server
When we run this, we should see output similar to the following:
server started for #<HelloWorld:0x18a3da0>
Hooray! The server is now functioning without error. Notice that we didn’t have to add the client {} to the bottom of the file. This is because we are not using the starfish binary, which was trying to run the “client” as well as the “server.”
What about the client? Again, if we try to run our existing client, we get the following error:
client.rb:11: undefined method ’client’ for main:Object (NoMethodError)
By now you should understand why that is, so let’s fix it:
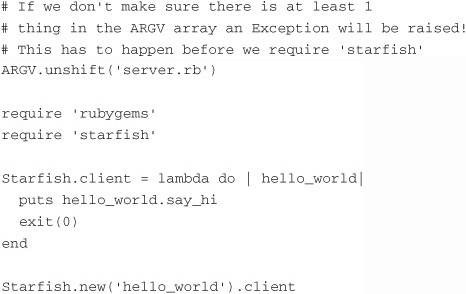
The changes we’ve made aren’t that different from the ones we’ve made to our server. Now we should be able to run this and get the following:
Hi There!
Great! Now we know how to get a Starfish server and client running independently of the starfish binary. It is a bit troublesome, and these hacks could be fixed quite simply in the code base, but they are certainly not insurmountable.
Building a Distributed Logger with Starfish
Now that you have a basic understanding of Starfish, and how to run it using independent files, let’s take a look at how we can build a distributed logger with the library. This will be a little trickier than you are used to, due to the Starfish architecture. As noted earlier, Starfish runs both the server and the client in infinite loops. This is fine for the server, because we want it to pick up any logging messages we may have, but we certainly can’t run our client in one big infinite loop just so that we have access to the distributed logger object.
So how will we get around the design of Starfish to allow us to retrieve the distributed Logger object and use it outside of the block? It’s actually not all that difficult. First, let’s look at our server:
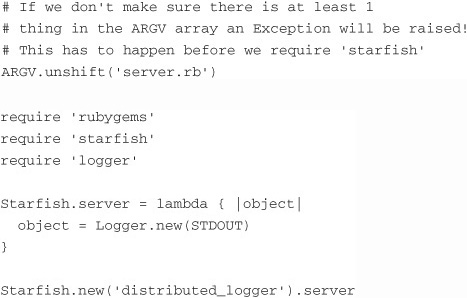
Nothing is new here that we haven’t seen in our previous examples with the “Hello World” application. The only real difference is that we are serving up a Logger instance instead of a HelloWorld instance. Now our client proves more difficult. Here is what we want the client code to look like:

The problem is that, when we run this, we get an infinite printout that looks like this:
Notice that we don’t see “bye bye” anywhere in there. The good news is we are not far from where we need to be. Let’s look at how we can fix this code to get the desired results:
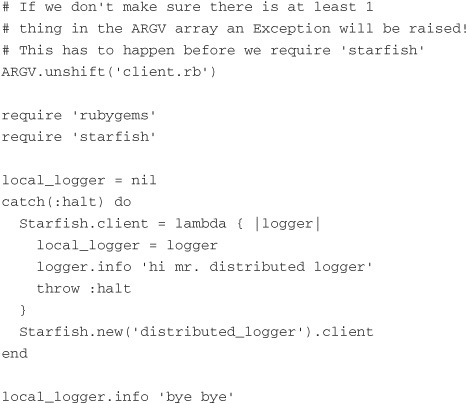
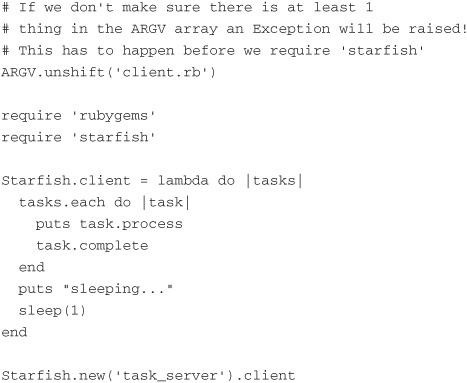
The large difference in this code example from the previous example is the use of the Ruby throw/catch syntax. First we wrap our Starfish code in a catch block. It’s important that we also wrap this line:
Starfish.new(’distributed_logger’).client
If we had just wrapped the lambda that we send to the client class method, this would not work. When we create a new instance of the Starfish class and call the client method on it, that is what runs the lambda we passed in, and that is what eventually calls the throw directive.
Finally, in the lambda we call throw :halt. When the lambda is run, it sets the local variable local_logger to the distributed Logger instance, calls the info method on it with a message, and then calls the throw. Our catch block gracefully handles the throw and lets our application move on to call the info method on the local variable local_logger and send it the message “bye bye.”
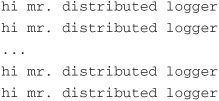
Now when we run this code we should get the following output on our server:
hi mr. distributed logger
bye bye
Again, a few more hacks to make this all work, but again, they are not insurmountable—just unfortunate.
Letting Starfish Shine
So far we have looked at how Starfish works. We’ve talked a lot about its weaknesses, but we haven’t given the library a real chance to shine, so let’s do just that.
To me, Starfish really excels as a means to do distributed queuing services. By no means is it the only one of its kind in this area, or even in this book, but it certainly is one of the easier systems to use.
In this example we will create a server that serves up tasks for the client to process. Sometimes there will be tasks, and sometimes there won’t be. Sometimes there might be n tasks, and sometimes there will be just one.
In the real world these tasks would most likely be fed from a database, the file system, or some other location. In our simple example we will feed the server by creating task files in a specific directory. The server then will serve them to the client. The client will first process the task and then complete the task.
Let’s see what our server will look like:
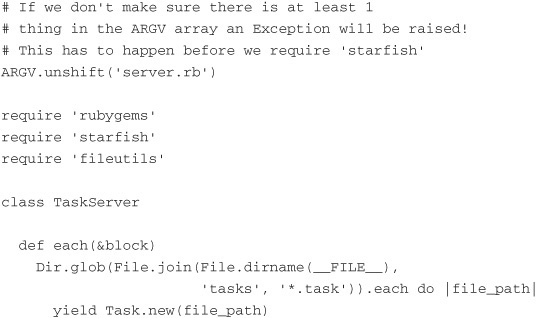

First we create our TaskServer class. This class contains just one method, each. The each method looks in a directory called tasks that is on the same level as the file we are running. In that directory it finds all the *.task files. If it finds any files, it loops through them, creates a new Task instance, gives it the path to the .task file, and then yields that new Task instance.
Our Task class is defined next. Again, this class is quite simple. It takes one parameter on initialization, which is the path to the .task file. It then defines process and complete methods. In the process method we read the file and return its contents. In the complete method we delete the .task file from the system so that we don’t accidentally process it again.
It is important to note that the Task class includes DRbUndumped. If we didn’t include DRbUndumped into the Task class, we would get the following error:
NoMethodError: undefined method ’process’ for
#<DRb::DRbUnknown:0x183ce70>
You’ll remember from our discussion of this subject in Chapter 1, “Distributed Ruby (DRb),” in the section “Proprietary Ruby Objects,” that we can’t send a proprietary class definition across the wire, unless we are sure that the client also has that same class definition available to it. If the “client” already had the Task defined, we wouldn’t get this error. Because it does not, we have to access the Task class by reference instead of by value.
Now let’s look at our client:
Our client asks the server for any tasks it might have. It then iterates over those tasks, calls the process method, printing its output to the screen, and then calls the complete method. When the client is finished processing the tasks, it sleeps for a second before starting the cycle again.
Here is a simple script that populates tasks for you to test this:
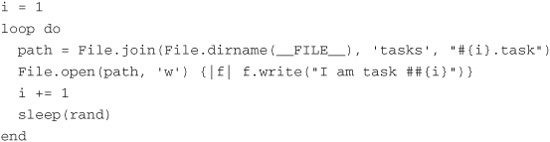
If we fire up the server, client, and script to create some tasks, we should see output similar to the following printed on our client’s screen:


As you can see, this is an easy way to set up a simple queuing service. It is not a lot of code, and you can get it running fairly quickly. In Part III, “Distributed Message Queues,” we will go into further details on using distributed messaging queues.
MapReduce and Starfish
In theory, the concept of MapReduce is a simple one, and its name, sort of, indicates what it does. The MapReduce design paradigm is simple. It maps a collection of data and then reduces it to a smaller collection. The most famous implementation of MapReduce comes from Google. At Google MapReduce is known as the hammer. It is named that because it is the tool Google turns to most often to deal with its incredibly large sets of data.
Google’s implementation of MapReduce is known to be incredibly complex, because it handles redundancy and failures and even detects slow machines. Google is known to run a million or more MapReduce programs a day. If that isn’t an endorsement for why MapReduce is useful for processing large data sets, I don’t know what is.
As I mentioned in the introduction to this chapter, Starfish ships with an implementation of the MapReduce paradigm. Starfish allows you to map either a collection of database objects, using the ActiveRecord4 object relational mapping framework, or a flat file. Let’s look at how Starfish approaches each of these types of datasets.
Using Starfish to MapReduce ActiveRecord
To help demonstrate how to create MapReduce jobs with Starfish and ActiveRecord, let’s build an application that will process click logs we have stored in our database. These logs get created when a user clicks a link on our site. We create an entry in the database representing each click. We then need to do some processing on each of these clicks. The problem we run into is that it can take up to 10 seconds to process each click log, and it can be very CPU-intensive to do so. Because of that, we want to create a MapReduce that will distribute that workload across a lot of different computers.
Although getting Starfish to create a mapping of ActiveRecord objects is fairly straightforward, we need to do a bit of prep work to get our examples set up so that they’ll run. Let’s do that now so that we can get to the good stuff.
First, let’s create our ClickLog model in a file called click_log.rb:
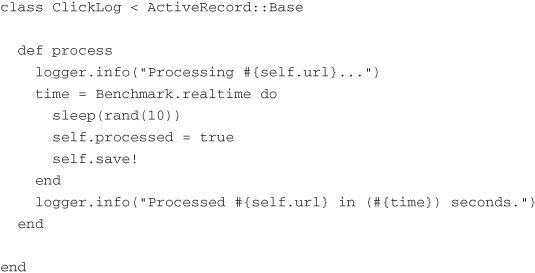
Here we have a simple ActiveRecord::Base model, ClickLog. The model has a method called process that we need to call. It does the heavy lifting of processing our log entry, and it can take up to 10 seconds to run.
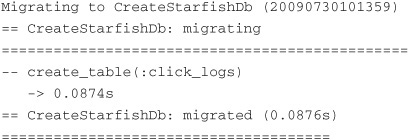
The ClickLog model needs a database table to speak to, so we must create a migration to generate that table. Of course, we don’t have to create a migration. We could just create the table manually either through the command line or through a GUI tool of some sort, but this is a little easier. Let’s create our migration in a folder called migrations and name it 20090730101359_create_starfish_db.rb.5 This migration should look like this:
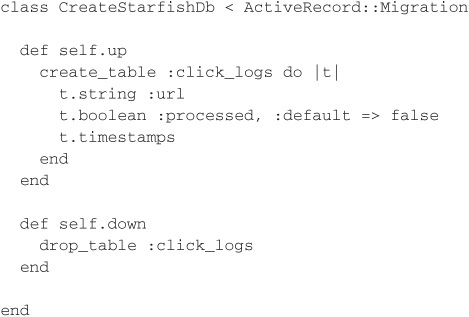
This creates a simple table called click_logs that has a column called url that houses the URL of the link the user clicked. It also has a column called processed that defaults to false. We will set it to true in the process method on the ClickLog model after we finish processing the record. This will prevent us from processing the record more than once.
Finally, we need a file that will establish a connection to a database for us, run the migration, if necessary, and populate some data for us. To do that, let’s create a file called ar_bootstrap.rb and make it look like this:
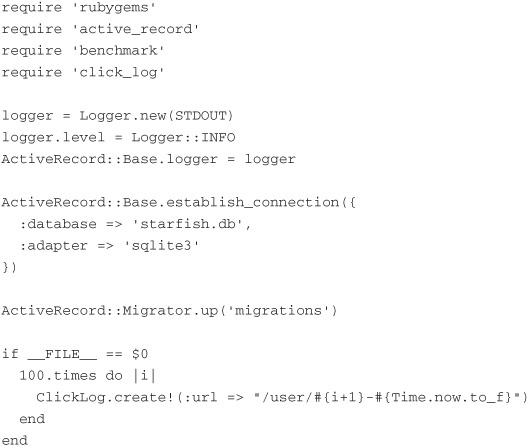
This file looks more intimidating than it actually is. First we require certain necessary classes. In particular, we need to add the ActiveRecord libraries and our ClickLog model. After we do that, we need to configure ActiveRecord itself. ActiveRecord requires a logger, so we configure a fairly simple instance of Logger that logs info level or higher messages to STDOUT (standard out). We then assign that logger to ActiveRecord::Base.logger.
Next we need to establish a connection to our database. For our example, we will use the file-backed SQLite36 database. To configure this, we call the establish_connection method on ActiveRecord::Base. We tell it the name of the database, or, in our case, the filename we want to use, starfish.db, and which adapter we will be using, sqlite3.
After we have established a connection to our database (by the way, it creates the file for you so that you don’t have to create it first), we can run the migration we created. We do that by calling the up method on ActiveRecord::Migrator and pointing it at the migrations directory we created earlier that has our migration in it.
Finally, at the bottom is some code that is designed to insert 100 records into the database. This code is found in the conditional statement at the bottom of the file; it looks like this:

This conditional block executes only if the current file that is being executed matches the name of our ar_bootstrap.rb file. This means that if we run the file directly, the conditional block executes. However, if we require the file, as we will be doing in another file, it does not execute the conditional block. The block simply loops 100 times and inserts 100 records into the click_logs table.
I admit that was a lot. But we’re pretty much done with the setup. Before we get to the fun stuff, however, we need to run the ar_bootstrap.rb file so that we can create our database, our table, and populate it with some examples. We can do that like this:
$ ruby ar_bootstrap.rb
This should output the following:
Now that our database is created and we have some data to play with, let’s create our server.
Earlier we talked about the different ways we can create a Starfish server—and client. I prefer not to use the “magic” trickery of the starfish binary and create a stand-alone executable file. This is my preference because it is very likely that you will create servers and clients that are executed from within another Ruby application, so by not tying our examples to the starfish binary we can easily port these scripts into larger libraries or applications without much trouble.
So, with that disclaimer out of the way, let’s take a look at our server:
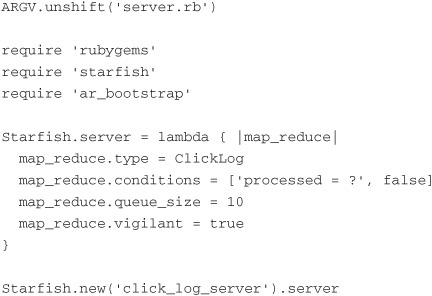
As mentioned earlier, we have to fool Starfish into thinking it’s running from its binary. That is why we have to insert the server.rb filename into the ARGV system Array. Remember that we can “name” this server anything we want, not just server.rb. But that is what we have been using so far, so why break with tradition? We also need to require the Starfish libraries, as well as our ar_bootstrap file, so that we can have a connection to our database as well as access to our ClickLog model.
Inside our lambda we use to configure the server, we set four different configuration settings. First, we tell Starfish that the type, or class, we will serve up is ClickLog. Next, we tell it that we want to work on rows in the click_logs table only when the processed column is false. Third, we tell Starfish to fill the queue with only ten records from the database at a time. This is an important setting, because by default it pulls all the matching records from the database. This isn’t good if that equals a million records!
These three parameters translate under the covers into the following ActiveRecord call:

The last setting, vigilant, tells Starfish whether it should exit the server when no more items are in the queue. By setting this value to true, we are telling Starfish to continue polling the database for new records forever, or until we stop the server manually. This is most likely the way you would want to run this type of example in real life, although it is nice to have the option for those one-off MapReduce jobs you want to run.
Finally, we start the server by naming it click_log_server.
Now our client code proves to be a lot simpler than the server code:
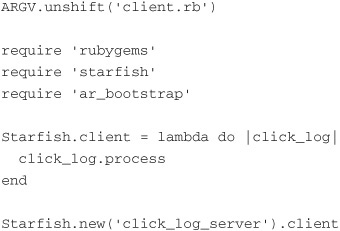
Again, we fool Starfish by making it think it is running from its binary and that the current file’s name is client.rb. We require our necessary code, and then we create a lambda for Starfish to execute for each ClickLog record it receives from the server. In our lambda we simply call the process method that we defined in our ClickLog model.
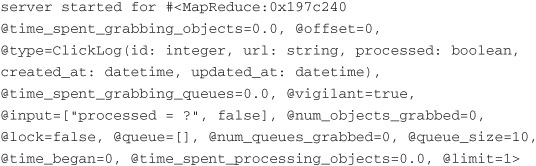
With our client now in place, we can start everything and watch it work its magic. First we need to run the server. When the server starts, we should see the following printed to the screen:
When we fire up our client, we should see that it starts to process the entries in our click_logs table:
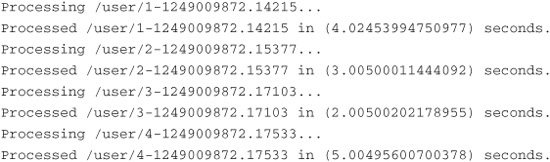
I recommend that you start more instances of the client and see what happens. You’ll see that the clients all start to get records to process. You’ll also notice that none of the clients get the same record to process. That is because the server keeps track of who is processing what record. It makes sure not to hand out that record again, but rather to hand out the next record in the queue.
Using Starfish to MapReduce a File
ActiveRecord isn’t the only input that Starfish can uses as a data source for your MapReduce programs. Starfish also reads through a file and delivers each line to each client, just like it did with each entry in the database when we were using ActiveRecord.
To start, let’s create a simple file called file_bootstrap.rb that we can use to populate a file filled with click logs we want to process:
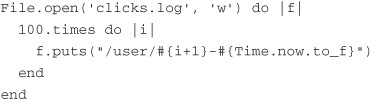
This creates a new file called clicks.log and fills it with 100 URLs for us to process. Let’s see what our server looks like for processing files compared to the server we used to dish out records in our database:

As you can see, we tell Starfish that the type of object we will serve up is a File. We then set the input to the clicks.log file we just created. As with our ActiveRecord implementation, we want to fill the queue with only ten entries at a time. In this case that means it will read the file ten lines at a time.
The next two configurations are unique to working with files. The first setting, lines_per_client, allows us to define how many lines of the file we want to send to the client at a time. Here we have set it to 5. This means that the client will be delivered an Array containing the five lines of the log file it has to process.
The last setting, rescan_when_complete, tells Starfish whether it should go back to the beginning of the file and start over. Although this might be useful on a few occasions, it is not helpful to us. In our example, if we had set this to true, it would just go back to the beginning of the file and start serving up each line again, causing us to forever be in a loop. To prevent an infinite loop, we will set it to false for now. As you will see in the following client, we are not removing the lines from the file, but rather just “processing” them.
Here’s what our client looks like:
As you can see, we are given an Array containing lines from the file that needs to be processed. We loop through each of these lines and process them.
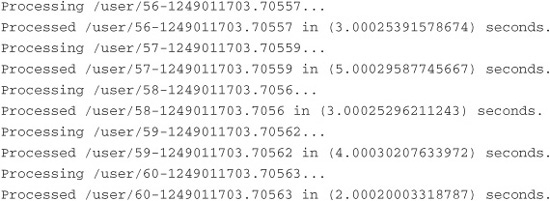
If we were to run both the server and the client, we would see the client successfully processing the records it is given:
This is all there is to working with files and Starfish. As you can imagine, this can prove to be very useful when dealing with extremely large access or error logs that need processing.
Conclusion
In this chapter we put the Starfish library through its paces and looked at where it excels and where it falls down. Although Starfish didn’t fare so well in our “Hello World” and “Distributed Logger” applications, we saw that it really shined when we used it to build a distributed task processing system.
Starfish also proves its worth when you write MapReduce programs. Its simple integration with ActiveRecord and files makes it a snap to get up and running and start distributing the processing of these records across many different machines. On that note, though, it is a shame that Starfish doesn’t have a way to write to an API for creating MapReduce tasks. It would be nice to be able to plug in another data source that isn’t ActiveRecord or a file and not have to hand-roll it all.
Although this is definitely a well-written library, I found that it fails in a few areas. The areas in which Starfish doesn’t succeed are easy to fix; I would love to see Lucas Carlson make a few changes. At that point I’m sure Starfish will be a more prominent player in the world of distributed programming with Ruby, particularly when it comes to writing MapReduce applications.
Carlson has built a very simple and easy-to-use library with Starfish that can make using distributed queues quite easy. A few bumps in the road occur with its use, but its ease of use should make the couple of simple hacks you need to do worth the hassle.
Endnotes
1. http://rufy.com/starfish/doc/
2. http://oreilly.com/catalog/9780596523695/
3. http://labs.google.com/papers/mapreduce.html, http://en.wikipedia.org/wiki/MapReduce
4. http://en.wikipedia.org/wiki/ActiveRecord_(Rails), http://ar.rubyonrails.org/. ActiveRecord can be installed using RubyGems: $ gem install activerecord
5. I know that seems like an awful name for any file. However, ActiveRecord has pretty strict requirements for the naming of its migrations. For example, each migration must start with a unique timestamp. The name that follows that has to be the underscored version of the migration class name. I know it’s pretty crazy, but that’s just the way it is.
6. http://www.sqlite.org/. In addition to having SQLite3 installed, you need to install the SQLite3 gem to have access from ActiveRecord to the SQLite3 libraries. This gem can be installed using RubyGems: $ gem install sqlite3-ruby.