Chapter 10 Delayed Job
This book has covered many different ways to handle background tasks. We have talked about using distributed messaging queues, such as RabbitMQ and Starling. We have discussed using token workers, such as Politics, to process those queues. We also have talked about using background servers, such as BackgrounDRb, to hand off those tasks so that they can be processed. All these approaches have their advantages and disadvantages. Some offer higher performance, some offer greater redundancy, and some offer simple interfaces.
In February 2008, Tobias Lütke1 announced the release of the Delayed Job2 plugin. This plugin was extracted from the Shopify3 project he works on. Tobias wrote Delayed Job with the idea that it would combine the best parts of these other systems while trying to leave out the bad parts.4
The idea behind Delayed Job is simple: Send the task you want to be performed in the background to the queue. In the case of Delayed Job, the queue is database backed. Then start a background process that pops tasks off the queue, locks them, and tries to process them. When the task is finished, it is marked as complete. If there is a problem, the error is recorded, and the task is tried again. Sounds simple, right? Well, let’s dive in and see if that is in fact the case.
Installation
I made the following disclaimer in the preceding chapter, but I feel it would be wise to repeat it:
Before we jump into installing and configuring Delayed Job, let me state that I’m assuming you are already familiar with Ruby on Rails, its structure and layout, what a Rails plugin is, and other such generalities.
Now, with the formalities out of the way, let’s get going. First, let’s create our new Rails project:
$ rails djob
With our Rails project created, we can install Delayed Job. Unlike BackgrounDRb, Delayed Job has no prerequisite gems that need to be installed. So installing the plugin is simply a matter of running the following command from within the Rails application folder:
$ ruby script/plugin install
git://github.com/collectiveidea/delayed_job.git
I would like to take this opportunity to point out that the URL we used to install the plugin is actually a fork of the original project. Currently this fork is generally considered to be the best version of Delayed Job. As you will see in a minute, it has a few enhanced offerings, including a generator to generate the necessary migrations and files we need. This may change in the future. Should you want to use Tobias’s original version of the project, or if he merges in the changes from other forks, you can find the original version at http://github.com/tobi/delayed_job/tree/master.
As I mentioned, we need to generate a migration to create the table that Delayed Job will use to store the tasks you ask it to perform. To do that we can use the built-in generator to create the migration:
$ ruby script/generate delayed_job
This should generate the following migration:

As you can see, the delayed_jobs table is actually very simple and straightforward. We will look at some of these columns in a bit more detail later in this chapter. I suspect that most columns will be pretty self-explanatory, because they are well named.
With the migration generated, let’s run it so that we can add the table to the database:
$ rake db:migrate
That’s it. Delayed Job is now installed and ready to accept tasks from our application.
Sending It Later with Delayed Job
One day you are in the shower when you have a brainstorm for what will be the next “killer” web app. Wouldn’t it be great if there were a website where people could upload their videos and share them with the rest of the world? How could it fail? It’s a great idea, and no one else has done it before.
You rush to the phone, soaking wet and with shampoo still in your hair, and call me about your great idea. I rush right over to help with the coding. Later that afternoon, after I insist that you put on some clothes, we launch the beta site, and the visitors start to pour in. There’s a problem, though. When people upload their videos, it can take up to a minute for the server to encode them into the proper video format for use with the site. The visitors are quickly leaving the site because they don’t want to wait that long. What should we do?
Delayed Job can come to the rescue. Let’s take a look at how it can help solve our video encoding problem.
So what does our code look like right now? Well, first we created our Video class with the following command:
$ ruby script/generate scaffold video title:string
description:text file_name:string encoded:Boolean
That created our migration, controller, and model classes. Next we updated our Video class to add a method to do the encoding. So now our Video class looks like this:

As you can see, the encode method can take up to 60 seconds to complete. That’s a long time to expect our visitors to wait for the page to return to them. Let’s look at what the create action on our VideosController looks like:

After we successfully save the new video, we call the encode method, and the user is forced to sit and wait until it is finished.
So how can we use Delayed Job to fix this? The answer is surprisingly easy. We just need to invoke the send_later method. Let’s see what our create action looks like when we call the send_later method, and then we’ll talk about what it does and where it comes from:

All we did was replace the call to the encode method with a call to the send_later method, passing in :encode as the argument to the method. The send_later method works pretty much like the send method does in Ruby, with one big difference. When you call the send method in Ruby, you pass it the name of the method you want to execute, and the send method then executes that method. The send_later method also expects you to pass in the name of the method you want to execute. In our case we pass in :encode, but it does not execute the method. Instead, the send_later method actually creates a new task in the delayed_jobs table, with a message saying that the encode method should be executed when the task is run.
Now when we use our Rails application to create a new video, we see that the server very quickly responds with our new flash message telling the user that his or her video is being encoded and will be available shortly. If we looked in the database, we would see that there is now a task sitting in the delayed_jobs table. We should also see that the encoded column on our new video record is set to false because it has not yet been encoded.
So how do we process our new task? There are two ways to process tasks. The first is recommended for development purposes because it runs in the foreground and provides simple debugging:
$ rake jobs:work
In production it is recommended that you use the following code, because it automatically daemonizes:
$ ruby script/delayed_job start -e production
The delayed_job script is another reason why you should use the aforementioned fork of Delayed Job. That script is not in the original project, and it comes in handy when you’re trying to start a daemonized instance of the process.
Help with script/delayed_job Parameters
script/delayed_job has a handful of useful parameters that can be passed in when starting/stopping it. Rather unfortunately, it also has two different ways to find out what those parameters are.
The first way is to simply call the script without any parameters:
$ ruby script/delayed_job
Under the covers the script uses the Daemons5 gem to wrap itself with start/stop/restart commands. Calling the script without any parameters gives you a printout of what the Daemons gem expects for parameters.
The second way to find out what parameters are available is with the following:
$ ruby script/delayed_job --help
This prints the parameters that Delayed Job allows you to pass in that affect its operations. For example:

Running the command both ways provides you with a good understanding of how to configure the script to meet your needs.
For our examples, let’s use the Rake task, because it provides some helpful output.
With the Rake task running, we just need to wait up to 60 seconds before we see that our task has been processed. When it is processed, we should see something similar to the following:
*** Starting job worker host:macbates.home pid:22858
1 jobs processed at 0.0240 j/s, 0 failed ...
To verify that it actually worked, we can look at the encoded column for our video record and see that it is now set to true.
Custom Workers and Delayed Job
As you just saw, the send_later method makes it incredibly easy to use Delayed Job. But what happens if we want to perform something more complicated than just calling a method on a class? For example, let’s look at the great video website we’ve built. Our site uses QuickTime for its video codec, so do we need to waste precious resources re-encoding a video that is already in the correct format? I don’t think so. We need to encode only those pesky .wma Windows files that people upload.
To solve this problem, we have two choices. We could change our encode method in the Video class to look like this:

That works. But now we’ve cluttered up our model with crazy logic determining whether we should actually perform the encoding. So what are the alternatives?
Well, Delayed Job allows you to create custom worker classes that can be added to the queue. Delayed Job requires that your class fulfill a simple interface. You just need to make sure that your class has a perform method on it. That’s it. Really. Just a perform method. You don’t need to include any modules or extend any classes.
Let’s see what our custom VideoWorker class would look like:

As you can see, we have a plain old Ruby class called VideoWorker. This class has an accessor called video_id. This will be the id of the video we want to work on. We have an initialize method that lets us set the video_id attribute. Finally, we have our perform method. The perform method finds the correct, unencoded video. If it exists, the method checks to see if the format is a Windows Media file. If it is, perform calls the encode method. If not, it marks the video as encoded, saves it, and then finishes.
Now that we have our custom VideoWorker, how do we use it to create a new task for Delayed Job to perform? Well, let’s take another look at our create action in VideosController and see how it changes:

We replaced the line that called the send_later method with the following:
Delayed::Job.enqueue(VideoWorker.new(@video.id))
We create a new instance of the VideoWorker class we just built and pass it in the id of the video object. We then call the enqueue method on the Delayed::Job class and pass it the VideoWorker instance we just created. That then creates the task for us in the database. Again, that’s all there is to it. When the Delayed Job process runs, it executes the perform method on our instance of the VideoWorker class we created, just the same as if we had used send_later instead.
Easy Workers, and a Few Extra Little Helpers
While writing this book I became enamored with Delayed Job, and I have started to use it on pretty much every project. In doing so, I have collected a handful of useful little extras into a gem, delayed_job_extras, which can be found at http://github.com/markbates/delayed_job_extras/tree.
So what are these extras? Well, there is support for Hoptoad notifications. This means that instead of just sticking an exception in the database, Delayed Job will also send a message to your Hoptoad account so that you can track the error.
There is support for the is_paranoid gem. This will “soft” delete jobs after they have been processed. The benefit of this is reporting.
Which brings us to…the stats method on Delayed::Job. This will tell you things such has the total jobs in the system (by worker), the number of remaining jobs, the number of processed jobs, and the number of failed jobs.
Finally, it also gives you a base worker class, Delayed::Worker, which you can implement for your custom workers. This will properly handle Hoptoad notifications, should you use them, so you don’t have to. It also gives you a logger method so you have easy access to the RAILS_DEFAULT_LOGGER constant.
The Delayed::Worker class also helps you to DRY up your code. Quickly looking at our VideoWorker, we would rewrite it to look like the following using Delayed::Worker:

It doesn’t look like we changed much—in fact, we didn’t. We made VideoWorker a subclass of Delayed::Worker and we changed the method definition of perform to use a class level method named perform and pass it a block. With those few changes, however, we now have Hoptoad support, we can now search through our delayed_jobs table for jobs for this specific worker, and we can change our code to create a new job from this:
Delayed::Job.enqueue(VideoWorker.new(1))
To this:
VideoWorker.enqueue(1)
That is much more readable!
There are a few more tricks up this gem’s sleeve, but I’ll let you dig into them a bit more, should you want to.
It’s Just ActiveRecord
The Delayed::Job class is just a souped-up ActiveRecord::Base class. That means we just use it to query the delayed_jobs table, just like any other ActiveRecord::Base class.
For example, from inside the Rails Console we can make a call like the following:
$ puts Delayed::Job.first.inspect
And we should expect to see something like the following returned:

Now you can use the Delayed::Job class to build your own processor to run reports with, or anything else your heart desires.
Here is where I let you in on a little secret: The send_later method creates an instance of a class called Delayed::PerformableMethod. It passes the method you want to call and the current object’s information to this class. Then it calls the enqueue method on the Delayed::Job class, passing it the instance of Delayed::PerformableMethod, just like we did earlier. Now you know Delayed Job’s send_later dirty little secret.
Who’s on First, and When Does He Steal Second?
When you’re creating tasks in any large system, sometimes the issue arises of which tasks to process first and when certain tasks are supposed to run. Delayed Job has a simple system in place to help you schedule and prioritize your tasks.
Suppose our video site has become the largest and most popular video site on the web.7 Because we are the biggest and best, we will offer our users a premium service. The most exciting perk that comes with this service is that the user’s videos are encoded before videos from users who don’t pay for the service. We might also want to place the encoding of certain members’ videos even higher in the queue if they have enough positive ratings, or followers, or some other very Web 2.0/social networking type of qualification.
So how do we place such a video higher in the queue? We assign it a priority number. So far, whenever we have created a new task in the queue, it has been given a priority level of 0. All we need to do is pass a second argument to either the send_later method or the enqueue method. They both take the same arguments, so all the following examples apply to both.
To place a video higher in the queue, we just need to do the following:
@video.send_later(:encode, 1)
Because 1 is greater than 0, Delayed Job processes this video first. When Delayed Job goes to fetch tasks from the delayed_jobs table, it appends the following to the SQL it generates:
priority DESC, run_at ASC
It first sorts on the priority column, with records of the highest priorities first in the list. It then sorts by the run_at column, getting the oldest records first (but we’ll get to that in a minute).
Because the priority column is just an Integer, we can use both positive and negative numbers when assigning priority. For example, our paid premium members get a priority of greater than 0, our nonpaid members get a priority of 0, and our unverified new users get a priority of less than 0.
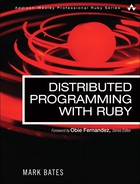
As you just saw, the run_at column does just what its name suggests: It allows us to tell Delayed Job when we want to run a particular task. For example, we want to create a task for each of our users that charges their credit cards on the first of each month. We also want to make sure that those tasks get a very high priority, because they’re the most important to the business. To do that, we might create a custom worker like the following. (Please note that unless you’ve actually created all the code to back all of this, the following examples are just for show, not for running.)
When the user signs up for the premium service, we would add a task to the system that charges her credit card immediately, with a high priority, such as this:
Delayed::Job.enqueue(PaymentWorker.new(@user.id), 1000)
We give our task a priority of 1000, ensuring that it gets attention pretty quickly. In our PaymentWorker we find the user and attempt to charge her credit card. If we succeed, we create another task with a high priority of 1000 and set it to run at the beginning of the next month. Then we send the customer an email letting her know we charged her account. Should the payment fail, we send the customer an email letting her know that it failed, and we add another task that tries again the following day to charge her account. But this time we make it even a higher priority to ensure that it gets first attention.
You can rest assured that Delayed Job is smart enough to not run your task until its time has come. With that said, Delayed Job makes no guarantees that it will run your task at the precise time you set it to be run. The column run_at is slightly misnamed. It really should be named run_after_at.
Configuring Delayed Job
Normally a section on configuring a library would be at the beginning of the chapter. I just felt that to help you understand the relatively few configuration settings that Delayed Job offers, it would help to understand what Delayed Job does and how it works.
To set our configuration settings, we would create an initializer file, delayed_job.rb, in the config/initializers directory, that looks like this:

So what do these settings mean, and what are their defaults? Let’s start with the first one:
Delayed::Job.destroy_failed_jobs = false
By default, if a task continues to fail and has hit the maximum number of attempts allotted, Delayed Job purges (read deletes) those tasks from the database. The downside of this, as you can imagine, is that unless you are paying close attention to what is happening with your tasks, it is possible that you will lose important information about what is causing these errors and how to fix them. By setting destroy_failed_jobs to false, you are telling Delayed Job to keep these tasks around, and not delete them, but to stop attempting to process them. The only downside of this approach is that you can start to clutter up your delayed_jobs table with failed tasks. However, I still recommend that you always set this to false.
As we just talked about, Delayed Job attempts to process a task for a set number of tries before it fails and finally declares the task a lost cause. The default setting for this is 25. You can change this setting like this:
Delayed::Job.const_set(”MAX_ATTEMPTS”, 3)
Delayed Job also uses the MAX_ATTEMPTS variable to determine the wait between each attempt at the task. The algorithm for setting the next run_at date is as follows:
Time.now + (attempt ** 4) + 5
If the attempt variable were the maximum default of 25, that would result in a date that is 100 hours into the future. This means that it would take a full 20 days between when the task first runs and when it has failed for the last time. The reason for this ever-increasing span of time is that it is assumed that as time passes, it is less and less likely that the task will succeed, so why keep pounding the system with it?
Finally, we can set a task’s expected maximum length as follows:
Delayed::Job.const_set(”MAX_RUN_TIME”, 5.minutes)
The default for MAX_RUN_TIME is 4 hours. This should be set to the amount of time you think your longest task will take. If a task exceeds this time, it is possible that another process can pick it up and start to work on it, so keep that in mind when defining this parameter.
I would like to share another configuration setting with you. This one is a bit different from the others, because it doesn’t necessarily configure Delayed Job. Rather, it helps you configure your code. I know that statement doesn’t make much sense, but please bear with me.
In one of your environments, such as production.rb, you can place the following code:

This performs a bit of “magic” under the covers. It creates an alias of the encode method we created on the Video class and sets it up to create a new task whenever you call it. For example, now if we call the following code:
@video.encode
it is the equivalent of calling this code:
@video.send_later(:encode)
The advantage is that we don’t have to update our code all over the place, because all calls to the encode method now generate tasks to be run later.
As you can imagine, this is a really cool feature. Unfortunately, I’ve never quite been able to make it work. I’ve tried it on numerous projects and on various types of classes, and I’ve never had any luck with it. I mention it because others don’t seem to have any problems with it. I hope by the time you read this I too can use this awesome feature. Try it for yourself and see if it works for you.
Conclusion
You have seen how Delayed Job is easy to integrate into our application and provides several flexible, easy-to-use ways of interacting with it. It comes full-featured out of the box, without any dependencies9 and very little configuration. Its simplicity means that you can easily integrate it into your application and that you have no excuse for not offloading those heavy tasks to a background process.
Despite its benefits, you still need to keep in mind a few issues when using Delayed Job. For a start, because it is database-backed, you still have the added overhead of creating a new ActiveRecord object and persisting it to the database when you create a new task. That’s a decent amount of overhead that shouldn’t be discounted, especially if the task you are offloading is just creating a record in the database.
Delayed Job should be used for slow tasks that can be performed offline, as well as tasks that may rely on external services that may go down. A good example of this is sending emails. Because it’s possible that the gateway might be down, it would be nice to have a reliable way of resending those emails later.
Like all the other technologies described in this book, using Delayed Job has pros and cons. You just have to ask yourself if the pros are the right pros for you, and if you can live with the cons.
Endnotes
2. http://github.com/tobi/delayed_job/tree/master
4. Of course, isn’t that what everyone tries to do when writing a library?
5. http://daemons.rubyforge.org/
6. http://github.com/blog/197-the-new-queue
7. Of course, we know this won’t actually happen unless we allow adult content. I’m not saying we should; I’m just saying we could probably make a lot of money if we did.
9. This is actually a little white lie. If you want to use the delayed_job script to start the process, you need to have the daemons gem installed for it to work. However, Delayed Job as a library requires no dependencies to work if you use the built-in Rake task.