
Chapter 2 Rinda
Chapter 1, “Distributed Ruby (DRb),” explored the DRb package that ships with Ruby. You used DRb to quickly build distributed applications. Although those applications were certainly functional and easy to code, they lacked a few key features and presented a few problems.
When reviewing all of our DRb applications, you will notice, for a start, that we hardcoded IP addresses and ports into both our servers and clients. This type of tight coupling of applications can be problematic in both production and development. It can make fault tolerance difficult to code for. And what do you do if you need to start the service on a different machine that has a different IP address? We could also create and attempt to maintain complex configurations, but in the modern world of cloud computing IP addresses fluctuate every time you launch an instance. So, keeping those configuration files up to date would be extremely complicated and prone to error. That is certainly not an option.
What about finding out what services, as a client, are available in our world of distributed applications? Again, we have been hardcoding our connection to the service we want to use. Let’s use a simple example. Say we want to send an email to a customer. We do that by writing to a mail service we have somewhere. What happens if that mail service is down and we want to write to a backup mail service? Do we just wait for the first call to time out, catch the exception, and then write to the backup? What if the backup is also down? Another timeout? Another exception? We need a way to get a listing of services that is available to us and then choose the correct service to use, or quickly raise an error.
Enter Rinda, a Ruby port of the Linda1 distributed computing paradigm. This paradigm allows an application, through the use of a RingServer, to detect and interact with other services on the network. This should help us solve some of the problems we were facing with our earlier DRb applications.
“Hello World” the Rinda Way
Let’s start by reviewing the “Hello World” application we built in Chapter 1. This will be a great way to see how a simple DRb application and a simple Rinda application differ.
I mentioned earlier that Rinda makes use of a RingServer. A RingServer is essentially a central clearinghouse for services, as shown in Figure 2-1. The life cycle for a typical RingServer with one service and one client basically goes something like this: The client asks the RingServer where to find a particular service. The RingServer responds with the service’s address. The client and service then communicate directly with each other (see Figure 2-2). The specifics are as follows:
1. The RingServer starts and begins listening on a broadcast UDP2 address.
2. A service creates a RingFinger that looks up and finds a broadcasting RingServer.
3. The service tells the RingServer where to find itself (for example, 127.0.0.1:8000), as well as what services it offers.
4. A client wants to find the service, so it also creates a RingFinger that again looks up and finds the RingServer.
5. The client tells the RingServer what kind of service it is looking for by using a Tuple template.
6. The RingServer responds by giving the client direct access to the original service on 127.0.0.1:8000.
Figure 2-1 Services list themselves with a central RingServer, which then coordinates all communication between the services.

Figure 2-2 The typical request life cycle of Rinda applications.

Building a RingServer is straightforward and simple. In Chapter 3, “RingyDingy,” we’ll discuss RingyDingy, a library that makes it even easier to use RingServers; but first we should write our own so we can understand exactly what it does.

Looking at the code for our RingServer, it should quickly leap out at you that we are making DRb calls. Why is that, you might ask? Simple. Rinda sits on top of the DRb library. This is great news for us, because we already understand how to use DRb. When we see lines like DRb.start_service and DRb.thread.join, we already know what they do. That allows us to focus on the actual RingServer portion of this code.
First we need to require the Rinda libraries. In particular, we need to require rinda/ring and rinda/tuplespace. Once we’ve done that and started the DRb service, we can start our RingServer with the following line:
Rinda::RingServer.new(Rinda::TupleSpace.new)
When we create our RingServer, we pass it a new Rinda::TupleSpace class. A TupleSpace3 essentially manages access to the Tuples4 it contains. Before I explain what a TupleSpace and a Tuple are, I would like to point out that even though we are starting a server, we did not have to bind the RingServer to any IP address or port. By default the RingServer binds to port 7647. You can change that by passing in an optional second parameter to the new method on Rinda::RingServer, like this:
Rinda::RingServer.new(Rinda::TupleSpace.new, 8080)
Now the RingServer will bind itself to port 8080.
Now, let’s talk about TupleSpaces and Tuples. I said earlier that a TupleSpace manages access to the Tuples it contains. But what does that mean? Let me give you an analogy that might make this a bit clearer. When you go into a coffee shop or grocery store, inevitably a bulletin board near the front door has a bunch of flyers pinned to it, advertising everything from guitar lessons to roommates to underwater basket-weaving courses. People come along and search the bulletin board, looking for something they need, or perhaps for a bit of a giggle. If they find a posting they like, they can either take it off the board so that no one else will see it, or they can make a copy for themselves and leave the original up there for others to see. We can think of a TupleSpace as that bulletin board. It is a place where we can post our services. The flyer is like the Tuple. In our current example we would be posting a “Hello World” service Tuple to the TupleSpace.
So, armed with a basic understanding of the world of TupleSpaces and Tuples, we can start to rewrite our “Hello World” service using Rinda. It should be noted that for the examples in this chapter to work, you must have a RingServer running in the background. It is also important to remember to restart your RingServer between each new example to avoid potentially confusing results. We will be iterating on many of these examples—if we don’t start/stop all our services between each build, things might start to get a bit confusing.
For now, let’s rebuild that “Hello World” service that we originally built in Chapter 1. Here is what our “Hello World” service originally looked like:

Now let’s look at what this service will look like when we rewrite it using Rinda:


Again you can see that we need to require the rinda/ring class. Our HelloWorldServer class shouldn’t look that different from what we are used to, except that we are now including the DRbUndumped module. Because we will send an instance of the HelloWorldServer class across the wire to the RingServer, we need to pass it by reference and not by value so that we don’t cause any exceptions on the client end if it doesn’t have the HelloWorldServer class definition. And chances are pretty good that the client won’t have the class definition for it, so why set ourselves up for errors?
After we start the DRb service, we find the RingServer we started earlier. We do that by calling the primary method on the Rinda::RingFinger class, which will retrieve the first RingServer it finds. Rinda::RingFinger is used by clients and other services to find the TupleSpace for a RingServer. Later in this chapter we will look at how to select a specific RingServer, but for now we have only one RingServer, so the primary method will work just fine.
After we have a RingServer, we can write our Tuple into it. The next section discusses creating Tuple templates at greater length, so we won’t go into much detail right now, except to say that we have given our service a set of parameters to describe our server and an instance of the HelloWorldServer to serve up.
Although it is definitely a bit more complicated than our original DRb version of the HelloWorldServer, this implementation will eventually lead to greater flexibility down the line. For example, have you noticed that we have not bound ourselves to a specific IP address or port? That’s because we passed our Tuple Array template into the write method on the RingServer. We have told the RingServer, “Here is my service, and you can find me here.”
So how does all of this affect our client?

Because we know what the first few lines of this code do, let’s jump to the following line:
service = ring_server.read([:hello_world_service, nil, nil, nil])
In our server code we called the write method on the RingServer, passing it a Tuple template. Now we are calling the read method and passing it a variation of our Tuple template. In the next section we’ll discuss Tuples and TupleSpaces in more depth. For now, please accept the explanation that a nil used in a Tuple template is the equivalent of a wildcard search, so we are basically asking for the first Tuple that matches :hello_world_service as the first parameter.
Now that you have a basic understanding of how to use Tuple templates, we can get back to our “Hello World” application. After we have retrieved a Tuple from the RingServer, we need to get the HelloWorldServer instance out of the Tuple Array with server = service[2]. It might seem odd that in order to retrieve our HelloWorldServer instance from the Tuple we retrieved from the RingServer using an Array syntax, service[2], it does, in fact, make sense. We stored an Array containing the original description of the service and the instance of the HelloWorldServer in the RingServer as an Array, the index of the HelloWorldServer is 2. When we run our client, it should produce output like this:

If we examine the inspect on the service, we can see that the Tuple Array that is returned from the RingServer matches the one we placed into. We can also see that the HelloWorldServer instance is being passed by reference and not by value because of our use of the DRbUndumped module. You can also see that the “Hello World” server is running on 192.168.1.12:55620. That was the IP address of the machine running the server, and the port was picked basically at random.
Understanding Tuples and TupleSpaces
In the preceding section we talked briefly about TupleSpaces. We used the analogy of a bulletin board to demonstrate how a TupleSpace works. Like a bulletin board, TupleSpaces allow us to perform a variety of tasks. We can write to a TupleSpace to post our service. Someone can come along and get a read-only copy of a service from that TupleSpace. We briefly looked at both of those examples when we recreated our “Hello World” application. But that is not all we can do with TupleSpaces. We can take a Tuple from the TupleSpace so that no one can see it. We can read all the Tuples, should we desire, just like with a bulletin board.
Writing a Tuple to a TupleSpace
Before we can look at reading and taking tuples from our TupleSpace, we need to create and write a Tuple to the TupleSpace. Creating a Tuple is quite easy. All you need to do is pass in an Array containing the template you want to store. Although this template can be of any size, and its values can be in any order, it is important to note that later, when you are trying to look up a service, you must match the template. This means that if you use an Array with ten entries as your Tuple template, you need to look it up later using an Array with ten entries, and those entries must all be in the same order. This will become clearer shortly as we look at our client code. With that said, there does seem to be a loose “standard” in the community of using a four-entry Tuple template with the following pattern: [:name, :Class, instance_of_class, 'description']. In our “Hello World” application, that translates into Tuple: [:hello_world_service, :HelloWorldServer, HelloWorldServer.new, ‘I like to say hi!’]. We would write that template like so:

Under the covers, Rinda takes the Array and creates the appropriate Rinda::Tuple class, so we don’t have to worry about learning yet another class API. The write method also takes an optional second argument, which can be either an Integer, representing the number of seconds you want this Tuple to live, or a Renewer. We will discuss Renewers later in this chapter. Simply put, the second parameter to the write method determines how and when the Tuple gets expired.
Reading a Tuple from a TupleSpace
In our “Hello World” application server code, we called the write method on the RingServer, passing it a Tuple template. To retrieve that Tuple we call the read method and pass it a variation of our Tuple template. Because our original Tuple template had four entries, our client also has to pass in a Tuple template with four entries. When you pass in nil as an entry in a Tuple template, you’re doing a wildcard search on any entry in that position. In our case we are asking for the first service whose first Tuple entry is :hello_world_service. We don’t care what the other template entries are. Let me give a few examples to clarify this point. Let’s look at this bit of code:

If we were to run this code, we would get something like the following:

As you can see, we make three different requests for services, each with different Tuple templates. Yet each time we get back a reference to the first Tuple entry we created. When Rinda attempts to find a Tuple based on a Tuple template, it returns the first Tuple that matches the Tuple template passed into it. This should demonstrate the importance not only of using a consistent Tuple template, but also of writing your Tuple to be as specific as possible.
Variation: Using Hashes for Tuples
The “standard” way to create Tuples is to use the Array syntax we have been discussing, but it is also possible to use a Hash to represent the Tuple. The rules for using the Hash syntax are pretty much the same as for the Array syntax. If you provide a Tuple template with four keys, you must search using a Hash with the same four keys. You still use nil as the wildcard for each of the keys in the Hash, as you would do with the Array syntax. The only other restriction is that you have to use a String for the key and no other type of Object, including Symbols.
Let’s see what our “Hello World” Tuple looks like using the Hash syntax:

The reading of that Tuple would look something like this:

After you have a Tuple, you can retrieve the instance by doing something like this:
service[‘service_instance’]
In my opinion, that is a lot easier to read than this:
service[2]
During the writing of this book, I came to enjoy the Hash syntax more than the Array syntax. I find that although it involves a bit more typing, it makes the code more readable. The only real downside, I’ve found, is that there is no “standard” naming convention for the keys to the Hash. So if you decide to use the Hash syntax, you also have to publish an API for the keys that the Hash expects. This is also somewhat true for the Array syntax. You can publish a Tuple of any size and with the elements in whatever order you want them. But as mentioned earlier, there does seem to be some consensus in the community about how an Array-based Tuple should be organized.
Taking a Tuple from a TupleSpace
Now that you have a firm grasp on how to read and write from our TupleSpace, let’s see what happens when we throw a bit of concurrency into the mix. Let’s look at a fairly contrived example. Let’s build a “Counter Service.” We will build a Rinda service that simply hosts an Integer, which will start at 0. Our client is responsible for incrementing that number by 1. First, the server:

Only two things are worth mentioning about our service. First, I used a nonstandard Array syntax for the Tuple. I only did that for the sake of brevity. The other thing worth mentioning, and this really goes for this whole example, is that the best way to solve our problem would be to let the server update the Integer. But that wouldn’t be any fun. Instead, we will let our client do that:
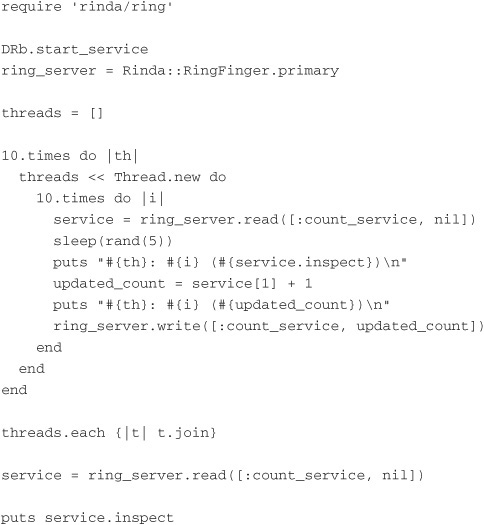
In our client we will create ten different Threads. Each of those Threads reads the current Integer from the server. The client then sleeps for a random time between 0 and 5 seconds. When the client wakes up, it increments the Integer by 1 and writes that back to the server. Because we have ten Threads running, and each Thread loops through our code ten times, we should see the final count be 100. Let’s see what happens when we run this code:

Well, I’m pretty sure that 12 does not equal 100! So what happened? Well, each time a Thread reads the Integer it got from the service, it holds onto that Integer, sleeps for a bit, and then updates that Integer and writes it back to the service. When it does that, it overwrites the previous Integer that another Thread placed in there while the first thread was sleeping. So now that we know what’s happening, how can we fix it? Enter the take method. Let’s rewrite our client to use the take method:


The only difference in our new client is the use of the take method instead of the read method. If we were to run this code, we would get something like the following:

That’s more like it! 100 definitely equals 100. Very good. So what just happened? When you use the take method, you remove that Tuple from the server. When you do that, no one else can access it. Think back to our bulletin board example. If you take the flyer for guitar lessons off the board, no one else can see it. That is exactly what the take method does. Because each Thread takes the Tuple from the server, holds it while it sleeps, and then updates it and puts it back, it prevents the other threads from doing the same thing.
The question you should be asking is, if two Threads hit the service, and the first one calls the take method, gets the Tuple, and then sleeps, why doesn’t the other raise an exception? Shouldn’t the second Thread get back nil from the server, causing the rest of the code to blow up? The answer is, it does not get back nil from the server. In fact, what actually happens is that the second Thread just sits there and waits for the take method to return the Tuple. The take method is basically wrapped in a big infinite loop that keeps checking to see if the Tuple has been returned. When it is returned, the loop is broken, and the Tuple is returned to the client. In the real world, this code would hang forever while it waited for the Tuple if we never wrote it back. So it is wise to always wrap any take method calls in a Timeout to prevent your code from simply hanging.
Reading All Tuples in a TupleSpace
Earlier, when we spoke about the read method and how Tuple templates work, I said that the read method returns the first Tuple that matches the template. That’s great, but what if you want to get back a list of services? The solution in Rinda is to use the read_all method. The read_all method behaves just like the read method, except that it returns an Array of Arrays representing all the services that match the template, instead of just a single Array representing the first matching template.
Let’s look at a couple of examples. First, let’s build a client that lists all the services that are available to us. I’ll use the server code we wrote in the section about the read method that creates three different Loggers. Let’s build a client that lists those for us:

By passing the read_all method a Tuple template full of nils, we are telling it to match all Tuple templates on the RingServer. We then print the uri of the RingServer. After we get the Array of services from the RingServer, we loop through each one and print a nicely formatted message telling us the name of the service, the type of class hosted there, where it’s hosted, and a description of the service. The output from that code would look something like the following:

Listing the services available is just a simple example of how to use the read_all method. In our simple example we could use the read_all method to get a list of just the Logger instances available to us. Then, if a problem occurs with the first, primary Logger, we could just iterate through that list until we either found a working Logger or ran out of logging services that we could use.
Callbacks and Observers
Callbacks and observers are evident in almost all languages, and most frameworks within those languages. They are a universal design pattern that allows a system to wait for another system or process to tell it that some event has occurred. The system that has been listening for that event can then choose to respond in some fashion. It could be that the system simply logs a message. Maybe it fires off an email or does some further process. Either way, it can be an incredibly useful design pattern to have access to.
In Ruby it is quite common for libraries to provide some sort of callback mechanism. One of the most significant examples of this is Ruby on Rails and its libraries. Ruby on Rails has introduced the concepts of notifications and callbacks to developers who would have otherwise been unaware of them and their power. The Ruby on Rails framework heavily relies on this design pattern to offer developers convenient hooks into the system so that they don’t have to hack the code to enhance the system.
Understanding Callbacks
Let’s look quickly at a simple ActiveRecord model. ActiveRecord is an Object Relational Mapping framework that ships with Ruby On Rails. Using ActiveRecord you can have a database model that looks as simple as this:
class User < ActiveRecord::Base
end
Assuming that the users table in the database has a username and a password column, you can create a new row in the users table as simply as this:
user = User.create(:username => ’markbates’, :password => ’123456’)
user.save
Wow! Remarkable, but shouldn’t we first encrypt the password before we save it to the database? What if you wanted to send a welcome email after the user was created? You could very easily encrypt the password before you send it to the create method on the user. You could also send the welcome email after you have called the save method. Those are definitely valid options. However, if you end up creating users in different parts of your application, you end up having that code repeated all over the place, and that is not very DRY.
Callbacks allow us to inject code at different parts of the event cycle to do the things we want. In our ActiveRecord example we could use the built-in callbacks system in ActiveRecord to allow us to encrypt the user’s password and send him or her a welcome email:

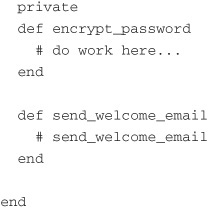
So now when you call the save method, it first checks to see if any registered callbacks should happen before the save action is invoked. In this case there is an encrypt_password callback, so it calls that method. Then it calls the actual save method that persists the record to the database. Then it checks to see if any callbacks are registered that need to be called after the record has been saved. Again, we have a registered callback that will send our welcome email.
Obviously this is an overly simple example, and I have left out a few things about how the underpinnings of ActiveRecord work, and that is because this isn’t a book on ActiveRecord. But I find this to be a simple example of how callbacks work and why they can be helpful.
Implementing Callbacks
Now that you have a simple grasp on what callbacks are, we can start to look at how you can use callbacks with your distributed applications to make them more powerful, and even more loosely coupled.
Rinda has three different events we can observe: take, write, and delete. The first two map directly to the TupleSpace methods we looked at in the section on TupleSpaces. For example, anytime someone takes a Tuple that matches our observed Tuple template, a notification is sent back to our observer to let us know. The same thing applies to write. The delete and close events are slightly different, and we will talk about those shortly.
Let’s look at some code. Here we have a simple service that just serves up a number:

ring_server.write([:callback_service, 0], 30)
DRb.thread.join
There’s nothing too special about our service. The only thing worth noting is that we are not using a Rinda::SimpleRenewer to handle the expiration of our Tuple. Instead, we have set it to 30 seconds. We will look at Renewers later in this chapter. We will also come back to the 30-second expiration in just a minute. First, let’s look at our simple client:

All our client is doing is taking the :callback_service Tuple from the server, adding 1 to the number, and writing it back, again with a 30-second expiration.
To help debug our fantastic distributed application, we would like to know whenever someone takes a Tuple that matches :callback_service, whenever someone writes to the :callback_service Tuple, and when and if the :callback_service Tuple expires. Doing all of this is actually remarkably easy using the callback system built into Rinda. Let’s look at how we would write a client to listen for these events:
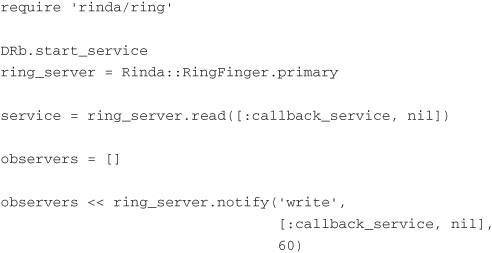

This code might seem a bit daunting at first, but actually it’s fairly straightforward and simple. Let’s look at just a piece of it first:
ring_server.notify(’write’, [:callback_service, nil], 60)
All we are doing with this line of code is telling the RingServer to give us a NotifyTemplateEntry object for the write action matching the Tuple template [:callback_service, nil], and we want to stop listening after 60 seconds. If we want to listen for callbacks indefinitely, we can either pass in nil for the last parameter or not pass in the parameter. I have chosen 60 seconds to demonstrate something a little later. The NotifyTemplateEntry object we receive from the RingServer can then be used to process our callback events.
In our code we are creating three different callbacks. The first two we have already discussed and should be familiar to you by now. The third, however, is a fairly new topic. We will discuss it a bit more in the section “Renewing Rinda Services,” but what we are doing with the delete callback is asking for a notification whenever a Tuple has been explicitly deleted by another service or when the RingServer deletes the Tuple because it has expired.
All that is left is to create a separate Thread for each of our observers and then just call the each method on the observer and print the event we receive.
When our client runs, it takes out the Tuple, increments the number, and then writes the Tuple back to the RingServer:
[“take”, [:callback_service, 0]]
[“write”, [:callback_service, 1]]
As you can see, the event we receive from our callback is an Array containing two parameters. The first parameter is the type of notification we are receiving. For example, in our first event, we receive a take callback. The second parameter contains the actual Tuple that triggered the callback. This is useful if we want to do something such as logging the event, as we just did.
Thirty seconds after we receive our first callbacks, the RingServer automatically expires the Tuple so that the delete callback is triggered:
[”delete”, [:callback_service, 1]]
Another 30 seconds after that, our callbacks expire, and we receive a close notification for each of them:

We have not previously mentioned the close callback, but its use should be fairly obvious. Because we specified that we want our callback hooks active for only 60 seconds when they expire, we get a callback telling us that. This event could then be used to do everything from shutting down the program to writing to a log to simply reregistering itself.
Security with Rinda
In Chapter 1, when we discussed DRb, we talked about security. Because Rinda is built on top of the DRb libraries, we are already pretty much armed with all there is to know about security when using Rinda. Let’s do a quick review of some of those points, and I’ll point out where Rinda may differ slightly.
First, let’s review this code sample again:

If you remember, this block of code has the unfortunate side effect of deleting the entire file system on the server it gets executed on. This is still true. If you do not set your $SAFE level when using Rinda, your server will be unsecure! I cannot stress that point enough. Make sure you are at least running at $SAFE level 1. Please review the “Security” section of Chapter 1 if you still do not understand this point.
Access Control Lists (ACLs)
Our knowledge of ACLs serves us well in Rinda, because there is no change in how we do things in that area. In Rinda ACLs are even more useful than in straight DRb applications. In DRb you have to know exactly where the application you are looking for is. Using the premise of security through obscurity, you can say that only applications that you want to access the service will know where to find it. Of course, this is a bad idea for many reasons, but this book is not here to talk about network, or application, security at that level. All I will say on that subject is, please don’t use this method of security. Even a simple ACL will help safeguard your application, and it is just a few extra lines of code.
If I haven’t yet stressed the importance of ACLs enough, I’m about to stress them even more when it comes to Rinda applications. Remember that Rinda applications are self-discoverable. Each service starts and registers itself with the RingServer. The RingServer then broadcasts across the network, telling anyone who will listen where it is and what it has to offer. ACLs can help keep those pesky unwanted visitors from using your service. Figure 2-3 shows the typical life cycle of a Rinda application involving ACLs. The client queries the RingServer, asking where it can find a particular service. The RingServer responds with the service’s address. The client then sends a request to the service. The service allows or denies access to the client based on the installed ACL.
Figure 2-3 The typical life cycle of a Rinda application involving ACLs.

When you install an ACL on a service, this prevents unwanted6 clients from accessing the service. What it does not do is stop those unwanted clients from seeing the service. It also does not stop an unwanted client from hitting the service and potentially creating a denial-of-service attack on the server.
For the installed ACL to work, the client must first connect to the service. The service can then either accept or reject that request. Because of this, a malicious client could keep sending requests to the service, despite the service’s rejecting the requests, thereby bringing down the service.
Unfortunately, we can’t do anything about this problem from the level of our code. We can, however, be smart about our service architecture and network security to help prevent these sorts of attacks.
Using Rinda over SSL
Using Rinda over SSL is possible. It’s not that different from what we have to do when setting up DRb to work over SSL. However, using Rinda over SSL has one small drawback: we lose the ability for Rinda to dynamically bind to any available port. This affects only the server code. The client still is completely unaware of where the service is and uses the RingServer to find the service’s location.
In Chapter 1, when we talked about using DRb over SSL, we set up our “Hello World” application to be secure. Let’s take that application and upgrade it to use Rinda. Normally we start with the server, but let’s look at our client first for a change:

With the exception of using Rinda to find the service, instead of hardcoding it with DRb, our client code doesn’t look any different than it did when we set it up the first time to talk SSL to the server.
Now let’s look at our server:

Again, the code doesn’t look too different from the first time around, except that we are now using Rinda to announce the service. With that said, normally when we call the start_service method in a Rinda service, we don’t call it with any parameters. This time, however, we are passing in three parameters: the host and port we want to bind the service to, nil because we won’t share anything directly (we will use Rinda to manage our service), and a Hash configuration of our SSL options.
If you remember back in the “DRb Over SSL” section of Chapter 1, we saw that we had to tell the service to use the drbssl protocol. Well, the same here is true. That is why we had to pass in the host and port we wanted to bind to. Unfortunately, there is no way to just specify that we want to use the drbssl protocol without also having to bind our service to a specific host and port. This means that if we are to fire up two instances of our “Hello World” service, we must make sure that they are not stepping on each other’s toes.
If we were to run this example, we would see that our client would output something along these lines:

So we can see that although we had to hardcode our server to a specific host and port, our client found that information dynamically by querying the RingServer.
Selecting a RingServer
Whenever we have discussed security, all we have really talked about is malicious clients trying to either attack our services or send dangerous or bogus messages to our servers. But what about the security of our clients? A hacker could just as easily set up a server that pretends to be a valid server and intercept requests from our clients. Certainly using things like SSL can help prevent this type of interception, because requests are terminated if either side of the relationship does not present the right credentials. The other option we have is to be more selective in choosing our RingServer.
So far in all our examples we have somewhat magically been locating the RingServer we were hoping to find. We have been calling the following code:
ring_server = Rinda::RingFinger.primary
How has this code been finding our RingServer? Great question. Before we answer it, let’s look at how we have been starting our RingServer so far:
Rinda::RingServer.new(Rinda::TupleSpace.new)
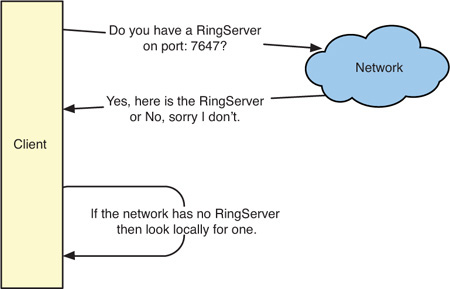
When we start our RingServer in this fashion, we are telling Rinda to start a RingServer and bind it to port 7647. When we call the primary method on Rinda::RingFinger, it first looks to see if somewhere on the local network a RingServer is broadcasting on port 7647. The first RingServer it finds broadcasting on that port is returned. If no RingServer is found broadcasting on the network, it then looks at the localhost of the requestor to see if a RingServer is broadcasting there. Again, if it is found, it is returned; otherwise, an exception is raised. This process is shown in Figure 2-4.
Figure 2-4 The “common” flow to look up a RingServer is to query the network for a RingServer on port 7647. If one is found, it is returned; otherwise, the localhost of the requestor is queried for the RingServer.
Now that you understand how the simple case of starting and locating a RingServer works, let’s fire up a RingServer on a nonstandard port:

The only change we make to our “normal” RingServer is to pass a different port to the new method on Rinda::RingServer. Now our server will start on port 9000.
If we were to try and find a RingServer now using our “normal” method of finding one:

we would get the following exception:
RuntimeError: RingNotFound
Obviously using the primary method on Rinda::RingFinger won’t work, because it’s looking for a RingServer broadcasting on port 7647. So how do we find it? Let’s start by firing up a couple of RingServers so that we know when we have connected the correct one:

Here we are starting up two RingServers. One is on port 9000, and the other is on port 9001. We have written a Tuple to each of their TupleSpaces, identifying which server we are talking to. This will make it easier for us in a minute to make sure the right RingServer is responding to us.
The first thing we have to do is create a new instance of Rinda::RingFinger. Now, if we were to create the instance as follows,
ring_finger = Rinda::RingFinger.new
we would not be doing anything different than what is happening under the covers when we call the primary class method. We will still only be looking for RingServers broadcasting on port 7647—first on the network, and then on the localhost.
The new method on Rinda::RingFinger takes two parameters. The first is an Array. This Array defaults to [’<broadcast>’, ’localhost’]. These represent the hosts that we want to search for our RingServers. An Array is used to specify order, so be aware that the order in which you have your servers listed in the Array will be the order in which they are searched. If nil is passed in as the first argument, the list defaults to [’localhost’]. I don’t know why it defaults to just [’localhost’] and not [’<broadcast>’, ’localhost’], but just be aware that it does. If we knew that our RingServer was hosted at ringserver.example.com on the default port of 7647, we would create a new Rinda::RingFinger like this:
ring_finger = Rinda::RingFinger.new([’Ringserver.example.com’])
Getting back to our example, we have created two RingServers on ports 9000 and 9001, respectively. Let’s try to find the one on port 9001:

When creating our Rinda::RingFinger, we wanted to re-create the default lookup behavior, so we passed in the Array of [’<broadcast>’, ’localhost’]. And since we wanted to look only on port 9001, we passed that in as the second parameter. That code should run and exit without any errors. The question still persists: How do we find a RingServer?
There are three ways we can find a RingServer once we have a properly configured Rinda::RingFinger. The first method is to use the lookup_ring_any method. This method is similar to the primary class method we are used to using. It finds the first RingServer that meets the specifications of the Rinda::RingFinger we created and returns that.
ring_finger.lookup_ring_any.read([:some_service, nil])
The next way of finding a RingServer is to use the each method. The each method will iterate through each of the RingServers it finds that matches the Rinda::RingFinger we created and yield up each RingServer:

The final way of finding a RingServer is to use the primary accessor method. This method has a major problem, however. Because primary is an accessor method, it is possible that it can return nil if it has not been set. You can either manually set the primary accessor yourself, or you can call either the each or lookup_ring_any method first, and it will set the primary accessor for you. The lookup_ring_any method determines what the primary RingServer should be set to by using the last RingServer found. So, by default, this is the one being served up by localhost. If we were to change our host Array to be [’<broadcast>’], the primary RingServer would get set to the last server in the list. This is usually either the last alphabetically or the last by IP address. Because of this, I recommend not using the primary accessor, unless you are the one who is setting it.


If we were to run this code, we would see something like this printed:

As you can see, the primary accessor is nil the first time we try to access it. After we call the lookup_ring_any method, the primary accessor is now set and returns the expected result.
We can demonstrate a lot of these points by running our multiple RingServers on two machines and running the following code on one of them:

The result is something like this:

The code was executed on a machine called “macbates.” The RingServers were started on “macbates” and “biglaptop.” We can see that the RingServer found on “macbates” was set to be the primary because we had localhost set as the last place to look for RingServers. You’ll notice that when we looped over each of the RingServers, our Rinda::RingFinger actually found three RingServers, two of them being the same instance of the one that resides on the “macbates” computer. The reason is that our Rinda::RingFinger found the “macbates” RingServer twice. It first found “macbates” when it searched the network, and then it found “macbates” when it looked at the localhost. If we were to search only the network using the [’<broadcast>’] Array, we would have the “macbates” RingServer in our list only once.
If we were to call the to_a method on our Rinda::RingFinger instance, assuming we were searching only the network, and not our localhost, we would expect to get back an Array that contains two entries—one for “biglaptop” and the other for “macbates”:
puts ring_finger.to_a.inspect
However, we actually get back the following:
[#<DRb::DRbObject:0x3bb668 @uri=“druby://biglaptop.home:53886”,
@ref=1786160>]
What happened to the second entry? When the lookup_ring_any method is called and it generates the list of RingServers, it pops the last entry off the list and assigns it to the primary accessor. Therefore, that entry is no longer part of this list of found RingServers. The reason the author of this code gave for this choice is that the to_a method is supposed to return the rest of the RingServers found. To get a full list of all the RingServers found, you would have to combine the primary accessor and the return value of the to_a method. The each method gets around this by first yielding the primary accessor and then calling the each method on the Array returned by the to_a method and yielding those values. This can be a gotcha, so be sure to watch out for it.
Renewing Rinda Services
Back when we talked about writing Tuples to TupleSpaces, we briefly touched on the subject of Renewers. I said that, simply put, a Renewer determines how long the Tuple will live and when it gets expired. That is true, but as with most things, a few subtleties should be examined.
When we have created Tuples, we have created them with code that looks similar to the following:
![]()
We also could have written that same code as follows:
ring_server.write([:some_service, ’some value’], 180)
Both lines of code do the same thing. They tell the RingServer that this Tuple should expire 180 seconds after the last time it was touched. When someone goes to touch the Tuple, it is checked to see if it has expired. If the Tuple has expired, it checks with its Renewer to see if it should be renewed and, if so, for how long.
Using a Numeric to Renew a Service
Using a Numeric to represent the number of seconds a Tuple should live is the easiest way of setting an expiration. Let’s look at a simple example:

With this code we are telling Rinda to expire the Tuple after 10 seconds. When using a Numeric for this value, we are also telling Rinda that we do not want this Tuple to self-renew. After 10 seconds this Tuple will be purged from the TupleSpace. Let’s look at a client that demonstrates this:

Here we are looping six times, reading the Tuple, and sleeping for a second. Because we have a 10-second expiration time, this should not be a problem. Then we sleep for another 6 seconds and try again. When we do that, we are trying to access the Tuple at least 12 seconds after we have created it. The resulting output should look something like this:

Using nil to Renew a Service
If we always want our Tuples to live forever, without fear of their expiring, using nil to set the expiration is the easiest way:

If we were to run our same client against this server again, we would see that the client never hits an exception, and we receive printouts for each Tuple successfully.
Using the SimpleRenewer Class
We have been using the Rinda::SimpleRenewer class throughout most of this chapter. By default this class sets a 180-second expiration time for the Tuple. When that expiration is reached, Rinda queries the SimpleRenewer to see if the Tuple should be renewed. The SimpleRenewer class tells Rinda to renew it again for another 180 seconds. You can change this period of time, 180 seconds, when you instantiate the class, like this:
Rinda::SimpleRenewer.new(10)
Now the Rinda::SimpleRenewer will set the Tuple to be renewed every 10 seconds. If you want infinite life, it is probably best to use nil, because this will have the least system impact. If you want something fancier, you need to write a custom Renewer.
Custom Renewers
Writing a custom Renewer is incredibly easy. Writing a custom Renewer has two main ingredients. The first is the DRbUndumped module. This ensures that the Renewer can be transported across the wire to the RingServer. The second ingredient is a renew method.
The renew method has to return one of three possible types—nil, false, or Numeric. Again, if you return nil, the Tuple lives for infinity. If you return false, Rinda expires the Tuple right then and there. Finally, if you return a Numeric value, Rinda checks the renew method again after that number of seconds.
Let’s write a custom Renewer that lets the Tuple be renewed for only N times for X seconds at a time:


In our renew method we check to see if the current_run is less than the imposed limit. If it is, we can renew the Tuple again for the given ttl (time to live). We increment the current_run so that we will eventually hit our limit. If our current_run is equal to or greater than the limit, we return false, and the Tuple expires.
Our client in this example just keeps looping and reading the Tuple until it has expired:

When we run this on the server side, we should see the following printed:

On the client side we will eventually be thrown a Timeout::Error exception.
One disadvantage of the Renewer system is that the Renewer class does not have access to the Tuple it is renewing. Because of this, it is impossible to decide the fate of the Tuple based on the Tuple’s contents. Again, this is just another thing to watch out for when you’re developing a Rinda application.
Conclusion
In this chapter we have taken a deep dive into all that Rinda has to offer. We demystified how Rinda implements the Linda distributed computing paradigm. Rinda is a powerful, easy-to-use, and sometimes dangerous platform that is offered to Ruby developers. We have looked at what makes it so powerful, and we have learned where the dangers and pitfalls await us.
We’ve explored creating, discovering, and securing our RingServers and services. You now understand how TupleSpaces work. You know how to query them, retrieve them, write them, and delete them. You also now know how to trigger callbacks when an event occurs on a Tuple.
Combined with what you learned in Chapter 1 about DRb, you now have a full understanding of what is bundled in the standard Ruby library. All that we have covered is applicable to both Ruby 1.8.x and Ruby 1.9.x.
Part II, “Third-Party Frameworks and Libraries,” of this book explores third-party frameworks and tools that you can use when writing your distributed applications. Before you read about those tools and frameworks, I encourage you to spend some time with what is available to you in the standard library in the form of DRb and Rinda. A lot of the third-party projects you will work on use these libraries under the covers, so it would behoove you to fully understand the foundation. We have covered a lot of that foundation in the first two chapters, but no amount of reading can replace real-world experience.
So experiment a bit. Use these first two chapters as a guide during your experiments. When you’re ready, we can continue on our journey of distributed programming with Ruby.
Endnotes
1. http://en.wikipedia.org/wiki/Linda_(coordination_language)
2. http://en.wikipedia.org/wiki/User_Datagram_Protocol
3. http://en.wikipedia.org/wiki/Tuple_space
4. http://en.wikipedia.org/wiki/Tuple
5. http://en.wikipedia.org/wiki/Year_2038_problem
6. I use the term “unwanted” here loosely. Because ACLs in DRb are based on IP address, it is impossible to have two clients sitting on the same IP address and to block one while allowing the other. You would have to do that programmatically in your code.