
CHAPTER 8
RHYTHM
There’s a reason we listen to music to relax. Rhythms lift us and carry us with them. In art, symmetry and pattern are visual rhythms, and, like music, can do wonders for a busy mind. Shapes repeated, symmetrical, or simply ordered, rest the eyes and spirit. Through repeated objects, negative space, and use of color, you can create your own visual “music.”
Patterns are everywhere in paintings and the decorative arts. You’ll find patterns in borders, in fabrics, quilts, wallpapers, and every other surface that can be decorated. They can be quiet and sparse, meticulously organized, or feel more like a random collection of images. We’ll play with pattern in this chapter. Enjoy the peacefulness that comes from making an ordered system, and throw a little whimsy in to shake things up. Let the framework of symmetry and pattern help you find a little calm in your day.

Willow Bough, William Morris, British (1834–1896). Color woodcut on paper, c. 1900. Art Gallery of South Australia, Adelaide/Bridgeman Images.
PROJECT 1
PATTERNED RIBBONS
This Mexican sampler includes more than a dozen different patterns, but because they’re stacked as narrow ribbons and similar colors repeat throughout the stack, they harmonize beautifully. This antique sampler is embroidered. We’ll make our patterned ribbons with paper and paint.

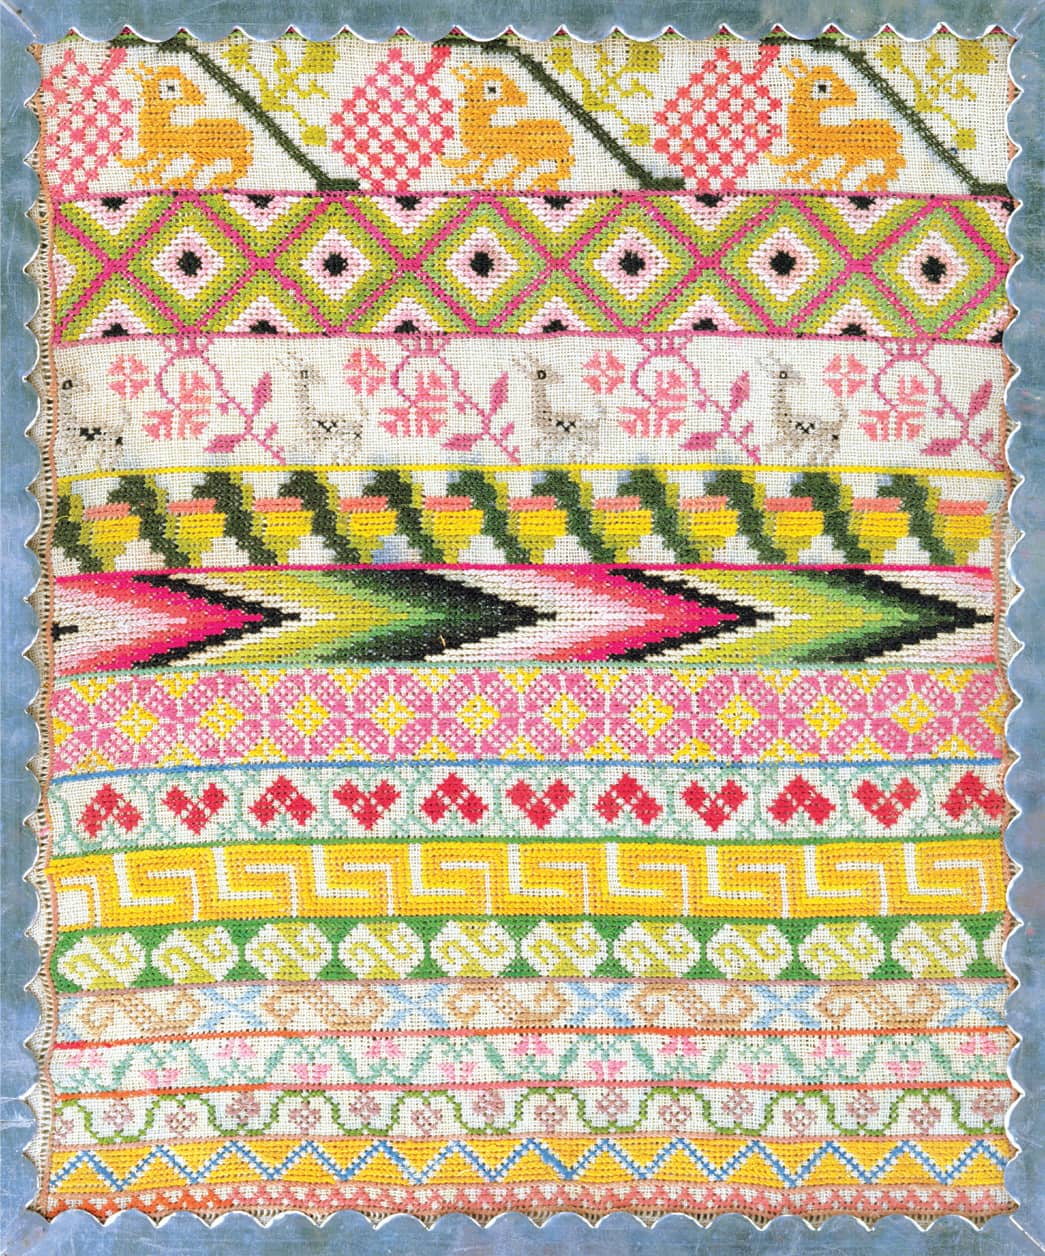
Embroidery Sampler, Mexican School. Cotton, nineteenth century. Private Collection/Bridgeman Images.
YOU WILL NEED:
• black Micron pens
• scrap paper or sketchbook
• six sheets of mixed-media paper, cut to 6" × 8" (15 × 20 cm)
• acrylic paints
• paintbrush
• scissors or craft knife
• white Gelly Roll pen
• 8" × 10" (20 × 25.5 cm) card stock or cardboard
• matte medium or glue
1 Make doodles on the scrap paper, any way that appeals. Create several pages of shapes, lines, and designs with no particular agenda. Take as much time as you need. (See A.)

2 Once you have a few pages of doodles, look at the shapes and designs you’ve created. Pick out several that you like and imagine them in repeat patterns. We’ll be making six ribbon patterns that will sit next to one another.
3 Brush thinned acrylic paint over sheets of mixed-media paper. Keep it simple by using just a few calm colors, such as blue or gray, or a single color to cover the page. Allow the paint to dry. (See B.)

4 Cut the painted paper into strips 8" (20 cm) long, but of varied widths. (Cut more than six if you’d like to have options when you work out your patterns.) (See C.)

5 Pick one of your doodled designs and choose one of the painted strips. Use a Micron pen or the white Gelly Roll pen to draw your designs on the strip, as ordered or as random as you like. Continue filling in your pattern strip by strip. (See D.)

6 Add additional colors or details to your patterns. Maybe color every other circle blue or the smallest shape on each strip red. Consider the color within each strip, as well as within your group of strips. (See E.)

7 Choose six or more strips to mount on the card stock. Arrange them on the background and play with how they sit next to one another. Decide what color you’d like to make the background. Paint the card stock and allow it to dry completely. (See F.)

8 Glue the pattern strips in place. They can be glued edge to edge or with strips of the background between them. (See G.)

9 When the glue has dried, fine-tune the colors and repeat designs in your ribbons to create a pleasing rhythm. The next time you do this project, try a different rhythm.
PROJECT 2
DOODLE QUILT
The look of antique quilts gives such a feeling of comfort. In this project, we’ll capture the look of an old quilt with cut paper. What’s fun about a crazy quilt collage is that you can create vibrant patterns of color without worrying about the exact measurements and straight lines. In a crazy quilt, every piece can reflect a little bit of you.


Embroidered Crazy Patchwork Coverlet, English School. Velvet, silk, and wool, 1886. Quilt Museum and Gallery, York, UK/Bridgeman Images.
YOU WILL NEED:
• scrap paper or sketchbook
• 4 or 5 pieces of 12" × 12" (30 × 30 cm) paper to use for painting and collage
• scissors or craft knife
• acrylic or gouache paints
• paintbrushes, in a variety of sizes
• black Micron pens
• white Gelly Roll pen
• piece of square card stock or cardboard, such as 10" × 10" (25 × 25 cm), for mounting the painted paper
• glue or double-sided adhesive for attaching shapes
• colored pencils, optional
1 Prepare the base for your collaged quilt with the card stock. Depending on how dense your collage will be, some of the card stock surface might show through. Choose whether to paint it black, a neutral color, or another tone. (See A.)

2 Choose your color palette and paint individual sheets of paper with those colors. A good balance might include a neutral or two, with two brighter colors. You can always add more color later. I chose black for my background, a gray, a tan, and two blues for my paper colors. Allow the paint to dry completely. (See B.)

3 Before cutting the painted paper into your quilting pieces, think about how you’d like the shapes to fit together. You can cut pieces to fit exactly within your square, or you can improvise as you go. Either approach is fine. Cut about half of each painted sheet into shapes. Keep your shapes simple and don’t make them too small. (See C.)

4 Prepare your painted square surface with an adhesive. You can use glue or double-sided adhesive tape to align the edges. (See D.)

5 Start piecing in your shapes. (Don’t press down on them firmly until you are sure of your placement.) You can start in the center, or at a corner and add shapes bit by bit. If you need to cut specific sizes, use the larger uncut pieces to fill in the gaps. Note how your color composition is coming together. Move pieces around until you’re happy with your square. Press down firmly to adhere your shapes. (See E.)

6 Now for the details. You can approach this step with paint, colored pencils, or both. Take each shape into consideration, and create a little world within each one. Do you want to make a circle pattern? Stripes? Maybe you want to make a doodle of a leaf or an acorn. Let each shape be its own little space, and let each space relate to the whole. Pay attention to how your drawings are oriented. You may not want everything facing the same way.
7 In the example quilt, you can see how the stitching serves as another pattern element. Feel free to add lines as if you are joining your pieces together. Get a little lost in your quilt, and add as many details as you’d like. If you’ve enjoyed the process, begin again, creating a new collage of shapes to draw upon. You can get a little more complex with your next one, or keep things simple and focus on the details inside the shapes. Quilting has a rich history and there is much inspiration to be found in it.
PROJECT 3
POLYPHONY
This project is an exploration of color, pattern, and texture. We will be rolling paint onto a surface as well as painting shapes and patterns with stencils. Klee’s painting, Polyphony is a lovely piece with which to spend some time. Notice the implied order of squares or straight edges, as well as the repeating dot texture throughout. Notice his color choices and how juxtaposing certain colors can help the texture to recede or come to life. Refer to Klee’s painting as you compose your own piece. As you work, notice how the elements sit together and how changing something minor can give your composition visual interest.


Polyphony, Paul Klee, Swiss (1879–1940). Tempera, 1932. M. Carrieri/Artists Rights Society/Bridgeman Images.
YOU WILL NEED:
• newsprint
• acrylic paints
• pencil or pen
• sketchpad or paper, any size
• small pieces of card stock, including scraps to use with the brayer
• scissors or craft knife
• sturdy pieces of cardboard or mat board for rolling out the paint
• brayer or paint roller
• scrap paper
• 9" × 12" (23 × 30.5 cm) Bristol board or primed wood panel
• small pieces of mesh or screen, or a stencil
• hole punch
• sponge or stipple brush
1 Cover your work surface with newsprint. Choose five colors to create your palette. Choose neutral colors or white to contrast with brighter tones. Roll the paint onto a 9" × 12" (23 × 30.5 cm) panel. (See A.)

2 Draw some shapes in the sketchbook. Choose one shape to repeat in your composition—perhaps a cloud, house, leaf, blades of grass, or even squares or circles. Doodle on the paper until you settle on a main shape and draw it in three different sizes on a piece of card stock. Think small, but not too small. Cut out the shapes, creating stencils for your painting. Set them aside. (See B.)

3 Squeeze a dab of neutral color onto the cardboard. Roll the brayer through it to load it. Test the paint on scrap paper and then roll it on the Bristol board, making straight lines. Use scraps of card stock to help you create parallel lines in the paint. Let the paint dry a little before moving on to the next color. (See C.)

4 Rinse the brayer and roll out a new color. Use the cardboard scraps to help roll out strips, boxes, and rectangles of color on top of the first layer of color. Allow the paint to dry completely. If any of the colors become muddy, wait until the paint is completely dry before touching them up with fresh color. (See D and E.)


5 The next layer focuses on texture created with a stencil. You can purchase a stencil or make your own. I used two: one was a small piece of window screen and the other I made by punching many holes in a piece of card stock with a hole punch. (The screen allows painting to be applied in an ordered pattern.)
Note: Create or purchase a few versions of your stencils, so you can use one for each color and avoid accidently mixing them.
6 Set the painted Bristol board horizontally on your work surface. Decide where you would like to add texture and think about what color you’d like to use. Using a complementary color that is either lighter or darker than the background makes the texture appear to lift off the page. Place the stencil on the section you’ve chosen, dip the sponge into a small amount of paint, and gently stipple it over the stencil. Move the stencil to the next area and continue adding texture until you are satisfied. Allow the paint to dry completely. (See F.)

7 Now we’ll use the shape stencil that you made in step 2. Look over your painting and see where you might want to add the shape(s). If you made leaves, do you want them cascading across the page? Do you want a very regimented row of circles that vary in size?
8 Decide where to position the main stencil on your painted board. Choose a paint color that contrasts with the background, dip the sponge in the paint, and gently stipple it over the stencil. Carefully remove the stencil and allow the paint to dry before adding another stenciled shape. You may change colors while repeating the same size and shape, or keep them the same and change stencil sizes. Take your time and find the balance in your composition, taking care to have something a little off or imperfect. (See G.)

9 If you want to fine-tune any stenciled areas with a brush, this is the time to do it.