Chapter 15. Settings
Right out of the box, the Droid X2 is set up for you and ready to go. But what if you want to change the way it notifies you there’s a call, fine-tune the way its location services work, or alter its music setup? You turn to this chapter, which describes all its settings, and explains what they do for you. To get to the Settings screen, press the Menu key when you’re on the Home screen or a pane. From there, scroll to the setting you want to change and tap it. Head into this chapter for the complete list and advice.
Wireless & Networks
Here’s where you’ll find all the settings for how the Droid X2 handles Wi-Fi, wireless, and network access.
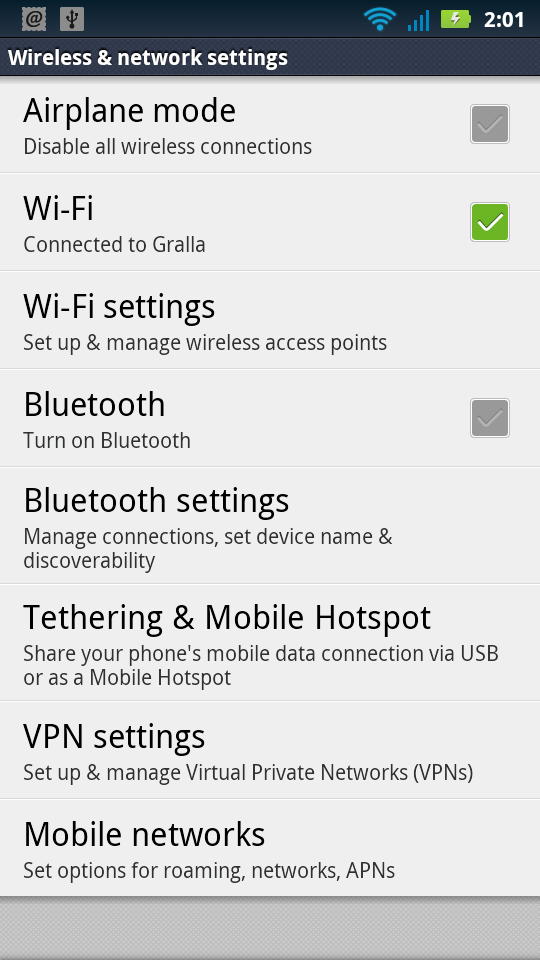
Airplane Mode
When Airplane mode is turned on, all your wireless radios are turned off, as airlines require during parts of the flight. But you can still use all your Droid X2 apps in this mode.
Wi-Fi
Tap to turn Wi-Fi on and off. (You can also turn Wi-Fi on and off from the Power Control widget in the Settings pane. See Settings Pane for details.)
Wi-Fi Settings
Tap to manage your Wi-Fi connections, including connecting to Wi-Fi hot spots, changing the way you connect to hot spots, and seeing what hot spots are nearby:
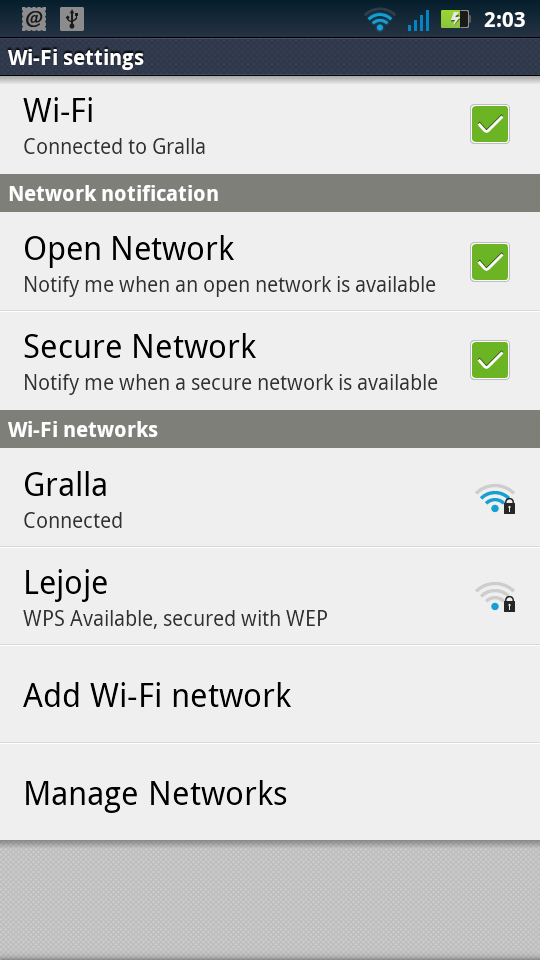
Wi-Fi. Turns Wi-Fi on and off.
Open Network. Turn on this box, and your Droid X2 will notify you when there’s an available open network nearby. (An open network is one that doesn’t require a password to join.)
Secure Network. Turn on this box, and your Droid X2 will notify you when there’s a secure network nearby. (A secure network is one that is encrypted and requires a password to join.)
Underneath these settings, you see “Wi-Fi networks,” which lists all nearby Wi-Fi networks. Tap any to connect to it. If you want to add a Wi-Fi network that’s not nearby, or that’s not broadcasting its name (SSID), tap “Add Wi-Fi network,” and fill in details about the network name and its type of security (Connecting to an “Invisible” Network). And if there’s a network that you automatically connect to when it’s in range, but you don’t want to any longer, tap Manage Networks, you’ll see a list of networks to which you automatically connect. Hold your finger on any that you no longer wish to connect to and tap Forget network. You can also modify the network settings from the menu that appears when you hold your finger on the network. Techies will love the fact that a “Proxy settings” screen is also on the menu. If you don’t know what that is, don’t worry; true techies will use it, while others won’t.
Note
When you’re on the Wi-Fi settings screen or the Manage Networks settings screen, press the Menu button, tap Advanced, and you’ll come to a screen full of options that only a techie can love, and that let you set advanced options such as whether to use a static IP address. (If you need to ask what that means, you don’t want to use it.) However, there is one useful setting you can use if you find yourself getting disconnected from Wi-Fi networks–Wi-Fi sleep policy. Tap it, and select “Never” and your Wi-Fi won’t go to sleep when the Droid X2’s screen turns off. Select “Never when plugged in” and Wi-Fi won’t go to sleep when your Droid X2 is plugged in.
Bluetooth
Tap to turn Bluetooth on and off. As with Wi-Fi, you can also turn Bluetooth on and off from the Power Control widget in the Settings pane.
Bluetooth Settings
Tap this to access all your Bluetooth settings:

Bluetooth. Turns Bluetooth on and off.
Device name. Displays the name of your Droid X2. To rename it, tap the down arrow and from the screen that appears, type a new name and then tap OK.
Discoverable. Tap if you want your Droid X2 to be discoverable by other Bluetooth devices (Bluetooth Car Kits). In other words, they can see it and can connect to it, if you let them.
Scan for devices. Tap this option, and the Droid X2 looks for any Bluetooth devices within range and then lists them. You’ll see devices listed there that are either nearby, or that you’ve connected (paired) with in the past. If you’re currently paired with a Bluetooth device and want to unpair from it and/or disconnect from it, hold your finger on it, and then choose either “Disconnect” or “Disconnect & unpair.” (If you aren’t currently connected to a Bluetooth device, but it’s listed, then when you hold your finger on it you’re given only the option to unpair.)

Note
If you choose only to disconnect from the other Bluetooth device, you close the connection, but the pairing will remain. In other words, the initial work you did to make sure the devices can pair will remain, and the Droid X2 will remember all the details about the other device, and you can quickly connect to it. If you unpair as well as disconnect from it, you’ll have to walk through the steps of pairing all over again.
Tethering & Mobile Hotspot
This section covers settings related to using your Droid X2 to give Internet access to a computer or other device, either via Wi-Fi or over a direct USB connection:
USB tethering. Lets you give a computer access when it’s plugged in via a USB cable.
Mobile Hotspot. Tap this to turn your Droid X2 into a Wi-Fi hotspot so other devices can share its connection. You’ll first need to configure the hotspot settings before you do this.
Mobile Hotspot settings. Here’s where you can set up a Hotspot so that devices can share your Internet connection via Wi-Fi. See Managing Wi-Fi Networks for more details.

You’ll need to pay an extra monthly fee if you want to use your Droid X2 as a mobile hotspot or to use USB tethering. Check with Verizon Wireless for details.
VPN Settings
Here’s where you can set up a virtual private network (VPN) connection with your workplace or, if you’ve already set it up, change any settings, such as its URL, password, means of authentication, and so on. You’ll need to get information from your company’s IT gurus to make the connection, so check with them for details. See Virtual Private Networking (VPN) for more details about setting up a VPN on your Droid X2.
Mobile Networks
If you leave an area that’s covered by Verizon, you may still be able to use your phone to make and receive calls. When you roam, if you’re outside Verizon’s network, you can instead connect to another carrier, and use that carrier instead of Verizon. Depending on your plan, you may be charged for roaming.
To turn off roaming, tap Mobile Networks→System Select, and then choose “Home only.”
Note
For details about how to enable or disable data roaming—the ability to send and receive data when you’re outside Verizon’s coverage—see Data Delivery.
Call Settings
You have plenty of ways to customize the way you make and receive calls on your Droid X2, such as changing the number you dial for accessing voicemail, whether you automatically redial a number if you couldn’t connect on a call, and more. Tap “Call settings,” and here’s what you can do:
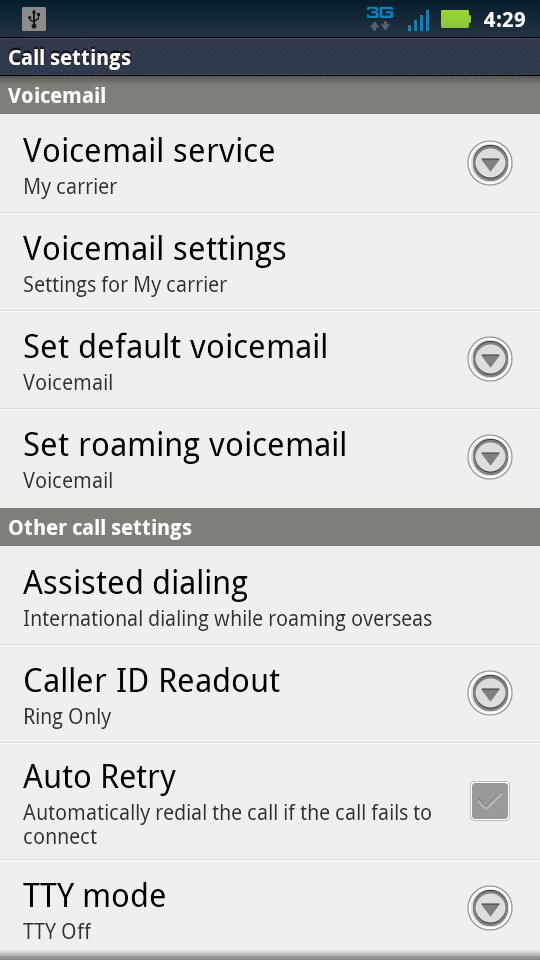
Voicemail service. On the Droid X2, this simply reads “My carrier,” which is Verizon. You can’t change it, so don’t bother tapping.
Voicemail settings. This lets you change the number that you dial to call voicemail. It’s *86, but if you want to change it, tap “Voicemail settings”→ Voicemail, type the number you want use, and then tap OK.
Set default voicemail. Lets you choose your default voicemail service—visual voicemail or regular voicemail.
Set roaming voicemail. Lets you choose your default voicemail service when you’re roaming—visual voicemail or regular voicemail.
Assisted dialing. When you’re overseas, if you want to get to an operator to help you make your call, tap this and then turn on the checkbox next to “Assisted dialing status” in the screen that appears. On that screen, you also select your home country, and the country from which you’re calling.
Caller ID Readout. Normally, when someone calls you, you see the phone number and person calling on the Droid X2, and your phone rings. If you’d prefer that the Droid X2 first speak the name of the phone number or person, you can set that option here by this option and then tapping “Caller ID then Ring.” If you want to dispense with the ring entirely, select Caller ID Repeat. From now on, the Droid X2 will repeat the name or number of the caller instead of using a ring.
Auto Retry. Sometimes you make a call, and it simply won’t connect. If you want the Droid X2 to redial the number automatically after that happens, turn on the checkbox next to this option.
TTY mode. Turn on this box to turn on Teletype mode, which lets the Droid X2 communicate with a teletypewriter, a machine that lets deaf people make phone calls by reading and typing text.
DTMF Tones. DTMF tones are the sounds a touchtone phone makes when dialing, and they’re also the tones used to access voicemail, to navigate through a phone tree (“Press 1 to be put on hold forever”), and to perform other kinds of automated services via your phone. Tap this option if you want to lengthen those tones (for example, if you have problems accessing these kinds of services).
HAC Mode Settings. HAC is short for hearing aid compatible. Turn this option on if you use your Droid X2 with a hearing aid device.
Auto answer. If you want the Droid X2 to automatically answer calls when you’re in hands-free mode using a Bluetooth headset, turn on this box.
Text message reply. Here’s a useful little setting. With it, you can have a text message sent to someone who calls you and you choose to ignore the call by tapping Ignore. Tap this setting, and not only can you turn on this feature, but you can customize the text message you’ll send.
Show dialpad. Sometimes you need to use the dialpad during a call—for example, to navigate a customer service phone tree (“Press 2 to be ignored”). You can have the Droid X2 automatically display the dialpad during certain types of calls, for example, when you call toll-free numbers, 900 numbers, voicemail, and so on. Tap “Show dialpad,” and you come to a screen that lets you tell the Droid X2 on which types of calls you want the dialpad to appear. You can even tell it to always display a dialpad when you call certain numbers or to display it for all calls.
Voice Privacy. Encrypts your voice conversation as it’s transferred over the wireless network. It’s automatically turned on, so you shouldn’t need to turn it on unless it’s accidentally been turned off. (There’s no benefit to turning it off.)

Sound
Here’s where to go to change just about everything about the way that the Droid handles sounds, such as your ringer and playing music, and even the display. Tap Sound to get to these options:
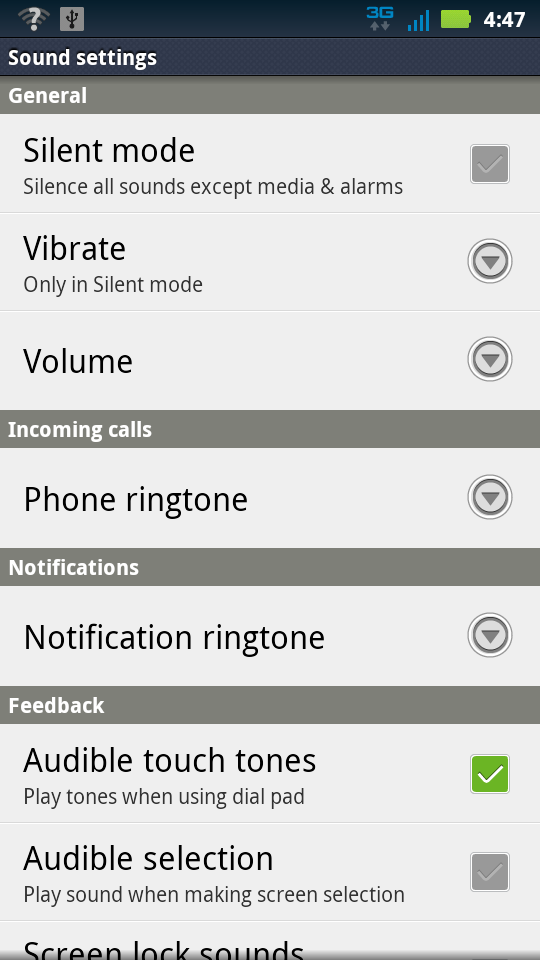
Silent mode. Tap to turn off all your phone’s sounds, except for alarms and media, such as music.
Vibrate. Tap to control when the phone vibrates to indicate an incoming call. It’s especially useful when combined with turning off the ringer for incoming calls, or for when you set the volume to low. Your choices are to always vibrate when you receive a call, never vibrate, vibrate only when you’ve set your phone to silent mode, or only when the phone isn’t in silent mode.
Volume. Tap to set the volume for music, media, and your ringtone when you receive a call. A slider appears that lets you set the volume for each individually. The Droid X2 plays the new volume level when you move the slider, so if you’re not satisfied with what you hear, change it again until you reach the level you want. You also have the option of having your notifications use the same volume as your ringtone volume.
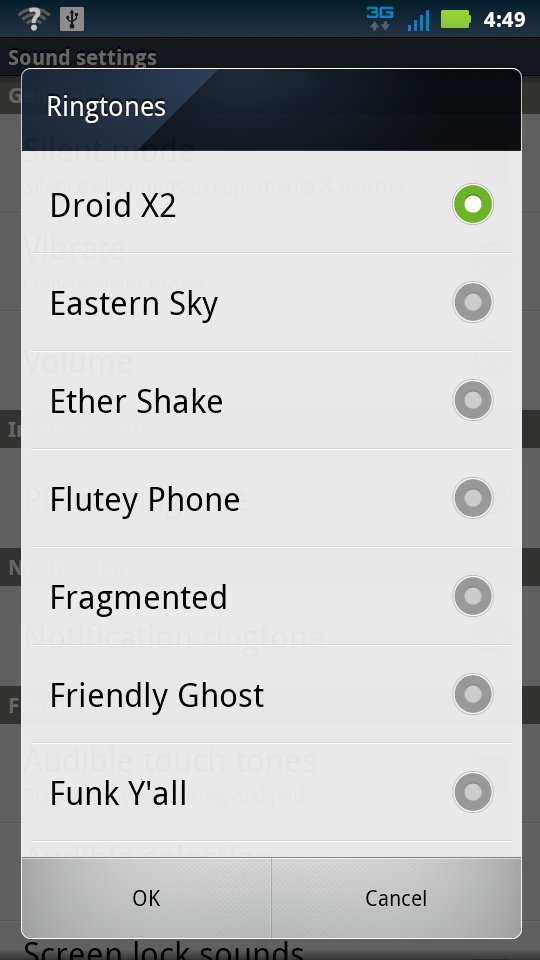
Phone ringtone. Tap this to change your phone ringtone. When you tap it, a list of available ringtones appears, including the one you’re currently using. Browse the list, tap the new one you’re considering, and you hear a preview. Select the one you want, and then tap OK to make it your ringtone.
Note
You can use any music you have stored on your Droid X2 as your ringtone. See Press and Hold Options for details.
Notification ringtone. Sets the ringtone you hear when you receive notifications, such as when new email has been received. You choose your new notification ringtone in the same way you do your phone ringtone.
Audible touch tones. Like to hear tones when you tap the dialpad? Turn on this option. If you’re a fan of silence, leave it unchecked.
Audible selection. Tap if you’d like a sound to play when you make a selection on the Droid X2 screen. This can get noisy, so choose it with care.
Screen lock sounds. Tap, and the Droid X2 will make a sound every time your screen locks, and when you unlock it.
Media audio effects. Want to enhance the quality of the music you play on your Droid X2? Here’s where to do it. You can add effects such as surround sound, use an equalizer, and more.
You get choices for “Wired stereo devices” and “Phone Speaker.”
Note
Wired stereo devices include not just headphones, but speakers, too, so you can add effects to speakers as well as to your headphones.
When you tap “Wired stereo devices,” tap “Enable audio effects” to add any effects. Tap the “Effects profile” drop-down box, and you can choose from a variety of profiles, such as 3D Stereo, Home Theater, and so on. You can also choose Custom to create your own settings.
Note
For more information about these settings and how best to use them, see More Music Options.
If you make any choice other than Custom, then you can’t change the other settings on the “Wired stereo devices” screen—Surround and Equalizer—because they’re controlled by the effects profile. But if you choose Custom for your effects profile, you can choose the kind of surround sound you want and select a different kind of equalizer.
Haptic feedback. Tap this option if you want to feel a slight vibration when you tap certain keys or take certain actions on the Droid X2—for example, when you unlock the phone, press a key on the dialer or keyboard, or add a widget.
SD card notifications. If you want a sound to play whenever you receive a notification about the SD card—for example, that it’s being prepared for use after you’ve turned off the phone and then turned it back on—turn on this checkbox.
Emergency tone. You can have the Droid X2 play an alert, vibrate, or do nothing when you make an emergency call (such as to 911). Tap this option to choose among them.
Call connect. Want to hear a sound when your phone makes a connection on a call? Tap this option.
Network Lost tone. There may be times when you lose your connection to the Verizon Network. If you want to be notified when that happens, turn on this option.
Roaming tone. To be warned when you’ve left the Verizon Network, and are roaming, turn on this box.
Software update alert. Want to be informed when there’s a new version of the Android operating system ready to download to your phone? Turn on this checkbox, and your Droid X2 will do it.
Battery Full Notification. Want your Droid X2 to tell you when your battery is fully juiced? Tap here, and it does your bidding.


Display
Change your display options here. Tap to get to these options:
Brightness. Normally, the Droid X2 chooses a screen brightness appropriate for that level of lighting—less light in the dark, and more in sunlight, for example. If you’d prefer to set it at a specific brightness level, and have it stay at that level until you change it, tap this option, and from the screen that appears, uncheck the box next to “Automatic brightness.” A slider appears that lets you manually set the brightness level.
Auto-rotate screen. With this setting turned on, whenever you turn your phone from vertical to horizontal, the screen rotates as well. Unless you’ve got a good reason to change that, it’s a good idea to leave this on.
Animation. At times, your Droid X2 uses animated effects between screens. Out of the box, it shows all animations. Tap this option, and you can turn off all animations, have the Droid X2 show just some of them, or show all animations.
Screen timeout. In order to save battery life, the Droid X2’s screen goes blank after 1 minute. You can change that to as low as 30 seconds, or as much as 30 minutes—or even have the screen never go blank. Tap this option and then choose the interval you want.
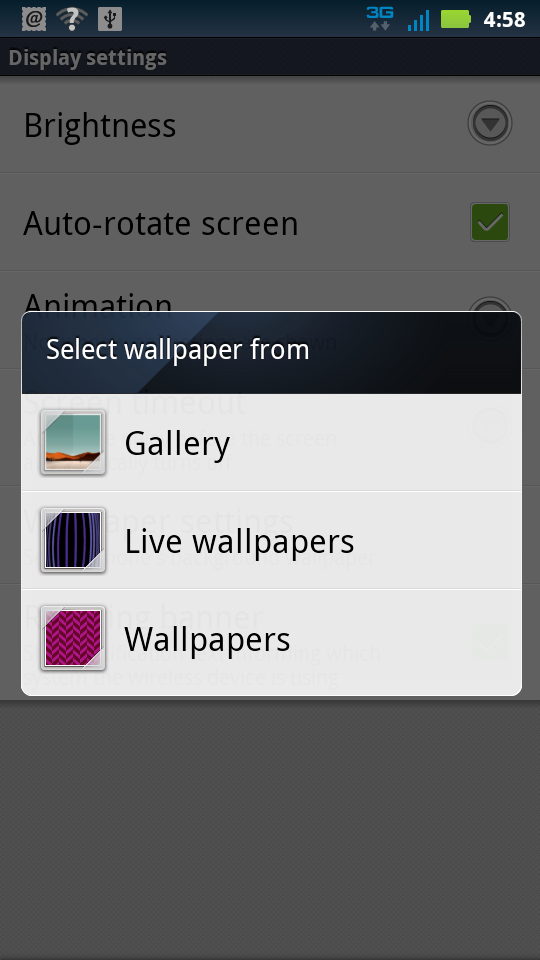
Wallpaper settings. Tap this setting, and a screen appears that lets you choose from three different kinds of wallpapers to display on the Droid X2’s Home screen: “Live wallpapers,” which can be animations, or can grab content from somewhere else and display it, such as a real-time map; “Media gallery,” a display of photos that you’ve taken; or Wallpapers, which are static wallpapers like the one that came with your Droid X2.
Tap the one you want to use, and you’ll be able to browse through a gallery of wallpapers and pick the one you want. For more information about choosing wallpapers, see Adding Widgets, Folders, Shortcuts, and Wallpaper.
Roaming banner. When you’re roaming and using a wireless provider other than Verizon and want a display to tell you which provider you’re using, make sure this box is turned on.


Battery and Data Manager
Droid X2 owners, like most people who use powerful smartphones, tend to be obsessive about battery life, and want to wring every last minute out of their batteries without giving up any of the Droid X2’s considerable power. This section helps you save battery life and also gives you choices for the way you manage how your Droid X2 synchronizes data.
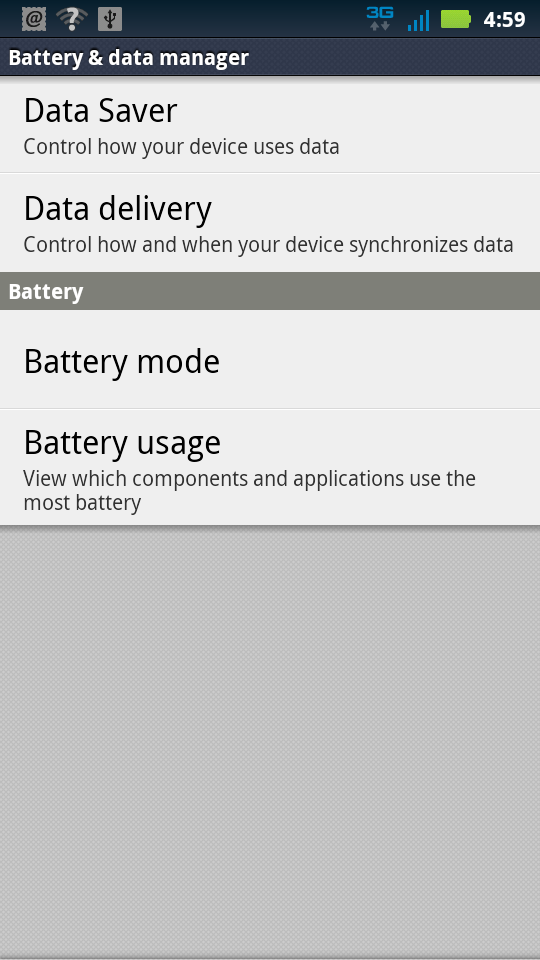
Data Saver
Don’t ignore this setting—it may save you money, something everyone wants to do these days. If you have a data plan that charges you extra if you use more than a specific amount of data every month, you’ll find this section your best friend. When you turn it on, it waits until you’re connected to a Wi-Fi network before it downloads lots of data, for example, large email attachments, big photos and videos, and more. Tap it and then from the screen that appears tap the box next to Data Saver, and it does all that for you and more. If you don’t have a cap on your data plan, you don’t need this feature, but if you do, you’ll want to use it.
Data Delivery
Here’s the section to head to when you want to control how your Droid X2 synchronizes data, and how to control certain aspect of how email works. Tap it and you get to these settings:

Background data. Your Droid X2 regularly checks whether you’ve got email, looks for the latest weather updates, and sees whether there are updates to social networking sites you use on the Droid X2, like Facebook and Twitter. When it finds changes, it syncs them in the background. That’s a good thing, but uses up a bit of battery life. If you don’t care about having the Droid X2 check for new updates and want to save some battery life, turn this setting off.
Data roaming. When this setting is turned on and you’re roaming—connected to a network other than Verizon—you can send and receive data, not just make phone calls. Depending on your service plan, data roaming can be expensive, so check your plan and then decide whether to turn this ability off.
Note
To find out how to turn roaming in general on or off, see VPN Settings.
Data enabled. This lets you send and receive data over the mobile network.
Email and Corporate Sync. Tap this to set a grab-bag of email options:
Notifications. This controls whether you should be notified when you get new email, and if so, whether to use a ringtone (and which to use), or whether your phone should vibrate.
Email delivery. Controls how your corporate email account and other email accounts, notably Gmail, handle getting and synchronizing mail. Tap this option, and you come to a page with three options: Data push, Fetch schedule, and Sync over Wi-Fi only.
To understand these settings, you need to know about something called push technology. Depending on your email service and setup, your Droid X2 may use push for some mail services—that is, as soon as mail is sent to the inbox in your server, it’s also sent to the Droid X2. In other words, the Droid X2 doesn’t have to ask the server whether there is new mail; the server automatically pushes the mail to the Droid X2.
Note
Gmail on the Droid X2 uses push, and if you have an email account that uses Microsoft Exchange, that’s a push account as well. Many other email accounts don’t use push technology, however.
If you want the Droid X2 to check for mail even if push has been turned off, or isn’t working for some reason, turn on the checkbox next to “Data push.” The Droid X2 will then regularly poll your email services to see whether there’s mail, and then fetch the mail for you. If you turn this on, you can set the interval at which the Droid X2 polls for mail, by tapping “Fetch schedule,” and then choosing anywhere from Manually to every 4 hours.
The last setting on this screen controls whether you sync your mail only when you’re connected to a Wi-Fi network. If you have wireless service based on the amount of data you send and receive, consider turning on this setting if you often send and receive large files, because when you send them over Wi-Fi, it’s not counted against your data plan.
Read Options. Tap this option, and you’ll be able to choose the text size, from 12, which is the smallest, to 20, which is the largest. Out of the box, the Droid X2 uses 14.
Compose Options. Tap, and you can change the type of font and font size, font color, background color, and so on for the email messages you compose. You can also create and edit a signature that’s appended to the bottom of all your outgoing email.
Default email account. If you have more than one email account, tap the drop-down box to choose which should be the default—the one that you automatically use when you send email. You can always choose to send from a different account when you compose mail. See the note on Note for details.
Out of office. Lets you create a message that will automatically be sent in response to email you get when you’re on vacation, or otherwise unavailable.
Manage address history. Shows you a list of the email addresses that have sent you email. You can delete any you want. Why delete any? Because when you type in an email address, your email app looks into this history list and makes suggestions based on what it finds. If you find some addresses you’d rather not have show up, delete them.
Smart forwarding. If you’ve got a corporate email account, this controls the way in which attachments are forwarded to you in email. Check with your company’s IT gods to understand it, and see what they recommend.
Social Applications. Tap this and you’ll come to a screen that controls whether you sync your social networking services such as Facebook only when you’re connected to a Wi-Fi network. If you have wireless service based on the amount of data you send and receive, consider turning on this setting if you often send and receive large files, because when you send them over Wi-Fi, it’s not counted against your data plan.


Battery Mode
This setting lets you choose the best trade-off between battery life and Droid X2 features. Tap it, and you come to a screen that lets you choose the best battery mode for the way you use your Droid X2.

The Droid X2 has four battery modes that balance battery life with the way in which the Droid X2 connects to 3G and Wi-Fi networks—Maximum battery saver, Nighttime saver, Performance Mode, and Custom battery saver:
In Maximum battery saver mode, your display is dimmed, and the phone stops syncing data after you haven’t used the phone for 15 minutes during both the day and night.
In Nighttime saver mode, the phone stops syncing data after you haven’t used the phone for 15 minutes between the hours of 10 p.m. to 5 a.m. During all other hours, it syncs as normal.
In Performance mode, the phone syncs without any restrictions during the night and day.
Custom battery saver gives you your own customized options for controlling your battery, such as changing the display brightness, and so on. Make your choices, tap OK, and then whenever you turn on the custom battery saver, they’ll be applied. Because you tend to use the Droid X2 more during certain hours than others, you can have the data connection set differently depending on the time of day—for example, you may want it to close a data connection quickly late at night, but more slowly during the day. The “Off-Peak hours” section of the screen lets you set a period of time that you don’t use the Droid X2 frequently, and choose a setting for that span of time only. The “Peak hours” section lets you choose a setting for your hours of peak usage.

Battery Usage
Tap this, and you see a nifty graphic that shows what uses up most of your Droid X2 battery life. A helpful chart shows you exactly where your juice is going. Armed with this information, you may be able to turn off various Droid X2 features and options to get more life out of your battery. For details on how to save battery life beyond choosing the right battery profile, see the box on Maximizing Your Battery Charge.

HDMI
Using the Droid X2’s HDMI port, you can watch videos or photos from your Droid X2 on a TV or a monitor. Tap this option, and you come to a setting that lets you control overscan—the viewable area displayed when your phone is connected to an HDMI display such as on a big-screen TV. A slider lets you change the setting, so that when you’re connected to an HDMI display, you can fiddle until you’ve got it right.

Backup Assistant
Verizon includes a free backup service that saves a copy all of your contacts on a secure Verizon server. If you lose your phone or buy a new one, you’ll be able to transfer all your contacts via the Backup Assistant. Tap this button to launch and set up Backup Assistant if you haven’t yet used it. If you’ve already used it, tap this screen to control settings such as when to sync contacts.
Location & Security
Plenty of apps, like turn-by-turn navigation and Foursquare, use the Droid X2’s ability to know your location. These settings control how the Droid X2 handles knowing your location, as well as security options, like setting a screen lock.

The top section of this screen is labeled My Location, and it determines how the Droid X2 handles location:
E911 Only. This item isn’t a setting, and you can’t change it—it’s a notification telling you that you can’t turn off the E911 location setting on the Droid X2. With E911 location, when you dial 911, your phone automatically sends your location, so that you can be more easily found by ambulance, police, or other emergency services. (E911 location is permanently turned on on every mobile phone with good reason—so emergency services can locate the caller.)
Google location services. Tap this, and the Droid X2 uses Google’s location services for determining your location with Wi-Fi or mobile networks, via techniques such as triangulation.
Standalone GPS services satellites. Tap this option, and the Droid X2 will determine your location via GPS satellites, which are a more precise means of locating you than wireless networks. GPS uses a good deal of battery power, so turn it on only when you need GPS services.
VZW location services. These location services uses Verizon’s cellular network and triangulation to determine your location.
The next section, Security, lets you lock your Droid so that only you can use it:
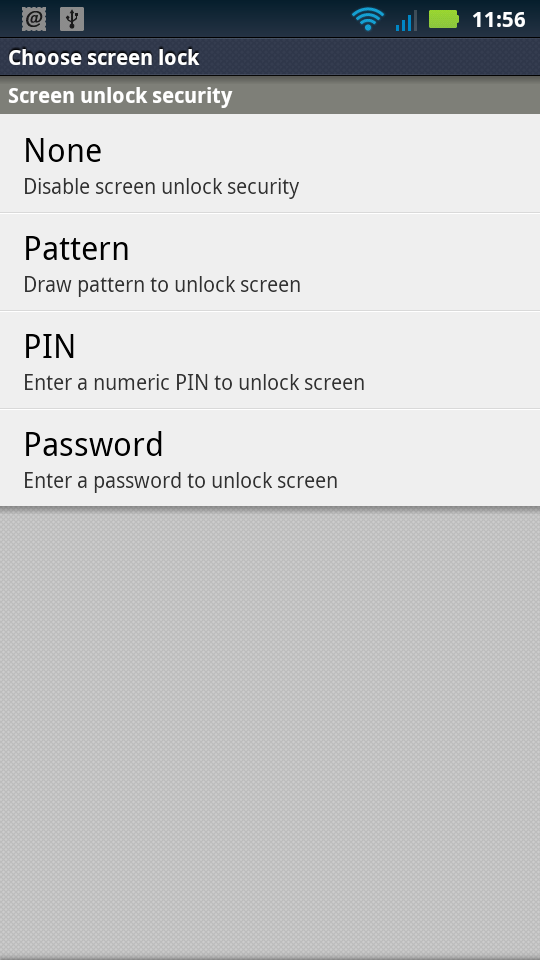
Set up screen lock. When your screen is locked, all you normally need to do is swipe the lock to the right to unlock it—anyone can do it. If you lose your phone, whoever finds it can use it. Tap this button if you want to help make sure that you’re the only person who can unlock the phone.
From the screen that appears, you can choose between a pattern lock, which is a special gesture you make on the phone when you want to unlock it; a PIN, which is a series of numbers that need to be typed to unlock the phone; and a password comprised of letters and numbers that needs to be typed to unlock the phone. If you already have a screen lock and want to disable it, select None.
Security lock timer. This lets you change how long it takes for the Droid X2’s security lock to kick in if you’ve set up screen lock. When you first set it up, it takes 20 minutes, but tap here to change it from anywhere between two minutes and 20 minutes.
Allow Bluetooth bypass. Turn this on if you want to be able to use a Bluetooth headset’s multifunction button to launch Voice Commands, even if you’ve set up a screen lock.
Note
Before creating a security lock, make sure to set up a Google or Gmail account, because if you want to reset your security lock, you’ll need to use your login information from that account to reset it.
Next comes the “Manage restriction lock” section:
Next is Passwords, another one-entry section:
The final sections of this screen are primarily used in corporations. For example, the Credential storage section is used in concert with some corporate virtual private networks (VPNs). If they’re required for VPN access, your company’s IT staff will tell you how to set up and customize these settings. Otherwise, you likely won’t need to touch them.
Accounts
Here’s where you make changes to or add new email accounts, Gmail accounts, and accounts for social networking sites such as Facebook and Twitter. It’s also where you adjust the way the Backup Assistant works, if you use it.
Tap an icon for one of your email accounts (aside from Gmail), and you come to a basic setup screen where you can change your basic email settings. You can also delete an account from your Droid X2 by tapping “Remove account.”


General settings. Here’s where you enter your email address, the account name (what the Droid X2 displays for the account—think of it as a nickname that makes it easy to identify the account), and the account’s “real name.” So if you have an email account with an Internet service provider called MyBigISP, the real name of the account would be MyBigISP, but you might want to use the name “Home email.” You can, of course, make the account name and the real name the same.
Incoming Server. These settings tell the Droid X2 where and how to grab email that’s sent to you. You’ll need information such as the type of mail server (for example, POP or IMAP), your user name and password, the port number, and so on. Get this information from your email provider, or from your computer’s email program.
Note
For more information about setting up your email account, the difference between POP accounts and IMAP accounts, and so on, see POP3 and IMAP Accounts.
Outgoing Server. This tells the Droid X2 how to send outgoing mail. You need the same type of information as you need for Incoming Server, so check with your mail provider or your computer’s email software.
Other Settings. Tap to set whether you want the Droid X2 to delete email messages. Your choices are to never delete them, or delete them after a week, two weeks, a month, or two months.

Gmail and Google
The Droid X2 handles Gmail and your Google account differently than it does other email accounts, so they get their own settings. You don’t need to enter information about your incoming and outgoing server, because when you set up Gmail, the Droid X2 handles all that automatically.

Instead, you set whether to synchronize your calendar with Google Calendar, your contacts with your Gmail contacts, and the mail on your Droid X2 with Gmail servers. If you uncheck the box of any service, it won’t synchronize. The screen also shows you the last time each was synced. To sync them all right manually, press the Menu key and then tap “Sync now.” To remove your Google and Gmail account from your Droid X2, tap “Remove account.”
If you have a Facebook account, tap its icon if you need to change your username or password. You can also remove the account from the phone by tapping “Remove account.” If you want to change any other Facebook options, you must do so on the Web.
Phone Backup Assistant
If you use Backup Assistant to back up your contacts, tap this item to set options like whether and how to automatically back up your contacts. This setting also gives details about the last time you backed them up.
Add Account
If you want to set up a new email account, social networking account, or similar type of account, tap this button. You come to a page with a list of account types, such as email, Facebook, MySpace, and so on. Tap the account you want to set up, and follow the instructions (which vary for each type of account).
Applications
From here you can manage and uninstall apps, control services running in the background, and more:

Unknown sources. With the Droid X2, you can find and install software not just through the Market, but in other ways as well, such as by downloading it from the Web. Turn on this option if you want to install apps from anywhere, not just the Market. If you’re very concerned about safety, turn off the box, since the Market checks apps for malware.
Manage applications. This option lets you uninstall apps, manage them, force them to stop running, and more. Tap it, and a list appears of all the apps on your Droid X2, in four categories: Downloaded (all apps you’ve downloaded), All, Media area (apps that can be moved to your SD card), and Running (those apps that are currently running). Tap any category to see the list of apps, and then tap an app that you want to manage in some way. You’ll likely be confused when you tap “Media area,” because it shows not just apps that have been moved there, but apps that can be moved there. Apps that are already there show up with green checkboxes next to them; apps that can be moved there have empty boxes.
Note
In the Downloaded category, you may see some apps that were preinstalled on the Droid X2, such as Maps. They show up in the Downloaded category because you’ve installed updates to them.
When you tap an app, you come to a screen full of information about it—its size, how much data it uses, the version number, and so on. Tap Uninstall to remove the app from your Droid X2. (You can’t uninstall apps that were preinstalled on the Droid X2. However, if you downloaded any updates to the preinstalled apps, you can uninstall the update and revert to the original version of the app.)
If the app uses your Droid X2’s built-in memory to store temporary information—called the cache—you can free up that memory by tapping “Clear cache.” Some apps are set to run every time you start your Droid X2; if you want to change that so they don’t start automatically, you can do so in the “Launch by default” area. If the app is running and you want to stop it, tap “Force stop.” And if you’re such a big fan of the app that you want to let others know about it, tap Share, and you can send an email or text message that includes the app’s name, size, description, and a URL where it can be downloaded. (Share doesn’t send the app itself.) You can also move the app from the phone’s main storage to its SD card (which the Droid X2 calls the media area) by tapping the “Move to media area” button. If the apps is already in the media area, tap “Move to phone” to move it back to the main phone storage.
Running services. Tap to see all the background services currently running on your Droid X2, like those for news, Backup Assistant, social networking sites, and more. Tap any to stop the service. Generally, unless you have the technical chops to know what you’re doing (and the consequences of it), it’s not a good idea to stop any running services, because doing so could stop various apps and the Droid X2 itself from running properly.
Storage use. Takes you to the All tab of the Manage Applications app. Look at the bottom of the screen, and it shows you the total amount of storage your apps use, and how much free space you’ve got left.
Battery use. Launches the same screen that appears when you tap Battery usage in the Battery & Data Manager settings screen. Why is it listed both here and there, and why is one called Battery use, and the other Battery usage? Got me. It’s one of those Google mysteries.
Development. Are you an Android developer? If not, don’t bother with this setting. If you are, it lets you set options such as for USB debugging and whether the screen should stay awake when the Droid X2 is charging.
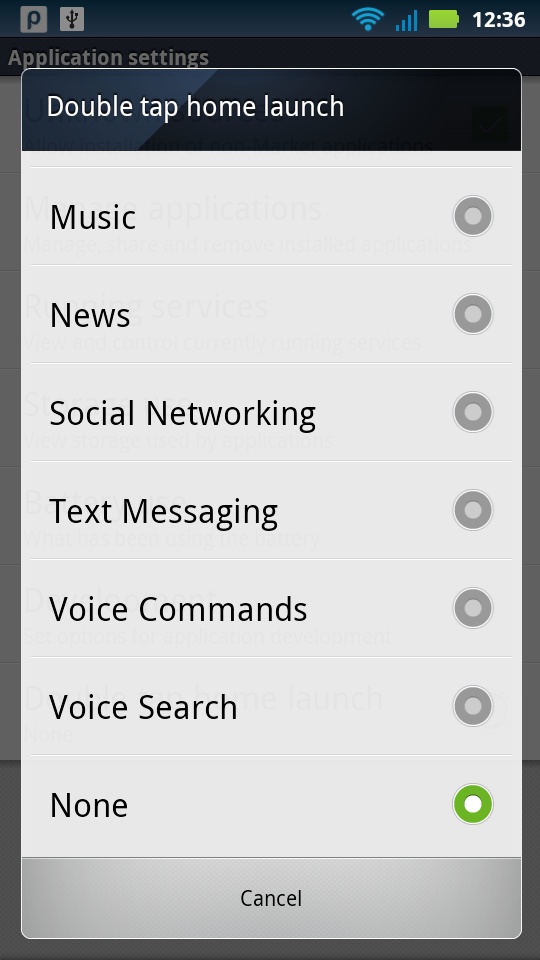
Double tap home launch. When you press the Home button twice in quick succession, the Droid X2 launches an app, such as Voice Commands, the Music app, the browser, the dialer, and so on. The “Double tap home launch” setting lets you choose which app or service should run. You can choose only from the list that appears; you can’t customize it to run any app or service beyond those listed.


Privacy
There are only three settings here:
Back up my data. This setting backs up your Droid X2 settings and data to Google’s servers so that if you have a problem with your Droid X2, you can restore the settings and data at some later time. Obviously, if you don’t feel safe with your data riding an anonymous server somewhere, turn this option off.
Automatic restore. If you uninstall an app, and then later decide that you want to install it again, if you have this turned on, the Droid X2 automatically grabs the relevant data you’ve backed up using the “Back up my data” option and puts it back on your Droid X2 when you reinstall the app.
Factory Data Reset. If you’re getting rid of your phone, you don’t want anyone else to get all your data. Tap this button and then follow the onscreen instructions for setting the Droid X2 back to the way it was before you began using it. It deletes all your data, eliminates any changes you made to the phone, deletes any apps you’ve installed, and makes the phone look and work exactly the way it did when it was shipped from the factory.

Storage
Here’s where to get details about the storage on your phone and SD card.

The first section, “Application storage,” shows you how much storage is available for your apps. It has a single listing:
Available space. Shows you how much space you’ve got left on the card.
The next section, “Internal storage,” gives details about the storage built into the phone itself. It has these three listings:
Total space. Shows the total amount of space on your Droid X2’s built-in storage.
Available space. Shows you how much space you’ve got left on your built-in storage.
Format internal storage. If you’ve got a problem reading data or apps from your phone, or storing data or apps, your internal storage may need to be reformatted. Tap this button to do it, but be aware it will erase your data and apps.
The next section, “SD card,” gives details about the storage on the SD card. It has these listings, which mirror the ones in the Internal storage area:
Total space. Shows the total amount of storage space on your SD card.
Available space. Shows you how much space you’ve got left on your SD card.
Unmount SD card. If you need to remove your SD card for any reason, tap this before removing the card. For more details on how to remove an SD card, see MicroSD Card.
Format SD card. If you’re installing a new SD card, or if your existing one gets corrupted for some reason, tap this to format it. Keep in mind that when you format an SD card, you erase all of its contents.
The next section, Windows Media Sync, has a single setting:
The final section, “Software install”, is only for those who face a very specific problem: Not being able to get a car stereo or photo kiosk to recognize their Droid X2s. If you run into this problem, head to this section, and tap “Software install help.” Then follow the directions, which include tapping the “Disable software install” option, but only after taking a number of steps first.
Language & Keyboard
This section lets you change the language you use, as well as various keyboard options, including whether to use the Droid X2’s built-in keyboard or Swype:

Select locale. Tap if you want to change your language. Choose the language from the list that appears.
User dictionary. The Droid X2 uses its dictionary to suggest words to you as you type. If you’d like to add a word to the dictionary, tap this option, and when a screen appears, press the Menu key and tap Add. Type the word into the “Add to dictionary” box that appears, and then tap OK.
Input method. You have two choices: either Swype or the Droid X2’s built-in multi-touch keyboard. For details about the differences between the two, see The Keyboards.
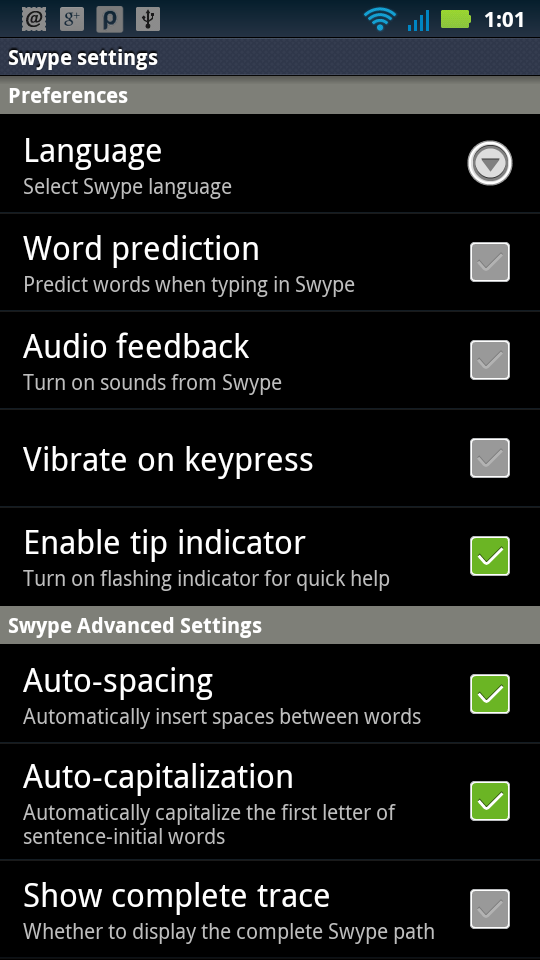
Swype. Tap to change a variety of Swype settings, such as whether to automatically capitalize the first letter of words that begin sentences, how long Swype shows its line “trace” on the keyboard, how quickly Swype responds to your input, and so on.
Multi-touch keyboard. Tap to change multi-touch keyboard settings, such as whether the Droid X2 makes a sound when you tap a key, vibrates when you tap a key, shows suggestions for words as you type them, and so on.

Voice Input & Output
A variety of apps, such as the Screen Reader and GPS navigation apps, can read text to you from your Droid X2. The settings in this section control how it works.
Voice Recognizer Settings
Here’s where you control how the Droid X2 recognizes your voice:
Language. Choose the language you’ll be speaking into the Droid X2.
SafeSearch. Controls the kind of search results you get when you search Google using voice commands, by filtering explicit images and explicit text. The Moderate setting filters explicit images, and the Strict setting filters both explicit images and explicit text. Off turns off the filter.
Block offensive words. Blocks the results of a voice search using offensive words. Uncheck it if you don’t want those results blocked.
Personalized recognition. Tap here, and Google attempts to improve voice recognition by using past words and phrases you’ve spoken into the Droid X2 and comparing them to what you’re currently saying. To do that, it needs to tie recordings of those words and phrases to your account—normally they’re kept anonymous. But if you worry about the privacy implications of this, don’t turn this option on.
Google Account dashboard. Launches a Web page that lets you manage all of your Google account settings. This group has nothing to do with voice recognition, so it’s not clear why it’s here. But here it is, so use it if you’d like.
Text to Speech Settings
This section controls the way in which the Droid X2 converts text on your phone into speech:
Listen to an example. Tap to hear a voice read text to you. Yes, it’s robotic-sounding—that’s the nature of text-to-speech.
Always use my settings. Individual apps have a variety of settings for controlling how text-to-speech works. If you want to override those settings with settings of your own, tap this option. You can then set the two options just below it on the list, under Default settings—“Speech rate” and “Language.”
Default Engine. You shouldn’t have to worry about this setting—it just tells you what text-to-speech software the Droid X2 uses, which out of the box is Pico TTS (TTS stands for text to speech) and the only choice. If you’ve installed other text-to-speech software, that may appear here instead.
Install voice data. This item is likely to be grayed out, because the Pico TTS system is already in place. However, after you install another text-to-speech system, you may have to come back to this setting and tap it to complete the installation of the voice data required for that system.
Speech rate. Tap to select how fast the text should be read to you. There are five choices, ranging from “Very slow” to “Very fast.”
Language. Tap and then choose the language of text that you want read to you. In most cases, that’ll be American English. But if someone sends you email in Italian, for example, and you want it read to you, select Italian. That way, the text reader will know that the language it’s looking at, and attempt to pronounce the words accordingly. For example, in Italian the letter combination “ci” is pronounced the same way as “ch” in English.
PICO TTS. Lets you choose which language you want the Droid X2’s Pico TTS to use. However, since the Language setting controls this, there’s no need to tap here.
Accessibility
If you or someone who uses the phone has vision problems or limitations, here’s where you can choose options to make the phone easier to use:


Accessibility. To use either of the two accessibility services, you need to first turn on this box.
Zoom Mode. Tap this option, and a box appears that magnifies anything on the screen. Move it around the screen to magnify text and pictures. You can change the magnification level by tapping the + or – signs.
Voice Readouts. Helps those with vision problems navigate through the Droid X2 and launch apps. It reads out actions you take, and then reads the options available to you. When using the Screen Reader, the Droid X2 does things differently than normal. For example, tapping an app’s icon doesn’t launch the app. Instead, the icon turns red, and the screen reader reads the app’s name. To launch the app, double-click it. The screen reader doesn’t read actual contents to you—for example, it won’t read you the contents of an email message.
Power button ends call. Turn on this option, and when you’re on a call, you can end it by pressing the Power/Lock key. The screen won’t be turned off as it is normally.
Date & Time
Choose from these settings for the date and time:
Automatic. As long as this checkbox is turned on, you won’t have to worry about setting the date and time—the Droid X2 automatically gets it from the Verizon Network, including your location (to set your time zone).
Set date. If you haven’t turned on the Automatic setting, and want to set the date yourself, tap here to do so.
Select time zone. If you’re not on Automatic, tap here and choose your time zone.
Set time. If you haven’t turned on the Automatic setting, tap to set the time.
Use 24-hour format. Tap if you prefer the 24-hour format—14:00 instead of 2 p.m., for example.
Select date format. You’ve got other options here if you don’t like the U.S. standard (09/22/2011), including 22/09/2011, and 2011/09/22.
About Phone
Go here for more information than you can ever imagine about your phone, including the version of the Android software you’re running, your current signal strength, whether you’re roaming, and much more. Much of what you’ll find here is informational only. It’s also where you go to see if there’s an Android software update for you:
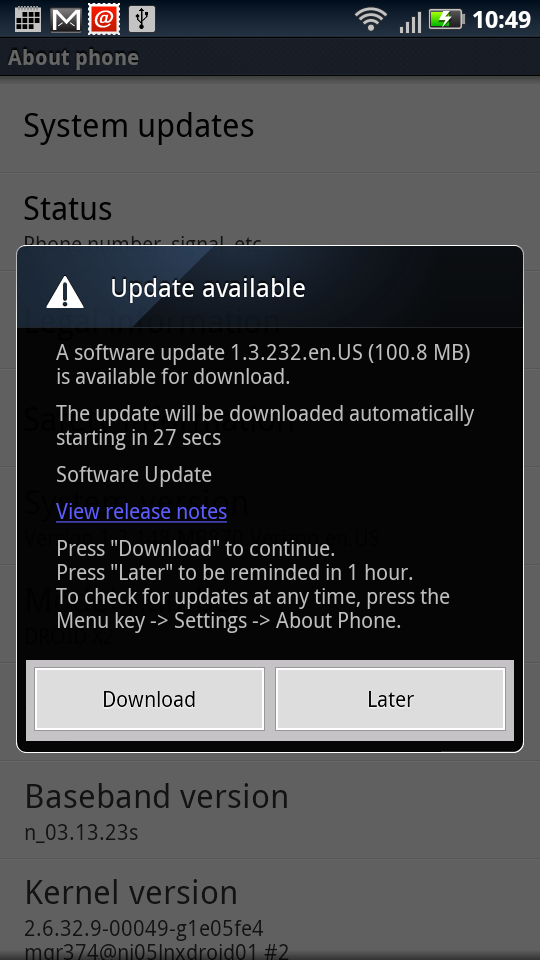
System updates. Tap if you want to see whether there’s a software update available. If there is, follow the instructions for installing it.
Note
Technically, you don’t need to update your phone’s software manually by tapping “System updates.” Updates are automatically delivered to you over the Verizon Network, via what’s called an over the air (OTA) update (Upgrading to the Newest Software).
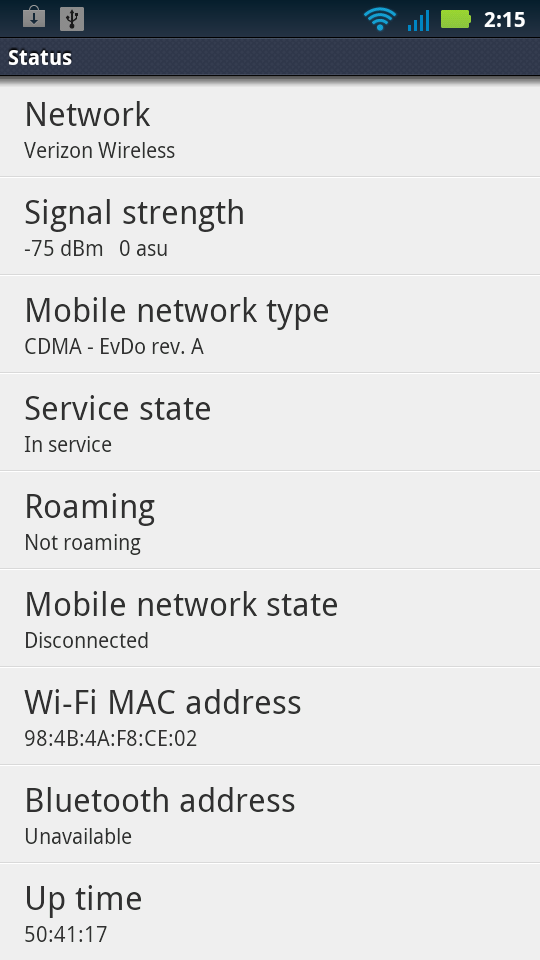
Status. Tap for a mind-boggling amount of detail about your phone’s status, including its signal strength, whether it’s roaming, the battery level, your phone numbers, the phone’s Wi-Fi MAC address (a unique number that identifies your Droid X2), the network you’re using (Verizon Wireless), and a barrage of techie details that only a full-time geek could love.
Legal information. Here’s where you can while away the hours reading Google’s terms of service, and the contracts that govern the use of Android. If you’re not a lawyer, you don’t want to read this. In fact, even if you are a lawyer, you don’t want to read this.
Safety information. Spend enough time reading the information you find here, and you may think the Droid X2 is a dangerous weapon, not a smartphone. This provides safety information about every aspect of using the Droid X2, including repetitive motion problems, glass parts, warnings about small children and the phone, and so on.
Other information. The rest of the screen gives you a variety of very technical information that you most likely will never need to know, such as the kernel number and the ERI version. However, if you ever need tech support, you may need to go back to this screen to read this information to a techie. The only setting to pay attention to is Android version, which tells you the current version number of your operating system.