Securing Windows 2000 Advanced Server and Red Hat Linux 6 for E-mail Services
Introduction
Microsoft Windows 2000 Advanced Server and Red Hat Linux are capable of high-end security. However, the out-of-the-box configurations must be altered to meet the security needs of most businesses with an Internet presence. This chapter will show you the steps for securing Windows 2000 Advanced Server and Red Hat Linux systems, which is a process called hardening the server. The hardening process focuses on the operating system, and is important regardless of the services offered by the server. The steps will vary slightly between services, such as e-mail and http, but are essential for protecting any server that is connected to a network, especially the Internet. Hardening the operating system allows the server to operate efficiently and securely.
This chapter includes the essential steps an administrator must follow to harden Windows 2000 Advanced Server and Red Hat Linux systems. These steps include maintenance, disabling unnecessary services, locking down ports, and placing the server behind a firewall, such as Axent Raptor or CheckPoint Firewall-1. Although Microsoft Exchange Server may lock down some services, many Exchange administrators will find this information useful as they install alternative e-mail servers, such as Sendmail.
Updating the Operating System
When an operating system is first released, it may contain many security vulnerabilities and software bugs. Vendors, such as Microsoft and Red Hat, provide updates to their operating systems to fix these vulnerabilities and bugs. In fact, many consulting firms recommend that companies do not purchase and implement new operating systems until the first update is available. In most cases, the first update will fix many of the problems encountered with the first release of the operating system. In this section, you will learn where to find the most current Microsoft Windows 2000 Service Packs and Red Hat Linux 6.2 Errata and Updates.
Microsoft Service Packs
The first step in hardening a Microsoft Windows 2000 Advanced Server is to apply the most current service pack to the operating system. A service pack provides the latest updates to an operating system. Each service pack is a collection of fixes to the operating system, such as fixes in security, reliability, setup, and application compatibility. Many service packs are not required upgrades. You need to read the service pack documentation to determine if you need to install it. You can order service packs on CD or download them directly from the Microsoft Web site.
The Microsoft Web site provides service packs at no charge. After your initial installation of Windows 2000 Advanced Server, you should point your browser to http://support.microsoft.com/servicedesks/servicepacks/servicepacks.asp to download the latest service pack. Here are the steps for installing a typical service pack:
1. To determine the latest service pack in Windows 2000 Advanced Server, select the Start menu and choose Updates. The browser will automatically open and load the Microsoft Windows Update Web page.
2. Identify the latest service pack. Figure 8.1 shows the availability of the first Windows 2000 Service Pack, SP1, which provided many of the bug fixes and security holes that existed in the initial release of Windows 2000.

3. Review the service pack documentation and determine if it is required for your system.
4. You can order the service pack on CD, or download it. To download it, select the checkbox next to the latest service pack, then click the download button. Follow the instructions.
5. The downloading process will download and install the service pack.
6. You must restart your computer for the service pack installation to complete.
When your computer restarts, you will have the latest, fully-tested, patches to the Windows 2000 operating system.
Red Hat Linux Updates and Errata Service Packages
The first step in hardening a Linux server is to apply the most current errata and Update Service Package to the operating system. The Update Service Package provides the latest fixes and additions to the operating system. It is a collection of fixes, corrections, and updates to the Red Hat products, such as bug fixes, security advisories, package enhancements, and add-on software. This collection of updates can also be downloaded individually as Errata, but it is a good idea to start with the latest Update Service Package, and then install Errata as necessary. However, you must pay to receive the Update Service Packages, and the Errata are free. Many Updates and Errata Service Packages are not required upgrades. You need to read the documentation to determine if you need to install it.
The Update Service Packages include all of the Errata in one package to keep your system up-to-date. After you pay for the service, you can order Update Service Packages on CD or download them directly from the Red Hat Web site. To find out more about the Update Service Packages, visit www.redhat.com/support/services/update.html, as shown in Figure 8.2. You will learn more about Errata in the maintenance section of this chapter.

Disabling Unnecessary Services and Ports
To harden a server, you must first disable any unnecessary services and ports. You must also ensure that unnecessary services are removed, such as Microsoft Server service or the Linux rlogin service. It is also important to lock down unnecessary Transmission Control Protocol/User Datagram Protocol (TCP/UDP) ports. Once these services and ports are secure, you must then regularly maintain the system.
Windows 2000 Advanced Server—Services to Disable
When a new operating system is introduced, there are many uncertainties because the OS has not been implemented in every production environment. There are many security vulnerabilities that have not been discovered. Most services on the system are not vulnerable to these weaknesses. However, an administrator can reduce the amount of risk by removing unnecessary services. Windows 2000 Advanced Server includes more services than ever before, so it makes sense that an administrator would customize the system to suit the company needs. You are removing risk when you remove unnecessary services.
The Server Service
The Windows 2000 Server service provides Remote Procedure Call (RPC) support for file, print, and named pipe sharing. RPC is a programming interface that allows computers to share resources with one another remotely. In Windows, the RPC uses NetBIOS network requests. NetBIOS is a native networking protocol for Windows and DOS networks, and is not required when using Windows 2000 as an Internet server. If the Server service is left running, the system is vulnerable to hackers who can exploit NetBIOS. If the service is disabled, two-thirds of all hacker attacks can be avoided.
To stop the Server service, you must disable it. It is recommended that you disable the service, not remove it, because removal can potentially damage the operating system. You must also verify that internal users do not require the Server service. If they require the Server service (for example, the server is used as a Windows LAN file server), you should place those resources on a different server and make them available internally. Because of this, disabling the Server service has drawbacks, and should be implemented only in certain situations.
1. To disable the Server service in Windows 2000 Advanced Server, click Start | Programs | Administrative Tools | Services.
2. The Microsoft Management Console (MMC) opens with the Services snap-in. The right-hand window lists the services installed on the machine, as shown in Figure 8.3.

3. Scroll to the Server service, right click the service, and select Properties.
4. The Server Properties window appears. The General tab is displayed by default.
5. In the Startup type drop-down menu, select Disabled, as shown in Figure 8.4.

6. Click the Stop button to stop the service. An Alert window appears stating that when the Server service stops, it also stops the Distributed File System and Computer Browser service. If you do not require these services, select Yes to stop them.
Internet Information Services (IIS)
If you plan to run services available in IIS 5, such as Web, File Transfer Protocol (FTP), or Network News Transfer Protocol (NNTP) services, you need to read the Microsoft document “Secure Internet Information Services 5 Checklist” at www.microsoft.com/technet/security/tools.asp. This Web site contains tools and checklists for securing many different Microsoft products. Configuring IIS 5 for security is simpler than in previous versions because the default settings for Microsoft Windows 2000 and IIS 5 are more secure than the default settings for Windows NT 4.0 and IIS 4.
If the system will run exclusively as an e-mail server, and will not require IIS, you should stop the unnecessary IIS, or remove it altogether. During installation of Windows 2000 Advanced Server, you are given the choice to install IIS 5. Simply deselect the checkbox and IIS will not install.
If you installed IIS, you can stop the services instead of removing them, especially if you periodically use the services. You can restart a service when needed (make sure the coinciding port is open). For instance, if you want to use the FTP service temporarily, you can start the FTP service, then open TCP port 21.
To stop IIS, use the following steps:
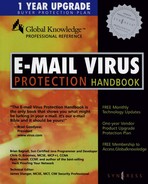
1. Access the Internet Information Services MMC by selecting Start | Programs | Administrative Tools | Internet Services Manager.
2. By default, all the IIS applications are started. To stop them, right-click each service and select Stop, as shown in Figure 8.5.
3. Stop the services that are not required. By default installation, the following will be available: Default FTP Site, Default Web Site, Administration Web Site, Default SMTP Virtual Server, and Default NNTP Virtual Server.
5. The unnecessary IIS programs have been stopped. If you require the use of an IIS program, simply open the Internet Information Services MMC, right-click the required service, and select Start.
Red Hat Linux—Services to Disable
Linux, by nature, is more secure than the Windows operating systems. However, it is also not as intuitive and user-friendly as Windows. Regardless, there are still uncertainties to every new Linux kernel that is released and many security vulnerabilities that have not been discovered. Most Linux services are not vulnerable to these exploits. However, just as in Windows, an administrator can reduce the amount of risk by removing unnecessary services. Red Hat Linux 6 includes many services, so it makes sense that an administrator would customize the system to suit the company needs. Remember, you are reducing risk when you remove unnecessary services.
Inetd.conf
The inetd.conf file controls many UNIX services, including FTP and Telnet. It determines what services are available to the system. If a service is commented out, then the service is unavailable. Because this file is so powerful, only the root should be able to configure it. The inetd.conf file makes it simple to disable services that your system is not using. For instance, you can disable the FTP and Telnet services by commenting out the FTP and Telnet entries in the file and restarting the service. If the service is commented out, it will not restart. The next section will demonstrate how to disable the Telnet service.
Most administrators find it very convenient to log in to their UNIX machines over a network for administration purposes. It allows the administrator to work remotely while maintaining network services. However, in a high security environment, only physical access may be permitted for administering a server. In this case, you should disable the Telnet interactive login utility. Once disabled, no one can access the machine via Telnet.
1. To disable Telnet, you must edit the inetd.conf file. Open the inetd file and locate the Telnet service, as shown in Figure 8.6.

2. Comment out the Telnet service, then write and quit the file.
3. Next, you must restart inetd.conf. Identify the process identifier (PID) for inetd by entering:
4. The second column lists the PID number. The last column lists the process using that PID. To restart inetd, identify the PID number and enter:
Attempt to log on to the system using Telnet. You should fail. Note that many services can be disabled using the inetd.conf file. You can disable the FTP service using the same method.
Rlogin
The rlogin service (remote login) is enabled by default in the inetd.conf file. Rlogin has security vulnerabilities because it can bypass the password prompt to access a system remotely. There are two services associated with rlogin: login and rsh (remote shell). Comment out these services if they are not required and restart inetd to ensure your system is not exploited.
Locking Down Ports
TCP/IP networks assign a port to each service, such as HTTP, SMTP, and POP3. Each port is given a number, called a port number, used to link incoming data to the correct service. For instance, if a client browser is requesting to view a server’s Web page, the request will be directed to port 80 on the server. The Web service receives the request and sends the Web page to the client. Each service is assigned a port number, and each port number has a TCP and UDP port. For instance, port 53 is used for the Domain Name System (DNS) and has a TCP port and a UDP port. TCP port 53 is used for zone transfers between DNS servers; UDP port 53 is used for common DNS queries—resolving domain names to IP addresses.
Well-Known and Registered Ports
There are two ranges of ports used for TCP/IP networks: well-known ports and registered ports. The well-known ports are the Internet services that have been assigned a specific port. For instance, SMTP is assigned port 25 and HTTP is assigned port 80. Servers listen on the network for requests at the well-known ports. Registered ports are temporary ports, usually used by clients, and will vary each time a service is used. Registered ports are also called ephemeral ports, because they last for only a brief time. The port is then abandoned and can be used by other services.
The port number ranges are classified as follows, according to Request for Comments (RFC) 1700. To access RFC 1700, go to ftp://ftp.isi.edu/in-notes/rfc1700.txt.
| Type | Port number range |
| Well-known | 1-1023 |
| Registered | 1024-65535 |
Most TCP/IP services use the registered ports 1024-5000 for ephemeral ports. The registered ports above 5000 are used for services that are not well known. You will see how well-known ports work with registered ports in a moment.
Table 8.1 is a list of well-known TCP/UDP port numbers.
Table 8.1
Commonly Used Well-known TCP/UDP Port Numbers
| Protocol | Port Number |
| FTP (Default data) | 20 |
| FTP (Connection dialog, control) | 21 |
| Telnet | 23 |
| SMTP | 25 |
| DNS | 53 |
| DHCP BOOTP Server | 67 |
| DHCP BOOTP Client | 68 |
| TFTP | 69 |
| Gopher | 70 |
| HTTP | 80 |
| POP3 | 110 |
| NNTP | 119 |
| NetBIOS Session Service | 139 |
| Internet Message Access Protocol (IMAP), version 2 | 143 |
To explain how well-known ports work with registered ports, let’s take a look at a typical Web site connection from a Web browser to a Web server. The client sends the HTTP request from a registered TCP port, such as port 3666. The request is routed across the network to the well-known TCP port 80 of a Web server. Once a session is established, the server continues to use port 80, and the client uses various registered ports, such as TCP port 3666 and 3667, to transfer the HTTP data.
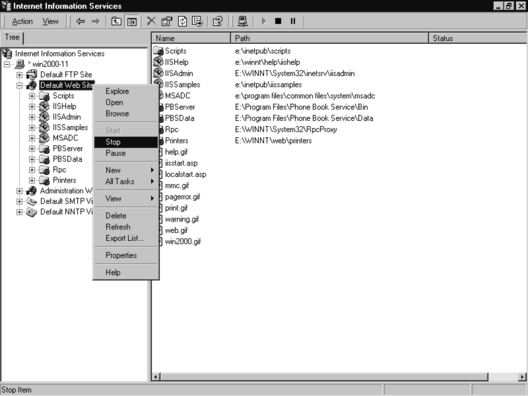
Figure 8.7 is a packet capture that displays the establishment of a TCP session between a client and server, and the transmission of HTTP data between them.
In frame number one of the packet capture, the source address (192.168.10.82) is the client computer requesting the Web page. The destination address (205.181.158.21) is the Web server, which hosts the Syngress Web site. In the summary field, the D=80 indicates that the destination TCP port is 80. The S=3666 indicates that the source TCP port is 3666. The first three frames display the TCP handshake, which establishes a TCP connection between the client and server. In frame four, the client requests HTTP data from the server. The request determines the HTTP version that the client and server will use. The following frames include the client requesting and downloading the contents of the Web page.
Determining Ports to Block
When determining which ports to block on your server, you must first determine which services you require. In most cases, block all ports that are not exclusively required by these services. This is tricky, because you can easily block yourself from services you need, especially services that use ephemeral ports, as explained above.
For example, if your server is an exclusive e-mail server running SMTP and IMAP, you can block all TCP ports except for ports 25 and 143, respectively. If you want to routinely download patches from the Microsoft Updates Web site using this server, you may be inclined to open TCP port 80.
If you block the same UDP ports 25, 80, and 143, DNS requests are blocked because DNS queries use UDP port 53, and DNS answers use a UDP ephemeral port (for example, the response stating that www.syngress.com=205.181.158.215). Even if you open port 53, a different ephemeral port may be assigned each time for the answer. Attempting to allow access to a randomly assigned ephemeral port is almost impossible and a waste of time. Another problem is that Microsoft and many other sites run reverse DNS lookups on computers accessing their sites, especially when systems download software. If your DNS ports are blocked, a reverse DNS lookup will fail, and you cannot access the site.
Therefore, you should either open all UDP ports so you can access the Windows Updates page, or block them (except for the services you require) and access these service packs, hot fixes, and security updates another way. Many administrators subscribe to the Microsoft TechNet program, which sends monthly CDs containing all service packs, host fixes, and security patches. You can also simply download the updates from another computer.
Blocking Ports in Windows
The TCP/IP Properties window allows you to access the TCP/IP Filtering window. Filtering allows you to disable TCP and UDP ports, so only the necessary ports are open. In the following example, all ports will be blocked except those required by the e-mail server:
1. To block TCP/UDP ports on Windows 2000 Advanced Server, right-click My Network Places on the desktop and select Properties.
2. Right-click Local Area Connection and select Properties.
3. In the scroll-down window, highlight Internet Protocol (TCP/IP) and click the Properties button.
4. Click the Advanced button and choose the Options tab.
5. Select TCP/IP filtering in the Optional settings field. Click Properties. The TCP/IP Filtering window appears.
6. Click the Enable TCP/IP Filtering (All adapters) select box.
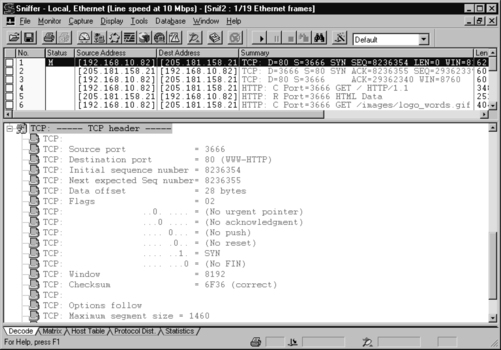
7. Above the TCP Ports field, click the Permit Only radio button. Click Add … and enter 25. This will open the SMTP TCP port. Select OK.
8. Click Add … again and enter 110 or 143, depending on whether your e-mail server uses SMTP or IMAP, respectively. Select OK.
9. Above the UDP Ports field, click the Permit Only radio button. Click Add … and enter 25. This will open the SMTP UDP port. Select OK.
10. Click Add … again and enter 110 or 143, depending on whether your e-mail server uses SMTP or IMAP, respectively. Select OK.
11. The TCP/IP Filtering window will resemble Figure 8.8.
12. Click OK four times and select Yes to restart your computer.
Once your system restarts, only the SMTP and IMAP protocols can access your computer over the network. If you find this configuration too restrictive, modify as necessary.
Blocking Ports in Linux
To block TCP/UDP services in Linux, you must disable the service that utilizes the specific port. The following section will discuss disabling ports using the inetd.conf file, and disabling ports assigned to stand-alone services.
Inetd Services
Many services are disabled in the inetd.conf file by commenting out the service that uses the port. You learned how to comment out services in the inetd.conf file earlier in this chapter. For instance, to disable port 79 (used for finger services, it gives out user data that can be used by hackers), you would comment out the finger entry in inetd.conf file. To view other ports you may wish to block, refer to Table 8.2 in the “Firewall Placement” section, which lists common ports blocked by firewalls. However, these ports can also be blocked at the server itself. The following example lists the steps to disable port 79:
Table 8.2
Common Ports Blocked by Firewalls
| Service | TCP/UDP Port |
| FTP data | 20 |
| FTP | 21 |
| Telnet | 23 |
| SMTP | 25 |
| nicname (whois Internet directory service) | 43 |
| domain (DNS) | 53 |
| TFTP (Trivial File Transfer Protocol) | 69 |
| gopher | 70 |
| fìnger | 79 |
| WWW-HTTP | 80 |
| kerberos (used for authentication) | 88 |
| POP3 | 110 |
| portmapper (Sun Remote Procedure Call [RPC]) | 111 |
| auth (authentication service) | 113 |
| NNTP | 119 |
| NTP (Network Time Protocol) | 123 |
| IMAP | 143 |
| SNMP (Simple Network Management Protocol) | 161 |
| snmptrap (SNMP system management messages) | 162 |
| https (secure HTTP using Secure Sockets Layer [SSL]) | 443 |
| exec (remote process execution) | 512 |
| login (used by rlogin [remote login]) | 513 TCP |
| who (remote who daemon [rwhod]) | 513 UDP |
| shell (remote shell [rsh]) | 514 TCP |
| syslog (system log facility) | 514 UDP |
| printer (line printer daemon [LDP] spooler) | 515 |
| talk (terminal-to-terminal chat) | 517 |
| ntalk (newer version of talk) | 518 |
| route (used by route daemon) | 520 |
| uucp (UNIX-to-UNIX Copy Protocol [UUCP]) | 540 |
| uucp-rlogin (variant of UUCP) | 541 |
| klogind (kerberos login) | 543 |
| pmd (PortMaster daemon [in.pmd]) | 1642 |
| pmconsole (PortMaster Console Protocol) | 1643 |
| radius (Remote Authentication Dial-In User Service) | 1645 |
| radacct (Radius accounting) | 1646 |
| choicenet | 1647 |
1. To disable port 79, you must edit the inet.conf file. Open the inet.conf file and locate the finger service.
2. Comment out the finger service, then write and quit the file.
3. Next, you must restart inetd.conf. Identify the process identifier (PID) for inetd by entering:
4. The second column lists the PID number. The last column lists the process using that PID. To restart inetd, identify the PID number and enter:
If you have a finger program installed on your system, or access to a finger gateway, attempt a finger request to your system. You should fail. Note that many other ports can be disabled using the inetd.conf file.
Stand-Alone Services
To disable ports whose corresponding services are not listed in the inetd.conf file, you must kill the service’s process and make sure that the service does not automatically restart upon reboot. These services are called stand-alone services. For example, port 111 is assigned a standalone Portmapper service not required for most e-mail servers. The Portmapper service, which is technically called the Sun Remote Procedure Call (RPC) service, runs on server machines and assigns port numbers to RPC packets, such as NIS and NSF packets. Because these RPC services are not used by most e-mail services, port 111 is not necessary. To disable port 111, you must disable the Portmapper service, as shown in the following steps:
1. To disable the Portmapper service, identify the PID for inetd by entering:
2. The second column lists the PID number. The last column lists the process using that PID. To stop the Portmapper service, identify the PID number and enter:
3. To make sure the service does not restart during reboot, enter:
4. Scroll down to the Portmapper service and uncheck the checkbox next to the service. Select OK. The Portmapper service will no longer restart at bootup.
Maintenance Issues
Not only should you apply the latest service pack and updates before the server goes live, but you must constantly maintain the server to make sure the most current required patches are installed. The more time an operating system is available to the public, the more time hackers have to exploit discovered vulnerabilities. As these vulnerabilities are discovered, vendors offer patches that are available shortly afterward. In some cases, the fixes are available at the vendor’s site the same day.
Administrators must also regularly test their systems using security analyzer software. Security analyzer software scans systems to uncover security vulnerabilities and recommends fixes to close the security hole. This section will discuss the maintenance required to ensure your systems are safe from the daily threats of the Internet.
Microsoft Service Pack Updates, Hot Fixes, and Security Patches
Maintaining a Microsoft server includes installing patches, which are service packs, hot fixes, and security patches. You should always check the Microsoft Web site or subscribe to the Microsoft Security Notification Service for the latest operating system news. The following list defines these software patches (you have already learned about service packs):
Hot Fix Provides a fix to specific issues, such as a certain error message that may occur when completing an operating system task. Hot fixes are not regression-tested and should be installed only if your system experiences a specific problem. If the problem is not causing extensive damage to your system, you should wait until the next service pack is available. Service packs are tested extensively, and contain most of the hot fixes released since the last service pack.
Security Patch Provides a patch that eliminates a security vulnerability in the operating system. A case study describing the importance of security packs is included in this section.
Earlier in this chapter you learned where to download service packs. There are several locations to download them on the Microsoft site, including a location that includes hot fixes. Here are the steps for accessing Microsoft 2000 hot fixes and security patches:
1. To download hot fixes (and service packs), point your browser to http://support.microsoft.com/servicedesks/servicepacks/servicepacks.asp. Download and install the latest hot fixes that affect your system.
2. To download security patches, go to www.microsoft.com/technet/security or access the Microsoft download page (www.microsoft.com/ downloads) and type keyword security patch for Windows 2000. Download and install the latest security patches that affect your system.
Case Study
Windows 2000 system services, such as the server and workstation services, are administered through the Service Control Manager (SCM). The SCM (services.exe) allows these services to be modified or created. As each service starts, the SCM creates a named pipe. A pipe is an area of memory that two or more processes share, and it allows these processes to communicate with one another.
The problem is that if a malicious program predicts and creates the named pipe for a service before that service starts, it can impersonate the service’s privileges. When the malicious program runs within the context of the service, it can gain the privileges of the local system and perhaps a given user. The malicious user could then gain more privileges on the system by logging on interactively and running arbitrary programs. Workstations and terminal servers are at greatest risk.
A security patch can be downloaded for this Service Control Manager Named Pipe Impersonation vulnerability at the Microsoft TechNet Security site or the Microsoft Download Center. Figure 8.9 shows the security bulletin alerting administrators of this vulnerability.
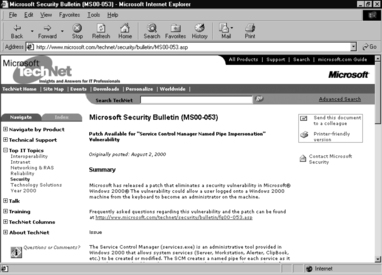
To find out more about this security patch, view the FAQ at www.microsoft.com/technet/security/bulletin/MS00-053.asp. You should then download and install the patch to eliminate this security vulnerability.
Red Hat Linux Errata: Fixes and Advisories
Not only should you apply the latest Update Service Package before the server goes live, but you must constantly maintain the server to make sure the most current required Errata are installed. These Errata include bug fixes, corrections, and updates to Red Hat products. You should always check the Red Hat site at www.redhat.com/apps/support/updates.html for the latest Errata news. The following list defines the different types of Errata found at the Red Hat Updates and Errata site:
Bug Fixes Addresses coding errors discovered after the release of the product, and may be critical to program functionality. These RPMs can be downloaded at no charge. Bug fixes provide a fix to specific issues, such as a certain error message that may occur when completing an operating system task. Bug fixes should be installed only if your system experiences a specific problem. Another helpful resource is Bugzilla, the Red Hat Bug Tracking System at http://bugzilla.redhat.com/bugzilla.
Security Advisories Provides updates that eliminate security vulnerabilities on the system. Red Hat recommends that all administrators download and install the security upgrades to avoid denial-of-service and intrusion attacks that can result from these weaknesses. For instance, a security update can be downloaded for a vulnerability that caused a memory overflow due to improper input verification in Netscape’s Joint Photographic Experts Group (JPEG) code.
Package Enhancements Provides updates to the functions and features of the operating system or specific applications. Package Enhancements are usually not critical to the system’s integrity. They often fix functionality programs, such as an RPM that provides new features.
Here are the steps for accessing Linux bug fixes, security advisories, and package enhancements:
1. To download bug fixes, point your browser to www.redhat.com/apps/support/updates.html. Under the “Errata: Fixes and Advisories” section, click the Red Hat Linux Bug Fixes link. The latest bug fixes are available for download on this page. Click each bug to learn more, and determine whether it affects your system. Some fixes do not include software downloads, such as RPMs. Instead, they explain how to configure your system to fix the problem.
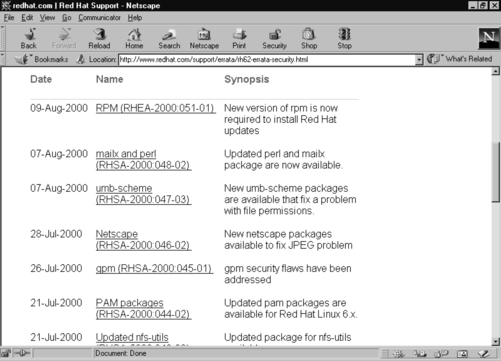
2. To download security advisories, point your browser to www.redhat.com/apps/support/updates.html. Under the “Errata: Fixes and Advisories” section, click the Red Hat Linux Security Advisories link. The available security fixes are listed, as shown in Figure 8.10. For instance, an updated perl and mailx package is available. This fixes a vulnerability that allowed suidperl to send mail to the local superuser account using bin/mail. This weakness could be exploited to gain local root access. It is imperative for Linux administrators to check this Web site on a regular basis, determine if the changes are necessary, and implement the vulnerability fix.
3. To download package enhancements, point your browser to www.redhat.com/apps/support/updates.html. Under the “Errata: Fixes and Advisories” section, click the All Red Hat Linux Errata link, then the Package Enhancements link. A Red Hat Linux Package Enhancements link may also exist on the main Errata page. The available package enhancements are listed. Check the list to see if any enhancements affect your operating system or applications. If an enhancement exists, and installing it would benefit your system, download and install the corresponding package.
Case Study
In a production environment, a problem may exist if a system has an i810 chipset and is running Red Hat Linux 6.2. The correct amount of system RAM may not be available to the system. Therefore, the system cannot maximize RAM usage, and may not run certain programs because it thinks it does not have enough RAM. A fix for this problem is available at the Red Hat Updates and Errata Web site.
According to the bug fix, an administrator needs to manually enter the amount of RAM for the system. To check if the problem exists on a system, log on as root and enter:
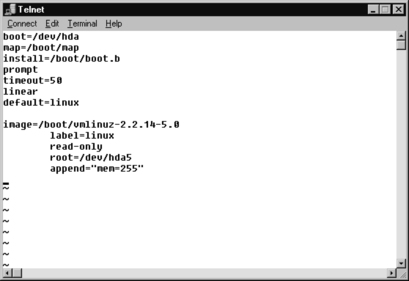
If the memTotal value is not within a few MB of the actual system RAM, you need to manually enter the correct amount of system RAM. To accomplish this task, you must have root access and edit the etc/lilo.conf file. You must locate the current kernel image and add a new line by entering:
append=“mem=[total amount of ram(in MB) – 1]M”
Figure 8.11 displays an edited lilo.conf file for a system that has 256 MB of RAM (one MB is subtracted from the total in the figure).
Write and quit the lilo.conf file. Load the updated lilo.conf file into memory by entering:
Next, you must reboot the machine. Afterward, check the RAM allocation by entering:
If it is within a few MB of the actual RAM, then the bug has been fixed. If not, you must repeat the case study steps to ensure the correct amount of RAM is allocated to the OS.
Windows Vulnerability Scanner (ISS System Scanner)
The Internet Security Systems (ISS) System Scanner is a Windows program that helps administrators discover and fix security vulnerabilities on their systems, and prints reports containing detailed information. It tests a system using policies that can be run manually or can be scheduled. Administrators can select from a wide range of tests to create their own customized policies. The program is available on the Windows 2000 Server Resource Kit CD as a third-party application in the Additional Components section. You can also visit www.iss.net and contact an ISS representative for an evaluation copy. At the time of this writing, ISS System Scanner had not been upgraded for Windows 2000. The version that Microsoft included with the Windows 2000 Server Resource Kit is the NT version.
To ensure that the latest security vulnerabilities are discovered, System Scanner has a feature that downloads the latest tests from the ISS Web site. The program is available for Windows NT, Windows 2000, and Windows 95/98. It includes 300 vulnerability tests. The ISS System Scanner for Windows informational material (located on the Windows 2000 Server Resource Kit CD) identifies the following tests:
![]() Comprehensive IIS/Personal Web Server (PWS) checks.
Comprehensive IIS/Personal Web Server (PWS) checks.
![]() Presence of well-known TCPIP-based services.
Presence of well-known TCPIP-based services.
![]() Microsoft Office vulnerabilities.
Microsoft Office vulnerabilities.
![]() Susceptibility to denial-of-service attacks.
Susceptibility to denial-of-service attacks.
![]() Configuration of virus scanners.
Configuration of virus scanners.
After the security test, you will receive a listing of all vulnerabilities on your system, and recommendations on how to fix the vulnerability. You can also print a report that lists the problems. The following example will run a scanning profile on a Windows 2000 Advanced Server system to identify security vulnerabilities. It is recommended that you run the program frequently to ensure your system is prepared for the latest security threats.
1. To run the ISS System Scanner, select Start | Programs | ISS | System Scanner | System Scanner.
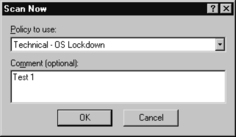
2. Select File | Scan Now. A list of policies will appear. You can choose the policy that best matches your situation. Because this chapter focuses on hardening an operating system, select Technical – OS Lockdown, as shown in Figure 8.12. You can also add a comment (optional).
3. System Scanner will scan your system for vulnerabilities, as shown in Figure 8.13.
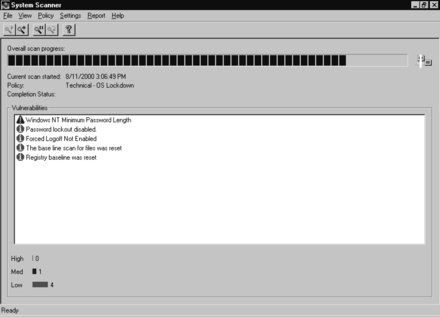
4. When the scan is complete, right-click each vulnerability and select “What’s This?” A description of the problem and the recommended fix appear, as shown in Figure 8.14.

5. Follow the steps to fix the vulnerability.
6. After the vulnerabilities are fixed, reset the baselines for the scan policy by selecting Policy | Reset Baselines. Choose Technical – OS Lockdown.
7. In the Baseline section, select the checkbox for each baseline you wish to reset, as shown in Figure 8.15.

9. Scan the system again using the Technical – OS Lockdown to ensure you have fixed the system vulnerabilities. If vulnerabilities still exist after the scan, verify the importance of these risks. You must decide if the fix is worth implementing. Review the recommended fixes by ISS. If the solution is not adequate, visit the Microsoft Updates site or visit Microsoft TechNet (www.microsoft.com/technet/default.asp) or Microsoft Security (www.microsoft.com/security/default.asp) for additional help.
You can generate a report of your vulnerability scan that documents the system’s security status. This report can be exported to a file or viewed in a Web browser. System Scanner also allows customization to create your own policies. It also allows you to configure it for automated scanning using a built-in scheduling tool. For instance, you can configure System Scanner to scan your system daily or weekly.
Linux Vulnerability Scanner (WebTrends Security Analyzer)
The WebTrends Security Analyzer is a program that helps administrators discover and fix security vulnerabilities on their systems, and prints reports containing detailed information. It is similar in functionality to the ISS System Scanner in that it tests a system using policies that can be run manually or can be scheduled. Administrators can select from a wide range of tests to create their own customized policies.
With most system security scanners or analyzers, the system that runs the scan and creates the report must be a Windows machine. The system that will be scanned must have an agent installed, which allows the Windows machine to run the scan. Most vendors provide agents for UNIX machines, such as IBM AIX, HP-UX, Sun Solaris, and Linux. This is the case with ISS, WebTrends, and PentaSafe’s VigilEnt Security programs.
ISS released a version of Internet Scanner that runs on UNIX systems. It uses an application called VMware. VMWare allows you to run several OS sessions on the same computer. Each session has its own configuration, including its own IP address, hostname, and file system. It requires a lot of system resources, so it is recommended that you use a system with at least a Pentium III at 450 MHz with 256 MB RAM and a 4 GB hard drive.
This chapter will use the WebTrends Security Analyzer Agent for Linux. To accomplish this task, you must install the WebTrends Security Analyzer and the agent software on your Windows machine. During the agent software installation, an RPM is created on the Windows machine. The Linux machine must install the RPM from the Windows machine. Once installed, the Linux machine becomes a Linux agent and the Windows machine can scan it.
The program is available at the WebTrends Web site at www.webtrends.com. You can download an evaluation copy that will function for 30 days. You must also download the Linux agent, called AgentLinux60.exe, and install it on the Windows machine. No downloading of the RPM is necessary, because the AgentLinux60.exe installation creates the RPM on the Windows machine.
To ensure that the latest security vulnerabilities are discovered, Security Analyzer has an AutoSync feature that downloads the latest tests from the WebTrends Web site. The program is available for Windows NT and Windows 2000. It includes agents for Windows 95/98/NT/2000, Solaris 2.6, and Red Hat 5.1 and higher.
After the security test, you will receive a listing of all vulnerabilities on your system, and recommendations on how to fix them. You can also print a report that lists the problems. The following example will run a scanning profile on a Linux system to identify security vulnerabilities. It is recommended that you run the program frequently to ensure your system is prepared for the latest security threats.
Complete the following steps on Windows 2000 Advanced Server:
1. Install the WebTrends Security Analyzer from the Web Trends Web site at www.webtrends.com, or from the CD.
2. To install the Linux agent, download the AgentLinux60.exe file from the WebTrends Web site. The agents are also included on the Security Analyzer CD.
3. Double-click the file. It will install on your system.
4. It will create the wsa_agent-3.5.linux60.i586.rpm and place it in the following folder (it also creates two TAR files as alternatives to the RPM):
/Program Files/WebTrends Security Analyzer/wsa_agents/Linux60
5. Place the file in your root FTP folder. Make sure the FTP service is started and configured properly.
Complete the following steps on the Linux machine:
1. Access the Windows machine via FTP and download the Linux agent RPM.
2. To install the agent on the Linux machine, execute the following command:
rpm –Uvh wsa_agent-3.5.linux60.i586.rpm
3. Ignore any messages you receive. You must first create an agent.dat file, then run the ./configure.sh command.
4. Create the agent.dat file in the /usr/local/wsa directory. Enter touch agent.dat.
5. Run the ./configure.sh command, and choose Yes to start the server at startup and Yes to start the agent now. The agent has been installed and started on the Linux machine.
Complete the following steps on Windows 2000 Advanced Server:
1. To run the WebTrends Security Analyzer, select Start | Programs | WebTrends Security Analyzer | WebTrends Security Analyzer.
2. Select File | New profile … Ins.
3. Enter Linux agent in the Profile Description field. You can be more specific, such as the agent’s IP address, or its network purpose.
4. Choose Critical Security Analysis in the Security Test Policy field. It will scan for high risk security issues on the Linux machine. Select the Next button.
5. Click the Add button in the Hosts To Scan field. Enter the IP address of the Linux agent, as shown in Figure 8.16.
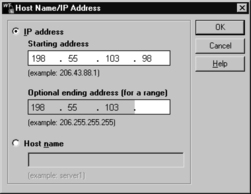
6. Click the Finish button. The agent has been added.
7. To start the scan, simply highlight the Linux Agent in the Security Analyzer, as shown in Figure 8.17.
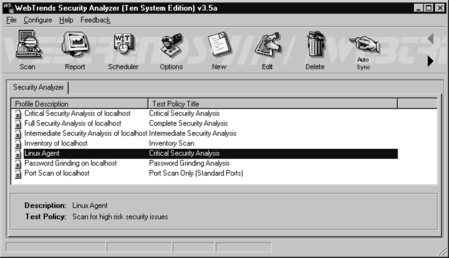
8. Click the Scan button. When the Scan window appears, select New Scan and select OK. The scan will commence. It can be time consuming, depending on the type of scan chosen.
9. When complete, select the Vulnerabilities tab to list the security vulnerabilities of the Linux system, as shown in Figure 8.18.
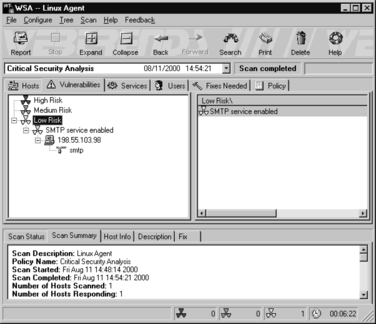
10. Select the Fixes Needed tab to display the recommended fixes. A description of the problem and the recommended fix appear, as shown in Figure 8.19. However, if you are running a mail server, you cannot remove the SMTP service. That is why this is a low security issue.

11. If any vulnerabilities are critical, fix them and scan the system again using the Linux agent profile. Rescanning the system ensures you have fixed the problem. If vulnerabilities still exist after the scan, verify the importance of these risks. You must decide if the fix is worth implementing. Review the recommended fixes by WebTrends. If the solution is not adequate, visit the Red Hat Web site or visit the Web site of the vendor whose program is vulnerable.
12. You can generate a report of your vulnerability scan that documents the system’s security status. This report can be exported to a file or viewed in a Web browser. Security Analyzer also allows customization to create your own policies. It also allows you to configure it for automated scanning using a built-in scheduling tool. For instance, you can configure System Scanner to scan your system daily or weekly.
Logging
Another aspect of routing maintenance is checking your log files. By default, both Windows 2000 Advanced Server and Linux offer logging so that administrators can see who and what has accessed their system. The following section will briefly discuss helpful commands and programs that provide access to system logs.
Windows 2000 Advanced Server
Probably the easiest and quickest way to access general logging data in Windows 2000 Advanced Server is through the Event Viewer. The Event Viewer is also available in Windows NT and has not changed significantly, although it is now an MMC snap-in. Open the program by selecting Start | Programs | Administrative Tools | Event Viewer.
Two logs of particular interest for your system are the Security log and the System log.
The System log identifies when services are stopped and started. This is very helpful because if a service started without your knowledge, a hacker may have started it. This could indicate that the hacker controls your system and is currently exploiting it. It could also mean that a fellow administrator started it without telling you. The System log also identifies system errors and provides a brief description of the problem.
The Security log is activated when you start auditing your system. When you enable auditing on your system, the auditing data will appear in the Security log. For instance, you can audit your system to identify who accesses a file, folder, or service.
The Event Viewer logs should be checked frequently to determine if any security violations have occurred on your system. Logs do not offer solutions, so you must analyze the data and decide what approach to pursue.
Linux
Linux offers commands that allow administrators to access useful log files. Two commands of interest are the last and lastlog commands. The message file also offers useful data for determining possible security breaches on your system.
The last command displays data such as who is logged onto the system, who recently logged on, and when the system has rebooted. For instance, you may receive data such as the following!:

The lastlog command displays the users and services that have accounts on your machine. It lists the last time each account logged in to the system, or if the account has ever logged in. Each service in Linux is given an account. This is very helpful because if a service logged in without your knowledge, a hacker may be responsible. Again, this would indicate that a hacker controls your system and is currently exploiting it, or that a fellow administrator started the service without telling you.
The message file is a log file that displays a list of recent activity on the system. For instance, it lists if a password was changed and who changed it. It identifies when a user session opens and closes. It also lists the time and date each event took place. It can be viewed by entering the command:
If you prefer a GUI to view your log files, a program called swatch allows an instant, real-time display for various log files. It can view any log files you specify.
The Linux logs should be checked frequently to determine if any security violations have occurred on your system. Remember that logs do not offer solutions, so you must analyze the data and decide how to counteract the attack.
Common Security Applications
In addition to the security programs mentioned above, you should be aware of three more: netstat, nmap, and tripwire. Each program is helpful for maintaining your system security. A brief description of each tool is listed below.
Netstat is a command available for both Windows 2000 and Linux. It displays active network connections, interface statistics, routing tables, masquerade connections, and more. It is extremely helpful for determining what ports and services are being accessed on your system. If unauthorized connections are being made to your system, you may need to block that port if you do not require the service. Netstat is available by default with both operating systems.
Nmap (www.insecure.org) is also available for both Windows 2000 and Linux. It is a port scanning program that scans for open ports and identifies operating systems through a process called stack fingerprinting. It keeps a large database of exactly how specific operating systems run. From the scan, it determines what OS is running on the target system, even if the system has been locked down. A hacker can use that information to attack the system’s specific vulnerabilities.
Tripwire is a Linux application with Windows NT agents available that creates a database from a “snapshot” of your system. The next day it takes another snapshot of your system and compares the two. If unauthorized changes are there, then you need to investigate the problem. By default, tripwire is designed to send a simple report to the root user via e-mail on a daily basis that indicates the differences on your system.
Firewall Placement
A firewall is a device that protects a network from security threats. It serves as a guard between your company’s network and the Internet. The firewall analyzes all incoming traffic from the Internet and determines if it will allow it to enter the network. A key factor is regulating ports. For instance, you can deny all Microsoft service ports (135 through 139) from entering your network, thus denying hackers the delight of NetBIOS exploits. If you place your e-mail server behind the firewall (for example, on the company network instead of directly connected to the Internet), you can block ports from the firewall instead of on the mail server.
If your mail server is placed behind a firewall, you need to open ports on the firewall to allow the mail services to function. If the firewall blocks all traffic destined to SMTP, POP3, or IMAP ports, your network users will be unable to send and receive e-mail outside the internal network (in other words, over the Internet). However, if your security policy is extremely strict, you may desire to block all mail services to the Internet.
One way to configure a firewall is to block all ports, then allow access to only the ports you require. Table 8.2 lists the common TCP/UDP ports that you should consider filtering or restricting through your firewall if not required for your network over the Internet. Tables 8.3 and 8.4 cover Microsoft services.

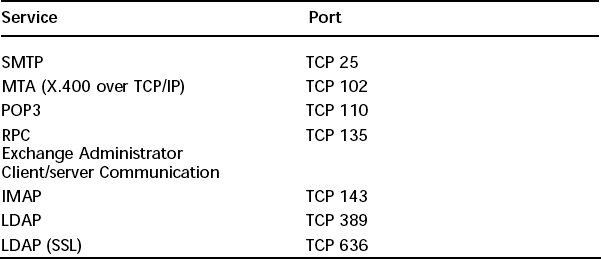
Table 8.3 lists the ports used by Windows services. Ports 135 through 139 are Windows-specific ports and are vulnerable to security threats. They should always be blocked at the firewall.
Table 8.4 lists the ports used by Microsoft Exchange. If you use Exchange only for sending and receiving e-mail and will not be remotely administering the server, then only the SMTP, POP3/IMAP services require access through the firewall.
The ports an administrator blocks at the firewall will vary. It depends on the company’s security policy, and the services required by the company. Find out what services your company requires over the Internet and plan to block ports at the firewall accordingly.
Summary
This chapter covered the basics of hardening a server to avoid security vulnerabilities, specifically, how to harden a Windows 2000 Advanced Server and a Red Hat Linux server. Four main sections covered disabling unnecessary services, locking down ports, handling maintenance issues, and placing an e-mail server behind a firewall.
Before discussing unnecessary services, the chapter emphasized the importance of installing the latest service pack or updates to the operating system, which fixes many security vulnerabilities and bugs before you even install any programs. Many services provided with operating systems are not required, and can therefore be removed. The key point to remember is that the fewer services you have, the less potential vulnerability. TCP/UDP ports were introduced in this chapter, and we described how each port is used by specific services. If you block ports on your server, you block the services that use those ports. Locking down ports is an excellent way to reduce exploitations of your system.
Maintaining your server not only involves downloading service packs and updates, it also requires regularly installing bug fixes, security patches, and software updates. These items are available through the operating system vendors, as well as the specific vendors that created the software you implement. Vulnerability scanners were also demonstrated. Scanners allow you to test your systems for security vulnerabilities before a hacker does, and recommend specific fixes for each vulnerability. Regularly scheduled scans will ensure your system is updated to withstand the latest hacking programs. Finally, we discussed firewalls, which are security guards at the edge of your network. They are particularly helpful in blocking ports if you place your e-mail server behind it. That way, the e-mail server can provide more services to the network, such as browser or directory services, without compromising the e-mail server’s security. The ports blocked at the firewall will depend on your company’s security policy and the services required by your network over external networks, such as the Internet.
FAQs
I have disabled the ports used by Microsoft networking (ports 135-139) at the firewall. However, my network also has UNIX machines. Which ports are used by UNIX systems for networking, and are they as vulnerable as the Microsoft ports?
Port 111 is used by the Remote Procedure Call (RPC) services, and includes Network Information System (NIS) and Network File System (NFS), commonly used by UNIX systems (such as Linux) for networking. These services are vulnerable because they can be used to gain access to data, such as passwords, and to gain read and write access to files. Block port 111 at the firewall.
I have a server that is strictly a mail server and uses SMTP and POP3. However, I want to download security patches from my vendor’s Web site directly to the server. Even though I open the TCP/UDP port 80 (HTTP) and port 53 (DNS), I am unable to download the patches on the mail server. What should I do?
If security if a priority, you should order update CDs through your vendor, such as Microsoft’s TechNet subscription program, or Red Hat’s Update Service Packages, and install them via your CD drive. If not, you probably can’t receive answers from your DNS server because it uses ephemeral UDP ports for replies, and they are currently blocked. You may need to open your registered UDP ports, which may require a system restart, to receive DNS answers. You can also use IP addresses instead of domain names to access the Web server, but you may be unable to download the patches if the Web server requires reverse DNS lookups for verification.
There are many types of firewalls that serve various purposes. For proxy-oriented firewalls, two popular products are Axent Raptor Firewall (www.axent.com) and Microsoft Proxy Server (www.microsoft.com). However, the Raptor firewall is a better solution for enterprise networks. For packet-filtering firewalls (restrict inbound traffic by analyzing packets), Checkpoint FireWall-1 (www.checkpoint.com) and Cisco PIX (www.cisco.com) are popular choices.
Standard practice is to place the e-mail server in a service network, often called a Demilitarized Zone (DMZ). A DMZ is usually comprised of a screening router that blocks out most attacks (such as denial of service, system scanning, and attacks against Microsoft NetBIOS ports), and then a firewall device that authoritatively blocks incoming traffic, effectively separating the internal network from the world. The DMZ exists between the screening router and the firewall. However, it is often best practice to place the e-mail server behind the firewall itself. If you do this, however, you must make sure your firewall is configured correctly. Otherwise, a malicious user can take advantage of a misconfigured firewall and gain access to your internal network.