Lesson 8. Symbols, Brushes, and Hoses
After the successful introduction of symbols in Macromedia Flash, Macromedia wisely added symbols to its FreeHand and Fireworks programs. Although symbols work slightly differently in each application, the underlying concept is basically the same: symbols streamline the use of repeating elements on your pages. Multiple instances of a symbol on a page consume much less memory than the same number of separate images, reducing file size. More important, when you make a change to a symbol, every instance of the symbol on the page is updated automatically.
Whenever you create a symbol, it is added to the Library panel. As you will see in this lesson, you can group your library items to make them more manageable. Also, if you import FreeHand files into Macromedia Flash, your FreeHand symbols are imported into the Macromedia Flash document library, saving you a step when creating animations.
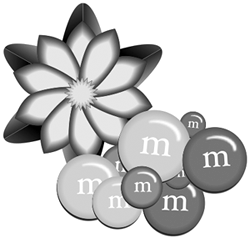
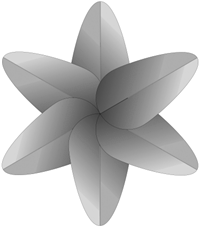
In this lesson, you will use blending techniques to add shading to objects. Then you will convert your objects to symbols and use the symbols as brushes and graphic hoses.
In this lesson, you will create and edit some symbols and use them as brushes and in a graphic hose. The brush feature allows you to take any element in your document (even text) and convert it to a brush stroke that you can apply to a path. This feature offers you new creative possibilities and saves production time when you want multiple objects to follow a set path. The Graphic Hose tool allows you to store up to 10 graphic objects in a hose set. When you drag the tool pointer around the page, the graphic objects in the hose set are sprayed on the page. You can change the settings to spray in random order and alter the scaling, spacing, and rotation of the objects as they are placed on the page.
This lesson also introduces some blending techniques that you can use to add shading to objects.
WHAT YOU WILL LEARN
In this lesson, you will:
• Convert an object to a symbol
• Edit a symbol
• Use blends for shading
• Use the Roughen tool
• Add a contour gradient
• Import a brush
• Create a library group
• Create and edit a brush
• Create a graphic hose
• Export your symbols
APPROXIMATE TIME
This lesson takes approximately 2 hours to complete.
LESSON FILES
Media Files:
Lesson08MediaGraphic Brushes.fh11
Starting Files:
None
Completed Projects:
Lesson08Completedflowers.fh11
Creating Symbols
A symbol is a graphic or group of elements you have created and saved in a library for future use. When you want to use a symbol, you simply go to the library, find the symbol you want to use, and drag the symbol into your document. The copy of the symbol that you place in your document is referred to as an instance. For example, the camera you created in Lesson 1, “FreeHand Basics,” could be converted to a symbol. Then, when you want to use it in another page, you could just drag it from the Library panel. Of course, you could always import the camera and copy and paste it from one page to another as you did in Lesson 7, “Page Layout and Printing,” but symbols give you more flexibility and control.
An advantage of symbols is that even if you use a symbol numerous times in a document, the multiple instances of the symbol will not significantly increase the file size. Another advantage of symbols is that any change you make to a symbol changes all instances of that symbol in your document. For example, suppose you create a symbol of the camera logo and place it on several pages in your document as you did in the corp_identity.fh11 file you modified in Lesson 7. If you later decide to change the design or color of the logo, you simply make your edits to the symbol, and when you are done, all instances of the logo are automatically updated in your document.
You can also export symbols and use them in other documents. Then you can import them into the library of the document, or you can send the symbol file to co-workers for use in their documents. And if you are a Flasher—that is, if you use Macromedia Flash—you can easily import the symbols you create in FreeHand into Macromedia Flash.
Note
In Flash, you would open the document library and then import the exported FreeHand library into the Flash library.
In this task, you will create a graphic, convert it to a symbol, and place instances of the symbol on the page. Then you will edit the symbol to see how the instances are automatically updated.
1) Create a new file and name it flowers.fh11. Save it in your Projects folder.
You will create a leaf and petal for a flower and save both as symbols.
2) On the page, draw a circle about 150 points in diameter. Choose Modify > Ungroup.
The size of the circle is not critical; you can always change the size of the final leaf. You want to ungroup the circle so you can modify one of the points.
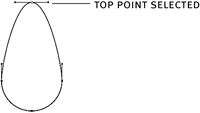
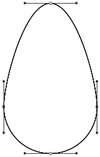
3) Select the top point of the circle. Hold down Shift and drag the point upward.
Holding Shift as you drag maintains the horizontal alignment of the point. You want the shape to resemble an elongated egg.
4) Drag the selection rectangle over the top and bottom points on the shape; then choose Modify > Split.
You now have two separate objects. In the next step, you will join the left side to create a closed path.
Note
You can also Shift-click each point to select the points.
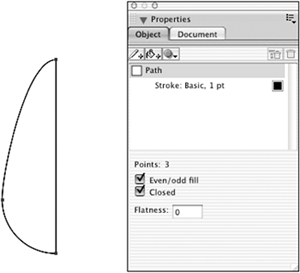
5) Press Tab to deselect both objects and then select the left object. On the Object panel, select Closed. Delete the right object.
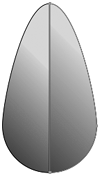
The left side is a closed object that you can fill with a gradient. Instead of manually creating the same fill for the right side, you will clone the left object and then use the Reflect tool to flip it to create the right side of the leaf.
6) Add a green color to the Swatches panel; then add a 20 percent tint of that color to the Swatches panel. Using these two green colors, add a gradient fill to the left side of the leaf with the darker color on the left of the gradient ramp.
You could use Forest Green from the Crayon color list or mix your own color.
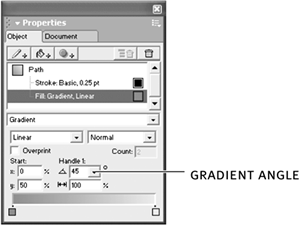
7) Change the angle of the gradient to 45 degrees.
Changing the angle of the gradient adds depth and shape to the leaf.
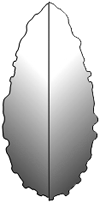
8) Choose Edit > Clone and then use the Reflect tool to create a mirror image of the clone.
Remember: To flip the clone, hold down Shift and drag down with the Reflect tool. The position of the Reflect pointer when you drag with the tool determines the reflection axis. If the right side of your leaf is not next to the left side, move the leaf halves together.
Note
If you position the Reflect pointer on the right edge of the object, the right flipped object should touch the left object.
In the next step, you will convert your leaf to a symbol. Then you will make copies of the leaf symbol and rotate them to form a leaf circle. If you think that your leaf is too large, resize it after you group it.
9) With the leaf group still selected, choose Modify > Symbol > Convert to Symbol.
Your object is converted to a symbol and placed in the library, as you will see in the next step.
Tip
The shortcut for creating a symbol in FreeHand is F8. Conveniently, that is the same shortcut as in Macromedia Flash. You can also drag the object to the Library panel to create a new symbol of the object.
Note
From the Modify > Symbol command, you can choose either Copy to Symbol or Convert to Symbol. If you choose Convert to Symbol, as you did in this step, you create a symbol, and the original object is converted to an instance of that symbol. If you choose Copy to Symbol, you create a symbol, but the original object remains as created. Choosing the Copy option saves you a step if you plan to modify the original object to create another symbol. If you do want to modify a symbol to create another symbol, you simply select an instance of the symbol and then choose Modify > Symbol > Release Instance. Then you can make any modifications and create a new symbol.
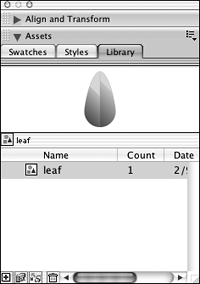
10) Choose Window > Library or click the Library tab on the Assets panel.
The Library panel should list your new symbol with a generic name such as Graphic-01 and display a preview of the image. To make your symbols easier to work with, you should assign them names that indicate their use; you will do this in the next step.
11) Double-click (Windows) or click (Mac OS) the generic symbol name on the Library panel and type leaf as the name. Press Enter (Windows) or Return (Mac OS) to apply the name to the symbol.
Now that your leaf is a symbol, you can easily use it to create a cluster of leaves on the page by using a power duplication method, creating a copy and rotating the copy in one step.
12) In Windows, either open the Info panel or use the Status toolbar bar that appears at the bottom of the document window. In Mac OS, open the Info panel.
You’ll use the Status bar or Info panel as you rotate the leaf in the next step.
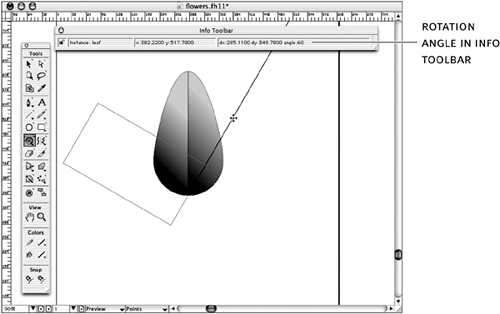
13) Clone the leaf. Select the Rotate tool and position the rotate pointer at the bottom of your leaf. Drag the mouse until you see 60 in the angle area of the Status bar (Windows only) or on the Info panel; then release the mouse button.
As you drag with the Rotate tool, a bounding box surrounds the object, and a line indicates the angle of rotation. If the object rotates too quickly, you can slow it down by moving the mouse pointer away from the center point of the rotation. The farther away from the center point you move the pointer, the more slowly the object rotates.
For this task, you want your leaves equally spaced as you rotate them. Since there are 360 degrees in a circle, using 60 degrees results in six leaves.
A new copy of the leaf is created and rotated for you. When you clone an object and then perform a transformation such as a rotation, FreeHand remembers those steps and repeats them when you choose the Duplicate command.
15) Repeat the Duplicate command until you have a total of six leaves.
Each leaf in your cluster is an instance of the original symbol. In the next step, you will make a change to the symbol and see how FreeHand automatically updates all instances of the symbol on the page.
Tip
The shortcut for the Duplicate command is Ctrl+Alt+D (Windows) or Command+Option+D (Mac OS). When you are using power duplication, you’ll want to use the shortcut instead of choosing the command from the menu.
16) Save your file.
Editing a Symbol
Once you place a symbol instance on the page, you can apply Transform (scaling, rotating, and skewing) and Arrange commands to it, but as long as it is a symbol instance, you cannot edit it in any other way as an individual object. Try to change one of the leaves on your page; you can’t ungroup it, nor can you make any changes to its color or shape. You can, however, easily make changes to all instances of the leaf, by editing the symbol, as you will do in this task.
1) Select one of the leaves on the page and choose Modify > Symbol > Edit Symbol.
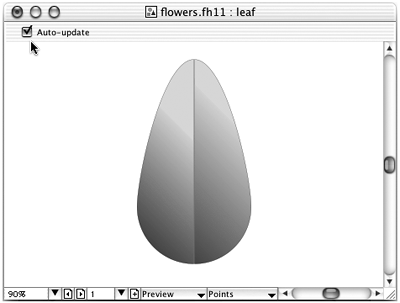
A new window opens where you can make changes to the leaf. Note the Auto-Update check box at the top left of the window. When this check box is selected (it is selected by default), any changes you make to the symbol are applied to all instances on the page.
Tip
You can also double-click the symbol icon (to the left of the symbol name) on the Library panel to open the symbol-editing window.
Note
The symbol-editing window is easy to confuse with the document window. The Auto-Update check box is your visual clue that you are in the symbol-editing window. Plus the symbol name, plus the document file name appears in the title bar of the symbol window.
2) Make a change to your leaf. For example, change the gradient color or add a new color to the gradient ramp.
You might add a warm yellow color to the gradient to give an autumn tone to the leaf. The goal here is to make an obvious change to the symbol.
Tip
Use the Subselect tool to select an object in a group instead of ungrouping the object. To use the shortcut for the temporary Subselect tool, hold down Alt (Windows) or Option (Mac OS) and click one of the grouped objects.
3) When you are done making changes to the symbol, close the symbol-editing window.
All instances of the leaf symbol on the page are updated with your changes. If there were instances of the symbol on multiple pages of your document, those would be updated as well.
Using the Roughen Tool
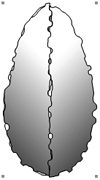
The Roughen tool changes smooth paths to irregular, ragged paths. It is a great tool for adding a hand-drawn effect to your artwork. The leaf you just created is a good example of a graphic with a smooth edge. Of course, Mother Nature is not that perfect, and you may want to alter your leaf to reflect the nonconforming edges in nature.
For this task, you will start with another instance of your leaf symbol and release it so you can roughen the edges.
1) Drag a new instance of your leaf symbol to the page. Choose Modify > Symbol > Release Instance.
This leaf is no longer a symbol, and any changes you make to this leaf do not affect the other leaves. Similarly, if you change the symbol, this leaf is not updated with those changes.
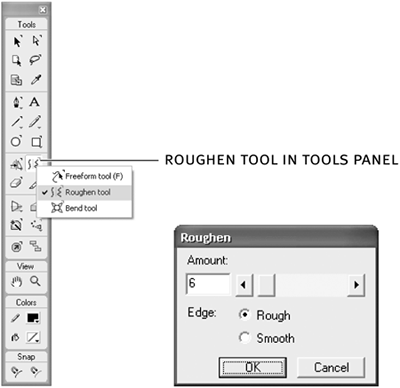
2) Double-click the Roughen tool to open the Roughen dialog box. Select Rough and drag the Amount slider to 6. Click OK.
You control the roughness of the edge by selecting either Rough or Smooth. Rough creates corner points and Smooth creates curved points. You use the Amount slider to control the number of segments that are added to the path when you use the tool.
3) Select the single leaf and drag with the Roughen tool.
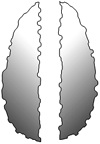
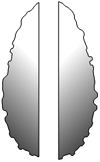
The edges of the leaf change as you drag. The farther you drag, the greater the distortion. Notice that all edges of the leaf are distorted—even the middle edge where the two sides of the leaf meet. You may not like this look. In the next step, you will use the Punch command to smooth the inside edges.
4) Choose Modify > Ungroup. Move one side of the leaf away from the other.
You need to ungroup the leaf so you can separate the left and right sides.
Note
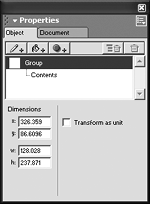
If you grouped your leaf before making it a symbol, you may need to perform the ungroup twice. Look in the Object panel to verify that the object is ungrouped.
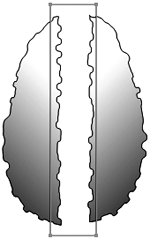
5) Draw a rectangle that overlaps the inside edges of each part of the leaf.
You will use the straight edge of the rectangle to cut though the roughened edges of the leaf parts. Make sure that the rectangle covers each side.
6) Select all three objects: the rectangle and both sides of the leaf. Choose Modify > Combine > Punch.
The inside edges of the leaf sides are sliced, resulting in straight lines.
7) Move the leaf sides together and make the new leaf a symbol.
If you want to replace the leaves in your circle of leaves, drop your new leaf object on the leaf symbol on the library. Click Replace in the alert box to replace all instances of the leaf symbol with this new object.
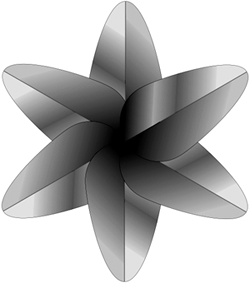
The leaves are a good start, but the image needs petals to look like a flower. In the next task, you will create some petal designs, using blends instead of a gradient to create the shading.
Using Blends for Shading
When the blend capability was first introduced for a competing product, marketing materials illustrated the feature by using the blend command to morph an S into a swan. That was pretty cool, but you probably won’t be using blends in that way often. More frequently, you will use blends to create shading for objects.
Blending lets you create multiple paths that morph from one shape to another. If the paths contain different colors, the colors as well as the paths of the objects shift over the course of the steps in the blend.
In this task, you will use a blend to create the shading for a flower petal. To draw the flower, you will use a technique similar to the one you used to draw the leaves.
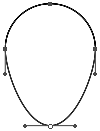
1) Draw a circle approximately 100 points in diameter and then ungroup it. Hold down the Shift key and drag the bottom point down to begin to create a flower petal.
The distance you drag the point determines the length of the petal. Experiment with the distance to get the shape you want for the petal.
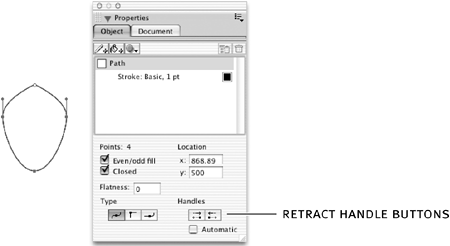
2) Select the top point of the shape; on the Object panel, click both Retract Handle buttons.
When you retract the handles, the curved top of the petal changes to a point.
3) Select the path of the petal.
In the previous step, you selected the top point. For the next step, you want just the path (not a point on the path) selected.
Note
If you see a hollow point on the path, that point is selected. Press Tab to deselect everything and then select the path again, making sure that you click the outline of the path, not the point.
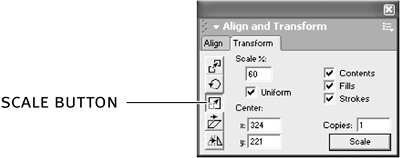
4) Choose Window > Transform to open the Transform panel. On the Transform panel, click the Scale button.
In the next step, you will create a scaled copy of the petal. The Transform panel allows you to make a copy and scale it all in one step.
5) On the Transform panel, select Uniform and in the Scale percentage text box, type 60. In the Copies text box, type 1; then click Scale.
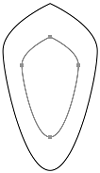
You now have a smaller copy of your petal.
Was the Strokes option on the Transform panel selected before you scaled the object? If so, the point size of the stroke on your petal was also scaled in the copy. For this task, the point size of the stroke is not a concern, as you will remove the stroke on both paths in the next step. Just remember to select the Strokes option if you need it when you use the panel for scaling other objects.
6) Fill the larger petal with a dark red color and choose a 10 percent tint of that color for the fill of the smaller petal. Remove the stroke on both petals.
In the next step, you will blend the two objects. You want a smooth transition from the smaller object to the larger one. If you leave the stroke on the petals, you will see the line of the stroke as part of the blend, which would not be desirable in this flower drawing.
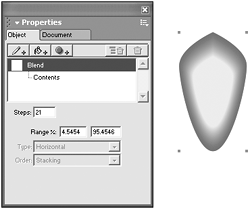
7) Select the top point on both petals. Choose Xtras > Create > Blend.
The two shapes are blended together. FreeHand does a good job of guessing the number of steps needed for the blend, but you can alter that number if desired.
Tip
You can also choose Modify > Combine > Blend or click the Blend button on the Xtra Operations toolbar to create the blend.
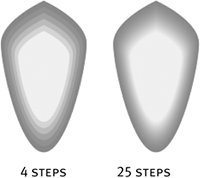
8) On the Object panel, in the Steps text box, type 4; then press Enter (Windows) or Return (Mac OS) to apply that number of steps.
When you use a small number of steps, you get a banding effect. If you don’t see the banding effect, try entering a smaller number.
9) Now type 25 as the number of steps.
The more steps in a blend, the smoother the transition. Using a large number of steps can increase the time needed to print your document, however. Choose the number of steps that works best for your petal.
10) Save your file.
On Your Own
Once you have your petal to your liking, convert it to a symbol. Use the clone and duplicate method you used for the leaves to rotate the petals to form a circle of petals. Instead of rotating each petal 60 degrees as you did for the leaf cluster, try using 36 degrees to create 10 petals.
Note
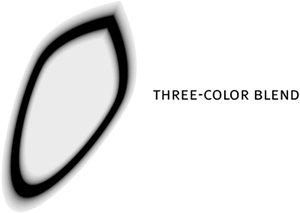
You can also use the Scale command on the smaller petal to create a third petal as you did in step 5. Fill that shape with a third color, select the top points of the three shapes, and then execute the Blend command. This results in a three-color petal. Let your imagination go wild here.
You may want to experiment with other ways to use a blend. For example, draw a curved path using the Pen or Pencil tool and use the Alt-drag or Option-drag method to offset a copy slightly. Then use the Duplicate command as you did for the petal to make several more copies of the path. Use a different stroke color for each path. Select all of the paths and then apply the blend. The result is a colorful ribbon that blends from one color to the next.
Adding a Contour Gradient
To complete your flower, you just need to add the middle section (called the stamen). For that part, you’ll draw a multifaceted star and add a contour gradient. A contour gradient is essentially a blend, similar to the blend you created for the petal and leaf of your flower. The difference is that FreeHand does all the work for you, plus it lets you control the amount of each color as the blend tapers from one color to another.
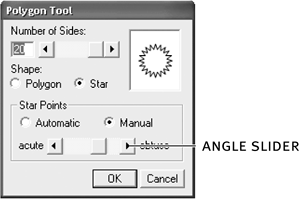
1) Double-click the Polygon tool to set the polygon options. Select Star as the shape of the polygon. Type 20 as the number of sides and set Star Points to Manual. Drag the angle slider to preview the look of the star shape. When you are satisfied, click OK.
You can change the number of points to match your flower. The number here is just a suggestion.
2) Drag to create your star.
You want this shape in the middle of your flower. Release the mouse button when the star is the size you need.
Tip
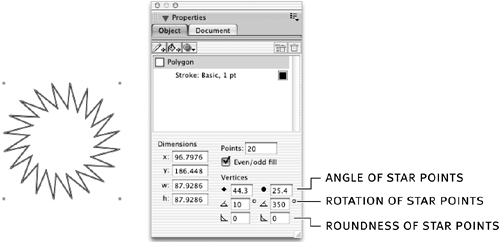
Once you create your star, you can modify the number of points by changing the number on the Object panel. Select the Polygon property on the Object panel and then type a new number for the points. You can also modify the angles and rotation of the star points. For example, type 350 for the rotation angle of the outer vertices to see the effect of the rotation.
3) Add an orange fill to the star.
If you prefer, you can pick a different color, to match your flower.
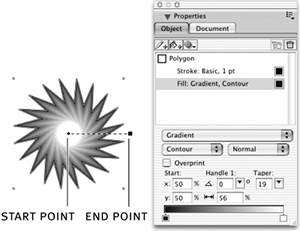
4) On the Object panel, select the Fill property; from the Fill Type pop-up menu, choose Gradient; and from the Gradient Type pop-up menu, choose Contour.
The Object panel provides several settings that you can use to change the look of the gradient. When the Gradient property is selected on the Object panel, your object displays a start point (a small circle) and an end point (a small square.) You can drag the start point to reposition the gradient or drag the end point to adjust the length of the gradient.
The Object panel offers four gradient behaviors: Normal, Repeat, Reflect, and Auto Size. These behaviors affect the way that the gradient fills the object.
• Normal: The positions of the start and end points determine the length of the gradient.
• Repeat: The gradient repeats a specified number of times.
• Reflect: The colors transition from one end of the gradient ramp and then back, going through one transition for each Repeat count.
• Auto Size: The length of the gradient is set to the exact width and height of the object.
Note
When Auto Size is selected, the gradient start- and end-point handles do not appear on the selected object. To adjust gradient attributes when Auto Size is selected, use the Object panel.
5) Adjust the contour settings to your liking and then save your file.
Using the Brush Feature
What comes to mind when you think of a brush? If you have used a brush in a bitmap application such as Macromedia Fireworks or Adobe Photoshop, you may think of a brush as a tool for painting pixels. In FreeHand, you create a brush from symbols. Anything you can draw in FreeHand can be made into a brush that you can apply to a path. For example, suppose you want to create a circular border consisting of triangles. Sure, you can draw a triangle, clone it, and rotate it to form the circle. In fact, you did just that when you drew the petals and leaves for the flower. But what if you want to use that same effect to create a border in the shape of a square or a curved path? If you create a brush using a triangle, then all you have to do is apply the brush to a path, just as you change the stroke for a path. What could be easier?
In Lesson 5, “Using Points and Paths,” you drew a bicycle and used a dashed line to represent the bike chain. The dashed line follows the curve of the path. Once you drew the path, changing it to a dashed line was just a matter of selecting the type of dashed line you wanted to use. What if you wanted to make a more realistic look for the bike chain? If you look at a bike chain, you’ll see that it consists of links in the shape of figure eights. You could draw one link and then place copies of the link to form the chain. However, if you converted the link to a symbol and used the symbol to create a brush, all you would then need to do is draw the path and apply the chain brush to the path. If you alter the path, the chain brush will bend to follow the path automatically. On your bike drawing, you would just remove the dashed line on the path and then replace it with the chain brush.
FreeHand conveniently includes a chain brush that you will use in this task. Later, you will create your own brush.
In this task, you will examine some of the brushes that come with FreeHand. Then you will create your own brush.
1) Add a new page to your document. On this new page, draw a line using the Pen or Pencil tool. On the Object panel, select the Stroke property.
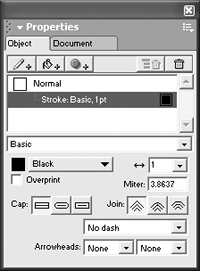
The Object panel displays the stroke attributes.
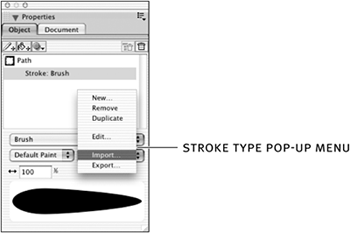
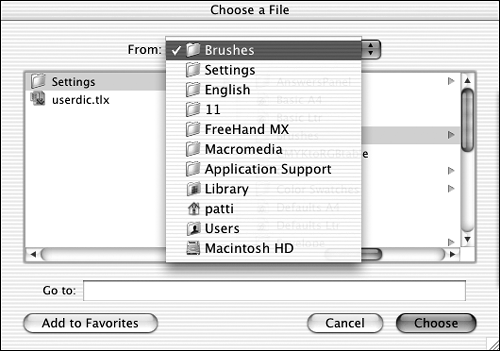
2) From the Stroke Type pop-up menu, choose Brush. Click the Options button (Windows) or Options pop-up menu (Mac OS) and choose Import. Select the Graphic Brushes file and click Import.
The open dialog box should open pointing to the Brushes folder within the Settings folder. If it doesn’t, you need to navigate to that folder. If you do not have the Graphic Brushes file on your computer, you can use the Graphic Brushes.fh11 file in the Media folder within the Lesson08 folder.
Note
If you see a folder named Brush Tips in the Library panel, the Graphic Brushes file is already imported in your document. You can still follow these steps, you will just add a copy of the chain symbol to your document.
Note
FreeHand stores symbols and brushes in the Macromedia/FreeHand MX/11/English/Settings folder located in the user-specific Application Data (Windows) or Application Support (Mac OS) folder.
Note
You should have a default brush installed. If not, a dialog box opens before you have a chance to choose Import from the pop-up menu. Click Import in the dialog box and continue with the instructions for step 2.
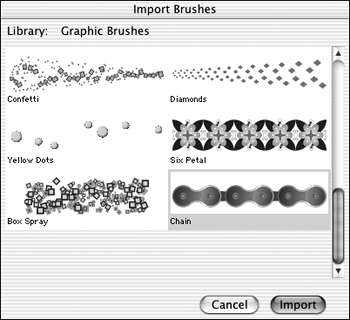
3) In the Import Brushes dialog box, select Chain from the list of included symbols and then click Import.
The selected symbol is placed in the library and added to your brushes list. The chain brush consists of two symbols: Link 1 and Link 2. You’ll see when you create your own brush that you can use several symbols in a brush to add interesting effects.
You should now have at least four symbols in your library: the symbols you just imported and the leaf and petal from the previous tasks. As you add more symbols to the library, you may want to organize them by grouping like items together. In the next step, you will create a group for the two brush symbols.
Tip
If you want to select multiple noncontiguous symbols in the Import Brushes dialog box, Ctrl-click (Windows) or Command-click (Mac OS) the images.
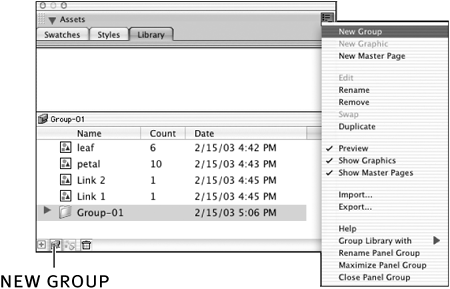
4) From the Library panel Options menu, choose New Group.
A folder icon is added to the library list with a generic name such as Group-01. In the next step, you will rename the folder.
Note
You can also click the New Group icon at the bottom of the Library panel to add a library group.
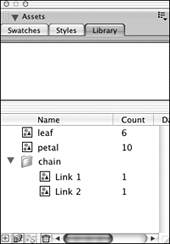
5) Double-click (Windows) or click (Mac OS) the default group name and then type chain as the new name. Press Enter (Windows) or Return (Mac OS) to apply the name to the group. Drag the Link 1 and Link 2 symbols to the Brushes group.
The symbols are added to this group. You can open and close the group on the panel to see or hide the contents. Click the plus sign (Window) or the right triangle (Mac OS) to open the folder; click the minus sign (Windows) or downward triangle (Mac OS) to close the group.
Once you add or import a brush, you can easily apply it to any path.
6) Using the Pen or Pencil tool, draw a curved path.
If you drag quickly with the Pencil tool, you should be able to create a smooth curve. Don’t worry if it is not perfect.
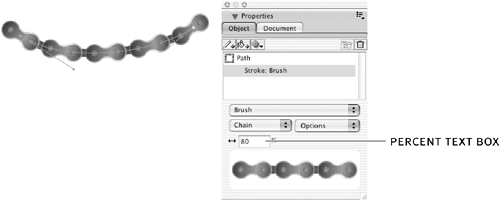
7) On the Object panel, choose the Stroke property; from the Stroke Type pop-up menu, choose Brush; and from the Brush pop-up menu, choose Chain.
The Brush menu lists the chain brush you just imported plus any default brushes. When you select the chain brush, it is applied to the selected path.
8) In the Percent text box, type 80; then press Enter (Windows) or Return (Mac OS) to apply that percentage amount.
The chain brush size changes based on the percentage you enter. Experiment by changing the points on the path to see how the brush adapts to the curves in the path. Try drawing other shapes and apply the brush to them as well. Remember the bicycle you drew in Lesson 5? You used a dashed line for the chain. Instead of the dashed line, you could use the chain brush for a more realistic look.
Creating a Brush
You’ve seen how easy it is to apply an existing brush, but to really take advantage of this feature, you can create your own brushes. For instance, the chain brush consists of two simple objects that you could easily draw. Link 1 is a figure-eight object, and Link 2 is a square, and when they alternate and overlap, you get the chain appearance.
In this task, you will draw some simple objects and then use them to create your own brush.
1) Draw a triangle and a rectangle. Fill each with a different color.
These two objects will alternate to create your brush.
2) Select the triangle and press F8 to convert it to a symbol; then do the same for the rectangle. Give each symbol a meaningful name.
Tip
You can also drag an object to the Library panel to convert it to a symbol.
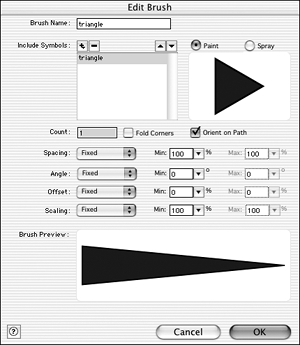
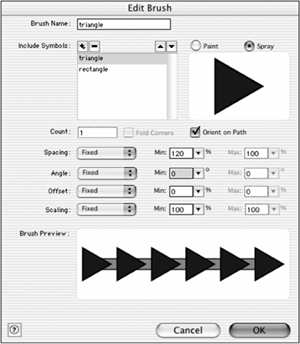
3) Select the triangle on the page (it is now an instance of the symbol) and choose Modify > Brush > Create Brush. In the Edit Brush dialog box, type triangle as the brush name.
In the Edit Brush dialog box, you specify how you want the path altered when you apply the brush. You can either paint or spray the brush. Painting stretches the brush tip along the path. Spraying places the graphic along the path.
4) Select Paint and then click OK.
You will next apply the brush to a line to see the effect of the Paint option. Then you will edit the brush to add the rectangle and change the brush to use the Spray option.
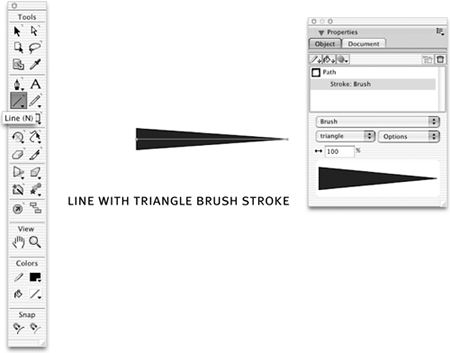
5) Select the Line tool and draw a line. On the Object panel, select the Stroke property; from the Stroke Type pop-up menu, choose Brush; and from the Brush pop-up menu, choose triangle.
The brush stroke is applied to the line. The triangle shape is stretched along the path of the line.
Power Tip
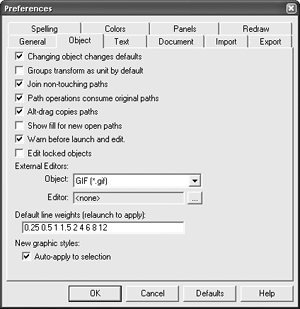
You can change your preferences to apply the last stroke or fill to the next object you draw. Choose Edit > Preferences (Windows and Mac OS 9) or FreeHand MX > Preferences (Mac OS X) and click the Object tab (Windows) or the Object category (Mac OS). Select the option Changing Object Changes Defaults and then click OK. Now each time you draw a new object, it takes on the attributes of the last object drawn. This preference setting is helpful when you want to use the brush stroke on every object you draw. Remove the option when you want each object you draw to use the default attributes, not the last one used.
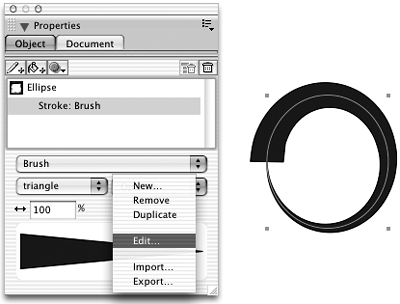
Try drawing some different shapes. For example, draw a circle or an ellipse and apply the brush stroke. Use the Line tool and draw lines of different length with that brush applied.
Editing a Brush
Once you create your brush, you have several options for changing its look. Remember that you created a symbol of the triangle. If you want to change the shape, color, or stroke of the triangle, you can double-click the symbol on the Library panel, make the change in the symbol-editing window, and then close that window. When you change the symbol, FreeHand updates the brush and all objects on the page that use that brush.
You can also edit the brush settings, changing the spacing, size, or rotation of the symbols that make up the brush. For instance, you will now add another symbol to your brush and change it to use the Spray option.
1) Select one of the paths with the triangle brush applied. On the Object panel, select the Stroke property; then click the Options button (Windows) or Options pop-up menu (Mac OS) and choose Edit.
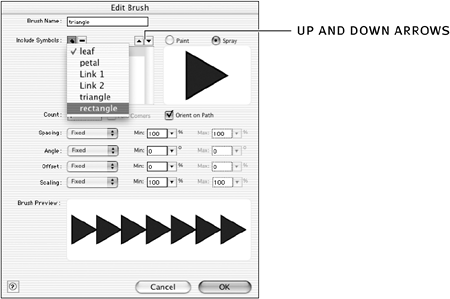
2) From the Plus pop-up menu, choose the rectangle symbol.
The symbol is added to the Include Symbols list for the brush. The order of the symbols will affect the look of the brush. You can use the up and down arrows to change the symbol order. Try moving each symbol to the top. As you move each symbol, look at the preview pane to see how your brush will appear. Then choose the look you like.
3) Select the triangle symbol and choose Spray. Select the rectangle symbol and choose Paint.
Each symbol in the list can use different options, giving you more flexibility for the look of your brush.
4) Select the triangle symbol and change the Minimum Spacing slider to 120 percent.
The Minimum Spacing option sets the distance between instances of that symbol on the path as a percentage of the symbol size. By default, the spacing option uses a fixed setting, but you can also choose either Random or Variable from the Spacing pop-up menu. When you choose Random or Variable, you then can set both minimum and maximum spacing percentages.
5) When you have the look you want for your brush, click OK. If the warning box alerting you that the brush is in use appears, click Change.
When you click Change, the brush attributes are changed, and any object that uses that brush is updated. If you click Create, FreeHand creates a new brush for you with a name such as Copy of Triangle.
On Your Own
By now, you are probably experimenting by creating all sorts of brushes. After all, this is fun! Hopefully, your creative mind is considering how you can use the brush feature in your drawings. The power of brushes is apparent when you need to use an object or effect repeatedly. If you just need two copies of an object, cloning the object is easier and quicker. If you want to use an object multiple times with varying lengths, then creating a brush may be the way to go. And because a brush is created from a symbol (or symbols), you are not drastically increasing your file size.
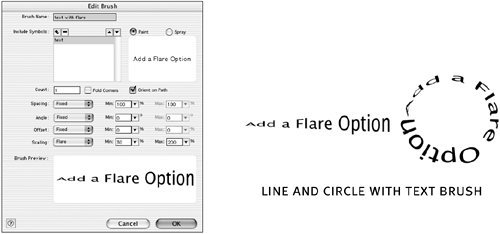
Here is something you can try. Convert some text to a symbol and then create a brush from the symbol. For the brush option, use Paint, and change the scaling to Flare. Change the minimum scaling to 30 percent and the maximum scaling to 200 percent. Experiment with these settings to create an appropriate look for your text. After you create the brush, draw a curved path and apply the brush. Pretty cool!
Creating More Symbols
If you want to place multiple instances of images on your page with varying sizes, rotation, and spacing, you can use the Graphic Hose tool. This may not be a feature that you will use often, but for certain drawing tasks, it can save you some time. Besides, it is fun to use.
To see how the Graphic Hose tool works, you’ll draw a piece of candy, using what you learned earlier in this lesson to add some shading. You will create several symbols of the candy, each with a different color. Then you’ll use those symbols to create a graphic hose.
1) Add a new page to your document. On this new page, draw a circle about 60 points in diameter. Fill the circle with a blue color. Make a copy of the circle and move it off to the side.
The circle is your candy. You will use the copy of the circle later to create a shadow for the candy.
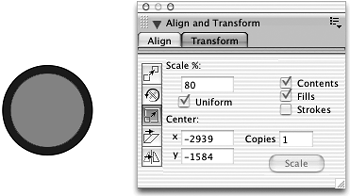
2) Select the original circle and use the Transform panel to make one copy; scale the copy 80 percent. Fill the smaller copy with a 90 percent tint of the original color.
Tip
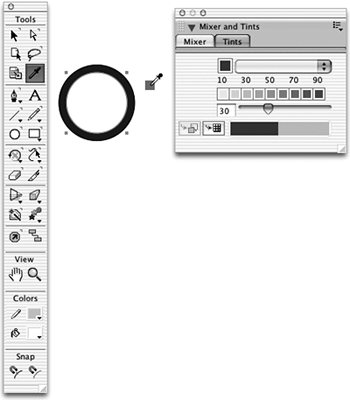
A quick way to add a color to the Tints panel is to use the Eyedropper tool. Select the Eyedropper tool and drag from the center of the circle to the color chip on the Tint panel. You should see a small square as you drag, indicating that you grabbed the color.
3) Select both circles, ungroup them, and remove the strokes.
You will create a blend from one circle to the other so you want to remove the strokes to get a smooth transition.
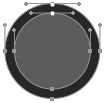
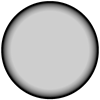
4) Select the top points of each circle and choose Xtras > Create > Blend. Change the number of steps for the blend to 5.
The blend should add some shading to your circle, giving it some dimension. You may want to zoom in on your circles to see if you have a smooth transition for your blend. If you don’t, slightly increase the number of steps to make the transition smoother.
Next you will add a highlight to the candy.
5) Use the Pen tool to draw a curved path at the top right of your circles.
Adjust the path so that you have a smooth curved line. Don’t worry about the stroke size or color of your path. In the next step, you will change the stroke to a shape that you can fill with color.
6) Choose Modify > Alter Path > Expand Stroke.
Expanding the stroke creates a single closed path that follows the outer edge of the stroke of the object.
7) For the stroke width, type 3, and for the Cap option, select the center icon. Click OK.
The Cap option determines the shape of the new path at its end points. The center icon rounds the end points of the new path.
8) Change the fill color of your new shape to white.
Next you will use the copy of the circle you moved aside to create a shadow for your candy.
Tip
If you forgot to make a copy of the circle before you created the blend, hold down Alt or Option and click the outside edge of the blend to select the larger circle. Use the Alt-drag or Option-drag method to make a copy of this circle. Remember that you can also switch to Keyline view to see the outside circle.
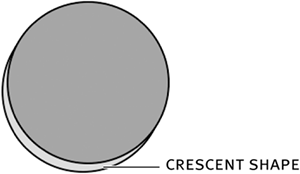
9) Use the Alt-drag or Option-drag method to make a copy of the circle you moved to the side of the page in step 1. Drag up and to the right.
You want a small crescent shape showing on the original circle when the two circles overlap. You want the shadow object to be opposite the highlight on the candy. Since you placed the highlight at the top right, you want the shadow at the lower left. By dragging the copy of the circle in the direction of the highlight, you should place the crescent in the correct position.
10) Select both circles and choose Modify > Combine > Punch. Fill the crescent shape with 80 percent black. Tuck the shadow under the candy.
Move the shadow so you don’t see the pointed ends of the crescent shape. You may need to send the shadow back behind the candy.
The final touch for the candy is to add a label.
11) Type a letter for your label. A small m would be appropriate for this candy. Change the color to white and change the size so that the letter fits within your candy. Choose Text > Convert to Paths.
In the next step, you will convert your candy to a symbol. If you hadn’t converted the text to a path, an error message indicating that the font could not be found might appear if you export this symbol for use on another computer.
12) Select all the objects in your candy and choose Modify > Group. Then choose Modify > Symbol > Copy to Symbol. On the Library panel, rename the symbol blue candy.
By using the Copy to Symbol command instead of pressing F8 (Convert to Symbol), you keep the original candy object intact. You will use that object to create several more symbols, each with a different color.
13) Save your file.
This might be a good time to take a chocolate break.
On Your Own
Remember that you blended two colored circles to create the main part of the candy and then you grouped all of the objects. To create a new color of candy, you need to change the color of the original two circles you created before you applied the blend. FreeHand will then create new colors for each step in the blend.
To change the color of the candy, first select the largest of the circles. If you created an eight-step blend, you will have eight circles. Use the Subselect tool, or (for an easier approach) hold down Alt (Windows) or Option (Mac OS) and click the outside edge of the circle; change the color of that circle. Select the Fill property on the Object panel, and you’ll see a color chip with the color you just applied to the circle. Drag that color chip to the Tints panel. Now drag either the 80 or 90 percent color from the Tints panel to the middle of your candy. You should see a new candy color. Make as many different candy colors as you like. Convert each color to a new symbol. In the next task, you will use those candy symbols to create a graphic hose.
Hosing it Down
The Graphic Hose is a tool you can use to spray objects on your page. With a garden hose, you spray water on your flowers. With the Graphic Hose tool, you can create flowers to spray on your page. The Graphic Hose tool allows you to place multiple copies of a graphic element on a page, randomly changing the size, rotation, or spacing between each object. Whereas brush objects are attached to paths, the Graphic Hose tool places individual elements on the page. Unlike with a brush, you do not need to use symbols when you create a graphic hose—symbols just make your task easier if you want to make changes. In addition, when you add symbols to a graphic hose and spray the page, you are placing instances instead of copies of the graphics, keeping the file size smaller.
1) Drag one instance of each candy symbol to the page.
Since all of your objects are now symbols, you first need to drag a copy of each one to the page.
To add an object to a graphic hose, you copy it and then paste it in the hose. To add multiple objects to the hose, as you will do here, you will select the instances one by one and paste them in the hose.
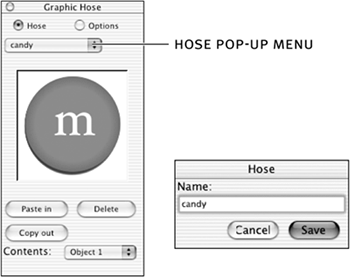
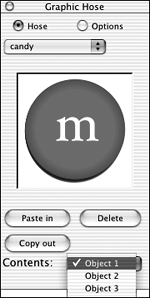
2) Select the first candy symbol and choose Edit > Copy. Double-click the Graphic Hose tool and choose Hose. From the Hose pop-up menu, choose New and for the hose name, type candy. Click Save.
3) Click Paste In.
The first copy of your candy is added to the hose as Object 1.
Tip
You can add up to 10 objects in each graphic hose. Switch to the Pointer tool when adding multiple objects to the hose so you can select the other items to add to the hose instead of spraying with the hose.
4) Copy the next candy object and repeat step 3. Continue until you have added all of your colors of candy to the hose. To see a preview of an object in your hose, choose that object from the Contents pop-up menu.
Now you are ready to see the options for the hose.
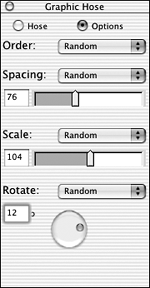
5) Click Options. From the Order pop-up menu, choose Random. From the Spacing pop-up menu, also choose Random and drag the spacing slider to 74. From the Scaling pop-up menu, choose Random again and drag the scaling slider to 104. From the Rotate pop-up menu, choose Random and type 12 as the rotate angle.
You can leave the Hose option window open as you try out your hose.
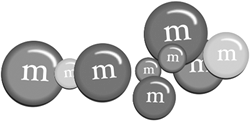
6) Drag the hose pointer around the page.
As you drag, your candy images are sprayed on the page. Experiment with the hose settings to see what effect each option has on the sprayed images.
On Your Own
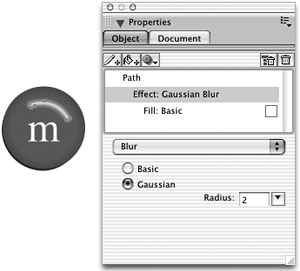
Because you created your hose from symbols, you can change a symbol and update all instances of that symbol on the page. For example, edit one of your candy symbols and add a gaussian blur effect to the highlight object.
Exporting Your Symbols
The brushes and symbols you create in a document appear only in that document. If you want to use your brushes or symbols in another document, you need to export them and then import them into the other document.
Note
If your symbols or brushes contain fonts or linked images, you need to send those elements along with the exported FreeHand file if you share your symbols with someone else or transfer them to another computer. Those elements are linked and are not included when you export.
1) Select one of your candy symbols from the Library panel.
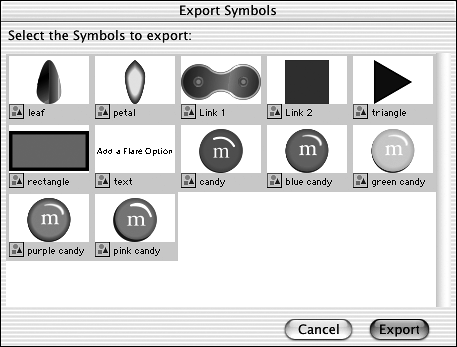
It doesn’t matter which one you select; the Export option will display all of the symbols in your document.
2) From the Library panel Options menu, choose Export.
The Export Symbols dialog box displays all of the symbols currently stored in your document.
3) Select the candy symbols from the list and then click Export. In the Export Symbols (Windows) or Save (Mac OS) dialog box, type mysymbols.fh11 and then click Save.
Tip
Ctrl-click (Windows) or Command-click to select multiple symbols in the list.
You will use your candy symbols in another document in a later lesson and import them into that document as you did earlier in this lesson.
Note
If you make a change to an imported brush or symbol, that change is applied only in the current document. If you want to make a change to imported symbols in several documents, you need to make the modifications in each document.
What You Have Learned
In this lesson, you have:
• Converted an object to a symbol (pages 240–246)
• Edited the symbol (pages 247–248)
• Used the Roughen tool to distort the edges of an object (pages 249–251)
• Used blends to create realistic shading on an object (pages 252–256)
• Added a contour gradient to complete your flower design (pages 256–258)
• Imported a brush (pages 259–263)
• Created and edited a brush (pages 264–269)
• Created a symbol and used it in a graphic hose (pages 269–276)
• Exported a symbol for use in another document (pages 276–277)
