Lesson 10. Creating Web Pages
As you’ve seen as you’ve worked through the lessons in this book, FreeHand is a premiere drawing program. With the continuing expansion of the Internet, people increasingly want to create web sites as well as print materials, and the drawing capabilities of FreeHand are as suitable for web pages as for printed documents. Although it was not designed as a complete web-production tool or as a replacement for applications such as Macromedia Dreamweaver or Macromedia Flash, FreeHand can play an important part in web-site creation.
Typically, in creating a web site, a designer draws a site diagram and then creates a sketch or digital composite (a comp) that shows more detail of a sample page of the site. Using the Connector tool in FreeHand, you can easily draw a site diagram. Then you can use FreeHand to design a page, or pages, of the site. Once you create your site design and pages, you can export the pages as a PDF file. You can even export the pages in HTML format and display them in a browser for the approval process.
You can use the Connector tool to quickly draw the connecting lines between the boxes in this site map.
In this lesson, you will draw a site map and then create pages for a site. You will use the Navigation panel to add links to buttons and add an e-mail link to some text. Then you will export your pages as an HTML file.
WHAT YOU WILL LEARN
In this lesson, you will:
• Use the Connector tool
• Change the style of the Connector tool
• Add a note to a PDF file from FreeHand
• Use FreeHand’s Paste Contents (Windows) or Paste Inside (Mac OS) feature
• Add URL links
• Export pages as HTML files
APPROXIMATE TIME
This lesson takes approximately 1 hour to complete.
LESSON FILES
Media Files:
Lesson10Mediaabout_us.rtf
Lesson10Mediacontact_us.rtf
Lesson10Mediahome_page_text.rtf
Lesson10Mediaair.jpg
Lesson10Mediaclimbing3.jpg
Lesson10Mediadownhill1.jpg
Lesson10Media
acer.jpg
Lesson10Media
acer2.jpg
Lesson10Media
ider3.jpg
Lesson10Media
iding1.jpg
Lesson10Media rackrace.jpg
Starting Files:
Lesson10Startsite_concept_start.fh11
Completed Projects:
Lesson10Completedsite_concept.fh11
Lesson10Completedsite_map.fh11
Lesson10Completedsite_map.pdf
Lesson10CompletedFreeHand HTML Output
Using the Connector Tool
The Connector tool creates connector lines that dynamically link objects together. Connector lines adjust themselves when you move the connected objects. You can use the tool to create organization charts, labels for diagrams, and site maps, as you will do in this task. Once you create the connector lines, you can use the Object panel to modify the stroke properties of the lines.
1) Create a new file and name it site_map.fh11. Change the page orientation to Landscape and then save the file in your Projects folder.
You will draw several rectangles to represent each page of the site and then use the Connector tool to draw lines that represent the links between the pages.
2) Draw a rectangle at the top of the page to represent the home page of your site.
Although the size of the rectangle is not critical, you want it large enough to contain some descriptive text. For example, draw your rectangle 120 pixels by 50 pixels.
You will use the Align panel in the next step to center the rectangle horizontally on the page.
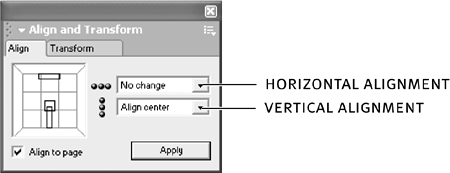
3) On the Align panel, select Align to Page, choose No Change from the horizontal alignment pop-up menu, and choose Align Center from the vertical alignment pop-up menu; then click Apply (Windows) or Align (Mac OS).
Your rectangle is centered horizontally on the page.
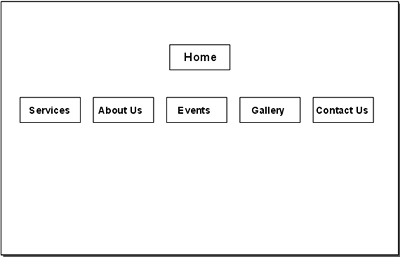
4) Draw another rectangle about the same size as the first one. Place this rectangle below the first and on the left side of the page.
This rectangle represents a page of the site that the home page links to.
5) Use the Alt-drag or Option-drag method to create a copy of this rectangle and move the copy to the right side of the page. Hold down Shift as you drag to constrain the movement to a straight line.
Ultimately, you want five rectangles, all the same size and equally distant from one another, spaced across the page. You could have moved the copy of the rectangle slightly apart from the original rectangle and then used the Duplicate command to make the other three copies, spacing them similarly. If you use this method, it is difficult to determine how far to drag the copies to space them equally. In the next step, you will use the Blend tool to create and position the additional copies. The Blend tool calculates the distance between two objects and mathematically determines for you the spacing between any number of items that you want to place between the two objects.
6) Select the Blend tool and drag from the first rectangle to the second rectangle.
The Blend tool lets you easily create blends from one object to another by dragging the blend line from one object to another. Notice that you did not need to select either of the objects you wanted to blend together; you just need to drag from the boundary of one rectangle to the boundary of the other. When you drag from the first object, you see the blend line, which you then use to connect to the other object.
Note
You could also have selected both objects and used the Blend command as you’ve done in previous lessons.
7) On the Object panel, change the number of steps in the blend to 3.
You now have five equally spaced rectangles across the page.
Note
You already have two objects on the page. The number of steps in the blend, plus the two original objects, gives you a total of five objects.
8) Choose Modify > Ungroup. Then select the middle rectangle and choose Modify > Ungroup again.
Objects in blends are grouped by default. When you ungroup the blend, the objects created from the blend are still grouped, so you need to ungroup those objects as well. In the next step, you will use the Connector tool to draw lines between the rectangles. You can’t use the Connector tool between objects in a blend.
9) Use the Text tool and type Home as the label for the top rectangle. Move the text block to the center of the top rectangle. Add text blocks within the rectangles on the bottom row using the following labels: Services, About Us, Events, Gallery, and Contact Us. Group each rectangle with its text block.
10) Choose the Connector tool on the Tools panel and drag from the bottom of the Home rectangle to the top of the Services rectangle.
The pointer of the Connector tool contains a plus sign and a connector arrow. Position the plus sign on the bottom line of the first rectangle. Release the mouse button when you see the connecting line. Notice that you did not need to select the top rectangle to use the tool.
The Connector tool displays an arrow at the end of the line and a circle at the start of the line. You can use the Object panel to change the stroke properties of each line. Use the defaults for now. In the next task, you will change the connector style, and that will change all the connector lines on the page.
11) Repeat step 10 for the remaining four rectangles.
As you connect each rectangle to the Home rectangle, FreeHand merges the connecting lines, resulting in one line that branches to the five rectangles.
12) Drag one of the bottom rectangles down and to the left.
Notice that the connector line moves and changes shape as you move one of the connected objects.
13) Draw a smaller rectangle below the Gallery rectangle. Make two copies of this rectangle and move them below the first rectangle. Label these rectangles Cycling, Rock Climbing, and Rafting.
You can use the Alt-drag or Option-drag method to create the two copies of the rectangle. These rectangles represent pages linked from the Gallery page.
14) With the Connector tool, drag from the left side of the Gallery rectangle to the left side of each of the smaller rectangles.
The length of the connector lines from the rectangles is set by FreeHand, but you will adjust it in the next step.
15) With the Connector tool, select one of the connector lines and then drag the handle on the connector line to the left, away from the rectangle. Repeat this step for the other lines.
When you are over the handle on the line, the pointer changes to a left-and-right pointing arrow, indicating that you can now drag the line.
Note
You can reshape the connector line only by dragging a handle with the Connector tool. If you use the Pointer tool, you’ll move the connector line along with the rectangle instead of reshaping the connector line.
16) Save your file.
Redefining the Connector Style
As you’ve seen, the default style for a connector line is a line with a filled circle at the start of the line and an arrow at the end of the line. You can change the look of a connector line by changing the stroke properties on the Object panel. In the previous task, you drew several connector lines. To manually change each one of the lines would take some time. An easier approach, as you will see in this task, is to edit the style that controls the look of the lines. In Lesson 3, “Colors, Gradients, and Styles,” you used the Styles panel to create and save a graphic style. In this lesson, you will redefine an existing style.
1) Select one of the connector lines. On the Object panel, select the Stroke property.
You see all of the attributes for the line: the size and the color, plus options for arrowheads.
2) From the left Arrowheads pop-up menu, choose None.
The left pop-up menu controls the start of the line; the right pop-up menu controls the end of the line. Changing the option to None removes the circle from the start of the line for the selected stroke.
Note
Many of your connector lines are overlapping so you may not be able to tell whether you’ve removed the circle. However, when you remove the circle, you may also see the line you’ve removed it from move slightly. When you redefine the style, all of the lines will be the same again, but now without the circle.
3) With the connector line still selected, choose Redefine from the Styles panel Options menu. In the Redefine Style dialog box, make sure that the Normal Connector style is selected. Then click OK.
All of the connector lines in your document are updated with the new line style, and any new connector lines you draw in this document will use the new style.
Note
The Style panel displays a plus sign before a style name to iudicate that the style for the selected item has been modified.
Power Tip
The start and end of the connector lines are determined by the order in which you connect the objects. If you want to reverse a connector line, you can select the line and then choose Modify > Alter Path > Reverse Direction.
4) Save your file.
Your site map is complete. In the next task, you will use the Navigation panel to add a note to the page and then export the page as a PDF file. The note you add will be converted to a note comment in the PDF file.
Adding a PDF Note
In Lesson 7, “Page Layout and Printing,” you saw how easily you can export your pages as PDF documents. In that lesson, your goal was to create a document that you could send to a service bureau for printing or to a colleague for printing from another machine. In this lesson, you’ve created a web-site map and want to send it to a client for comments or approval. Both you and your client have Adobe Acrobat (the application, not the free Acrobat Reader), and you want to use that program to attach comments to the PDF file as you collaborate on the site design.
Note
You will be able to see the PDF notes in Acrobat Reader if you don’t have Adobe Acrobat. If you have Adobe Acrobat, you will be able to add or edit the notes.
Once you export your page as a PDF document, you can open the file in Adobe Acrobat and add your notes. But you can also add notes in FreeHand, before you export the page, as you will do in this task.
1) Type a title for the page. For example, type Action Photos Site Map. Select the text block.
Notes are added to objects on the page. You’ll use the title text block as the object for the note.
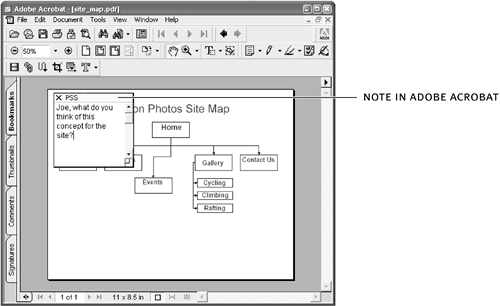
2) Choose Window > Navigation to open the Navigation panel. Type a message in the Notes text box. For example, type Joe, what do you think of this concept for the site?
The text you type in the Notes text box appears as a note in the PDF.
3) Type your name in the Name text box.
When you add notes in Acrobat, the user name is added to the note to identify the author of the note. In FreeHand, you need to add your name in the Name text box to activate this feature in the PDF file.
4) Choose File > Export. From the Save as Type (Windows) or Format (Mac OS) pop-up menu, choose PDF and then click Setup.
You need to specify your export settings.
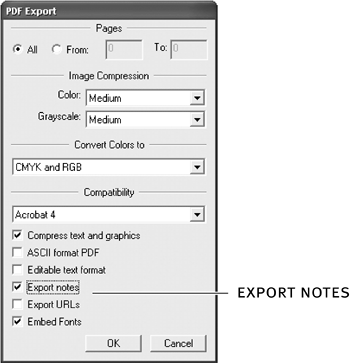
5) In the PDF Export dialog box, select Export Notes and then click OK. Navigate to the Projects folder and then click Save (Windows) or Export (Mac OS).
FreeHand creates the PDF file.
6) Open the PDF file in either Acrobat Reader or Adobe Acrobat. Double-click the note icon near the title.
When you open the note, you see your name in the note title and the message you entered in the Notes text box. If you are using Acrobat Reader, you can move the icon on the page, but you can’t make changes to the message in the note. If you are using Adobe Acrobat, you can move the icon on the page, and you can edit the note text.
Power Tip
If you return to your FreeHand document and make other changes to the document file, you can choose File > Export Again to bypass the Export dialog box. FreeHand uses the settings from the last export operation.
7) Close the PDF file and then save and close your site_map.fh11 file.
Pasting an Image in a Path
You can use the Paste Contents or Paste Inside feature of FreeHand to fill a closed path with another vector or bitmap graphic. Only the part of the object located inside the closed path is displayed; the part of the graphic that extends outside the path is not displayed or printed. Pasting inside a path is also referred to as creating a clipping path.
In this task, you will import some graphics and then paste them inside existing rectangles on the page.
1) Open the site_concept_start.fh11 file in the Start folder. Choose File > Save As, rename the file site_concept.fh11, and save the file in the Projects folder.
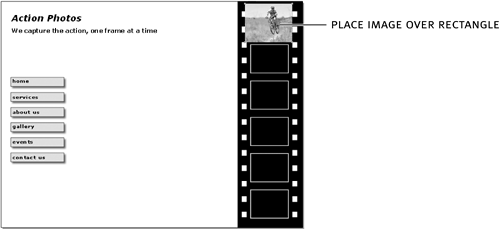
The document contains buttons and some text. On the right of the page is a filmstrip graphic. You will use the paste inside feature to add images within the rectangle on the filmstrip.
2) Import the file air.jpg file from the Media folder within the Lesson10 folder and place it over the top rectangle at the right side of the page.
You want the image directly over the rectangle. After you paste the image within the path of the rectangle, you will still be able to move it if you want to change its position.
3) With the air.jpg image still selected, choose Edit > Cut. Then select the top rectangle and choose Edit > Paste Contents (Windows) or Edit > Paste Inside (Mac OS).
The image appears within the boundaries of the rectangle.
4) On the Object panel, select the Contents property.
The contents handle (a small blue star) appears on the image.
5) Drag the contents handle to reposition the image within the rectangle.
If you drag the image and not the contents handle, you move the rectangle, not the image within the rectangle.
Note
The Contents property on the Object panel must be selected for the contents handle to appear.
6) Using the images in the Media folder, repeat steps 2 through 5 to paste images inside the remaining rectangles.
The Media folder contains several images for you to use. Choose any of the images you want to use on your page. In the next step, you will replace one of the images.
7) Select one of the rectangles with an image and then choose Edit > Cut Contents.
The image is removed from the contents of the rectangle and placed on the page.
8) Delete the image and import a new image. Paste the new image inside the empty rectangle.
9) Select all of the objects in the filmstrip and group them.
In a later task, you will export your file as an HTML document. FreeHand exports grouped items as a single graphic when exporting as HTML.
10) Save your file.
Adding URL Links
You’ve completed the web page design. Now you want to add links to the buttons. You add links to objects on a page using the Navigation panel. Not only can you add links to navigate to other pages in the document, you can also add links to external web sites and even links to send an e-mail message. Of course, you will need Internet access to check your links. Once you add the links to the buttons, you will export the pages as an HTML file.
First, you need to add another page to your document so you can test the links you add to the buttons. The new page will use the same buttons and filmstrip graphic.
1) From the Document panel Options menu, choose Duplicate.
A new page is added to your document containing all of the objects of the first page.
2) From the Media folder, import the home_page_text.rtf file and place the text on the first page. Import the about_us.rtf and contact_us.rtf files and place the text on the second page.
You’ll use the first page as the home page of your site; the second page will be the About Us page.
3) On the first page, select the Home button, and on the Navigation panel, choose Page 1 from the Link pop-up menu. Next, on the first page, select the About Us button; then choose Page 2 from the Link pop-up menu on the Navigation panel. Repeat this process to add the links to the buttons on the second page as well.
HTML links to the specified pages will be added to these button graphics when you export your document as HTML.
In the next step, you will add an e-mail link to the e-mail address on page 2.
4) Select the text on page 2 that contains the e-mail address. On the Navigation panel, in the Link text box, type mailto:[email protected].
Note that the entry in this example is not a valid e-mail address; you may want to use your e-mail address instead. Be sure to include the mailto: prefix. This is the HTML format for adding e-mail links to pages and must be entered before the e-mail address.
5) Save your file.
Exporting as HTML
Although it is not designed to compete with Dreamweaver, FreeHand does a good job of creating HTML pages, but it does have limitations. For example, in the last task you added links to buttons using the Navigation panel. When you check your links in the browser, you’ll see that the buttons work as expected, but FreeHand offers no way for you to provide alternate text for a link—that is, text that appears when the user rolls over a button or image. As you build your pages in FreeHand, remember that you are using Freehand as a design tool for your web pages. Once the approval process is complete, you can take the FreeHand HTML files into Dreamweaver for fine-tuning.
1) Choose File > Publish as HTML. In the HTML Output dialog box, click Setup.
In the HTML Setup dialog box, you specify the method for creating the HTML pages from your document. The default settings create a folder on your desktop. This folder is titled FreeHand HTML Output. All of the HTML pages and the exported images are placed within that folder.
2) From the Vector Art pop-up menu, choose GIF. Click OK.
The FreeHand default file format for exporting vector art is SWF. You’ve added links to the buttons on the page and want the button links to work in all browsers, so you want your buttons exported as GIF files. If you export your buttons as SWF files, your users will need the Flash plug-in to view your buttons.
3) In the HTML Output dialog box, select View in Browser or HTML Editor. Choose your browser from the browser pop-up menu.
If your browser does not appear in the pop-up menu, click Browse and locate your browser.
Note
If you have Macromedia Dreamweaver installed, you can select it from the pop-up menu instead of a browser. When FreeHand completes exporting your file, it will open Dreamweaver for you.
4) Click Save as HTML.
FreeHand exports your files and saves them in the specified folder. Your home page opens in the browser (or HTML editor) you selected in step 3.
If FreeHand encounters problems when exporting your files, it displays the HTML Output Warnings dialog box listing all of the errors.
Tip
If you make changes to your FreeHand document and export it again as HTML, you may need to refresh your browser or reload the file in your browser to update the images.
What You Have Learned
• Used the Connector tool to show links in a site map (pages 328–334)
• Changed the end style of the connector line (pages 334–336)
• Added a note to a PDF file from FreeHand (pages 337–339)
• Used Paste Contents or Paste Inside to display images inside path objects (pages 340–342)
• Added URL links to buttons (pages 343–344)
• Exported your pages as an HTML file (pages 345–346)
