Lesson 4. Using Layers
As you create drawings that are more complex, you will want to organize and control the elements on the page. You can do that with layers. Layers are transparent planes on which you place your objects. You can choose to show or hide a layer, which shows or hides all of the objects on that layer. You can move a layer up or down, changing the stacking order in which objects appear on a page.
Say, for example, that you are drawing a complex map of an area. The map contains streets and highways, rivers, railroads, and descriptive text. While you are concentrating on the streets, you don’t want to be distracted by the rivers and the railroads. If you put all of the streets and highways, rivers, railroads, and text each on a separate layer, you can quickly hide and then show the layers as you work on a part of the map.
Using layers in your drawings makes managing multiple objects easier, as you will learn in this lesson.
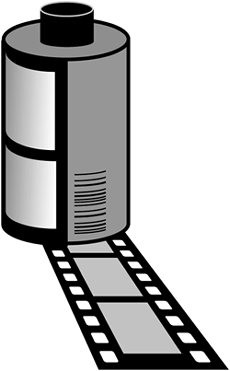
In this lesson, you will add some layers to the document containing your film canister. Then you will draw a strip of film and change its perspective using the 3D Rotation tool.
WHAT YOU WILL LEARN
In this lesson, you will:
• Move objects above and below other objects
• Add layers and move objects to those layers
• Change the order of layers
• Hide, show, and lock layers
• Align and distribute objects
• Rotate an object in 3D space
• Change the color of a layer
APPROXIMATE TIME
This lesson takes approximately 2 hours to complete.
LESSON FILES
Media Files:
None
Starting Files:
Lesson04Startfilm_canister_start.fh11
Completed Projects:
Lesson04Completedfilm_canister.fh11
Using the Arrange Commands
You may have noticed that each object you’ve drawn on the page has been placed on top of the last object you drew. You haven’t defined any layers, but you are stacking objects as you draw them. All of the objects you’ve drawn up to now have been placed on the default layer: the Foreground layer. If you have followed the step-by-step instructions, you’ve drawn the objects in the proper sequence, and you may not have noticed the stacking order of the objects.
To see how the stacking order affects the objects on your page, you will use the Arrange commands to move your objects in front of or behind other objects. The FreeHand commands to bring objects to the front and send objects to the back work like similar commands in other graphics programs. If you are familiar with these concepts, you can skip this section and jump to the section “Using the Layers Panel.”
1) Open the film_canister.fh11 file if it is not already open. Select one of the two shapes (with the gradient) on the left side of the canister.
You can also use the film_canister_start.fh11 file in the Start folder within the Lesson04 folder if you no longer have your file.
You are going to experiment with the Arrange commands.
2) Choose Modify > Arrange > Send to Back.
The shape moves behind the black object. It is hidden except for its blue outline, indicating that it is still selected. Leave it selected.
3) Choose Modify > Arrange > Bring to Front.
The item returns to its original position, in front of the black object.
Although you didn’t need to change the arrangement of this item, there will be times when you want to move objects in front of or behind other objects. Remember that objects with fills hide the objects behind them. In a later lesson, you will apply transparency to objects. When you apply transparency, the opacity level of the top object determines how much of the object below it you see. For now, though, just remember that filled objects are opaque.
Note
If you deselected the object before bringing it back to the front, you’ll discover that it is a bit difficult to select it again. An easier approach in this case is to select the black portion of the film canister and send it to the back. The smaller piece is then on top again.
The Arrange commands not only allow you to move objects to the very front or to the very back, but also forward or backward in the stack one object at a time. The left side of the film canister is only two objects deep, so choosing Send Backward would be the same as choosing Send to Back. If you’d like to experiment with the other commands, draw a filled rectangle on top of the left side of the film canister and place it so a portion of it is off the canister so you can see it move forward and backward.
Using the Layers Panel
The Arrange commands you experimented with in the previous section control only items on a single layer. Using the Layers panel, you can add separate layers for your objects and change the order of each layer. Note the distinction between the stacking order within a layer and the layer order: if an object is on the top layer and you send it to the back, it will be the bottom object on that layer, but it will still be above any object on a layer below it.
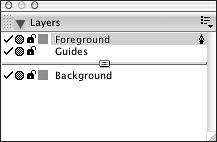
FreeHand has three default layers: Foreground, Guides, and Background. You can add multiple foreground and background layers. The Foreground layer is the default layer for objects on the page. The Guides layer holds all of the guides you use for aligning elements in your document. One use of a background layer is to place objects that you want to trace. For example, you might have a logo or a piece of artwork that you’ve scanned and want to use as a guide for your drawing. Objects on a background layer are screened to 50 percent of their original color, making them easier for you to trace. In Lesson 5, “Using Points and Paths,” you will place some artwork on the Background layer to use as a guide for drawing.
The Layers panel is divided into two sections: the top section contains foreground layers; the bottom section is for background layers. Any layer (except the Guides layer) above the separator line on the Layers panel is a printing layer. Any layer below the separator line is a nonprinting background layer.
In the next section, you will add layers to your document and move objects onto the layers.
1) Open your film_canister.fh11 file if it is not already open.
You can also use the film_canister_start.fh11 file in the Start folder within the Lesson04 folder if you no longer have your file.
2) Select the text block on the film canister.
Look at the Layers panel. The Foreground layer is highlighted, indicating that the selected object is on that layer.
3) Choose New from the Layers panel Options menu.
A new layer, named Layer-1, is added at the top level on the Layers panel.
4) Select Layer-1 on the Layers panel.
The selected text block moves to the layer.
Note
This is the default behavior, but you can change this in your preferences. If this step doesn’t work as described, check the Panel section of the Preferences dialog box and verify that the option to click the layer name to move selected objects is selected.
5) Double-click the Layer-1 name to select it and then type text. Press Enter (Windows) or Return (Macintosh) to rename the layer. Press Tab to deselect the text block.
It is very easy to move an object to a layer. You select the object or objects and then select the name of the layer on the Layers panel. It is also just as easy to inadvertently move objects to the wrong layers. Just remember that anything that is selected when you select a layer is moved to that layer. When you are changing a layer name or moving a layer, be sure to press Tab to deselect all objects on the page before making the change to the layer.
Note
If you find yourself continually moving objects to the wrong layer, deselect the option in the Panel section of the Preferences dialog box and deselect the option to click the layer name to move selected objects.
If you are drawing a new object and want it placed on a layer, deselect everything, select the layer, and then create the object. It will be placed on the selected layer. If you later decide to move the object to another layer, select the object and then select the new layer while the object is still selected.
Note
The Layers panel displays a small pen icon to the right of the text layer you just created. That icon indicates the active layer. New objects you create are always placed on the active layer. The blue bar across the layer name doesn’t represent the active layer unless you see the pen icon as well. Select the yellow object on the page. The Layers panel highlights (with the blue bar) the layer name, but the pen icon remains on the text layer. If you draw a new object on the page, it will be placed on the text layer.
6) Create a new layer, name it bar code, and move the bar code object to that layer.
You now have three foreground layers in addition to the Guides layer.
7) Click the lock icon to the left of the bar code layer name.
When a layer is locked, you can’t select any objects on that layer. You also can’t move an object to that layer. When working on complex drawings, it is very handy to lock a layer you are not currently modifying or using. That way, you can’t inadvertently delete or move the contents of the layer. However, you can still change the stacking position of a layer when it is locked.
Power Tip
To quickly lock or unlock all layers, hold down Ctrl (Windows) or Option (Macintosh) and click the lock icon to the left of any layer name.
8) Click the check mark to the left of the bar code layer name to hide the layer; then click the same area again to display the layer.
When the check mark is gone, the text block, and any other objects on that layer, is hidden. The text is not deleted; it is just hidden from view. Click the same area again to redisplay the check mark and show the layer.
Showing and hiding layers is another way to make complex drawings easier to work on. Think again of the map example. You have streets and street names. Perhaps you are trying to modify the curve of a street, but the street name is in the way, and you keep selecting the street name instead of the street. If you’ve placed all of the text on a separate layer, you can hide the text layer and just concentrate on the streets.
Power Tip
To quickly hide or show all layers, hold down Ctrl (Windows) or Option (Macintosh) and click the check mark (or check mark area) to the left of any layer name.
Power Tip
To select all objects on a layer, hold down Alt (Windows) or Option (Mac OS) and click the layer on the Layers panel.
9) Save your file.
Aligning Objects
In the next steps, you will draw a strip of film to add to the page. You’ve already learned the skills to complete this exercise, so this will just be more practice for you. The strip of film consists of several large rectangles representing the frames of the film plus two rows of small rectangles with rounded corners down the sides of the strip representing the sprocket holes. You will create a new layer to make it easier to manage the strip of film.
1) Create a new layer and name it film. Drag it below the Foreground layer.
You want the illusion of the film canister sitting on the strip of film, so this layer needs to be below all of the other layers. As long as this layer is selected, all items you create are placed on that layer.
2) Draw a tall, skinny rectangle. Make the rectangle approximately the same width as your film canister and twice as long. Fill the rectangle with black.
You may want to move the rectangle off to the side of the film canister to make it easier to manage. This rectangle will form the filmstrip.
3) Draw a smaller rectangle within the filmstrip for one of the frames of the film. Fill this rectangle with 30% black.
The frame needs to be centered on the filmstrip and placed toward the top of the filmstrip. In the next step, you will align the frame to the filmstrip. You want some room on either side of the frame to draw the sprockets, so don’t draw the frame too wide.
4) Select both rectangles. Choose Modify > Align > Center Vertical.
The small gray frame is centered within the filmstrip.
5) Draw a small rectangle for the sprocket. Fill the shape with white and add a 1-point curve to the corners. Move the rectangle to the top left of the filmstrip.
Remember that to add a corner radius, you use the Object panel. Select the Rectangle item in the panel list and then type 1 in the Corner text box.
6) Make a copy of the rectangle using the Alt-drag or Option-drag method, holding down Shift as you drag to keep the copy aligned with the original. Move the copy just below the first rectangle. Choose Edit > Duplicate to make another copy. Repeat the Duplicate command until the rectangles fill the left side of the filmstrip.
The number of rectangles depends on the size of your elements. Don’t worry how many you have. You are more interested in achieving the look of sprocket holes on a filmstrip. When you’ve finished making the duplicates, you may notice that they are not evenly spaced within the filmstrip. They are equidistant from one another, but they may not be spaced equally on the top and bottom of the filmstrip.
Later you will use the Align panel to distribute the items so they are spaced evenly. Before you can do that, though, you need to position the top and bottom sprockets on the filmstrip.
7) Use the arrow key to move the last sprocket down until the distance between the bottom of the sprocket and the bottom of the filmstrip is the same as the distance between the top of the first sprocket and the top of the filmstrip.
8) Select all of the sprocket rectangles.
There are many ways to select just those items. You can use any method you’ve learned. One way is to use the selection rectangle and drag around all of the items. This selects all of the sprockets, the filmstrip, and the gray frame. Then hold down Shift and click the frame and the filmstrip to deselect them, leaving just the sprockets selected.
9) Choose Window > Align.
The Align panel aligns selected objects on their edges or their centers or spaces them equally. You could have used the Align panel instead of the Modify menu to align the frame in step 4.
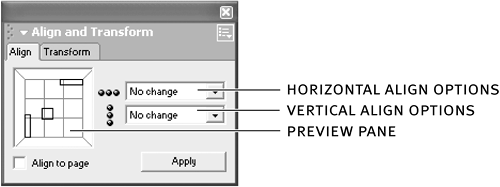
The Align panel has two pop-up menus with horizontal and vertical options and a preview pane with three rectangles illustrating your align selection.
10) Choose Distribute Centers from the Horizontal pop-up menu. Click Apply (Windows) or Align (Mac OS).
Your rectangles are equally spaced within the filmstrip.
Note
When you choose a distribute option from the pop-up menu, another rectangle is added to the preview pane.
11) While all of the sprockets are still selected, use the Alt-drag or Option-drag method again to make a copy of them for the right side of the filmstrip. Use that method again to add frames to the filmstrip.
If your frames aren’t spaced the way you want them, you can use the Align panel to distribute them.
12) Save your file.
Tip
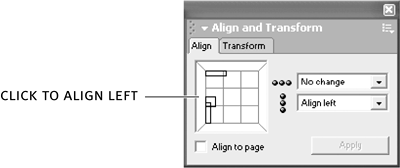
You can also use the preview pane on the Align panel to quickly align selected objects. For example, if you want objects aligned to their left edges, you can click anywhere within the far left polygon in the Align panel. You’ll see the preview rectangles in the pane move to the left edge. You can click any of the bounding polygons or any of the interior rectangles to change the alignment method.
Using the 3D Rotation Tool
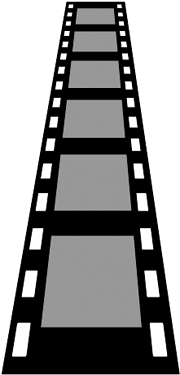
The 3D Rotation tool applies simple 3D rotation to your 2D objects. You have just completed your filmstrip. To add perspective to your drawing, you will use the 3D Rotation tool to rotate the filmstrip back away from you in 3D space. The resulting image will be larger at the bottom and smaller at the top.
The 3D Rotation tool is fun to play with and can create some cool effects. But it does have a drawback in that you can distort your image more than the desired amount. Even the multiple number of undo’s that FreeHand has may not be enough to return your image to its original state. When working with this tool, it is a good idea to make a copy of the image and move it to the pasteboard. That way, you can always return to the copy if needed.
1) Select all of the elements in your filmstrip and group them. Make a copy of the filmstrip and move it to the pasteboard.
Remember that to group objects, you choose Modify > Group. Grouping the filmstrip makes it easier to manage. In the next step, you are going to apply the 3D Rotation tool to all of the objects in the group. The copy of the filmstrip is used only if you need to return to the original image.
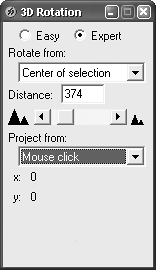
2) Choose Window > Toolbars > Xtra Tools. Double-click the 3D Rotation tool and then select Expert.
The 3D Rotation dialog box allows you to choose either the Easy or Expert mode. The Expert mode gives you a few more options for controlling the rotation.
3) From the Rotate From pop-up menu, choose Center of Selection, drag the Distance slider to about 374, and from the Project From pop-up menu, choose Mouse Click.
The Rotate From pop-up menu has four options:
• Mouse Click rotates from the point you click with the mouse pointer.
• Center of Selection rotates from the center of the selected object.
• Center of Gravity rotates from the visual center of the object.
• Origin rotates from the lower left corner of the object.
The Distance value you enter determines the amount of distortion of the rotation; smaller values result in more distortion.
In Expert mode, you also can select a point of projection from the Project From pop-up menu:
• Mouse Click makes the projection extend to the point you click with the mouse pointer.
• Center of Selection makes the projection point behind the selected object.
• Center of Gravity makes the projection point behind the visual center of the object.
• Origin makes the projection begin at the lower left corner of the object.
• X/Y Coordinates lets you enter X and Y values for the projection. The values default to the last coordinates of your pointer.
4) Position the pointer toward the top of your filmstrip. Hold down Shift and slowly drag up.
As you drag, you’ll see a preview of the rotation of the filmstrip. Holding Shift as you drag constrains the 3D rotation. Before releasing the mouse button, you can experiment with releasing Shift and moving the mouse left and right. You want the appearance of perspective.
Note
Dragging up rotates the filmstrip toward the back. Dragging down rotates the filmstrip toward the front. Dragging left rotates it to the left, and dragging right rotates it to the right. Each time you release the mouse button and drag again with the 3D Rotation tool, you are rotating the rotated item, not the original item. If you want to start over, you can choose Edit > Undo or use the copy of the filmstrip you placed on the pasteboard.
5) Switch to the Pointer tool and then move the filmstrip below the film canister, so the canister appears to be sitting on the filmstrip. If your filmstrip is too large or too small, double-click it to display the transform handles and then use the handles to scale the filmstrip.
Since the filmstrip is on its own layer that is beneath the other objects on the page, you can move the filmstrip so it appears to be underneath the film canister.
6) Save your file.
Changing the Layer Color
You may have noticed a blue color chip next to each layer on the Layers panel. That color corresponds to the color used to highlight the points and paths of the items on that layer. When you select an item on your drawing, you can easily glance at the Layers panel to see the assigned layer. But if you have a more complex drawing, you may have difficulty figuring out which objects are on which layers. To help you see which objects are on the same layer, you can change the layer color for key layers. Then all you need to do is select an item and check the color of its points or paths to see which layer it is on.
In the next steps, you will select a color from the Crayon color library and use that color for the film layer.
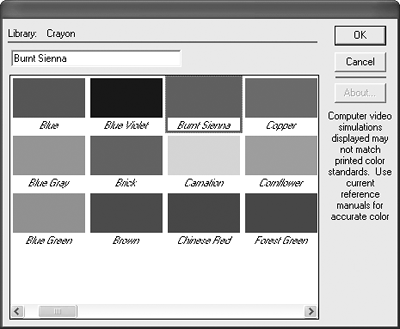
1) Choose Crayon from the Swatches panel Options menu.
You may need to scroll down the list of options in the menu to see the color libraries. The list has several color libraries that you can use in your drawings. PANTONE® colors are used for print, and web-safe colors are used when you are creating graphics to be used on a web page. The Crayon color library contains colors you might recognize from your childhood.
2) Select Burnt Sienna from the color swatches and click OK.
The color is added to the Swatches panel.
3) Drag the Burnt Sienna color chip from the Swatches panel and drop it on the blue color chip next to the film layer on the Layers panel.
The layer color changes. To see the color change, select the filmstrip on the page. You should see brown handles around the bounding box of the object. Select the canister; it has blue handles because it is on a different layer with a layer color of blue.
4) Save your file.
What You Have Learned
• Used the Arrange commands to move objects above and below other objects (pages 104–105)
• Added layers to the Layers panel and moved objects to those layers (pages 105–108)
• Locked and hidden layers to manage the objects on those layers (pages 108–109)
• Used the Align panel to align and distribute objects (pages 109–113)
• Used the 3D Rotation tool to distort an object in 3D space (pages 114–117)
• Changed the color of a layer (pages 117–118)
