A. Binding to Data in ASP.NET
Many developers are faced with the challenge of having to build user interfaces using both Windows Forms and ASP.NET. Windows Forms is the ideal choice to provide the richest, most interactive application interface to your users possible. However, deploying Windows Forms applications requires some control over the configuration of the client desktop computer, and in some applications you need to reach users who may not have standard or controlled configurations. Rather than dumbing down your whole UI, you might provide a rich user interface with Windows Forms for users who live inside the firewall on your corporate network, and if you have to expose some functionality to a broad audience on the open Internet, where you have no control over the software configuration of the client machines, using ASP.NET is a good choice as a Web user interface development platform.
If you are designing your application architecture well, exposing a Web UI doesn’t mean completely duplicating your whole application. With good decoupling of the application logic and data access through a layered application architecture, you should be able to focus on adding a new UI that happens to be a Web UI built with ASP.NET. In this situation, you will often want to provide data-bound user interfaces in a similar fashion to what you built for your Windows Forms application, and maximize the reuse of your business logic and data access code.
ASP.NET provides many of the same conceptual data-binding features as Windows Forms, although they manifest themselves in different ways to your code. Additionally, whenever you are programming a user interface that will live in a browser on the user’s desktop, your hands are tied by the request-response model of the Web. The only way the user interface gets updated is if the client browser requests a refresh. So there is no way to achieve true two-way data binding in a browser-based application, because changes to the bound data on the server side will only be seen by users if they request a refresh of their page explicitly or implicitly. Likewise, any changes made to one control in a page don’t immediately reflect in other controls in the page, because the page has been statically rendered to the browser. A client-side script is needed to achieve synchronization between controls on the client side, which isn’t part of the ASP.NET processing model. However, in ASP.NET 2.0, you can still get pretty close to true two-way binding with postbacks, and you can easily present and update data through bound controls.
This appendix isn’t intended to be a tutorial or comprehensive coverage of how to build Web applications with ASP.NET. The intent here is just to cover how to create some simple data-bound interfaces in ASP.NET to get you started if you need to build both Window Forms and ASP.NET Web applications, and to give you a sense of the similarities and differences between the ways of doing it in Windows Forms and in ASP.NET. The material in this appendix assumes that you have some familiarity with building simple Web forms with ASP.NET. I will give a quick introduction to the page processing model of ASP.NET to lay the groundwork if you don’t have this experience, and then will dive right into how data binding works with some examples. We’ll start with an example and walkthrough in ASP.NET 1.1, because the basic mechanisms of page processing and data binding haven’t changed in ASP.NET 2.0, then cover the specific ways that you should approach data binding in ASP.NET 2.0 in the rest of this appendix. This should whet your appetite and help get you started with doing the same kinds of things the rest of this book has discussed, but in ASP.NET.
ASP.NET Web form processing is based on a postback model. When a page first gets visited by a user (either by directly addressing it in the browser address bar or by following a link on another page or a favorite), the page is rendered by ASP.NET. This involves creating an instance of the page class, firing some events that are part of the page processing, and having each of the controls on the page render themselves into the response stream in the form of HTML that a browser can then render on the user’s desktop. If a page is designed to be interactive (rather than just a plain rendering of content), then the ASP.NET processing model is designed to have a page postback. This means that the user takes some action in the page, such as clicking a button or selecting a control, and this results in a new request being sent from the browser to the ASP.NET Web application for the same page. The new request is an HTTP POST request for the same page, and it may carry along any number of parameters from the embedded controls on the page. The page processing code and the controls themselves may then choose to render the page content differently based on the posted back parameters.
Typically, ASP.NET pages built with Visual Studio are constructed of a combination of the page itself, which is an ASPX file containing the markup describing the page and its contents, and a code-behind class that gets defined in a separate source file and compiled at design time to an assembly that is loaded by ASP.NET at runtime. The markup code in the ASPX file gets compiled into a class along with the code from the codebehind class, which will either be a partial class definition that gets blended with the ASPX file definition (the default model in ASP.NET 2.0), or the page class can derive from the code-behind class, which itself derives from the ASP.NET Page base class (the ASP.NET 1.1 model). The code that handles postback processing and event handling typically resides in the code-behind class, although ASP.NET also supports putting all supporting code for the page in script blocks in the ASPX file itself. The ASPX markup file can also contain embedded script blocks of various types for inline computation of content that will be emitted as HTML.
Data binding in ASP.NET 1.X involved a combination of data-bound controls, data-binding expressions in the page markup, data sources, and data-binding event processing that was part of the page-rendering lifecycle. The mechanisms for data binding in .NET 1.X still work in .NET 2.0 for backward-compatibility reasons, and you will still use many of the same constructs. However, the approach has changed quite a bit, and there are a number of new controls that support the new process that are discussed in the rest of this appendix. Additionally, there have been some significant changes in the Visual Studio experience when developing ASP.NET Web applications in Visual Studio 2005 compared to Visual Studio .NET 2003. You no longer use projects to manage Web applications; you just work on individual files and artifacts that are part of a Web folder. There are also new features, like dynamic code compilation for support code and script callbacks that let server controls refresh their contents in the browser without performing a full postback of the entire page. However, it is worthwhile to review how data binding worked in ASP.NET 1.X to understand the differences between the Web data-binding model and that of Windows Forms, in case you get exposed to any existing ASP.NET applications that were built before .NET 2.0 came out. You can still use the ASP.NET 1.X controls in ASP.NET 2.0 applications, but it is recommended that you adopt the new approach to data binding to reduce the amount of code you need to write and maintain.
ASP.NET 1.X data-bound controls follow a similar data-binding process to their Windows Forms counterparts. For example, the ASP.NET DataGrid control is a complex tabular control that lets you show tables of data, select rows, edit them, sort columns, and page through the data. The DataGrid has a DataSource property that you set to a collection of data and a DataMember property that you can use to refine what collection of data within that collection you want to use for complex containers of data like a data set. The DataGrid default behavior involves iterating over the table specified by its DataSource and DataMember properties and will render each row in the collection as an HTML table on the page. There is a great deal of flexibility in formatting the output HTML, both from a look-and-feel perspective and in terms of which columns of data get included. To handle things like sorting, selecting, and editing requires handling events fired by the control on postback. The DataGrid control, like many ASP.NET server controls, are template driven, allowing you to customize exactly what gets rendered for each cell of the resulting table, although the code to do so can become somewhat arcane and isn’t intended for beginners.
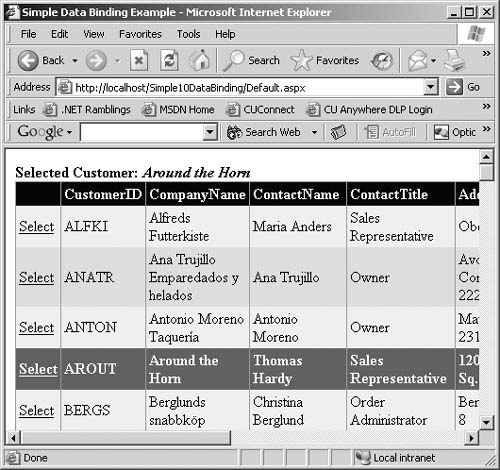
As a simple example, assume you want to present a table of customers on a page, with the ability to select a customer from the list. When the customer is selected, the customer’s company name is to be displayed at the top of the page. The code to accomplish this is shown in Listings A.1 and A.2. The running application is shown in Figure A.1 (with some autoformatting changes applied so that you can see what is going on).
LISTING A.1: Default.aspx Markup
<%@ Page language="c#" Codebehind="Default.aspx.cs"
AutoEventWireup="false" Inherits="Simple10DataBinding._Default" %>
<!DOCTYPE HTML PUBLIC "-//W3C//DTD HTML 4.0 Transitional//EN" >
<HTML>
<HEAD>
<title>Simple Data Binding Example</title>
</HEAD>
<body MS_POSITIONING="FlowLayout">
<form id="Form1" method="post" runat="server">
<asp:Label id="m_SelectedCustomerPromptLabel"
runat="server">Selected Customer:</asp:Label>
<asp:Label id="m_SelectedCustomerLabel"
runat="server" />
<asp:DataGrid id="m_CustomersGrid" runat="server">
<Columns>
<asp:ButtonColumn Text="Select"
CommandName="Select" />
</Columns>
</asp:DataGrid>
</form>
</body>
</HTML>
An ASP.NET Web form always contains HTML that marks the HEAD and body elements, which are part of the HTML standard for a Web page. Each Web form should contain a single form element that contains all of the ASP.NET-specific markup. Within the form element, other markup tags define the controls that the page is composed of, along with attributes or child elements for those tags that drive their behavior when rendered to the browser. Intermixed with the markup tags can be any amount of inline script in several different forms of script blocks.
In the code in Listing A.1, you can see that three ASP.NET controls are declared—two Labels and a DataGrid. Each tag is prefixed by asp:, which scopes the tag name to the namespace in which Web server controls are defined. They also each have an id attribute and a runat="server" attribute. The id is used to map the tag to a server control instance at runtime, and the runat attribute identifies the control as a server control that will have an instance created and called while the page is being processed on the server.
Complex controls like the DataGrid have an intricate schema of allowable child attributes and elements that can be used to customize their runtime rendering behavior. Any properties that are exposed on the control class as public or private can also be set to values in the markup by specifying those properties as attributes on the control’s markup tag. In the DataGrid in Listing A.1, a single column control of type ButtonColumn is specified as a child element in the Columns collection. Additional columns will be dynamically added in this sample when the grid is data bound.
After you have specified the layout of the page through the ASPX markup file, you then hook up the dynamic behavior of the page through a codebehind file, as shown in Listing A.2.
LISTING A.2: Default.aspx.cs Code-Behind
public class _Default : System.Web.UI.Page
{
protected Label m_SelectedCustomerPromptLabel;
protected Label m_SelectedCustomerLabel;
protected NorthwindDataSet m_CustomersDataSet;
protected DataGrid m_CustomersGrid;
private void Page_Load(object sender, EventArgs e)
{
if (!IsPostBack)
{
NorthwindDataAccess dac = new NorthwindDataAccess();
m_CustomersDataSet = dac.GetCustomers();
m_CustomersGrid.DataSource = m_CustomersDataSet;
m_CustomersGrid.DataMember = "Customers";
DataBind();
}
}
private void OnSelectedIndexChanged(object sender, EventArgs e)
{
int rowNumber = m_CustomersGrid.SelectedIndex;
string customerName =
m_CustomersGrid.SelectedItem.Cells[2].Text;
m_SelectedCustomerLabel.Text = customerName;
}
}
The code in Listing A.2 shows the code-behind for the sample, and it is typical of a simple ASP.NET 1.1 Web form. Any server controls that are defined in the markup of the ASPX file are also included as member variables in the code-behind class. The ASP.NET runtime will associate the control created at runtime based on the markup with these member variables by matching the member variable name with the control tag ID in the ASPX file. The member variables of the code-behind class can then be used to programmatically access and modify those controls while the page is processing. You can see one additional member here that wasn’t visible in the page markup for a NorthwindDataSet typed data set. This was added by dragging a DataSet item from the Toolbox onto the page in the designer, but because it has no visible rendering of its own, it doesn’t add anything to the markup, just the code-behind.
Most ASP.NET pages will do a lot of their processing in their Page.Load event handler, which is named Page_Load by default in Visual Studio. This is often the place that you will go to retrieve any data that is needed by the page for rendering, and you will often store that data in member variables so that it is available for other methods in the page that are called while the page is being processed. Keep in mind that a new instance of the page is created for each request that comes in, so the member variables are only in scope for as long as a single request is processing.
Additionally, you may have any number of helper methods to factor out the code that initializes page controls and members, and you may have any number of event handlers for events that are raised by controls on the page on postback. You will typically do the first rendering initialization of page controls in the Page_Load event handler, and will then do most of the postback processing in the event handlers for the controls on the page, although you can also do a lot of work in Page_Load on postback if it makes sense for your scenario.
In the code in Listing A.2, the Page_Load event handler retrieves the customer data into a member instance of the NorthwindDataSet typed data set using a data access helper class that is part of the project. This kind of call will typically call out to a data access layer or business layer in realworld applications. After the page code gets the data into the member variable, it uses that data set to set the DataSource property on the DataGrid control and sets the DataMember to “Customers” to indicate that it is the Customers table within the data set that is the real tabular data source for the grid. This should all look very similar to what you normally do in a Windows Form. Finally, it calls DataBind, which is always required in ASP.NET 1.X, and is still required in ASP.NET 2.0 when you programmatically set the DataSource property. All of this code is wrapped in a check for the page’s IsPostBack property, which means that it will only be executed when the page is initially rendered, and it won’t be re-executed on postbacks.
The grid is designed to support selecting of rows by adding a ButtonColumn to the grid with the link text set to Select, as shown in Listing A.1. When that link is clicked, the code that is rendered to the browser causes the form to post itself back to the server with the same address (default.aspx), and it will carry with it enough information so that the grid on the server side can detect that a postback has occurred. It will know the selected row index based on the form’s post parameters generated from the code emitted to the browser by the grid control. The grid will also fire an event named SelectedIndexChanged, and the page code-behind class has an event handler hooked up to that event named OnSelectedIndexChanged.
The handler code for the SelectedIndexChanged event extracts the text from the third cell (index 2) of the currently selected item, which is a row in the grid, and presents it by setting the Text property of a Label control on the page. When the page rerenders itself back to the browser based on this postback, the label will display the selected customer, and the selected row will be rendered differently in the grid based on its own internal rendering and formatting code (see Figure A.1).
Note that when the postback occurs, the Page_Load event handler will still be called in the page processing, but the data-binding code in that method won’t be called again because the IsPostBack property on the page will be true. The grid will still render the previously retrieved table data because by default the DataGrid carries all of the data in ViewState for the page, and so it can rerender the grid using that data, which comes back to the server with the post parameters for the page.
ViewState is really just a hidden input field that is rendered to the page and that contains base64-encoded data for the controls on the page. ViewState can have a significant negative impact on performance, so if you want to avoid the round-trip transmission cost of all that data in ViewState, you can turn off ViewState for the grid, but then you will have to requery for the data on every postback, or obtain it from a serverside cache.
Instead of explicitly setting the DataSource and DataMember properties through the code-behind as shown in Listing A.2, you can use the designer in Visual Studio to set up the binding based on the data set member that was added to the page through the designer. Doing so results in a different form of data-binding syntax supported by ASP.NET—data-binding expressions in the markup code. The following code shows the modified DataGrid tag that sets the DataSource property using a data-binding script expression.
<asp:DataGrid id="m_CustomersGrid" runat="server"
DataSource="<%# m_CustomersDataSet %>" DataMember="Customers">
...
</asp:DataGrid>
The <%# ... %> syntax marks a data-binding expression in the markup code. Data-binding expressions aren’t evaluated until their control’s DataBind method is called, either directly or by the page’s DataBind method or event. Properties on controls can be set directly in the markup by specifying them as an attribute on the tag with the value to be set. The value can be static, as in the case of the string “Customers” for the DataMember property in the preceding sample code, or it can be dynamic in the form of an ASP.NET script or data-binding expression, as is the case for the DataSource property. You will still need to have code in the codebehind class that goes out and retrieves the data from the source and places it in the instance of the data set to which the grid is bound through the data-binding expression. You will also need to make an explicit call to DataBind on the control or page to trigger the data-binding expression in the markup to execute, which sets the DataSource property on the page to the data set. When you call DataBind at the page level, the page calls DataBind on all of its child controls.
Other controls follow different data-binding approaches. For example, the ListBox and DropDownList controls let you show a collection of items, and you can keep a hidden value associated with them as well, much like the Windows Forms ListBox and ComboBox controls. For the ListBox and DropDownList controls, you set a DataSource and optionally a DataMember to define what the collection of data is that you are working with. You then set the DataTextField property to the field’s name within each row of the collection that you want displayed in the list. You can also set the DataValueField property to the name of another field within that collection, and its value will be associated with each item in the list as well. Just like with Windows Forms, this lets you keep track of a primary key or object identifier that can be used for subsequent queries based on selections in the list. Think of DataTextField in an ASP.NET DropDownList as being the same as the DisplayMember property for a ComboBox control in Windows Forms and the DataValueField property as being the same as ValueMember.
For single-valued controls like a TextBox, you will usually use databinding expressions to set the Text property or set the value programmatically from code-behind methods. You can also explicitly call code-behind methods or properties from a data-binding expression as long as they are protected or public members on the code-behind class. For example, to set the Text property of a TextBox on a page using a property in the codebehind class named CurrentCustomerID, you could use code like this in the ASPX page:
<asp:TextBox id=TextBox1 runat="server"
Text='<%# CurrentCustomerID %>' />
Notice that everything discussed so far has to do with rendering the data bound to a control, which is one-way data binding. What about receiving updates from the bound controls if the user edits the data? Well, this is where you become constrained by the Web request-response model. There is no way for the server to know whether the user will ever submit changes, and it doesn’t make sense to keep instances of controls hanging around in server memory, tying up resources in case they do. So each time a page gets rendered, the page and all of its child controls get created, used, and discarded. If the user makes changes to the rendered data through the controls in the browser and sends them back, it will come in the form of a new request, typically a postback to the same page in an ASP.NET application. The changed data will come back as form post parameters for the page’s input controls, and the page will have to reassociate those values with the new instances of the controls it creates while processing the postback. This creates the appearance, from a programming perspective, that you are working with the same instance of the control that you did when initially rendering the page, although that isn’t really the case. As a result, it is difficult to achieve the appearance of true two-way data binding, because that requires persistent instances of data-bound controls throughout the interaction with the user, as well as the data sources that feed them.
There is obviously a lot more that you will need to learn to be able to tackle complex data-binding scenarios in ASP.NET 1.X applications, but this should give you a general sense of the approach and how things get tied together, and most of it still applies to ASP.NET 2.0.
One of the big goals for ASP.NET 2.0 was to dramatically reduce the amount of application code programmers had to write when designing rich, interactive, data-bound Web user interfaces. To accomplish this, a bunch of new controls and components were added to the .NET Framework for ASP.NET Web forms, many of them focused on data-bound scenarios. Additionally, the designer in Visual Studio 2005 has been improved to the point that for many common scenarios, you can get exactly what you want without writing a line of programmatic code, and this is done without causing unnecessary coupling between your data sources and your bound controls.
The biggest change in terms of how you approach data binding in ASP.NET 2.0 is the use of data source controls, which are a new kind of control that are conceptually very similar to a BindingSource component in Windows Forms 2.0. Data source controls provide a layer of decoupling between a data source and the controls to which it gets bound. However, the similarities stop at the conceptual level. The way that you define and employ data source controls in ASP.NET is quite different from the way that you use BindingSources in Windows Forms, and will be the subject of the following sections in this appendix.
There are also a number of additions to the set of controls available for data-bound scenarios in ASP.NET pages, as well as enhancements to existing controls. The most significant new data-bound controls that I will cover are the GridView, DetailsView, FormView, and TreeView controls. Existing controls such as DropDownList, ListBox, TextBox, and Label are used in much the same way as they were in ASP.NET 1.X, except that you should bind them to data source controls instead of directly to data sources to provide the same indirection and a consistent model with the new data controls. Additionally, the need to set up individual control bindings is greatly reduced due to the capabilities of the DetailsView and FormView controls, as you will see later in this appendix.
As mentioned earlier, data source controls play a crucial role in building data-bound ASP.NET 2.0 Web forms. There are a number of data source controls that ship with ASP.NET 2.0, and they are tailored to different kinds of data. Each data source control implements a common interface called IDataSource, which provides the shared behavior of the data sources as well as defines the interface that derived data source controls must implement to work properly with data-bound controls in Web forms.
A data source control forms a layer of abstraction between a bound control and the data that is being presented. It lets you easily bind multiple controls to the same data source and update all of those controls simply by changing the data in one place—at the data source control. Data source controls encapsulate all the details of connecting to their respective data sources and exposing the underlying data as a collection suitable for binding.
Data source controls, as well as a number of other capabilities in ASP.NET 2.0, follow a design pattern referred to as the provider model. This lets you plug in new capabilities by implementing new components that comply with the interface defined as part of the provider model and integrating them through configuration file entries. As a result, you can define custom data source controls if the built-in controls don’t meet your needs.
To use a data source control, you add an instance of one to your Web forms, and set any appropriate properties on the control to drive the way it retrieves and updates data from the underlying source. You then set the DataSourceID property for a data-bound control, such as a GridView or DropDownList, to the data source control’s ID. Each of the ASP.NET databound controls has been extended to include a DataSourceID property in addition to a DataSource property. You can still set the data source through the DataSource property, but then you will still be responsible for calling the DataBind method on the control or the page at the appropriate time. When you set the data source through the DataSourceID, the binding will be automatic as the page is loaded. Let’s take a quick look at each of the data source controls that ship with ASP.NET 2.0 and what they are designed for, and then we will get into a couple of examples.
The SqlDataSource data source control is designed to let you execute queries against a SQL Server database to retrieve and update data through bound controls. When you add a SqlDataSource object to your page, you populate its ConnectionString and ProviderName properties to tell it what to connect to. You then populate its SelectCommand, InsertCommand, UpdateCommand, and DeleteCommand properties with the SQL statements or stored procedure names that are to be executed when data is retrieved or updated. Each command can have a set of child Parameter objects that identify their types along with the parameters in the queries or stored procedures. The SelectCommand will automatically be executed when data binding occurs to retrieve the data and make it available to any bound controls as a collection. Additionally, the insert, update, and delete queries are exposed by the data source control through a standard interface that all bound controls understand and can use to persist changes that are returned through a postback to the underlying data source without requiring any programmatic code.
The easiest way to get familiar with the code required to use a SqlDataSource is to let the Visual Studio designer write it for you.
1. Start by creating a new Web site in Visual Studio (File > New > Web Site).
2. When you see the source code for the default.aspx page, change to Design view by clicking the Design tab at the bottom left of the content window. You will then see the design surface for the Web page, which should be blank.
3. Bring up Server Explorer (View > Server Explorer), and create a new data connection for the Northwind database if you don’t already have one.
4. Expand the tree for Northwind down to the Customers table, and drag and drop the Customers table onto the design surface for the Web page.
After you do these steps, Visual Studio will add a GridView control and a SqlDataSource control to your page, populate them with all the information needed to retrieve the data from the Customers table, and present it in the grid—without you needing to write a single line of code. If you look at your code-behind file at this point, you will see that it is still empty. All of the code needed to set up the binding is added in the markup code of the ASPX file itself, as shown in Listing A.3.
LISTING A.3: Data-Bound GridView Sample
<%@ Page Language="C#" AutoEventWireup="true"
CodeFile="Default.aspx.cs" Inherits="_Default" %>
<!DOCTYPE html PUBLIC "-//W3C//DTD XHTML 1.1//EN" "http://www.w3.org/
TR/xhtml11/DTD/xhtml11.dtd">
<html xmlns="http://www.w3.org/1999/xhtml" >
<head runat="server">
<title>Untitled Page</title>
</head>
<body>
<form id="form1" runat="server">
<div>
<asp:GridView ID="GridView1" runat="server"
AutoGenerateColumns="False" DataKeyNames="CustomerID"
DataSourceID="SqlDataSource1"
EmptyDataText="There are no data records to display.">
<Columns>
<asp:BoundField DataField="CustomerID"
HeaderText="CustomerID" ReadOnly="True"
SortExpression="CustomerID" />
<asp:BoundField DataField="CompanyName"
HeaderText="CompanyName"
SortExpression="CompanyName" />
<asp:BoundField DataField="ContactName"
HeaderText="ContactName"
SortExpression="ContactName" />
<asp:BoundField DataField="ContactTitle"
HeaderText="ContactTitle"
SortExpression="ContactTitle" />
<asp:BoundField DataField="Address"
HeaderText="Address" SortExpression="Address" />
<asp:BoundField DataField="City" HeaderText="City"
SortExpression="City" />
<asp:BoundField DataField="Region"
HeaderText="Region"
SortExpression="Region" />
<asp:BoundField DataField="PostalCode"
HeaderText="PostalCode"
SortExpression="PostalCode" />
<asp:BoundField DataField="Country"
HeaderText="Country" SortExpression="Country" />
<asp:BoundField DataField="Phone" HeaderText="Phone"
SortExpression="Phone" />
<asp:BoundField DataField="Fax" HeaderText="Fax"
SortExpression="Fax" />
</Columns>
</asp:GridView>
<asp:SqlDataSource ID="SqlDataSource1" runat="server"
ConnectionString=
"<%$ ConnectionStrings:NorthwindConnectionString1 %>"
DeleteCommand="DELETE FROM [Customers] WHERE [CustomerID] =
@original_CustomerID"
InsertCommand="INSERT INTO [Customers] ([CustomerID],
[CompanyName], [ContactName],
[ContactTitle],[Address], [City], [Region],
[PostalCode],[Country], [Phone], [Fax])
VALUES (@CustomerID, @CompanyName,
@ContactName, @ContactTitle, @Address,
@City, @Region, @PostalCode, @Country,
@Phone, @Fax)"
ProviderName=
"<%$ ConnectionStrings:NorthwindConnectionString1.ProviderName %>"
SelectCommand="SELECT [CustomerID], [CompanyName],
[ContactName], [ContactTitle], [Address],
[City], [Region], [PostalCode], [Country],
[Phone], [Fax] FROM [Customers]"
UpdateCommand="UPDATE [Customers] SET [CompanyName] =
@CompanyName, [ContactName] =
@ContactName, [ContactTitle] =
@ContactTitle, [Address] = @Address,
[City] = @City, [Region] = @Region,
[PostalCode] = @PostalCode, [Country] =
@Country, [Phone] = @Phone, [Fax] = @Fax
WHERE [CustomerID] = @original_CustomerID">
<InsertParameters>
<asp:Parameter Name="CustomerID" Type="String" />
<asp:Parameter Name="CompanyName" Type="String" />
<asp:Parameter Name="ContactName" Type="String" />
<asp:Parameter Name="ContactTitle" Type="String" />
<asp:Parameter Name="Address" Type="String" />
<asp:Parameter Name="City" Type="String" />
<asp:Parameter Name="Region" Type="String" />
<asp:Parameter Name="PostalCode" Type="String" />
<asp:Parameter Name="Country" Type="String" />
<asp:Parameter Name="Phone" Type="String" />
<asp:Parameter Name="Fax" Type="String" />
</InsertParameters>
<UpdateParameters>
<asp:Parameter Name="CompanyName" Type="String" />
<asp:Parameter Name="ContactName" Type="String" />
<asp:Parameter Name="ContactTitle" Type="String" />
<asp:Parameter Name="Address" Type="String" />
<asp:Parameter Name="City" Type="String" />
<asp:Parameter Name="Region" Type="String" />
<asp:Parameter Name="PostalCode" Type="String" />
<asp:Parameter Name="Country" Type="String" />
<asp:Parameter Name="Phone" Type="String" />
<asp:Parameter Name="Fax" Type="String" />
<asp:Parameter Name="original_CustomerID"
Type="String" />
</UpdateParameters>
<DeleteParameters>
<asp:Parameter Name="original_CustomerID"
Type="String" />
</DeleteParameters>
</asp:SqlDataSource>
</div>
</form>
</body>
</html>
Obviously, having Visual Studio write all this code for you is preferable and less error-prone than trying to write it all yourself. You can also accomplish the same thing by programming against the objects themselves. For example, if you don’t need to support updating, you don’t have to provide insert, update, and delete commands and their parameters. You can also use the default behavior of the GridView to autogenerate the columns based on the data it is bound to. So the code generated by Visual Studio in Listing A.3 can be trimmed down to the code in Listings A.4 and A.5.
LISTING A.4: Programmatic Read-Only Grid Markup
<%@ Page Language="C#" AutoEventWireup="true"
CodeFile="ProgrammaticGrid.aspx.cs" Inherits="ProgrammaticGrid" %>
<!DOCTYPE html PUBLIC "-//W3C//DTD XHTML 1.1//EN"
"http://www.w3.org/TR/xhtml11/DTD/xhtml11.dtd">
<html xmlns="http://www.w3.org/1999/xhtml" >
<head runat="server">
<title>Untitled Page</title>
</head>
<body>
<form id="form1" runat="server">
<div>
<asp:GridView ID="m_CustomersGrid" runat="server">
</asp:GridView>
<asp:SqlDataSource ID="m_CustomersDataSource"
runat="server"></asp:SqlDataSource>
</div>
</form>
</body>
</html>
LISTING A.5: Programmatic Read-Only Grid Code-Behind
public partial class ProgrammaticGrid : System.Web.UI.Page
{
protected void Page_Load(object sender, EventArgs e)
{
m_CustomersDataSource.SelectCommand =
"SELECT * FROM Customers";
m_CustomersDataSource.ConnectionString =
"server=localhost;database=Northwind;trusted_connection=true";
m_CustomersGrid.DataSourceID = m_CustomersDataSource.ID;
}
}
The advantage of the SqlDataSource is expediency. You can drag and drop objects from Server Explorer onto the designer surface and it will generate the appropriate code as part of your page. You can also use the Configure Data Source wizard (see Figure A.2) to set up the query associated with a data source control after it has been added to the page. This allows you to simply drag and drop a SqlDataSource control from the Toolbox onto the page, and then generate the binding code through the wizard.

The problem with the SqlDataSource control is that it introduces a tight coupling between your pages and your database, something that violates the concept of a layered application architecture and that is generally to be avoided in large applications. However, for smaller applications or rapid prototypes, using this capability can save a lot of time coding up infrastructure code that you may or may not need.
The ObjectDataSource control is the solution to the tight coupling that is caused by using SqlDataSources in your pages. Using the ObjectDataSource control, you can easily bind controls on your page to any source of data, such as custom business objects and collections in a layered application architecture. You set the ObjectDataSource control’s TypeName property to the fully qualified type name of a class, and that class should have a method that returns a collection of the objects you want to bind to.
As an example, say that you have a layered application with a data access layer, a business layer, and the ASP.NET presentation layer. You want to bind a grid on a Web form to a collection of Customer objects that are returned by a method in your business layer, but the details of how those Customer objects are constructed are hidden from you through the encapsulation of the business layer.
The data will need to come from somewhere, so for the example I added a CustomersDataSet to the project as a typed data set using the techniques described in Chapter 2. The business layer classes include the Customer business entity class definition, which contains a factory method for returning a collection of Customers as shown in Listing A.6. The GetCustomers method uses the CustomersTableAdapter defined in the typed data set to retrieve a collection of customer data, and uses it to populate the simple business class entities and return them as a List<Customer>.
LISTING A.6: Customer Business Logic Class
public class Customer
{
private string m_Name;
public string Name
{
get { return m_Name; }
set { m_Name = value; }
}
private string m_ID;
public string CustomerID
{
get { return m_ID; }
set { m_ID = value; }
}
public List<Customer> GetCustomers()
{
List<Customer> results = new List<Customer>();
CustomersTableAdapter adapter = new CustomersTableAdapter();
CustomersDataSet.CustomersDataTable custs = adapter.GetData();
foreach (CustomersDataSet.CustomersRow row in custs)
{
Customer c = new Customer();
c.Name = row.CompanyName;
c.CustomerID = row.CustomerID;
results.Add(c);
}
return results;
}
}
To use this data from an ASP.NET Web form requires that you add an ObjectDataSource control to the page, and something to bind that to, such as a GridView. The following code is from the code-behind for such a page.
protected void Page_Load(object sender, EventArgs e)
{
m_CustomerDataSource.TypeName = "Customer";
m_CustomerDataSource.SelectMethod = "GetCustomers";
m_CustomerGrid.DataSourceID = m_CustomerDataSource.ID;
}
The AccessDataSource control provides simplified support for binding to data coming from a Microsoft Access database. To use this control, you set the file path for the database file through the DataFile property. This class derives from SqlDataSource and only supports reading data; if you need to update data, you should use a SqlDataSource. The AccessDataSource uses the OLE DB provider under the covers, so you can only parameterize queries by position using the ? (question mark) character for parameter placeholders in the query.
The XmlDataSource control lets you perform data binding against a hierarchical XML data document. This is particularly powerful with a control that allows you to present hierarchical data, such as the TreeView and Menu controls, but it can also be used when the XML data represents tabular data that is received as an XML document.
The SiteMapDataSource control is a specialized hierarchical data provider. Its primary use is for mapping navigation controls to a site map that defines the structure of your site. A site map is defined using a particular schema of nodes in an XML file. Because of the limited scenario for which this data source control was designed, it doesn’t support sorting, filtering, paging, caching, or updating like the other data source controls do.
To include an expression in your markup code that is evaluated when data binding occurs, you have enclosed it in the special <%# ... %> syntax. The code that you enclose in these data-binding expressions can include code that gets evaluated directly, as if it were in the code-behind, such as referencing a property or method on the code-behind class as discussed earlier.
<asp:TextBox ID="TextBox3" runat="server"
Text=<%# SomeProperty %>"></asp:TextBox>
<asp:TextBox ID="TextBox2" runat="server"
Text="<%# GetSomeTextValue() %>"></asp:TextBox>
Another common expression within a data-binding expression in ASP.NET is to reference the container’s data item:
<%# Container.DataItem["CustomerID"] %>
The data item means the current row or object within the collection that is being bound to, which is associated with the container control. This syntax can be used when the control is designed to be bound against a strongly typed collection of data, so the compiler can resolve the [. . . ] indexer operator against the current data item for the container of data (the collection). Because most controls are designed to be bound to a wide variety of collection and data item types, you usually have to use a more dynamically typed resolution of the item you are trying to bind to. To do this, you can use the DataBinder.Eval method:
<%# DataBinder.Eval(Container.DataItem, "CustomerID") %>
This uses reflection to attempt to locate a CustomerID property or field on the current item in the bound data collection and return its value.
ASP.NET 2.0 supports a simplified syntax of the DataBinder.Eval that uses the Eval method. The following expression:
<%# Eval("CustomerID") %>
gets you the same result as if you used the lengthier syntax with the DataBinder.Eval method.
There is also a Bind method that is new in .NET 2.0 that you will want to use instead of the Eval method for expressions that work against data sources that support updates on postback. If you plan to let the user edit the data in a bound control, and that control is bound to a data source that supports persisting updates, then the Bind method will also call the update method on the bound data source when a postback occurs with edited data. Specifically, the GridView, DetailsView, and FormView classes support this kind of automatic updating.
<%# Bind("CompanyName") %>
You should use the Bind method instead of Eval whenever you are setting properties inside a template for one of the new bound controls, and when you are setting the data source using the DataSourceID property, which allows automatic updating on postback.
Probably the most common control used in data-bound ASP.NET Web applications prior to ASP.NET 2.0 was the DataGrid control, which allows the presentation of tabular data. Like the Windows Forms DataGrid control, the ASP.NET DataGrid control was easy to use for simple scenarios, but it left a lot to be desired for more advanced scenarios. As a result, the ASP.NET team followed the same approach as the Windows Client team—instead of trying to “fix” or improve the existing control while maintaining backward compatibility, they decided to replace it outright. The result is the GridView control.
The GridView control functions much like the DataGrid control did for simple scenarios. You set a data source, apply some styling, and when data binding occurs, the items in the bound collection are rendered as rows in an HTML table, with each column or property in the data source items displayed in a column in the row.
However, the GridView capabilities go way beyond that and make common and more advanced scenarios far easier. For example, as mentioned earlier, to support editing, selecting, sorting, and paging with the DataGrid control required handling events on postback that weren’t particularly easy or intuitive to get right until you had done it a few times. In the GridView control, you just set a control’s property and specify that you want it to support one or several of those functions, and this control takes care of it. All of the postback handling is encapsulated for you for the most common scenarios, but the events are still raised, letting you handle custom situations in a consistent way. The grid’s styling capabilities have been improved, as well as its ability to use templates for containing custom cell contents.
The GridView is also designed to work with the data source controls to allow it to communicate changes back through the data source control it is bound to when the user edits data through the control. The data source can then ensure that changes are persisted automatically. Working with the GridView control in the designer has been beefed up; you can handle most common scenarios declaratively through designer interactions and wizards, so that you often can get very complex data binding and formatting set up without writing a single line of code by hand.
To hook up simple data binding, you set the control’s DataSourceID property to the ID of the corresponding page’s data source control. As shown earlier, you can also still set the DataSource and DataMember properties and programmatically call DataBind to have explicit control over the data-binding process if desired.
You have already seen some simple uses of the GridView in the code examples in this appendix. For a slightly more complex example, the code in Listing A.7 shows the markup for a GridView that supports the sorting, editing, paging, deleting, and selecting of rows.
LISTING A.7: GridView Control Example
<asp:GridView ID="GridView1" runat="server"
AllowPaging="True" AllowSorting="True"
AutoGenerateColumns="False" DataKeyNames="CustomerID"
DataSourceID="SqlDataSource1"
EmptyDataText="There are no data records to display.">
<Columns>
<asp:CommandField ShowDeleteButton="True"
ShowEditButton="True" ShowSelectButton="True" />
<asp:BoundField DataField="CustomerID"
HeaderText="CustomerID" ReadOnly="True"
SortExpression="CustomerID" />
<asp:BoundField DataField="CompanyName"
HeaderText="CompanyName" SortExpression="CompanyName" />
<asp:BoundField DataField="ContactName"
HeaderText="ContactName" SortExpression="ContactName" />
<asp:TemplateField HeaderText="Phone" SortExpression="Phone">
<ItemTemplate>
<asp:Label ID="Label1" runat="server"
Text='<%# Eval("Phone") %>'></asp:Label>
</ItemTemplate>
<EditItemTemplate>
<asp:TextBox ID="TextBox1" runat="server"
Text='<%# Bind("Phone") %>'></asp:TextBox>
</EditItemTemplate>
</asp:TemplateField>
<asp:BoundField DataField="Fax" HeaderText="Fax"
SortExpression="Fax" />
</Columns>
</asp:GridView>
To support paging, all that is required is to set the AllowPaging property to true. For sorting, you set the AllowSorting property to true, and then specify a SortExpression property for each of the bound columns. Editing, deleting, and selecting are supported by adding a CommandField to the grid and setting the ShowXXXButton properties to true for each of the kinds of command buttons you want to support. Note also the use of a template column for the Phone column, and the use of the Eval and Bind methods to set the data-binding expression.
The DetailsView control is a handy new control that sets up a table to display the details of a single data item for easier viewing. You can think of the formatting of a DetailsView control as if it flipped a row from a tabular grid on its side, presenting the column headers as row headers, and the field values from the desired row as adjacent cells in each of those rows. An example is shown in Figure A.3.
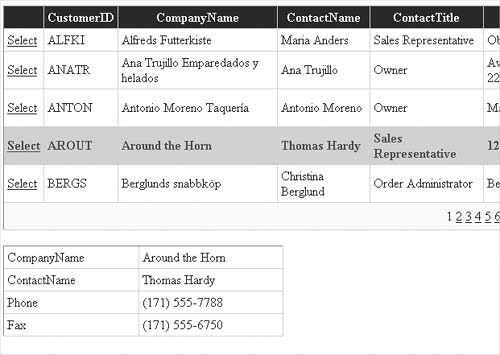
To use the DetailsView, you set up a data source control as described earlier, and set its ID as the DataSourceID on the DetailsView control. You can restrict which row is chosen within the data source either by restricting the data source query to return only a single data item (using a WHERE clause in the case of a SqlDataSource), or you can set the FilterExpression property to a value that will filter to the desired row. The code for the page illustrated in Figure A.3 (minus its formatting) is shown in Listing A.8.
Listing A.8: Integrated GridView and DetailsView
<%@ Page Language="C#" AutoEventWireup="true"
CodeFile="GridViewSample.aspx.cs" Inherits="GridViewSample" %>
<!DOCTYPE html PUBLIC "-//W3C//DTD XHTML 1.1//EN"
"http://www.w3.org/TR/xhtml11/DTD/xhtml11.dtd">
<html xmlns="http://www.w3.org/1999/xhtml" >
<head runat="server">
<title>DetailsView Sample</title>
</head>
<body>
<form id="form1" runat="server">
<div>
<asp:GridView ID="m_CustomersGrid" runat="server"
AllowPaging="True" DataKeyNames="CustomerID"
DataSourceID="m_CustomersDataSource" PageSize="5">
<Columns>
<asp:CommandField ShowSelectButton="True" />
</Columns>
</asp:GridView>
<asp:SqlDataSource ID="m_CustomersDataSource" runat="server"
ConnectionString=
"<%$ ConnectionStrings:NorthwindConnectionString1 %>"
SelectCommand="SELECT * FROM Customers">
</asp:SqlDataSource>
<br />
<asp:DetailsView ID="m_CustomerDetails" runat="server"
AutoGenerateRows="False" DataKeyNames="CustomerID"
DataSourceID="m_ CustomerDetailsDataSource"
Height="50px" Width="348px">
<Fields>
<asp:BoundField DataField="CompanyName"
HeaderText="CompanyName"
SortExpression="CompanyName" />
<asp:BoundField DataField="ContactName"
HeaderText="ContactName"
SortExpression="ContactName" />
<asp:BoundField DataField="Phone" HeaderText="Phone"
SortExpression="Phone" />
<asp:BoundField DataField="Fax" HeaderText="Fax"
SortExpression="Fax" />
</Fields>
</asp:DetailsView>
<asp:SqlDataSource ID="m_CustomerDetailsDataSource"
runat="server" ConnectionString=
"<%$ ConnectionStrings:NorthwindConnectionString %>"
SelectCommand="SELECT * FROM [Customers]
WHERE ([CustomerID] = @CustomerID)">
<SelectParameters>
<asp:ControlParameter ControlID="m_CustomersGrid"
Name="CustomerID" PropertyName="SelectedValue"
Type="String" />
</SelectParameters>
</asp:SqlDataSource>
</div>
</form>
</body>
</html>
Note that there are two SqlDataSource controls. The first is set as the grid’s data source and gets all customer records from the database. The second is set as the DetailsView control’s data source, and uses a SELECT... WHERE clause to restrict which row is selected. The selection parameter is dynamically determined using a SelectParameter that points to the grid control, and its SelectedValue property gets the value of the selected row’s data key field, which is set to the CustomerID.
The DetailsView control also supports paging, editing, and many of the features supported by the GridView itself. It is designed to operate on a single row at a time, so the data source has to be set up appropriately based on the way it is going to be used.
The FormView control provides similar capability to the DetailsView control, but it also lets you provide templates for all aspects of its display, which gives you a lot more flexibility in the way a single row of data or an object is presented. You provide an item template that specifies the form’s content for each record in the bound data source. The template’s contents can contain static markup and binding expressions that result in the output of each row or object in the data collection in the format that you provide. The following code is a simple example of a FormView control with an ItemTemplate. It shows the company name and phone information of each item in the Customers table that gets bound to the control:
<asp:FormView ID="FormView1" runat="server"
DataKeyNames="CustomerID" DataSourceID="SqlDataSource1">
<ItemTemplate>
CompanyName:
<asp:Label ID="CompanyNameLabel" runat="server"
Text='<%# Bind("CompanyName") %>'></asp:Label><br />
Phone:
<asp:Label ID="PhoneLabel" runat="server"
Text='<%# Bind("Phone") %>'></asp:Label><br />
</ItemTemplate>
</asp:FormView>
If you have worked with ASP.NET controls before, you can think of the FormView being related to the DetailsView much like the Repeater control is related to the DataList. The DetailsView gives you more built-in data presentation capability, but you cannot customize the content quite as easily or directly. In contrast, the FormView is more primitive, providing almost no automatic presentation of data, but it gives you much more flexibility in specifying the way the data gets presented and how it gets laid out on the page.
The FormView also supports editing and adding new records, as well as paging. These things are enabled in a similar fashion to other controls, by setting properties on the control or by providing subelements in the markup. Specifically, if you want to support paging, set the AllowPaging property to true. If you want to support editing and inserting, you provide additional templates under the EditTemplate and InsertTemplate elements as child elements of the FormView tag.
Master-details data binding is accomplished much differently from how you do it in Windows Forms. You saw a simple example earlier in Listing A.8. You set up separate data source controls for each bound control that will participate in the master-details presentation. The first data source binds to the parent collection of data in a normal fashion.
If the child data source is a SqlDataSource, it sets its SelectCommand to an appropriate query to get the child collection of data. You can then choose between either providing a parameterized WHERE clause in the SelectCommand as shown earlier, or you can set the FilterExpression property on the data source control to a valid filter criteria and provide any FilterParameters that feed it. An example of this approach is shown in Listing A.9.
LISTING A.9: Master-Details Binding Using Filtering
<%@ Page Language="C#" AutoEventWireup="true"
CodeFile="MasterDetails.aspx.cs" Inherits="MasterDetails" %>
<!DOCTYPE html PUBLIC "-//W3C//DTD XHTML 1.1//EN"
"http://www.w3.org/TR/xhtml11/DTD/xhtml11.dtd">
<html xmlns="http://www.w3.org/1999/xhtml" >
<head runat="server">
<title>Master Details Sample</title>
</head>
<body>
<form id="form1" runat="server">
<div>
<asp:GridView ID="m_CustomersGrid" runat="server"
AutoGenerateColumns="False"
DataSourceID="m_CustomersDataSource"
EmptyDataText="There are no data records to display."
DataKeyNames="CustomerID" AllowPaging="True">
<Columns>
<asp:CommandField ShowSelectButton="True" />
<asp:BoundField DataField="CompanyName"
HeaderText="CompanyName"
SortExpression="CompanyName" />
<asp:BoundField DataField="ContactName"
HeaderText="ContactName"
SortExpression="ContactName" />
<asp:BoundField DataField="Phone"
HeaderText="Phone" SortExpression="Phone" />
<asp:BoundField DataField="CustomerID"
HeaderText="CustomerID" ReadOnly="True"
SortExpression="CustomerID" />
</Columns>
</asp:GridView>
<asp:SqlDataSource ID="m_CustomersDataSource" runat="server"
ConnectionString=
"<%$ ConnectionStrings:NorthwindConnectionString1 %>"
SelectCommand="SELECT [CompanyName], [ContactName], [Phone],
[CustomerID] FROM [Customers]"></asp:SqlDataSource>
<asp:GridView ID="m_OrdersGrid" runat="server"
AutoGenerateColumns="False" DataSourceID="m_OrdersDataSource"
EmptyDataText="There are no data records to display.">
<Columns>
<asp:BoundField DataField="CustomerID"
HeaderText="CustomerID"
SortExpression="CustomerID" />
<asp:BoundField DataField="OrderDate"
HeaderText="OrderDate"
SortExpression="OrderDate" />
<asp:BoundField DataField="ShipAddress"
HeaderText="ShipAddress"
SortExpression="ShipAddress" />
<asp:BoundField DataField="ShipCity"
HeaderText="ShipCity"
SortExpression="ShipCity" />
<asp:BoundField DataField="ShipRegion"
HeaderText="ShipRegion"
SortExpression="ShipRegion" />
<asp:BoundField DataField="ShipPostalCode"
HeaderText="ShipPostalCode"
SortExpression="ShipPostalCode" />
<asp:BoundField DataField="ShipCountry"
HeaderText="ShipCountry"
SortExpression="ShipCountry" />
</Columns>
</asp:GridView>
<asp:SqlDataSource ID="m_OrdersDataSource" runat="server"
ConnectionString=
"<%$ ConnectionStrings:NorthwindConnectionString1 %>"
SelectCommand="SELECT [CustomerID], [OrderDate],
[ShipAddress], [ShipCity], [ShipRegion], [ShipPostalCode],
[ShipCountry] FROM [Orders]"
FilterExpression="CustomerID='{0}'">
<FilterParameters>
<asp:ControlParameter ControlID="m_CustomersGrid"
PropertyName="SelectedValue" Name="CustomerID"
DefaultValue="ALFKI"/>
</FilterParameters>
</asp:SqlDataSource>
</div>
</form>
</body>
</html>
In this example, the customers grid is bound to the SqlDataSource in the same way shown in previous examples. The orders grid is bound to its own data source, whose query selects all order records from the Orders table. The data source then sets the FilterExpression property to a string with a placeholder in it ('{0}'). The placeholder gets populated from the filter parameter that is provided by a ControlParameter object. This object extracts the value to use for filtering from some other control on the page, in this case the customers grid, using the specified property name on that control (SelectedValue). The result is that all order records are pulled down to the Web page, but a filter is placed on a data view under the covers to limit which records are rendered through the data source.
Using select parameters, as shown earlier, will be more efficient if you aren’t caching the data. But if you cache the data, then you would want to get all the records in this way so that they are being filtered in memory from the entire collection, saving a round-trip to the database. There are additional properties you can set on the data source to have it cache the data automatically.
To do master-details binding to an object collection using an ObjectDataSource instead of a SqlDataSource, you would need to have a SelectMethod that takes parameters to limit the result set that is returned in the same way that a WHERE clause does for SQL. It would depend on the capabilities of the collection returned as to whether filtering would work.
One capability that ASP.NET has that Windows Forms does not is the ability to bind a hierarchical data source, such as an XML file, to a hierarchical control, such as the TreeView control. To do this, you can use an XmlDataSource pointed to an XML file, and set that as the data source for the TreeView. You can then set TreeNodeBindings within the TreeView to pick out particular fields from the elements in the hierarchy. The following example will display each element name in the books.xml file as a tree node, and when a tree node named book is found, it will show child items based on the value of the title attribute of each book node:
<form id="form1" runat="server">
<div>
<asp:XmlDataSource ID="XmlDataSource1" runat="server"
DataFile="~/App_Data/books.xml"></asp:XmlDataSource>
<asp:TreeView ID="TreeView1" runat="server"
DataSourceID="XmlDataSource1">
<DataBindings>
<asp:TreeNodeBinding DataMember="book"
TextField="title" />
</DataBindings>
</asp:TreeView>
</div>
</form>
This appendix has given you a very quick introduction to coding databinding scenarios using ASP.NET 2.0, and an idea of what capabilities exist and how to approach them. It isn’t intended as a comprehensive lesson in data binding, but it should help get you started. This information will be important to you if you need to code similar data-bound UIs for an application when you are also building a Windows Forms version for a subset of your users.