One easy way to create a file is with a Unix feature called input/output redirection , as Chapter 5 explains. This sends the output of a program directly to a file, to make a new file or add to an existing one.
You’ll usually create and edit a plain-text file with a text editor program. Text editors are somewhat different than word processors.
A text editor
lets you add, change, and rearrange text easily. Three popular Unix
editors included with Mac OS X are
vi
(pronounced
“vee-eye”),
Pico
(“pea-co”), and
Emacs
(“e-max”).
You should choose an editor you’re comfortable with. vi is probably the best choice because almost all Unix systems have it, but Emacs is also widely available. If you’ll be doing simple editing only, Pico is a great choice. Although Pico is much less powerful than Emacs or vi, it’s a lot easier to learn. For this book, however, we’ll focus on the rudiments of vi since it’s the most widely available Unix editor, and there’s a version of vi included with Mac OS X.
None of these plain text editors has the same features as popular word-processing software within the graphical face of Mac OS X, but vi and Emacs are sophisticated, extremely flexible editors for all kinds of plain-text files: programs, email messages, and so on.
Tip
Of course, you can opt to use an Aqua-based text editor such as
BBEdit or TextEdit with good results too,
if you’d rather just sidestep editing while within
the Terminal application. If you do, try using the
open command within the Terminal to launch the
editor with the proper file already loaded. For example:
open -e myfile.txt.
By "plain text,” we mean a
file with only letters, numbers, and punctuation characters in it
(text without formatting such as point size, bold and italics, or
embedded images). Unix systems use plain-text files in many places:
redirected input and output of Unix programs (Chapter 5), as shell setup files (see Section 4.2), for shell scripts (shown in
Section 10.3), for system configuration, and more.
Text editors edit these files. When
you use a word processor, though, although the
screen may look as if the file is only plain text, the file probably
also has hidden codes (nontext characters) in it.
That’s often true even if you tell the word
processor to “Save as plain text.”
One easy way to check for nontext characters in a file is by reading
the file with
less
; look for characters
in reversed colors, codes such as <36>, and
so on.
If you need to do word processing — making documents, envelopes, and so on — your best bet is to work with a program designed for that purpose such as Microsoft Office X, AppleWorks, or even TextEdit.
The vi editor, originally written by Bill Joy at the University of California, Berkeley, is easy to use once you master the fundamental concept of a modal editor.
Modes can be best explained by thinking about your car stereo. When
you have a tape in (or a CD), the
“1” button does one task, but if
you are listening to the radio, the very same button does something
else (perhaps jump to pre-programmed station #1). The vi editor is
exactly the same: in command
mode
,
i jumps you into insert mode, but in
insert mode
it
actually inserts an “i” into the
text itself. The handiest key on your keyboard while
you’re learning vi is unquestionably
ESC: if
you’re in insert mode, ESC will move you back into
command mode, and if you’re in command mode,
it’ll beep to let you know that all is well. Use ESC
often, until you’re completely comfortable keeping
track of what mode you’re in.
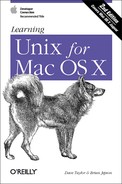
Start vi by typing its name; the
argument is the filename you want to create or edit. For instance, to
edit your .tcshrc setup file, you would
cd to your home directory and enter:
% vi .tcshrcThe terminal fills with a copy of the file (and, because the file is
short, some blank lines too, as denoted by the ~
at the beginning of the line), as shown in Figure 3-1.
The bottom row of the window is the status line, which indicates what
file you’re editing: .tcshrc: unmodified:
line 1. Quit the program by typing
:q and pressing Return while in command mode.
Let’s take a tour through vi. In this example,
you’ll make a new file. You can call the file
anything you want, but it’s best to use only letters
and numbers in the filename. For instance, to make a file named
sample, enter the command vi sample. Let’s start our tour now.
Your screen should look something like Figure 3-1, but the cursor should be on the top line and the rest of the lines should have the
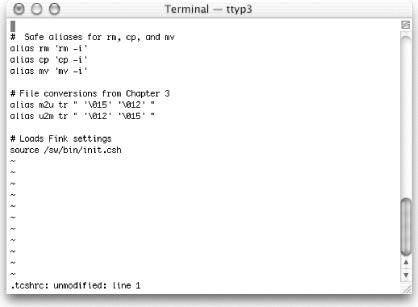
~blank line delimiter. Pressito move out of command mode and into insert mode, and you’re ready to enter text.Enter some lines of text. Make some lines too short (press Return before the line gets to the right margin). Make others too long; watch how vi wraps long lines. If you have another terminal window open with some text in it or an Aqua application, you can also use your mouse to copy text from another window and paste it into the vi window (always make sure you’re in insert mode before you do this, however, or you could irrevocably mess up your file). To get a lot of text quickly, paste the same text more than once.
Let’s practice moving around the file. To do this, we’ll need to leave insert mode by pressing ESC once. Press it again and you’ll hear a beep, reminding you that you are already in command mode. You can use your arrow keys to move around the file, but vi also lets you keep your fingers on the keyboard by using
hjklas the four motion keys (left, down, up, and right, respectively). Unless you have enabled Option click to position cursor (see Chapter 4), vi will ignore your mouse if you try to use it to move the cursor. If you’ve entered a lot of text, you can experiment with various movement commands:Hto jump to the first line on the screen,Gto jump to the bottom of the file. You should also try thewandbcommands, to move forward and backward by words. Also,0(zero) jumps to the beginning of the line, while$jumps to the end.vi’s search or “where is” command,
/pattern, can help you find a word quickly. It’s handy even on a short file, where it can be quicker to type/and a word than to use the cursor-moving commands. Thesearchcommand is also a good example of the way that vi can move your cursor to the status line so you can enter more information. Let’s try it by typing/. You should see a display like Figure 3-2.Notice that the cursor has jumped to the bottom of the display (which has changed since you started vi) and is sitting next to a
/. You can type a word or characters to search for, then press Return to do the search. After a search finishes, you can typento repeat the search.If your text isn’t in paragraphs separated by blank lines, break some of it into paragraphs. Put your cursor at the place you want to break the text and press
ito move back into insert mode, then Return twice (once to break the line, another to make a blank line).Now justify one paragraph. Put the cursor at the beginning of the paragraph and type
!}fmt. (vi’s status line won’t change until you press the}character.) Now the paragraph’s lines should flow and fit neatly between the margins.Text can be deleted by using
xto delete the character that’s under the cursor, or the powerfuldcommand:dddeletes lines,dwdeletes individual words,d$deletes to the end of the line,d0deletes to the beginning of the line, anddGdeletes to the end of the file (if you’re seeing a pattern and thinking that it’sd+motionspecifieryou’re absolutely correct). To undo the deletion, pressu. You can also paste the deleted text with thepcommand.The first step to copying text is to position your cursor. The
copycommand or “yank” works similar to the delete command. Theywcommand copies one word,yyyanks the line,y1a single character, andynwyanksnnumber words. Move the cursor to the line you want to copy and pressyy. After repositioning your cursor to where you’d like the text copied, presspto paste the text.As with any text editor, it’s a good idea to save your work from vi every 5 or 10 minutes. That way, if something goes wrong on the computer or network, you’ll be able to recover the edited buffer since the last time you saved it. When launching vi again, use the
-roption with afilenameto recover the edited buffer where the filename is the name of the file you were editing.Try writing out your work with
:wfollowed by Return. The bottom of the display will show the filename saved and the number of lines and characters in the file.This part confuses some vi beginners. If you want to save the file with the same name it had when you started, just press
:wand Return; that’s all! You can also choose a different filename: type:wfollowed by the new filename. Press Return and it’s saved.Make one or two more small edits. Then, exit with
:q. vi warns you that the file has not been saved. If you want to override the warning type:q!. You can also use a shortcut::wqwrites out your changes and quits vi.
That’s it. There’s a lot more you
can learn about vi, and there’s a considerably more
sophisticated version of vi called
vim
that you can download for your Mac
(http://www.vim.org/), if you
want something even more powerful. In Table 3-1,
you’ll find a handy listing of some of the most
common vi commands and their descriptions. O’Reilly
has two very helpful books if you want to become a power user:
Learning the vi Editor and vi Editor
Pocket Reference.
Table 3-1. Common vi editing commands