Once you launch Terminal, you can use the many facilities that Mac OS X provides. As a user, you have an account that gives you:
A place in the filesystem where you can store your files
A username that identifies you and lets you control access to your files
An environment you can customize
A file is the unit of storage in Mac OS X. A file can hold anything: text (a report you’re writing, a to-do list), a program, digitally encoded pictures or sound, and so on. All of those are just sequences of raw data until they’re interpreted by the right program.
Files are organized into directories (more commonly referred to as a folder on the Mac). A directory is actually a special kind of file where the system stores information about other files. You can think of a directory as a place, so that files are said to be contained in directories, and you work inside a directory.
A filesystem includes all the files and directories on a mounted volume, such as your system’s hard disk or your iDisk. This section introduces the Mac OS X filesystem. Later sections show how you can look in files and protect them. Chapter 3 has more information.
When you launch Terminal, you’re placed in a directory called your home directory . This directory, which can be opened in the Finder by clicking the Home icon, contains personal files, application preferences, and application data such as bookmarks. In your home directory, you can create your own files. As you’ll see, you can also create directories within your home directory. Like folders in a file cabinet, this is a good way to organize your files.
Your working directory (also called your current directory) is the directory in which you’re currently working. Every time you open a new Terminal window, your home directory is your working directory. When you change to another directory, the directory you move to becomes your working directory.
Unless you specify otherwise, all commands that you enter apply to
the files in your working directory. In the same way, when you create
files, they’re created in your working directory
unless you specify another directory. For instance, if you type the
command vi
report, the vi
editor is started, and a file named report is
created in your working directory. But if you type a command such as
vi
/Users/john/Documents/report, a
report file is created in a different
directory — without changing your working directory.
You’ll learn more about this when we cover pathnames
later in this chapter.
If you have more than one Terminal window open, each session has its own working directory. Changing the working directory in one session doesn’t affect other Terminal windows.
All directories on a Mac OS X system are
organized into a hierarchical structure that you can imagine as a
family tree. The parent directory of the tree (the directory that
contains all other directories) is known as the root
directory
and is written as a forward slash
(/). The root directory is what you see if you
open a new Finder window, click the Computer icon, and then open your
startup disk.
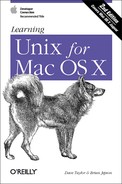
The root directory contains several other directories. Figure 2-1 shows a visual representation of the top of the Mac OS X filesystem tree: the root directory and some directories under the root. (To see how this appears in the Finder, see Figure 2-7.)
Applications, Library,
Users, and System are some
of the
subdirectories
(child directories) of the root directory. There are several other
directories that are invisible in the Finder but visible at the shell
prompt (you can see them if you use the command ls /). These subdirectories are standard Unix
directories and include
bin, dev,
etc, sbin,
tmp, usr, and
var; they contain Unix system files. For
instance, bin contains many Unix programs.
In our example, the parent directory of Users (one level above) is the root directory. Users has two subdirectories (one level below), john and carol. On a Mac OS X system, each directory has only one parent directory, but it may have one or more subdirectories.[2]
A subdirectory (such as carol) can have its own subdirectories (such as work and play).
To specify a file or directory location, write its pathname. A pathname is like the address of the directory or file in the filesystem. We will look at pathnames in the next section.
On a basic Mac OS X system, all files in the filesystem are stored on disks connected to your computer. Mac OS X has a way to access files on other computers: a networked filesystem . Networked filesystems make a remote computer’s files appear as if they’re part of your computer’s directory tree. For instance, when you mount your iDisk (Choose Go → iDisk in the Finder), Mac OS X mounts your iDisk on your desktop, and also makes it available as a directory under /Volumes. You can also mount shared directories from other Macintoshes or Windows machines (choose Go → Connect to Server in the Finder). These will also appear in the /Volumes directory, as will other disks, such as external FireWire drives.
As you saw earlier, the Unix
filesystem organizes its files and directories in an inverted tree
structure with the root directory at the top. An absolute
pathname tells you the path of directories through which
you must travel to get from the root to the directory or file you
want. In a pathname, put slashes (/) between the
directory names.
For example, /Users/john is an absolute pathname. It locates one (only one!) directory. Here’s how:
Tip
Be sure that you do not type spaces anywhere in the pathname. If there are spaces in one or more of the directories, you need to either quote the entire directory pathname, or preface each space with a backslash to ensure that the shell understands that the spaces are part of the pathname itself.
Figure 2-2 shows this structure.

In Figure 2-2, you’ll see that the directory john has a subdirectory named work. Its absolute pathname is /Users/john/work.
The root is always indicated by the slash (/) at
the start of the pathname. In other words, an absolute pathname
always starts with a slash.
You can also locate a file or directory with a relative pathname . A relative pathname gives the location relative to your working directory.
Unless you use an absolute pathname (starting with a slash), Unix assumes that you’re using a relative pathname. Like absolute pathnames, relative pathnames can go through more than one directory level by naming the directories along the path.
For example, if you’re currently in the Users directory (see Figure 2-2), the relative pathname to the carol directory below is simply carol. The relative pathname to the play directory below that is carol/play.
Notice that neither pathname in the previous paragraph starts with a slash. That’s what makes them relative pathnames! Relative pathnames start at the working directory, not the root directory. In other words, a relative pathname never starts with a slash.
Here’s a short but important question. The previous example explains the relative pathname carol/play. What do you think Unix would say about the pathname /carol/play? (Look again at Figure 2-2.)
Unix would say “No such file or directory.” Why? (Please think about that before you read more. It’s very important and it’s one of the most common beginner’s mistakes.) Here’s the answer. Because it starts with a slash, the pathname /carol/play is an absolute pathname that starts from the root. It says to look in the root directory for a subdirectory named carol. But there is no subdirectory named carol one level directly below the root, so the pathname is wrong. The only absolute pathname to the play directory is /Users/carol/play.
You can go up the tree with the shorthand
..
(dot dot) for the parent
directory. As you saw earlier, you can also go down the tree by using
subdirectory names. In either case (up or down), separate each level
by a / (slash).
Figure 2-3 shows part of Figure 2-1. If your working directory in the figure is
work, then there are two pathnames for the
play subdirectory of carol.
You already know how to write the absolute pathname,
/Users/carol/play. You can also go up one level
(with ..) to carol, then go
down the tree to play. Figure 2-3 illustrates this.

The relative pathname would be ../play. It would be wrong to give the relative address as carol/play. Using carol/play would say that carol is a subdirectory of your working directory instead of what it is in this case: the parent directory.
Absolute and relative pathnames are interchangeable. Unix programs simply follow whichever path you specify to wherever it leads. If you use an absolute pathname, the path starts from the root. If you use a relative pathname, the path starts from your current working directory. Choose whichever is easier at the moment.
Once you know the absolute or relative pathname of a directory where you’d like to work, you can move up and down the Mac OS X filesystem to reach it. The following sections explain some helpful commands for navigating through a directory tree.
To find which directory
you’re currently in, use pwd
(print working directory), which prints the absolute pathname of your
working directory. The pwd command takes no
arguments:
% pwd
/Users/john
%
You can change your working directory to
any directory (including another user’s directory,
if you have permission) with the cd (change
directory) command, which has the form:
cd pathnameThe argument is an absolute or a relative pathname (whichever is easier) for the directory you want to change to:
%cd /Users/carol%pwd/Users/carol %cd work%pwd/Users/carol/work %
Tip
The command cd, with no arguments, takes you to
your home directory from wherever you are in the filesystem.
Note that you can only change to another directory. You cannot
cd to a filename. If you try, your shell (in this
example, tcsh) gives you an error message:
% cd /etc/manpath.config
/etc/manpath.config:  Not a directory.
%
/etc/manpath.config is a file with information
about the configuration of the man command.
One neat trick worth mentioning is that you can always have Terminal enter the path directly by dragging a file or folder icon from the Finder onto the active Terminal window.
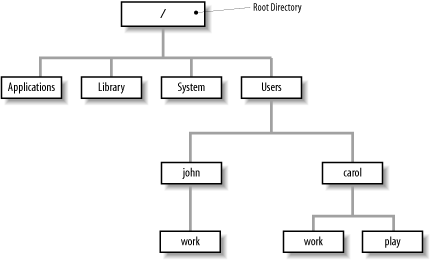
A directory can hold subdirectories. And, of course, a directory can hold files. Figure 2-4 is a close-up of the filesystem around john’s home directory. The four files are shown along with the work subdirectory.
Pathnames to files are made the same way as pathnames to directories.
As with directories, files’ pathnames can be
absolute (starting from the root directory) or relative (starting
from the working directory). For example, if your working directory
is Users, the relative pathname to the
work directory below would be
john/work. The relative pathname to the
ch1 file would be john/ch1.
Unix filesystems can hold things that aren’t directories or files, such as symbolic links (similar to aliases), devices (the /dev directory contains entries for devices attached to the system), and sockets (network communication channels). You may see some of them as you explore the filesystem. We don’t cover those advanced topics in this little book.
To
use the cd command, you must know which entries in
a directory are subdirectories and which are files. The
ls command lists entries in the directory tree and
can also show you which is which.
When you enter the ls command, you get a list of
the files and subdirectories contained in your working directory. The
syntax is:
ls option(s) directory-and-filename(s)If you’ve just moved into an empty directory,
entering ls without any arguments may seem to do
nothing. This isn’t surprising, because you
haven’t made any files in your working directory. If
you have no files, nothing is displayed; you’ll
simply get a new shell prompt:
% ls
%
But if you’re in your home directory,
ls displays the names of the files and directories
in that directory. The output depends on what’s in
your directory. The screen should look something like this:
% ls
Desktop    Documents    Library    Movies   Music    Pictures    Public
%
Sometimes ls might display filenames in a single
column. If yours does, you can make a multicolumn display with the
-C (uppercase
“C”) option or the
-x option. ls has a lot of
options that change the information and display format.
The -a option (for
all) is guaranteed to show you some more files, as in the following
example:
% ls -a
.            ..          .Trash    .tcsh_history
Desktop      Documents   Library   Movies
Music        Pictures    Public
%
When you use ls -a, you’ll always
see at least two entries with the names . (dot)
and .. (dot dot). As mentioned earlier,
.. is always the relative pathname to the parent
directory. A single . always stands for its
working directory; this is useful with commands such as
cp (see Section 3.4.2).
There may also be other files, such as .tcshrc
or .Trash. Any entry whose name begins with a
dot is hidden — it’s listed only if you use
ls -a.
To get more information about each item
that ls lists, add the -l
option. (That’s a lowercase
“L” for
“long.”) This option can be used
alone, or in combination with -a, as shown in
Figure 2-5. Because .tcshrc
and .Trash are hidden files, only
ch1 and ch2 would appear if
you viewed this directory in the Finder.

The long format provides the following information about each item:
- Total n
n is the amount of storage used by everything in this directory. (This is measured in blocks.) On Mac OS X, blocks are 1,024 bytes in size.
- Type
Tells whether the item is a directory (
d) or a plain file (-). (There are other less common types that we don’t explain here.)- Access modes
Specifies three types of users (yourself, your group, all others) who are allowed to read (
r), write (w), or execute (x) your files or directories. We’ll talk more about access modes later.- Links
The number of files or directories linked to this one. (This isn’t the same as a web page link. We don’t discuss filesystem links in this little book.)
- Owner
The user who created or owns this file or directory.
- Group
The group that owns the file or directory.
- Size (in bytes)
The size of the file or directory. (A directory is actually a special type of file. Here, the “size” of a directory is of the directory file itself, not the total of all the files in that directory.)
- Modification date
The date when the file was last modified, or when the directory contents last changed (when something in the directory was added, renamed, or removed). If an entry was modified more than six months ago,
lsshows the year instead of the time.- Name
The name of the file or directory.
Notice especially the columns that list the owner and group of the files, and the access modes (also called permissions). The person who creates a file is its owner; if you’ve created any files, this column should show your username. You also belong to a group. Files you create are marked either with the name of your group or, in some cases, the group that owns the directory.
The permissions show who can read, write, or execute the file or
directory. The permissions have 10 characters. The first character
shows the file type (d for directory or
- for a plain file). The other characters come in
groups of three. The first group, characters 2-4, shows the
permissions for the file’s owner, which is you if
you created the file. The second group, characters 5-7, shows
permissions for other members of the file’s group.
The third group, characters 8-10, shows permissions for all other
users.
For example, the permissions for .tcshrc in
Figure 2-5 are -rw-r--r--. The
first hyphen, -, indicates that
it’s a plain file. The next three characters,
rw-, mean that the owner,
john, has both read (r) and
write (w) permissions. The next two sets of
permissions are both r--, which means that other
users who belong to the file’s group
staff, as well as all other users of the system,
can only read the file; they don’t have write
permission, so they can’t change
what’s in the file. No one has execute
(x) permission, which should be used only for
executable files (programs) and directories.
In the case of directories, x means the permission
to access the directory — for example, to run a command that
reads a file there or to use a subdirectory. Notice that the first
directory shown in Figure 2-5 is executable
(accessible) by john, by users in the
staff group, and by everyone else on the system.
A directory with write (w) permission allows
deleting, renaming, or adding files within the directory. Read
(r) permission allows listing the directory with
ls.
You can use the chmod command to change the
permissions of your files and directories. (See Section 2.2 later in this chapter.)
If you need to know only which files
are directories and which are executable files, you can use the
-F option with ls. If you give
the pathname to a directory, ls lists the
directory but does not change your working
directory. The pwd command here shows this:
%ls -F /Users/andycalendar goals ideas/ ch2 guide/ testpgm* %pwd/Applications %
ls
-F puts a
/ (slash) at the end of each directory name. (The
directory name doesn’t really have a slash in it;
that’s just the shorthand ls
-F uses to identify a directory.) In our example,
guide and ideas are
directories. You can verify this by using ls
-l and noting the d in the
first field of the output. Files with an execute status
(x), such as programs, are marked with an
* (asterisk). The file
testpgm is an executable file. Files that
aren’t marked are not executable.
ls
-R (recursive) lists a directory and all its
subdirectories. This can make a very long list — especially when
you list a directory near the root! (Piping the output of
ls to a pager program solves this problem.
There’s an example in Section 6.2.3.) You can combine other options with
-R; for instance, ls
-RF marks each directory and file type, while
recursively listing files and directories.
You can find the size of a file
with the du command:
% du Documents/Outline.doc
300     Documents/Outline.doc
The size is reported in kilobytes, so
Outline.doc is 300k in size. If you give
du the name of a directory, it will calculate the
sizes of everything in it:
% du Library
0   Library/Application Support/AddressBook/Images/CachedMacDotComPhotos
4   Library/Application Support/AddressBook/Images
228 Library/Application Support/AddressBook
...
If you want the total for the directory, use -s
(summarize):
% du -s Library
164892  Library
If you’d like separate totals for all directories and files, including hidden ones, use a wildcard pattern that ignores the . (current) and .. (parent) directories (see Section 2.1.5.2, earlier in this chapter):
% du -s * .[^.]*
0       Applications
1048    Desktop
18964   Documents
164892  Library
...
12700   .Trash
4       .tcshrc
You
can also calculate your system’s free disk space
with df -h (the -h produces
more user-friendly output):
% df -h
Filesystem            Size  Used Avail Use% Mounted on
/dev/disk1s9           18G   15G  3.9G  79% /
devfs                 1.0k  1.0k     0 100% /dev
fdesc                 1.0k  1.0k     0 100% /dev
<volfs>               512k  512k     0 100% /.vol
/dev/disk1s10         449M  406M   43M  91% /Volumes/Mac OS 9
The first column (Filesystem) shows the Unix device name for the volume. The second column (Size) shows the total disk size, and it’s followed by the amount of disk space used up (Used) and the amount that’s available (Avail). After that, the Use% column shows the percentage of disk space used, followed by where the volume is mounted (Mounted on).
/ is the root of your filesystem (a volume that is named Macintosh HD by default). /dev contains files that correspond to hardware devices, and /.vol exposes some internals of the Mac OS X filesystem called HFS+ file ids. The last entry is a volume called Mac OS 9.
Most Unix shells can complete a partly typed file or directory name for you. Different shells have different methods. If you’re using the default shell in Mac OS X, tcsh, just type the first few letters of the name, then press Tab. If the shell can find just one way to finish the name, it will; your cursor will move to the end of the new name, where you can type more or press Return to run the command. (You can also edit or erase the completed name.)
What happens if more than one file or directory name matches what
you’ve typed so far? The shell will beep at you to
tell you that it couldn’t find a match. To get a
list of all possible completions, try pressing
Control-D and you may see a list of all
names starting with the characters you’ve typed so
far (you won’t see anything if there are no
matches). Here’s an example from the
tcsh shell:
% ma<Control-D>
mach_init        mailstat         make_smbcodepage makemap
machine          mailstats        make_unicodemap  malloc_history
mail             make             makedbm          man
mailq            make_printerdef  makeinfo         manpath
% ma
At this point, you could type another character or two — an
i, for example — and then press Control-D once
more to list only the mail-related commands.
You’re now equipped to explore the filesystem with
cd, ls, and
pwd. Take a tour of the directory system, hopping
one or many levels at a time, with a mixture of cd
and pwd commands.
|
Task |
Command |
|---|---|
|
Go to your home directory. |
|
|
Find your working directory. |
|
|
Change to new working directory with its absolute pathname. |
|
|
List files in new working directory. |
|
|
Change directory to root and list it in one step. (Use the command separator: a semicolon.) |
|
|
Find your working directory. |
|
|
Change to a subdirectory; use its relative pathname. |
|
|
Find your working directory. |
|
|
Change to a subdirectory. |
|
|
Find your working directory. |
|
|
Give a wrong pathname. |
|
|
List files in another directory. |
|
|
Find your working directory (notice that ls didn’t change it). |
|
|
Return to your home directory. |
|
By now, you’re probably tired of looking at files from the outside. It’s akin to visiting a bookstore and looking at the covers, but never getting to read a word. Let’s look at a program for reading text files.
If you want to “read” a long plain
text file on the screen, you can use the less
command to display one “page” (a
Terminal window filled from top to bottom) of text at a time.
If you don’t like less, you can
try a very similar program named more. In fact,
the name less is a play on the name of
more, which came first (but
less has more features than
more). The syntax for less is:
less option(s) file(s)
less lets you move forward or backward in the
files by any number of pages or lines; you can also move back and
forth between two or more files specified on the command line. When
you invoke less, the first
“page” of the file appears. A
prompt appears at the bottom of the Terminal window, as in the
following example:
% less ch03
A file is the unit of storage in Unix, as in most other systems.
A file can hold anything: text (a report you're writing,
 .
 .
 .
:
The basic less prompt is a colon
(:); although, for the first screenful,
less displays the file’s name as
a prompt. The cursor sits to the right of this prompt as a signal for
you to enter a less command to tell
less what to do. To quit, type
q.
Like almost everything about less, the prompt can
be customized. For example, using the -M starting
flag on the less command line makes the prompt
show the filename and your position in the file (as a percentage).
Tip
If you want this to happen every time you use
less, you can set the LESS
environment variable to M (without a dash) in your
shell setup file. See Section 4.2.
You can set or unset most options temporarily from the
less prompt. For instance, if you have the short
less prompt (a colon), you can enter
-M while less is running.
less responds “Long prompt (press
Return),” and for the rest of the session,
less prompts with the filename, line number, and
percentage of the file viewed.
To display
the less commands and options available on your
system, press h (for
“help”) while
less is running. Table 2-1
lists some simple (but still quite useful) commands.
Table 2-1. Useful less commands
|
Command |
Description |
Command |
Description | |
|---|---|---|---|---|
|
SPACE |
Display next page |
|
Starts the vi editor | |
|
Return |
Display next line |
Control-L |
Redisplay current page | |
|
|
Move forward n lines |
|
Help | |
|
|
Move backward one page |
|
Go to next file on command line | |
|
|
Move backward n lines |
|
Go back to previous file on command line | |
|
|
Search forward for word | |||
|
|
Search backward for word |
|