Chapter 5. Sorting and Filtering
WHEN YOUR ACCESS DATABASE contains just a small number of records, it’s a breeze to go in, look up information, and find what you need. Once that database swells to a few hundred or a few thousand records, you’ve got a different situation on your hands. For instance, you may need to put the records in order so you can scan them more easily, or quickly locate everyone who lives in Chicago and whose account balance is more than 30 days past due.
In this chapter, you’ll see how you can use tools like sorting and filtering to view your records and the information they contain. You’ll also learn how to use sorting when you want to put all your records in order, like alphabetical order, and use filtering, alone or in combination with sorting, to pull out only the records that meet a particular condition.
Sorting Database Records
In the days before computers, the word sorting implied drudgery like putting a huge pile of index cards in alphabetical order. Access can do such tasks much faster than you can by hand (and without spilling coffee on a single card), so you can save your organization skills for planning your database.
Before you do anything more than enter the first few records into the database, Access performs an automatic sort based on the primary key field. Look at any of the databases you’ve worked with so far, and you’ll see that the records are automatically sorted so they’re in ascending order based on whatever number or other information is in the designated primary key field (like an account number, for example).
Yet at any time you choose, like when you’re going in to look for specific records, you can re-sort your records using a field that’s different from the primary key, or even using multiple fields. In other words, you can sort your database by last name instead of by account number, or sort by city and by last name within each city.
Beyond choosing one or more different fields on which to sort, you can choose between two basic ways your sort can run. An ascending sort lists results lowest to highest, oldest to newest, beginning of alphabet to end, and so on. Access’s automatic primary key field sort is ascending. A descending sort starts with the last number or letter and works backward.
To work through the sorting exercises in this chapter, download its folder from the “Missing CD” page (Example Databases). Open the OurClub database, and then open the Members table.
Ascending Sorts
Sorts performed in an ascending order are the most common. Typically, you see these sorts when you’re listing names alphabetically, dates chronologically, or account numbers sequentially. The most basic example of ascending sorts is when you want to display customer or employee last names starting with A and working forward to the Xs, Ys, and Zs, or you want to list a group’s members from youngest to oldest.
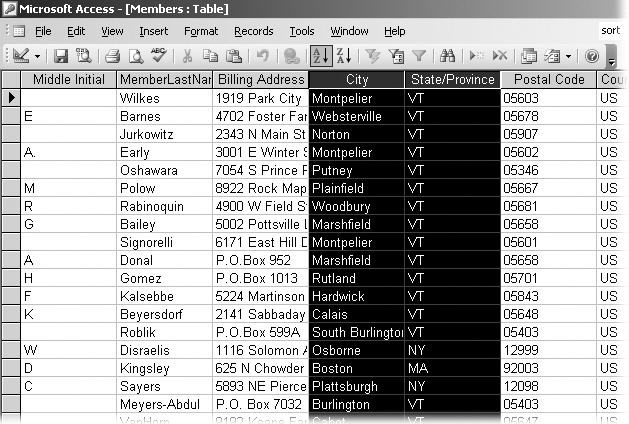
Say you’ve got the job of putting together a database for a club where you’ve started entering records. The result may look a lot like what you see in the Members table you’ve got open. You get a call from somebody in the club asking if there are any members in Colchester, Vermont. Since you aren’t sure of the answer, it’s time to look at your database. While your records are already sorted in Datasheet view by the primary key, the members’ city of residence isn’t your primary key.
You’ll select the City field and do an ascending sort, since Colchester starts with a letter near the beginning of the alphabet. To do so, right-click the column labeled City. From the shortcut menu (Figure 5-1), choose Sort Ascending. Next, you can scroll down to look for any entries in Colchester, and then look in the State column to be sure the Colchester listed is indeed in Vermont (VT).

With your sort complete, you can tell your caller that, sure enough, you’ve got someone in Colchester, and then you can provide any desired details. Later in this chapter, as you begin to apply filters to your database records, you’ll discover a way to narrow your search so that you see only the Colchester records. (Or specifically Colchester, Vermont, so you don’t accidentally cause a very expensive long-distance phone call to the oldest town in Great Britain.)
Descending Sorts
Descending sorts work almost identically to ascending ones, except the results are reversed. Suppose you’ve entered about 20 records, but now you’re wondering whether you’ve already entered a certain name. The member’s name, you remember, is Kit VanHorn. In this case, you want to re-sort your records based on last name, and since the last name falls near the end of the alphabet, a descending sort is the fastest way to check.
To do so, perform the same steps you did for ascending sorts, with a slight twist: In the Members table, right-click the MembersLastName column, and then click Sort Descending. (Again, you’re free to click the Sort Descending toolbar button, or choose Records → Sort Descending.) Now scan down from the first record (for Wilkes) and you see that, yes, somebody did already enter the record for Ms. VanHorn.
Sorting on Multiple Fields
Since you’ve already sorted based on a single field, remember you’re not limited to a one-field sort (unless you’re using Form view, as previously mentioned). For example, when you sort your database by city, as in the Colchester example, there’s always the chance that you’ll have members located in cities of the same name in two or more different states. So you may want to sort by both the City and State fields to be sure all entries for Colchester, Vermont, are grouped together. When you scan your list, you can easily make sure you’ve got the right Colchester.
A sort by City and State fields is a common example for more reasons than that one. Access is a bit fussy about multiple field sorts. When you click to select columns for sorting, the program wants the two fields to be adjacent to each other. Fortunately, the OurClub database, like most of its kind, has the City and State fields side-by-side.
To do this two-field sort, start by clicking the City column. Next, press the Shift key while simultaneously clicking the State/Province column. On the toolbar, with both columns highlighted, click Sort Ascending. As it turns out, there’s just one Colchester listed, and it’s indeed in Vermont (Figure 5-2).
Tip
When you sort on multiple fields as described in this section, Access sorts all the values in the fields in the same order, either ascending or descending. If you need to mix it up and sort by ascending for one field but by descending for another, that’s a job for Advanced Filter/Sort (Using Advanced Filter/Sort).
Moving fields for multiple choice sorts
You’re not limited to sorting on just two fields; you can pick three or four if the situation (or a gigantic database) demands it. In fact, you’re not even limited to fields located in adjacent columns. In this section, you’ll learn how to do a switcheroo, moving columns around—albeit temporarily.
The trick is to move the fields you want to sort so that they do sit side-by-side, and then sort. Don’t worry—you haven’t changed anything permanently. When you go to close the table or the entire database, Access asks if you want to save the change you made to the field order (see Figure 5-3). All you have to do is click No, and Access saves the table and its fields using the original order, discarding your temporary swap, along with your sort, in the virtual bit stream.

To get a feel for how to rearrange your fields, look at the Members table in the OurClub database. Assume you want to group your records by the City field as well as by Area Code and Phone Number, since you want to call your fellow club members in Montpelier to let them know of an emergency meeting. While the Area Code and Phone Number are right next to one another in the table, the City field isn’t adjacent. Here’s how to temporarily shift the City field so it sits next to the other two:
At the top of the City column, click and hold the mouse button on the field selector.
Keep holding all the way through the next step.
Drag the column across to just before the Area Code field column. Release the mouse button.
The column drops into place—automagically! Now that all three desired fields are side-by-side, you want to arrange them in the order by which you want Access to sort.
Click the City column, and then press Shift while you click the Area Code and Phone Number fields.
If you did it right, all three columns together are highlighted.
From the toolbar, click Sort Ascending.
You can also choose Records → Sort Ascending, or right-click any one of the highlighted columns, and then choose Sort Ascending from the shortcut menu.
Access sorts the records first by city, then by area code within each city, and finally by phone number, nice and neat, as shown in Figure 5-4.
Now you can look for those records listed for Montpelier, and you’ve got the phone numbers right there to begin dialing.

Saving Your Sorting Choice
Don’t close that OurClub database! At least, don’t do so before you understand how Access automatically saves your work. Otherwise, you may make your changes permanent when you don’t want them to be.
Now, Access is kind. As you start to close the table or database, Access asks you if you want to save the changes you’ve made to layout or design. You saw this kindness in action back in Figure 5-3. Normally, when you perform a sort (or apply the filters you’ll work with in the next section), you won’t want those changes to stick around. So click No when Access asks. If you do want to preserve the arrangement, simply click Yes instead.
To be doubly sure to return everything in the database to its original order after a sort or filter, choose Records → Remove Filter/Sort (Figure 5-5), or right-click the datasheet, and then, from the shortcut menu, select Remove Filter/Sort. You can use this command any time before you close a table or perform any other work.

Finding Data with Filters
Filters are nothing unique to databases. For example, sunglass lenses selectively filter out UV rays while letting in enough light for your eyes to see. In a better analogy, your brain is constantly filtering out irrelevant details so you can focus on the more important things.
Filters in a database do the same critical job: They let you sweep aside (or temporarily hide) everything that isn’t exactly what you’re looking for at that particular moment. Like sorting, you use filters to look up information quickly, typically without keeping those filters in place any longer than it takes to find what you need.
When you sort as described in the previous section, you can still see all records; you’ve just grouped them by field so you can look through them in a more organized fashion. The larger your database becomes, the more often you’ll use filters so you can focus on key records while ignoring the hundreds or thousands of irrelevant ones. As well as reducing potentially distracting onscreen information, filters become almost mandatory when you’re seeking all records that match a particular condition (like “all customers in Michigan” or “all new accounts generated in the last 30 days”), you’re working with a database of more than 50 records, or you just need an answer fast.
Furthermore, you can use sorting and filtering in any combination. For example, after you filter for all Michigan customers, you can immediately use the steps in Sorting Database Records to sort those Michigan records by city, Zip code, last name, or whatever. If you’ve already sorted records by state, say, and then realize you want to print a list of only the Michigan customers, you can filter by state right then and there: Access hides all but the Michigan records. You can go on to sort those records by last name, and then filter by email address . . . you get the idea.
Access offers a number of ways to filter. Here they are in ascending order of speed and complexity:
The Filter for shortcut menu option lets you quickly create a filter when you right-click that field (as shown in Figure 5-6).
In Filter by Selection and Filter Excluding Selection, you highlight a particular bit of text or a field in your database (like a city name or a last name), and then create a filter based on whatever you’ve chosen. Filter by Selection looks for other records that match that text or field, while Filter Excluding Selection looks for all records that do not contain the chosen text or field.
Filter by Form lets you set a filter by typing the text or values you want to search by.
Use Advanced Filter/Sort when you want to do a more sophisticated search through your records, where you can filter on multiple fields at once or set up a specific sort order.
Note
Besides combining filters with sorting, you can use them as part of the query process that you’ll learn in the next chapter. Basically, filters and queries often do very similar jobs. They both look up records based on criteria you set. Among other differences, though, Access automatically saves queries (as part of the Table view) when you save your database.
Because filters are pretty simple and straightforward to use and are usually pretty fast to perform, you can use them any time you’re looking for results that target only specific files. (If you’re working with an underpowered computer or a humongous database, you may find filtering goes as slow as molasses. See the box in Power Users’ Clinic: When Bad PCs Happen to Good People for advice.)

How to save or discard a filter
Access makes it a cinch to discard a filter or reapply it at any time you choose. The button you use to do this is actually a toggle switch: Click once and you remove, click again and you reapply the same filter again.
Whether you do a quick filter-on-the-fly, as you saw in Figure 5-6, or you use one of the more involved methods described in the next section, the way to remove—or rerun—a filter is exactly the same:
On the Access toolbar, click the Remove Filter button (Figure 5-7) once to remove the applied filter.
You see your entire record set again. Click a second time to reapply the same filter.

It’s almost as easy to save a filter to either your Datasheet or Form view so Access will keep track of the filter for your next session. You can save filters of all the types listed in Finding Data with Filters. Normally, Access assumes you want to save the filter unless you tell it otherwise. But if you want to be sure, there’s an extra step you can take: Some people prefer to save the filter on the spot because then they don’t have to worry about paying attention to the “Do you want to save...” dialog box when they close the file. (Everyone is guilty of occasionally pressing the Return key without bothering to read this warning.)
To save a filter, do any of the following:
Filtering by Selection: The Quick Way to Filter
After the “Filter for” method described in Finding Data with Filters, Filtering by Selection is the fastest and most common filter, where you’re looking for all records that contain the text or value you want to find. To work through the following examples, have the OurClub database open to the Members table.
Adding a filter by selection
Using your fictional membership database, assume you want to limit your view of records to only those that contain the Vermont area code of 802. This filter will eliminate from your immediate view any members who are located out of state (Vermont is small and has a single area code).
On the first listed record, right-click the Area Code field, and then, from the shortcut menu, choose Filter by Selection.
Alternatively, on Access’s toolbar (the one with the little lightning bolt to its right), you can click the Filter by Selection icon.
You’ve just applied a filter based on the exact contacts of the area code field you clicked—802, in this example. All out-of-state records go away, so you see only those records with the 802 area code. You’re not just limited to matching an entire field, though. You can filter just by a letter (or number) or two rather than the entire entry.
Say you want to look up all records where the member’s last name starts with the first two letters “Ba,” since you’re not sure of the exact spelling of a name.
On the toolbar, click the Remove Filter button.
You’re doing a completely different filter this time, so you need to get all your records back first.
In the MemberLastName column, locate the first field listed there that begins with “Ba.” Highlight just those two letters, and then click the Filter by Selection toolbar button.
Simple as that. Figure 5-8 shows the results for all records where the last name starts with the letters “Ba.”
Figure 5-8. You can also highlight characters other than the first or first few in an entry. For example, if you know you’re looking for a member whose last name ends in “dorf,” locate a record with “dorf” anywhere in the name. Next, highlight those four letters, and then click Filter by Selection from the toolbar (circled).Tip
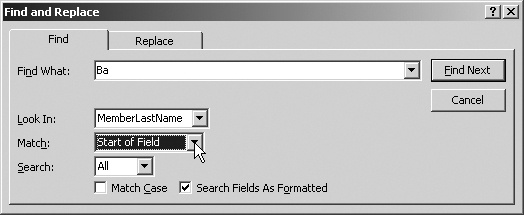
Don’t scan laboriously down a long list of records when you’re trying to find just part of a name. Instead, point to the field you want to use, like MemberLastName in this case, and then choose Edit → Find. Next, from the Find window, as shown in Figure 5-9, type in the characters you want to locate. Click Find Next to locate the first occurrence of your match in the listing.

Filtering by exclusion
Filter by Exclusion is sort of the mirror opposite of what you just did with Filtering by Selection. Here, you’re excluding specifically all records that contain whatever text or value you select as the filter—for example, when you want to automatically filter out any records in the 05658 Zip code.
To try Filter by Exclusion in the Members table in the OurClub database, do the following:
Choose Edit → Find.
A small Find box appears.
Type 05658, and then click Find Next.
Access takes you to the first record where this text appears.
Right-click the field, and then select Filter by Exclusion (or, on the Access toolbar, click the icon of the same name).
You now see a display of records where the sole Zip code you excluded is nowhere to be found.
Using these same steps, you can select just some of the characters in the field as a point of exclusion rather than the entire field entry.
Filtering by Form
Performing a Filter by Form is just as simple as the others you’ve seen. And although the title has “form” in it, you can apply this filter in Datasheet view as well as Form view. The difference with this approach is that you open up a form that reflects the field IDs you’ve already established in your database. In it you can type conditions to match from one or more of those fields. This approach may be a more comfortable fit because it shows you the field IDs and lets you choose which one to filter by.
Adding filter criteria
To gain some experience using this type of filter in the OurClub database, open the Members table. Remember, you can work from Datasheet view, and this method works even if you haven’t designed a form yet for data entry.
In this tutorial, you’ll filter your records by which members are not currently serving on any of your organization’s committees. Glance at the Members Table, and you see that the Committee Member field has just two types of responses listed: Y for yes and N for no. You want to look for the Ns so you can tap someone who currently isn’t part of any committee to get more involved.
In the Members table, from the Access toolbar, click Filter by Form. (Or right-click the table, and then choose Filter by Form.)
A form showing your field IDs appears. Click inside the Committee Member field.
At the right of the field, a drop-down arrow appears. Click it, and then choose N (for no). Next, on the toolbar, click Apply Filter (Figure 5-10).
Access shows you the results for just those members without any committee assignment listed.
Figure 5-10. In the Filter by Form window, when you click in a field, you can choose from a drop-down menu of entries from all records. Filter by Form is a great choice when a field only has a few possible entries, like the one shown here. For fields like City that could have hundreds of different entries, Filter by Selection or Filter by Input are better options.

Filtering with Wildcards, Operators, and Expressions
So far, you’ve applied filters using specific entries like a full Zip code. But you’re not always going to have that luxury. At times, you’ll need to narrow—or expand—your search results to capture those records that match just part of an entry, like the first few numbers of a Zip code, the first letters of a name, or the last word in a product name. Other times, you may want to find records that meet two or more criteria you set based on two or more fields in your database.
Access lets you use tools like wildcards (characters that stand in for text or other values) and operators (special words for combining search terms, like AND and OR). Access also understands expressions, where you use mathematical equations to look for either exact matches (like all members who joined on 1/1/2000) or comparisons (all members who joined on or after 1/1/2000 or whose membership type meets one condition or another).
All these examples show more complex types of filters and can be used with either the Filter by Form or Advanced Filter/Sort methods. They often aren’t a good match for simpler searches using other types like Filter by Selection or Filter by Input.
Tip
The use of wildcards, operators, and expressions can get pretty sophisticated and complex. In fact, the more you come to know about them, the more power you’ll have in trying to find the exact records you want the first time, without having to go through a lot of chaff. While you’ve got the basics here, consider picking up a copy of Access 2003 Personal Trainer by CustomGuide (O’Reilly).
Using wildcards in filters
Wildcards give you both power and flexibility in performing searches and filters because you don’t have to enter the full text or value. Instead, you can use a wildcard (like “*”) to replace any letters that may be different. For example, you know that all the records you want to see have a Zip code that begins with the numbers 056. If you apply the filter 056*, the asterisk wildcard tells Access to look for every occurrence where the first three numbers of the Zip code match but the rest don’t.
The most useful wildcards are:
An asterisk (*) can substitute for any character or characters, as in the Zip code example above.
A question mark (?) steps in for a single character only. Say you’re looking for all records where the last name is Greenburg—or is it Greenberg? You would apply the filter like this: Greenb?rg.
A pound sign (#) pinch-hits strictly for numerical characters, one-for-one. So if you want to search for all records where you have a four-digit street number in the Address field, use #### as the filter.
A hyphen (-) acts as a range wildcard, and you can use it in combination with other ones. Say you want to look for all members with a last name between letters l and p. The filter would look like this: [l-p]*.
Using operators in filters
AND and OR are examples of operators, known in math circles as logical operators, because that’s how they analyze the records you apply them to. In a filter, AND tells Access to look for records that meet both conditions on either side of it. For example, you can use AND to filter all members located in Vermont who also serve on a committee. With OR, you tell Access to look for records that meet either the first condition or second condition, but not both. For example you’d use OR to filter members residing in either Marshfield or Calais, Vermont.
Access also recognizes the following operators:
> and < find records either greater than or less than a value; for example, greater than 10 or before M in the alphabet.
= finds records equal to a value.
BETWEEN finds records between two values; for instance, between 1/1/2005 and 6/30/2005.
LIKE finds matches according to a pattern (like the 056* example on the previous page), with the help of wildcards.
Using expressions in filters
Expression is a technical term that simply refers to something you’ve been using throughout this chapter: It’s whatever term you’re looking for, like some text or a value. When you filter by a specific Zip code like “05681,” the Zip code is the expression. Likewise, if you’re looking for the name “Gomez,” that name is the expression for the filter.
This expression then becomes the thing Access looks to match records against. That expression can be:
Exact (like the name Gomez)
Nearly exact, as when you replace some text or values with a wildcard (the 056* rather than 05681, for example)
Comparative, where you’re looking for records that meet or exceed a specific requirement like “all members who joined on or after January 1, 2000”
Note
Chapter 6, where you dive into queries into your database, goes into more detail about constructing expressions and setting conditions for your filters.
Applying and removing filters
Now that you’ve got some theory under your belt, it’s time to put a filter to work in a database. Returning to the OurClub database, perhaps you have a situation where you want to find all members named Gomez, as mentioned before. But from practical experience, you know that some people spell their name “Gomes.”
To see it in action, apply a filter to the Members table with a wildcard that catches both Gomez and Gomes:
In the Access toolbar, click Filter by Form.
Access opens an empty form, ready for you to type filter criteria.
Click in the MemberLastName field and type Gome* (Gome? would also work), and then press Return.
You’ve just typed an expression. As you can see in Figure 5-11, Access adds an operator (LIKE) to the MemberLastName field, because you’ve set a wildcard to get all matches close to (that is, like) this name.
Click Apply Filter to see all the records that are like the expression you typed.
If you typed the expression correctly, you’ll see records with the name spelled both ways. Click Remove Filter when you’re ready to read on.

Next, try something that builds on your success. This time, you’ll locate someone with a name like Gomez who also lives in Vermont (some members live in Massachusetts and New York as well, but you’re not looking for those).
Follow the steps on the previous page, with the following adjustments:
After clearing the previous filter, click Filter by Form.
In the MemberLastName field, type Gome* or Gome?, and then press Return.
In the State/Province field, type VT (or click the drop-down arrow and choose VT).
Then apply the filter.
Access uses the LIKE operator to look for records where the last name starts with “Gome,” and the AND operator to filter only those who live in the state of Vermont. In the next section, you’ll dive in a bit deeper as you go through what’s involved with an Advanced Filter/Sort.
Using Advanced Filter/Sort
The Advanced Filter/Sort is your filter of choice when you need to do more than rather simple searching. This type gives you the tools required to set multiple conditions on multiple fields for what the filter searches through in your database. You’ve already gotten a little taste of this filtering method in the previous section, but you’re about to get a heaping, yet still digestible, helping.
The Advanced Filter/Sort feature does one thing differently from the filters you’ve seen so far: It lets you both sort individual fields and select search criteria—all from the same window. No extra steps required. Instead, you see a targeted filter window in which you specify your requirements.
Note
You can apply this type of filter in either Datasheet or Form view. It’s also fairly flexible; you can apply it to tables, queries, or forms.
Adding filter criteria
Turning once more to the OurClub database, you’ll give this tougher filter a trial run. Again, you’ll use the Members table, but here you’re going to filter based on three different fields: You want to see member records for all those who reside in Montpelier, Vermont, who aren’t already on club committees.
To do this:
Choose Records → Filter → Advanced Filter/Sort.
The filter design window appears. In the upper-left area of the window, you see a list of your table’s fields.
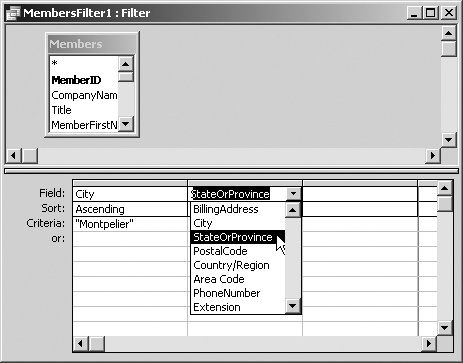
Point to City and drag it down into the first Field box in the QBE (Query by Example) Grid at the bottom of the window.
Figure 5-12 shows the drill.
On the QBE grid, click the Sort field, and then select Sort Ascending.
You’ve just told Access to display its result in alphabetical order (A–Z).
In the Criteria box, type Montpelier.
You’ve just set one criteria. You want Access to show you only records whose city is Montpelier.
Return to the field list at the top left of the window, select StateOrProvince, and then drag this down into the next available Field window so it sits side-by-side with “Montpelier.” In the Criteria box, type VT.
Adding the StateOrProvince field makes the query more specific. You’re only interested in members from Montpelier, Vermont.
Go once more to the field list and drag Committee Member into the next open Field box. In the Criteria box, type N (for “no”).
“No” means you’re looking for folks not serving on committees. Your finished filter grid should look like that in Figure 5-13.

Now it’s time to apply the filter and do the sort. Because your database is so small, you’ll get results instantaneously.
Applying and removing Filter/Sort
With your Advanced Filter/Sort criteria all set up, go ahead and apply the filter and its associated sort: In the toolbar, click Apply Filter. After you’ve done that, you’ll see your results, which show just a single member in Montpelier who doesn’t serve on a committee. When you’re done and ready to remove the filter, click the Remove Filter toolbar icon.