
Chapter 6. Finding Data with Queries
IF ALL YOU NEED TO DO is keep track of a bit of information and go back and look at those details again later, you don’t need a database. A plain old spreadsheet program like Microsoft Excel, which lets you set up lists that work much like a simple database, can do most of the sorting and filtering tricks you learned in the previous chapter.
But you’re not in Excel anymore. In Access, you can sift and scrutinize your information with much more power and flexibility. The key is queries—a database feature that uses a question-and-answer model to let you be very specific about what information you want to see and how you want to see it. Queries also let you make very selective changes to that information without having to change records individually.
For example, through careful crafting of queries, you can:
Include or exclude specific rows and/or columns from a table.
Combine tables (for example, if two tables in your database happen to contain all the essential ingredients you need, you can force the query to act like there’s just one table that combines the information contained in both tables).
Use the same table more than once in the same query.
Sort rows.
Collapse groups of rows to temporarily hide the contents of those rows from view.
Remember the club membership database you worked with in Chapter 5? In the Members table, you had one field that listed each person’s membership expiration date. One thing you can do with a query, for example, is to look for all members whose registration expires next month (based on the date entered in that specific field) and come up with a printed reminder for them that it’s time to renew their membership by sending in that check. That’s a relatively easy query, and it takes a lot of the work off clerical staff (paid or volunteer) that would normally have to go digging through individual records to pull together a list. (You’ll learn exactly how to do this query later in this chapter.)
Types of Queries
Access gives you the ability to run—that, is perform—a broad range of different query types. Choosing the right query can make all the difference in getting useful results, including the ability to check for and remove pesky duplicate records, update records automatically, or do something far more advanced, like calculate numbers or other values stored in your fields so you can get totals and subtotals, figure percentages, and more.
Select Query
The most commonly used type of query is called a Select query. It’s also the type most similar to the filters you worked with in Chapter 5. A Select query gives you a fair amount of flexibility and capability, including ways to:
Choose which fields you want to display and which you want to hide.
Create new calculated fields (like when you want to total up all your accounts that are overdue in payment).
Run a query that involves more than one table in your database.
Summarize and group your data.
When you go through the Query Wizard in the next section, you’ll get some hands-on experience developing and running a Select query a few different ways.
Crosstab Query
Presentation of data can play a huge role in how well people can understand what they’re seeing. A Crosstab query offers an extremely effective way to do that by putting your record information into a totally different format from the standard look of Access records like you see in Table view. By pooling together important fields and displaying them in the rows-and-columns standard of a spreadsheet, you eliminate all the interposing, irrelevant fields so you can better assess and understand what the information means. This is true with sales figures, financial account information, and much more.
Parameter Query
You’ve no doubt heard the word parameter many times before. With queries, parameters serve as a placeholder of sorts of actual values. Using parameters, you can set up an extremely flexible query where you’ve got all the detail work established in advance, and then, using a parameter, substitute in different values all the time so you can look at the same information in a variety of different ways.
Suppose you have a database that lists every product your company offers, including the sales performance of each. Rather than set up a completely different query for each product (which involves way too much time for a busy person like you), you can create one query where the parameter acts as the placeholder in which you can swap in a different product name or category each time so that you can review the sales for each separately.
Action Query
Action queries get their name because they do something to the records in your database. The something they do can vary from inserting new records to deleting or purging old ones, or performing an update to a number of different records at once. Updating your records using an Action query can save serious time over going into individual records and making changes, one at a time.
Autolookup Query
Autolookup queries are typically used to save you both time and keystrokes. Lookup refers to Access’s ability to automatically search and locate information you’ve previously entered elsewhere.
For example, you may have one table, named Employees, with each person’s company ID number (used for personnel and payroll), as well as his name, home address, phone number, and pager number. As you create a new table in which you’re listing emergency, off-hours contact details for each employee who pulls special on-call duty, you can specify that Access look up the previously entered fields, like cell phone and pager numbers, and automatically enter them into the appropriate fields of the record for you—so you don’t have to type this information all over again.
The beauty of this type of query, besides saving you the time of repeat entries, is that if you later have to go back and update record information (say, if an employee changes her cell phone or pager number), all occurrences in all tables automatically get updated as well.
SQL Query
The chief difference between a SQL query and any of the other types of queries you can perform on your database is that SQL queries contain SQL statements or expressions. Because these kinds of queries use SQL, the native language your database understands, they’re some of the most powerful and helpful queries you can run. With them, you can do just about anything to your data, including insert, delete, amend, and automatically update records. (For a quick intro to SQL, see the box in Learning the Lingo: What’s a Dynaset? What’s SQL?.)
As a newcomer to Access and databases, you probably don’t know much SQL. That’s OK, because Access—at least, to some degree—guides you through the process of picking what you want to look for or do, and then transforms it into SQL just as if you had a tiny U.N. interpreter sitting there on your desktop. All this activity happens pretty much out of your sight.
Tip
Want to become a little better acquainted with the SQL underlying your query? If so, Access offers a special SQL view to let you do that. To see this view, open your query in either Datasheet or Design view, and then, to the right of the Query view button, click the drop-down arrow (which opens a list box). Next, select SQL view. You may also choose View → SQL view rather than going through the list box.
Setting Query Properties
Query properties define and control both the appearance and the overall behavior of that query and the results you get from it. As you create a query, either on your own or through a wizard, certain properties are automatically assigned to the query.
You can view these properties at any time—that is, after you’ve created a query. You have three different options for opening a query’s Properties window to see them:
Click Properties.
Choose View → Properties.
Right-click anywhere in the Design window (except in the field lists themselves), and then select Properties from the shortcut menu.
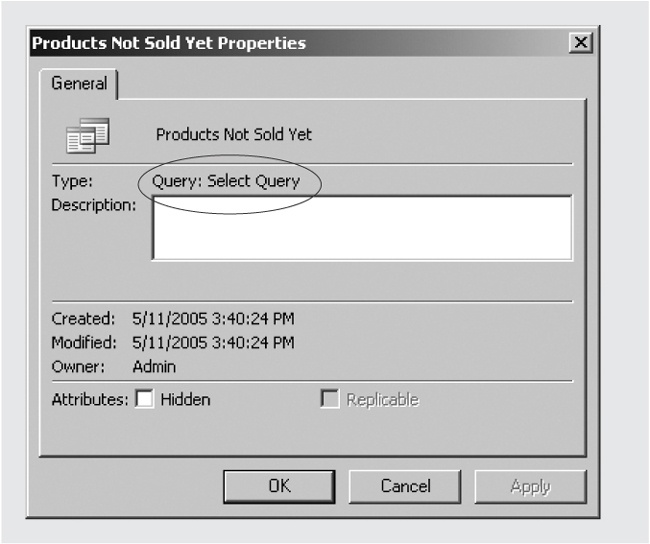
Figure 6-1 shows the query properties for one of the queries you’ll create in this chapter when you make and run a Find Unmatched query.
Creating Queries with the Query Wizard
Just like elsewhere in Access, wizards help guide you through constructing queries that get you the results you want the first time and every time thereafter. In this section, you’ll see when it’s right to go with the wizard versus crafting your own from scratch in the Query Design window covered in the next chapter. Try your very first query using one of Access’s ultra-helpful and wise wizards.
Using these wizards is a great way to get a feel for queries if you’ve never done one before. Access’s query wizards include:
Simple Query Wizard. This great starter wizard lets you run the most common database queries, called Select queries, discussed in Types of Queries.
Crosstab Query Wizard. Use this wizard to step through a specialized query that lets you organize information obtained from a table or query. You’ll read more about this type later in this chapter.
Find Duplicates Query Wizard. Can you guess what this wizard does? Sure you can—and you’ll find it highly useful, too, for spot-checking your database for duplicate entries, the bane of any database manager.
Find Unmatched Query Wizard. Does your database have records in one table that have absolutely no matches in another table? This wizard creates a query to help you identify them, and can and should be used when you need to either see possible problems or locate records that need action. For example, perhaps you have a sales database where you’re trying to determine which of your sales reps hasn’t yet sold a single product, or a customer who has set up an account but has never ordered.
Yet you can also move beyond these wizards to design your own queries or modify ones you’ve started through the multiple wizards using the Query Design window covered in the next chapter. The more complex your query becomes, the more likely it is that you’ll need to create it from scratch rather than going through one of the prepackaged query wizards.
Creating a Simple Query
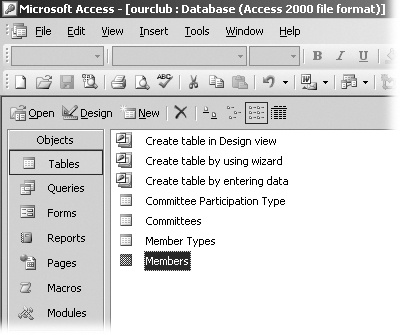
Easy and simple is good, so why not start off your relationship with queries by performing a very basic one? Download (Example Databases) and open the OurClub2 database. (Yes, it’s the same one as you used in the previous chapter, but just like a real-life database, it’s undergone some slight changes from the first attempt). Start with the OurClub2 database open in the main Database window, as shown in Figure 6-2.
For this operation, you’re going to use the Simple Query Wizard. Your first query will be super simple, and similar to what you’ve already mastered with filters: checking to see which of your members are located in Montpelier, Vermont. You want the first and last name of each of these members, along with the telephone number so you can call them, as needed.
In the Objects bar, click Queries.
The Queries panel is where you start all new query work. It’s also where, after you’ve created and saved queries, you can return to modify and run them.
Double-click “Create query by using wizard.”
The Simple Query Wizard opens.
Click in the Tables/Queries list box (see Figure 6-3), and then choose Members.
In Access, you’ll often see tables and queries grouped together in various windows. This setup makes sense because you run queries on tables, or on other queries, rather than on other types of objects like forms or reports.
Under Available fields, select MemberFirstName, and press the single arrow button to add it to the currently empty list of chosen fields at the right.
The double arrow buttons let you select everything in the list at once, or, in the case of the left-pointing double arrows, deselect everything.
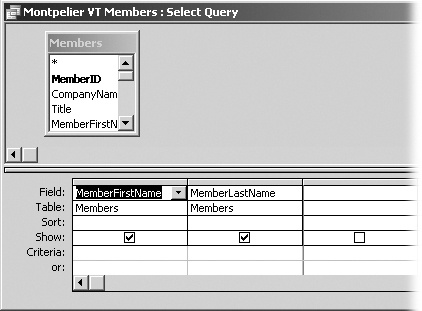
Repeat Step 4 to add the MemberLastName field to the right-hand list until you have both fields selected, and then click Next.
Figure 6-4 shows exactly what these selections should look like to get the right result.
Choose Details from the next wizard screen, and then click Next.
When you choose Details, your results show every record that meets your query conditions. Your other option from this window is Summary. The Summary Options let you apply math functions like count or average (AVG) to a short, summary-style display of the records returned in the query.
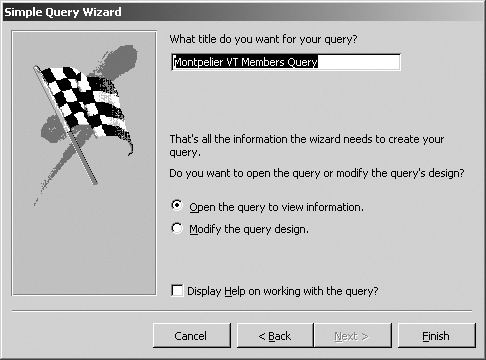
Next, the wizard asks you to name your query results.
In the box at the top of the next wizard screen (see Figure 6-5), click to remove the text that’s there, and then type: Montpelier VT Members.
Although you’ve just selected the fields to display, you haven’t done anything yet to limit your results to just those members residing in Vermont’s capitol city. You’ll take care of that now using a filtering process. (However, you could also just click Finish now, and then go back later to modify the query design and rerun the query.)
Turn on “Modify the query design,” and then click Finish.
If you select View rather than Modify, you can also go back at any time to make changes to the query design.


After you’ve wrapped up the wizard, the same type of window appears that you used to create filters in the last chapter (Figure 6-6). It now bears the prestigious title of Query Design window. You’ll study and use this window in far more detail in Chapter 7. Here, the only criteria you need to set tells Access to limit the records returned to just those living in Montpelier, Vermont.
Here are the steps for applying a filter to the query for the city Montpelier.
Click the first criteria field in the City column, and type Montpelier.
By setting this option, you’re limiting records to only those where the city listed for the member is Vermont’s capitol city.
Under StateOrProvince, click the first criteria field, and then type VT.
Adding the state is a smart idea if there’s any chance you have the same city name, or similar criteria, that could come up in a whole other state. In this case, you’re working with a small database so you can get away with just dealing with a few extra records. But once you get into a sizeable database of hundreds or thousands of records, you want to do everything possible to keep your work—and results—sane and manageable.
With your criteria now set to limit your record display, from the Access toolbar, click Run (the red exclamation mark).
You should see the Run icon on the toolbar whenever you’re working with Access in query mode. In fact, if you don’t see that urgent-looking icon, it’s a sign you’re not in query mode.
You can also choose Query → Run to start the query process and return your results.
Immediately, the results from your query open up in a new window and, yes, as you can see for yourself in Figure 6-7, you’ve got just those members from Montpelier, Vermont listed. Nice work!

Creating a Crosstab Query
Crosstab queries begin a bit differently from the simple one you just created, because they take a different approach. They don’t just filter and sort your data, they summarize it. Much like the summary reports you’ll see in the next chapter, a crosstab query can add up, average, count, and group information so you can analyze and compare it much more easily. Unlike other queries, crosstab queries let you define rows as well as columns, which is what adds the extra summarizing power.
You’ll use a different example file for this query, with good reason: Crosstab queries, at least the way your database may be set up, may not always be an easy fit for the wizard. Trying to force your information into the wizard to get the results you want can be an exercise in how much headache remedy you can consume without developing an ulcer. Fortunately, Access comes with a sample database that illustrates the concept perfectly. To open it, choose Help → Sample Databases → Northwind Sample Database. (If you see an error message, you probably didn’t install the sample database. See the box on the previous page for more detail.) Click OK on the opening screen. When the Main Switchboard window opens, click DatabaseView.
Note
If you don’t get clean results when creating a Crosstab query in your own database with the wizard, then you can create a query from scratch using Design view. You can learn how to do that in Creating Queries in the Query Design Window.
To start your query, open the Northwind database and go to the Queries panel in the Database window, as described in Creating a Simple Query. The database already contains some queries. You’re going to add a new one that summarizes product sales by category.
On the first Crosstab Wizard screen, select the Queries radio button (Figure 6-8). Then, in the Query list, click Sales by Category.
To calculate product sales by category, you need fields containing category, product name, and product sales. Fortunately, a query containing these fields already exists, so you’ve chosen it here. Click Next when you’re done.
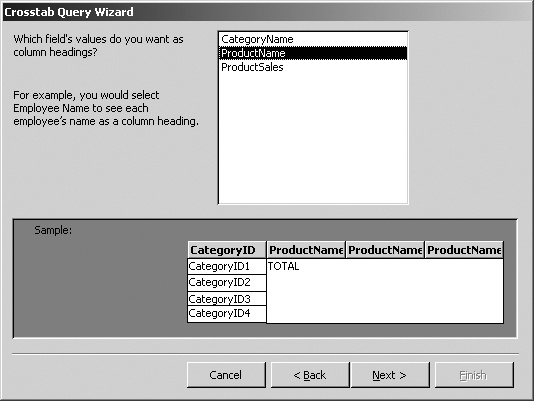
Select the Category Name field, and then click the right arrow to add it to the Selected Fields list at right.
A crosstab query works much like a spreadsheet, performing calculations on rows and columns. In Access, the information in the rows and columns come from your fields. You’ve just told the wizard which field to use as the rows. As the preview shows, your query results will show each product category on its own row. The Crosstab Wizard calls this field the row heading. Click Next.
In the list of remaining fields, select Product Name.
The preview shows that Product Name is the column heading. If your screen looks like Figure 6-9, you did it right. Click Next.
Figure 6-8. The Crosstab Wizard starts out by asking you to choose a table or query that contain the fields your query will filter and sort by. If you’ve already created a query containing all the fields you need, click the Queries radio button and choose it here.Now the wizard needs to know what kind of calculation to perform for each category and product, and what field to get the numbers from.
In the Fields list, click ProductSales. Then, in the Functions list, click Sum.
You can choose a number of common functions here, like the ones in Using Expression Builder. You’ve chosen Sum here because you want the total sales of all products in each category. Click Next.
On the final wizard screen, type a name for the Query, and then click Finish.
Access suggests Sales by Category_Crosstab because of the query you started out from.

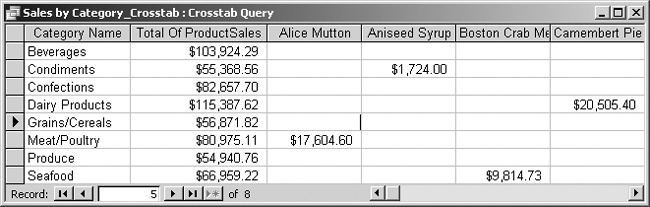
As you can see in Figure 6-10, this crosstab query shows the total sales in each category (in the Total Of Products column). As you scroll to the left, you see the sales broken down by individual product.
Using a Query to Check for Duplicate Records
Remember when you read that duplicates are the bane of any database manager? It’s entirely too easy to create multiple copies of the same account, product, or even person. This problem comes up all the time when you enter records in chunks over a period of time or you have multiple people performing data entry.
Duplicate records are more than just a mere inconvenience. For instance:
You waste time when you enter the same information more than once.
Duplicates take up space and, left unchecked, can make a large database into an unwieldy one.
Worst of all, confusion can ensue when you update a record, but there’s a duplicate hanging around that still contains the old information. Imagine a customer makes a payment on his account, and you record it in your database, but because there’s a duplicate record for that customer that doesn’t reflect the payment, the database sends him an annoying (and erroneous) collection notice.
Of course, with experience, you can use techniques like validation (Validation) to make Access check for and discourage duplicate entries. But even then, the possibility always exists that you’ll end up with multiple records for the same John Smith guy, with slight variations in the name, like John Smith, Jon Smith, J.Q. Smith, and maybe even Jack Smith. You’ll need a system you can use regularly to check for and remove duplicate entries. The query you’re about to perform does just that. You can run it on a schedule (for example, once a day in a very busy and large database, or once a month for a personal system).
Access provides a wizard specifically for creating a query to look for duplicates. Once you’ve created a basic query, you can always go back and tweak it later, as necessary. This time, open the OurClub2 database, and then follow these steps to set up a duplicate checker.
Open the Database window, and then in the Objects panel, click Queries. Click New, and then choose Find Duplicates Query Wizard. Click OK.
The Find Duplicates Query Wizard opens. Right off, you get to choose the table where you want to check for dupes.
On the first wizard screen, select Members, and then click Next.
There’s always the option of setting up a sophisticated query to check more than one table, or you can simply run the wizard again, choosing a different table each time. However, you’ll find that certain types of tables are simply more apt to contain duplicates than others, and frequently these are the tables containing the greatest volume of records, like the Members table.
On the next wizard screen, add the MemberFirstName and MemberLastName fields to the Selected Fields list at the right. Click Next.
First and last name fields for a table like this are likely suspects for duplicates. If you need help moving fields from the Available to the Selected field lists, review Figure 6-4.
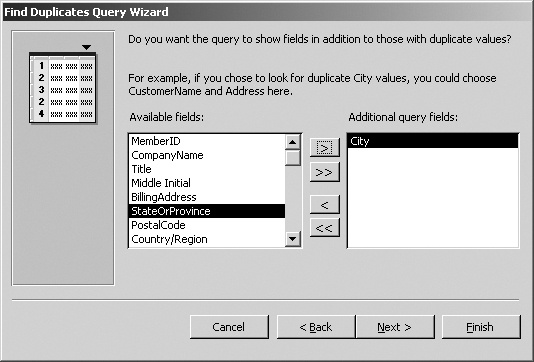
On the next screen, choose City in the Fields list, and then click the right-pointing single arrow to add it to Selected Fields (Figure 6-11). Click Next.
The fields you choose here are the ones you want Access to display. In addition to City, you could add additional fields, like State/Province or Phone Number. A good rule to use is that you want as few fields as possible while still making it easy to identify a dupe from a legitimate similar entry.
On the final wizard screen, Access suggests a name for the query you’ve just created. Since “Find duplicates for Members” is good, leave it in place, and then, with “View the results automatically” selected below, click Finish.
Showing its usual initiative, Access runs the new query and displays its results.
Look at your query results. You see that you indeed have two records from the Members table that appear to be identical, as shown in Figure 6-12. You have two Renata Signorellis in Montpelier. Is one a duplicate?

Actually, right now, the question of whether this is a true duplicate is hard to answer. You may have a case of two people with identical first and last name spellings in the same city, which isn’t impossible even with less-than-common names like this one. If you know for sure one isn’t a duplicate, you can just close your query results and be done with it. But suppose you can’t say for sure, at least not yet. You have two options:
Go into the Members table and look for these duplicates, perhaps by using a filter.
Modify the query to add a little more identifying information to help you establish whether you have a duplicate record.
Intrepid as ever, you decide to modify the query and run it again. First, close the query results window (by clicking its Close box, for example). Next, follow these steps to give your query an additional field to help decide whether you’ve found a true duplicate:
If you’ve just gone through the Query Wizard as in the previous tutorial, the Database window probably shows the Queries panel. You’re in the right place. In the Queries list, highlight “Find duplicates in Members”; in the toolbar, click the Design button.
The Design window opens, where you modify your query. The box at the top left lists the fields in the data source (Members table). Among these fields, an identical street address or phone number would help you differentiate a duplicate from a similar-but-not-same entry.
Try adding the Phone Number field. Drag Phone Number from the Tables box into the first blank field listing below.
The result should look like Figure 6-13. Since you need to be able to find these records in the main table, and the table could contain many different records, it may help to add the unique Member ID number to the query as well. You’ll add that next.
Select Member ID from the Table list and drag it down to the next blank Field box to the right of the Phone Number you just added.
In the Sort row below each field, Access shows automatically ascending order. You’re free to change the sort order, but in this case, ascending works just fine.
With your changes made, close the Design view window.
As soon as you click the Close box, Access prompts you to save changes to the query you’ve just modified.
Click Yes because you want those changes to stay.
Without wasting a moment, Access automatically runs the query again and displays the results in a fresh window.

You now get to see the results from your modified query. Since the phone numbers for both matching records are identical, you can assume that you’ve got a true-blue duplicate. Your next task is to delete one of them. Look at the Member ID field for the second occurrence of this member’s name. The field identifies the duplicate record as #22. That’s the one you want to find and kill in your Members table.
Warning
At this point, you’ll be tempted to right-click the second occurrence of Ms. Signorelli’s record and choose Delete Record. However, this action deletes only the record from your query results and not from the Members table, which doesn’t help much.
After committing the ID number to memory (or sticky note), close the query results window. Then follow these steps to get rid of record #22 once and for all:
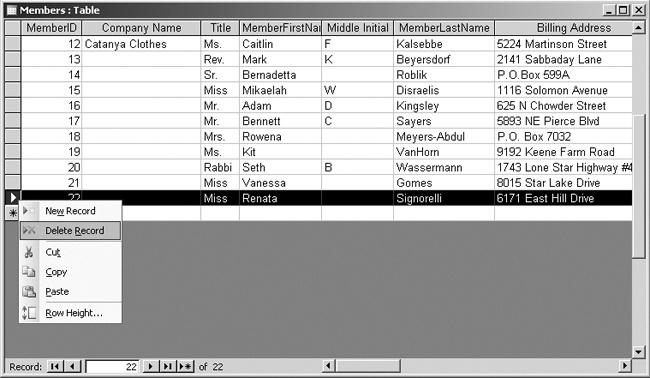
In the Database window’s Objects panel, click Tables. From the list of tables in your database, double-click the Members table.
This step opens your Members table where you actually need to remove the duplicate record.
Scroll down to Member ID 22. Click in the border to the left of the Member ID field to highlight the entire record.
You can also use the Edit → Find command to locate Member ID 22. That method may be faster than scrolling in a large database.
With the record selected, right-click and select Delete Record (Figure 6-14).
Access asks you to confirm that you want to remove this record permanently. Click Yes to do the deed.
Creating a Find Unmatched Query
A special type of query you can run in Access 2003, and one already set up for you in wizard form, is the Find Unmatched Query. The job of this query type is to identify records that appear in one table but have no match in a related table where you may otherwise expect to see matching records. You may want to use this type of query in situations like the following:
You want to identify which customers haven’t placed orders yet with your company this year by comparing the records in your Customers table to the records of orders placed this year in your Orders table.
You need to see which people in your Sales Rep table have made no product sales—because you can’t find any matching records for them in the Sales Rep Orders Placed table.
You must determine which employees contained in your employees table have a large backlog of unused vacation or sick time that must be used up or will be lost by the end of the year by comparing your Employees table against a table that tracks who has applied for or taken a vacation or sick leave over the past year.
The key ingredient in all these situations is that the two tables are related to each other. For example, you would normally expect to find orders placed by a customer or sales rep, or vacation time requested by an employee. Understanding this, you can then apply this type of query to other situations where you have a similar situation.
For this exercise, you get to do some role-playing. You’ll be one of the many folks who make a living by placing goods up for auction on a site like eBay. You’ve set up a simple database in which two of your tables keep track of the items you’re selling (Products) and of the customers who win the bid to purchase them (Auction Customers). But you’ve been so busy that you’re no longer sure how many of the goodies you’re offering online remain unsold. So you’re going to run a Find Unmatched query to determine just that.
Download (Example Databases), open the eBayProducts database, and proceed as follows:
Make sure you’re in the Database window. In the Objects panel, click Queries.
Since it’s your first time doing this type of query, you want to start with the wizard, although the Queries panel shows you lots of other tools as well.
In the toolbar, click New. When the Query Wizard Options window opens, select Find Unmatched Query Wizard. Click OK.
The appropriate wizard opens so you can begin your work and, ultimately, get the information you need from your little database.
On the first wizard screen, select Table: Products, and then click Next.
The Products table contains the records you want to see in your query results. This table holds a list of all products, sold and unsold, that you’re auctioning online.
On the next wizard screen, choose Tables: Auction Customers, and then click Next.
You’ve just told Access which table contains the related records, as shown in Figure 6-15. The Auction Customers table not only lists contact information for each of the buyers, but it also contains the Product ID field—also found in the Products table—to specify which product they purchased. As you learned in Chapter 4, Product ID is the common field that links these two different tables.
On the next screen, select Product ID, and then click the double-arrowed button.
The double-arrowed button simply indicates that the same field exists in both tables. Next, you’ll select the fields you want to display in your query results.
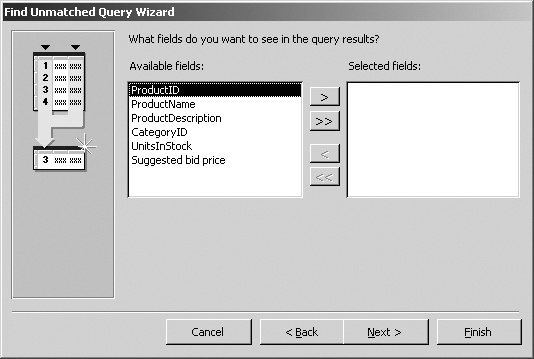
Choose Product ID, and click the right-pointing arrow (Figure 6-16). Repeat this step to choose the Product Name and Suggested Product Price fields.
The idea here is to choose fields that, when viewed as part of the result, give you a fairly good picture of what you’re looking at without (necessarily) opening the Products table to find out.
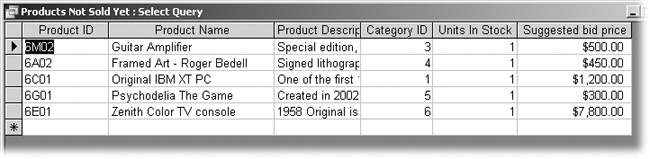
In the final wizard screen, click inside the name box to delete the suggested name, type Products Not Sold Yet, and then, with “View the results” already checked, click Finish.
The new name you’ve provided here is just a little more readily identifiable than what the wizard automatically offered. If you wanted it better still, you could add the date to the title when you type it to help you identify the date of the query when you last checked how many products were left unsold.

Look at your results; they should match what you see displayed in Figure 6-17. You see a fairly complete picture of the goodies you’ve yet to sell, and you don’t have to open the original tables to get this.
Saving, Deleting, and Printing Queries
Without you having to do a thing, Access automatically saves your queries to the Queries list available when, from the Database view you see when you first open your database, you click Queries under Objects. Figure 6-18 shows an example list of queries for the OurClub2 database you’ve worked with several times already.
When you modify an existing query and then go to close it, you’ll be asked whether to save your changes. But you can also select File → Save to save the file before you close it.

To remove a query you don’t plan to use again, just highlight it in the Queries list, and do one of the following:
Press your keyboard’s Delete key.
Right-click and select Delete.
Choose Edit → Delete.
Whichever of these you try, you’ll get a prompt asking if you’re sure you really do want to kill that query. Click Yes, and the query disappears from your list.
You can print your query results right from the results window. Select File → Print or press Ctrl+P. Either method opens your Printer window and lets you set properties, or simply click OK to print a hard copy immediately.
You’ve learned a lot in this chapter, but there’s much more to know about queries. Turn to Chapter 7, where you’ll take queries to a whole new level, starting with the Query Design window and moving right through to the setting of specific criteria and adding calculated fields to give you more details.