
Appendix B. Access FAQ
THIS BOOK COVERS ALL THE BASICS of creating and using Access databases, but there’s plenty more to be curious about. You may not need to swap files between Access and, say, Word or Excel very often, but it’s good to know you can. And the fields in your database probably work just fine, but there’s a way to make extra sure that you’re entering information correctly. This appendix covers these burning issues and more.
Importing and Exporting
Q: I’ve already done a fair amount of work in other Office programs like Microsoft Word and Excel. Now that I’ve gotten Access, how can I move this information over to Access without having to enter all the information all over again?
A: Excellent question! Actually, you can move information, including text and numbers, between other programs and Access in any number of ways. This is especially true for Access and other programs in the Microsoft Office product line, such as Excel, PowerPoint, and Word. (You got a hint of this in Chapter 8 where you learned about Access reports.)
For example, you can take records or query results from Access and import them into Word where you may be preparing a whole document—say, for a monthly or annual report. You could also take a list you’ve been keeping in Word and use it as the start of a new Access database; you could do the same with information stored in an Excel spreadsheet.
The best way to get a feel for the import and export process is to try it. For these examples, you’ll go through two of the more common operations: importing a Word file into Access, and taking information stored in Excel and bringing it into Access.
Importing a Word File into Access
If you have Microsoft Word on your computer, you can get an idea of how you can move a table of information in a Word document and import it into Microsoft Access with the following exercise. Download (Example Databases) and, in Word, open the file Group Members.doc.
This document contains contact information for members of an organization in Word’s table format. You’ve decided that it makes more sense to keep this contact list in a table in Access, but you don’t want to have to create all these individual records yourself manually; rather, you’d like to import the information directly from Word.
Here’s how to import a Word table into Access:
Open Microsoft Access and choose File → New.
Here, you’re creating a brand new database to start tracking information about these members.
Select Blank Database and, when prompted to save the new file, save it with the name: New Group Members.
Notice that the new database is stored automatically in your My Documents folder, which is where you’ll find it when you want to open it again.
Next, switch back to the Word document you have open.
You need to make some changes to the Word document to prepare for it to be easily read by Access.
Delete all the text in the Word document that appears outside the table. The finished result should display only the table, as shown in Figure B-1.
The note above the table isn’t something you want to bring into your Access database. By deleting this text, you don’t have to worry about it later during the import process.
Highlight all fields in the table, and then select Table → Convert → Table to Text.
Access can’t properly read inside the table grid. In this step, you’re changing the listings from the table to straight text.
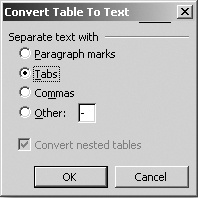
From the Convert Table window, you need to choose a character type to tell Word how to separate the various fields in the table (see Figure B-2). Choose Tabs, and then click OK.
Access can read the different fields as unique if they’re separated by different types of characters, like the Tab key that’s used to move between fields in the table. You’ve just instructed Word to use tabs to separate them.
Choose File → Save As. Click inside the File Name window, and type ExistingMembers. Next, click inside the Save as File Type list box, and choose Plain Text, as shown in Figure B-3. Click Save.
Because Word documents contain special formatting normally hidden from your view—but which will be very apparent, as well as problematic, to Access—you need to save the file as a text file. This is what you’ve just done. You may be prompted that by changing the file type, you’ll lose all formatting, which is exactly what you want. Click OK.
Close Word and any open files.
With your work done in Word, close Word and any files open in it. This step is necessary because Access won’t be able to open your newly created text file if it’s already open in Word.


You’ve just completed the first part of your work. You’re now ready to return to Access to perform the second phase of the operation.
Follow these steps to proceed:
Switch back to Access and the blank new database you created.
The new database should be open in Database view with Tables selected from the Objects menu. If it isn’t, click Tables.
This action is necessary because you’re actually going to add a table to the new, blank database by importing that table-turned-to-text in the text file you converted a few steps ago.
Select File → Get External Data → Import, as shown in Figure B-4.
You’ll be prompted next to specify the file type (text) and then the actual filename of the document you converted to a text file.
In the Files of Type box, select Text Files.
Here, you tell Access you’re going to import a text file.
Locate and select the text file ExistingMembers, and then click Import.
Once you specify the exact file to use to import, or bring into, Access, the Import Text Wizard opens.
Select Delimited, and click Next.
You’ve told Access to expect a separator (or delimiter) between the fields.
Choose the delimiter type Tabs. Click Next.
Tabs are the separators you chose when you converted the Word table earlier. Next, Access asks where to store the information it’s about to import.
Select New Table. Click Next.
This step tells Access to create a whole new table to store the imported fields because you don’t have any existing tables.
In the window shown in Figure B-5, you can specify details about each of the different fields you’re importing. Here, however, that’s not necessary, so click Next.
Since the table you had in your Word document didn’t label the different fields, you’re seeing automatically set field names used here like Field1, Field2, and so on. You can change these field names later by renaming them after you finish the importing process.
On the next screen, you see that Access automatically adds an “ID” field to the imported table that will serve as the table’s primary key if you want to use it. This works for you, so click Next.
If you had a different field you wanted to use as primary key, you would choose to set your own primary key instead.
In the final Import Text Wizard screen, click inside the Import to Table field, and type a new name for your document.
Or just accept Access’s suggested name, which is the name of the text file you imported. When you’re done, click Finish to close the wizard.


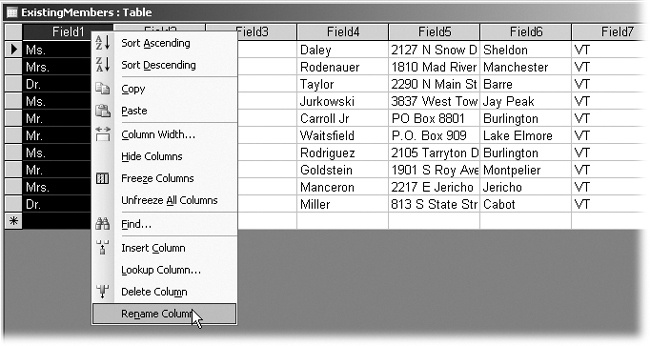
To see how well your importing job did, click to open ExistingMembers to see the newly created table. You should see that the result is pretty clean. But you’ll notice that you’ve got the automatically set field names of Field 1 and so on. You’ll probably want to change the names for each of the fields.
Right-click Field 1 and select Rename, as shown in Figure B-6. Next, click inside Field1, press Delete to remove the preset name, and type Title. Repeat this action to change the other fields to First Name, Last Name, and so on, right through to Phone No.
While you went through several steps to convert the existing table from the Word document into the table in Access you now have, this process is still probably faster than having to print out a copy of the table and create a new table in Access where you type in all these individual records. The more records you import, the more time you save.
Importing an Excel Spreadsheet into Access
Microsoft Excel, the world’s bestselling spreadsheet program, isn’t always used to crunch numbers. People often create a spreadsheet—called a worksheet in Excel—to keep track of information, including details for a project and even a contact list.
In fact, you can create a list in Excel that acts very much like a basic database. If you’re new to Access but not to Excel, you may have already created a list in Excel, but now, with the addition of Access to your desktop, you may want to use that Excel list as the start of a new Access database. That’s what you’re going to do here.
Download (Example Databases) and open the Excel workbook MonthlyProductionTotals.xls. In this spreadsheet the first worksheet tracks the production totals by employee for each month in 2006. The range of cells, A4:M19, has already been set up as a list, which can work something like a database. Much like the tables you’ve already seen in Access, an Excel list has labels identifying each field contained in the first row. In this spreadsheet, the person who prepared the list also named the range A4:M19 “ProductionList” to help differentiate this list from anything else contained in the workbook, which will make your job of importing the list easier.
After you’ve looked at the list, choose File → Save As and save it with the same filename in your My Documents folder. Next, close this file because Access can’t open the file and import the list if it’s open in Excel.
To import the list from this spreadsheet into Access:
In Access, create a new blank database and save it with the name Production.
Access suggests you save it in the My Documents folder.
In the Objects bar, select Tables.
Since you’ll be importing the list from Excel as a new table in this new database, you want to start from the Tables view, just as you did when you imported a table from Word.
Select File → Get External Data → Import.
The Import window opens, where you’ll choose the file you want to import into Access.
In the Import window, next to Files of Type, click in the list box and choose Microsoft Excel, as shown in Figure B-7. Next, from the main Import window, double-click Monthly Production Totals to open it.
After you specify the Excel file type, you’ll see only those files created with Excel listed in the main window of the Import window. Next, the Import Spreadsheet Wizard opens.
Click Named Ranges to display a list of named ranges in this spreadsheet. When the list appears, select ProductionList (see Figure B-8), and click Next.
You could also choose an individual spreadsheet (this workbook contains two) from this first wizard screen. But the named range limits the importing to just the records contained in the list.
When the next wizard screen opens, make sure First Row Contains Column Headings is turned on. If it isn’t, click to turn it on. Click Next.
This setting is important, because the table you’re importing has its own column headings, and you want to make sure the wizard uses those as the field names in Access.
On the next screen, select New Table, and then click Next.
You’re starting with a blank database, so you don’t have an existing table to choose here. On the next screen, you can select one or more fields to exclude (or Skip) when importing. You don’t want to make any changes, so click Next again.
Below Import to Table, click in the box, delete any existing text, and type 2006 Monthly Production Totals. Click Finish.
Your new database table, based on the Excel data, appears in the Tables list in Database view.


To double-check that everything went beautifully and resulted in a perfect new table based on the Excel list, open the newly created table. As you can see in Figure B-9, as well as on your screen, the results are fabulous.

Q: Besides importing whole blocks of information into Access from other programs, how easy is it to simply copy smaller bits of information between Access and my word processor or another application?
A: Actually, that’s usually very easy to do. You just need to have both files open, like the Access database and a Word document. For example, suppose you want to copy a street address from a Word document into an address field in an Access record in table view.
First, select the information you want to copy from the Word document, and then choose Edit → Copy (or press Ctrl+Insert). Next, move your cursor to the field in the Access table (or other Access object) where you want to place this copied information, and choose Edit → Paste (or press Shift+Insert) to drop the copied address into place.
Q: This book hints that Access can import and export information directly to Web pages and Web sites. How about a little more information on this?
A: Just about all the Microsoft Office programs are Web friendly, meaning they let you both import information from the Web and save your own files as Web pages. That lets you upload them to a Web server just like any other Web site, where your friends (and enemies) can visit them. Next, when you save a Word document as a Web page, it looks and works pretty much the same on the Internet as on your own screen. Not so with Access databases.
Making an Access file Web-worthy usually involves the creation of special files called Data access pages, in which you can either simply report data from your database on a Web site or let visitors add data directly or download information into their own copies of Access. Data access pages are a subject unto themselves, well beyond the scope of this book, but if you’re game, try a book like Microsoft Access 2003 Professional Results by Noel Jerke (McGraw-Hill), which focuses on Access’s Web side.
Q: Every time I read something about creating Web pages, I see the term XML. What is it?
A: XML stands for Extensible Markup Language, which is the universal data format of the Web. Many databases and spreadsheets store information in what’s called a proprietary format, meaning that when you get a data file from someone else, you often have to have the same program they use in order to open the file. XML changes all that, because most modern database programs—in fact, all kinds of programs—can understand XML documents.
Access can read XML files and save information in XML format. Data access pages, as described above, use some XML. XML is a programming language, and you don’t have to learn XML in order to use it. If anyone asks for a copy of your data in XML format, just open up your table, choose File → Export, type a name for the new file, and choose XML from the “Save as type” menu.
Validation
Q: Even when I’m the only one adding records to my database, I find I’m not always consistent. For example, I may misspell a name, or I abbreviate an entry in one place but not in another. Other times, I forget and leave fields blank that I didn’t intend to skip. How can I make Access be more demanding so that I don’t create these inconsistencies?
A: What you’re talking about actually involves validation, or making certain that what you enter in a field meets the condition(s) you establish for that data. As part of this validation, you can also tell Access not to allow a field to be left blank or skipped.
Also, there are two major types of validation:
Field validation. With this type of validation, you’re specifying the values, or a range of values, that can be entered into a specific field. You can tell Access that a field’s valid entries can be any number between 0–10, for example.
Record validation. This validation is used when you have a reason to force Access to check the contents entered into one field against another field in the same record to determine if the value entered is legitimate. Here’s an example: Say you have one field that specifies the maximum credit limit allowed for an account holder. If someone then tried to enter a credit purchase that is greater than the amount of the remaining credit amount, that person would see an error message (in the Validation text field under a field’s properties).
It’s time to try some examples. Open the ClassGrades2 database (Example Databases). This database is the starter database you used in an earlier example when you did some basic calculations. Two forms have been created with this database to allow for data entry. You’re going to change the properties of one of the forms to make certain that a field can’t be left blank and that whatever is entered into a field meets conditions you set.
To do this:
From Database view, from the Objects menu, click Forms.
Since you’ll most often use forms to enter data, it makes sense to change the form attached to a table. You can, however, apply validation to a table using the same steps outlined here.
From the Forms menu, select Grades, and then, from the Database toolbar, click Design.
The Grades form opens in Design view, as shown in Figure B-10.
Right-click inside the field labeled Test1, and choose Properties.
When you choose Properties here, you’re opening the Properties window for a specific field, with the name of the field at the top of the window.
Select the All tab.
Here you set validation rules and test for a field.
To the right of Validation Rule, click inside the dialog box, and type the expression: >=0 AND <=100, also shown in Figure B-10.
What this expression means is that the value provided must be 0 or greater but no higher than 100, since all grade values fall between 0 and 100.
Next, to the right of Validation Text, click in the dialog box, and type The value entered must be between 0 and 100.
By providing this text, you’re telling Access to pop up an error window, whenever someone tries to enter a value that doesn’t fit this field, that instructs them what the valid field values are.
Close the Properties window and, when prompted, save the changes to the form.
You’re not done yet because you also want to require some value to be typed in this field, rather than skipped. For that, you’ll switch to the Tables view.
From the Objects menu, select Tables.
Next, you’ll choose the table where this information would be entered.
Select Individual Grades, and then, from the Database toolbar, click Design view.
When you do this, the table opens up using the Design window you’ve used before.
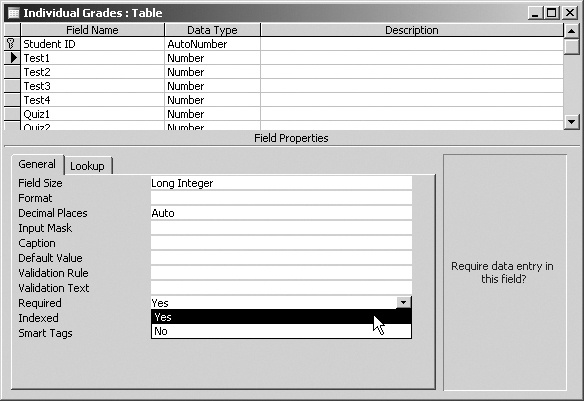
Click within the field Test1. Specific information for this field opens, as shown in Figure B-11.
At the bottom of the window, click in the field next to Required, and select Yes.
You’ve now made it mandatory that someone enters something in this field and can’t leave it blank. You can now close the field and table and save the changes, when prompted to do so.

Understand that validation can get far fancier and more sophisticated than what you’ve seen here. But this example gives you a sense for what you can do and how you can control your data entry, regardless of how many different people are adding or editing records and the level of consistency they generally use in working with them.
Q: I’ve heard of something called a lookup list that you can use for a type of validation. What’s a lookup list?
A: You’re undoubtedly thinking of a method of data entry where folks can choose entries from a list that pops up onscreen, rather than typing the whole word or phrase. Access actually has two ways of outfitting your database with this type of list—value lists and lookup lists. Both are quite easy to implement with a wizard, and both can look and act the same for the person entering the data. Both kinds of lists are attached to a lookup field, which actually goes and looks up information stored elsewhere in your database to display on the list. A lookup list is a better option when you don’t know in advance exactly what the data will be: To change what’s on the list, you just edit the field in its table. In fact, the list is updated automatically when anyone adds or edits the field’s values in, say, another form in your database. A value list is better when the data to be entered is unchanging, like a list of the 50 United States (although you can go back and edit a value list later).
To add either kind of list to your database, you can start either in Form Design view or Table Design view. In Table Design view, click the field you want a list for (State, for example), and choose Lookup Wizard in the Data Type column. The Lookup Wizard opens.
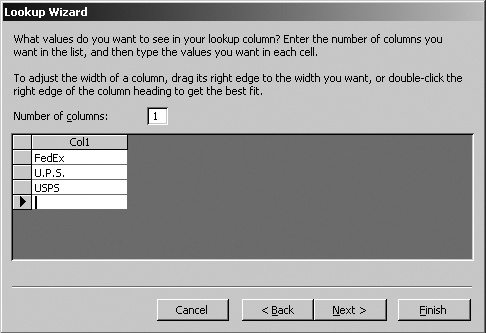
To create a value list, choose “I will type in the values I want.” The next screen gives you a one-column table to enter the list items (Figure B-12). Type a list of states, for example. Lastly, the wizard asks you to type a label, if desired, that will appear when you use the field on a form.
To create a lookup list, choose “I want the lookup column to look up the values in a table or query” on the first wizard screen. On the next screen, you get to choose the table and field that holds the information you want on the list. For example, in the first and last name fields on the orders table, you may want data-entry people to choose from names that are already in the Customers table. In a related database, the wizard gives you a chance to hide the CustomerID number, so that data-entry people only see the name.
Note
You can also create a value list or lookup list in Form Design view. Start by clicking the Control Wizards button on the Toolbox, and click the List Box button. Draw the field on your form design. When you let go of the mouse, the List Box Wizard opens, offering much the same choices as the Lookup Wizard, just not in the same order.
Finding Find
Q: Chapter 5 is all about finding information in Access, so why is there so little mention of the Find dialog box?
A: Actually, that’s two questions. But the same answer covers both. You won’t see Access’s Find and Replace dialog box very often since you don’t need it very often. Most of the time, in a database, you’re searching for records; the Find and Replace dialog box searches for text. You might use it when, for example, you have a table open in datasheet view and want to find all the records in a field that begin with “Ma,” because you can’t find Mr. Mazur and think someone might have spelled his name incorrectly. Since it looks and works much like the Find box in most word processing programs (see Figure B-13, on the next page), some folks find it easier to use until they’ve learned the ins and outs of sorting, filtering, and querying.
