
Chapter 3. Creating Forms to Add and Display Data
THERE’S A REASON ALL DOCTOR’S OFFICES, schools, businesses, and governments use forms to collect information from you: Forms work. They ensure all the important information is obtained. And though you may resent having to fill them out, forms do make life easier.
In Access, forms don’t just handle data collection. Onscreen forms can also provide help so people know what to type even if they’re not familiar with your database. In addition, forms can error-check information as it’s entered, preventing incorrect information from getting into the database. Furthermore, you can use Access forms to display information onscreen.
Tip
You can use forms to print data, too, but it’s not always easy to make an onscreen form look good on paper. Reports (Chapter 8) are usually better used for printing.
Access gives you three ways to create forms:
Autoforms are the fastest and easiest way to create a form but give you very few design choices. You get what you get, though very often what you get is enough.
The Form Wizard takes you through a series of screens that ask you questions about your form design. At the end, the wizard creates a form based on your answers. The Form Wizard gives you more choices than the Autoforms method and is much easier to use than creating a form from scratch in the Design window.
The Design window requires the most work on your part but gives you the most control of all three methods. In the Design window, you manually lay out your form on a screen grid. You position the form’s blanks, labels, buttons, and other features. The Design window method is fine if you need an unusual form layout (or you’re just a die-hard do-it-yourselfer).
Tip
If you’re not sure where to start, start with the Form Wizard, and then use the Design window to touch up your design. You’ll get the best of both worlds!
Form Basics
No matter which of the three methods you use to create your forms, all forms have some features in common. These common features are:
Layout. The basic arrangement of information on the form.
Controls. The labels, text boxes, list boxes, buttons, and other items you put on the form.
Properties. The aspects of the form itself and of the controls on the form. Common properties include height, color, type font, size, and data source (such as a table).
If you understand these common features, you’ll know how to apply them to any form you create. You’ll be able to rearrange the organization of your forms, change how they work, and change how they look.
Form Layouts
A form layout determines where fields, labels, and other items appear on the form. It also determines the general look of the form. No matter which layout you choose, your form will work the same way. The layout affects only how your form looks on the screen. (You’ll find the following types of forms in the Form Wizard, but you can create most of them, or get the same effect, using the Autoform or Design view, too.)
Access, through the wizard, includes these predefined layouts:
Columnar forms place the table’s fields in columns. To the left of each field, a text label shows the field name. Of all the types of forms, columnar forms most resemble paper forms. Use columnar forms for situations where it works well to show only one record on the screen at a time.
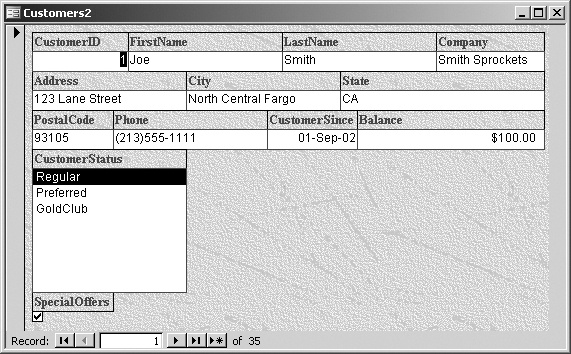
Tabular forms make each table record into one horizontal row of fields, the same as in a datasheet. At the top of each column, a text label gives the field name. Tabular forms are laid out a lot like datasheet forms, except that you only see one record at a time, each record can have multiple rows, and the fields look like blanks on a form instead of table cells (see Figure 3-1). Use a tabular form when what you’ll enter requires relatively narrow fields and you want to be able to eyeball more than one record on the screen at once.
Datasheet forms look just like table datasheets. There’s not much reason to use datasheet forms, unless you really want your database to look and act like a spreadsheet. If you simply want to enter data into a table’s datasheet, you can always use Datasheet view, so there’s little need to create a Datasheet form.
Justified forms look like a cross between a columnar form and a datasheet form.
PivotTable forms lay out your data in a crosstab table format. PivotTables summarize your data by grouping it together. For example, an office equipment store could set up a pivot table to see how many typewriters each customer bought in each quarter of the year.
PivotChart forms summarize your data, like PivotTable forms, but they do it by creating a graph.

Controls
Controls make it easy to enter data into your form. Examples of controls include a label explaining the form, a box in which you type text, or a button you click to do something. Autoforms come with suitable controls built right in. You can add controls in the Form Wizard or Design window when you first create a form, and you can go back and add, edit, or delete them any time. Controls fall into the following three categories.
A bound control is connected to a field in your data source. Any data you put into the control goes to the field. For example, if your form has a text box that’s bound to the LastName field of a Customers table, then when you type a name in the text box, Access puts it into that field of a record in the table.
An unbound control shows or does something on your form but isn’t connected to any data source—for example, a label at the top of a form that simply identifies the form. Another example of an unbound control is an image of the company logo.
A calculated control gets data from fields in your data source, does a calculation like a total, and then displays the result on your form (or report). However, the result of the calculation doesn’t usually go back into your table: It’s just for display on the form or report.
You can use more than a dozen different controls on forms. In this chapter, you’ll learn about the ones you’ll use most often. Some controls, like the following, appear in almost all computerized databases. (If they sound familiar, it’s because they’re distant cousins to the ones you see on Web page forms.)
Labels simply display text on a form. That’s usually all they do. You can use labels for any kind of explanatory text and can format them in any type font that you have available on your computer. At the top of a form you may put a label that says “Customer Record,” while next to an account category field you may put a label that briefly lists the different categories of accounts. (If you’re a programming wiz, you can even make labels do actions when you click them, but that’s another book.)
Text boxes take data and copy it to your table or other data source. They almost always have a label next to them that explains what they are. In fact, when you create a form to enter data into a table, Access automatically creates a field-name label for each field’s text box on the form.
List boxes and Combo boxes let you (actually, they force you) to choose from a list of values. You can use list boxes when you know in advance that you want a field to get one item from a short list of values. For example, if a typewriter store had three categories of customers (Regular, Preferred, and Gold Club), you could put a list box with those choices on your data-entry form for the Customers table. Not only do list boxes make it easier to enter information into the table, but they also prevent typing errors, since you must choose from the list box instead of keying the data into the field. Combo boxes are very similar to list boxes, but are often used more in data-entry forms, while list boxes frequently work best on forms where people need to be able to make multiple choices to run a query, report, or search.
Checkboxes let you easily enter data into Yes/No fields (see Chapter 2). A Yes/No field, as its name implies, has only two possible values. If a checkbox is turned on, the corresponding Yes/No field gets a Yes; if the checkbox is turned off, the field gets a No.
Images let you put graphics like photographs or logos on your forms.
Properties and the Property Sheet
Just like real-world objects, Access forms and controls have properties, as explained in the box in Up to Speed: Database Objects Defined. By changing the properties of those database objects, you can change how they look or what they do. You can view or change the properties of a form or control by displaying its property sheet, like the one in Figure 3-2.
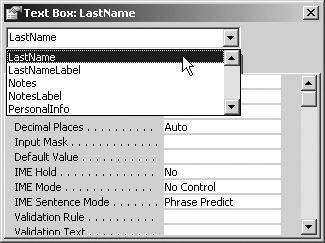
You can always open the property sheet for any Access item by choosing from the File menu, but there’s a quicker way: Just right-click anywhere on the form and choose Properties from the pop-up menu. To view properties of a different object, either click it on the form or choose it from the list box at the top of the property sheet.
With the property sheet in front of you, all kinds of power is at your fingertips. You can resize, reposition, and reformat things, turn them on and off, and even make them invisible. If you design a form using any of the methods described in this chapter, and then later regret one of your choices, the property sheet is often the fastest (if a wee bit technical) way to undo or redo your work.
In Figure 3-2, for example, the Left property determines how far the text box’s left edge is from the edge of the form; the Top property works the same way. By retyping the measurements for these properties, you can move the text box to a different location on the form. In fact, when you drag the text box with the mouse, the property sheet changes the Left and Top coordinates behind the scenes. The mouse is convenient and intuitive; the property sheet lets you be more precise and change lots of aspects of your form without leaving the keyboard. You can lead a long, happy Access life without ever opening the property sheet, but it’ll always be there when you feel limited by the mouse.
Creating Autoforms
Easy is good. If easy does what you want, then there’s no need to look any further. And Autoforms are easy. That’s their main advantage.
Autoforms also have three disadvantages. First, they can only work with data from a single table, while forms you create with a wizard or in the Design window can work with data from multiple sources. Second, Autoforms typically include all the fields from your table or data source, while the wizard and Design window methods let you pick and choose the fields you want to include. Third, you can’t use the justified layout with Autoforms, though you can use all the other layouts.
To get some practice, download the example file for this chapter from the “Missing CD” page (Example Databases). Open the CreatingForms database, and then follow the steps below to create an Autoform.
Tip
The CreatingForms database is ideal for following the tutorials in this chapter, but it’s unrealistic in one respect: The Customers table wouldn’t normally have a Balance field showing each customer’s account balance. In Chapter 4, you’ll learn a better way to keep that kind of often-changing information in a separate (but linked) table.
In the Objects bar, click Forms, and then click New at the top of the Database window.
Access displays the New Form dialog box (Figure 3-3). You can also open the New Form dialog box by choosing Insert → Form.
In the list box, click Autoform: Columnar.
That unlabeled white box lists all the kinds of forms Access can create using either an Autoform or the wizard.
From the “Choose the table or query” drop-down menu, choose Customers, and then click OK.
Access creates a form just like the one shown in Figure 3-4.
Figure 3-4. Notice that the CustomerStatus field contains a list of values with one value highlighted. That’s because in the Customers table design, the CustomerStatus field is a list box from which you can choose from a lookup list of values, as described in 11.Choose File → Save. In the Save As dialog box, type frm_Customers, and then click OK.
Access offers to save the Autoform with the default name Customers. But you may want to take a naming tip from the pros: Save objects like tables and forms with a prefix that helps distinguish similarly named objects. For example, rather than just save a form as Customers, you can save it as frm_Customers to avoid confusion with the table named Customers. (In fact, you could even name the Customers table tbl_Customers.)


When you’re done, you can close the Customers form window. If you’re moving on to the next section, leave the CreatingForms database open.
Creating Forms with the Form Wizard
The Form Wizard is the happy medium of forms creation. Using it is almost as easy as creating an Autoform, but the wizard gives you a lot more flexibility. Unlike an Autoform, the wizard lets you do the following:
Use multiple tables or other data sources with your form. For example, you could put all the fields from a Customers table on your form, and then add one field from an Orders table.
Choose which fields you want to include on your form.
Specify the order in which fields appear on your form.
Select a visual style for your form.
There’s really no downside to using the Form Wizard unless you need a form with unusual features or tabbed pages: The wizard can create any common type of form. Most of the time, you’ll need to fine-tune the forms created by the wizard, but using it is still much quicker and much less work than doing all the form layout yourself. You go through five chief phases to design a form using the Form Wizard.
Phase 1: Choosing a Record Source
In phase 1 of the process, you start the Form Wizard and choose a record source. Your record source can be a table from any open Access database or a query.
Open the CreatingForms example database. It’s the same one used in the preceding section. Next you’ll do the following:
In the Database window’s Objects bar, click Forms, and then double-click “Create form by using wizard.”
Access displays the first Form Wizard screen, as shown in Figure 3-5.
An alternative method: In the Objects bar, click Forms, and then click New. Click Form Wizard, choose a table from the pop-up menu, and then click OK.
Figure 3-5. After you choose a table in the first Form Wizard screen, the fields from that table appear in the list box at the left. Move the fields you want to include on your form into the list on the right by using the arrow buttons. The whole routine is described in Phase 2: Choosing Fields.Click the Tables/Queries list box and observe that it lists all the tables in your database. Choose Table:Customers.
The wizard selects the Customers table as the data source for your form and shows the table’s fields in the Available Fields list.

The next phase is important: telling Access which fields you want to appear on the form, which may not be all of them. For example, if you’re creating a simple form for quickly looking up phone numbers, you can leave off, say, PostalCode.
Phase 2: Choosing Fields
In this phase, you choose the fields that you want to appear on your form, providing the groundwork for your form’s layout. Unlike an Autoform, the Form Wizard lets you choose not only which fields to include, but also the order in which they’ll appear on the form. The wizard gives you four buttons to use to select and unselect fields from your form (see Figure 3-5):
The > button moves the currently highlighted field from the Available Fields list to the Selected Fields list so that Access includes it on your form.
The >> button moves all fields from the Available Fields list to the Selected Fields list so that Access includes all of them on your form.
The < button removes the currently highlighted field from the Selected Fields list and puts it back in the Available fields list. The field doesn’t appear on your form unless you move it back into the Selected Fields list.
The << button removes all fields from the Selected Fields list and puts them back in the Available Fields list. It’s a godsend when you realize you’ve chosen fields in totally the wrong order. Click this button if you need to start fresh.
In this example, suppose you want to use all your fields on the form but not in the same order as they appear in the table. Here’s how to do it:
In the Available Fields list, click CustomerID, and then click the > button.
The wizard moves the CustomerID field into the Selected Fields list.
In the Available Fields list, click FirstName, click the > button, and then add the LastName field in the same way.
The wizard moves the FirstName and LastName fields into the Selected Fields list. On your form, the FirstName field appears before the LastName field.
Oops—you’ve changed your mind about putting the FirstName field first, so click it to make sure it’s highlighted, and then click the < button.
The wizard removes FirstName from the Selected Fields list.
As you may have noticed in steps 1 and 2, when you click the > button to add a field, Access places it below whatever field’s currently highlighted in the Selected Fields list. You want FirstName to come after LastName, so make sure LastName is highlighted in the Selected Fields list before going on to the next step.
In the Available Fields list, click FirstName. Click the > button.
FirstName shows up below LastName in the Selected Fields list. (If you do something different and get confused, remember what the << button is for.)
The remaining Available Fields list is already ordered correctly for the form, so click the >> button to move all of the fields at the same time.
The wizard moves all the fields to the Selected Fields list and adds them under the FirstName field. The fields appear on the form in the same order as the list.
Click Next.
Access displays the second Form Wizard screen (Figure 3-6).

Phase 3: Choosing a Form Layout
In this phase, you choose how to arrange the controls on your form. The Form Wizard gives you almost exactly the same layout choices as you get with Autoforms: Columnar, Tabular, Datasheet, Pivot Table, and Pivot Chart (Jumpstart: Good Form). The only additional layout you get is Justified, which arranges the fields in a neat series of boxes on the screen.
In this example, you’ll get to see how a Justified layout looks, compared to the Columnar layout used for the Autoform earlier in this chapter. Here’s how to choose the layout for your form:
On the third wizard screen, the Columnar layout is already selected. Click the Justified radio button.
The screen shows a thumbnail preview of the justified form layout. (If you want, click the radio buttons for the other form layouts to see how they look.)
Click Next.
Access applies the justified layout to the form and displays the third Form Wizard screen as shown in Figure 3-7.
Phase 4: Choosing a Form Style
In this phase, you choose a form style, a bunch of visual settings that determine how your form looks, including elements like your form’s background color, type font, and whether or not field boxes have a 3-D look. Just like form layout, form styles are purely cosmetic and have no effect on how your forms work. Therefore, you can pick any style that pleases you.
Tip
Access’s predefined form styles make your work easier. Because each style is a collection of visual settings, you can get the same result by using a form’s property sheet to choose each setting manually. If you get your form looking a way you especially like, you can even save that collection of settings as a new form style: See the box in Power users’ clinic: Create Your Own Form Styles.
Access lets you pick from 10 different predefined styles for your forms. If you think they’re exactly the same ones you chose from for your database as a whole in Chapter 1, you’re right. When the third Form Wizard screen opens, it shows the style you picked the last time you created a form. If you haven’t created any forms before, it shows the Standard style.

To choose a form style:
Click several styles in the list to see how they look.
As you click styles, the screen shows a preview of each, as shown in Figure 3-7.
Click the Expedition style for a nice, earthy effect, and then click Next.
Access applies the Expedition style to the form and displays the final Form Wizard screen (see Figure 3-8).

Phase 5: Naming and Saving the Form
The final phase lets you name and save your form. Yet the form name you choose here doesn’t appear on the form itself as a form title: Access uses the form name to identify the form in your Database window. If you want to add a form title, you’ll need to use the Design window and put the title in a label control.
In the “What title do you want for your form?” box, delete the name that’s already there and type frm_Customers_just.
Access lists the form in the Database window.
Click Finish.
Access creates the form and opens it on your screen (see Figure 3-9).
Modifying the Form Design
After you’ve create a form using the Autoform or Form Wizard, you can open the form in Design view to tweak it a bit and make sure the results are exactly what you want. You may not get many design choices with an Autoform, and even the Form Wizard doesn’t give you full control, but once you’ve saved a form you’ve made using either of those methods, you can open it up in Design view and modify it any way you like.
Open the frm_Customers form you created earlier in this chapter. If you don’t have one, create a quick Autoform now, as described in Creating Autoforms. Take a look at the Columnar layout that Access designed for you. It’s got a few flaws:
The field labels have no spaces in them.
The form has no title at the top.
The Special Offers checkbox is higher than its label. (Admit it: This is driving you crazy.)
To modify the form, choose View → Design View or click the Design button (with little pictures of a pencil and a triangle) at the left end of the Access toolbar. Access opens your form in the Design window (see Figure 3-10). Maximize the Design window.

Editing the Labels
The first change you want to make is to put spaces into the field labels. If the form’s property sheet isn’t visible, choose View → Properties or press Alt+Enter to display it. Then proceed as follows:
When you have a form open in Design view, Access displays the Toolbox, which contains controls you can put on your form. If the Toolbox isn’t visible on your screen, choose View → Toolbox to make it appear. Choosing View → Toolbox again dismisses it, but such drastic measures are rarely necessary. If the Toolbox is blocking part of the form you’re working on, simply drag it out of the way by its title bar.
The arrow button at the upper left is the tool you’ll use most often—the selection tool. You click with the selection (arrow) tool to tell Access which design element in the window you want to work on. The other buttons let you add and edit labels, controls, and other elements of a form. If you’re not sure what a tool does, just hold the mouse pointer over it and a tool tip explains its purpose (label, text box, and so forth).

Click the CustomerID label to select it, and then click it once more between “Customer” and “ID.”
Access positions the text cursor right after the “r” in “Customer.” (If the Toolbox or property sheet’s in your way, just drag them away from the Design window.)
Press the Space bar, and then click a blank area of the form.
Access inserts a space between “Customer” and “ID.”
Click the FirstName label to select it, and then look at the property sheet.
The list box at the top of the property sheet says FirstName_Label: It means that if you make any changes in the property sheet, Access applies them to the FirstName label.
In the property sheet, click the Format tab to make sure it’s in front. Then in the Caption box, click right between “First” and “Name” in the word “FirstName.” Press the Space bar, and then press Enter.
Access inserts a space in the label. It now says “First Name.” If you want, use either method to insert spaces between words in other labels.
Adding a Title in the Form Header
Next, say you want to add a title at the top of the form. To do that, you’ll use the Form Header section of your form: That’s where you put titles, logos, and other material that you want at the top of the form. Forms also have a Form Footer section where you can put material that you want at the bottom of the form. To add a title to the Form Header section:
Open the list box at the top of the property sheet, and then choose Form Header.
Access selects the Form Header section. If you make any changes in the property sheet, Access applies them to that section of the form.
Click the Format tab to make sure it’s in front, click in the Height box, and then delete its contents. Type 1.5, and then press Enter.
Oops! That’s a bigger form header than you wanted.
Hold the mouse pointer over the top border of the horizontal gray bar at the bottom of the Form Header section until the pointer turns into a double arrow; see Figure 3-11. Slowly drag the border up until it’s even with the thin black grid line that marks a one-inch height for the section.
Access changes the section height to one inch. Notice that the Height box in the property sheet now indicates the same thing: one inch.
In the Toolbox, click the Label tool. That’s the tool marked with the letters Aa. Click near the top-left corner of the Form Header section. (For more information about the Toolbox, see the box in Jump Start: Using the Toolbox.)
A small text box appears where you can type a label.
Type Cambridge Typewriters Customer, and then press Enter.
Access adds the label to your form. The label is still selected.
In the property sheet, scroll down in the Format tab, and then click in the Font Size box. An arrow button appears, indicating that the box has a drop-down list. Click it, and then choose 18.
Now that you’ve resized the text, you need to make room for it, which you’ll do next.
Position the mouse pointer over the bottom-right corner of the label until the pointer turns into a double arrow. Drag the corner down and to the right to make the label big enough to show the enlarged text.
Dragging a Control
Next, you’ll drag the Special Offers checkbox down a bit so it isn’t higher than its label. Dragging a field is a little trickier than you may imagine. When Access puts a field on a form, it groups the field together with its label. If you try to drag the field, you end up dragging the label at the same time.
The solution is to look at the mouse pointer. When you click a field to select it, you automatically select its label at the same time. If you then hold the mouse pointer over the field, the pointer changes into one of two shapes:
A hand with all five fingers extended. Dragging with this pointer drags both the field and its label.
A hand with only one finger extended. (No, it’s not that finger.) This pointer lets you drag only the label or the field—whichever one the pointer is over.
To drag the checkbox, scroll down in the Design window, if necessary, so you can see the Special Offers label and checkbox. Next:
Click the checkbox to select it. Move the mouse slightly over the checkbox and the label and observe what happens to the pointer.
Sometimes the pointer has its normal appearance (an arrow), sometimes it’s the five-finger hand, and sometimes it’s the one-finger hand.
When the mouse pointer turns into a one-finger hand over the checkbox, drag the checkbox down a tad.
The checkbox is now even with the label.
Choose File → Save to save the design changes, and then choose View → Form View to see the results of your hard work.
Because you added a form header, you may need to make the Form window bigger to see the entire form. You can drag the bottom border of the Form window (with the double-arrow pointer) in the same way as anything else in Access.
Close the form when you’re done.
Creating Forms in Design View
Normally, it’s most efficient to create your forms with the Form Wizard and then use the Design window to modify them. However, there are times when you should start in the Design window, especially if you’re brimming with creative ideas or have a very complex form in mind. For example, for a form with multiple tabbed pages, the Design window is often easier because you create the tabbed pages at the outset. If you’d started with the Form Wizard, you’d spend lots of extra time trying to rearrange the fields from the original nontabbed design.
In this section, you’ll learn the basics of creating a form in the Design window. Along the way, you’ll learn to use the Image control in the Toolbox.
Phase 1: Starting Your Design
For your first form, you’ll start with a fairly simple one. Because it’s already got some good tables to work with, open the CreatingForms database. If you haven’t downloaded the example files for this chapter, do so now (Example Databases), because there’s an image file in there you’ll need for this tutorial. Then follow these steps:
In the Database window, click Forms in the Objects bar, and then double-click “Create form in Design view.”
Access displays the Design window as shown in Figure 3-12. To set up your workspace, double-click the Design window’s title bar (it says Form1:Form) to maximize the window. If the property sheet doesn’t appear, choose View → Properties to display it. In the next step, you’ll define the boundaries of the form itself.
Drag the bottom border of the work area down to three inches on the vertical ruler. Then drag the right border of the work area out to six inches on the horizontal ruler.
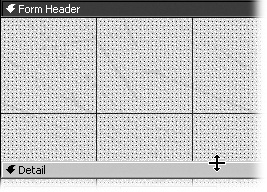
To this blank canvas, you need to add the individual parts that make up a form. In this example, you’ll add a header and footer.
Choose View → Form Header/Footer to add header and footer sections to the form.
Notice that your form now has three sections: Form Header, Detail, and Form Footer. The Detail section is where you put most of the form content, like fields and labels. Use the Form Header section for logos, form titles, and other material you want at the top of your form. Use the Form Footer section for material you want at the bottom of your form.
Drag the bottom border of the Form Header section down to the one-inch mark on the vertical ruler.
You’ve just created a one-inch-deep header for your form.

Phase 2: Choosing a Data Source
Next, you need to choose a data source for your form. Not all forms use a data source, but for data entry and display, you have to associate your form with at least one data source:
In the property sheet, make sure that the list box at the top of the sheet shows that you’ve got the form selected. If it doesn’t, open the list box and select Form.
Another way to select the form is to choose Edit → Select Form. A third way is to press Ctrl+R.
In the property sheet, click the Data tab. On that tab, click the down arrow to open the Record Source list.
The list contains all the tables in the database.
Click Customers.
Access selects the Customers table as the data source for your form. As soon as you choose a data source, Access displays list of fields from the data source you chose (see Figure 3-13).

Phase 3: Adding Fields to the Form
Your next step is to add fields from the field list to the form. You’ll also align the fields and their labels so that the form looks nice and symmetrical.
In the field list, click FirstName and drag it onto the Detail section about a half inch below the top and one inch from the left margin.
If you drag a field too close to the left margin of the form, the field box sometimes overlaps with its label because the label has bumped up against the left margin. You can use the one-finger mouse pointer to drag the field box away from the label, but it’s usually easier just to delete the field from the form and drag it onto the form again.
In the field list, click LastName and drag it onto the Detail section about one inch from the top margin and three and a half inches from the left margin.
Access puts the field on the form. The form looks awful because the FirstName field isn’t even with the LastName field. You can see that the LastName field is selected because it has the border with the drag handles.
Position the mouse pointer above and to the left of the FirstName field, and then drag down and to the right until the pointer is below and to the right of the LastName field.
You’ve selected both the FirstName and LastName fields, as well as their labels.
Choose Format → Align → Top.
Access aligns the fields vertically. You can use the same trick (Format → Align) to align selected controls horizontally.
Phase 4: Adding Images to the Form
Since the whole point of designing your own form is to exercise some creativity, you’ll add an image to the Form Header section. This image isn’t connected to any field; it’s just to make the form look nicer. Even if you’re aesthetically challenged, give it a shot:
In the Toolbox, click the Image control.
The Image control has a picture of a mountain with no cactus. If you’re not sure which is the Image control, hold the mouse pointer over the controls in the Toolbox. Tool tips pop up to identify each tool for you.
Click the top-left corner of the Form Header section.
Access displays the Insert Picture dialog box.
Browse to and select RoyalQuietDeluxe.jpg, and then click OK.
Access inserts the image at the top-left corner of the Form Header section. If it’s not exactly where you want, you can drag it just like any other control.
Phase 5: Adding a Form Style
Even when you start in Design view, you can add one of Access’s canned styles to a form just as you do when you use the Form Wizard. The process is a little odd, but here it is:
Choose Edit → Select Form to select the entire form.
You’ll know you’ve done it right if little boxes and selection handles appear all over your form in the Design window.
Choose Format → AutoFormat to open the AutoFormat dialog box (Figure 3-14). In the Form AutoFormats list, click the Blends style, and then click OK twice.
Access applies the style to the form.
Phase 6: Naming and Saving the Form
Your final step is to name and save your form design. By now, these steps should be familiar:
Choose File → Save.
Access displays the Save As dialog box.
In the Form Name text box, type frm_Customers_design and click OK.
Access saves your form.
Choose View → Form View to display your form for data entry.
Notice that the form has the same navigation buttons at the bottom of the window as you’ve seen before: First Record, Previous Record, Next Record, Last Record, and New Record. You can enter records exactly as described in Adding Records Using a Form.

When you’re done admiring your work, click Close at the top-right corner of the Design window.
In the next chapter, you’ll learn how to crank up your databases with table-to-table links. A whole new level of possibility awaits: When you use related information from multiple tables in a database, you can make your forms, reports, and other database tools work even harder for you.