
Chapter 5. Recipient Management
Introduction
Recipient objects in Exchange 2000 and Exchange Server 2003 fall into some fairly basic categories, most of which are based on underlying Active Directory concepts. The first, and arguably most important, distinction is between objects that can be used to log on and those that cannot. The former are known as security principals because they contain a security identifier (or SID) and a few other attributes necessary for authenticating the principal’s credentials against Active Directory. User accounts are security principals; contacts and distribution groups are not.
The next important distinction to draw is between objects that are
mail-enabled and those that are
mailbox-enabled. Mail-enabled objects have at least
one email address associated with them. A contact (what old Exchange 5.5
hands would call a “custom recipient”) is a great example: it exists in
the directory, and it has an email address, but it doesn’t have a
mailbox associated with it. Several classes of object can be
mail-enabled. However, only user and InetOrgPerson objects can generally be
mailbox-enabled; whenever you see that term applied, it means that the
object has an Exchange mailbox associated with it. (There are a few
other object types, including recipient policies, public folders, and
site replication service objects, that can be mailbox-enabled by
Exchange, but we won’t be treating them as recipients in this
chapter.)
For objects that represent people, we have three general classes to think about:
- User objects
These are security principals that can be mailbox-enabled. A mailbox-enabled user is associated with at most one Exchange mailbox; every mailbox in the store is owned by exactly one mailbox-enabled object.
- Contact objects
These are not security principals so they can’t be mailbox-enabled, but can be mail-enabled. Contacts appear in the GAL just like user accounts do, but they can’t be used to log on, and the associated email addresses may only be used for mail forwarding.
- InetOrgPerson objects
The base Active Directory schema used with Exchange 2000 and Windows 2000 provides only for Windows-style user accounts. However, the IETF (and a number of other X.500-based directory services) define uses for the InetOrgPerson object class; this is basically an alternate to the Active Directory way of representing a user. InetOrgPerson support is included in Windows Server 2003 and Exchange Server 2003; although it is mostly used for compatibility with foreign directory services, InetOrgPerson objects can be used anywhere a user object can be. We won’t be talking about them in this chapter.
Of course, people aren’t the only things we can represent: we can aggregate lots of people into group objects. Microsoft has long advocated using groups for permission assignment, and Windows 2000 and Windows 2003 support a variety of group scopes that we’ll mostly ignore here (including local, global, and universal groups). However, there are two group types that have a direct bearing on Exchange: security groups and distribution groups. In Exchange 5.5, you could assign permissions to objects using a distribution list (DL). In Exchange 2000 and later, you can’t exactly do this, because distribution groups aren’t security principals. Security groups are principals, so they can be used for access control. Both of these group types may be mail-enabled, so you can duplicate the distribution behavior of an ordinary Exchange 5.5 DL by creating a mail-enabled distribution group, or you can create a security group and mail-enable it to provide both access control and ease of mailing to all the group members from a single address. Exchange will convert distribution groups to security groups under some circumstances, as described in Chapter 10 of the Exchange 2000 Resource Kit.
Because of these distinctions, it can be confusing to talk about objects without using the correct set of adjectives—if we say “We created a user account for Joe,” it’s not clear whether we also meant that we created a mailbox for him unless we say so. The recipes in this chapter cover creating and removing mailboxes and email addresses for mail- and mailbox-enabled objects, as well as creating, removing, and modifying various object types.
The ExchMbx Tool
Joe Richards, one of the technical reviewers for this book, has written a terrific command-line tool called ExchMbx, available from JoeWare.net (http://www.joeware.net/win/free/tools/exchmbx.htm). This tool allows you to mail-enable users, groups, and contacts, remove Exchange attributes from selected objects, and do a number of other interesting and useful things. Best of all, it can be used with the JoeWare adfind utility so that you never have to type another long user DN on a command line—feed adfind your search criteria, then pipe its results to exchmbx and you’re golden.
5.1. Creating a User Account and Mailbox
Solution
Using a graphical user interface
Open the Exchange-enabled version of the Active Directory Users and Computers (ADUC) snap-in (Users and Computers.msc).
Ensure that you are connected to the correct domain for the new user object.
In the left pane, browse to the appropriate container for the new user account, right-click on it, and select New→ User.
Enter the proper values for the first name, last name, full name, and user logon name and click Next.
Enter and confirm the password, set the password flags as appropriate, and click Next.
Ensure the Create an Exchange Mailbox checkbox is selected and that the alias, server, and mailbox stores are correct. Click Next.
Confirm the information and click Finish.
Using a command-line interface with dsadd
You can use the dsadd
command to add
new user accounts from the command line. Here’s an example:
> dsadd user "cn=DavidR,cn=Users,dc=robichaux,dc=net" -samid "david"
-fn "David" -mi "P" -ln "Robichaux" -display "David P. Robichaux"
-memberof "Family" -mustchpwd yes
This creates a new user account for David. The account’s SAM
ID is [email protected] (which is also the UPN, since we didn’t
use the -upn switch); the other
switches are self-explanatory. dsadd lets you specify a number of
attribute values at creation time, including telephone and fax
numbers, home directory and drive information, and password policy
settings. In this case, the only significant attribute we added was
to force David to change his password the first time he logs on with
-mustchpwd yes.
Once the user object has been added, you can use exchmbx with the -me switch to mail-enable it, like
this:
> exchmbx -b "cn=David Robichaux,cn=users,cn=robichaux,cn=net"
   -me [email protected]
Using a command-line interface with ldifde
Use your favorite text editor to create an LDIF file. The file should appear as below, customized for your environment:
# ------------------import-user.ldf--------------------- dn: cn=
<userCN>,cn=Users,<ForestRootDN>changetype: add CN:<userCN>objectClass: user samAccountName:<userAccount>givenName:<firstName>sn:<lastName>userAccountControl: 514 userPrincipalName:<userAccount@domain>Save the file with a .ldf extension.
Next, run the following command:
> ldifde -i -f
<fileName>.ldf -s DCname -j c: empUse exchmbx with the
-crswitch to mail-enable the newly created user object. This requires you to know the user’s DN, the address you want to assign, and the server, storage group, and mailbox database where you want to create the mailbox. For example:> exchmbx -b "CN=paulr,CN=Users,DC=robichaux,DC=net" -cr "batman:First Storage Group:Mailbox01"
This will create a new mailbox for the user named
paulrin the Users container of the http://robichaux.net domain. The mailbox will be created in the Mailbox01 mailbox database of First Storage Group on the server named batman.
Using VBScript
' This code creates a new user mailbox, then mail-enables
' it by creating a mailbox in the first MDB on the server.

' ------ SCRIPT CONFIGURATION ------
strDCName = "<DC>"             ' e.g., "batman"
strUserName = "<userName>"     ' e.g., "jrandomuser"
strFirstName = "<userFirst>"   ' e.g., "Joe"
strLastName = "<userLast>"     ' e.g., "Blow"
strPassword = "<password>"     ' "G0bbeldygook!#"
' ------ END CONFIGURATION ------

Set oIADS = GetObject("LDAP://RootDSE")
strDefaultNC = oIADS.Get("defaultnamingcontext")
strConfigNC = oIADS.Get("configurationNamingContext")
strContainer= "/CN=Users," & strDefaultNC
Set objContainer = GetObject("LDAP://" & strDCName & strContainer)
Set NewUser = objContainer.Create("User", "cn=" & strUserName)
With NewUser
  .firstName = strFirstName
  .lastName = strLastName
  .Put "sAMAccountName", strUserName
  .SetInfo
End With

With NewUser
   .AccountDisabled = False
   .SetPassword strPassword
   .SetInfo
End With

' Open the connection.
Set theConnection = CreateObject("ADODB.Connection")
set theCommand = CreateObject("ADODB.Command")
Set theRecordSet = CreateObject("ADODB.Recordset")
theConnection.Provider = "ADsDSOObject"
theConnection.Open "ADs Provider"

' Build the query to find the private MDBs. Use the first
' one if any are found.
strQuery = "<LDAP://" & strConfigNC & _
    ">;(objectCategory=msExchPrivateMDB);name,adspath;subtree"

theCommand.ActiveConnection = theConnection
theCommand.CommandText = strQuery
Set theRecordSet = theCommand.Execute
If Not theRecordSet.EOF Then
    theRecordSet.MoveFirst
    firstMDB = CStr(theRecordSet.Fields("ADsPath").Value)
Else
    firstMDB = ""
End If

' create the mailbox
With NewUser
  .CreateMailbox firstMDB
  .SetInfo
End With
WScript.Echo "Mailbox created successfully"
Discussion
While you can create a mailbox using ldifde, we’re not going to show you how to
do it, because it doesn’t really work properly, as the msExchMailboxSecurityDescriptor attribute
can’t be correctly set through ldifde. You can use the information
included within this recipe to create the user object, but you then
need to manually mailbox-enable the user object through ADUC (this was
determined after a painful amount of testing the creation of a
mailbox—once we determined that the mailbox
looked right, but wasn’t working right, we did a
little more research and found out that Microsoft definitely doesn’t
recommend the creation of mailboxes through ldifde imports). However, the exchmbx tool fixes this problem by making
it easy to mail-enable newly created mailboxes or contacts from the
command line correctly, so feel free to use this method if it’s
appropriate for your environment.
The creation of a mailbox via a script is really a two-step process, and it’s imperfect at best. Basically, what we’ve done is create a new user account in Active Directory, then used the script that is also used for Recipe 5.2 to mailbox-enable that user account. The discussion for Recipe 5.2 explains a lot of the process, so we’re going to point you to that.
See Also
MS KB 305144 (How to Use the UserAccountControl Flags to Manipulate User Account Properties), MS KB 324353 (Users Cannot Access Public Folders or Delegate Mailboxes on a Separate Server), RFC 2849 (The LDAP Data Interchange Format (LDIF)—Technical Specification), MS KB 293339 (How to create a mailbox-enabled user with CDOEXM in Visual C++), and MS KB 237677 (Using LDIFDE to Import and Export Directory Objects to Active Directory); exchmbx documentation at http://joeware.net
5.2. Creating a Mailbox for an Existing User
Problem
You have an existing account that isn’t mailbox-enabled; you need to create a mailbox for it.
Solution
Using a graphical user interface
Log on to any machine in your domain that has the Exchange management tools installed.
Open the ADUC snap-in (Users and Computers.msc).
Locate the account for which you want to create a mailbox.
Right-click the target account and choose the Exchange Tasks command.
The Exchange Task Wizard will appear. (You may see a welcome page first; if so, click Next to move past it.)
From the Available Tasks window, choose Create Mailbox and click Next.
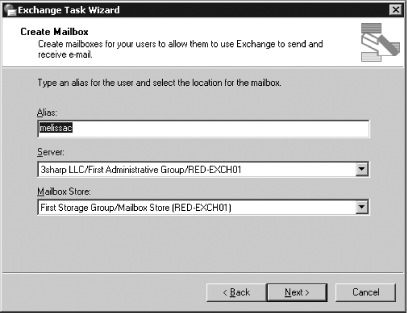
On the Create Mailbox page (see Figure 5-1), fill in the alias you want the mailbox to have, then select a server and mailbox store from the drop-down listings. Note that you may not be able to easily move the user’s mailbox later, depending on your organization and site configuration, so choose carefully. Click Next.
The Task in Progress window will briefly appear, then you’ll see a completion page that indicates whether the mailbox creation succeeded or not. Click Finish.
Using a command-line interface
Use exchmbx with the
-cr switch to specify the server,
storage group, and mailbox database where you want the user’s
mailbox to be created:
> exchmbx -b <userDN> -cr <server>:<storageGroup>:<mailboxDatabase>
Using VBScript
' This code adds a mailbox in the first MDB on the server to an
' existing user object
' ------ SCRIPT CONFIGURATION ------
strDCName = "<DC>"    '  e.g., "batman"
strUserName = "CN=<userCN>"        ' e.g., "Random User"
' ------ END CONFIGURATION ------

' get the default and config NC names
Set oIADS = GetObject("LDAP://RootDSE")
strDefaultNC = oIADS.Get("defaultnamingcontext")
strConfigNC = oIADS.Get("configurationNamingContext")
strContainer= "/CN=Users," & strDefaultNC
Set objContainer = GetObject("LDAP://" & strDCName & strContainer)

' find the target user
Set oIADSUser = GetObject("LDAP://" & strUserName & ",CN=Users," & strDefaultNC)
Set oMailBox = oIADSUser

' Open the Connection.
Set oConnection = CreateObject("ADODB.Connection")
set oCommand = CreateObject("ADODB.Command")
Set oRecordSet = CreateObject("ADODB.Recordset")
oConnection.Provider = "ADsDSOObject"
oConnection.Open "ADs Provider"

' Build the query to find the private MDBs. Use the first one if any are found.
strQuery = "<LDAP://" & strConfigNC & _
    ">;(objectCategory=msExchPrivateMDB);name,adspath;subtree"
oCommand.ActiveConnection = oConnection
oCommand.CommandText = strQuery
Set oRecordSet = oCommand.Execute
If Not oRecordSet.EOF Then
    oRecordSet.MoveFirst
    firstMDB = CStr(oRecordSet.Fields("ADsPath").Value)
Else
    firstMDB = ""
End If

' create the mailbox
oMailbox.CreateMailbox firstMDB
oIADSUser.SetInfo

WScript.Echo "Created mailbox for " & strUserName
Discussion
Creating a mailbox for an account that already exists is
relatively straightforward; actually, Microsoft only supports using
ADSI or the CDOEXM CreateMailbox
method to create the mailbox. That’s because mailbox
creation actually has four distinct phases:
The user account is created and enabled. You can do this manually or with an ADSI script. At this point, the user can log on and work, but he doesn’t have access to his own mailbox because it doesn’t exist yet.
An administrator mailbox-enables the account. The two methods shown above are logically equivalent; the most important aspect of these methods is that both of them ensure that the
msExchMailboxSecurityDescriptorattribute on the account is correctly filled in. This attribute contains a partial copy of the security descriptor that’s stored as part of the mailbox data in the Exchange mailbox database. If the descriptor isn’t set properly, the user won’t be able to access mail and public folder data. (A side effect of this relationship is that you can only change ACEs on the mailbox by changing them in the store; any changes you make to the AD attribute will be overwritten by the store’s copy of the ACL.)When the Recipient Update Service runs, it stamps several additional properties on the user object. At this point, the user is completely mailbox-enabled, but there’s not actually a mailbox in the database yet.
When a user logs on to the mailbox, or when someone sends mail to that mailbox, Exchange will create it.
The reason you need to understand this process is timing. Until step 4, the user can’t log on to the mailbox because it hasn’t been created. For that reason, many organizations want to automate their mailbox provisioning by setting the security descriptor and other attributes manually; that way, instead of waiting for steps 3 and 4 to finish, users can log on and use their mailboxes immediately after creation. (Actually, these scripts normally send mail to the users as part of the setup process, so step 4 really does occur.) MS KB 304935 describes the somewhat involved process required to set mailbox rights on a newly created mailbox; it’s far simpler and safer to let the RUS and store do the work instead, so that’s the approach we present here.
See Also
Recipe 5.1 for
creating a user and mailbox together, MS KB 313420 (How To Add a
Mailbox to an Existing User Account in Exchange 2000 Server), MS KB
275636 (Creating Exchange Mailbox-Enabled and Mail-Enabled Objects in
Active Directory), MS KB 327079 (How to programmatically create a
mailbox for an existing user in the Active Directory by using CDOEXM),
MS KB 304935 (How to set Exchange 2000 mailbox rights at the time of
mailbox creation), and MSDN: IMailboxStore::CreateMailbox; exchmbx documentation at http://joeware.net
5.3. Removing a Mailbox for an Existing User
Solution
Using a graphical user interface
Log on to any machine in your domain that has the Exchange management tools installed.
Open the ADUC snap-in (Users and Computers.msc).
Locate the account whose mailbox you want to delete.
Right-click the target account and choose the Exchange Tasks command.
The Exchange Task Wizard will appear. (You may see a welcome page first; if so, click Next to dismiss it.)
From the Available Tasks window, choose Delete Mailbox and click Next.
The Delete Mailbox page appears, along with a warning that deleting the mailbox will delete the messages it contains. Click Next if you really want it deleted.
The Task in Progress window will briefly appear, then you’ll see a completion page that indicates whether the mailbox creation succeeded or not. Click Finish.
Using a command-line interface
Use exchmbx with the
-clear switch to remove the
mailbox from the specified user:
> exchmbx -b <userDN> -clearUsing VBScript
' This code removes the mailbox associated with the specified ' account. Once it's gone, it can still be retrieved, until the ' deleted mailbox retention period expires ' ------ SCRIPT CONFIGURATION ------ strDCName = "<ServerName>" ' e.g., CONT-EXBE01 strUserName = "/cn=<User>, CN=Users,<ForestRootDN>" ' ------ END CONFIGURATION --------- ' find the target user strQuery = "LDAP://" & strDCName & strUserName Set theUser = GetObject(strQuery) if (theUser.HomeMDB = "") then WScript.Echo strUser & " doesn't have a mailbox" else theUser.DeleteMailbox theUser.SetInfo WScript.Echo "Deleted mailbox for " & strUser end if
Discussion
In keeping with science-fiction author Spider Robinson’s famous
dictum that it’s easier to build a tape eraser than a tape recorder,
it turns out that removing a mailbox is simpler than creating one. The
CDOEXM DeleteMailbox method does all the dirty work. In the previous script,
you have to supply the user’s DN and the name of a DC, so that ADSI
can be used to identify the mailbox; after that, deleting the mailbox
itself is simple. When you delete the mailbox, two things happen: the
mail-enabled attributes are removed from the user object (which will
then be replicated to other DCs in the same domain, and then to GCs
throughout the forest), and the mailbox table, and its associated
data, will be marked for deletion in the information store. Don’t
delete a mailbox unless you really want to get rid of it, because once
the store deletes it, you’ll find it difficult to get it back; you can
disconnect mailboxes or disable accounts if you want to prevent access
while still preserving your opportunity to restore access
later.
See Also
Recipes Recipe
5.1 and Recipe
5.2 for creating mailboxes and user objects, MS KB 297398
(HOWTO: Delete a Mailbox Using CDOEXM and Visual C++ ), and MSDN:
IMailboxStore::DeleteMailbox.
5.4. Creating a Mail-Enabled Group
Solution
Using a graphical user interface
Log on to any machine in your domain that has the Exchange management tools installed.
Open the ADUC snap-in (Users and Computers.msc).
Locate the container in which you want the new group to reside.
Right-click the target container and choose the New→ Group command.
The New Object - Group dialog will appear.
Provide a name for the group and select its scope.
Click the Distribution radio button and then click Next.
Check the Create an Exchange email address checkbox. Give the group a mail alias in the Alias field, then select the administrative group that should own the group object. Click Next.
Click Finish on the summary page.
Using a command-line interface
You can use the
dsadd command (which ships with Windows Server
2003 and can be used for some operations on Windows 2000) to add new
groups from the command line. Here’s an example:
> dsadd group "<groupName>" -scope <groupScope>-secgrp { yes | no } -desc <groupDesc>
<groupName> is the full DN of
the group you want to create,
<groupScope> is the group scope
(L for local, G for global, and U for universal), and
<groupDesc> is the description you
want the group to have. The parameter used with the secgrp switch indicates whether you want a
security group (-secgrp yes, the default) or a distribution group
(-secgrp no). Once the group’s added, you can use
exchmbx with the -me switch to mail-enable it, like
this:
> dsadd group "cn=Editors,cn=users,dc=robichaux,dc=net" -scope L
-secgrp yes -desc "Cookbook editors"
> exchmbx -b "cn=Editors,cn=users,dc=robichaux,dc=net" -me
Using VBScript
' This code creates a new mail-enabled group of the specified
' type. You have to specify the container and group name.
' ------ SCRIPT CONFIGURATION ------
 strDCName = "<ServerName>"    ' e.g., CONT-EXBE01
 strContainer= "<containerName>" ' e.g., "/CN=Users, dc=contoso, dc=local"
 strGroupName = "<groupName>" ' e.g., "Led Zeppelin Fans"
 Const ADS_GROUP_TYPE_DOMAIN_LOCAL_GROUP = 4
 Const ADS_GROUP_TYPE_GLOBAL_GROUP       = 2
 Const ADS_GROUP_TYPE_LOCAL_GROUP        = 4
 Const ADS_GROUP_TYPE_SECURITY_ENABLED   = -2147483648
 Const ADS_GROUP_TYPE_UNIVERSAL_GROUP    = 8
' ------ END CONFIGURATION ---------

Set objContainer = GetObject("LDAP://" & strDCName & strContainer)
Set objGroup = objContainer.Create("Group", "cn=" & strGroupName)
With objGroup
  .Put "sAMAccountName", strGroupname
  .Put "groupType", ADS_GROUP_TYPE_UNIVERSAL_GROUP
  .MailEnable
  .SetInfo
End with
WScript.Echo "New group " & strGroupName & " created successfully"
Discussion
Creating a mail-enabled group from a script requires two
separate sets of operations. First, you have to create the group. This
is simple, since you can just use the ADSI Create method to create an object with the
specified location and name (of course, you have to tell Create that you’re creating a group). This
step also requires you to set the group scope, which you do by setting
the groupType attribute. We’ve
included the relevant group types as constants in the previous
script.
After creating the group, you have to mail-enable it so that the
correct proxy addresses are set. In a similar vein, if you create
groups from the command line with dsadd, you’ll need to mail-enable them with
the Exchange Tasks wizard or by using the MailEnable method as shown in the previous
script.
One important note: the groupType attribute stores both the group
scope and its type (that is, whether it’s a security or distribution
group). To create a security group, just set the ADS_GROUP_TYPE_SECURITY_ENABLED to the group
scope flag. For example, to create a security-enabled universal group
in VBScript, you’d write:
objGroup.Put "groupType", ADS_GROUP_TYPE_UNIVERSAL_GROUP Or
ADS_GROUP_TYPE_SECURITY_ENABLED
See Also
Recipe 5.1 and
Recipe 5.2 for
creating mailboxes and user objects, Chapter 7 of Active
Directory Cookbook for more recipes for creating and
removing group objects and manipulating their membership; MS KB 231273
(Group Type and Scope Usage in Windows); dsadd
documentation at Microsoft’s
Windows Server 2003 site
5.5. Controlling Mailbox Size Limits
Problem
You want to apply mailbox size limits to users, groups, or organizational units, but Exchange only lets you set them on servers, mailbox databases, or the Exchange organization.
Solution
Using a graphical user interface
To set mailbox limits on an individual user, do the following:
Log on to any machine in your domain that has the Exchange management tools installed.
Open the ADUC snap-in (Users and Computers.msc).
Locate the account whose mailbox limits you want to change.
Right-click the target account or group and select Properties.
The account properties dialog will appear. Switch to the Exchange General tab (remember, you’ll only see this if you’re editing a mail-enabled object and if you’ve installed ESM on the machine from which you’re running the snap-in).
Click the Storage Limits button; the Storage Limits dialog box will appear.
Uncheck the Use mailbox store defaults button.
Select the desired combination of warning, prohibit send, and prohibit send/receive limits and sizes.
Click OK.
Using a command-line interface
To set a user’s quota limits from the command line, use
exchmbx with the -quota switch:
exchmbx -b<userDN> -quota <warningLimit>:<prohibitSendLimit>:<prohibitReceiveLimit>
You specify the quota limits in kilobytes, using ordinary
integers (e.g., 100000:120000:125000 to specify limits of
100 MB, 120 MB, and 125 MB, respectively). To get mailbox send and
receive limits for multiple users, you can use the csvde
command to generate a CSV file listing the specified
attribute values for all users. Here’s an example:
> csvde -f<fileName> -r<searchFilter>-l "DN, objectClass, name, mDBSTorageQuota,mDBOverQuotaLimit,mDBOverHardQuotaLimit"
<fileName> is the name of the
output CSV file; <searchFilter> is
the search you want to use (”(&(objectClass=User)(objectCategory=Person))"
will grab all mailboxes).
Using VBScript
' This code gets and sets mailbox quotas on the specified user ' ------ SCRIPT CONFIGURATION ------ strServerName = "<ServerName>" ' e.g., CONT-EXBE01 strContainer= ", <container>,<ForestRootDN>" ' e.g., ", CN=users,dc=robichaux,dc=net" strUser= "<UserName>" ' e.g., "Paul Robichaux" ' ------ END CONFIGURATION --------- ' get the target mailbox Set objMailbox = GetObject("LDAP://" & strServerName & "/CN=" & _ strUser & strContainer) ' get the warning limits; these gets will fail if ' the corresponding limit is not defined on error resume next warnLimit = objMailbox.Get ("mDBStorageQuota") prohibitSendLimit = objMailbox.Get ("mDBOverQuotaLimit") prohibitSendReceiveLimit = objMailbox.Get ("mDBOverHardQuotaLimit") ' display the limits, then bump each of them by 10 KB Wscript.echo "Existing quotas for " & strUser Wscript.echo " warning limit: " & warnLimit Wscript.echo " prohibit send limit: " & prohibitSendLimit Wscript.echo " prohibit send/receive: " & prohibitSendReceiveLimit objMailbox.Put "mDBStorageQuota", warnLimit+10 objMailbox.Put "mDBOverQuotaLimit", prohibitSendLimit+10 objMailbox.Put "mDBOverHardQuotaLimit", prohibitSendReceiveLimit+10 objMailbox.SetInfo WScript.Echo "Quotas for " & strUser & " updated."
Discussion
You can set mailbox storage limits in several different places,
depending on how widely you want them to apply. By default, the
storage limits you put on a mailbox (or public folder) database
applies to the objects it contains; however, you can override those
limits for individual mailboxes. As an optimization, only those limits
that are actually set are stored. For example, let’s say you’ve
configured a database to provide a default set of limits of 200 MB for
warning, 300 MB for prohibit send, and 325 MB for prohibit
send/receive. You then edit a handful of mailboxes to apply new
limits, unchecking Use mailbox store defaults and filling in your own
values for the warning limit. If you then try to query the value of
mDBOverQuotaLimit and mDBOverHardQuotaLimit on the mailbox, you’ll
find that these attributes don’t exist; instead, you’ll have to check
the limits on the mailbox store to find out what the default limits
are.
See Also
Recipe 4.5 for applying system policies to servers and Recipe 4.10 for setting default send/receive size limits on messages in transit
5.6. Moving Mailboxes
Solution
Using a graphical user interface
For Exchange Server 2003:
Log on to any machine in your domain that has the Exchange management tools installed.
Open the ADUC snap-in (Users and Computers.msc).
Locate the container that holds the mailbox you want to move.
Select the mailboxes you want to move, then right-click any one of them and choose the Exchange Tasks command.
The Exchange Task Wizard will appear. (You may see a welcome page first; if so, click Next to dismiss it.)
From the Available Tasks window, choose Move Mailbox and click Next.
The Move Mailbox page will appear, showing the server where the target mailbox is currently stored.
Choose the target mailbox server from the Server drop-down listing; it will list only those servers that you can move the mailbox to. For example, if you have front-end servers, they won’t appear in the drop-down listing even if they have mailbox stores.
Choose the mailbox database that you want to hold the mailboxes; the contents of the Mailbox Store database will change to reflect available databases on the selected server.
Click Next and then click Finish.
Wait while the mailboxes are moved.
Using a command-line interface
The -move switch allows you
to specify a target location for the specified mailbox:
> exchmbx -b <userDN>-move<server>:<storageGroup>:<mailboxDatabase>
You specify <server> as a
NetBIOS or FQDN; the <storageGroup>
and <mailboxDatabase> values must
match the server’s names exactly.
Using VBScript
' This code moves the target mailbox to the specified server.
' ------ SCRIPT CONFIGURATION ------
 strServerName = "<ServerName>"    ' e.g., CONT-EXBE01
 strUser= "<UserName>"         ' e.g., "Paul Robichaux"
 strDomain= "<domainPath>"        ' e.g., "dc=robichaux, dc=net"
 strTargetName = "/CN=mdbName,CN=sgName, CN=Information Store,"
 strServerContainer = ",CN=servers,cn=<adminGroup>," &_
     "CN=administrative groups,cn=<orgName>,cn=" &_
     "Microsoft Exchange,cn=Services,cn=configuration," & strDomain
 ' e.g., strServerContainer = ",CN=servers,cn=First Administrative Group," &_
     "CN=administrative groups,cn=Robichaux and Associates,cn=" &_
     "Microsoft Exchange,cn=Services,cn=configuration," & strDomain

' ------ END CONFIGURATION ---------

' get the target user object
what = "LDAP://" & strServerName & "/CN=" & strUser &_
    ",CN=users," & strDomain
Set objUser = GetObject(what)
Set objMailbox = objUser

strTargetMDB = "LDAP://" + strServerName + strTargetName
strTargetMDB = strTargetMDB + "CN=" & strServerName &_
  strServerContainer
objMailbox.MoveMailbox strTargetMDB
objUser.SetInfo
WScript.Echo "Mailbox for " & strUser & " moved to " & strTargetName
Discussion
The process of moving mailboxes is largely the same for Exchange 2000 and Exchange Server 2003. However, the Exchange Server 2003 version of the mailbox mover includes two welcome improvements:
It’s multithreaded, so it takes better advantage of multiprocessor (or hyperthreaded) machines. By default, the mailbox mover will start four concurrent threads. You can move mailboxes from multiple machines, as long as you don’t try to move the same mailbox on more than one machine at a time. For example, you could use workstation A to start a move of all mailboxes in database 1 on server 1 to server 2, then kick off a concurrent session on workstation B to move mailboxes from database 2 on server 1.
With Exchange Server 2003 SP1 and later, it understands how to move mailboxes between different administrative groups and Exchange 5.5 sites. This cross-site functionality is extremely important for Exchange 5.5 migrations, since without it you’d either have to replace each Exchange 5.5 site with an Exchange 2000 or Exchange Server 2003 administrative group or use a third-party migration tool.
Before you can move mailboxes across sites in a mixed 5.5/2000/2003 environment, there are some prerequisite steps you must fulfill:
Install the hotfix described in MS KB 836489 on all of your Exchange 5.5 servers. The fix makes some minor changes to the directory structure, so allow time for directory propagation before you try to move anything.
Upgrade all instances of the ADC in your organization to the version included with Exchange Server 2003 SP1 or later.
Ensure that the Site Replication Service (SRS) is correctly replicating, and receiving, changes in site topology.
The script for this recipe is distinguished largely by the long, ugly set of strings necessary to specify correctly which mailbox DB is to be used. It is necessary to specify the full path to the target MDB, but you don’t have to specify anything about the source mailbox other than the DN of the user.
See Also
MS KB 836489 (an update is required for mixed-mode site consolidation with Exchange Server 5.5)
5.7. Getting Mailbox Access and Logon Information
Solution
Using a graphical user interface
Open the Exchange System Manager (Exchange System Manager.msc).
In the left pane, expand the appropriate Administrative Groups container, and then expand the Servers container.
Expand the storage group and database that hold the target mailbox.
Select the Mailboxes node under the mailbox store object.
Check the Last Logon Time, Last Logoff Time, and Last Logged on By columns in the right ESM pane. (If any of these columns are not visible, use the View → Add/Remove Columns command to make them appear.)
Using VBScript with Exchange Server 2003
' This code retrieves the logon and logoff times for all mailboxes on
' the specified server.
 ' ------ SCRIPT CONFIGURATION ------
 strComputerName = "<ServerName>"  ' e.g., batman
 strE2K3WMIQuery = "winmgmts://" & strComputerName &_
    "/root/MicrosoftExchangeV2"
' ------ END CONFIGURATION ---------

For each mailbox in mboxList
    strOutput = ""
    strOutput = "Mailbox: " & mailbox.MailboxDisplayName & vbCRLF
    theTime = mailbox.LastLogonTime
    If (IsNull(theTime)) then
       strOutput = strOutput & "  Never logged on" & vbCRLF
    else
       strOutput = strOutput & "  Last logon at: " & theTime & vbCRLF
       strOutput = strOutput & "             by: " & mailbox.LastLoggedOnUserAccount
    End If
    WScript.Echo strOutput
  Next
Discussion
Exchange has always tracked who logs on to what mailboxes and
when; it just hasn’t exposed most of this data in a usable way (and
no, printing out screen captures of the mailbox listing described in
the GUI solution doesn’t count as “usable”). The Exchange Server
2003 WMI provider’s Exchange_Mailbox class provides the time
of the last logon and logoff (in GMT), as well as exposes the name
of the last account used to log on to the mailbox. This can easily
be used in scripts that find stale mailboxes that haven’t been used
in a specified period; alternatively, you can use it to find
mailboxes that shouldn’t be used but were. If
you need to get this information from Exchange 2000 or Exchange 5.5
servers without using ESM, you’ll need a third-party reporting/query
tool.
There’s one caveat to this recipe: if you’re using an anti-virus, backup, or other program that logs on to mailboxes with MAPI, the last logon time will be updated when they log on. This means that you can’t rely on the logon times to tell you when the user last logged on to her mailbox. Some third-party tools, such as Quest’s MessageStats, tend to use the tracking logs to obtain information about which mailboxes are active by seeing whether they send any email during the reporting period.
See Also
MSDN: Exchange_Mailbox class
in the Exchange 2003 WMI section of the Exchange SDK
5.8. Determining the Size of a Mailbox
Solution
Using a graphical user interface
Open the Exchange System Manager (Exchange System Manager.msc).
In the left pane, expand the appropriate Administrative Groups container, and then expand the Servers container.
Expand the storage group and database that hold the target mailbox.
Select the Mailboxes node under the mailbox store object.
Check the Size (KB) and Total Items columns in the right ESM pane. (If any of these columns are not visible, use the View→ Add/Remove Columns command to make them appear.)
Using VBScript
' This code lists the size of all mailboxes on the selected server.
' ------ SCRIPT CONFIGURATION ------
 strComputerName = "<ServerName>" ' e.g., batman
 strE2K3WMIQuery = "winmgmts://" & strComputerName &_
    "/root/MicrosoftExchangeV2"
' ------ END CONFIGURATION ---------

' Find each mailbox on the target server and report their
  ' item counts and sizes
  Set mboxList = GetObject(strE2K3WMIQuery).InstancesOf("Exchange_Mailbox")

For each mailbox in mboxList
    strOutput = ""
    strOutput =  "Mailbox: " & mailbox.MailboxDisplayName & vbCRLF
    strOutput = strOutput &  "   " & mailbox.Size & "KB in " &_
         mailbox.TotalItems & " items" & vbCRLF
     WScript.Echo strOutput
 Next
Discussion
The code to find mailbox size is very similar to the code used to retrieve access and logon information. The mailbox size and item count are directly exposed via WMI in Exchange Server 2003, so they’re easy to get. Unfortunately, if you want to get the same information without WMI, you’re consigned to using MAPI: you’ll need to write a script that locates all the mailboxes (easy, given what you’ve learned in this chapter), then logs on to each one using MAPI to retrieve the mailbox size and item count properties. There are two big problems with this approach: one is that logging in updates the last logon time and user, and the other is that you have to run such a script with an account that has read access to all the mailboxes you’re scanning. For those reasons, we haven’t included the script here.
See Also
Recipe 5.7 for
getting mailbox logon information and MSDN: Exchange_Mailbox class
5.9. Recovering a Deleted Mailbox
Solution
Using a graphical user interface
For Exchange Server 2003:
Open the Exchange System Manager (Exchange System Manager.msc).
Expand the Tools node and right-click the Mailbox Recovery Center node.
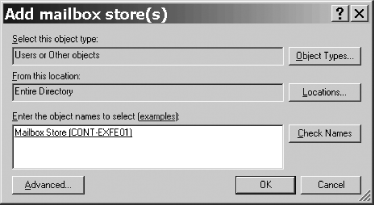
Select the Add Mailbox Store command. The Add Mailbox store(s) dialog box will appear (see Figure 5-2).
Enter the name of the mailbox database that formerly contained the mailboxes you want to recover; there’s no way to browse them. However, you do not need the name of the server or storage group that hosts the mailbox stores in question. You can use the Check Names button to verify that you’ve entered a valid database name. Click OK when you’re done; ESM will update its right pane and list all deleted mailboxes that are still present in the store.
If you don’t see the mailbox you want to recover, that means that it’s gone past the deleted mailbox retention period specified on the database or that it’s actually in a different database. If you do see it, right-click it and select the Find Match command. This starts the Exchange Mailbox Matching Wizard; click Next and the wizard will attempt to match the mailbox to the account formerly associated with it.
The completion screen of the wizard will appear; click Finish after verifying that the mailbox was connected to the right mailbox. If it’s not, you’ll need to right-click the mailbox and choose the Resolve Conflicts command, which shows you a list of potential matches and allows you to pick the correct one.
Right-click the mailbox and choose the Reconnect command. This starts the Exchange Mailbox Reconnect Wizard; click Next to skip its welcome screen, and then click Next to indicate that you really do want to reconnect the mailbox to its parent account.
Click Finish.
Verify the reconnection by having the user log in to the mailbox. (Note that there may be a delay caused by replication; the mailbox may not immediately be available.)
For Exchange 2000:
Open the Exchange System Manager (Exchange System Manager.msc).
In the left pane, expand the appropriate container beneath Administrative Groups, and then expand the Servers container.
Expand the storage group and database that hold the target mailbox.
Right-click the database and choose the Run Cleanup Agent command.
In the list of mailboxes that appears, right-click the target mailbox and choose the Reconnect command.
In the list of Active Directory accounts that appears, select the user account that you want the mailbox connected to, then click OK.
Verify the reconnection by having the user log in to the mailbox. (Note that there may be a delay caused by replication; the mailbox may not be immediately available.)
Discussion
When you delete a mailbox, sometimes you need to get it back. Strategies for doing this vary according to what version of Exchange you’re using:
In any version of Exchange, you can use third-party products like Quest’s Exchange Recovery Manager or OnTrack’s PowerControls to read low-level data from the EDB/STM file and reconstruct the missing data.
In Exchange 5.5, you have to restore a backup of the database to a recovery server, then copy the mailbox data to a PST file, then recreate the “real” mailbox and import the PST file’s contents. This is a time-consuming (nay, painful) process, because every Exchange 5.5 object has an embedded DN that complicates the recovery process significantly.
In Exchange 2000, you can reconnect the mailbox to its own account, or you can restore the database to a recovery server and extract the mail data; it’s somewhat easier to do than in Exchange 5.5, but it’s still not a lot of fun.
In Exchange Server 2003, you can directly restore the deleted mailbox using the Mailbox Recovery Center; you can also use a recovery storage group to mount a backup of the affected database, then move the mailbox data back into the production database.
The Mailbox Recovery Center in Exchange Server 2003 works very much like the deleted item retention behavior for mail items. When you delete an Exchange Server 2003 mailbox, Exchange doesn’t actually remove the associated mailbox data from the store immediately. Instead, it replaces the mailbox attribute of the account with a special value known as a tombstone and leaves the mailbox data intact. The tombstone ages over time; when it reaches the end of the retention period (which defaults to 30 days), the store’s normal IS maintenance task will remove the associated data. Just as with the deleted item “dumpster,” you can recover mailboxes as long as you’re within the retention period for the associated store. All the recovery center does is remove the tombstone and reassociate the data in the EDB/STM files with the Active Directory account (to be sure, this is somewhat of an oversimplified explanation).
See Also
Recipe 5.2 for creating mailboxes, Recipe Recipe 11.10 for using the Mailbox Recovery Center, and Recipe 11.11 for using recovering storage groups
5.10. Bulk-Adding Mailboxes from an Excel Worksheet
Problem
You have an Excel spreadsheet (or some other data source that can easily be turned into an Excel sheet) and you want to add many mailboxes at once based on its contents.
Solution
Using VBScript
' This code will read the contents of an Excel file and use the fields ' to create a set of mailboxes ' ------ SCRIPT CONFIGURATION ------ strComputerName = "<ServerName>" ' e.g., batman strWorksheetName = "<pathToExcelFile>" ' e.g., "c:dataexcelSheet.xls" strTargetMDB = "<mailboxDBDN>" strTargetContainer = "cn=Users,<ForestRootDN>" ' ------ END CONFIGURATION --------- ' create an invisible Excel instance and open our specified file set objExcel = CreateObject("Excel.Application") Set objWorkbook = objExcel.Workbooks.Open(strWorksheetName) ' assume that row 1 is header data, and that rows 2-N contain data ' Columns: ' 1: first name ' 2: last name ' 3: CN ' 4: alias currentRow = 2 Do until objExcel.Cells(currentRow, 1).Value ="" userFirst = objExcel.Cells(currentRow, 1).Value userLast = objExcel.Cells(currentRow, 2).Value userCN = objExcel.Cells(currentRow, 3).Value userAlias = objExcel.Cells(currentRow, 4).Value Set objTargetContainer = GetObject(strTargetContainer) Set objUser = objOU.objTargetContainer _ ("User", "cn=" & userCN) objUser.sAMAccountName = userAlias objUser.GivenName = userFirst objUser.SN = userLast objUser.AccountDisabled = true objUser.SetInfo objUser.CreateMailbox targetMDB currentRow = currentRow + 1 Loop objExcel.quit
Discussion
Many administrators never realize that Office applications like
Excel, Word, PowerPoint, Visio, and Access are scriptable, too; in
fact, the Visual Basic for Applications (VBA) script language shipped
long before Microsoft decided to support broader scripting for
administrators. You might be wondering why you’d want to use Excel as
the front end for mass creation of mailboxes, but it actually makes a
lot of sense to do so. First, Excel can easily digest CSV files, so if
you’ve used csvde, the Exchange 5.5
Administrator application, or some other means of generating a CSV
file, Excel makes it easy to clean up or reformat the contents of that
file with minimal fuss. Second, Excel is scriptable and can easily
connect to databases, so if you want to be able to tie account
creation to some kind of existing business process that revolves
around creating user records in a database, it’s a natural candidate.
Third, Excel is a familiar tool to many otherwise nontechnical
users—like your HR department. Providing a tie between Excel and
Exchange means that you can more easily accept data from them without
writing your own custom tools.
You can do something very similar with the exchmbx tool’s -cr switch, since you can pipe a text file
into it. To use exchmbx
, create a text file that contains the CNs of the
mailboxes you want created. Optionally, you can specify the mailbox
database where you want them created. Here’s a sample file, mailboxes.txt, that lists three users, one
of which has a specific database given.
"CN=Paul Robichaux,ou=partners,dc=3sharp,dc=com"
"cn=Peter Kelly,ou=partners,dc=3sharp,dc=com" RED-EXCH01:SG1:MDB2
"cn=John Peltonen,ou=partners,dc=3sharp,dc=com"
Then use the -cr switch like
this:
> Exchmbx -cr RED-EXCH01:SG1:MDB1 < mailboxes.txt
The two accounts that don’t have a mailbox database specified will end up in the database specified as an argument to exchmbx; the other will be created in its specified database.
See Also
Recipe 5.1 for creating an individual mailbox, Recipe 5.2 for mailbox-enabling an existing user, Chapter 6 of Active Directory Cookbook, and MSDN: Create User Accounts from Information in an Excel Spreadsheet (http://msdn.microsoft.com/library/en-us/dnclinic/html/scripting04132004.asp)
5.11. Creating a Mail-Enabled Contact
Problem
You want to create a contact (or custom recipient, in Exchange 5.5 parlance) that can receive mail but that doesn’t have a mailbox.
Solution
Using a graphical user interface
Log on to any machine in your domain that has the Exchange management tools installed.
Open the ADUC snap-in (Users and Computers.msc).
Locate the domain and container in which you want to create the new contact.
Right-click the appropriate container and use the New → Contact command.
When the New Object - Contact dialog appears, fill in the appropriate fields (first name, last name, full name, initials, and display name), then click Next.
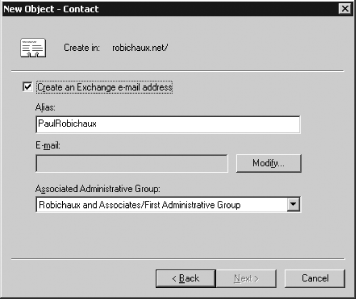
The New Object - Contact dialog will update so that it looks like Figure 5-3. If necessary, edit the alias and choose the administrative group where you want this contact to be expanded.
Click the Modify button. The New E-mail Address dialog box will appear. Select the address type (for most uses it will be SMTP), then click OK.
When the address properties dialog appears, enter the email address you want associated with the contact. For example, if your contact’s external address is [email protected], that’s what you’d enter. Click OK, and then click Next.
Click Finish to create the contact.
Using a command-line interface
To create a mail-enabled contact from the command line, you need to combine the dsadd utility (which creates the contact) with exchmbx (which adds the necessary attributes for the actual mail enablement):
> dsadd contact "<contactDN>" -fn "<FirstName>" -ln "<LastName>"
    -display "<DisplayName>" -email "<Email>"
> exchmbx -b "<contactDN>" -me
For example, these commands add a new contact entry for James Bond:
> Dsadd contact "cn=James Bond,cn=users,dc=Robichaux,dc=net" -fn "James" -ln "Bond"
   -display "James Bond (007)" -email "[email protected]"
> Exchmbx -b "cn=James Bond,cn=users,dc=Robichaux,dc=net" -me
Using VBScript
' This code creates a new contact object
' ------ SCRIPT CONFIGURATION ------
 strDCName = "<ServerName>"  ' e.g., batman
 strContainer= "<container>" ' e.g., "/CN=Users, dc=robichaux, dc=net"
 strContactName = "<contactName>"    ' e.g., "John Doe"
 strContactAlias = "<contactAlias>" ' e.g., "JDoe"
 strContactProxyAddr = "<contactSMTP>" ' e.g., "SMTP:[email protected]"
' ------ END CONFIGURATION ---------

Set objContainer = GetObject("LDAP://" & strDCName & strContainer)
Set objContact = objContainer.Create("Contact", "cn=" & strContactName)
objContact.Put "mailNickname", strContactAlias
With objContact
   .Put "mailNickname", strContactAlias
   .Put "displayName", strContactName
   .Put "targetAddress", strContactProxyAddr
   .Put "systemFlags", 1610612736
   .SetInfo
End With
WScript.Echo "Created contact " & strContactAlias & " at " &_
    strContactProxyAddr
Discussion
Contacts differ from actual user objects in several ways, all of
which are related to the set of attributes associated with the
respective objects. Contacts aren’t security principals and don’t have
any of the security principals’ attributes, so they cannot be used
to assign privileges or to log on, nor do they have any of the
SID-related attributes (SAMAccountName, objectSID, userAccountControl, and userPrincipalName) that user accounts have.
They also don’t have mailboxes; instead, they use the proxy address
field, familiar to us as the placeholder for the address of an
account’s mailbox, to forward mail sent to the contact. The advantage
of this approach: contacts can appear in address lists, so they look
just like every other mail-enabled object.
When you create a contact via ADSI, the Dsadd utility, or CSV import, you only have
to specify two attributes: the DN (specified by combining the contact
object’s mailNickname attribute
with its container path) and the primary email proxy address are
required, but other attributes (including the display name, first
name, last name, telephone number, and so on) are all optional. There
are several important additional attributes (notably showInAddressBook, mAPIRecipient, and InternetEncoding) that will
not be populated by the RUS when it next runs;
you must stamp these values manually.
5.12. Creating Multiple Address Lists
Solution
Using a graphical user interface
Open the Exchange System Manager (Exchange System Manager.msc).
Expand your Exchange organization object, then expand the Recipients container.
Right-click the All Global Address Lists node, then choose the New→ Global Address List command.
In the Create Exchange Address List dialog box, give the address list a name, then click the Filter Rules button to specify which objects should appear in the address list.
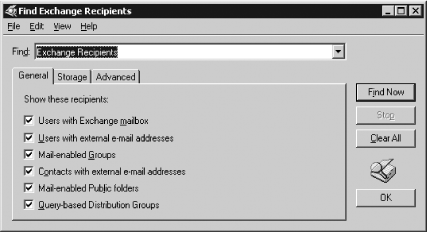
The Find Exchange Recipients dialog box (see Figure 5-4) will appear. By default, the Find field will be set to find Exchange recipients, so you can use the checkboxes to select specific types of objects, or the Storage tab to select only recipients on a particular server or storage group. The Advanced tab lets you filter by any defined attribute on directory objects; for example, you can filter by custom attributes if you’re using them, or by city, manager name, first name, or anything else you like. You can also use the Find field to perform other types of queries; for example, by setting it to Users, Contacts, and Groups, then entering “Robichaux” into the Name field, we can easily build a list of family members who have accounts on my home Exchange server.
Once you’ve built a set of criteria, you can use the Find Now button to execute the query and verify that it finds the objects you want included in the address list. Adjust the query as necessary, then click OK.
Click Finish to save the address list.
Wait for the RUS to run, then inspect the contents of the new address list to make sure the filter you built in step 5 is working properly.
Using VBScript
' This code creates a new global address list ' ------ SCRIPT CONFIGURATION ------ strDCName = "<serverName>" ' e.g., CONT-EXBE01 strContainer= "/CN=All Address Lists,CN=Address Lists Container,CN=<orgName>," &_ "CN=Microsoft Exchange,CN=Services,CN=Configuration,<ForestRootDN>" strALName = "<addressListName>" ' e.g., "Seattle Employees" strDomain = "<domainPath>" ' e.g., "dc=robichaux, dc=net" ' ------ END CONFIGURATION --------- Set objContainer = GetObject("LDAP://" & strDCName & strContainer) Set objAddrList = objContainer.Create("AddressBookContainer", "cn=" & strALName) objAddrList.Put "displayName", strALName objAddrList.Put "PurportedSearch", "(&(mailNickname=*)(objectClass=user))" objAddrList.Put "systemFlags", 1610612736 objAddrList.SetInfo WScript.Echo " Created new GAL named " & strALName
Discussion
Address lists allow you to create flexible groupings of your users that are automatically updated. If you’re familiar with recipient containers in Exchange 5.5, you’ll recognize the underlying idea: define a rule that says which users should be grouped together, then let Exchange reassign users as necessary. Unlike 5.5 recipient containers (which didn’t allow you to move users between them), address lists are based on LDAP queries, so the lists are dynamically assembled, and the original objects’ attributes are mostly untouched. You can write arbitrarily complex LDAP filter expressions to define the contents of your address lists; ESM provides a fairly robust interface for creating canned queries, but you can plug in your own filter expression via the GUI or in a script. (Note that although LDAP queries are used to build the address lists, clients access them via the Name Services Provider Interface, or NSPI.)
Once the address list has been created, the RUS will update it
whenever it runs (which means that you may experience short
propagation delays). If you leave the RUS schedule set to its default
of “always run,” then the RUS will be run whenever a recipient policy
changes, which in turn means that your address lists will be updated
when you change recipient policies. The RUS actually updates the
showInAddressBook attribute to
reflect each address list in which the object should be visible. You
can verify the address list’s presence in two ways: within ESM
(although it may not appear until you quit and relaunch the snap-in)
or by creating a new message in Outlook and clicking the To button,
then using the Show names from the combo box to pick the new address
list.
When you create an address list via script, it is important that
you create it in the correct container. The All Address Lists object is the immediate parent of all the address lists
you define in the organization; in turn, that object lives in the
Address Lists Container object, a
child of the Exchange organization object. The value of the PurportedSearch attribute specifies your
LDAP filter.
See Also
Recipe 5.17 for hiding items from address lists, MS KB 319213 (How to Use Address Lists to Organize Recipients in Exchange Server 2003), MS KB 822940 (How to Manage Address Lists When You Host Virtual Organizations), and MS KB 253828 (How the Recipient Update Service Populates Address Lists)
5.13. Creating Query-Based Distribution Groups
Problem
You want to create a mail-enabled distribution group that automatically updates its membership based on rules you specify.
Solution
Using a graphical user interface
Log on to any machine in your domain that has the Exchange management tools installed.
Open the ADUC snap-in (Users and Computers.msc).
Navigate to the domain and container (or OU) that you want to host the new group.
Right-click the target container and choose the New→ Query-based Distribution Group command.
Tip
You can only create and use query-based distribution groups when your Exchange organization is in native mode and has Exchange 2000 SP3 or later on all servers. Your global catalog servers can be running Windows 2000 (with the DynamicDLPageSize key set; see MS KB 822897) or Windows Server 2003. If you try to perform step 4 while your organization is in mixed mode, you’ll get a polite error dialog explaining that you must go native before creating any QDGs; if you don’t adjust DynamicDLPageSize, you may find that QDGs aren’t reliably expanded.
When the New Object - Query-based Distribution Group dialog appears, enter a name for the QDG; optionally, you can enter a separate alias (but if you don’t, the name will be used as the alias). Click Next.
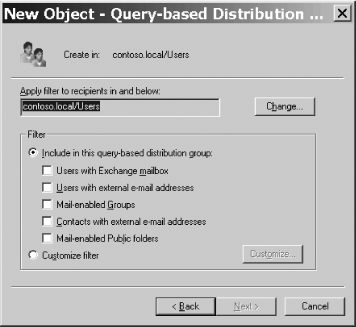
The filter specification dialog (see Figure 5-5) will appear:
Use the Change button to select the container scope that the QDG is restricted to; by default, the QDG will be restricted to the Users container in the domain where you created the QDG.
Use the controls in the Filter group to select which objects are included in the QDG. Most of the time, the Users with Exchange mailbox checkbox will be the only one you select, since most QDGs are intended to encompass users only.
Use the Customize filter radio button, and the associated Customize button, to create a customized query for the QDG. When you click Customize, you’ll see the Find Exchange Recipients dialog box shown in Figure 5-4; from that dialog, you can find pretty much any AD object and use the resulting query as the basis for your QDG.
Once you’ve chosen the filter specifications that you want to use, click Next, and then click Finish.
Using VBScript
' This code creates a new query-based distribution group in the Users
' container. The QDG contains all users who have Exchange mailboxes.
' ------ SCRIPT CONFIGURATION ------
 strDCName = "<serverName>" ' e.g., "CONT-EXBE01"
 strContainer= "<container>" ' e.g., "CN=users,dc=robichaux, dc=net"
 strQDGName = "<name>"    'e.g., "Mail Users"
 strDomain = "@<domain>"    ' e.g., "@robichaux.net"
 strFilter = "(&(!cn=SystemMailbox{*})(& (mailnickname=*)" &_
             "(|&(objectCategory=person) (objectClass=user)" &_
             "(|(homeMDB=*)(msExchHomeServerName=*))) )))"
' ------ END CONFIGURATION ---------
Set objContainer = GetObject("LDAP://" & strDCName & "/" & strContainer)
Set objQDG = objContainer.Create("msExchDynamicDistributionList", _
    "CN=" & strQDGName)
With objQDG
  .Put "msExchDynamicDLFilter", strFilter
  .Put "displayName", strQDGName
  .Put "mailNickname", strQDGName
  .Put "reportToOriginator", True
  .Put "proxyAddresses", "SMTP:" & strQDGName & strDomain
  .Put "legacyExchangeDN", "/o=<orgName>/ou=<adminGrp>/cn=Recipients/cn=" &
            strQDGName
  ' e.g. "/o=Robichaux and Associates/ou=First Administrative
  '       Group/cn=Recipients/cn=" & strQDGName
  .put "msExchDynamicDLBaseDN", strContainer
  .Put "systemFlags", 1610612736
  .SetInfo
 End With
Wscript.echo "Created QDG " & strQDGName
Discussion
Query-based distribution groups are probably better known by their original name: dynamic DLs. The idea behind QDGs is that you should be able to define some set of search criteria that can be used to populate a DL, and that when objects’ properties change such that they should be included in, or excluded from, the DL, the DL should automatically be updated somehow. When you create a QDG, you must specify an LDAP filter that selects the objects you want. The filter in the listing above is the one generated by the ESM GUI when you create a new QDG; notice that it excludes items named “System Mailbox” and any item that isn’t a user or that doesn’t have an Exchange home server defined. You can specify more complex LDAP filters to selectively limit QDG membership to particular OUs or subgroups of users. One thing to bear in mind when designing your QDG queries is that the query will be executed each time the QDG is expanded. Each message sent to the QDG will cause an expansion, depending on where the sender is and which server is responsible for the expansion process. For complex queries, or for large result sets, the performance impact on your GCs and Exchange servers can be significant. You can work around this to an extent by designating a specific expansion server for the QDG (or any other DG); this doesn’t reduce the load, but it does let you control where it goes.
Another very important aspect of QDGs is that each has a
legacyExchangeDN attribute, just
like a mailbox. Also just like mailboxes, the legacyExchangeDN value for each QDG must be
unique in the forest. If you create multiple QDGs
with the same name (say, one in each domain of a multidomain forest),
you must be certain that the legacyExchangeDN values for each QDG are
distinct.
See Also
MS KB 822897 (How to Troubleshoot Query-Based Distribution Groups) and MS KB 839949 (Troubleshooting mail transport and distribution groups in Exchange 2000 Server and in Exchange Server 2003)
5.14. Granting Full Access to Mailboxes
Solution
Using a graphical user interface
Log on to any machine in your domain that has the Exchange management tools installed.
Open the ADUC snap-in (Users and Computers.msc).
Locate the user for whom you want to grant access.
Right-click the target user and choose the Properties command.
Switch to the Exchange Advanced tab and click the Mailbox Rights button.
In the Permissions dialog box, click the Add button.
In the Select Users, Computers, or Groups dialog box, select the user or group to which you want to delegate access, then click OK.
In the permissions list of the Permissions dialog, make sure the Allow checkbox for Full mailbox access is checked.
If you’re granting access to an administrator, click the Advanced button.
Click the Add button.
In the Select Users, Computers, or Groups dialog box, select the user or group to which you want to delegate access, then click OK.
Check the Full mailbox access entry in the Allow column, then click OK.
Click OK.
Click OK to close the Properties dialog box. (Note that you may have to wait for these permissions to replicate before the new permissions take effect.)
Discussion
You can assign delegate access to individual mailbox folders using the Outlook user interface; this is commonly done to give executive assistants access to their principals’ calendars without giving them access to messages contained in the Inbox. However, Outlook’s tool for setting mail folder permissions are best suited for providing delegate access, including the ability to send on the other user’s behalf. There are other scenarios in which you might want to give one user full access to another’s mailbox. For example, if you have a user who’s out on extended medical leave, another user might require access to that user’s Inbox and saved mail; another sadly common example is when an employee is being investigated for wrongdoing and the legal or HR departments request mailbox access. The technique described above gives one account or group full access to the target mailbox, meaning that users who have access can log on to the mailbox and use it as the original user could—no “Sent on behalf of” tags or other telltale signs that delegate access is in use. If you instead use ESM to grant these permissions to a mailbox store, the grantee will have that same level of access for all mailboxes in that database. Note that when you assign full mailbox access rights using the ADUC snap-in, the delegate doesn’t automatically get Send As permissions (see Recipe 5.21 to grant these).
See Also
Recipe 5.21 to grant Send As permissions, Recipe 5.15 to get the list of existing delegates on a mailbox, MS KB 295558 for using MAPI in Visual Basic to assign delegate permissions to individual folders, and MS KB 821900 for using OWA 2003 to get delegate access
5.15. Getting the List of Delegates for a Mailbox
Solution
Using a graphical user interface
In Outlook 2003, do the following:
Log on to a computer that has a profile for the target mailbox. Alternatively, create a profile for the target mailbox.
Open Outlook using the mailbox profile.
Select the Tools→ Options command.
Click the Delegates tab; the existing delegates will be listed.
Using a command-line interface
You can use the ldifde
utility to dump the publicDelegates
attribute for a selected set of users. For example, this command
dumps the delegate list for the robichaux.net
domain to the file delegates.txt:
> ldifde -f delegates.txt -d "cn=users,dc=robichaux,dc=net"
-l name,publicDelegates,publicDelegatesBL -r "(|(publicDelegates=*)
(publicDelegatesBL=*))"
Using VBScript
' This code lists the delegates for the selected mailbox ' ------ SCRIPT CONFIGURATION ------ strDCName = "<serverName>" ' e.g., "Batman" strUserName = "/cn=<userName>, CN=Users,<ForestRootDN>" ' ------ END CONFIGURATION --------- ' find the target user strQuery = "LDAP://" & strDCName & strUserName Set theUser = GetObject(strQuery) WScript.echo "Delegates for " & strUserName On Error Resume Next delegateList = theUser.Get("publicDelegates") If Err.Number <> -2147463155 Then For Each Desc In delegateList WScript.Echo desc Next Else WScript.Echo "No delegates" End If
Discussion
The list of delegates is stored as a single AD attribute on the
user account: publicDelegates. When
you ask Outlook to display the delegate list, it does so by reading
that attribute and expanding it, then reading the security descriptors
on folders in the mailbox. It also allows you to explicitly assign
permissions. However, reading publicDelegates directly from the user
object doesn’t tell you anything about what specific rights the
defined delegates have, merely that they exist as delegates. At a
minimum, they’ll have the ability to send on behalf of the original
user.
See Also
Recipe 5.14 to grant full access to a mailbox
5.16. Changing the Display Name Format in the GAL
Problem
Your GAL currently displays user names with the first name first; you need to switch things so that the last name is displayed first.
Solution
Using VBScript
' Script taken from:
'  MS KB 277717 (How to Change the Display Names of Active Directory
'                Users with Active Directory Services Interface Script)

' This code can change existing users in a given
' organizational unit (OU) to the Lastname, Firstname format

rem chgdisplay.vbs - Changes the display names of all users in a given OU to the
rem format of Lastname, Firstname.
rem Usage = cscript chgdisplay.vbs "OU=My Ou, DC=My Domain, DC=com"
rem OU must be enclosed in quotes if it contains spaces in the name

Dim strTargetOU

ParseCommandLine()

wscript.echo strTargetOU
wscript.echo
wscript.echo "Changing Display names of users in " & strTargetOU

Set oTargetOU = GetObject("LDAP://" & strTargetOU)

oTargetOU.Filter = Array("user")

For each usr in oTargetOU

        if instr(usr.SamAccountName, "$") = 0 then
                vLast = usr.get("Sn")
                vFirst = usr.get("GivenName")
                 vFullname = vLast + ", " + vFirst
                    usr.put "displayName", vFullName
                    usr.setinfo
                wscript.echo usr.displayName
        end if
Next


Sub ParseCommandLine()
          Dim vArgs

          set vArgs = WScript.Arguments

          if vArgs.Count <> 1 then
                      DisplayUsage()
          Else
                     strTargetOU = vArgs(0)
          End if
End Sub

Sub DisplayUsage()
        WScript.Echo
         WScript.Echo "Usage:  cscript.exe " & WScript.ScriptName & _
                     " <Target OU to change users display names in>"
         WScript.Echo "Example: cscript " & WScript.ScriptName & " " & _
                     chr(34) & "OU=MyOU,DC=MyDomain,DC=com" & chr(34)
        WScript.Quit(0)
End Sub
Discussion
By default, AD creates new user and contact objects with a
canonical name (CN) based on the first and last names
you supply, with the first name coming first. Thus, a user named “Tim
O’Reilly” will end up as cn=Tim
O'Reilly. This is normal and
natural. However, some organizations insist on having the GAL sorted
by last name. If you fall into that category, you have a couple of
choices.
First, you could follow the procedures described in MS KB 250455
to change the way those CNs are created for new accounts, but you must
be careful not to run afoul of the character restrictions described in
MS KB 276266. In particular, creating CNs like cn=O'Reilly, Tim is a big no-no because of the embedded
comma; you can use a backslash to escape embedded commas, but who
wants to see strings like cn=O'Reilly, Tim? It also wouldn’t help you with existing
accounts, because the GAL is actually built using the displayName property. When the object is
created, its CN is copied to the displayName property unless you specify a
separate display name at creation time. Thus, a better approach is to
adjust the displayName property
itself, since this has no impact on normal LDAP behavior. The previous
script enumerates each user object in the selected container, skipping
machine accounts or accounts (like Administrator) that don’t have a
first name or last name set, then resetting the display name for
accounts that have a first and last name defined. You’d need to re-run
the script later to catch and fix any objects added after the first
time you ran it; better yet, you could schedule it as a task to run
periodically.
See Also
MS KB 300427 (How to Change Active Directory Display Names), MS KB 277717 (How to Change the Display Names of Active Directory Users with Active Directory Services Interface Script), MS KB 250455 (How to Change Display Names of Active Directory Users), and MS KB 276266 (Group Changes for Users with LDAP-Restricted Characters May Not Work)
5.17. Hiding or Revealing Items in Address Lists
Problem
You have mailboxes or mail-enabled groups that you don’t want to appear in the GAL. Alternatively, you have some hidden objects that you want to unhide.
Solution
Using a graphical user interface
Log on to any machine in your domain that has the Exchange management tools installed.
Open the ADUC snap-in (Users and Computers.msc).
Locate the account or group you want to hide.
Right-click the target account or group and choose the Properties command.
The account properties dialog will appear. Switch to the Exchange Advanced tab (remember, you’ll only see this if you’re editing a mail-enabled object and if you’ve installed ESM on the machine you’re running the snap-in from).
Set the appropriate status in the Hide from Exchange address lists check box.
Click OK.
Using a command-line interface
exchmbx supports two
switches for toggling the visibility state: -hfal causes the selected item to be
hidden from address lists, and -uhfal makes them visible again. Here’s an
example:
> exchmbx -b "cn=Elvis Presley,cn=Users,dc=robichaux,dc=net" -hfal
Using VBScript
' This code hides the selected object from all address lists ' ------ SCRIPT CONFIGURATION ------ strDCName = "<ServerName>" ' e.g., CONT-EXBE01 strUserName = "/cn=<User>, CN=Users,<ForestRootDN>" ' ------ END CONFIGURATION --------- ' find the target user strQuery = "LDAP://" & strDCName & strUserName Set theUser = GetObject(strQuery) theUser.Put "msExchHideFromAddressLists", True theUser.SetInfo WScript.Echo "Hid " & strUserName & " from all address lists"
Discussion
Some objects need to be hidden from address lists so that users
won’t send mail directly to them. For example, you might have resource
mailboxes or mailboxes for people or projects that your general user
population either doesn’t need to know about or shouldn’t be sending
messages to. Making a mailbox invisible requires changing a single
Boolean property, msExchHideFromAddressLists. There’s a
separate property named showInAddressBook that contains the lists of
address lists that the item should appear in. The RUS maintains
showInAddressBook by updating the
values in the list each time you modify an address list
definition.
You can also use msExchHideFromAddressLists in LDAP queries.
For example, you can easily query for all hidden mailboxes by
using:
(&(&(objectclass=user)(objectCategory=Person))(msExchHideFromAddressLists=TRUE))
as the query string. However, you can’t hide an object from some
address lists but not others: if you set msExchHideFromAddressLists on an object, it
will be hidden from all address lists.
See Also
MS KB 253828 (How the Recipient Update Service Populates Address Lists)
5.18. Setting a Default Reply-to Address for a Mailbox
Solution
Using a graphical user interface
Log on to any machine in your domain that has the Exchange management tools installed.
Open the ADUC snap-in (Users and Computers.msc).
Locate the container that holds the mailbox whose reply-to address you want to modify.
Select the mailbox you want to modify, then right-click it and choose Properties.
Select the E-mail Addresses tab in the Properties dialog box.
Click New. Select a type of address, typically this will be SMTP Address.
Type the new email address and click OK.
Click on the new address and click Set As Primary.
Remove the check from the Automatically update email addresses based on recipient policy box.
Using a command-line interface
Use your favorite text editor to create an LDIF file. The file should appear as the sample below; you’ll obviously need to change the DNs and proxy addresses to match your requirements:
# ------------------ import-proxy.ldf ---------------------
dn: CN=alex,OU=TestUsers,DC=3sharpaustin,DC=com
changetype: modify
replace: proxyAddresses
proxyAddresses: smtp:[email protected]
proxyAddresses: smtp:[email protected]
proxyAddresses: smtp:[email protected]
proxyAddresses: SMTP:[email protected]
proxyAddresses: X400:c=us;a= ;p=First Organization;o=Exchange;s=alex;
-

dn: CN=alex,OU=TestUsers,DC=3sharpaustin,DC=com
changetype: modify
replace: mail
mail: [email protected]
-

dn: CN=alex,OU=TestUsers,DC=3sharpaustin,DC=com
changetype: modify
replace: msExchPoliciesExcluded
msExchPoliciesExcluded:  {26491CFC-9E50-4857-861B-0CB8DF22B5D7}
-
Save the file with a .ldf extension.
Next, run the following command:
> ldifde -i -f
yourFile.ldf -s DCname
Using VBScript
' This code forcibly sets the default reply address for a mailbox ' and then excludes it from recipient policy processing so that the RUS ' doesn't replace the changed reply address. ' ------ SCRIPT CONFIGURATION ------ CONST ADS_PROPERTY_UPDATE = 2 strDCName= "<server>" ' e.g., "BATMAN" strContainer= ", CN=Users,<ForestRootDN>" strUser= "<userName>" ' e.g., "Paul Robichaux" strDefaultAddr= "<defaultSMTPaddr>" ' e.g., [email protected] strProxyAddr1= "<additionalSMTPaddr>" ' e.g., [email protected] strX400addr="<X400addr>" 'e.g., c=us;a= ;p=First Organization;o=Exchange;s=paulr; ' ------ END CONFIGURATION --------- ' get the target mailbox Set objMailbox = GetObject("LDAP://" & strDCName & _ "/CN=" & strUser & strContainer) objMailbox.Put "mail", strDefaultAddr objMailbox.PutEx ADS_PROPERTY_UPDATE, "proxyAddresses", Array(_ "SMTP:" & strDefaultAddr, _ "smtp:" & strProxyAddr1, _ "X400:" & strX400Addr) objMailbox.PutEx ADS_PROPERTY_UPDATE, "msExchPoliciesExcluded", _ Array("{26491CFC-9E50-4857-861B-0CB8DF22B5D7}") objMailbox.SetInfo WScript.Echo "Reset proxy addresses on " & strDefaultAddr
Discussion
This recipe shows how to add a new reply-to address to a mailbox
and set it as default. To set the default reply-to address across a
larger number of objects, it is wiser to create a new recipient policy
that is based on an LDAP query that applies to that group. Keep in
mind that by default the highest-priority recipient policy that
applies to the object will stamp the mailbox with an SMTP address
(assuming that the policy contains an SMTP address specifier!). If you
wish to manually set the default SMTP address, you should clear this
property; otherwise, if the recipient policy and the addresses you’ve
just entered are of the same type, the manually entered addresses will
be overwritten the next time the RUS runs. The GUI has a checkbox
labeled Automatically update email addresses based on recipient
policy, which you will clear so that the information is not
overwritten. When adding a new recipient policy programmatically,
automatic updating is disabled by adding a value to the msExchPoliciesExcluded property. Changing
this property to the value {26491CFC-9E50-4857-861B-0CB8DF22B5D7}
achieves the same result as deselecting the automatic update checkbox
in the GUI; if you want to reset it programmatically, you simply reset
it to a null value by deleting that string.
See Also
Recipe 5.19 for creating recipient policies, which is the preferred way to update many addresses in the organization at once, and MS KB 318072 (Update E-Mail Addresses Based on Recipient Policy)
5.19. Creating Recipient Policies
Problem
You want to create a recipient policy for your organization to control generation of email addresses for Exchange recipients, Mailbox Manager settings, or set Exchange to accept mail for a new SMTP domain.
Solution
Using a graphical user interface
Open the Exchange System Manager (Exchange System Manager.msc).
Select the Recipients node.
Right-click the Recipient Policies node and select New→ Recipient Policy . . . .
At the New Policy dialog box, place a check in the Email Addresses and/or Mailbox Manager Settings checkbox. These checkboxes will indicate whether you wish to be able to specify that mailbox policies, email addresses, or both are controlled by this recipient policy. Click OK
On the General tab of the recipient policy dialog box, enter a name for the recipient policy. Click the Modify button to select which Exchange recipients you wish to fall under the influence of this recipient policy.
Use the LDAP query builder to select the attributes of a mailbox object or select a mailbox store or server. Click Find Now to ensure that your LDAP query locates the desired group of mailboxes.
On the Email Addresses (Policy) tab, create or edit an email address policy template (using the dialog shown in Figure 5-6). This template will be applied to all Exchange recipients who fall under this recipient policy.
If you wish to apply Mailbox Manager settings with the same recipient policy, select the Mailbox Manager Settings tab and follow the instructions in Recipe 5.26.
Click OK.
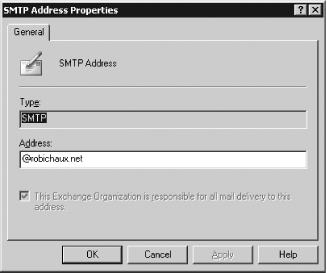
Discussion
Recipient policies are a useful way to apply address policies to groups of mail-enabled resources. Based upon an LDAP query, they allow you to specify a subgroup of objects to which they will apply. By default, Exchange will create SMTP addresses for all mail-enabled objects of the form [email protected]. Many organizations host more than one domain, or wish to have different address templates used for different departments, and recipient policies offer a simple method to achieve this.
Creating an email address within recipient policies is quite simple. The basic technique for SMTP proxy address templates has remained the same since the days of Exchange 5.5; you combine static parts of your email address template with variables that, when extracted from AD, will construct unique addresses for your Exchange recipients. The examples given assume that you want to create SMTP addresses, but the same technique works for generating X.400, cc:Mail, GroupWise, or Lotus Notes addresses. By default, a new recipient policy will be populated with a template of [email protected], which would simply take the Exchange alias property and prepend it to @domain.com.
Some of the useful variables available for constructing addresses include the following:
%gGiven (first) name.
%iMiddle initial(s).
%sSurname (last name).
%dDisplay name.
%mExchange alias.
%rxyReplace all occurrences of character
xwith charactery. This is very useful for replacing characters that would be otherwise be illegal in SMTP names with legal ones.
You can place a number in front of any of these strings to allow
you to specify the first n characters of that
variable; that is, %4s would give
you the first four characters of the user’s surname, or %8d would give you the first eight
characters of the user’s display name. The following are examples of
how these variables work, given a user named John Q. Public, with a
display name of “John Public”, and Exchange alias of jqpublic.
Besides allowing you to set recipient email addresses and mailbox manager policies, recipient policies are used by Exchange for two other scenarios. All domains that you wish to receive inbound mail for must exist in a recipient policy. The Exchange routing engine checks SMTP domain addresses in all recipient policies to discern which domains are local to the Exchange organization. Exchange also uses the default SMTP domain of the default recipient policy to determine the domain name used in creating the Exchange virtual directory and the Outlook Web Access virtual directory. For this reason, it is usually preferable not to modify the default recipient policy, but to add new recipient policies that will take precedence for creating addresses. (If you’re specifying a custom policy, be sure that the values you are specifying in the policy exist. If they don’t, the RUS will generate a wide variety of ugly email addresses, and that will cause problems.)
See Also
Recipe 5.26 for configuring Mailbox Manager settings, MS KB 319201 (How to Use Recipient Policies to Control E-mail Addresses), MS KB 822447 (How to Modify an SMTP E-Mail Address by Using Recipient Policies), MS KB 285136 (How to Customize the SMTP E-mail Address Generators Through Recipient Policies), and MSDN: Creating a Query Filter (http://msdn.microsoft.com/library/en-us/ad/ad/creating_a_query_filter.asp)
5.20. Limiting Who Can Send Mail to a Distribution Group
Solution
Using a graphical user interface
Log on to any machine in your domain that has the Exchange management tools installed.
Open the ADUC snap-in (Users and Computers.msc).
Browse to the OU or domain where your groups are located.
Right-click the distribution group or mail-enabled security group, click Properties, and select the Exchange General tab.
By default, the group is set to allow mail From everyone. If you want to allow mail only from certain users, select Only from; if you want to exclude mail from certain users or groups, select From everyone except.
If you selected Only from or From everyone except, click Add, then select the desired user, group, and contact objects, and click OK to define which users are permitted or excluded.
For Exchange Server 2003 only, check the From authenticated users only checkbox if you want Exchange to ensure that a message has been submitted by an authenticated user. Click OK.
Using VBScript
' This code displays the sender restrictions on a group object.
' ------ SCRIPT CONFIGURATION ------
const cdoexmAccept = 0                  ' Included senders
const cdoexmReject = 1                  ' Excluded senders
strGroupDN         = "<GroupParentDN>"  ' e.g., cn=Staff,dc=3sharp,dc=com
' ------ END CONFIGURATION ------
' Prepare the address list array
Dim arrAddress()
intSize = 0
' Create the group object
set objGroup = GetObject("LDAP://" & strGroupDN)
Wscript.Echo "Sender restrictions for " & objGroup.Name & "."
' Is the address list empty? If so, there are no restrictions.
' If not, determine the type and enumerate using a dynamic array since we
' do not know how many items there are in it.
If IsNull(objGroup.RestrictedAddressList) Then
   Wscript.Echo "There are no sender restrictions on this group."
Else
   If objGroup.RestrictedAddresses = cdoexmAccept Then
     Wscript.Echo "The following senders can send to the group:"
   Else
     Wscript.Echo "The following senders cannot send to the group:"
   End If
   For Each strAddress in objGroup.RestrictedAddressList
     ReDim Preserve arrAddress(intSize)
     arrAddress(intSize) = strAddress
     Wscript.Echo arrAddress(intSize)
     intSize = intSize + 1
   Next
End If
If you actually want to change the group restrictions on an object, you’ll need to apply the addresses that you want to have access:
' This code configures the sender restrictions on a group object. ' ------ SCRIPT CONFIGURATION ------ const cdoexmAccept = 0 ' Included senders const cdoexmReject = 1 ' Excluded senders strGroupDN = "<GroupParentDN>" ' e.g., cn=Staff,dc=3sharp,dc=com intSize = 0 Dim arrAddress(2) ' put allowed senders here arrAddress(0) =<EmailAddress1>arrAddress(1) =<EmailAddress2>' ------ END CONFIGURATION ------ ' Prepare the address list array ' Create the group object set objGroup = GetObject("LDAP://" & strGroupDN) Wscript.Echo "Updating sender restrictions for " & objGroup.Name & ":" ' Set the type of sender restriction objGroup.RestrictedAddresses = cdoexmAccept ' Enumerate the address list, then place it on the group object Wscript.Echo "Only the following senders can send to the group:" For Each strAddress in objGroup.RestrictedAddressList Wscript.Echo arrAddress(intSize) intSize = intSize + 1 Next objGroup.RestrictedAddressList = arrAddress ' Write the update object data back to the directory objGroup.SetInfo WScript.Echo "Set sender restrictions on " & strGroupDN
Discussion
This recipe provides a measure of control over traffic sent to groups within your organization, whether it originates within the organization or comes from without. There are two common scenarios where this is desirable:
You have groups with large numbers of members, typically an “all users” broadcast group, and only certain staff members should be able to send to the group. These groups can also become a problem by providing an easy route for spam, viruses, and worms to spread throughout your organization.
You have one or more broadcast groups and one or more users who routinely reply to all recipients. The resulting traffic puts an increased load on your Exchange servers and can become a severe resource drain over low-bandwidth WAN connections.
Both distribution and security groups are managed in the same fashion, although security groups must be mail-enabled before the relevant attributes are available. When creating sender inclusions or exclusions in forests with multiple domains, be sure to consider the group’s scope and ensure that the groups added remain within the same scope boundaries whenever possible.
Note that the sender addresses specified must be associated with objects within Active Directory. You cannot use this as a general per-recipient filtering mechanism for external senders unless you are willing to create Active Directory contact objects for each external address.
Also note that Exchange 2000 (and by default Exchange Server 2003) trusts the value of the sender as provided in the header of the message, so this restriction can be easily defeated by forgery. Exchange Server 2003 provides the option to enforce authentication; however the message enters the organization, be it by MAPI, OWA, or SMTP, Exchange will ensure that the sender matches the provided authentication credentials when this option is enabled, preventing header spoofing. Since contact objects cannot be authenticated, they cannot be used to include foreign addresses when authentication is desired.
Using VBScript
The script makes use of the CDOEXM IMailRecipient interface. This interface exposes the RestrictedAddresses and RestrictedAddressList properties, which
together control the sender restriction behavior. Exchange checks to
make sure that the RestrictedAddressList property contains no
addresses; if it is null, Exchange will ignore the value of RestrictedAddresses and enforce no
restriction. If the list is populated, Exchange will treat the
addresses contained as either an inclusion or exclusion depending on
the value of RestrictedAddresses.
The addresses in the RestrictedAddressList property can be provided as either email addresses or
as Active Directory paths; they will be converted to Active
Directory paths and written in that format. In order to display the
contents of the property, use a dynamic array; likewise, when
setting the property, first construct an array of the individual
sender addresses and then write the entire array
to the RestrictedAddressList
property.
See Also
MSDN CDOEXM documentation for RestrictedAddressList property
5.21. Granting Send-as Permissions
Solution
Using a graphical user interface
Log on to any machine in your domain that has the Exchange management tools installed.
Open the ADUC snap-in (Users and Computers.msc).
Choose the View menu’s Advanced Features command.
Browse to your Users OU.
Right-click the mailbox you wish to allow others to send mail as and click Properties.
Select the Security tab.
Under Group or user names, click Add.
Type the account name of the user that needs to be able to send mail as the user whose account you’ve selected, and click Check Names. Click OK.
Select Allow next to Send As on the Permissions list. Click OK.
Discussion
We tried to create scripts for both this recipe and Recipe 5.22 but neither one was really scriptable, because there are actually two parts to the delegation of these rights—delegating access to the actual attribute and creating the necessary ACLs. This made scripting a solution impractical.
Send-as permissions provide the ability for one user to send mail that appears to be from another user. This kind of permission is often granted in cases where a user is unable to access their mailbox for a period of time (due to vacation or an extended leave of absence), but it must appear that they are available, so someone else responds to new messages in their place.
See Also
Recipe 5.22 for assigning “send on behalf of” permission, and MS KB 327000 (How to Grant “Send as” and “Send on behalf” permissions in Exchange 2000 Server)
5.22. Granting Send on Behalf of Permissions
Solution
Using a graphical user interface
Open the ADUC snap-in (Users and Computers.msc).
Browse to the container that holds the target user account.
Right-click the user account that mail needs to be sent on behalf of and click Properties.
Select the Exchange General tab. Click Delivery Options.
In the Send on behalf control group, click Add.
Type the account name of the user that needs to be able to send mail as the user whose account you’ve selected, and click Check Names.
Discussion
When “send on behalf of” permissions are granted to a user, the user can send email messages from the account it was granted permissions to. The message will show the recipient that the message was sent on behalf of the modified account. Often, an executive may request that this type of permission be given to a trusted assistant so that the assistant can respond to general inquiries. For that reason, Outlook allows you to set this permission directly from the Delegates tab.
See Also
Recipe 5.21 for assigning “send as” permission, and MS KB 327000 (How to Grant “Send as” and “Send on behalf” permissions in Exchange 2000 Server)
5.23. Granting Users or Groups Permission to Access Other Mailboxes
Problem
You have a mailbox and need to allow either an additional user or a group of users to access information within it. This mailbox could either be a normal user mailbox or a resource mailbox, used to book a resource such as a conference room, audio/video equipment, or a company car.
Solution
Using a graphical user interface
Log on to any machine in your domain that has the Exchange management tools installed.
Open the ADUC snap-in (Users and Computers.msc).
Browse to the container that holds the target user account.
Ensure that the Advanced View is selected on the View menu.
Right-click the user account whose mailbox you want others to be able to access and click Properties.
Select the Exchange Advanced tab and click Mailbox Rights.
Click Add and select the users and groups you wish to have permissions to the mailbox. Click OK.
In the Allow column of the Permissions list, make sure Full mailbox access is checked. Click OK.
Click OK.
Discussion
The link between an AD user object and the actual mailbox in the
Exchange message store is contained in two places: the security
descriptor property on the actual mailbox database and the msExchMailboxSecurityDescriptor property in AD. The msExchMailboxSecurityDescriptor property is
added to the AD user object by the Exchange schema updates; it holds a
partial copy of the security descriptor on the actual mailbox.
Modifying the AD property directly will not change the descriptor on
the mailbox; changes to the mailbox security descriptor are mirrored
back to the msExchMailboxSecurityDescriptor property.
Because of this, granting access to other users programmatically can
only be done through CDOEXM.
MS KB 310866 describes the steps necessary to modify a mailbox
security descriptor using CDOEXM; in order to use it, the server must
be at least Exchange 2000 Service Pack 2 or later. In addition, the
relevant information store must be started and the mailbox store
mounted. CDOEXM provides the IExchangeMailbox interface, which in turn exposes the MailboxRights property. This property then allows you to manage the
security descriptor using the standard IADsSecurityDescriptor ADSI
interface.
This technique requires a thorough understanding of security
descriptors, access control lists (ACLs), and access control entries (ACEs); manipulating the IADsSecurityDescriptor interface uses the
same principles underlying the NTFS file system permissions. This is a
topic of sufficient complexity that it is outside the scope of a
recipe.
There are two caveats to remember:
Permissions that have been inherited from the mailbox store are not directly exposed in the
msExchMailboxSecurityDescriptorproperty. They can only be viewed or modified through theIExchangeMailboxinterface.Mailboxes that have not yet been created, either through user logon or through having received a message for the recipient, do not have a mailbox database; the
msExchMailboxSecurityDescriptorproperty has only a limited set of rights.
Many experienced Exchange 5.5 administrators find the relationship between user accounts and mailboxes to be one of the biggest differences in Exchange 2000 and Exchange Server 2003, as it affects the way that resource accounts are handled.
Under Exchange 5.5, user accounts (the Windows NT domain SAM) and Exchange information (ExchangeDS) were two separate directories. Under this model, it was easy for the Exchange directory to store the proper associations to relate multiple mailboxes back to one Windows NT domain user account. The user to mailbox relationship was one to many; any need for a many-to-one relationship was taken care of through the appropriate mailbox ACLs.
With the advent of AD, this association changed. The attributes that keep track of the user/mailbox association are now part of the user object, turning it into a one-to-one relationship. Resource objects in the AD-aware Exchange world have their own corresponding account object, usually disabled; management permissions are then granted to the appropriate user accounts via the security descriptor. Since the actual mailbox database (and associated security descriptor) is not created until the message store must actually deliver a message or enumerate the contents of the database, the initial permissions are not granted until the mailbox is initialized. This complicates scripted provisioning of accounts that must be accessible by multiple users.
See Also
Recipes Recipe 5.1 and Recipe 5.2 for creating mailbox-enabled accounts, MS KB 275636 (Creating Exchange Mailbox-Enabled and Mail-Enabled Objects in Active Directory), MS KB 327079 (How to programmatically create a mailbox for an existing user in the Active Directory by using CDOEXM), MS KB 304935 (How to set Exchange 2000 mailbox rights at the time of mailbox creation), MS KB 310866 (How to Set Exchange 2000 Mailbox Rights on a Mailbox That Exists in the Information Store), and Chapter 23 (“Permissions and Auditing”) of Active Directory, Second Edition (O’Reilly)
5.24. Limiting the Number of Recipients to Which Messages Can Be Sent
Solution
Using a graphical user interface
To set the maximum recipient count globally, do the following:
Open the Exchange System Manager (Exchange System Manager.msc).
Browse to the Global Settings object and expand the object.
Right-click Message Delivery and select Properties from the drop-down list.
Select the Defaults tab.
In the Recipient limits area, select Maximum (recipients) and enter 100 (or an appropriate value for your organization). Click Apply, and then click OK.
To set it on a per-server basis, do the following:
Open the Exchange System Manager (Exchange System Manager.msc).
Browse to the Server object (Administrative Groups → Administrative Group Name → Servers → Server Name) and expand the object.
Expand the Protocols object and double-click to expand the SMTP object.
Right-click Default SMTP Virtual Server and select Properties from the drop-down list.
Select the Messages tab.
Limit number of recipients per message to should be set to its default value of
64000. Change this to100(or an appropriate value for your organization). Click Apply, and then click OK.Repeat this action for each SMTP virtual server or connector within your organization that you wish this setting to apply to.
Using a command-line interface
Save the following LDF file and run the command ldifde -i -f
<filename>.ldf:
# ---------------- limit-recips.ldf ------------------ dn: CN=Message Delivery,CN=Global Settings,CN=<yourOrgName>,CN=Microsoft Exchange, CN=Services,CN=Configuration,<ForestRootDN>changetype: modify replace: msExchRecipLimit msExchRecipLimit: 100
Using VBScript
' This code sets a cap on the number of recipients allowed
' on a single message
' ------ SCRIPT CONFIGURATION ------
strMessageDeliveryDN = "cn=message delivery,cn=global settings," & _
     "cn=<orgName>,cn=microsoft exchange,cn=services," & _
     "cn=configuration, <ForestRootDN>"
' ------ END CONFIGURATION ------
set objMessageLimit = Getobject("LDAP://" & strMessageDeliveryDN)
objMessageLimit.Put "msExchRecipLimit", "100"
objMessageLimit.SetInfo
WScript.Echo "Set recipient limit on " & strMessageDeliveryDN & " to 100"
Discussion
Limiting the number of recipients that can be included in one message can help prevent the spread of viruses by SMTP. We chose to set the recipient limit to 100 per message, but we’re not working in an organization where messages are sent to hundreds of recipients at once. While limiting the number of recipients a message can be sent to is a good thing, you should ensure you’re not preventing your users from doing business efficiently.
See Also
Recipe 4.10 for more on setting default send and receive limits; MS KB 821881 (How to Modify Global Settings in Exchange System Manager) and MS KB 319356 (How to prevent unsolicited commercial email in Exchange 2000 Server)
5.25. Creating and Using Offline Address Lists
Solution
Using a graphical user interface
To set the properties of an OAL, do the following:
Open the Exchange System Manager (Exchange System Manager.msc).
Expand the Recipients node and select the Offline Address Lists node.
Right-click the OAL you want to modify and choose the Properties command.
Choose the server you want to be responsible for generating the OAL by clicking the Browse button. This can be any server in any administrative group.
Use the Address lists field and the Add and Remove buttons to include or exclude the global address lists you want included in your OAL. By default, your organization will have a single OAL that will contain the default GAL.
Use the Update interval drop-down listing and the Customize button to schedule when you want the OAL generated. Microsoft recommends that you leave this interval set to no more than once per day, unless your server resources allow more frequent updates. The time required to build the OAL increases as the number of accounts in the included address lists increases. However, Outlook 2003 users in cached Exchange mode won’t see account additions and deletions until the next time they download an up-to-date OAL.
Click OK.
To create a new OAL, do the following:
Log on to your Exchange server using an account that has administrative privileges on the domain.
Open the Exchange System Manager.
Expand the Recipients node and right-click the Offline Address Lists node.
Choose the New→ Offline Address List command.
Give the new OAL a name, then use the Browse button to select the server you want to generate the OAL. Click Next.
Select the address lists you want included in the OAL, then click Next.
Click Next again to acknowledge that the new OAL won’t be created until the next scheduled window for store maintenance, then click Finish.
Discussion
Before we start in on the details of how offline address lists work, let’s straighten out a terminology wrinkle. The Outlook team calls these objects “offline address books,” or OABs. The Exchange team sometimes calls the same things OALs, but sometimes they call them OABs. Don’t let this confuse you too much.
OALs are designed as a convenience for clients—specifically, clients that may not be connected to the server at a given time. The idea behind the OAL is that it should serve as a locally available replica of selected address lists that can be used for address resolution on a machine that cannot connect to an Exchange server at the time. If you think of the OAL as merely an offline version of the GAL (or of selected GALs, since you can choose which specific address lists are included in a particular OAL), you’ve got the idea, although the OAL doesn’t include all of the information found in the GAL (custom properties and group membership data isn’t included). Outlook uses its local copy of the OAL to handle both GAL browsing and name resolution when offline.
The OAL itself is a set of .OAB files that are stored in a system public folder, the name of which varies according to the version of Exchange you’re using (for Exchange Server 2003, it’s OAB Version 3a); that’s why, when you create a new OAL, you have to wait for store maintenance to run—a new instance of the system public folder has to be created. Each day, the Exchange system attendant kicks off a process known as OABGen; it creates an incremental file (changes.oab) that contains all the changes made in the preceding 24 hours. This daily incremental update is posted to the folder so that clients can download it; by default, the folder’s aging limit is set to 30 days, so clients can pull up to 30 days of deltas before they have to download a complete OAL. Speaking of complete OALs: after the daily differential object is created, OABGen refreshes the full copy of the OAL and stores it as well.
There are several circumstances in which Outlook will download a full OAL:
When Outlook connects to the server for the first time, it will download the full version of the OAL. After that, it will download the next day’s incremental after 24 hours have elapsed, and every 24 hours after that.
If Outlook has an older version of the OAL and it connects to a server that only has a newer version, it will download the newer version. For example, if you move a user’s mailbox from an Exchange 5.5 to an Exchange Server 2003 server, the old OAL will be an old version, so it’ll be replaced.
If the total volume of incremental changes needed to bring the OAL up to date is more than one-eighth the total size of the full OAL, Outlook will just go ahead and download the whole thing—this keeps it from downloading updates that have been superseded by other later updates. MS KB 841273 describes a number of tweakable parameters that control Outlook’s behavior in this regard. This kind of mass change can happen if you change or add recipient policies or modify some AD schema objects.
If you create or remove an administrative group, Outlook has to fetch the full OAL because the Exchange parent distinguished name (PDN) table has changed.
If there’s a missing incremental file, Outlook has to fetch the full OAL because it can’t recover from the missing file. This can occur because of a problem on the server, or because Outlook has been offline for longer than the aging period on the OAL’s public folder.
When you tell it to by using the Tools→ Send/Receive→ Download Address Book command.
See Also
Recipe 5.12 for creating address lists, MS KB 841273 (Administering the Offline Address Book in Outlook 2003), and MS KB 811870 (XADM: Troubleshoot offline address book download issues)
5.26. Using Mailbox Manager
Problem
You want to use the Mailbox Manager feature of Exchange Server to clean up certain items within your users’ mailboxes.
Solution
Using a graphical user interface
Open the Exchange System Manager (Exchange System Manager.msc).
Expand the Recipients node and select the Recipient Policies node.
Right-click Recipient Policies and select New→ Recipient Policy.
Select Mailbox Manager Settings and click OK.
On the General tab, type a name for the policy, such as Mailbox Manager.
Select the Mailbox Manager Setting (Policy) tab.
Ensure that the default settings meet your needs. If you wish to modify an item, select the item and click Edit to change either the age or size limit defined.
In the When processing a mailbox drop-down list, select Move to Deleted Items folder. You may also choose to use the reporting mode initially; if so, select Generate report only.
Select Send notification to mail user after processing and click Message.
Modify the message as appropriate. You may also select the Insert the number of messages processed option so your users will know how many items were cleaned up within their mailbox. Click OK.
Click Apply. Close Mailbox Manager Properties by clicking OK.
You now need to schedule Mailbox Manager to run on each mailbox server within your organization. The same set of policies you just created will be used on each server.
In the Exchange System Manager snap-in, browse to the Server object (Administrative Groups→ Administrative Group Name→ Servers→ Server Name).
Right-click the server you want to apply the policy to and select Properties.
Select the Mailbox Management tab (see Figure 5-7).
In the Start mailbox management process drop-down list, select Run Saturday at Midnight (or pick a time that works best for your organization—it’s best to ensure the mailbox management process doesn’t overlap with any other type of system maintenance, such as online maintenance or backup processes, if possible). If none of the times in the drop-down list work with your schedule, select the Use custom schedule option and click Customize to create your schedule.
In the Reporting drop-down list, select Send summary report to administrator. If you wish to have more detailed reporting, you can alternately select Send detail report to administrator.
Click Browse. Type the name of the account or group that you want to receive the reports and click Check Names. Click OK to exit the Select Recipient dialog.
Click Apply and click OK.
Repeat steps 4 through 7 on each mailbox server within your organization.
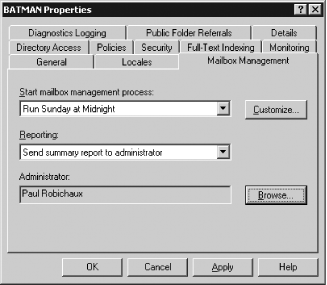
Discussion
Mailbox Manager examines three MAPI properties of an object when
determining whether to process an item according to the policies in
place: PR_MESSAGE_DELIVERY_TIME,
PR_CLIENT_SUBMIT_TIME, and PR_LAST_MODIFICATION_TIME. If all three of
these properties do not meet the criteria defined within Mailbox
Manager, then the object will not be removed from the mailbox. Since
the PR_LAST_MODIFICATION_TIME
property is reset each time a message is opened, items that you might
have expected to be removed from the mailbox may still be in place.
This is to ensure that objects that are currently in use within the
mailbox remain active and usable.
For objects such as IPM.Appointment, IPM.Task, and IPM.Journal, additional MAPI properties are
checked to ensure that active and recurring appointments, active
tasks, and active journaling activities are retained. You may not want
mailbox manager to take action on a specific message class. In order
to leave all appointment items, for instance, you can select Exclude
Specific Message Classes and click Customize. You would then type
IPM.Appointment in the Exclude Message Classes area and click
Add.
Mailbox Manager also checks for message sizes. By default, it will not remove items that are less than 1 MB. If the message size is less than 1 MB (or whatever size you modify your policy to use), it will not be deleted from the mailbox even if it is older than the age limit defined in your policy (which is 30 days in the default settings).
It is always best to initially run Mailbox Manager in report mode to determine what the results of the scan will be.
It’s possible to create a script to duplicate the functionality of Mailbox Manager, but it seems impractical to do so, given the inherent flexibility of Mailbox Manager itself.
See Also
MS KB 302804 (Message Age Limit Properties Used by Mailbox Manager) and MS KB 319188 (How to use recipient policies to control mailboxes in Exchange 2000 and Exchange 2003)
5.27. Using ADModify.NET to Update User Attributes
Solution
Using a graphical user interface
Download ADModify.NET from the Microsoft Download Center (see the Discussion) and extract the ZIP archive to a selected folder on the local hard drive.
Open ADModify.NET by double-clicking the ADModify.exe file.
Click Modify Changes.
Choose your domain and domain controller from the drop-down lists and click the green arrow.
Navigate through the domain tree and select a container that holds user accounts you wish to modify. Click Add to List. Repeat this step until the right hand pane contains all of the user accounts you wish to modify.
In the right pane, select the specific users you wish to modify. Click Next.
Navigate through the tabs and fields and select the modifications you wish to make. Remember that they will be applied to all of the users you selected in step 6.
Click Go! to apply your modifications.
Refer to the ADModify.NET.chm file for more information.
Discussion
The ADModify tool, written by Marc Nivens and Dan Winter of the 24x7 Enterprise Messaging Support team at Microsoft Product Support Services, provides a powerful GUI utility for bulk modification of user accounts. It comes in two flavors, Win32 (Version 1.6) and .NET (Version 2.x) and is available for download from the Microsoft Download Center or from its project home at GotDotNet (http://workspaces.gotdotnet.com/ADModify).
ADModify 1.6 generally provides less functionality than ADModify.NET does, but it does provide the following features that have been removed from Version 2:
Export Exchange 5.5 users to LDIF
Export Active Directory users to LDIF
Perform an LDIF import to Active Directory
Support for X.500 and Lotus Notes fields
If you don’t need any of these features, are not yet running Windows Server 2003, or prefer not to deploy the .NET Framework 1.1 on your management workstation, use ADModify 1.6. It is used in much the same fashion as Version 2 and is documented in the included help file. Otherwise, look at both flavors and use the one that gives you the mix of functionality you need; on Windows Server 2003, this will generally be Version 2.
ADModify.NET provides the ability to export mailbox rights to XML and reimport them, as well as an XML log that provides undo capability. It also adds support for the remote control and Terminal Services fields in Windows Server 2003.
5.28. Setting Properties on User Accounts
Solution
Using a graphical user interface
Log on to any machine in your domain that has the Exchange management tools installed.
Open the ADUC snap-in (Users and Computers.msc).
Locate the container that holds the user object whose properties you want to modify.
Select the user object you want to modify, then right-click it and choose Properties.
Select the General tab in the Properties dialog box.
Edit properties as desired.
Select other pages in the tabbed dialog box, and edit other properties.
Click OK to close the Properties dialog box.
Using VBScript
' This code fills the target user account with a bunch of silly
' properties, primarily to illustrate how to set multivalued properties
' ------ SCRIPT CONFIGURATION ------
strUser = "<UserDN>"  'e.g., "cn=jimmy,cn=Users,dc=domain,dc=com"
set objUser = GetObject("LDAP://" & strUser)
' ------ END CONFIGURATION ---------

givenName="James"           'First (given) Name
initials="F"                'Initial(s)
sn="Jones"                    'Last Name
displayName="James F Jones"  'Display Name
description="New accounting intern"
physicalDeliveryOfficeName="Finance & Accounting"   ' Office
telephoneNumber="512-555-0000"
WWWHomePage="http://wwww.domain.com/accounting"

' ------ ADU&C ADDRESS TAB ---------
streetAddress="123 Main Street" & vbCRLF & "AcmeCo Towers" & vbCRLF & "Suite 700B"  'Street
postOfficeBox="PO BOX 1234"
l="Anytown"               'city
st="CA"                'state
postalCode="94111"        'Zip/Postal Code
co="United States"       'Country/region

' ------ ADU&C TELEPHONES TAB ---------
homePhone="512.555.0011"
otherHomePhone = Array("512-111-1111", _
               "512-222-2222")       'other home phone

pager="1.888.PAGE-JIM"
otherPager= Array("512-333-3333", _
            "512-333-4444")           ' other pager
mobile="512.555.1212"
otherMobile = Array("512-444-4444", _
            "512-444-5555")           ' other mobile
facsimileTelephoneNumber="512-452-0156"
otherFacsimileTelephoneNumber= Array("512-555-5555", _
                    "512-555-6666")   ' other Fax
ipPhone="10.1.1.231"
otherIpPhone = Array("10.10.10.200", _
            "192.168.0.57")           ' other IP Phone
info="Some notes about this user"        'Notes

' ------ ADU&C ORGANIZATION TAB ---------
title="Accounting Intern 1"
department="Finance & Accounting"
company="Acme Widgets"
manager="CN=paul,OU=TestUsers,DC=3sharpaustin,DC=com"

' ------ OPTIONAL ATTRIBUTES ---------
msExchAssistantName="Joe Secretary"
extensionAttribute1="foobar"
extensionAttribute2="foo"
extensionAttribute15="bar"
'-----------------------------------------------
'General Tab in ADU&C
objUser.Put "givenName", givenName
objUser.Put "initials", Initials
objUser.Put "sn", sn
objUser.Put "displayName", displayName
objUser.Put "description", description
objUser.Put "physicalDeliveryOfficeName", physicalDeliveryOfficeName
objUser.Put "telephoneNumber", telephoneNumber
objUser.Put "wWWHomePage", WWWHomePage
'Address Tab in ADU&C
objUser.Put "streetAddress", streetAddress
objUser.Put "postOfficeBox", postOfficeBox
objUser.Put "l", l
objUser.Put "st", st
objUser.Put "postalCode", postalCode
objUser.Put "co", co
objUser.Put "homePhone", homePhone
objuser.Put "otherHomePhone", otherHomePhone
objUser.Put "pager", pager
objuser.Put "otherPager", otherPager
objUser.Put "mobile", mobile
objuser.Put "otherMobile", otherMobile
objUser.Put "facsimileTelephoneNumber", facsimileTelephoneNumber
objuser.Put "otherFacsimileTelephoneNumber", otherFacsimileTelephoneNumber
objUser.Put "ipPhone", ipPhone
objuser.Put "otherIpPhone", otherIpPhone
objuser.Put "info", info
objUser.Put "title", title
objUser.Put "department", department
objUser.Put "company", company
objUser.Put "manager", manager
objUser.Put "msexchAssistantName", msExchAssistantName
objUser.Put "extensionAttribute1", extensionAttribute1
objUser.Put "extensionAttribute2", extensionAttribute2
objUser.Put "extensionAttribute15", extensionAttribute15

objUser.SetInfo
Wscript.Echo "User account for " & objUser.Get("sAMAccountName") & _
             " has been updated"
Discussion
Setting attributes of user objects is extremely straightforward
using the ADUC MMC. However, in the interest of usability, Microsoft
chose to expose the most common subset of attributes to the MMC
interface. For example, it’s especially confusing that the Exchange
Global Address List displays an “assistant” field, but the field does
not exist in the GUI. The best way to change these unexposed
attributes is through scripting. Our “assistant” example is kept in
the msExchAssistantName field, and
when updated through scripting, will appear in the Exchange Global
Address List. Because some attributes are missing from ADUC, you may
want to use either ADSIEdit or LDP to view attributes, even though
these tools are somewhat more difficult to use.
You can also get the acctinfo.dll extension from the Windows Server 2003 Resource Kit; this DLL, when registered, will add a new Additional Account Info tab to the user properties dialog; this tab shows logon time, password date and policy, and lockout information for the selected account.
This type of script is also useful for stepping through a group of objects and updating a particular attribute, such as changing a division’s address or phone number.
See Also
Recipe 5.1 for creating mail-enabled user accounts, and Recipe 5.29 for retrieving properties on user accounts; the table at http://www.kouti.com/tables/userattributes.htm for mapping AD attributes to what you see in ADUC
5.29. Retrieving Properties on User Accounts
Solution
Using a graphical user interface
Log on to any machine in your domain that has the Exchange management tools installed.
Open the ADUC snap-in (Users and Computers.msc).
Locate the container that holds the user object whose properties you want to modify.
Select the user object you want to modify, then right-click it and select Properties.
Select the General tab in the Properties dialog box.
Edit properties as desired.
Select other pages in the tabbed dialog box, and edit other properties.
Click OK to close the Properties dialog box.
Repeat steps 4-8 for each additional user whose properties you want to review.
Using a command-line interface
Run the following command:
> ldifde -f c:outfile.ldf -r "(&(objectClass=User)(objectCategory=Person))" -d "cn=<Username>,cn=users,<ForestRootDN>"
This will create an LDIF-format file called outfile.ldf, which you can view with your favorite text editor.
Using VBScript
' This code dumps most of the properties on the selected user object.
'To output to a text file, run 'cscript filename.vbs >outfile.txt'
' ------ SCRIPT CONFIGURATION ------
strUser = "<Username>"    'e.g., "cn=jimmy,cn=Users,dc=domain,dc=com"
set objUser = GetObject("LDAP://" & strUser)

'declare arrays for multivalue properties
arrOtherHomePhone = objUser.GetEx("otherHomePhone")
arrOtherPager = objUser.GetEx("otherPager")
arrOtherMobile = objUser.GetEx("otherMobile")
arrOtherIpPhone = objUser.GetEx("otherIpPhone")
arrOtherFax = objUser.GetEx("otherFacsimileTelephoneNumber")

'General Tab in ADU&C
Wscript.Echo "First Name:      " & objUser.Get("givenName")
Wscript.Echo "Initials:        " & objUser.Get("initials")
Wscript.Echo "Last Name:       " & objUser.Get("sn")
Wscript.Echo "Description:     " & objUser.Get("description")
Wscript.Echo "Office:          " & objUser.Get("physicalDeliveryOfficeName")
Wscript.Echo "Telephone:       " & objUser.Get("telephoneNumber")
Wscript.Echo "Web Page:        " & objUser.Get("wWWHomePage")

'Address Tab in ADU&C
Wscript.Echo "Street Address:  " & objUser.Get("streetAddress")
Wscript.Echo "PO Box           " & objUser.Get("postOfficeBox")
Wscript.Echo "City:            " & objUser.Get("l")
Wscript.Echo "State/Region:    " & objUser.Get("st")
Wscript.Echo "Zip/Postal code: " & objUser.Get("postalCode")
Wscript.Echo "Country:         " & objUser.Get("co")

'Telephones Tab in ADU&C
Wscript.Echo "Home Phone:      " & objUser.Get("homePhone")
For Each strValue in arrOtherHomePhone
    WScript.echo "Other Home Phone: " & strValue
Next

Wscript.Echo "Pager:           " & objUser.Get("pager")
For Each strValue in arrOtherPager
    WScript.echo "Other Pager:     " & strValue
Next
Wscript.Echo "Mobile Phone:    " & objUser.Get("mobile")
For Each strValue in arrOtherMobile
    WScript.echo "Other Mobile:    " & strValue
Next
Wscript.Echo "Fax:             " & objUser.Get("facsimileTelephoneNumber")
For Each strValue in arrOtherFax
     WScript.echo "Other Fax:       " & strValue
Next

Wscript.Echo "IP Phone:        " & objUser.Get("ipPhone")
For Each strValue in arrOtherIpPhone
    WScript.echo "Other IP Phone:  " & strValue
Next
Wscript.Echo "Info:            " & objUser.Get("info")

'Organization Tab in ADU&C
Wscript.Echo "Title:           " & objUser.Get("title")
Wscript.Echo "Department:      " & objUser.Get("department")
Wscript.Echo "Company:         " & objUser.Get("company")
Wscript.Echo "Manager:         " & objUser.Get("manager")

'Optional Attributes
Wscript.Echo "Secretary:       " & objUser.Get("secretary")
Wscript.Echo "Custom Attrib1:  " & objUser.Get("extensionAttribute1")
Wscript.Echo "Custom Attrib2:  " & objUser.Get("extensionAttribute2")
Wscript.Echo "Custom Attrib15: " & objUser.Get("extensionAttribute15")
Discussion
ldifde is a useful tool to
quickly export a list of object attributes from a command line, but
the output is not as clean as if you write a script. By scripting your
solution, you can limit your output to the subset of information
you’re looking for, or format the output in a more readable
manner.
See Also
MS KB 237677 (Using LDIFDE to Import and Export Directory Objects to Active Directory) and MSDN: Active Directory Schema