
Chapter 7. Execution Control
Introduction
This chapter presents problems related to controlling execution of your web application. Some of the solutions use listener features provided by the Servlet container. These classes and interfaces allow your application to receive notification of servlet container events. Servlet listeners can be used on any Java web application and container that supports the Servlet 2.3 API.
Managing workflow in a web application can be a challenge due to the stateless nature of HTTP. This chapter covers some approaches for handling navigation within a Struts application. Finally, this chapter will look at some specific problems and solutions you’ll encounter when working with files. You’ll find solutions for enabling and processing file uploads as well as displaying content—in varying formats—from files on the server.
7.1. Performing Tasks at Application Startup
Problem
You want to be notified when your web application is initialized so you can preload application-scope data or execute other startup functions.
Solution
Create a class that implements the
ServletContextListener
interface. The class shown in Example 7-1 stores the
current date and time in the servlet context when the application is
started.
package com.oreilly.strutsckbk.ch07;

import java.util.Date;

import javax.servlet.ServletContextEvent;
import javax.servlet.ServletContextListener;

public class ContextLoader implements ServletContextListener {
    public void contextInitialized(ServletContextEvent event) {
        ServletContext ctx = event.getServletContext( );
        ctx.setAttribute("dateStarted", new Date( ));
    }
    public void contextDestroyed(ServletContextEvent event) {
        // clean up here
    }
}
Declare the class with a listener element in your
web application’s
web.xml
file. The listener element is supported by Version
2.3 or 2.4 of the Servlet specification; the DTD must specify Version
2.3 or 2.4:
<?xml version="1.0" encoding="ISO-8859-1" ?>
<!DOCTYPE web-app PUBLIC
    "-//Sun Microsystems, Inc.//DTD Web Application 2.3//EN"
    "http://java.sun.com/dtd/web-app_2_3.dtd">

<web-app>
  <display-name>Struts Cookbook - Chapter 7 Examples</display-name>

  <listener>
               <listener-class>com.oreilly.strutsckbk.ch07.ContextLoader
      </listener-class>
               </listener>
  ... rest of web.xml
Discussion
Every Java web
application has one single
servlet context. This context is the place where application-scoped
attributes are stored. The servlet container creates the servlet
context for a web application when the application is started. You
can create a class that gets notified when this context is created
(or destroyed) by implementing the
ServletContextListener
interface. Your listener class
receives notifications immediately after the servlet context is
created and immediately before the context is destroyed. These events
coincide with the startup and shutdown of the web application.
The ServletContextListener interface defines two
methods: contextInitialized( ) and
contextDestroyed( ). The container passes a
ServletContextEvent to these methods. This class
provides access to the ServletContext itself. With
the servlet context, you can add, remove, and replace
application-scope objects as servlet context attributes. The class in
Example 7-1 uses the
ServletContext.setAttribute(
name,value
)
method to store the current a Date object in the servlet context. You
could access this data from a JSP page as an application-scoped
object:
Running since: <bean:write name="dateStarted"
                         scope="application"
                        format="MM/dd/yy"/>
Servlet context listeners make an excellent choice for this kind
of
data loading, but for a Struts application you may prefer to use a
Struts plug-in. A plug-in can do anything a context listener can do,
and a plug-in gives you access to your entire
application’s Struts configuration through the
ActionServlet. You can pass parameters to a
plug-in using the
set-property
element, making plug-ins more flexible and reusable than listeners.
Because you declare plug-ins in the
struts-config.xml file,
you get a side benefit as your application’s
configuration will be centralized in one place.
See Also
Recipe 2.1 gives complete details on writing and configuring Struts plug-ins. Recipe 7.2 describes how to create classes that monitor HTTP sessions.
If you are unfamiliar with servlet programming, then you should check out Java Servlet Programming by Jason Hunter (O’Reilly). This classic work will give you all the information you need to create highly functional servlets and servlet-related classes.
7.2. Tracking Client Sessions
Problem
You need to keep track of the number of clients currently using your application.
Solution
Create a class that implements the
HttpSessionListener
interface, like the one shown in Example 7-2, that
keeps count of the total number of active sessions.
package com.oreilly.strutsckbk.ch07;

import javax.servlet.ServletContext;
import javax.servlet.http.HttpSessionEvent;
import javax.servlet.http.HttpSessionListener;

public class SessionCounter implements HttpSessionListener {
    public void sessionCreated(HttpSessionEvent event) {
        ServletContext ctx = event.getSession( ).getServletContext( );
        Integer numSessions = (Integer) ctx.getAttribute("numSessions");
        if (numSessions == null) {
            numSessions = new Integer(1);
        }
        else {
            int count = numSessions.intValue( );
            numSessions = new Integer(count + 1);
        }
        ctx.setAttribute("numSessions", numSessions);
    }
    public void sessionDestroyed(HttpSessionEvent event) {
        ServletContext ctx = event.getSession( ).getServletContext( );
        Integer numSessions = (Integer) ctx.getAttribute("numSessions");
        if (numSessions == null) {
            numSessions = new Integer(0);
        }
        else {
            int count = numSessions.intValue( );
            numSessions = new Integer(count - 1);
        }
        ctx.setAttribute("numSessions", numSessions);
    }
}
Declare your class in a listener element of your
application’s
web.xml
file. The listener element is supported by Version
2.3 or 2.4 of the Servlet specification—the DTD must specify
Version 2.3 or 2.4:
<?xml version="1.0" encoding="ISO-8859-1" ?>
<!DOCTYPE web-app PUBLIC
    "-//Sun Microsystems, Inc.//DTD Web Application 2.3//EN"
    "http://java.sun.com/dtd/web-app_2_3.dtd">

<web-app>
  <display-name>Struts Cookbook - Chapter 7 Examples</display-name>

  <listener>
               <listener-class>com.oreilly.strutsckbk.ch07.SessionCounter
      </listener-class>
               </listener>
  ... rest of web.xml
Discussion
In the Solution, any time a session is created, a counter—stored in the servlet context—is incremented. Every time a session is destroyed, that counter is decremented. In practical terms, this custom class tracks the number of users currently using your application.
Web applications use HTTP sessions to maintain state between
requests. The Servlet 2.3 specification added support for session
listeners that receive notifications when any session is created or
destroyed. You can write a class that receives these events by
implementing the HttpSessionListener interface.
This interface defines two methods: sessionCreated(
) and sessionDestroyed( ). The container
calls sessionCreated( ) after a session is created
and sessionDestroyed( ) before the session is
destroyed or invalidated. The container passes an
HttpSessionEvent to each of these methods. This
event object has a getSession( ) method that gives
you a handle to the particular session.
Once you’ve got the HttpSession,
you can do anything you want to with it. If the session was just
created, you can add objects as session-scoped attributes. If
destroyed, then you have the opportunity to dispose of session
objects that require special handling. The
HttpSession provides the getAttribute(), setAttribute( ), and
removeAttribute( ) methods for manipulating
session attributes. You can get a reference to your
application’s servlet context via the
getServletContext( ) method.
See Also
While session listeners receive notification of session lifecycle events, servlet context listeners receive notification of application life-cycle events. These listeners are discussed in Recipe 7.1. If you want notifications specifically when objects are added to or removed from the session, use a session attribute listener discussed in Recipe 7.3.
If you are unfamiliar with servlet programming, you should check out Java Servlet Programming by Jason Hunter (O’Reilly). This classic work will give you all the information you need to create highly functional servlets and servlet-related classes.
7.3. Monitoring User Logins
Problem
You want to know when a user has logged into your application.
Solution
Create a class that implements the
HttpSessionAttributeListener
for session-scoped objects. The class shown in Example 7-3 tracks the number of logged-in users of an
application by listening for the addition and removal of a
User object to or from the session.
package com.oreilly.strutsckbk.ch07;

import javax.servlet.ServletContext;
import javax.servlet.http.HttpSessionAttributeListener;
import javax.servlet.http.HttpSessionBindingEvent;

public class UserCounter implements HttpSessionAttributeListener {

    public void attributeAdded(HttpSessionBindingEvent event) {
        if (attributeIsUser(event))
            adjustUserCounter(event.getSession( ).getServletContext( ),
            true);
    }

    public void attributeRemoved(HttpSessionBindingEvent event) {
        if (attributeIsUser(event))
            adjustUserCounter(event.getSession( ).getServletContext( ),
            false);
    }

    public void attributeReplaced(HttpSessionBindingEvent event) {
    }

    private boolean attributeIsUser(HttpSessionBindingEvent event) {
        String name = event.getName( );
        Object value = event.getValue( );
        return "user".equals(name) &&
               value instanceof com.oreilly.strutsckbk.ch07.User;
    }

    private void adjustUserCounter(ServletContext ctx, boolean userAdded) {
        Integer counterObj = (Integer) ctx.getAttribute("numUsers");
        int counter = (counterObj == null ? 0 : counterObj.intValue( ));
        if (userAdded) {
          counter++;
        }
        else {
            if (counter > 0) counter--;
        }
        ctx.setAttribute("numUsers", new Integer(counter));
    }
}
Like the other servlet listeners, you declare the class as a
listener element in your web
application’s web.xml file. The
listener element is supported by Version 2.3 or
2.4 of the Servlet specification; the DTD must specify Version 2.3 or
2.4:
<?xml version="1.0" encoding="ISO-8859-1" ?>
<!DOCTYPE web-app PUBLIC
    "-//Sun Microsystems, Inc.//DTD Web Application 2.3//EN"
    "http://java.sun.com/dtd/web-app_2_3.dtd">

<web-app>
  <display-name>Struts Cookbook - Chapter 7 Examples</display-name>

  <listener>
               <listener-class>com.oreilly.strutsckbk.ch07.UserCounter
      </listener-class>
               </listener>
  ... rest of web.xml
Discussion
The Servlet 2.3 specification added
support for various listener types. Attribute listeners allow you to
receive event notifications when an object is added, removed, or
replaced in the session and application scopes. A class that
implements the HttpSessionAttributeListener
interface monitors session-scope objects.
The Solution shown in Example 7-3 shows how an attribute listener can track the number of users logged into your application. When an attribute is added to the session under the name “user,” a counter object—maintained in the servlet context—is incremented. Likewise, when the user object is removed from the session, the counter is decremented. The session listener of Recipe 7.2 provided a similar function. However, using an attribute listener gives you finer-grained monitoring.
The HttpSessionAttributeListener specifies three
methods: attributeAdded( ),
attributeReplaced( ), and
attributeRemoved( ). The servlet container calls
attributeAdded( ) when an object is added to the
session or servlet context under a new name. If an attribute is added
using the name of an existing attribute, the
attributeReplaced( ) method is called. When an
object is removed from the session or servlet context, the container
calls attributeRemoved( ). When an
HttpSession is invalidated, the servlet container
will call the removeAttribute( ) method of any
HttpSessionAttributeListeners for each object in
the session. This allows you to perform any necessary cleanup on
those objects before the session is destroyed.
Tip
Objects can be added, replaced, or removed from the
HttpSession and ServletContext
using the setAttribute( ) and
removeAttribute( ) methods. You can manipulate
these objects from a JSP page using custom tags like the standard
jsp:useBean, Struts’
bean:define, and JSTL’s
c:set.
The session attribute that caused the event is accessible via the
HttpSessionBindingEvent object passed to each
notification method. The getValue( ) method
retrieves the object and the getName( ) retrieves
the attribute’s name.
See Also
You can monitor attributes added to the ServletContext using a
ServletContextAttributeListener. Furthermore, the
Servlet 2.4 specification adds a
ServletRequestAttributeListener and lets you
monitor objects added to any servlet request.
The
HttpSessionBindingListener
interface allows objects being managed as session attributes to be
notified when they’re bound or unbound from the
session. The methods of this interface are triggered by the same
events as the HttpSessionAttributeListener. The
JavaDocs for the session binding listener can be found at http://java.sun.com/products/servlet/2.3/javadoc/javax/servlet/http/HttpSessionBindingListener.html.
If you are unfamiliar with servlet programming, you should check out Java Servlet Programming by Jason Hunter (O’Reilly). This classic work will give you all the information you need to create highly functional servlets and servlet-related classes.
7.4. Forwarding Users to Alternate Destinations
Problem
You want to define locations, such as other servlets, JSPs, or Struts components that you can forward users to from your application code.
Solution
Define the
global forwards in the
struts-config.xml file. If the
forward is for a specific module, define it in
that module’s struts-config.xml
file:
<form-beans>
  <!-- snipped ... -->
</form-beans>
<global-forwards>
    <forward name="main" path="/index.jsp"
         redirect="true"/>
    <forward name="logon" path="/Logon.do"
         contextRelative="true" redirect="true"/>
    <forward name="logoff" path="/Logoff.do"
         contextRelative="true" redirect="true"/>
</global-forwards>
<global-exceptions>
  <!-- snipped ... -->
</global-exceptions>
Discussion
The URL paths you use in your application commonly evolve and change
as your application develops. You can create logical references to
application paths using a Struts forward. Global
forwards—defined using forward elements
nested in the global-forwards element—create
logical destinations that can be accessed from anywhere in your
application. The Struts html:link,
html:rewrite, and html:frame
tags all support the forward attribute that
accepts the name of a global forward. The tag uses the logical
path for that forward to
generate the actual URL.
Local forwards are specific to a given action.
Local
forwards are specified as nested elements of an
action element:
<action    path="/LoadData"
           type="com.oreilly.strutsckbk.ch07.LoadDataAction"
          scope="request"
           name="TestForm">
    <forward name="success" path="/show_data_form.jsp"/>
</action>
Local forwards are used by action classes to specify a logical
destination. The ActionMapping.findForward( )
method retrieves a forward by name. This method finds a matching
local forward for the given name. If none can be found, it searches
the global forwards. Here’s how a typical custom
Action uses the findForward( )
method to retrieve and return an ActionForward:
public ActionForward execute(ActionMapping mapping, ActionForm form,
            HttpServletRequest request, HttpServletResponse response)
        throws Exception {
    // perform action here

        // forward to the logical "success" location
    return mapping.findForward("success");
}
The forward element, whether global or local, accepts the attributes shown in Table 7-1.
|
Attribute |
Description |
|
|
Fully qualified Java class name of the
|
|
|
Set this to |
|
|
The module prefix to use with this path. This value begins with a
slash (for example, |
|
|
A module-unique logical identifier for this forward. This value is
used to retrieve the forward using the
|
|
|
The module-relative or context-relative URI path to the resource for
this |
|
|
Set this to |
The
URI generated for the forward is
determined by the contextRelative,
module, and path attributes.
For Struts 1.1 applications, the contextRelative
attribute lets you create forwards between modules. For Struts 1.2,
use the module attribute instead of
contextRelative. Specifying a module value of
/ is the same as setting
contextRelative to true.
The path attribute contains the location to the
desired resource. You can include request parameters by appending a
query string. Just be sure to use the ampersand character entity
(&) to separate name-value pairs. Table 7-2 contains some example global forwards and the
resulting URIs.
|
Forward definition |
Resultant URL |
|
|
http://localhost/jsc-ch07/index.jsp |
|
|
http://localhost/jsc-ch07/mod1/module1.jsp |
|
|
http://localhost/jsc-ch07/default_module.jsp |
|
|
http://localhost/jsc-ch07//default_module.jsp |
See Also
Using a global forward specifically to switch to a page in a different module is covered in Recipe 7.5. More information on switching between modules can be found in Recipe 6-7. Global forwards can be used like bridges between workflows as described in Recipe 6.5.
The Struts User Guide provides additional information on configuring and using global and local forwards. The relevant section can be found at http://struts.apache.org/userGuide/building_controller.html#config.
7.5. Forwarding Users to a Module
Problem
You want to forward control from one module to a page in another module.
Solution
If the link is for a JSP page and not an action, create an action of
type ForwardAction for that page in the target
module’s struts-config.xml
file. Specify the path to the JSP page as the value of the
parameter attribute:
<action path="/module1Menu"
type="org.apache.struts.actions.ForwardAction"
parameter="/mod1/module1Menu.jsp"/>Then define a
global
forward, in the struts-config.xml file of the
source module, with the module attribute set to
the target module prefix and the path attribute
set to the name of the action you just created:
<forward name="goToModule1" module="/mod1" path="/module1.do"/>
If the link is for an action in the other module, then specify the
path to the action, making sure to include the Struts
ActionServlet prefix or suffix (for example,
.do):
<html:link forward="goToModule1">Go To Module 1</html:link>
Discussion
You would think that you could create a link to a page in another
module by specifying the module attribute on the
global forward:
<forward name="goToModule1" module="/mod1"
path="/module1.jsp"/>
Unfortunately, this will not work. The URL to the page is correctly generated as http://localhost/jsc-ch07/mod1/module1.jsp; however, internally Struts still thinks that you are in the source module. Module-specific Struts entities such as global forwards and message resources will not be available on the target page because Struts has not switched the module context. In short, you can’t link between pages in a module but only between actions.
To force Struts to switch the module context, the URL must go through
the Struts controller, which is the ActionServlet.
To achieve this, create an action in the Struts
configuration XML file of the target module that uses the
ForwardAction. Specify the name of the JSP page as
the value for the parameter attribute. Then define
a global forward, setting the module attribute to the target module
and the path attribute to the path to the forwarding action. Make
sure to include the extension (for example,
/module1.do).
See Also
Module support has been enhanced in Struts 1.2. Check the online user’s guide for the latest updates. The Struts User Guide can be found at http://struts.apache.org/userGuide/index.html. Some other recipes that relate are Recipes Section 6.7 and Section 7.4.
7.6. Creating a Wizard-Style Page Flow
Problem
You want users to have a wizard-style page flow experience.
Solution
Implement a subclass of LookupDispatchAction that
supports operations for the navigational
functions—previous, next, and finish—and template methods
for the business logic. For each discrete step of the workflow,
extend this subclass, placing the business logic for each step in the
provided template methods. (See Example 7-4.)
package com.oreilly.strutsckbk.ch07;

import java.util.HashMap;
import java.util.Map;

import javax.servlet.http.HttpServletRequest;
import javax.servlet.http.HttpServletResponse;

import org.apache.struts.action.ActionForm;
import org.apache.struts.action.ActionForward;
import org.apache.struts.action.ActionMapping;
import org.apache.struts.actions.LookupDispatchAction;

public class WizardLookupDispatchAction extends LookupDispatchAction {

    public WizardLookupDispatchAction( ) {
        keyMethodMap = new HashMap( );
        keyMethodMap.put("button.previous", "doPrevious");
        keyMethodMap.put("button.next", "doNext");
        keyMethodMap.put("button.finish", "doFinish");
    }

    public ActionForward doPrevious( ActionMapping mapping,
            ActionForm form,
            HttpServletRequest request,
            HttpServletResponse response) throws Exception {
        processPrevious(mapping, form, request, response);
        return mapping.findForward("previous");
    }

    protected void processPrevious( ActionMapping mapping,
            ActionForm form,
            HttpServletRequest request,
            HttpServletResponse response) throws Exception {
    }

    public ActionForward doNext( ActionMapping mapping,
            ActionForm form,
            HttpServletRequest request,
            HttpServletResponse response) throws Exception {
       processNext(mapping, form, request, response);
       return mapping.findForward("next");
    }

    protected void processNext( ActionMapping mapping,
            ActionForm form,
            HttpServletRequest request,
            HttpServletResponse response) throws Exception {
    }

    public ActionForward doFinish( ActionMapping mapping,
           ActionForm form,
           HttpServletRequest request,
           HttpServletResponse response) throws Exception {
      processFinish(mapping, form, request, response);
      return mapping.findForward("finish");
    }

    protected void processFinish( ActionMapping mapping,
            ActionForm form,
            HttpServletRequest request,
            HttpServletResponse response) throws Exception {
    }

    protected Map getKeyMethodMap( ) {
        return keyMethodMap;
    }
}
Specify the workflow for the wizard in the struts-config.xml file:
<!-- Wizard mappings -->
<!-- Step 1 -->
<action    path="/ViewStep1"
           name="WizardForm"
          scope="session"
           type="org.apache.struts.actions.ForwardAction"
      parameter="/step1.jsp"/>
<action    path="/ProcessStep1"
           name="WizardForm"
          scope="session"
           type="com.oreilly.strutsckbk.ch07.WizardLookupDispatchAction"
      parameter="methodToCall">
    <forward name="next" path="/ViewStep2.do"/>
</action>

<!-- Step 2 -->
<action    path="/ViewStep2"
           name="WizardForm"
          scope="session"
           type="org.apache.struts.actions.ForwardAction"
      parameter="/step2.jsp"/>
<action    path="/ProcessStep2"
           name="WizardForm"
          scope="session"
           type="com.oreilly.strutsckbk.ch07.WizardLookupDispatchAction"
      parameter="methodToCall">
    <forward name="previous" path="/ViewStep1.do"/>
               <forward name="next" path="/ViewStep3.do"/>
</action>

<!-- Step 3 -->
<action    path="/ViewStep3"
           name="WizardForm"
          scope="session"
           type="org.apache.struts.actions.ForwardAction"
      parameter="/step3.jsp"/>
<action    path="/ProcessStep3"
           name="WizardForm"
          scope="session"
           type="com.oreilly.strutsckbk.ch07.WizardLookupDispatchAction"
      parameter="methodToCall">
    <forward name="previous" path="/ViewStep2.do"/>
               <forward name="finish" path="/wizard_done.jsp"/>
</action>
Discussion
The topic of wizard-style applications comes up frequently on the
Struts mailing lists. Struts doesn’t have a silver
bullet solution for this problem.
Wizard
interfaces can be built many ways; there is no
“right way” to do it. The Solution
leverages the ability of the LookupDispatchAction
and the use of a session-scoped form to pass data from page to page.
If it doesn’t meet your needs, it will at least
provide the basis of a custom solution.
The WizardLookupDispatchAction subclasses
LookupDispatchAction, implementing the
getKeyMethodMap( ) method to map a button label
key to the corresponding method. Methods are provided for handling
previous, next, and
finish buttons. Each of these methods delegates
processing to a no-op protected method. The business logic for
processing the form from each JSP would be added to the
processNext( ) method. Business logic required
when clicking previous would be implemented in the
processPrevious( ) and logic to be handled when
clicking finish is implemented in the processFinish(
) method.
A benefit of this Solution is you can see the flow from page to page in the struts-config.xml. You can look at the mappings and follow the steps in the flow:
<forward name="previous" path="/ViewStep1.do"/>
<forward name="next" path="/ViewStep3.do"/>
The solution works even if the user clicks the browser’s back or forward buttons instead of using the navigation buttons.
One common gripe about the LookupDispatchAction is
it doesn’t work well if you are using images for
buttons. In this case, you may want to extend
DispatchAction and set the dispatch action using
JavaScript.
See Also
Use of the LookupDispatchAction is presented in
Recipe 6.9. The
DispatchAction is shown in Recipe 6.8. The basic approach shown here is similar to
that presented in the Struts Newbie FAQ at http://struts.apache.org/faqs/newbie.html#wizard.
An extension to Struts for complex
workflows has been developed by
Matthias Bauer and can be found at http://www.livinglogic.de/Struts/index.html.
This extension utilizes a custom ActionMapping and
RequestProcessor. In addition to the basic
workflow steps discussed in this recipe, it supports workflow
branching and custom authentication.
7.7. Determining the Action Based on User Input
Problem
You want to change the target action for a form based on user input.
Solution
Call a JavaScript function, like the one shown in Example 7-5, from an event handler on the HTML control that determines the action.
<script>
      function swapAction(control) {
        formAction = document.getElementById("empForm").action;
        if (control.checked)
          newAction = '<html:rewrite page="/CreateEmployee.do"/>';
        else
          newAction = '<html:rewrite page="/UpdateEmployee.do"/>';
        document.getElementById("empForm").action = newAction;
      }
</script>
<html:form styleId="empForm" action="/UpdateEmployee">
    New Employee: <html:checkbox property="create"
      onclick='swapAction(this)"'/><br />
    ... rest of the page
Discussion
JavaScript makes this problem easy to solve. You might be tempted to
hardcode the new value for the action in the function. However, the
function will be a lot more robust if you use the
html:rewrite tag.
Using this tag ensures the action URI includes the appropriate
application context prefix. It generates the session token if cookies
are disabled. You can verify this works by disabling cookies on your
browser. If you clicked the “New
Employee” checkbox and submit the form
you’d see a URL like the following:
http://localhost/jsc-ch05/CreateEmployee.do;jsessionid=
C0691FF1D538431815A448C4278BA999
If you had hardcoded the action, you’d lose the
session. The drawback to this solution is you must specify the Struts
ActionServlet mapping prefix or extension (for
example, /action or
.do). Unlike the
html:link tag, the Struts 1.1
html:rewrite tag doesn’t support
the action attribute, which would eliminate this
problem. Struts 1.2 corrects this annoyance; the
html:rewrite tag supports the
action attribute like the
html:link tag.
See Also
An interesting thread on this discussion from the struts-user mailing list can be found at http://marc.theaimsgroup.com/?l=struts-user&m=107885895821471&w=2.
7.8. Using Wildcards in Action Paths
Problem
You want to reduce the number of action mappings by combining similar action mappings into a single generic mapping.
Solution
<action
        path="/Edit*"
        type="com.oreilly.strutsckbk.ch07.Edit{1}Action"
        name="{1}Form"
        scope="request"
        validate="false">
    <forward
        name="success"
        path="/edit_{1}.jsp"/>
</action>

<action
        path="/Save*"
        type="com.oreilly.strutsckbk.ch07.Save{1}Action"
        name="{1}Form"
        scope="request"
        validate="true"
        input="edit_{1}.jsp">
    <forward
        name="success"
        path="/saved_{1}.jsp"/>
</action>
Discussion
Many developers find that their action mappings start to follow
similar patterns. In fact, many applications use standard conventions
for naming action paths,
Action classes, and
ActionForms, making their application easier to
organize and maintain. Struts 1.2 allows you to leverage these
conventions in your
struts-config.xml
file. Create your action elements using an asterisk
(*) as a wildcard in the path
attribute. When Struts finds the action mapping for a given request
path, it attempts to find an exact match. If an exact match is not
found, it attempts a match using the wildcards.
In the Solution, for example, when a request comes in for
/EditEmployee.do, the action mapping with the
path of /Edit* will match. The
{1} notation represents the part of the request
URL value that matches the wildcard, minus any extension. In this
case, {1} has the value of
Employee.
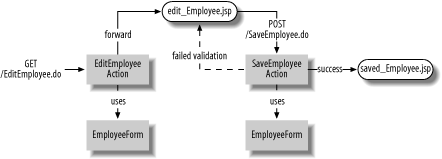
Wildcard mappings reduce the number of action elements you have to write and can enforce a workflow of your own design. Figure 7-1 illustrates the workflow for the Solution when applied to editing employee data.
Suppose you need to edit and save different information, such as vendor data. Without wildcard mappings, you would create action mappings such as the following:
<action
        path="/EditVendor"
        type="com.oreilly.strutsckbk.ch07.EditVendorAction"
        name="VendorForm"
        scope="request"
        validate="false">
    <forward
        name="success"
        path="/edit_Vendor.jsp"/>
</action>

<action
        path="/SaveVendor"
        type="com.oreilly.strutsckbk.ch07.SaveVendorAction"
        name="VendorForm"
        scope="request"
        validate="true"
        input="edit_Vendor.jsp">
    <forward
        name="success"
        path="/saved_Vendor.jsp"/>
</action>
But with the wildcard mappings shown in the Solution, you can use one
common set of action elements for employee and
vendor data. Of course, you need to create the JSPs,
Actions, and ActionForms
specific to vendor data.
The action element attributes that can use
wildcard-matched strings via the
{
n
}
notation are the following:
typenamerolesparameterattributeforwardincludeinput
You can use the placeholders in the path attribute
of nested local forward elements.
If the mappings for a particular application feature no longer fit the pattern, create standard action mappings without wildcards that exactly match the request path. An exact-match mapping takes precedence over a wildcard mapping.
Tip
The algorithm and code used for wildcard matching was derived from similar features in the Apache Cocoon project.
You can use other wildcard characters in addition to the
“*” in your path
attribute. Table 7-3 shows the complete set of
supported characters.
As was shown in the Solution, the wildcard-matched values can be
accessed with the
{
n
}
notation. n is a number from 1 to 9 that
indicates the position of the wildcard-matched value to substitute.
The entire request URI can be accessed with the
{0} token.
See Also
The Struts User’s guide discusses wildcard mapping. The specific section can be found at http://struts.apache.org/userGuide/building_controller.html#action_mapping_wildcards. If you’re using Struts 1.1 and want to use wildcard mapping, earlier versions are available. Consult http://www.twdata.org/struts-wildcard/ for details, documentation, and downloads.
As mentioned, the DispatchAction can be used to
provide a single action that serves multiple purposes. The
DispatchAction and its related subclasses are
discussed in Chapter 6.
7.9. Preventing Double Form Submissions
Problem
You need to stop users from inadvertently submitting a form twice.
Solution
Use the
Struts token facility to
reject a duplicate request. First, as shown in Example 7-6, save a token in the HTTP request in the
Action which precedes the JSP containing the form.
package com.oreilly.strutsckbk.ch06;

import javax.servlet.http.HttpServletRequest;
import javax.servlet.http.HttpServletResponse;

import org.apache.struts.action.Action;
import org.apache.struts.action.ActionForm;
import org.apache.struts.action.ActionForward;
import org.apache.struts.action.ActionMapping;

public class SaveTokenAction extends Action {
    public ActionForward execute(ActionMapping mapping, ActionForm form,
            HttpServletRequest request, HttpServletResponse response)
            throws Exception {
        // save a token
        saveToken(request);

        // load the data to view
        BusinessService.loadData( );

        return mapping.findForward("success");
    }
}
You don’t have to make any changes to the JSP that
displays the form as long as you create the form using the
html:form tag (as shown in Example 7-7).
<%@ page contentType="text/html;charset=UTF-8" language="java" %>
<%@ taglib uri="http://struts.apache.org/tags-html" prefix="html" %>

<html>
<head>
  <title>Struts Cookbook - Chapter 7 : Token Test</title>
</head>
<body bgcolor="white">
<h2>Token Test</h2>
  <html:errors/>
  <html:form action="/SaveData">
      <html:text property="name"/>
      <html:submit/>
  </html:form>
  <html:link action="/SaveData" transaction="true">Save</html:link>
</body>
</html>
In the Action that processes the form, shown in
Example 7-8, check the token. If the token is
invalid, reject the request by throwing an exception or returning
errors; otherwise, continue normal processing.
package com.oreilly.strutsckbk.ch06;

import javax.servlet.http.HttpServletRequest;
import javax.servlet.http.HttpServletResponse;

import org.apache.struts.Globals;
import org.apache.struts.action.Action;
import org.apache.struts.action.ActionError;
import org.apache.struts.action.ActionErrors;
import org.apache.struts.action.ActionForm;
import org.apache.struts.action.ActionForward;
import org.apache.struts.action.ActionMapping;

public class CheckTokenAction extends Action {
    public ActionForward execute(ActionMapping mapping, ActionForm form,
            HttpServletRequest request, HttpServletResponse response)
            throws Exception {
        if (isTokenValid(request)) {
            // reset the token
            resetToken(request);

            // save data
            BusinessService.saveData( );
        }
        else {
            ActionErrors errors = new ActionErrors( );
            errors.add(ActionErrors.GLOBAL_ERROR,
                       new ActionError("Invalid token"));
            saveErrors(request, errors);
            return new ActionForward(mapping.getInput( ));
        }
        return mapping.findForward("success");
    }
}
Discussion
Inadvertent or duplicate form submissions cause real problems with many web applications. When the form being submitted results in financial transactions, real dollars can be erroneously lost or gained. A couple of common scenarios result in double form submission. If the server’s form processing takes several seconds, the user may be tempted to resubmit the form, thinking the first submit wasn’t received. Users get in the habit of refreshing a page when the browser isn’t responding. The typical user may not realize that pressing Refresh resubmits the form.
Another common problem is double-clicks. Users are conditioned by the operating system to use double-click to open applications. Users unaccustomed to web browsing commonly use double-click when they need to single-click. The double-click problem happens because users have a “loose trigger finger.”
Struts provides a mechanism for managing these problems. This
mechanism can’t prevent a user from submitting a
form twice (see the Sidebar 7-1), but it does allow for an
Action to check if the request was received as
expected. If the request wasn’t expected, the action
can reject the request and generate an appropriate error or
exception.
The Solution shows the basic pattern for utilizing tokens. You need
an Action that forwards to the JSP page containing
the form. Usually this pre-form Action is
responsible for loading the data to be displayed. In this
Action, call the
saveToken(HttpServletRequest
request) method provided by the base Struts
Action class
(org.apache.struts.action.Action). This method
generates a unique String value, as a token for
the current transaction and saves that value under a known attribute
name in the HTTP request.
When the form is rendered on the JSP page, Struts generates an HTML
hidden field containing the token value. You can generate the token
value as request parameter on a hyperlink by setting
transaction=true on the
html:link tag. The token value, whether rendered
as a hidden field or a request parameter, is only generated if a
token is found in the current request for the JSP. The generated page
source from the JSP is shown in Example 7-9.
<html>
<head>
  <title>Struts Cookbook - Chapter 7 : Token Test</title>
</head>
<body bgcolor="white">
<h2>Token Test</h2>

<form name="TestForm" method="post" action="/jsc-ch07/SaveData.do">
  <input type="hidden" name="org.apache.struts.taglib.html.TOKEN"
        value="8f72ef608fb385fd757513ff5fc1b091">
  <input type="text" name="name" value="">
  <input type="submit" value="Submit">
</form>
<a href="/jsc-ch07/SaveData.do?org.apache.struts.taglib.html.
 TOKEN=8f72ef608fb385fd757513ff5fc1b091">
  Save Data
</a>
  <hr />
  <a href="/jsc-ch07/index.jsp">Home</a>
</body>
</html>
You check the token value in the Action that is
the target of the form or link using the isTokenValid(
) method of the base Struts Action. If
the token is invalid, you can generate an appropriate error or throw
an exception. If it is, then you should clear the token using the
resetToken( ) method.
See Also
The methods for generating, saving, checking, and resetting tokens
are all defined in the Struts Action class.
JavaDocs for this class can be found at http://struts.apache.org/api/org/apache/struts/action/Action.html.
The JavaWorld online magazine has a good article on the Struts token handling and can be found at http://www.javaworld.com/javatips/jw-javatip136_p.html. The topic comes up frequently on the struts-user mailing list; search for “token” and you’ll find a number of discussions.
The “Introduce Synchronizer Token” refactoring presented in the book Core J2EE Patterns by Deepak Alur, John Crupi, and Dan Malks (Sun Microsystems Press) was based, in part, on the Struts token facility.
7.10. Allowing Users to Upload Files
Problem
You need to allow users to upload file content to a web application.
Solution
Create an ActionForm that uses the Struts
FormFile object as a property as shown in Example 7-10.
package com.oreilly.strutsckbk.ch04;

import org.apache.struts.action.ActionForm;
import org.apache.struts.upload.FormFile;

public class UploadForm extends ActionForm {
    private FormFile content;

    public FormFile getContent( ) {
        return content;
    }
    public void setContent(FormFile content) {
        this.content = content;
    }
}
Then use the html:file tag on the JSP page
(upload_test.jsp) that contains the form as
shown in Example 7-11. For file uploads, the
enctype attribute of the
html:form tag must be set to
multipart/form-data and the
method attribute set to POST.
<%@ page contentType="text/html;charset=UTF-8" language="java" %>
<%@ taglib uri="http://jakarta.apache.org/struts/tags-html" prefix="html" %>
  <html>
<head>
  <title>Struts Cookbook - Chapter 4 : Upload Test</title>
</head>
<body>
  <html:form action="/ProcessUpload"
             method="POST"
            enctype="multipart/form-data">
    <html:file property="content"/>
    <html:submit/>
  </html:form>
</body>
</html>
Tip
The default value for the method attribute of the
html:form tag is POST, so the
attribute isn’t required here. In this case,
however, explicitly setting the value reduces the risk of the
method type being changed by another developer.
When the form is processed, use the FormFile
object to retrieve the uploaded file content. The
ProcessUploadAction shown in Example 7-12 retrieves the file contents in an
InputStream and writes this data to a file.
package com.oreilly.strutsckbk.ch04;

import java.io.BufferedOutputStream;
import java.io.FileOutputStream;
import java.io.InputStream;
import java.io.OutputStream;

import javax.servlet.http.HttpServletRequest;
import javax.servlet.http.HttpServletResponse;

import org.apache.struts.action.Action;
import org.apache.struts.action.ActionForm;
import org.apache.struts.action.ActionForward;
import org.apache.struts.action.ActionMapping;
import org.apache.struts.upload.FormFile;

public class ProcessUploadAction extends Action {

  public ActionForward execute(ActionMapping mapping,
      ActionForm form,
      HttpServletRequest request,
      HttpServletResponse response) throws Exception {

    // Get the form file property from the form
    UploadForm uploadForm = (UploadForm) form;
    FormFile content = uploadForm.getContent( );

    InputStream in = null;
    OutputStream out = null;

    try {
      // Get an input stream on the form file
      in = content.getInputStream( );

      // Create an output stream to a file
      out = new BufferedOutputStream (new FileOutputStream("temp.txt"));

      byte[] buffer = new byte[512];
      while (in.read(buffer) != -1) {
        out.write(buffer);
      }
    }
    finally {
      if (out != null) out.close( );
      if (in != null) in.close( );
    }

    return mapping.findForward("success");
  }
}
Discussion
Handling a file upload for a Java-based web application can be
critical and downright intimidating for many developers. Thankfully,
Struts provides an
API for file uploads that simplifies this
task. The API is accessed primarily through a single class
(FormFile) you can use as a property on your
ActionForm.
You can handle file uploads by using the
FormFile
class as the type for a property of an ActionForm.
On the JSP page that displays the form, use the
html:file tag to refer to the
FormFile property. The
html:file tag generates the HTML that lets a user
upload a file:
<input type="file">.
The FormFile object encapsulates the uploaded
file. It contains information about the name and type of the uploaded
file as well as the actual file contents. The getFileName() method returns the actual filename from the
client’s machine. This filename may have been keyed
in by the user directly, or, more commonly, the filename was set when
the user chose the file using the
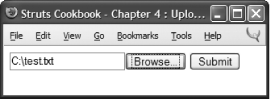
“Browse...” button. Figure 7-2 shows the displayed JSP page after the user
picked a file from his local system.
If you’re going to save the uploaded file to the server’s filesystem, don’t make the mistake of using this filename. The filename and path won’t be correct for the server and will probably not be valid for the server’s operating system. However, you may want to preserve the filename and other information about the file as metadata. You could include the name of the user that uploaded the file as well as the date and time it was uploaded.
The ProcessUploadAction, shown in Example 7-12, handles the FormFile
property. The uploadForm.getContent( ) method
returns the FormFile property. The
getInputStream( ) method of
FormFile returns an input stream for reading the
file contents. Data is read from the stream in 512-KB chunks and
written using an output stream to the temp.txt
file.
So where does this file get saved to when it is written? The answer varies by application server. On Tomcat, the filename is relative to the directory from which Tomcat was started, usually <CATALINA_HOME>/bin. Check your application server’s documentation for more information.
See Also
The underlying implementation of the Struts file upload capability is
provided by the Jakarta Commons FileUpload project.
Details can be found at http://jakarta.apache.org/commons/fileupload/.
The API documenaton for the Struts html:file tag
can be found online at http://struts.apache.org/userGuide/struts-html.html#file.
The Struts source distribution includes a file upload example, similar to this recipe, contained within the struts-examples sample web application.
7.11. Displaying a File from the Server
Problem
You need to display the contents of a file on your server’s filesystem that isn’t part of your web application.
Solution
Use a servlet, similar to the one shown in Example 7-13, to read the file from the filesystem and write the file contents to the HTTP response.
package com.oreilly.strutsckbk.ch07;

import java.io.File;
import java.io.FileReader;
import java.io.IOException;
import java.io.PrintWriter;

import javax.servlet.ServletException;
import javax.servlet.http.HttpServlet;
import javax.servlet.http.HttpServletRequest;
import javax.servlet.http.HttpServletResponse;

public class FileViewerServlet extends HttpServlet {

    protected void doGet(HttpServletRequest request,
            HttpServletResponse response)
            throws ServletException, IOException {
        doPost(request, response);
    }
    protected void doPost(HttpServletRequest request,
            HttpServletResponse response)
            throws ServletException, IOException {
        String fileName = (String) request.getAttribute("fileName");
        fileName = "temp.txt";
        FileReader in = null;
        PrintWriter out = null;
        response.setContentType("text/plain");
        File dir = (File) getServletContext( ).getAttribute("javax.
                    servlet.context.tempdir");
        File f = new File(dir, "test.tmp");
        try {
            // Get an input stream on the form file
            in = new FileReader(f);

            // Get an output stream for the response
            out = response.getWriter( );

            // Write from the input stream to the output stream
            char[] buffer = new char[512];
            int chars = 0;
            while ((chars = in.read(buffer)) != -1) {
                out.write(buffer, 0, chars);
            }
        }
        finally {
            if (out != null) out.close( );
            if (in != null) in.close( );
        }
    }
}
Discussion
This servlet reads a file from the filesystem and writes it out to the response; it’s written to handle a file uploaded using the Solution from Recipe 7.10. The file is read from the servlet’s temp directory; however, the location of the file could be any place accessible to the server, even a database.
Tip
The servlet shown in Example 7-13 can be used for any Java web application and not just a Struts application.
Here are the primary steps to render content from a servlet, regardless of where the file is located:
Determine the file to retrieve.
Set the HTTP response content type to the correct MIME type for the file.
Acquire a
java.io.Readeron the file.Acquire a
java.io.Writeron theresponse.In a buffered fashion, read the data from the
Readerand write to theWriter.Ensure the
ReaderandWriterare always closed on completion.
See Also
Jason Hunter’s classic text, Java Servlet Programming (O’Reilly), is the bible of servlet programming. This text has loads more information on the details and nuances of rendering content in this fashion.
Recipe 6.5 shows a good technique for integrating a servlet like this into a Struts application.