
Chapter 3. User Interface
Introduction
Face it: you can create the most architecturally pure, elegant, and robust web application, but if the users don’t like the looks of the interface, you are doomed to failure. Some Java developers consider themselves above the use of such mundane technologies as HTML and JavaScript. Whether you like it or not, however, knowledge of these technologies—particularly HTML—can make all the difference when it comes to presentation and usability. If you don’t know how to use them to your advantage, you will find it challenging for your application to be endorsed by the user community.
This chapter will introduce some recipes to help you get the most out of your application’s presentation. The recipes here don’t eliminate the need for a good graphics/user interface designer. However, they do go a long way in helping you leverage HTML via the dynamic capability of Struts. In addition, this chapter will provide alternative solutions based on complementary technologies, such as JSTL.
Some scenarios when working with HTML forms are always challenging. Checkboxes, for example, cause no end of headaches because of the way that unchecked controls are handled. This chapter includes a recipe that specifically tackles this problem. Another common issue in form processing is how to handle date fields. There are many ways to do them and they all have their pros and cons. A recipe that highlights these different approaches is included in this chapter as well.
You’ll find various other recipes that address issues such as setting form tab order, generating URLs for use in JavaScript, and working with frames. All in all, if you’ve got a user interface problem, there is a good chance that you’ll find some help in these pages.
3.1. Using JSTL
Problem
You want to use the JSP Standard Tag Library (JSTL) tags in your Struts application.
Solution
Download the Jakarta Taglibs JSTL reference implementation from http://jakarta.apache.org/taglibs. Copy the jstl.jar and standard.jar files from the lib folder into your applications WEB-INF/lib folder. Then copy the c.tld, fmt.tld, sql.tld, and x.tld files from the tlds folder into your applications WEB-INF/lib folder.
Use the appropriate taglib directives on JSP pages
where you want to use JSTL:
<%@ taglib uri="http://java.sun.com/jstl/core" prefix="c" %>
Table 3-1 lists the JSTL tag libraries and the corresponding URIs.
Discussion
JSTL is a powerful set of tag libraries that should be a part of any Struts developer’s toolkit. JSTL contains tags for outputting JavaBean properties, looping, conditional logic, and URL formatting. There are tags for formatting and parsing dates and numbers. The XML tag library can be used to parse and process XML on a JSP page. The tags of the SQL tag library interact with a relational database. The Functions tag library provides useful functions that can be used in expressions, primarily for string manipulation.
By far the most important of these to have in your bag of developer
tricks is the
Core
tag library. This library contains tags that can be used instead of
many of the Struts bean
logic
tags. Why would you want to use these tags instead of the Struts
tags? The answer is a practical one: These tags are more powerful and
easier to use than the Struts tags. Make no mistake, however; the
folks on the Struts project are not offended by this. Quite the
contrary. JSTL has allowed Struts to focus on what it does best:
providing the controller glue for robust JSP-based web applications.
Take a look at how you would implement a loop and display output using JSTL tags compared to the Struts tags. First, here’s the Struts version:
<ul>
    <logic:iterate id="cust" name="branch" property="customers">
        <li>
            <bean:write name="cust" property="lastName"/>,
            <bean:write name="cust" property="firstName"/>
        </li>
    </logic:iterate>
</ul>
In JSTL, this becomes a lot simpler:
<ul>
    <c:forEach var="cust" items="${branch.customers}">
        <li>
            <c:out value="${cust.lastName}, ${cust.firstName}"/>
        </li>
    </c:forEach>
</ul>
The cool part is that you don’t have to choose one
over the other. JSTL tags can be introduced into an application as
you learn it. The
JSP Expression Language
(EL) enables easy access to data in ActionForms
and objects available in the various JSP scopes (page, request,
session, and application). The hardest decision you will have to make
is not whether to use JSTL, but which version of
JSTL to use. If you are using a JSP
2.0/Servlet 2.4 container such as Tomcat 5, you should use JSTL 1.1.
Otherwise, you’ll need to use JSTL 1.0.
Throughout this book, where appropriate, JSTL examples will be provided along with the pure Struts-based examples. In many cases, examples are provided that use the capabilities of both Struts and JSTL.
See Also
Recipe 3.2 shows how you can use EL expressions with the Struts tags. JavaServer Pages by Hans Bergsten (O’Reilly) covers JSTL in great detail and is an invaluable source. Sun provides an excellent tutorial on JSTL that can be found at http://java.sun.com/tutorials/jstl.
I’ve created a handy quick reference guide for JSTL. This guide can be found in PDF format at http://www.jadecove.com/jstl-quick-reference.pdf.
3.2. Using the Struts-EL Tags
Problem
You want to be able to use JSTL expressions for attribute values on Struts tags.
Solution
Use the tag libraries supplied with the Struts distribution in the
contrib/struts-el/lib directory. You will need
to copy all the JAR and TLD files from this directory to your
application’s WEB-INF/lib
directory. Use the appropriate taglib directives
on JSP pages where you want to use expressions:
<%@ taglib uri="http://jakarta.apache.org/struts/tags-html-el"
        prefix="html-el" %>
Table 3-2 lists the Struts-EL tag libraries and
the corresponding taglib URIs.
Discussion
JSTL-style expressions, such as ${foo.bar[4].baz},
are not supported by the base Struts tags. For example, it would be
nice if you could format a tag using an expression like the
following:
<html:text value="${sessionScope.foo.bar[3]}"/>Instead, these tags require runtime expressions, which is just Java code:
<html:text
    value="<%=session.((Foo)getAttribute("foo")).getBar(3)%>"/>
Getting the Java code out of your JSP pages makes your pages less
brittle and more maintainable. This lack of EL support was identified
and the
Struts-EL tag libraries were created.
These libraries extend the html,
bean, and logic Struts tag
libraries to add support for EL expressions. If an attribute of a
Struts tag supports a runtime expression, the corresponding Struts-EL
tag will allow a JSTL expression. It is possible to use the regular
Struts tags and the Struts-EL tags in the same application and even
on the same JSP page. Just be sure to define unique prefixes in the
taglib directive for each library.
The Struts-EL tags are not a replacement, however, for JSTL. The Struts-EL tags only provide unique tags for Struts. If a Struts tag can be replaced by a JSTL tag, that tag is not implemented in the Struts-EL tag libraries.
See Also
Recipe 3.1 details how to configure your application to use JSTL.
3.3. Displaying Indexed Properties
Problem
On a JSP page, you need to access data from an indexed property of an object.
Solution
Use
bean.property[
index
]
to access the indexed value, as shown in Example 3-1.
<@taglib uri=http://jakarta.apache.org/struts/tags-bean" prefix="bean"%>

<ul>
  <li><bean:write name="foo" property="bar.baz[0]"/></li>
  <li><bean:write name="foo" property="bar.baz[1]"/></li>
  <li><bean:write name="foo" property="bar.baz[2]"/></li>
</ul>
JSTL supports access to indexed properties, as shown in Example 3-2.
Discussion
Indexed properties are one of the most misunderstood aspects of the Struts tags. An indexed property is a JavaBean property that represents a set of values, not a single scalar value. Indexed properties are accessed using a getter method of the following form:
public Foo getSomeProperty (int index) { ... }Likewise, indexed properties are set using a setter method of this form:
public void setFoo(int index, Foo someProperty) { ... }Consider a JavaBean representing a calendar. The
CalendarHolder
class shown in Example 3-3 has a nested property
representing the months in a calendar named
monthSet.
package com.oreilly.strutsckbk;

public class CalendarHolder {

    private MonthSet monthSet;

    public CalendarHolder( ) {
        monthSet = new MonthSet( );
    }

    public MonthSet getMonthSet( ) {
        return monthSet;
    }
}
The
MonthSet
class, shown in Example 3-4, is a class that has an
indexed property, month representing the month
names (“January,”
“February,” and so forth).
package com.oreilly.strutsckbk;

public class MonthSet {

    static String[] months = new String[] {
            "January", "February", "March", "April",
              "May", "June", "July", "August",
              "September", "October", "November", "December"
    };

    public String[] getMonths( ) {
        return months;
    }

    public String getMonth(int index) {
        return months[index];
    }

    public void setMonth(int index, String value) {
        months[index] = value;
    }
}
The goal is to access the indexed property month
of the monthSet property of the
CalendarHolder instance in a JSP page as shown in
the following snippet from a JSP:
<jsp:useBean id="calendar" class="com.oreilly.strutsckbk.CalendarHolder"/>

<ul>
    <li><bean:write name="calendar" property="monthSet.month[0]"/></li>
    <li><bean:write name="calendar" property="monthSet.month[1]"/></li>
    <li><bean:write name="calendar" property="monthSet.month[2]"/></li>
</ul>
If the specific indexed property to display was determined dynamically—that is, the index to use was set using a JSP scripting variable—you would need to use scriptlet to generate the property value as follows:
You have selected month number <bean:write name="monthIndex"/>:
<bean:write name="calendar"
        property='<%= "monthSet.month[" + monthIndex + "]" %>'
Using the scriptlet approach makes for an extremely hard to read and even harder to maintain JSP page. If you were using JSTL, however, this becomes much cleaner:
You have selected month number <c:out value="${monthIndex}"/>:

                  <c:out value="${calendar.monthSet.month[monthIndex]}"/>
More commonly, indexed properties are accessed dynamically in a loop.
Say you want to display the list of months using the Struts
logic:iterate tag. This tag iterates over
Collections and arrays. Here’s how you would display
all the months in an ordered list:
<ol>
<logic:iterate id="monthName" name="calendar" property="monthSet.months">
    <li><bean:write name="monthName"/></li>
</logic:iterate>
</ol>
Again, JSTL can be used as an alternative. The JSTL
c:forEach tag is a
bit easier to use than the Struts
logic:iterate
tag. Here’s how you would generate the same ordered
list using JSTL:
<ol>
<c:forEach var="monthName" items="${calendar.monthSet.months}">
    <li><c:out name="${monthName}"/></li>
</c:forEach>
</ol>
See Also
Problems come in when you need to create form fields that correspond
to indexed properties using the Struts html tags.
Recipe 3.4 addresses these particular
issues. Recipe 3.5 provides more details on
using indexed properties in JSTL looping constructs.
3.4. Using Indexed Properties on Forms
Problem
You want to create a set of input fields on a form that corresponds to the indexed properties of a bean.
Solution
Use the indexed attribute on tags in the
Struts
html tag library to generate the property value:
<html:form action="TestOneAction"><p>
  <logic:iterate name="MyForm" property="stringArray"
                   id="stringValue" indexId="ctr">
    <br/>
    <html:text property="stringArray" indexed="true"/>
</logic:iterate>
</html:form>
Discussion
As shown in Recipe 3.3, accessing indexed
properties for display purposes is easy. However, using indexed
properties in a form can be tricky. If the name of the generated
input field is not formatted correctly, Struts can’t
populate the ActionForm when the HTML form is
submitted. Struts populates the ActionForm with
values from the HTTP request using the Jakarta Commons BeanUtils package.
Specifically, the BeanUtils.populate( ) method
loads the ActionForm from the HTTP request data
sent when the form is submitted.
For indexed properties,
BeanUtils.populate(
)
uses the name of the request parameter to determine the
proper setter method to call on the ActionForm.
Table 3-3 illustrates how different form input
field names are processed. The table shows the HTML tag, the
corresponding HTTP request name/value pair, and the method that is
called on the ActionForm when the request is
processed.
|
HTML form input tag |
Generated request pair |
Resulting method call |
|
|
|
|
|
|
|
|
|
|
|
|
|
|
|
|
|
|
|
|
Consider a form that allows a user to enter a list of favorite things
such as colors and web sites. The ActionForm to
hold this data contains a String property for the
user’s name, a String array
representing the user’s favorite colors, and a
List of WebLink objects
representing the user’s favorite web sites. The
WebLink class, shown in Example 3-5, defines a simple JavaBean with properties for
the site name and URL.
The form bean,
FavoritesForm,
containing properties for the user’s name, favorite
colors, and favorite links is shown in Example 3-6.
package com.oreilly.strutsckbk;

import java.util.ArrayList;
import java.util.List;

import org.apache.struts.action.ActionForm;

public final class FavoritesForm extends ActionForm  {
    public FavoritesForm( ) {
        webLinks = new ArrayList( );
        for (int i=0; i<5; i++) webLinks.add(new WebLink( ));
        colors = new String[3];
    }
    public String getName( ) {
        return name;
    }
    public void setName(String name) {
        this.name = name;
    }
    public String getColor(int index) {
        return colors[index];
    }
    public void setColor(int index, String color) {
        colors[index] = color;
    }
    public String[] getColor( ) {
        return colors;
    }
    public List getWebLinks( ) {
        return webLinks;
    }
    public WebLink getWebLink(int index) {
        return (WebLink)webLinks.get(index);
    }
    public void setWebLink(int index, WebLink webLink) {
        webLinks.set(index, webLink);
    }

    public void reset( ) {
        webLinks.clear( );
        colors = new String[3];
    }

    private List webLinks;
    private String name;
    private String[] colors;
}
Now you can create a JSP page (favorites.jsp) that allows a user to input corresponding data on a form, as shown in Example 3-7.
<%@ page contentType="text/html;charset=UTF-8" language="java" %>
<%@ taglib uri="/WEB-INF/struts-bean.tld" prefix="bean" %>
<%@ taglib uri="/WEB-INF/struts-html.tld" prefix="html" %>
<%@ taglib uri="/WEB-INF/struts-logic.tld" prefix="logic" %>
<%@ taglib uri="http://java.sun.com/jstl/core" prefix="c" %>

<html:html locale="true">
<head>
<title><bean:message key="index.title"/></title>
<html:base/>
</head>
<body bgcolor="white">
<h2>Favorites Poll</h2>
<html:form action="/admin/ViewFavorites">
    <p>
        What is your name:
        <br/><html:text property="name"/>
    </p>
    <p>
        What are your three favorite colors:
        <br/><html:text property="color[0]"/>
        <br/><html:text property="color[1]"/>
        <br/><html:text property="color[2]"/>
    </p>
   <p>
      What are your favorite links?
      <table>
         <tr>
            <th>Name</th>
            <th>URL</th>
         </tr>
         <tr>
            <td><html:text property="webLink[0].name"/></td>
            <td><html:text property="webLink[0].url"/></td>
         </tr>
      </table>
   </p>
    <html:submit/>
    <html:reset/>
</html:form>
</body>
</html:html>
Since the index values in Example 3-7 are
hardcoded and not dynamic, the html:text tag
property values are easily constructed, so the
generated HTML tags have the appropriate name
attribute values. However, suppose you wanted to use the
logic:iterate tag to
generate the repeated input fields. To do this for the
color property, you might be tempted to try some
JSP code like this:
What are your three favorite colors:
  <logic:iterate name="FavoritesForm" id="theColor">
    <br/><html:text property="color" indexed="true"/>
  </logic:iterate>
This will not generate the needed HTML markup.
The indexed attribute applies an index (i.e.,
[n]) to the value specified for the
name attribute of the particular Struts
html tag (in this case,
html:text). If you were to deploy a JSP using the
snippet above, the generated HTML would look something like the
following:
What are your three favorite colors:
<br/><input type="text" name="org.apache.struts.taglib.html.
BEAN[0].color" value="[Ljava.lang.String;@5f1ba8">
<br/><input type="text" name="org.apache.struts.taglib.html.
BEAN[1].color" value="[Ljava.lang.String;@5f1ba8">
<br/><input type="text" name="org.apache.struts.taglib.html.
BEAN[2].color" value="[Ljava.lang.String;@5f1ba8">
The index is not applied to the value for the property. Instead, the
value is applied to the internal Struts name for the form bean.
Additionally, the value attribute contains the
results of calling toString( ) on the array, and
not a specific element in the array.
What this means in the long run is that the
indexed attribute is useful when you need to set a
nested simple property of an indexed property that is a complex
object—e.g., a JavaBean. You can generate the input fields for
a non-nested property in a logic:iterate tag, but
you must resort to scriptlet to generate the array index:
What are your three favorite colors:
  <logic:iterate name="FavoritesForm" id="theColor" indexId="ctr">
    <br/><html:text property='<%="color["+ctr+"]"%>'/>
  </logic:iterate>
Suppose you wanted to use the
logic:iterate
tag to generate input fields for the favorite links (the
WebLink objects). In this case, the
indexed attribute will do exactly what you want:
What are your favorite links?
<table>
  <tr>
     <th>Name</th>
     <th>URL</th>
  </tr>
  <logic:iterate id="webLink" name="FavoritesForm" property="webLinks">
    <tr>
      <td><html:text name="webLink" property="name" indexed="true"/></td>
      <td><html:text name="webLink" property="url" indexed="true"/></td>
    </tr>
  </logic:iterate>
<table>
Using the indexed attribute with the
html tag library
can be confusing. This confusion generally stems from the
name attribute’s new importance.
In most cases, when using the html tags, the
name attribute can be left off as the value will
be based on the form-bean that is declared for the
action mapping. However, when using the indexed
attribute, the name attribute refers to the nested
indexed property of the corresponding ActionForm.
Going back to the problem with the color property,
you have alternatives other than using scriptlet. You can use the
Struts html-el tags or JSTL. Both of these
alternatives essentially do the same thing as the scriptlet, but they
do so using EL (expression language). The cleanest approach utilizes
the
html-el
tags:
What are your three favorite colors:
  <logic:iterate name="FavoritesForm" id="theColor" indexId="ctr">
    <br/><html-el:text property='color[${ctr}]>'/>
  </logic:iterate>
If you prefer JSTL, you can generate the required
input tag directly instead of using the
Struts html tags:
What are your three favorite colors:
<logic:iterate id="color" name="FavoritesForm" property="color" indexId="ctr">
  <br/><input type="text" name="color[<c:out value='${ctr}'/>]"

                  value="<c:out value='${FavoritesForm.color[ctr]}'/>"/>

</logic:iterate>
This JSTL version is about as ugly as the original version using
scriptlet. In addition, since neither the Struts
html:text nor
html-el:text tag is
used, the HTML input tag’s
value attribute must be explicitly coded. If you
were to use the Struts
html:text
tag, the value would be set automatically.
See Also
Recipe 3.3 discusses techniques to use when
displaying values from indexed properties outside of a form.
Recipe 3.5 discusses how to use indexed properties
in a JSTL c:forEach loop.
The
BeanUtils package
of the Jakarta Commons project defines how the indexed properties are
resolved. The package description provides additional details and can
be found at http://jakarta.apache.org/commons/beanutils/api/org/apache/commons/beanutils/package-summary.html#package_description.
3.5. Using Indexed Properties in a JSTL Loop
Problem
You want to use indexed bean properties with the Struts
html tags in a JSTL c:forEach
loop instead of Struts
logic:iterate
loop.
Solution
To create fields for a simple
indexed property, use the bean:define tag to
expose the loop counter as a scripting variable that can be used in a
runtime expression:
<c:forEach var="theItem" items="${MyForm.myItems}" varStatus="loopStatus">
  <bean:define id="itemIndex">
    <c:out value="${loopStatus.index}"/>
  </bean:define>
  <br/><html:text property='<%="myItem["+itemIndex+"]"%>'/>
</c:forEach>
If the indexed property is a nested bean and you are using the
indexed="true" property, then replace the Struts
logic:iterate tag with the JSTL
c:forEach:
<c:forEach var="theNestedItem" items="${MyForm.myNestedItems}">
  <br/><html:text name="theNestedItem"
              property="nestedProperty"
              indexed="true"/>
</c:forEach>
Discussion
The
c:forEach tag
provided by JSTL provides additional functionality and can be easier
to use than the logic:iterate tag. The items to
loop through can be specified using EL. The JSTL tag permits greater
control for looping over a subset of the collection, and details on
the loop status are easily obtained. However, as is common to all
JSTL tags, no scripting
variables are created. As was shown in other recipes in this chapter,
runtime expressions may have to be used when dealing with indexed
properties. This is particularly true if you are not using the
struts-el tag libraries.
The
bean:define
tag can create a scripting variable from a JSTL-created scoped
variables. This bean:define tag creates a new
scoped variable and a corresponding scripting variable based on the
value taken from the value attribute or the body
of the tag. This latter facility provides a useful bridge between
JSTL and the Struts tags. In the Solution, the
bean:define tag is used to create a variable
containing the index to use for accessing the indexed property. You
can apply this technique to the form for selecting the favorite
colors from Recipe 3.4:
What are your three favorite colors:
<c:forEach var="theColor" items="${FavoritesForm.color}"
     varStatus="loopStatus">
    <bean:define id="ctr">
        <c:out value="${loopStatus.index}"/>
    </bean:define>
    <br/><html:text property='<%="color["+ctr+"]"%>'/>
</c:forEach>
As shown in Recipe 3.4, you can use the Struts-El tags to eliminate the scriptlet altogether:
What are your three favorite colors:
<c:forEach var="theColor" items="${FavoritesForm.color}"
varStatus="loopStatus">
  <br/><html-el:text property='color[${ctr}]'/>
</c:forEach>
If you need to create an HTML input field for the nested
property of an object, which is an indexed property, then specify the
indexed="true" attribute on the Struts
html tags. The usage of the
indexed attribute is identical when used in a JSTL
c:forEach loop as when using the
logic:iterate tag. Here is an example of how this
would be done for the Favorite Links portion of the form from Recipe 3-4:
What are your favorite links?
<table>
    <tr>
        <th>Name</th>
        <th>URL</th>
    </tr>
    <c:forEach var="webLink" items="${FavoritesForm.webLinks}">
        <tr>
            <td>
                <html:text name="webLink"
                       property="name" indexed="true"/>
            </td>
            <td>
                <html:text name="webLink"
                       property="url" indexed="true"/>
            </td>
        </tr>
    </c:forEach>
</table>
The rendered index values are generated correctly even when using the
begin, end, and
step attributes to control the loop. The following
use of the
c:forEach tag
demonstrates how to generate input fields for the first and third
elements of a collection:
<c:forEach var="webLink" items="${FavoritesForm.webLinks}"
         begin="1" end="3" step="2">
    <tr>
        <td>
            <html:text name="webLink" property="name" indexed="true"/>
        </td>
        <td>
            <html:text name="webLink" property="url" indexed="true"/>
        </td>
    </tr>
</c:forEach>
This results in the following generated HTML:
<tr>
    <td><input type="text" name="webLink[1].name" value=""></td>
    <td><input type="text" name="webLink[1].url" value=""></td>
</tr>

<tr>
    <td><input type="text" name="webLink[3].name" value=""></td>
    <td><input type="text" name="webLink[3].url" value=""></td>
</tr>
For rendering dynamic data in a loop for display, JSTL works well and should be easier to use than the corresponding Struts tags. As you have seen, JSTL has better support for accessing indexed properties than the Struts tags. For example, the following shows how the favorite colors could be displayed:
<c:forEach var="color" items="${favs.color}">
    <li><c:out value="${color}"/></li>
</c:forEach>
See Also
Recipe 3.4 demonstrates similar usages of indexed properties. You should consult the JSTL documentation if needed. The specification provides additional details on the tags mentioned here. The specification can be found at http://java.sun.com/jsp/jstl.
3.6. Submitting a Form from an Image
Problem
You want the user to be able to submit a form by clicking an image
that isn’t contained within the HTML
form tags.
Solution
Use a link with a JavaScript URL to submit the form:
<html:link href="javascript:document.MyForm.submit(  )">
    <html:img page="/submit-form.gif"
               alt="Submit" border="0"/>
</html:link>
Discussion
Web sites frequently use clickable images instead of HTML submit
buttons to trigger form submission. The Struts
html:image tag can be
used to generate an HTML input type="image" tag
that creates such an image. However, with complex HTML layouts, it is
not always possible to nest the image within the
<form> . . . </form> tags. In some
cases, an HTML page may have multiple forms in one section of a page,
with the images for submitting the forms in a separate region of the
page.
The Solution above can be used to submit a form from an image located
outside of the form tags. The image to display is
nested in an html:link tag. The link submits the
form by executing a line of JavaScript. In the Solution, the
JavaScript will submit the form named MyForm. The
form name must match the name attribute from the
corresponding action element in the
struts-config.xml. Here is the HTML that gets
generated using the Solution:
<a href="javascript:document.MyForm.submit(  )">
    <img src="/myApp/struts-power.gif"
         border="0" alt="Submit">
</a>
Though you could directly use the above HTML markup instead of the
Struts html tags, you would lose the features
provided by those tags. By using the Struts tags, you
don’t have to specify the context name, and you have
the ability for the image name and alternate text to be retrieved
from a resource bundle (if needed).
Another alternative is to use the onclick
attribute of the html:img tag:
<html:img page="/submit-form.gif"
       onclick="document.MyForm.submit( );"
           alt="Submit" border="0"/>
The disadvantage of this approach is that most browsers won’t provide a visual clue that the image is clickable. Since the image is nested in a link, most browsers change the mouse pointer to indicate that the image can be clicked as shown in the Solution.
See Also
Recipe 3.9 describes how to submit a form to
an alternate URL from the one specified in the
form’s action
attribute.
3.7. Generating JavaScript on the Fly
Problem
You want to generate JavaScript dynamically using data retrieved from your application’s Model.
Solution
Use the Struts tags to render data within the JavaScript code just as you would within HTML:
<script language="JavaScript">
    function showMessage(  ) {
        alert( "Hello, <bean:write name='myForm' property='name'/>!" );
    }
</script>
Discussion
The Solution above generates a JavaScript function that pops up a
message box with the text “Hello,
name!” The value for
name is generated using the
bean:write tag.
The Solution shows how the Struts tags can be used to create
JavaScript just as easily as they create HTML.
While this solution seems obvious, it is surprising how many times this question comes up. Often the question is posed as, “How do I call a JavaScript function in HTML from Struts?” Technically, you can’t call a JavaScript function on an HTML page from Struts. Struts—and the underlying JSP technology—runs on the server-side. JavaScript, in contrast, is processed by the browser on the client-side. However, with the dynamic generation capabilities of Struts as shown in the Solution, you can approximate this behavior.
Another important concept that this recipe hinges on is the JSP
translation process. A JSP page is composed of JSP declarations,
standard JSP tags (such as jsp:useBean), custom
JSP tags (such as the Struts and JSTP tags), runtime expressions, and
scriptlets. Everything else in the page is
template text. The
template text is anything that isn’t processed as
part of the JSP translation. People commonly think of template text
as the HTML markup, but it is JavaScript or any other non-JSP
processed text. The JSP translator does not care what form the
template text takes. Therefore, you can as easily generate text into
a JavaScript function as you can into an HTML element.
Warning
If you are using JSP documents to generate
well-formed XHTML, then dynamic JavaScript
template text must be specified using a combination of
jsp:text elements and CDATA
sections. See Hans Bergsten’s ONJava article at
http://www.onjava.com/pub/a/onjava/2004/04/21/JSP2part3.html
for more details.
The Solution presents a simple scenario. If the model data being
accessed require the use of complex
JavaScript data
structures, such as Arrays, you could use iteration tags such as
logic:iterate and
c:forEach to
populate those structures.
See Also
Recipe 3.8 uses iteration tags to generate client-side JavaScript arrays.
3.8. Dynamically Changing Select Options Using JavaScript
Problem
You want to use JavaScript to dynamically change the items displayed
in an HTML select element based on data retrieved
from your application’s model.
Solution
Use the Struts
logic:iterate tag
to create JavaScript arrays for the different option sets. Then use a
JavaScript onchange
event handler to change the options set at
runtime. Example 3-8 shows a complete JSP page where
the JavaScript arrays are dynamically created using Struts tags. The
changeOptions
event handler function resets the options for the
select control using the JavaScript arrays.
<%@ page contentType="text/html;charset=UTF-8" language="java" %>
<%@ taglib uri="/WEB-INF/struts-bean.tld" prefix="bean" %>
<%@ taglib uri="/WEB-INF/struts-html.tld" prefix="html" %>
<%@ taglib uri="/WEB-INF/struts-logic.tld" prefix="logic" %>

<html>
<head>
    <title>Struts - JavaScript Example</title>
    <script language="JavaScript">
        // Create the array for the first set of options
        fooArray = new Array( );
        <logic:iterate id="fooValue" indexId="ctr"
                     name="MyForm"  property="fooList">
            fooArray[<bean:write name="ctr"/>] =
                new Option("<bean:write name='fooValue'/>",
                           "<bean:write name='fooValue'/>",
                           false, false);
        </logic:iterate>

        // Create the array for the second set of options
        barArray = new Array( );
        <logic:iterate id="barValue" indexId="ctr"
                     name="MyForm"  property="barList">
            fooArray[<bean:write name="ctr"/>] =
                new Option("<bean:write name='barValue'/>",
                           "<bean:write name='barValue'/>",
                           false, false);
        </logic:iterate>

        function changeOptions(var control) {
            // control is the triggering control
            // baz is the select control
            baz = document.MyForm.baz;
            baz.options.length=0;

            if (control.value == 'Foo')
                bazArray = fooArray;
            else
                bazArray = barArray;

            for (i=0; i < bazArray.length; i++)
               baz.options[i] = bazArray[i];
        }
    </script>
</head>
<body>
    <html:form name="MyForm" action="processMyForm">
        <html:radio property="fooBar" value="Foo"
                     onclick="changeOptions(this);"/> Foo<br/>
        <html:radio property="fooBar" value="Bar"
                     onclick="changeOptions(this);"/> Bar<br/>
        Baz: <html:select property="baz">
             </html:select>
    </html:form>
</body>
</html>
Discussion
You can use Struts to generate JavaScript as you can use it to generate HTML. Some developers consider JavaScript “evil”; in reality, it’s only “slightly wicked.” Take a pragmatic approach: If JavaScript makes your application better and your users happier, then use it. But, use it in such a way that your business logic stays in the business layer, and not slapped on the web page. Struts helps you do just this.
A concrete example can illustrate this approach. Suppose you want to ask a user to select his favorite programming language and, subsequently, favorite Integrated Development Environment (IDE) for the selected language. The language will be chosen using radio buttons, and the IDE will be selected from a drop-down menu. If the language is Java, then the IDE drop-down will display options such as Eclipse, Net Beans, IDEA, etc. If the language is C#, then the drop-down will display Visual Studio and SharpDevelop.
Example 3-9 shows the action form that holds this data.
package com.oreilly.strutsckbk;

import org.apache.struts.action.ActionForm;

public final class MyForm extends ActionForm  {

    private static String[] javaIdes =
        new String[] {"Eclipse", "IDEA", "JBuilder",
                       "JDeveloper", "NetBeans"};
    private static String[] csharpIdes =
        new String[] {"SharpDevelop", "Visual Studio"};

    public String[] getJavaIdes( ) {return javaIdes;}
    public String[] getCsharpIdes( ) {return csharpIdes;}

    public String getLanguage( ) {
        return language;
    }

    public void setLanguage(String language) {
        this.language = language;
    }

    public String getIde( ) {
        return ide;
    }
    public void setIde(String ide) {
        this.ide = ide;
    }
    private String language;
    private String ide;
}
Example 3-10 shows the JSP (favorite_language.jsp) that renders the input page. This example is similar to the Solution.
<%@ page contentType="text/html;charset=UTF-8" language="java" %>
<%@ taglib uri="/WEB-INF/struts-bean.tld" prefix="bean" %>
<%@ taglib uri="/WEB-INF/struts-html.tld" prefix="html" %>
<%@ taglib uri="/WEB-INF/struts-logic.tld" prefix="logic" %>
<html>
<head>
  <title>Struts - JavaScript Example</title>
  <script language="JavaScript">
     // Create the array for the first set of options
     javaIdesArray = new Array( );
     <logic:iterate id="ide" indexId="ctr"
                  name="MyForm"  property="javaIdes">
          javaIdesArray[<bean:write name="ctr"/>] =
             new Option("<bean:write name='ide'/>",
                        "<bean:write name='ide'/>",
                        false, false);
     </logic:iterate>

     // Create the array for the second set of options
     csharpIdesArray = new Array( );
     <logic:iterate id="ide" indexId="ctr"
                  name="MyForm"  property="csharpIdes">
          csharpIdesArray[<bean:write name="ctr"/>] =
             new Option("<bean:write name='ide'/>",
                        "<bean:write name='ide'/>",
                        false, false);
     </logic:iterate>

     function changeOptions(control) {
       ideControl = document.MyForm.ide;
       ideControl.options.length=0;

       if (control.value == 'Java')
         ideArray = javaIdesArray;
       else
         ideArray = csharpIdesArray;

       for (i=0; i < ideArray.length; i++)
           ideControl.options[i] = ideArray[i];
     }
  </script>
</head>
<body>
  <html:form action="/admin/ViewFavoriteLanguage">
      What's your favorite programming language?<br/>
      <html:radio property="language" value="Java"
                   onclick="changeOptions(this);"/> Java<br/>
      <html:radio property="language" value="C-Sharp"
                   onclick="changeOptions(this);"/> C-Sharp<br/>
      <p>What's your favorite development tool?<br/>
      IDE: <html:select property="ide"/>
      </p>
      <html:submit/>
  </html:form>
</body>
</html>
The script block nested in the
head element contains the JavaScript. The
logic:iterate tags loop over JavaBean properties
to create two JavaScript arrays: one for the Java IDEs and one for
the C# IDEs. Each array contains a set of Option
JavaScript objects. The Option object represents
an option of an HTML select control. This object
takes four parameters in the constructor: the text value to display,
the value to pass when the form is submitted, a Boolean indicating if
the value is the default selected value, and another Boolean
indicating if the value is currently selected.
The JavaScript function for changing the options comes after the
logic:iterate loop. This function is pure static
JavaScript. The radio button that triggers the change is passed as
the parameter to the function. If the current value of the radio
button control is Java, then the select control is
populated with the Option objects representing the
Java IDEs. Otherwise, the control is populated with the
Option objects representing the C# IDEs.
The HTML body contains the form, rendered using the Struts
html tags. The Struts tags support the JavaScript
change listeners via the
on
function attributes.
For radio buttons, the onclick listener works
well. The single parameter passed to the function,
this, is a reference to the HTML radio button.
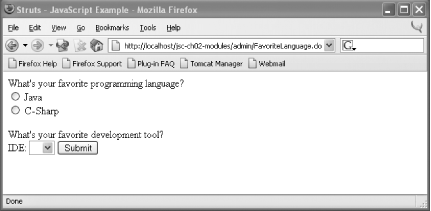
When the page is initially rendered, the display should look
something like Figure 3-1.
Once you click one of the radio buttons, the options in the drop-down list for the IDE field are populated with the data originally from the form bean. Figure 3-2 shows the display when you click the Java radio button.
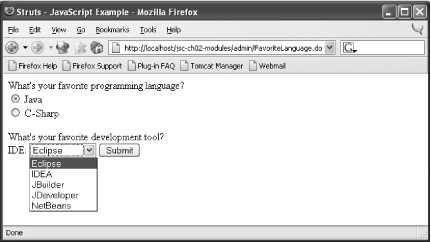
Similarly, if you click the C-Sharp radio button, the values in the drop-down list change to reflect the values from the corresponding JavaScript array.
JSTL can be used instead of the Struts bean and
logic tags. In this case, you use the JSTL
c:forEach and c:out tags
instead of logic:iterate and
bean:write. These tags generate the JavaScript
array in the same manner as the Struts tags:
javaIdesArray = new Array(  );
<c:forEach var="ide" varStatus="status"
         items="${MyForm.javaIdes}">
   javaIdesArray[<c:out value="${status.index}"/>] =
   new Option("<c:out value='${ide}'/>",
              "<c:out value='${ide}'/>",
              false, false);
</c:forEach>
JavaScript programming can be frustrating, particularly for the Java developer used to strong typing and compile-time checks. However, providing this type of dynamic
client-side interaction can lead to a much richer end-user experience.
See Also
JavaScript: The Definitive Guide by David Flanagan (O’Reilly) is invaluable when it comes to JavaScript programming. If business logic is required to determine the dynamic data, then Recipe 3.9 provides a better approach.
3.9. Generating Dynamic Select List Options
Problem
You want to dynamically change the options displayed in a
select element based on a change in another field
in the same form, without having to render the set of options in
client-side JavaScript.
Solution
Use an onchange or onclick
JavaScript listener to call a JavaScript function that submits the
form to a Struts Action. In the
Action, perform the necessary business logic to
construct a new collection for the select options,
and forward control back to the original JSP page. Example 3-11 shows a JSP page that submits the form to an
Action when the user clicks a radio button. The
value of the radio button is passed to the Action
as a request parameter.
<%@ page contentType="text/html;charset=UTF-8" language="java" %>
<%@ taglib uri="/WEB-INF/struts-bean.tld" prefix="bean" %>
<%@ taglib uri="/WEB-INF/struts-html.tld" prefix="html" %>
<html>
<head>
  <title>Struts - JavaScript Example</title>
  <script language="JavaScript">
     function getOptions(control) {
        form = control.form;
        form.action = "SetOptions.do?someProp=";
        form.action += control.value;
        form.submit( );
     }
   </script>
</head>
<body>
  <html:form action="ProcessMyForm">
      <html:radio property="someProp1" value="val1"
                   onclick="getOptions(this);"/> Value 1<br/>
      <html:radio property="language" value="val2"
                   onclick="getOptions(this);"/> Value 2<br/>
      SomeProp2:
      <html:select property="someProp2">
         <html:optionsCollection property="prop2Values"/>
      </html:select>
      </p>
      <html:submit/>
  </html:form>
</body>
</html>
Discussion
When the requirements for the dynamic interaction of a web page are
driven by business logic, then it’s best to use an
Action, not JavaScript, to perform this function.
Encoding
business rules into JavaScript functions
leads to hard-to-maintain, nonreusable code. A better approach is to
execute the behavior on the server-side.
This recipe addresses the same problem as described in Recipe 3.8. However, the Solution here
doesn’t rely on the incorporation of the data in a
JavaScript function. Instead, the function called by the
onclick event handler submits the form to a
different URL and Action than specified by the
form’s action attribute. This
alternative URL directs control to an Action whose
sole purpose is to determine the new set of options to display in the
select control. This Action
forwards control back to the original JSP page at which point the
drop-down menu is populated based on the new values.
Creating a separate Action for changing the values
in an HTML control may seem like overkill. However, the technique
demonstrated here provides a flexible solution that puts the full
power of the server behind the dynamic HTML. Consider the case where
you are computing financial data for one field based on the values
from another input field on the same form. The service for performing
the calculation should be called by an Action. The
Solution shown here works well for this scenario.
For a concrete example, the approach used in Recipe 3.8 will be replaced with the approach detailed in this recipe. This example provides an input form where a user can input information about his favorite programming language and IDE. The options for the IDE are contingent upon the selected programming language. Example 3-12 shows the JSP page (favorite_language2.jsp) that displays the form.
<%@ page contentType="text/html;charset=UTF-8" language="java" %>
<%@ taglib uri="/WEB-INF/struts-html.tld" prefix="html" %>
<html>
<head>
  <title>Struts - JavaScript Example</title>
  <script language="JavaScript">
     function getOptions(control) {
        form = control.form;
        form.action = "GetIdeOptions.do?language=";
        form.action += control.value;
        form.submit( );
     }
   </script>
</head>
<body>
   <html:form action="ViewFavoriteLanguage">
      What's your favorite programming language?<br/>
      <html:radio property="language" value="Java"
                   onclick="getOptions(this);"/> Java<br/>
      <html:radio property="language" value="C-Sharp"
                   onclick="getOptions(this);"/> C-Sharp<br/>
      <p>What's your favorite development tool?<br/>
      IDE:
      <html:select property="ide">
         <html:optionsCollection property="ides"/>
      </html:select>
      </p>
      <html:submit/>
  </html:form>
</body>
</html>
The
action
elements in the
struts-config.xml file
specifies the URL paths used by the form. The first mapping,
/FavoriteLanguage2, specifies the action that
forwards to the JSP in Example 3-12. The second
mapping, /GetIdeOptions, specifies the action
that’s called when the user clicks the radio button.
The last mapping, /ViewFavoriteLanguage, specifies
the action that processes the form when Submit is pressed:
<action    path="/FavoriteLanguage2"
           name="MyForm"
          scope="session"
           type="org.apache.struts.actions.ForwardAction"
      parameter="/favorite_language2.jsp"/>

<action    path="/GetIdeOptions"
           name="MyForm"
          scope="session"
           type="com.oreilly.strutsckbk.GetIdeOptionsAction">
     <forward name="success" path="/FavoriteLanguage2.do"/>
</action>

<action    path="/ViewFavoriteLanguage"
           name="MyForm"
          scope="session"
           type="org.apache.struts.actions.ForwardAction"
      parameter="/view_favorite_language.jsp"/>
The last piece of the puzzle is the
GetIdeOptionsAction itself, shown in Example 3-13.
package com.oreilly.strutsckbk;

import java.util.ArrayList;

import javax.servlet.http.HttpServletRequest;
import javax.servlet.http.HttpServletResponse;

import org.apache.struts.action.Action;
import org.apache.struts.action.ActionForm;
import org.apache.struts.action.ActionForward;
import org.apache.struts.action.ActionMapping;
import org.apache.struts.util.LabelValueBean;

public final class GetIdeOptionsAction extends Action {

    public ActionForward execute(ActionMapping mapping,
                 ActionForm form,
                 HttpServletRequest request,
                 HttpServletResponse response)
    throws Exception {
        MyForm myForm = (MyForm) form;
        String language = myForm.getLanguage( );
        ArrayList ides = new ArrayList( );
        if (language.equals("Java")) {
            ides.add(new LabelValueBean("Net Beans","Net Beans"));
            ides.add(new LabelValueBean("Eclipse", "Eclipse"));
            ides.add(new LabelValueBean("jEdit", "jEdit"));
        }
        else if (language.equals("C-Sharp")) {
            ides.add(new LabelValueBean("Sharp Develop", "Sharp Develop"));
            ides.add(new LabelValueBean("Visual Studio", "Visual Studio"));
        }
      myForm.setIdes( ides );

        // Forward control to the specified success URI
        return (mapping.findForward("success"));
    }
}
This class is responsible for retrieving the selected language from
MyForm. The Action then sets
the collection containing the corresponding IDE names into the form.
For simplicity, this Action creates the
collections directly. In a real-world application, these values would
probably come from the business layer, perhaps from a database.
Finally, the Action returns the
success forward, looping back to the initial
Action.
Tip
A consequence of using this approach is that you may need to define
the ActionForm to be in session scope.
This will
allow the main JSP page to reflect the changed data when the form is
resubmitted back to the original page from the alternate
Action.
For this example, the built-in ForwardAction
processes the form, forwarding the request directly to the JSP page.
If instead you were using a custom Action,
consider extending the DispatchAction and
implementing the ancillary action as a method of the
DispatchAction. This approach allows you to keep
related code together, making the application easier to maintain.
See Also
Recipe 3.8 provides an alternative solution
to this problem that utilizes dynamically generated JavaScript
arrays. The DispatchAction is covered in Recipe 6-8.
3.10. Filtering Text Input
Problem
You want to render data containing HTML tags, and you want that data to be interpreted and processed by the browser as HTML markup.
Solution
This is about as simple as it gets:
<bean:write name="myForm" property="freeText" filtered="false"/>
You can allow unfiltered values when using JSTL:
<c:out value="${myForm.freeText}" escapeXml="false"/>Discussion
When you use the Struts
bean:write tag to
generate text, by default any special characters sensitive to HTML
processing are replaced with their entity equivalents. For example,
the greater than character (>) is replaced with
the > character entity. This feature is
known as response filtering and is enabled by default. In most cases,
the filtering is desired, as an unfiltered response can be
misinterpreted by the browser. Table 3-4 shows the
characters and the corresponding replacement entities that are
filtered by the bean:write tag.
Sometimes, however, you want rendered text to include HTML tags. Suppose you had an online journaling application that allows a user to enter text that will be displayed on a page. Allowing HTML permits the user to use tags that make text appear in bold or italics. The text could contain hyperlinks, different font sizes, and images. In other situations, your application may be retrieving HTML template text from some other source such as another URL, an XML file, a web service, or a database.
By setting the filtered attribute of the
bean:write tag to false, you instruct the Struts
tag not to replace the special characters with the corresponding
entities. First, take a look at how the filtering works. Say a user
enters the following text into a form:
Struts <b>rocks</b>!
Now this text is rendered using the bean:write
tag. The text with the character entities replacing the special
characters—when the filtered attribute is set to true (the
default value)—looks like this:
Struts <b>rocks</b>!
This is most likely not what the user wanted. He wanted it to look
something like “Struts rocks!”. However, since the
intent was to allow the user to enter embellishing HTML tags, then
setting the filtered attribute to false yields the
correct rendering:
Struts <b>rocks</b>!
The browser will recognize the tags and apply the HTML markup as desired.
This is a useful mechanism when rendering a web page. However, care must be taken when using this approach. If the data are not filtered, then the layout of the rendered HTML can be compromised, and the entire page could appear mangled. For example, suppose the following text was entered:
Struts <b>rocks<b>!
At first glance, this looks fine. However, notice that the forward
slash is missing on what should be the closing b
(bold) element. This mistake is easily overlooked, and it could make
all the text on the rest of the page appear bolded!
Unfortunately, avoiding this error is difficult. The best you can do is to try to ensure that the entered data is valid HTML. One option is to process the data through an XML parser. This will detect problems such as unbalanced tags. Another alternative is to process the data through a parser that will attempt to fix any errors, such as JTidy. Finally, if the data are coming from an uncontrolled source such as a user, you may want to disallow HTML altogether. If you still want the user to be able to enter text enhancements such as bold and italic, and hyperlinks, then you may want to consider using an alternative form of markup such as WikiText or UBB Code.
See Also
JTidy provides a command-line interface and Java API for parsing and tidying up HTML. Details on JTidy can be found at http://jtidy.sourceforge.net. UBBCode is a markup form natively supported by PHP. It is possible to process UBBCode using Java. A PHP function for parsing UBBCode that could be rewritten in Java can be found at http://www.firegemsoftware.com/other/tutorials/ubb.php.
3.11. Generating a Set of Related Radio Buttons
Problem
You want to generate a set of related radio buttons whose values are
dynamically based on values retrieved from a
Collection.
Solution
Expose the set of values for the radio buttons as a
Collection that can be iterated over using the
logic:iterate tag. The
idName attribute of the
html:radio tag should be the same as the value of
the id attribute of the iterate
tag. Use the value attribute of the
html:radio tag to specify a property of the
idName object. The value of this property will be
the value for the generated input type="radio"
HTML control:
<logic:iterate id="loopVar" name="MyForm" property="values"> <html:radio property="beanValue" idName="loopVar" value="value"/> <bean:write name="loopVar" property="name"/> <br /> </logic:iterate>
Discussion
Radio buttons are HTML controls in which one button can be selected
at a time. Radio buttons are grouped together based on the
name attribute of the HTML
input tag. Like other HTML form input elements,
the label for the control isn’t part of the control
itself. Developers label the control however they want using regular
text. Typically, radio buttons are labeled with the text to the right
of the input tag:
<input type="radio" name="skill" value="1"/> Beginner <br />
<input type="radio" name="skill" value="2"/> Intermediate <br />
<input type="radio" name="skill" value="3"/> Advanced <br />
In some cases, the set of radio buttons in a group is dynamic. In other words, the radio buttons to render varies. Say you are taking a poll on programming languages and developer tools using a wizard-style interface. On the first page, you display a set of radio buttons where the poll takers pick their favorite language. On the second page, you present a set of related radio buttons where the poll takers pick their favorite IDE. The set of radio buttons for the IDE choices is dynamic, based on the language chosen on the first page.
First, you need to define the form that will be used to hold the
selected language and IDE. Since these are simple
String properties, you can use a
DynaActionForm:
<form-bean name="DevPollForm"
           type="org.apache.struts.action.DynaActionForm">
  <form-property name="language" type="java.lang.String" />
  <form-property name="ide" type="java.lang.String" />
</form-bean>
Next, create the Java class that holds the set of programming
languages and corresponding IDEs, as shown in Example 3-14. The values are hardcoded here for
demonstration purposes. The Struts LabelValueBean
is used to hold the name/value pairs for the data.
package com.oreilly.strutsckbk;

import java.util.*;
import org.apache.struts.util.LabelValueBean;

public class LanguageChoices {
    public LanguageChoices( ) {
        // create the set of languages
        languages = new ArrayList( );
        languages.add(createBean("Java"));
        languages.add(createBean("C#"));

        languageIdeMap = new HashMap( );

        // create the set of Java IDEs
        LabelValueBean[] javaIdes =  new LabelValueBean[] {
                createBean("Eclipse"),
                createBean("NetBeans"),
                createBean("JDeveloper"),
                createBean("IDEA") };

        // create the set of C# IDEs
        LabelValueBean[] csharpIdes =  new LabelValueBean[] {
                createBean("SharpDevelop"),
                createBean("Visual Studio") };

        // relate the language and IDEs
        languageIdeMap.put("Java", javaIdes);
        languageIdeMap.put("C#", csharpIdes);
    }

    private LabelValueBean createBean(String name) {
        return new LabelValueBean(name, name);
    }

    public Map getLanguageIdeMap( ) {
        return languageIdeMap;
    }

    public List getLanguages( ) {
        return languages;
    }

    private List languages;
    private Map languageIdeMap;
}
The first JSP page (lang_poll_1.jsp), shown in Example 3-15, renders the form containing the radio buttons for the language choice.
<%@ page contentType="text/html;charset=UTF-8" language="java" %>
<%@ taglib uri="/WEB-INF/struts-bean.tld" prefix="bean" %>
<%@ taglib uri="/WEB-INF/struts-html.tld" prefix="html" %>
<%@ taglib uri="/WEB-INF/struts-logic.tld" prefix="logic" %>
<html>
<head>
<title>Struts Cookbook - Developer Poll</title>
</head>
<body>
<jsp:useBean id="languageChoices"
class="com.oreilly.strutsckbk.LanguageChoices"
scope="application"/>
<html:form action="ProcessLanguageChoice">
What's your favorite programming language?
<p>
<logic:iterate id="lang" name="languageChoices" property="languages">
<html:radio property="language" idName="lang" value="value"/>
<bean:write name="lang" property="label"/><br />
</logic:iterate>
</p>
<html:submit value="Next >>"/>
</html:form>
</body>
</html>The LanguageChoices object is placed in
application scope using the
jsp:useBean
standard JSP tag. Alternatively, this object could have been placed
in scope using an Action or with a Struts plug-in.
After the bean is instantiated, the form is created. The
logic:iterate tag loops over the
Language property of the
LanguageChoices bean. This property is a
java.util.List of
org.apache.struts.util.LabelValueBeans. The
LabelValueBean class mates a
String label and a String
value. The label is accessed by the label property
and the value by the value property. In this
example, the label and value are the same. In a real-world
application, the value would probably be some sort of identity value,
usually different from the displayed text.
The logic:iterate tag exposes each
LabelValueBean in the list as a scoped variable
specified by the id attribute:
"lang“. The
html:radio tag creates the actual input
type="radio" HTML element. The property
attribute identifies the name of the property of the
ActionForm that will receive the value of the
radio button. The idName attribute identifies the
bean that contains the radio button value; in other words, the value
exposed by the logic:iterate tag:
"lang“.
Tip
The idName attribute was added with the release of
Struts 1.1. With Struts 1.0, the value for the radio button had to be
rendered using a runtime expression:
<html:radio property="language" value="<%= lang.getValue( ) %>"/>
After creating the radio button, the label for the button is generated
using the
bean:write tag.
This tag is used to render the label property from
the LabelValueBean (lang).
Example 3-16 shows the source that is generated from the JSP page in Example 3-15.
<html>
<head>
<title>Struts Cookbook - Developer Poll</title>
</head>
<body>
<form name="DevPollForm" method="post"
action="/jsc-ch03/ProcessLanguageChoice.do">
What's your favorite programming language?
<p>
<input type="radio" name="language" value="Java">
Java<br />
<input type="radio" name="language" value="C#">
C#<br />
</p>
<input type="submit" value="Next >>">
</form>
</body>
</html>The second page of the poll asks the poll taker to choose a favorite
IDE. The choices are based on the programming language selected on
the first page. Like the first page, the choices are rendered as a
set of radio buttons. Though the second page, shown in Example 3-17, is similar to the first page, this page uses
a JSTL c:forEach loop.
<%@ page contentType="text/html;charset=UTF-8" language="java" %>
<%@ taglib uri="/WEB-INF/struts-html.tld" prefix="html" %>
<%@ taglib uri="http://java.sun.com/jstl/core" prefix="c" %>
<html>
<head>
<title>Struts Cookbook - Developer Poll</title>
</head>
<body>
Favorite Language: <b><c:out value="${DevPollForm.language}"/></b>
<html:form action="ProcessIdeChoice">
What's your favorite IDE?
<p>
<c:forEach var="langIde"
items="${languageChoices.languageIdeMap[DevPollForm.map.language]}">
<html:radio property="ide" idName="langIde" value="value"/>
<c:out value="${langIde.label}"/><br />
</c:forEach>
</p>
<html:submit value="Next >>"/>
</html:form>
</body>
</html>The html:radio tag is used just as it was on the
first page shown in Example 3-15. Though
c:forEach is used instead of
logic:iterate, you can use the
idName attribute of the radio tag. When using JSTL
in this way, the idName should be the same as the
value for the var attribute of the JSTL
c:forEach tag.
See Also
Ted Husted has some great Struts tips at http://www.husted.com/struts/tips. Specifically, a discussion on the intricacies of the using radio buttons can be found at http://www.husted.com/struts/tips/016.html.
3.12. Handling Unchecked Checkboxes
Problem
You need to ensure that a Boolean ActionForm
property, corresponding to an HTML checkbox, is set to
false when the checkbox is unchecked.
Solution
Create a checkbox input field that uses JavaScript to set the value
of a hidden Boolean field. Use the logic:equal tag
to set the checked property of the checkbox if the
value for the hidden field is true. The
JSP page (checkbox_test.jsp) in Example 3-18 uses this approach to guarantee a true or
false value is always submitted.
<%@ page contentType="text/html;charset=UTF-8"
language="java" %>
<%@ taglib uri="http://jakarta.apache.org/struts/tags-html"
prefix="html" %>
<%@ taglib uri="http://jakarta.apache.org/struts/tags-logic"
prefix="logic" %>
<html>
<head>
  <title>Struts Cookbook - Chapter 4 : Checkbox Test</title>
</head>
<body>
  <html:form method="get" action="/ProcessCheckbox">
    <input type="checkbox" name="foo_"
      onclick="javascript:elements['foo'].value=this.checked;"
      <logic:equal name="CheckboxForm" property="foo" value="true">
        checked
      </logic:equal>
    >
    <html:hidden property="foo"/>
    <html:submit/>
  </html:form>
</body>
</html>
Discussion
For such a common little field, the HTML checkbox can cause trouble. If a checkbox is unchecked and the form is submitted, no value for that field will be sent in the request. Suppose you have a form with one checkbox on it:
<html:form method="get" action="ProcessFoo">
  <html:checkbox property="foo"/>
  <html:submit/>
</html:form>
If the checkbox is checked, then the resultant request URL looks something like this:
http://localhost/jsc-ch04/ProcessFoo?foo=on
When processed by Struts, your ActionForm is
populated by BeanUtils.populate( ) method. If
foo is a boolean property, its
value is set to true.
The problem occurs when you uncheck the checkbox with the intention of setting the property value to false. If the checkbox is unchecked, the resultant URL looks something like this:
http://localhost/jsc-ch04/ProcessFoo?
Where did the property value go? One would expect the request query
string to contain “foo=off” or
“foo=”. Unfortunately, no request
parameter is generated for an unchecked checkbox. When
BeanUtils.populate( ) is called, it
doesn’t know to set the property value.
This problem can usually be handled by implementing the
reset() method in your ActionForm. The Struts
request processor calls this method before the
ActionForm is populated. The method gives you a
chance to set the form properties to desired default values. If the
HTTP request doesn’t contain a name/value pair for a
property, then the property retains the value set in the
reset( ) method. For checkboxes, set the value to
false, as shown here:
public void reset( ActionMapping mapping,
                   HttpServletRequest request )
{
    foo = false;
}
However, the reset( ) method
can’t always solve the problem. If
you’re using a form in session
scope in a wizard-style interface, then implementing
reset() will clear the form when you don’t want
it to. You need an alternative that guarantees that a value will be
sent when the form is submitted. The Solution does that by
implementing two fields on the form. The actual form field
corresponding to the Boolean ActionForm property
isn’t the checkbox, but is a hidden field generated
using the html:hidden tag. The checkbox is then
created using normal HTML (input type="checkbox“).
A JavaScript onclick event handler is defined for
this control:
javascript:elements['foo'].value=this.checked;
When a user clicks the checkbox, the value of the hidden field is
set. If the checkbox is checked, the value is set to true; otherwise,
it is set to false. To ensure that the checkbox renders correctly
when the form is initially displayed, the
logic:equal tag is used to render the
checked attribute for the field.
See Also
This topic comes up fairly frequently on the struts-user mailing list. A good thread that discusses this topic is archived at http://www.mail-archive.com/[email protected]/msg93525.html.
If you are using the Struts
html:multibox control
to render a set of checkboxes, a similar problem can occur when the
user clears all the values. An archived discussion on this topic can
be found at http://www.mail-archive.com/[email protected]/msg96487.html.
3.13. Handling Date Input Fields
Problem
You want to allow a user to input a value for a calendar date.
Solution
First, only use
String form fields to
hold the input date values. If the user can manually type in the
date, it helps if you provide graphical Calendar control, either
client- or server-based, that can populate the date input fields
automatically. When the date value is submitted, validate the input
using the Struts Validator.
Here’s a
DynaActionForm, JSP
page, and Action that demonstrate this approach.
The DynaActionForm is declared with the following
form-bean element:
<form-bean name="DateForm"
           type="org.apache.struts.validator.DynaValidatorForm">
    <!-- Date 1 -->
    <form-property name="month" type="java.lang.String"/>
    <form-property name="day" type="java.lang.String"/>
    <form-property name="year" type="java.lang.String"/>
    <!-- Birth Date-->
    <form-property name="birthDateString" type="java.lang.String"/>
    <!-- Date 3 -->
    <form-property name="monthOpt" type="java.lang.String"/>
    <form-property name="dayOpt" type="java.lang.String"/>
    <form-property name="yearOpt" type="java.lang.String"/>
</form-bean>
The JSP page shown in Example 3-19 (date_test.jsp) renders
fields for inputting data for these three variations of date formats.
The first variation uses three numeric fields to accept the month,
day, and year. The second variation accepts the date as a single
value in mm/dd/yyyy format. This variation
utilizes a JavaScript calendar that can be used to pick the value.
The third variation uses drop-down menus for selecting the month,
day, and year.
<%@ page contentType="text/html;charset=UTF-8" language="java" %>
<%@ taglib uri="http://jakarta.apache.org/struts/tags-html" prefix="html" %>
<%@ taglib uri="http://java.sun.com/jstl/core" prefix="c" %>
<%@ taglib uri="http://java.sun.com/jstl/fmt" prefix="fmt" %>
<html>
<head>
<title>Struts Cookbook - Chapter 4 : Date Test</title>
<script language="JavaScript" src="scripts/CalendarPopup.js"></script>
<!-- This prints out the default stylehseets used by the
DIV style calendar. Only needed if you are using the DIV style popup -->
<script language="JavaScript">document.write(getCalendarStyles( ));
</script>
</head>
<body>
<html:errors/>
<html:form action="/ProcessDate">
Date 1 (mm|dd|yyyy):
<html:text size="2" property="month"></html:text>
<html:text size="2" property="day"></html:text>
<html:text size="4" property="year"></html:text>
<br />
<c:if test="${not empty date1}">
Date 1: <b><fmt:formatDate dateStyle="full" value="${date1}"/></b>.
</c:if>
<p></p>
<script language="JavaScript" type="text/javascript" id="jscal1x">
var cal1x = new CalendarPopup("testdiv1");
cal1x.showNavigationDropdowns( );
cal1x.setYearSelectStartOffset(60);
</script>
Birth Date (mm/dd/yyyy):
<html:text size="8" property="birthDateString"/>
<a href="" onClick="cal1x.select(document.forms[0].birthDateString,
'anchor1x','MM/dd/yyyy'), return false;" TITLE="cal1x.select(document.
forms[0].birthDateString,'anchor1x','MM/dd/yyyy'), return false;"
NAME="anchor1x" ID="anchor1x">select</A>
<br />
<c:if test="${not empty birthDate}">
Birth Date: <b><fmt:formatDate dateStyle="full"
value="${birthDate}"/></b>.
</c:if>
<p></p>
Date 3 (month day, year):
<html:select property="monthOpt">
<option value="1">January</option>
<option value="2">February</option>
<option value="3">March</option>
<option value="4">April</option>
<option value="5">May</option>
<option value="6">June</option>
<option value="7">July</option>
<option value="8">August</option>
<option value="9">September</option>
<option value="10">October</option>
<option value="11">November</option>
<option value="12">December</option>
</html:select>
<html:select property="dayOpt">
<option>1</option>
<option>2</option>
<option>3</option>
<option>4</option>
<option>5</option>
<option>6</option>
<option>7</option>
<option>8</option>
<option>9</option>
<option>10</option>
<option>11</option>
<option>12</option>
<option>13</option>
<option>14</option>
<option>15</option>
<option>16</option>
<option>17</option>
<option>18</option>
<option>19</option>
<option>20</option>
<option>21</option>
<option>22</option>
<option>23</option>
<option>24</option>
<option>25</option>
<option>26</option>
<option>27</option>
<option>28</option>
<option>29</option>
<option>30</option>
<option>31</option>
</html:select>,
<html:select property="yearOpt">
<option>2001</option>
<option>2002</option>
<option>2003</option>
<option>2004</option>
<option>2005</option>
</html:select>
<c:if test="${not empty date3}">
Date 3: <b><fmt:formatDate dateStyle="full" value="${date3}"/></b>.
</c:if>
<p></p>
<html:submit/>
</html:form>
<DIV ID="testdiv1" STYLE="position:absolute;visibility:hidden;
background-color:white;layer-background-color:white;"></DIV>
</body>
</html>The generated page should look something like Figure 3-3.
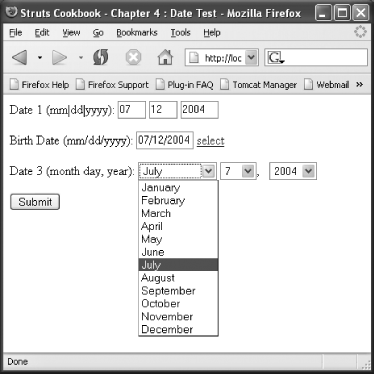
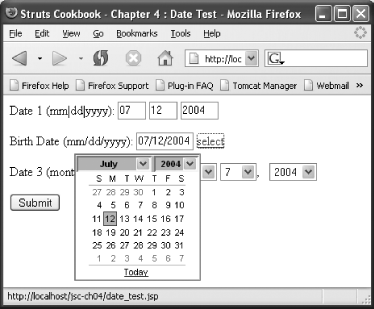
The “select” link beside the Birth Date field displays a JavaScript calendar pop up. The birth date input field is populated with a correctly formatted value when the user selects a date from the pop up. Figure 3-4 shows the pop up.
Discussion
There are four primary rules of thumb that apply to handling dates. The first two are considered Struts best practices that apply to all form fields:
ActionForms should only containStringproperties.Validate all input fields, always on the server side and optionally on the client side.
Make the date format apparent to the user by showing an accepted format pattern or example beside the field.
For Date fields, use a Calendar control for better usability and to minimize typographical errors.
Working with dates can be aggravating; if you’re not careful, it’s easy for the user to input bad data. As a developer, using separate fields for the month, day, and year components of the date would seem to be a good approach. But users don’t like having to move from field to field to enter a date; they would prefer entering the date in a single field. This mismatch of requirements can be frustrating for developers and users alike.
A compromise can be made by using a client-side calendar. (The calendar in the Solution was written by Matt Kruse.) This excellent calendar tool can be used to populate a single field with specific formatting as with the Birth Date field, or multiple fields as in the first and third date inputs shown in the Solution. If users have JavaScript turned off, then they can still manually key in the date.
Regardless of what approach you take, you should always validate the data. Recipe 8.6 provides all the details on date validation using the Struts Validator.
See Also
Recipe 8.6 shows the different ways you can validate date fields using the Validator’s built-in rules, regular expressions, or your own custom rules.
Matt Kruse’s awesome calendar pop up can be found at http://www.mattkruse.com/javascript/calendarpopup/. While some web purists may frown on the use of JavaScript, the pragmatic developer can see how helpful a tool like this can be.
3.14. Setting Tab Order
Problem
You want to control the tab order of the elements on a page.
Solution
Use the tabindex attribute of the Struts
html tags to sequence the fields:
<html:form action="/SomeAction">
  <table>
    <tr>
      <td><html:text property="field1" tabindex="1"/></td>
      <td><html:text property="field4" tabindex="4"/></td>
    </tr>
    <tr>
      <td><html:text property="field2" tabindex="2"/></td>
      <td><html:text property="field5" tabindex="5"/></td>
    </tr>
    <tr>
      <td><html:text property="field3" tabindex="3"/></td>
      <td><html:text property="field6" tabindex="6"/></td>
    </tr>
  </table>
</html:form>
Discussion
On most most browsers, users can use the Tab and Backtab
keys to set the form input fields, buttons, and hyperlinks
that have the current focus. By default, the browser changes focus
from field to field in the order that the elements appear in the
source HTML document. This generally equates to a top-to-bottom,
left-to-right sequencing. While this default ordering works fine in
most cases, sometimes you need to control the tab ordering manually.
Struts provides the tabindex attribute on most
tags in the Struts html tag library for manually
controlling the ordering. This attribute takes a positive integer
value that indicates the sequence of the element.
In the Solution, an HTML table lays out the text fields of the form in a two-column fashion. You want the user to be able to tab down the fields in the first column and then down the fields in the second column. This newspaper-style column interface is more common than you might think. A web page that allows a user to enter a billing address on the left and the shipping address on the right could use such a layout.
The default tab sequencing won’t provide the desired
navigation. To override the browsers default ordering, the
tabindex attribute is used. This attribute is a
pass-through attribute to the actual HTML element rendered. In other
words, the value of the attribute passes through unaltered to the
value of the corresponding attribute of the rendered HTML element.
The value for the tabindex should be a
non-negative integer. Its value represents the relative tab ordering
sequence of the element. The first element in a form might have a
tabindex equal to
“1,” the second field
“2,” and so forth.
The browser determines the tab sequence of the fields using the
tabindex. If an element does not have a
tabindex attribute, then its position in the
sequence is based on its order in the source document. If the
tabindex is 0, the element will
be skipped when tabbing. The browser starts navigation with the
element that has the lowest nonzero tabindex
value. As you press Tab, the browser changes focus to the element
with the next highest value.
On a JSP page, the value for the tabindex can be
dynamically generated using a scriptlet, or if you are using the
Struts-EL libraries, a JSP 2.0 expression. This capability could be
used, for example, if you were generating a dynamic set of fields in
an iteration loop. A beneficial technique when using tab indices is
to use non-sequential values. Instead of using 1, 2, 3, etc., use 5,
10, 15, and so on. With this approach, if you need to add a new field
to the page, you won’t have to re-sequence the
tabindex values for all the elements. Add the
field and set the sequence to an unused value so the fields are
ordered as desired.
See Also
HTML: The Definitive Guide by David Flanagan (O’Reilly) is the quintessential reference for HTML.
3.15. Generating URLs
Problem
You want to generate a hyperlink URL for use in a
JavaScript function, using the same
mechanisms available to the Struts html:link tag.
Solution
Use the Struts
html:rewrite
tag to generate the URL in the function as needed:
<script language="JavaScript">
  function popupHelp(  ) {
    window.open('<html:rewrite forward="showHelp"/>'),
  }
</script>
Discussion
The Struts html:link tag can be used to generate
hyperlinks that are based on a Struts action (Struts 1.2), a global
forward, the name of a JSP page, or any other URL. Sometimes,
however, you need to generate a URL for uses other than as the value
of the href attribute of an HTML anchor
(a) element. The Struts
html:rewrite tag addresses this issue.
A common example of this usage occurs when a URL is needed within
JavaScript. In the Solution, the html:rewrite tag
generates the URL for the
JavaScript window.open() function. This function opens a new browser window using
the URL—the first argument of the function—as the browser
location. Without the html:rewrite tag, you would
have to hardcode the real path for the URL. Furthermore, if you
needed to use URL rewriting to maintain the session ID, you would
have to hardcode this as well. The html:rewrite
tag properly handles URL rewriting just like the
html:link
tag. Like the Struts html:link tag, the
html:rewrite tag can refer to a global forward, an
action, a context-relative page, or an absolute URL. Exactly one of
the following attributes must be specified:
-
forward The value of this attribute is the name of a global
ActionForwardspecified as aforwardelement in the Struts configuration file .-
action The value of this attribute is the name of an
actionelement in the Struts configuration file. This attribute is only available in Struts 1.2.-
page The value of this attribute, taken as a module-relative path, is used to generate a server-relative URI, including the context path and module prefix.
-
href The value of this attribute is passed through unchanged.
Request parameters can be added to the query string of the URL using
the paramId, paramName, and
paramProperty elements as with the
html:link
tag. If you need to add more than one parameter, use the technique
shown in Recipe 3.16.
See Also
The Struts documentation for the rewrite tag can be found at http://jakarta.apache.org/struts/userGuide/struts-html.html#rewrite. Recipe 3.7 shows some other techniques for generating dynamic JavaScript using the Struts tags.
3.16. Adding Request Parameters to a Link
Problem
You want to add an arbitrary set of request parameters to a hyperlink
or URL created using the Struts html:link or
html:rewrite tags.
Solution
Create a java.util.HashMap as a page-context bean
using the jsp:useBean tag. Populate the map using
the JSTL c:set tag. Then reference the created map
using the name attribute of the
html:link and html:rewrite
tags:
<%@ taglib prefix="c"    uri="http://java.sun.com/jstl/core" %>
<%@ taglib prefix="html" uri="http://jakarta.apache.org/struts/tags-html" %>

<!-- header stuff here -->

<jsp:useBean id="params" class="java.util.HashMap"/>

<c:set target="${params}" property="user" value="${user.username}"/>
<c:set target="${params}" property="product" value="${product.productId}"/>
<html:link action="/BuyProduct" name="params">Buy Product Link</html:link>
<a href="javascript:window.open(
        <html:rewrite action='/BuyProduct' name='params'/>)">
    Buy Product Popup
</a>
Discussion
The Struts html:link and
html:rewrite
tags allow you to add name/value parameters to the generated URL by
referring to a Map property of a JavaBean. The map
key is the parameter name and the map value is the parameter value.
While this approach is functional, it smells like a hack. You are forced to create Java code to represent something used only used to create an HTML link. Granted, the data comes from your business objects—which is the Model—but the parameter names are purely part of the View. A more practical problem with this approach is that the values for the parameters may come from different objects. Forcing developers to cobble together a class on the serverside to render a link reeks of a bad technique.
The Solution avoids this problem by utilizing the JSP, Struts, and
JSTL tag libraries in concert. The jsp:useBean tag
creates a java.util.HashMap as a page-scoped
variable, and the JSTL
c:set tag populates
the map with name/value pairs. The property
attribute is the map key and the value is the map
value. The JSTL c:set tag provides an added
benefit so you have the full power of the JSTL expression language to
retrieve the value.
You can avoid the Struts tags altogether and use the JSTL
c:url tag to create
the URL:
<c:url="/BuyProduct.do" var="buyLink">
  <c:param name="user" value="${user.username}"/>
  <c:param name="product" value="${product.productId}"/>
</c:url>
<a href='<c:out value="${buyLink}"/>'>
Buy Product Link
</a>
<a href="javascript:window.open('<c:out value="${buyLink}"/>')">
    Buy Product Popup
</a>
Nesting the c:param tags within the
c:url feels more natural than the
HashMap approach supported by Struts. This
approach, however, has a major disadvantage compared with the Struts
tags: You cannot refer to your Struts actions or global forwards
defined in your struts-config.xml. The Struts
tags allow you
to render the links with a
transaction token. You surrender these features when you
don’t use the Struts html:link
and html:rewrite tags.
See Also
If you are unfamiliar with JSTL, refer to Recipe 3.1. It has all the details you need to get
started using these powerful tags. Another important source is the
Struts documentation for the
html tag library,
which can be found at http://struts.apache.org/userGuide/dev_html.html.
The Struts transaction token handling facility is discussed in Recipe 7-9.
3.17. Using Frames
Problem
You need to reference an Action or JSP page from within one frame to another.
Solution
Use the Struts
html:frame
tag to create frame elements with the proper URLs for your Struts
application, as in Example 3-20
(frame_test.jsp).
<%@ page contentType="text/html;charset=UTF-8" language="java" %>
<%@ taglib uri="http://jakarta.apache.org/struts/tags-html" prefix="html" %>
<frameset cols="50%,*">
  <html:frame frameName="_frame1"
                   page="/frame1.jsp"
            marginwidth="10"
           marginheight="10"
              scrolling="auto"
            frameborder="1"/>
  <html:frame frameName="_frame2"
                   page="/frame2.jsp"
            marginwidth="10"
           marginheight="10"
              scrolling="auto"
            frameborder="1"/>
</frameset>
Within the individual frame’s source JSP, use the
target attribute on the
html:link and
html:form
tags to refer to the other frame.
The JSP in Example 3-21
(frame1.jsp) demonstrates this approach.
<%@ page contentType="text/html;charset=UTF-8" language="java" %>
<%@ taglib uri="http://jakarta.apache.org/struts/tags-html" prefix="html" %>
<%@ taglib uri="http://java.sun.com/jstl/core" prefix="c" %>
<html>
<head>
<title>Struts Cookbook - Chapter 04: Frame Test</title>
</head>
<body bgcolor="white">
<h2>Frame 1</h2>
<html:link href="frame2.jsp?calledBy=FRAME_1" target="_frame2">
Call Frame2
</html:link>
<p>
Message received:
<c:out value="${FrameForm.map.message}"/>
</body>
</html>Likewise, frame2.jsp shown in Example 3-22 defines a form that submits to an
Action and directs the result to
_frame1 using the target
attribute.
<%@ page contentType="text/html;charset=UTF-8" language="java" %>
<%@ taglib uri="http://jakarta.apache.org/struts/tags-html" prefix="html" %>
<%@ taglib uri="http://java.sun.com/jstl/core" prefix="c" %>

<html>
<head>
  <title>Struts Cookbook - Chapter 04: Frame Test</title>
<body bgcolor="white">
<h2>Frame 2</h2>
  Send a message to frame 1!
  <html:form action="CallFrame1" target="_frame1">
    <html:text property="message"/>
    <html:submit/>
  </html:form>
  <c:forEach var="paramValue" items="${paramValues}">
    <br />
    Parameter: <c:out value="${paramValue.key}"/><br />
    Values:
    <c:forEach var="theValue" items="${paramValue.value}">
      <c:out value="${theValue}"/><br />
    </c:forEach>
  </c:forEach>
</body>
</html>
Discussion
There are two key concerns when using HTML frames within a Struts
application. First, the URLs of the frame elements
within the frameset tag should be generated using
the same
rules used by the Struts
html:link and html:rewrite
tags—i.e., enter the html:frame tag. It
supports the same action, page,
and href attributes as the
html:link and html:rewrite
tags. The html:frame tag supports additional
attributes specific to the HTML frame element.
Most of these attributes are pass-throughs, and the attribute value
is passed through without modification to the generated
frame element.
Second, with frame-to-frame interaction, you will probably need a
user request, made on one frame, to affect the display of another
frame displayed on the same page. The key to making this
communication work is the use of the target
attribute on the html:form and
html:link tags.
The target attribute
specifies
the window or frame that receives the results of a request. The
request can come from a form submission or link. In the Solution, a
frameset is created that contains two
frames—_frame1 and
_frame2—positioned on the left and right,
respectively. Frame 1, as shown in Example 3-21,
defines a link with the page attribute set to
frame2.jsp and the target set
to _frame2. Parameters are passed on the query
string that will be displayed by frame2.jsp:
<html:link href="frame2.jsp?calledBy=FRAME_1" target="_frame2">
    Call Frame2
</html:link>
Similarly, frame2.jsp, shown in Example 3-22, defines a form where the
target is specified as
_frame1:
<html:form action="CallFrame1" target="_frame1">The form-bean and action for
this example are defined in the
struts-config.xml file:
<form-bean name="FrameForm" type="org.apache.struts.action.DynaActionForm">
  <form-property name="message" type="java.lang.String"/>
</form-bean>
...
<action    path="/CallFrame1"
          name="FrameForm"
         scope="request"
          type="org.apache.struts.actions.ForwardAction"
     parameter="/frame1.jsp"/>
When you first access frame_test.jsp and click the link on the lefthand frame, you’ll see the data displayed in Frame 2. Likewise, when you submit the form on the righthand frame, you will see the results displayed in Frame 1. Figure 3-5 shows the frames after this series of interaction.
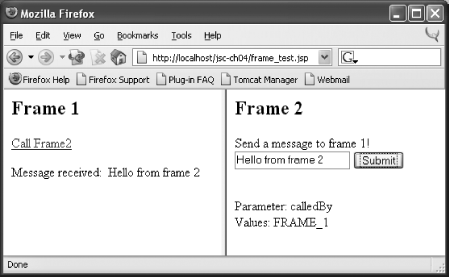
If the target attribute was omitted, the output
would be displayed in the same frame from where the request was made.
Think of a frame as a browser within a browser. The Solution works
the way it does because _frame1 and
_frame2 are both part of the same
frameset.
Other specially named targets are relevant to frames that are handled in specific ways by the browser. These special targets in described in Chapter 3.
|
Frame |
Description |
|
|
The browser loads the received request into a new browser window. This target is useful for creating pop ups. |
|
|
The browser loads the received request into the current window or frame. This is the default setting when the target is not specified. |
|
|
The browser loads the received request into the parent window or
frameset directly containing this frame. If the current reference is
a top-level frame or window, this is equivalent to
|
|
|
The browser loads the received request into the window at the top of the hierarchy. This results in the request being displayed in the entire browser window. |
Frames can get complicated, particularly if you use frames within frames as well as hidden frames. Many people prefer to steer clear of frames because of this complexity. Carefully consider your requirements when using frames. You may find that you can get similar behavior without the complexity of inter-frame communication using JSP includes or Tiles.
See Also
The Struts documentation for the html tag library
provides complete details on the html:frame tag as
well as the use of the target attribute. You can
find this at
http://struts.apache.org/userGuide/struts-html.html.
A great reference for details on frames can be found in HTML and XHTML: The Definitive Guide by Chuck Musciano and Bill Kennedy (O’Reilly).
Recipe 14.1 provides the basics of setting up Tiles for your application.
3.18. Defeating Browser Caching
Problem
You want to force the browser to display an up-to-date JSP page instead of showing the page from the browser’s cache.
Solution
Set the nocache attribute to true for the
controller element in your
struts-config.xml
file.
<controller nocache="true"/>
Discussion
To speed processing, browsers frequently keep a copy of a visited page on the client’s local system. If an identical URL for the original page is requested and that page hasn’t expired, the browser may display the page from the local cache instead of issuing a new request. This caching reduces network traffic and improves the user experience significantly. However, this can cause problems for dynamically generated pages. Consider a JSP page that renders data retrieved from the HTTP session. If data stored in the session changes, the browser won’t be aware of the change. When the browser receives a new request for the page, it serves up the old page instead.
The easiest means of solving this problem for a Struts application is
to configure the Struts RequestProcessor to
generate a nocache header entry for every
generated HTTP response. Set the nocache attribute
to true on the controller element, as shown in the
Solution. If the nocache attribute is not
specified, the default value is false.
While this solves the problem, a consequence of its use is that every
page accessed through a Struts Action results in a
new request being sent to the server, even if the data
haven’t changed. One alternative solution is to
generate a dummy request parameter with some unique value, such as
the current time in milliseconds. This guarantees that the browser
issues a new request. This technique works when the request uses the
HTTP GET method; however, it may fail
if the URL is accessed via an
HTTP POST, or the URL is the result of
a servlet forward to the URL.
Given these conditions, it would be nice if there were a way to
indicate selectively which actions should be cached or not. You can
delve into this by taking a look at how the Struts
RequestProcessor handles the
nocache attribute. The code below shows the actual
implementation of the
processNocache( )
method from the
org.apache.struts.action.RequestProcessor class:
/**
 * Set the no-cache headers for all responses, if requested.
 * <strong>NOTE</strong> - This header will be overridden
 * automatically if a <code>RequestDispatcher.forward( )</code> call is
 * ultimately invoked.
 *
 * @param request The servlet request we are processing
 * @param response The servlet response we are creating
 */
protected void processNoCache(HttpServletRequest request,
                              HttpServletResponse response) {

    if (moduleConfig.getControllerConfig( ).getNocache( )) {
        response.setHeader("Pragma", "No-cache");
        response.setHeader("Cache-Control", "no-cache");
        response.setDateHeader("Expires", 1);
    }
}
You can provide a similar response handling on a
per-Action basis by utilizing a custom action
mapping. The custom action mapping, shown in Example 3-23, allows specification of the
nocache attribute on a per-action basis.
package com.oreilly.strutsckbk;

import org.apache.struts.action.ActionMapping;

public class NocacheActionMapping extends ActionMapping {

    private String nocache;
    private boolean nocacheEnabled = false;

    public String getNocache( ) {
        return nocache;
    }

    public void setNocache(String nocache) {
        this.nocache = nocache;
        nocacheEnabled = new Boolean(nocache).booleanValue( );
    }

    public boolean isNocacheEnabled( ) {
        return nocacheEnabled;
    }
}
A custom
RequestProcessor evaluates the
nocache setting for each request. Example 3-24 shows the custom
RequestProcessor that checks the caching property
of the custom ActionMapping, setting the HTTP
response headers as appropriate.
package com.oreilly.strutsckbk;

import java.io.IOException;

import javax.servlet.ServletException;
import javax.servlet.http.HttpServletRequest;
import javax.servlet.http.HttpServletResponse;

import org.apache.struts.action.Action;
import org.apache.struts.action.ActionForm;
import org.apache.struts.action.ActionForward;
import org.apache.struts.action.ActionMapping;
import org.apache.struts.action.RequestProcessor;

public class NocacheRequestProcessor extends RequestProcessor {

    protected ActionForward processActionPerform(HttpServletRequest
           request,
           HttpServletResponse response, Action action,ActionForm form,
            ActionMapping mapping) throws IOException, ServletException {
      ActionForward forward = null;
      if (mapping instanceof NocacheActionMapping) {
        NocacheActionMapping customMapping =
                  (NocacheActionMapping) mapping;
        if (customMapping.isNocacheEnabled( )) {
          response.setHeader("Pragma", "No-cache");
          response.setHeader("Cache-Control", "no-cache");
          response.setDateHeader("Expires", 1);
        }
      }
      forward = super.processActionPerform( request, response,
                                            action, form, mapping);
      return forward;
    }
}
To complete the solution, you need to define the custom action mapping and request processor in your struts-config.xml file (see Example 3-25).
<?xml version="1.0" encoding="ISO-8859-1" ?>

<!DOCTYPE struts-config PUBLIC
          "-//Apache Software Foundation//DTD Struts Configuration 1.1//EN"
          "http://jakarta.apache.org/struts/dtds/struts-config_1_1.dtd">
<struts-config>
  <action-mappings type="com.oreilly.strutsckbk.NocacheActionMapping">
    <action   path="/main"
              type="org.apache.struts.actions.ForwardAction"
         parameter="/index.jsp">
      <set-property property="nocache" value="true"/>
    </action>
  </action-mappings>
  <controller
    processorClass="com.oreilly.strutsckbk.NocacheRequestProcessor"/>
</struts-config>
See Also
The Struts documentation for the controller element can be found at http://jakarta.apache.org/struts/userGuide/configuration.html#controller_config. Recipe 2.8 demonstrates another way that you can use custom action mappings.