
Chapter 13. Testing and Debugging
Introduction
You can write the coolest Struts applications in the world, but if
you don’t know how to test them, or you
can’t seem to debug them, you might as well not have
written them in the first place. Testing and debugging web
applications can be a frustrating experience. If you test your
application by deploying it to your application server and
“banging on it,” then the recipes
in this chapter will provide some techniques that are worth learning.
If your only approach to debugging involves sticking
System.out.println( ) in places where you
think the problem might be, then
you’ll definitely want to check out some of these
solutions.
The key to debugging an application is visibility; the more information you have about the internal workings of the application, the easier it can be to pinpoint the problem. The chapter has solutions that show you how to monitor what your application is doing. This first half of this chapter presents some solutions related to logging and debugging that will help you understand what’s going on inside your application.
The heart of testing and debugging is the unit test. A unit test verifies that a specific portion of your application does what it is supposed to do. Java developers commonly think of the “unit” as a Java class. But the unit can be anything as long as it can be identified by discrete boundaries and isolated from code external to the unit. This chapter has two recipes that show you how to unit test your Struts actions.
In “traditional” software testing, the tester ensures that the application functions as the user expects. You can apply the concepts of unit testing to functional testing by considering a scenario as the “unit.” Use cases such as “Login,” “New User Registration,” or “Place an Order” to drive your unit tests. These functional unit tests are as valid as the low-level tests, though these tests can be more difficult to isolate from outside effects. If you follow the best practices of web application design—using the Model-View-Controller (MVC) design pattern supported by Struts—your most important unit tests will be testing your application’s model and business services. Struts-specific tests should comprise a small portion of your application’s entire unit test suite.
Without a doubt, the
JUnit (http://www.junit.org) framework, developed by
Erich Gamma and Kent Beck, provides an elegant, extensible framework
that has become the de facto standard for Java
unit testing. JUnit provides the base test class,
TestCase, that you extend to create your specific
unit test. You write test methods that exercise the unit under test
and verify the unit behaves as expected for different inputs.
JUnit provides the test harness for running your tests. JUnit treats
any method in your test class that begins with the word
“test” as a method to run; your
test methods will have names like testSearchByName(), testSuccess( ), etc. JUnit runs your
test by instantiating your test class and calling these test methods.
Within each test method, you exercise the class under test and verify
the results using assertion
methods defined in the TestCase base class. An
assertion expresses a Boolean (true/false)
relationship. For example, you may assert that a value returned from
a method is not null, or that the returned value has a specific
value. If an assertion fails, that particular test method will fail.
You can run your tests using command-line and graphical test runners
included with JUnit. Many popular Java development environments, such
as Eclipse and IDEA, come with built-in JUnit test runners. You can
also run your tests as part of your application’s
Ant build script.
The second half of this chapter shows you some recipes that make it easier to write unit tests for your Struts application. The solutions make use of a number of excellent open source extensions to JUnit such as StrutsTestCase, Cactus, and JWebUnit.
13.1. Deploying an Application Automatically
Problem
You want to be able to test and retest your web application in Tomcat without having to redeploy the application whenever a change is made to a Java class or JSP page.
Solution
Use the development directories of your application as the actual
directories that the application server uses for the deployed
application. For Tomcat, you would create a
Context element immediately before the
</Host> end tag in the
conf/server.xml file (under your
CATALINA_HOME top-level directory).
<Host...>
   ...
   <Context path="/struts-cookbook"
         docBase="/path/to/myapp/web"
      reloadable="true"/>
</Host>
Discussion
This recipe is not particular to Struts but is applicable to any J2EE-based web applications. However, the Solution is particular to Tomcat. If you aren’t using Tomcat, your application server most likely uses a similar mechanism. If you use the Solution, you won’t have to deploy your application when changes are made; your application will always be deployed.
The docBase attribute specifies a file path to
your deployment directory. If you’re using Windows,
you’ll need to include the drive letter on the path
as shown here:
docBase="c:/Documents and Settings/My App/web"
The structure of this directory must match the structure of a valid J2EE web application. Its contents would look something like this:
/index.html
/welcome.jsp
/feedback.jsp
/images/banner.gif
/WEB-INF/web.xml
/WEB-INF/struts-config.xml
/WEB-INF/classes/ApplicationResources.properties
/WEB-INF/classes/com/foo/MyBar.class
/WEB-INF/classes/...
/WEB-INF/lib/struts.jar
/WEB-INF/lib/...
By setting reloadable="true" Tomcat will monitor
the WEB-INF/classes and
WEB-INF/lib directories of your application.
When changes occur in either of these directories, Tomcat will
restart your application and the changes will get picked up. Setting
reloadable to true will negatively impact
performance and should only be used in development. If
you’re making JSP changes, you
don’t have to set reloadable to
true. Tomcat detects changes to JSPs automatically, translating and
recompiling on the fly. However, if you change configuration files,
such as the
struts-config.xml,
web.xml, and
validation.xml, you’ll need to
restart the web application manually as these files are read on
application initialization.
This deployment approach increases your productivity by reducing the code-compile-test cycle time. However, the Solution depends on the platform—both the application server and the operating system—and is not viable for production and QA deployments. Therefore, your application should include a platform-independent build script. Ant (http://ant.apache.org) provides an excellent framework for these scripts.
See Also
Recipe 1.7 shows you how to define a repeatable process for the compile-deploy cycle.
Recipe 13.4 describes how to enable remote debugging of a web application running in a different JVM.
You can find additional details on configuring Tomcat at http://jakarta.apache.org/tomcat.
13.2. Configuring Struts Logging
Problem
You need to set the severity level and details of the log messages generated by internal Struts components.
Solution
Configure Struts logging to use Log4J as its logging implementation:
Download the Log4J jar file from http://jakarta.apache.org/log4j.
Copy the jar file to your application’s WEB-INF/lib folder.
Set the log level and log destination (referred to as an appender) for all Struts packages (
org.apache.struts), as shown in Example 13-1 (log4j.properties). Place this file in your application’s WEB-INF/classes folder.
# The output information consists of relative time, log level, thread
# name, logger name, nested diagnostic context and the message in that
# order.
# For the general syntax of property based configuration files see the
# documentation of org.apache.log4j.PropertyConfigurator.

log4j.rootLogger=WARN,Console
log4j.logger.org.apache.struts=DEBUG,Console,File

log4j.appender.Console=org.apache.log4j.ConsoleAppender
log4j.appender.Console.layout=org.apache.log4j.PatternLayout
log4j.appender.Console.layout.ConversionPattern=%d [%t] %-5p %c - %m%n

# File is set to be a FileAppender which outputs to struts-debug.log
log4j.appender.File=org.apache.log4j.FileAppender
log4j.appender.File.file=struts-log.log

# File uses PatternLayout.
log4j.appender.File.layout=org.apache.log4j.PatternLayout

# The conversion pattern uses format specifiers. You might want to
# change the pattern an watch the output format change.
log4j.appender.File.layout.ConversionPattern=%d [%t] %-5p %c - %m%n
Configure Commons Logging to use Log4J in the commons-logging.properties file shown in Example 13-2. Save this file in your WEB-INF/classes directory.
Discussion
If your application is misbehaving, the first thing to do is check the log files. If Struts is recording informational messages, then you will need to adjust the logging so you can see more detail. Struts records log messages using the Jakarta Commons Logging API. This API acts as a lightweight, generic façade around several popular Java logging packages. Most users employ the Log4J (http://jakarta.apache.org/log4j) or JDK 1.4 Logging as the logging implementation. Many developers prefer Log4J even if they are using JDK 1.3. Log4J is more mature and feature-rich than JDK 1.4 Logging and is easily configured.
Log4J reads its settings from a configuration file,
log4j.properties. Classes write logging messages
using a logger. In most cases, the logger name
matches the fully qualified class name. For each logger, you can set
the logging level and the destination of the log messages, known as
an appender. With Log4J, you can set the log
level and the appenders with one property. For example, you could
configure the Struts RequestProcessor to log debug
messages to the console with this property:
log4j.logger.org.apache.struts.action.RequestProcessor=DEBUG,Console
Loggers are hierarchical; therefore, you can set the logging level for all Struts classes like this:
log4j.logger.org.apache.struts=DEBUG,Console,File
Log4J supports the concept of a default logger, known as the root logger. The root logger is configured like this:
log4j.rootLogger=WARN,Console
If a log4j.logger property isn’t
set for a specific logger, the log messages will be written based on
the root logger settings. In Example 13-1, the
default logging level is set to WARN. Period messages that are
warnings, or have a higher severity such as ERROR or FATAL, will be
logged, and the messages will be written to the
Console appender.
Appenders are configured using a log4j.appender
property. The console and file appenders shown in Example 13-1 will work on any system. For more details on
configuring appenders, see the Log4J documentation at http://logging.apache.org/log4j.
Figure 13-1 shows a sample of logging output when the Solution is applied to the struts-example.
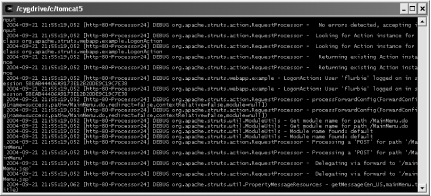
The information displayed in each log message is based on the layout properties specified for the appender. In the Solution, a series of format specifiers are used:
log4j.appender.Console.layout.ConversionPattern=%d [%t] %-5p %c - %m%n
These format specifiers result in the display of the date
(%d), thread (%t), priority
(%-5p), class name (%c), log
message (%m), and a carriage return
(%n). For a complete list of all supported format
specifiers, see the documentation for the Log4J
PatternLayout class.
See Also
For additional details o n configuring Struts logging, check the Struts User’s Guide at http://struts.apache.org/userGuide/configuration.html#config_logging.
You can find information on Commons Logging at http://jakarta.apache.org/commons/logging. For more information on Log4J, point your browser to http://logging.apache.org/log4j.
13.3. Adding Logging to Your Own Classes
Problem
You want to log messages of varying severity from your own classes.
Solution
Use Commons Logging within your own classes, as shown in Example 13-3.
package com.fooware.barapp;

import org.apache.commons.logging.Log;
import org.apache.commons.logging.LogFactory;

public class MyClazz {

    private static Log log = LogFactory.getLog(MyClazz.class);

    public void doSomething( ) {
        log.debug("About to do something.");
        try {
            //call something that throws an exception
        } catch (Exception e) {
            log.error("An exception occured doing something.", e);
        }
        log.info("Successfully did something.");
    }
}
Discussion
Any critical application should use logging of some kind. Relying on
System.out.println( ) limits logging flexibility
and can significantly downgrade application performance. You can roll
your own logging mechanism, as many shops have done, or you can take
advantage of frameworks and APIs such as Log4J and Commons Logging
that make logging easy.
The Solution uses the Commons Logging API. Messages are logged to a logging category. If you use the class name as the category, you can control logging at the class level. In addition, you can use the package name as a hierarchy. The Commons Logging API supports the following logging levels in increasing order of severity:
Trace
Debug
Info
Warn
Error
Fatal
Using Commons Logging gives you the flexibility of choosing a logging implementation as desired. If you were using Log4J, you would configure logging for your package or classes as was done for the Struts packages in Recipe 13.2. Example 13-4 shows the log4j.properties file that enables console logging of errors and warnings for the class in the Solution.
log4j.rootLogger=ERROR,Console
log4j.logger.com.foo.bar.MyClazz=WARN,Console
#
# The output information consists of relative time, log level, thread
# name, logger name, nested diagnostic context and the message in that
# order.
log4j.appender.Console=org.apache.log4j.ConsoleAppender
log4j.appender.Console.layout=org.apache.log4j.PatternLayout
log4j.appender.Console.layout.ConversionPattern=%d [%t] %-5p %c - %m%n
See Also
You can find information on Commons Logging at http://jakarta.apache.org/commons/logging. For more information on Log4J, point your browser to http://logging.apache.org/log4j.
13.4. Enabling Remote Debugging
Problem
You want to debug your Struts application running on a remote server.
Solution
Configure the JVM running your application server to use the
Java Platform
Debugger Architecture (JPDA). You will need to add the following
options to the java command that starts your
application server.
Discussion
The JPDA has made debugging Java applications much easier: You can
use any debugging tool you want independently of the application
being debugged. JPDA allows you to debug a Java application running
in a separate JVM on a remote server on your network. Your local JVM,
running the debugger, connects to the remote JVM across the network
using the host name and a known port. In the Solution, the
address specifies the port.
This approach works well when the two computers are the same—for example, your desktop machine. JPDA permits you to have two JVMs—one for your IDE or debugger and one for the application server—that can work together. You no longer have to run the application server and your IDE all within the same process.
If you’re using Tomcat as your application server, debugging is easier. Tomcat’s startup scripts include the JPDA options shown in the Solution. By default, Tomcat reserves port 8000 for the JPDA port. Figure 13-2 shows how to start Tomcat, on a Linux/Unix machine, using the catalina.sh shell script.
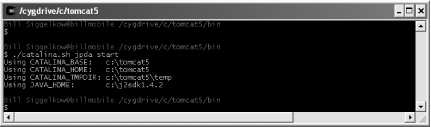
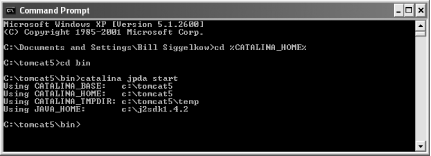
For Win32 machines, the catalina.bat startup script configures JPDA to use shared memory instead of TCP/IP sockets for the transport mechanism. The use of shared memory is only supported by Win32, and most IDEs don’t support connecting using this transport; you’re better sticking with the socket approach. If you’re using a Tomcat on a Win32 machine, you have two main options: You can use the Cygwin Unix emulator and execute the catalina.sh shell script, or you can modify the catalina.bat file to use sockets. Change the variables for the transport and address as follows:
...
rem set JPDA_TRANSPORT=dt_shmem
set JPDA_TRANSPORT=dt_socket
...
rem set JPDA_ADDRESS=jdbconn
set JPDA_ADDRESS=8000
...
Of course, you can change the JPDA_ADDRESS to any available port you like and execute the catalina.bat file to start Tomcat in debug mode. Figure 13-3 shows the results.
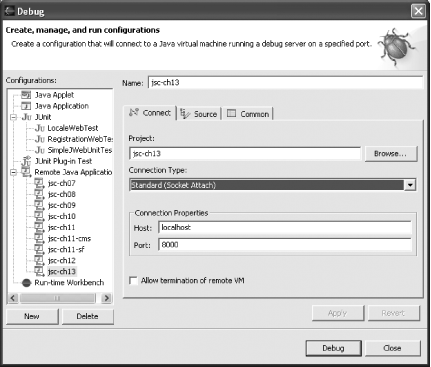
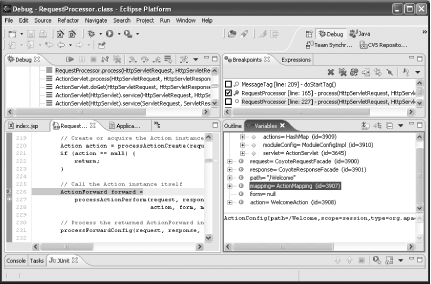
Once the application server is started, you connect to the server’s JVM using your debugger. You only need to specify the host name and port for the remote JVM. As an example, here’s how you would configure Eclipse IDE for debugging. You start by selecting Run → Debug . . . from the Eclipse menus. Figure 13-4 shows the window displayed for creating a new debug run configuration.
Clicking the Debug button will attach to the remote JVM. Figure 13-5 shows the Eclipse Debug perspective; here, the
breakpoint has been set within the Struts
RequestProcessor.
The latest IDEs have made debugging easier. If you debug using
System.out.println( ) calls, logging messages, and
educated guessing, learn how to use a debugger. It will save you
hours, you’ll learn about your
application’s internals, and you’ll
probably have some fun in the process. And because you have free
access to the Struts source code, you can step down into the Struts
framework if needed.
See Also
JSWAT, a standalone, JPDA-compliant, open source debugger can be downloaded from http://www.bluemarsh.com/java/jswat/.
To learn more about using JPDA, see http://java.sun.com/j2se/1.4.2/docs/guide/jpda/conninv.html.
13.5. Troubleshooting JSP Pages
Problem
You want to see a dump of the names and values of servlet request and HTTP session attributes and for a particular JSP page so you can troubleshoot rendering problems.
Solution
Include the debug.jsp file shown on the JSP page (see Example 13-5).
<hr width="3px">
Debug Information:<br>
<table border="1" width="50%" class="debug">
    <tr>
        <th colspan="3" style="background:orange">
            <b>Request Parameters</b>
        </th>
    </tr>
    <c:forEach items="${paramValues}" var="parameter">
        <tr>
            <td><c:out value="${parameter.key}"/></td>
            <td colspan="2">
                <c:forEach var="value" items="${parameter.value}">
                    <textarea rows="2" cols="50">
                        <c:out value="${value}"/>
                    </textarea>
                </c:forEach>
            </td>
        </tr>
    </c:forEach>

    <tr>
        <th colspan="3" style="background:orange">
            <b>Header Values</b>
        </th>
    </tr>
    <c:forEach items="${header}" var="h">
        <tr>
            <td><c:out value="${h.key}"/></td>
            <td colspan="2">
                <textarea rows="2" cols="50">
                    <c:out value="${h.value}"/>
                </textarea>
            </td>
        </tr>
    </c:forEach>

    <tr>
        <th colspan="3" style="background:orange">
            <b>Initialization Parameters</b>
        </th>
    </tr>
    <c:forEach items="${initParam}" var="parameter">
        <tr>
            <td><c:out value="${parameter.key}"/></td>
            <td colspan="2">
                <textarea rows="2" cols="50">
                    <c:out value="${parameter.value}"/>
                </textarea>
            </td>
        </tr>
    </c:forEach>

    <tr>
        <th colspan="3" style="background:orange">
            <b>Cookies</b>
        </th>
    </tr>
    <c:forEach items="${cookie}" var="mapEntry">
        <tr>
            <td rowspan="8"><c:out value="${mapEntry.key}"/></td>
            <td align="right">Name:</td>
            <td><c:out value="${mapEntry.value.name}"/></td>
        </tr>
        <tr>
            <td align="right">Value:</td>
            <td><c:out value="${mapEntry.value.value}"/></td>
        </tr>
        <tr>
            <td align="right">Domain:</td>
            <td><c:out value="${mapEntry.value.domain}"/></td>
        </tr>
        <tr>
            <td align="right">Max Age:</td>
            <td><c:out value="${mapEntry.value.maxAge}"/></td>
        </tr>
        <tr>
            <td align="right">Path:</td>
            <td><c:out value="${mapEntry.value.path}"/></td>
        </tr>
        <tr>
            <td align="right">Secure:</td>
            <td><c:out value="${mapEntry.value.secure}"/></td>
        </tr>
        <tr>
            <td align="right">Version:</td>
            <td><c:out value="${mapEntry.value.version}"/></td>
        </tr>
        <tr>
            <td align="right">Comment:</td>
            <td><c:out value="${mapEntry.value.comment}"/></td>
        </tr>
    </c:forEach>

    <tr>
        <th colspan="3" style="background:orange">
            <b>Page Scope Attributes</b>
        </th>
    </tr>
    <c:forEach items="${pageScope}" var="itm">
        <c:if test="${itm.key != 'javax.servlet.jsp.jspResponse'}">
            <tr>
                <td><c:out value="${itm.key}"/></td>
                <td colspan="2">
                    <textarea rows="2" cols="50">
                        <c:out value="${itm.value}"/>
                    </textarea>
                </td>
            </tr>
        </c:if>
    </c:forEach>

    <tr>
        <th colspan="3" style="background:orange">
            <b>Request Scope Attributes</b>
        </th>
    </tr>
    <c:forEach items="${requestScope}" var="itm">
        <tr>
            <td><c:out value="${itm.key}"/></td>
            <td colspan="2">
                <textarea rows="2" cols="50">
                    <c:out value="${itm.value}"/>
                </textarea>
            </td>
        </tr>
    </c:forEach>

    <tr>
        <th colspan="3" style="background:orange">
            <b>Session Scoped Attributes</b>
        </th>
    </tr>
    <c:forEach items="${sessionScope}" var="itm">
      <tr>
        <td><c:out value="${itm.key}"/></td>
        <td colspan="2">
            <textarea rows="2" cols="50">
                <c:out value="${itm.value}"/>
            </textarea>
        </td>
      </tr>
    </c:forEach>

    <tr>
        <th colspan="3" style="background:orange">
            <b>Application Scope Attributes</b>
        </th>
    </tr>
    <c:forEach items="${applicationScope}" var="itm">
      <tr>
        <td><c:out value="${itm.key}"/></td>
        <td colspan="2">
            <c:choose>
                <c:when test="${itm.key eq 'org.apache.struts.action.
                                   PLUG_INS'}">
                     <c:forEach items="${itm.value}" var="subitm">
                         <textarea rows="2" cols="50">
                             <c:out value="${subitm}"/>
                         </textarea>
                    </c:forEach>
                </c:when>
                <c:otherwise>
                    <textarea rows="2" cols="50">
                        <c:out value="${itm.value}"/>
                    </textarea>
                </c:otherwise>
            </c:choose>
        </td>
      </tr>
    </c:forEach>
</table>
Discussion
During development, JSP pages commonly show incorrect data, to render
halfway, or to throw an exception. Developers troubleshoot these
problems by commenting out portions of the page that appear to be
causing the problem, and then entering scriptlet to display the
values of request and session attributes used on the page. This is
the equivalent of commenting out troublesome Java code and adding
System.out.println( ) statements.
This solution doesn’t replace this arcane approach but makes it easier to apply. You have to comment out the failing portion of the page, but you can use the JSP fragment in Example 13-5 to eliminate the handcoded scriptlet. This reusable JSP fragment, derived from work by James Mitchell, displays request headers, scoped attributes, and other Struts-specific information to help you debug your problem. You can include the fragment anywhere on the page though, typically, it would be placed near the bottom of the page using the include directive:
...
<!-- Debug Data -->
<%@ include file="debug.jsp" %>
<!-- End Debug Data -->
</body>
</html:html>
The debug.jsp displays the following data:
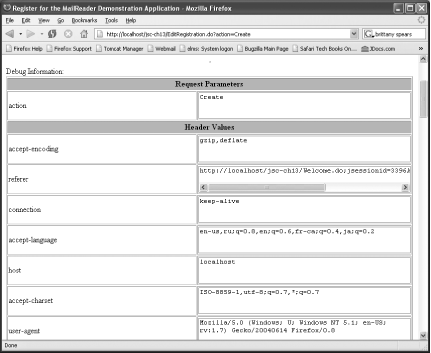
You can modify debug.jsp to display custom attributes that you may use in your application. Figure 13-6 shows a sample of the displayed information when debug.jsp is included at the bottom of the Registration.jsp file from the struts-example web application.
The debug.jsp page displays detailed information about cookies, as shown in Figure 13-7.
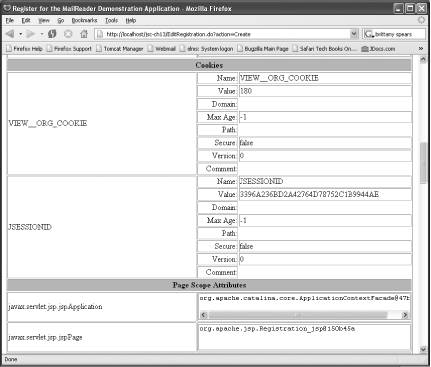
The debug.jsp page fragment should only be used in development; leaving this information displayed in production will make you look silly and will open a major security hole.
See Also
The debug.jsp page uses JSTL. You can use JSTL tags in your own application using the Solution shown in Recipe 3.1.
13.6. Testing Your Actions with Mock Objects
Problem
You want to unit test your Struts actions without running the application on an application server.
Solution
Use the StrutsTestCase framework to create a
unit test, extending the StrutsTestCase
MockStrutsTestCase base class, which verifies that
your action does what it’s supposed to do.
Discussion
The StrutsTestCase framework (http://strutstestcase.sourceforge.net), a JUnit extension, specifically targets the testing of Struts actions. You can download StrutsTestCase from http://strutstestcase.sourceforge.net. If you are coding to the Servlet 2.2 specification, download the binary for 2.2, strutstest212_1.1-2.2.zip; for Servlet 2.3 or later, download strutstest212_1.1-2.3.zip. You should also download the source code for StrutsTestCase; when you need to use a debugger, you can step into the StrutsTestCase code. Unzip the binary and source zip files into a directory.
Copy the strutstest-2.1.2.jar to a location on your application’s classpath. Separate your test source code, classes, and libraries from the rest of your application code. You should create a test directory for the application that contains the following:
A src folder your test source code
A classes folder to compile the test source into
A lib folder containing test-specific JAR files such as the StrutsTestCase Jar
When testing, place the test/classes directory and the JAR files in your test/lib directory on your classpath. When you build the actual distribution for your application (for example, the WAR file), you can easily exclude the test directory. Without a separate test directory, it’s much more cumbersome to separate test code from production code.
Tip
StrutsTestCase uses your application’s struts-config.xml file and web.xml file for performing the test, as well as verifying results. So Struts-TestCase can find these files, you must place the directory that contains your WEB-INF directory on your classpath.
With StrutsTestCase, you can create tests that run standalone outside
of the servlet container. StrutsTestCase simulates the servlet
container using mock objects that represent the servlet-related
managed objects such as the HttpServletRequest,
HttpServletResponse,
HttpSession, and
ServletContext. This approach runs tests easier
and faster and allows you to make your test immune to side effects of
the servlet container and other external objects. Your test focuses
exclusively on the Action being tested.
The Struts MailReader example application provides a good basis for
demonstration. Say you wanted to create a test for the
LogonAction shown in Example 13-6.
package org.apache.struts.webapp.example;

import javax.servlet.http.HttpServletRequest;
import javax.servlet.http.HttpServletResponse;
import javax.servlet.http.HttpSession;

import org.apache.commons.beanutils.PropertyUtils;
import org.apache.struts.action.ActionForm;
import org.apache.struts.action.ActionForward;
import org.apache.struts.action.ActionMapping;
import org.apache.struts.action.ActionMessage;
import org.apache.struts.action.ActionMessages;

public final class LogonAction extends BaseAction {

    /**
     * Name of username field ["username"].
     */
    static String USERNAME = "username";

    /**
     * Name of password field ["password"].
     */
    static String PASSWORD = "password";

    // --------------------------------------------------- Protected Methods

    /**
     * <p>Confirm user credentials. Post any errors and return User object
     * (or null).</p>
     *
     * @param database Database in which to look up the user
     * @param username Username specified on the logon form
     * @param password Password specified on the logon form
     * @param errors ActionMessages queue to passback errors
     *
     * @return Validated User object or null
     * @throws ExpiredPasswordException to be handled by Struts exception
     * processor via the action-mapping
     */
    User getUser(UserDatabase database, String username,
                           String password, ActionMessages errors)
         throws ExpiredPasswordException {

        User user = null;
        if (database == null){
            errors.add(
                ActionMessages.GLOBAL_MESSAGE,
                new ActionMessage("error.database.missing"));
        }
        else {
            user = database.findUser(username);
            if ((user != null) && !user.getPassword( ).equals(password)) {
                user = null;
            }
            if (user == null) {
                errors.add(
                    ActionMessages.GLOBAL_MESSAGE,
                    new ActionMessage("error.password.mismatch"));
            }
        }

        return user;

    }


    /**
     * <p>Store User object in client session.
     * If user object is null, any existing user object is removed.</p>
     *
     * @param request The request we are processing
     * @param user The user object returned from the database
     */
    void SaveUser(HttpServletRequest request, User user) {

        HttpSession session = request.getSession( );
        session.setAttribute(Constants.USER_KEY, user);
        if (log.isDebugEnabled( )) {
            log.debug(
                "LogonAction: User '"
                    + user.getUsername( )
                    + "' logged on in session "
                    + session.getId( ));
        }

    }

    // ------------------------------------------------------ Public Methods

    /**
     * Use "username" and "password" fields from ActionForm to retrieve a User
     * object from the database. If credentials are not valid, or database
     * has disappeared, post error messages and forward to input.
     *
     * @param mapping The ActionMapping used to select this instance
     * @param form The optional ActionForm bean for this request (if any)
     * @param request The HTTP request we are processing
     * @param response The HTTP response we are creating
     *
     * @exception Exception if the application business logic throws
     *  an exception
     */
    public ActionForward execute(
        ActionMapping mapping,
        ActionForm form,
        HttpServletRequest request,
        HttpServletResponse response)
        throws Exception {

        // Local variables
        UserDatabase database = getUserDatabase(request);
        String username = (String) PropertyUtils.getSimpleProperty(form,
                USERNAME);
        String password = (String) PropertyUtils.getSimpleProperty(form,
                PASSWORD);
        ActionMessages errors = new ActionMessages( );

        // Retrieve user
        User user = getUser(database,username,password,errors);

        // Report back any errors, and exit if any
        if (!errors.isEmpty( )) {
            this.saveErrors(request, errors);
            return (mapping.getInputForward( ));
        }

        // Save (or clear) user object
        SaveUser(request,user);

        // Otherwise, return "success"
        return (findSuccess(mapping));

    }

}
This Action is used by the
/SubmitLogon action defined in the
struts-config.xml file:
<!-- Process a user logon -->
<action    path="/SubmitLogon"
           type="org.apache.struts.webapp.example.LogonAction"
           name="LogonForm"
          scope="request"
          input="logon">
    <exception
              key="expired.password"
             type="org.apache.struts.webapp.example.ExpiredPasswordException"
             path="/ExpiredPassword.do"/>
</action>
Now, you can create a test to verify that the
LogonAction performs as expected. Example 13-7 presents a unit test that verifies the
following:
If a valid username and password are entered, the correct
Userobject is added to the session and control is forwarded to the “success” page.If an invalid username and password are entered, an
ActionErrorwith the key of “error.password.mismatch” is generated and control is forwarded to the “logon” page.
package com.oreilly.strutsckbk.ch13;

import org.apache.struts.webapp.example.Constants;
import org.apache.struts.webapp.example.User;

import servletunit.struts.MockStrutsTestCase;

public class SubmitLogonActionTest extends MockStrutsTestCase {

    private static final String ACTION_PATH = "/SubmitLogon";

    public SubmitLogonActionTest (String theName) {
        super(theName);
    }

    public void testValidUserLogon( ) throws Exception {
        addRequestParameter("username", "user");
        addRequestParameter("password", "pass");

        setRequestPathInfo(ACTION_PATH);
        actionPerform( );

        verifyNoActionErrors( );

        User user = (User) getSession( ).getAttribute(Constants.USER_KEY);
        assertNotNull("User", user);
        assertEquals("Username", "user", user.getUsername( ));

        verifyForward("success");
    }

    public void testInvalidUserLogon( ) throws Exception {
        addRequestParameter("username", "junk");
        addRequestParameter("password", "bond");

        setRequestPathInfo(ACTION_PATH);
        actionPerform( );

        verifyActionErrors(new String[] {"error.password.mismatch"});

        verifyForward("logon");
    }
}
Each test adds request parameters corresponding to the username and
password. The ACTION_PATH constant contains the
URL of the action being tested. The actionPerform(
) method processes the request through the mock container.
Upon completion of this method, you can check that the
Action did what you expected. Because the
MockStrutsTestCase extends the JUnit
TestCase class, your unit test has full access to
all of the assertion methods that JUnit provides. On top of that,
Struts-TestCase adds additional
methods for verifying Struts-specific behavior:
-
verify[No]ActionErrors Checks that specific errors were generated or that none were generated
-
verify[No]ActionMessages Checks that a specific set of action messages, identified by key, were sent or that none were sent
-
verifyForward Checks that the
Actionforwarded to a specificActionForwardidentified by logical name-
verifyForwardPath Checks that the
Actionforwarded to a specific URL-
verifyInputForward Checks that the controller forwarded to the path identified by the action mappings
inputattribute-
verifyTilesForward Checks that the controller forwarded to a specified logical forward name from the Struts configuration and a Tiles definition name from the Tiles configuration
-
verifyInputTilesForward Checks that the controller forwarded to the defined input of a specified Tiles definition
My initial coding of the SubmitLogonActionTest
used verifyInputForward( ), instead of
verifyForward("logon"), to check that control was
forwarded back to the appropriate page when invalid data was
submitted. Unexpectedly, the verifyInputForward( )
assertion failed with the following message:
junit.framework.AssertionFailedError: was expecting '/logon' but received '/Logon.do'
It took a second to realize that the
struts-example configures the controller to
treat the input attribute value as a local or
global forward instead of a module-relative path:
<controller pagePattern="$M$P" inputForward="true"/>Unfortunately, verifyInputForward( ) expects the
value of the input attribute on the
action element to be a module-relative path.
Changing verifyInputForward( ) to
verifyForward("logon") resolved the issue and the
test passed.
You’ll find another wrinkle in testing the Struts
MailReader example that’s worth exploring. Suppose
you wanted to test an action related to the
application’s registration features. These actions
are declared in the
struts-config-registration.xml file, and not the
standard struts-config.xml file. When you use an
alternate configuration file like this, you have to tell
StrutsTestCase to use it. The setConfigFile( )
method gives you this ability:
setConfigFile(java.lang.String pathname); setConfigFile(java.lang.String moduleName,java.lang.String pathname);
Use the first variation to specify the location of the nonstandard Struts configuration file if you aren’t using modules; for the default module, use the second variation to specify the nonstandard Struts configuration file for a specific module.
Your test’s setUp( ) method is
the logical place to call this method. You can put other common code,
required to initialize every test, in the setUp( )
method as well.
Warning
If you choose to override the setUp( ) method, you
must call super.setUp( ). This base method
performs some important initialization routines, and StrutsTestCase
will not work if it isn’t called.
Example 13-8 shows a test case for the
EditRegistrationAction.
package com.oreilly.strutsckbk.ch13;
import org.apache.struts.Globals;
import servletunit.struts.MockStrutsTestCase;
public class EditRegistrationActionTest extends MockStrutsTestCase {
private static final String ACTION_PATH = "/EditRegistration";
public EditRegistrationActionTest (String theName) {
super(theName);
}
public void setUp( ) throws Exception {
super.setUp( );
setConfigFile("/WEB-INF/struts-config-registration.xml");
setRequestPathInfo(ACTION_PATH);
}
public void testCreateRegistration( ) throws Exception {
addRequestParameter("action", "Create");
actionPerform( );
String token = (String) getRequest( ).getAttribute(
Globals.TRANSACTION_TOKEN_KEY);
assertNotNull(token, "Token was not saved");
verifyForward("success");
}
}This test shows how you can verify that attributes are stored, as
expected, in the request. In this case, the
EditRegistrationAction is supposed to store a
Struts transaction token in the request.
See Also
StrutsTestCase provides two base classes for creating
Action unit tests.
MockStrutsTestCase is used for creating tests that
can be run outside of a servlet container. The other base class,
CactusStrutsTestCase, can be used for testing
actions running in a live container using the Cactus (http://jakarta.apache.org/cactus) test
framework. Recipe 13.7 shows this approach.
If you need to verify the actual HTML generated by an
Action or JSP, you can use
HttpUnit (http://httpunit.sourceforge.net).
HttpUnit provides an object-oriented Java API
that allows you to inspect the returned HTTP response.
13.7. Testing Your Actions in the Container
Problem
You want to unit test an action as it’s running within your application server.
Solution
Use StrutsTestCase to create a test that can be run using the Cactus integration testing framework.
Discussion
Recipe 13.6 shows you how to test an action independently from the servlet container using StrutsTestCase (http://strutstestcase.sourceforge.net). You can use Struts-TestCase, in conjunction with the Cactus testing framework (http://jakarta.apache.org/cactus), to test Struts actions running in the servlet container. This type of testing is referred to as integration unit testing.
Integration unit testing isn’t unit testing in the pure sense. Unit tests isolate the unit from outside dependencies. This makes it easier to identify the cause of errors when a test fails. However, an integrated unit test may give you a more realistic view than a non-integrated test. If you are planning on deploying your application to different application servers (or different versions of the same application server), then you’ll find integration unit testing to be invaluable.
Cactus was developed to provide these types of unit tests. It was originally developed to test Enterprise JavaBeans but is equally up to the task of testing servlets, servlet filters, and JSPs. In fact, Cactus can be used to test any type of behavior that relies on a J2EE/Servlet container. However, these tests come at a cost of increased complexity and slower test performance. Using StrutsTestCase, Cactus-executed action tests are easy to write, but configuration and deployment can be complex. If you are running your unit tests frequently as part of your build process, you’ll find that the build script takes more time to run. The reason Cactus tests take longer is that Cactus starts your application server every time it runs its suite of tests. A good option is to run Cactus tests periodically, such as on nightly automated builds.
Start by downloading and extracting the StrutsTestCase and Cactus binary distributions. Each of these packages provides separates distributions for a Servlet 2.3 (or later) container or Servlet 2.2 container. For Cactus, these versions are identified by the J2EE version as 1.3 or 1.2.
Copy the strutstest.jar file and all the JAR
files from Cactus’s lib
directory to the WEB-INF/lib directory of your
web application. Cactus uses a servlet to redirect HTTP requests to
your test class. You’ll need to declare this servlet
in your application’s web.xml
file. Before the ActionServlet declaration, add
this servlet declaration:
<!-- Cactus Servlet Redirector -->
<servlet>
    <servlet-name>
        ServletRedirector
    </servlet-name>
    <servlet-class>
        org.apache.cactus.server.ServletTestRedirector
    </servlet-class>
</servlet>
Before the ActionServlet servlet mapping, add this
servlet mapping:
<!-- Cactus Servlet Redirector mapping -->
<servlet-mapping>
    <servlet-name>ServletRedirector</servlet-name>
    <url-pattern>/ServletRedirector</url-pattern>
</servlet-mapping>
It’s time to write the test using StrutsTestCase.
StrutsTestCase provides two base classes for creating tests:
MockStrutsTestCase and
CactusStrutsTestCase. Figure 13-8
shows how the StrutsTestCase, Cactus, and JUnit base classes relate
to each other.
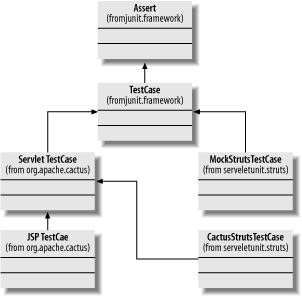
You extend the MockStrutsTestCase (see Example 13-7) to create a standalone unit test for an
Action. You can change a mock test into an
in-container test by changing it to inherit from
CactusStrutsTestCase instead of
MockStrutsTestCase. Example 13-9
shows a Cactus test, identical to the excerpt in Example 13-7 of the parent class, that tests the
LogonAction of the Struts MailReader example
application.
package com.oreilly.strutsckbk.ch13;

import org.apache.struts.webapp.example.Constants;
import org.apache.struts.webapp.example.User;

import servletunit.struts.CactusStrutsTestCase;

public class SubmitLogonActionCactusTest extends CactusStrutsTestCase {

    private static final String ACTION_PATH = "/SubmitLogon";

    public SubmitLogonActionCactusTest(String testName) {
        super(testName);
    }

    public void testValidUserLogon( ) throws Exception {
        addRequestParameter("username", "user");
        addRequestParameter("password", "pass");

        setRequestPathInfo(ACTION_PATH);
        actionPerform( );

        verifyNoActionErrors( );

        User user = (User) getSession( ).getAttribute(Constants.USER_KEY);
        assertNotNull("User", user);
        assertEquals("Username", "user", user.getUsername( ));

        verifyForward("success");
    }

    public void testInvalidUserLogon( ) throws Exception {
        addRequestParameter("username", "junk");
        addRequestParameter("password", "bond");

        setRequestPathInfo(ACTION_PATH);
        actionPerform( );

        verifyActionErrors(new String[] {"error.password.mismatch"});

        verifyForward("logon");
    }

}
The CactusStrutsTestCase provides the same
verification methods available with the
MockStrutsTestCase. See Recipe 13.6 for a detailed explanation of these methods.
To run the test, you have to build and deploy your application and run your application server. You can run your test using any JUnit test runner. Cactus executes your test using a client Java virtual machine (the JUnit test runner’s JVM) and a server Java virtual machine (the application server’s JVM).
Before running your test, you have to tell Cactus how to find your application from the client side. You will need to create a file named cactus.properties and save it on your classpath. Example 13-10 shows the cactus.properties file used in this recipe.
# Configuration file for Cactus.

# Each project using Cactus need to have such a file put in the client side
# CLASSPATH (Meaning the directory containgin this file should be in the
# client side CLASSPATH, not the file itself of course ... :) )

# Defines the URLs that will be used by Cactus to call it's redirectors
# (Servlet and JSP). You need to specify in these URLs the webapp context
# that you use for your application.

cactus.contextURL = http://localhost/jsc-ch13
cactus.servletRedirectorName = ServletRedirector
cactus.enableLogging=true
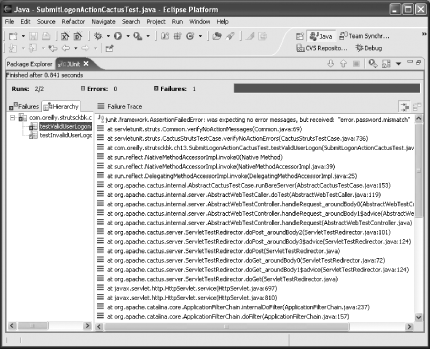
Like any kind of unit testing, it’s pretty boring
(but satisfying) when the test passes. Interesting things happen when
the test fails. For a Cactus test, though it’s
executed from the client side, you get the failure information and
stack trace from the server side. Figure 13-9 shows
the results when the test was changed to send an invalid username for
the testValidUserLogon( ) method.
See Also
Lu Jian has written an interesting article, “Unit Test Your Struts Application,” for ONJava. This article delves into the use of aspect-oriented programming for testing Struts applications. It can be found at http://www.onjava.com/pub/a/onjava/2004/09/22/test-struts.html.
The StrutsTestCase web site, http://strutstestcase.sourceforge.net, has an active forum for posting questions and getting answers.
Cactus can be used in many different ways and a complete treatment is beyond the scope of this recipe. In addition to Struts actions, you can use Cactus to test servlets, servlet filters, JSP pages, and custom JSP tags. Cactus works best when it’s integrated in your Ant build process. You can find complete details on the Cactus web site (http://jakarta.apache.org/cactus).
13.8. Testing Application Functionality
Problem
You want to verify that your application, deployed and running on an application server, does what it’s supposed to do for a specific use case or scenario.
Discussion
JWebUnit, an extension of the JUnit testing framework, leverages JUnit and Http-Unit for web application acceptance testing. JUnit provides the test harness and basic assertion methods, and HttpUnit (http://httpunit.sourceforge.net) provides a mechanism for programmatically sending requests and reading responses from a web application. JWebUnit exercises a running web application by programmatically sending requests, clicking links, filling out and submitting forms, and inspecting the response.
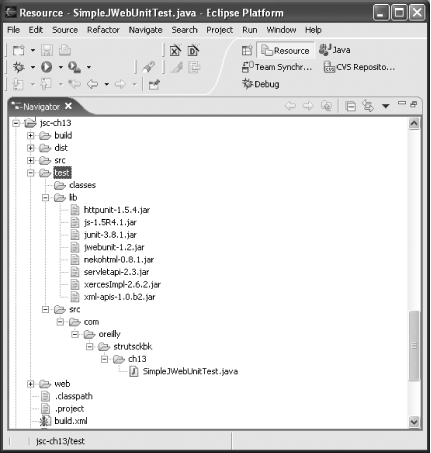
To get started with JWebUnit, download it from the project site, http://jwebunit.sourceforge.net. The source distribution includes everything you need; the JWebUnit Jar file, dependent Jar files, documentation, and the JWebUnit source code. Create a test directory structure in your application’s project directory like that shown in Figure 13-10. You will need to copy the Jar files included with JWebUnit to your test/lib directory.
The easiest way to create a new JWebUnit test class is to subclass
net.sourceforge.jwebunit.WebTestCase.
Tip
If you have been using your own extension of the JUnit
TestCase and cannot subclass
WebTestCase, you can delegate calls to the
net.sourceforge.jwebunit.WebTester class. The
source for the WebTestCase class shows how this is
done.
Example 13-11 shows a simple test case verifying that the jsc-ch13 web application is up and running.
package com.oreilly.strutsckbk.ch13;
import net.sourceforge.jwebunit.TestContext;
import net.sourceforge.jwebunit.WebTestCase;
public class SimpleWebTest extends WebTestCase {
public SimpleWebTest(String name) {
super(name);
}
public void setUp( ) throws Exception {
TestContext testContext = getTestContext( );
testContext.setBaseUrl("http://localhost/jsc-ch13");
// Use the message resources properties file
testContext.setResourceBundleName(
"org.apache.struts.webapp.example.ApplicationResources"
);
}
public void testAppAvailable( ) {
beginAt("/index.jsp");
// use the title text from the testContext resource bundle
assertTitleEqualsKey("index.title");
}
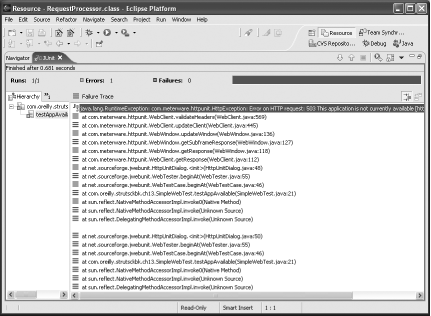
}You can run this test using any of the JUnit test runners. Like any
other JUnit test, a successful test run is rather boring to look at;
it’s more interesting to look at a failed test.
Figure 13-11 shows the results from
Eclipse’s JUnit test runner when the
SimpleWebTest of Example 13-11
fails because the application server isn’t running.
Every JWebUnit test has a test context. This context, typically
configured in the setUp( ) method, contains
information applicable to the test case such as the base URL. In
Example 13-11 this value was set to the web
application’s context:
testContext.setBaseUrl("http://localhost/jsc-ch13");You can use JWebUnit to test the internationalization features of
your web application. The test context allows you to specify the
resource bundle for your localized text as well as the locale being
tested. JWebUnit looks up properties from the resource bundle using
that locale. The locale that you set in the test context is only used
on the client side to look up resource bundle properties. To mimic
the browser’s locale settings, you must set the
Accept-Language header to the locale being tested.
The Struts MailReader can be localized for Russian. Example 13-12 tests this localization by verifying that the
response title has the correct value.
package com.oreilly.strutsckbk.ch13;

import java.util.Locale;

import net.sourceforge.jwebunit.TestContext;
import net.sourceforge.jwebunit.WebTestCase;

public class LocaleWebTest extends WebTestCase {

    public LocaleWebTest(String name) {
        super(name);
    }

    public void setUp( ) throws Exception {
        testContext = getTestContext( );
        testContext.setBaseUrl("http://localhost/jsc-ch13");
        testContext.setResourceBundleName(
            "org.apache.struts.webapp.example.ApplicationResources"
        );
    }

    public void testRussian( ) {
        testContext.setLocale(new Locale("ru"));
        testContext.getWebClient( ).setHeaderField("Accept-Language","ru");
        beginAt("/index.jsp");
        assertTitleEqualsKey("index.title");
    }

    private TestContext testContext;
}
Want more you say? JWebUnit shines at testing application scenarios and use cases. Say you wanted to verify the registration process of the Struts MailReader. The following simple case illustrates this process:
The users browse to the application’s welcome page.
The users click the “Register” link.
The registration form is displayed.
The users fill out the registration form with their full name, username, password, and email information.
The users submit the form.
The main menu page is displayed with a heading message personalized for the users.
You can create a JWebUnit test case that implements this use case, as shown in Example 13-13.
package com.oreilly.strutsckbk.ch13;

import com.meterware.httpunit.HttpUnitOptions;

import net.sourceforge.jwebunit.TestContext;
import net.sourceforge.jwebunit.WebTestCase;

public class RegistrationWebTest extends WebTestCase {
    public RegistrationWebTest(String name) {
        super(name);
    }

    public void setUp( ) throws Exception {
        // disable JavaScript handling
        HttpUnitOptions.setScriptingEnabled(false);
        TestContext testContext = getTestContext( );
        testContext.setBaseUrl("http://localhost/jsc-ch13");
        testContext.setResourceBundleName("org.apache.struts.
        webapp.example.ApplicationResources");
    }

    public void testRegistration( ) {
        // start at the welcome page
        beginAt("/index.jsp");

        // find the registration link and click it
        String regLinkText = getMessage("index.registration");
        clickLinkWithText(regLinkText);

        // check that the registration form is displayed
        assertFormElementPresent("username");

        // use the current time as part of the username for repeatability
        long ts = System.currentTimeMillis( );

        // fill out the form
        setFormElement("username","t"+ts);
        setFormElement("password","gotech");
        setFormElement("password2","gotech");
        String fullName = "George P. Burdell";
        setFormElement("fullName", fullName);
        setFormElement("fromAddress","[email protected]");
        setFormElement("replyToAddress","[email protected]");

        // submit the form
        submit( );

        // check that the main menu is displayed with the name included
        assertTextPresent(getMessage("mainMenu.heading")+' '+fullName);
    }

    public void tearDown( ) {
        // logoff to clean up the session
        gotoPage("/Logoff.do");
    }
}
This test shows off the power of JWebUnit and, though hidden from view, HttpUnit. For complete details, download JWebUnit and give it a try!
See Also
Other tools provide similar functionality as JWebUnit. Canoo WebTest (http://www.canoo.com) uses an Ant-like XML file to describe a test scenario. If your test writers aren’t comfortable with Java, then take a look at this excellent open source tool.