
Chapter 9. Building Rich Clients
I love kayaks. I usually leave canoes to those who prefer them. In that spirit, we leave rich clients to Keith Donald, the founder of the Spring Rich project, for the content and examples in this chapter..
Getting Started
In this section, you’ll
start creating a rich client
RentABike with an emerging project built directly
on the Spring Framework, the Spring Rich Client Project (Spring
Rich). The first thing
you’ll do is get the necessary project files.
You’ll then see how to get a basic application shell
with a splash screen up and running.
But first, a brief background on the aims of the project At its core, Spring Rich is a framework for constructing high-quality, professional Swing-powered desktop applications. It serves several important needs:
- Simplification
Swing is the most complete Java widget toolkit today, but it’s complex and cumbersome. Spring Rich provides a simpler programming model that’s easy to leverage and extend.
- Consistency
Low-level Swing provides no guidelines for constructing consistently well-layered enterprise applications. Through Spring, you get effective J2EE services integration and configuration with a consistent programming model.
- Integration
Spring Rich integrates the best features of projects like JGoodies, JDNC, JDIC, Webstart, Glazed Lists, Spin, Foxtrot, JIDE, InfoNode, and FlexDock (to name a few), in order to provide a end-to-end platform for rich client development.
How do I do that?
You first want to get the Spring Rich project. Link to it from the Spring site at http://www.springframework.org and follow the directions that you see there. In a nutshell, you will:
Access the Spring Rich sourceforge homepage at http://sourceforge.net/projects/spring-rich-c.
Access the “Files” tab and select to download the latest “with-dependencies” release archive.
Note
Spring Rich ships two distributions for each release: a bare-bones distribution containing the minimal jars, and an all-in-one jar also containing all dependencies.
The “with dependencies” release has everything that you need, including Spring Rich and all of its dependencies.
The project is still rapidly evolving, so if you need to download and build the latest CVS snapshot to take advantage of the newest to-be released features, do the following:
Connect to the
spring-rich-cmodule repository using your favorite CVS plugin. Here are the parameters you’ll need:Hostname: cvs.sourceforge.netRepository path: /cvsroot/spring-rich-cUsername: anonymousConnection type: pserverCheck out the
spring-richclientmodule. If you’re using eclipse, you can import this module directly as an eclipse project.Go to the spring-richclient root directory and run the build.xml file to build spring-richclient.jar. Use the alljars Ant target.
Now you’ve got the spring-richclient.jar, which you can plug right into your project. You’re also going to need a set of image resources. Spring Rich ships a set of out-of-the-box images in spring-richclient-resources.jar you can use to jumpstart your UI development. You can also take the images that we packaged with the book’s code examples and use them where an example calls for images.
Move the jars into your lib directory under your project, and you’re off to the races. You’ll next configure a splash screen and code a thin application bootstrapper to make sure that things are working.
A startup application context, which hosts services needed at initialization, defines your splash screen (Example 9-1).
com.springbook.richclient.startup-context.xml

<beans>

    <bean id="splashScreen"
          class="org.springframework.richclient.application.SplashScreen">
       <property name="imageResourcePath">
         <value>classpath:/images/splash-screen.jpg</value>
       </property>
    </bean>

</beans>
Of course, you’ll want to get a designer to build you an outrageously cool splash screen, but we all failed art, so you’re on your own. In the mean time, you can use a simple JSP like the one in Example 9-2.
You’ll then want a simple main driver to kick of loading your application (Example 9-3).
public class RentABikeLauncher {
    public static void main(String[] args) {
        try {
            String packagePrefix = "com/springbook/richclient";
            String startupContextPath =
                packagePrefix + "/startup-context.xml";
            String[] rootContextPath =
                new String[] {
                    packagePrefix + "/business-layer-definitions.xml",
      packagePrefix + "/richclient-definitions.xml" };

            new ApplicationLauncher(startupContextPath,
                rootContextPath);
        }
        catch (Exception e) {
            System.exit(1);
        }
    }
}
This thin bootstrapper uses ApplicationLauncher to
load your application from the configuration defined in two spring
application contexts.
In a standalone rich client environment, you’ll
typically specify three context configuration files on the
classpath. The first configuration file is
startup-context.xml, which you just defined with
your splash screen bean definition. The next two files are
business-layer-definitions.xml and
richclient-definitions.xml. These make up the
central root application context, which you will define and configure
in the next lab.
You’re ready to let it fly.
What just happened?
Like most rich client apps, Spring Rich-powered apps can take a little bit of time to launch, so the framework lets you put up a splash screen when you launch your application while the user waits. As you’ve seen, Spring Rich lets you specify the splash-screen configuration in the context.
There’s more to it than meets the eye. The framework forks off a thread for you, and loads your application while you look at the pretty splash screen. That way, the user gets the impression of immediate response. This boilerplate code exists in most rich client applications, but is completely managed by the framework.
Building the Application Shell
Now that you’ve got Spring Rich up and running, you’re ready to configure the main application window. You’ll see how to configure the window’s command bars, including the menu bar and tool bar. You’ll also learn how Spring Rich lets you invoke a centralized GUI command through any number of actionable controls, which can trigger some action, like buttons or menu items. You’ll also specify a logical command group, which you can reuse in any number of grouping controls. These are controls that let you group other actionable controls, like menus or command bars.
Once that soaks in, the following lab shows how to configure the main
window’s page area. The page will provide the
central view into the RentABike inventory.
High-level application goals
Before going further with
implementation, let’s
clarify the goals of the RentABike rich client
that you’ll build in this lab.
- The user launches the Bike Store
The application presents a dazzling splash screen while the application loads.
- The main window displays
The window’s menu bar organizes your user’s available commands into logical groups. The window’s tool bar provides easy access to frequently needed commands. A “Bike Navigator” component displayed in a central page area provides a view into our current store inventory.
- The user selects an existing bike for editing
The application presents a form that lets a user update a bike’s properties. The form provides validation of the shop’s business rules.
- The user adds a new bike
Doing so displays a wizard, which lets the user enter bike properties validated against our Bike business rules.
Notice a few minor differences between this vision and the web-based clients that you’ve already used. You’ve already seen the splash screen. You’ll also need to specify the command bars. Later, you’ll see the rich validation and forms framework. In this lab, you’ll focus on building the main window.
How do I do that?
To configure your main window, you first need to define several singleton beans that hold the context for your application. As usual, you’ll leverage Spring for configuration and dependency injection.
As you’ve seen, a typical Spring Rich configuration will have three context definitions: a startup context, a root application context, and a child context for each application window. For now, focus on the root application context.
A single root application context defines your logical middle tier (Example 9-4). It’s also where several Spring Rich services and descriptors are defined. Typically, the middle-tier business definitions are broken out into their own file, separate from the rich client-tier presentation definitions.
<beans>
    <bean name="rentABike" class="com.springbook.ArrayListRentABike">
        <property name="storeName"><value>Keith's Bikes</value></property>
    </bean>
</beans>
You’ve already seen the RentABike
interface. Notice this context links to the
ArrayListRentABike, which allows us to build and
test the application without any database support (Example 9-5). Later, you’ll be able to
swap this implementation with one of the database implementations.
<beans>

    <bean id="application"
     class="org.springframework.richclient.application.Application">
        <constructor-arg index="0">
            <ref bean="applicationDescriptor"/>
        </constructor-arg>
        <constructor-arg index="1">
            <ref bean="applicationLifecycleAdvisor"/>
        </constructor-arg>
    </bean>

    <bean id="applicationDescriptor"
     class="org.springframework.richclient.application.ApplicationDescriptor">
            <property name="name">
                <value>My RentABike</value>
            </property>
            <property name="version">
                <value>1.0</value>
            </property>
    </bean>

    <bean id="applicationLifecycleAdvisor"
     class="com.springbook.richclient.RentABikeLifecycleAdvisor">
        <property name="windowCommandBarDefinitions">
            <value>
              classpath:com/springbook/richclient/window-command-bars.xml
            </value>
        </property>
        <property name="startingPageId">
            <value>bikeNavigator</value>
        </property>
    </bean>
You see three bean definitions:
-
Application The
Applicationclass is the central component in a set of application management abstractions in Spring Rich. You’ll always define a singleapplicationbean for each of your Spring Rich apps.Applicationis loaded at startup by theApplicationLauncherto complete the startup initialization process. It issues callbacks at well-defined points within the application’s lifecycle to theApplicationLifecycleAdvisorbelow. It also provides a programmatic API for opening and closing application windows.-
ApplicationDescriptor Each application has an optional application descriptor, which provides the application’s name, image, caption, description, version, build ID, and other metadata.
-
ApplicationLifecycleAdvisor The lifecycle advisor allows convenient customization within well-defined points of a Spring Rich application’s lifecycle. For example, before a new window is opened, a callback is issued allowing pre-window display configuration.
The next set of bean definitions select implementations of common services typical of most rich client applications:
  <bean id="componentFactory"
   class="org.springframework.richclient.factory.DefaultComponentFactory"/>

  <bean id="messageSource"

    class="org.springframework.context.support.ResourceBundleMessageSource">
      <property name="basenames">
        <list>
          <value>org.springframework.richclient.application.messages</value>
          <value>com.springbook.richclient.messages</value>
        </list>
      </property>
</bean> <bean id="imageSource"
class="org.springframework.richclient.image.DefaultImageSource">
<property name="basenames">
<list>
<value>org.springframework.richclient.application.images</value>
<value>com.springbook.richclient.images</value>
</list>
</property>
<property name="brokenImageIndicator">
<value>classpath:/images/alert/error_obj.gif</value>
</property>
</bean> <bean id="lookAndFeelConfigurer"
class="org.springframework.richclient.application.
config.JGoodiesLooksConfigurer">
<property name="theme">
<bean class="com.jgoodies.plaf.plastic.theme.ExperienceBlue"/>
</property>
</bean>The next rich client bean definition deserves special attention because it is a bean post processor. Any bean post processor defined in the context will receive a call back after another bean is instantiated by Spring. That callback allows the insertion of custom processing for those beans.
Note
The optional LooksConfigurer definition lets you control the application’s look and feel—in this case, a jgoodies skin.
The applicationObjectConfigurer post processor
below processes all beans that act as factories for controls to be
displayed on the screen. Set it up like this, and
you’ll learn more below:
    <bean id="applicationObjectConfigurer"
     class="org.springframework.richclient.application.config.
                DefaultApplicationObjectConfigurer">
    </bean>
This applicationObjectConfigurer injects
properties to visual descriptor beans.
Essentially, these beans act as factories for GUI components
rendering i18n messages, images, or icons.
To illustrate this in action, consider the
applicationDescriptor bean you defined above.
After Spring instantiates this descriptor, the
applicationObjectConfigurer injects it localized
properties, pulling them from the configured i18n sources.
In summary, the applicationObjectConfigurer gives
you a powerful, consistent, automated configuration strategy for all
of your GUI control factories.
Check point
Time for a check point. So far in this lab, you’ve
created the root application context defining the business layer and
several important rich client services. If you were to run your
application now, by launching the
RentABikeApplicationLauncher main method defined
in the first lab, this is what you’d get:
org.springframework.richclient.application.ConfigurationException:
 Unable to load window command bar definition at location:
 [classpath: com/springbook/richclient/window-command-bars.xml]
The cause is simple. The RentABikeLifecycleAdvisor
bean points to the above file for the configuration of the main
window command bars, but the file doesn’t yet exist.
It’s time to create that file so the main window
will load successfully (Example 9-6).
To keep things simple, you’ll add a menubar with a single “File” menu for now, and a tool bar with a shared “Save” command.
<beans>

  <bean id="menuBar"
   class="org.springframework.richclient.command.CommandGroupFactoryBean">
     <property name="members">
       <list>
         <ref bean="fileMenu"/>
       </list>
     </property>
  </bean>

  <bean id="fileMenu"
    class="org.springframework.richclient.command.CommandGroupFactoryBean">
    <property name="members">
      <list>
        <ref bean="newMenu"/>
        <value>separator</value>
        <value>saveCommand</value>
        <value>propertiesCommand</value>
        <value>separator</value>
        <bean class="org.springframework.richclient.command.support.
                     ExitCommand"/>
      </list>
    </property>
  </bean>

  <bean id="sharedTargetableCommandList"
   class="org.springframework.richclient.command.support.CommandList">
     <property name="commandIds">
       <list>
         <value>saveCommand</value>
         <value>propertyCommand</value>
        </list>
     </property>
  </bean>

  <bean id="newMenu"
    class="org.springframework.richclient.command.CommandGroupFactoryBean">
    <property name="members">
      <list>
          <value>placeholder:newBikeCommand</value>
      </list>
    </property>
  </bean>

  <bean id="toolBar"
    class="org.springframework.richclient.command.CommandGroupFactoryBean">
    <property name="members">
      <list>
        <ref bean="newMenu"/>
        <value>saveCommand</value>
      </list>
    </property>
  </bean>

</beans>
That’s it! Now if you were to run your application
by launching the RentABikeApplicationLauncher main
method defined in the first lab, you’d get Figure 9-1.
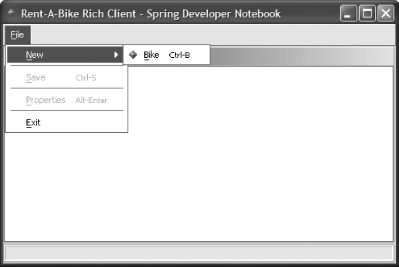
A generic application shell, with placeholders for our application-specific commands! Pretty easy, huh?!
What just happened?
How did the framework know that the newBikeCommand
should be labeled “Bike” with a
“B” mnemonic and a Ctrl-B
accelerator key? You certainly didn’t define any of
that configuration above!
That leads us back to the application object configurer. Just as it
can autoconfigure any control factory, it can also autoconfigure
commands, pulling i18n metadata from the Spring configured message
and image sources. For example, for the
newBikeCommand above, the resource bundle files
include the following:
newBikeCommand.label=&Bike@ctrl B
newBikeCommand.caption=Creates a new bike
newBikeCommand.icon=bullets/blue_diamond.gif
The framework handles all the configuration for you. No more manual configuration code!
You saw in this lab how to define the root context of a Spring Rich powered application, and how to configure the main window, including the window’s “command bars.” The result? A application shell with placeholders for the commands needed by your application, ready to customize in the next lab.
There’s a lot going on behind the scenes to make
things very convenient for you as a developer. The framework manages
the entire lifecycle of your application, including opening a fully
configured window populated with the command bars configured in the
context file. The slick
applicationObjectConfigurer autoconfigures beans
for you that produce controls to be displayed on the screen,
relieving you from having to configure them manually. In summary,
boilerplate code is kept inside the framework, so you can focus on
solving your domain problem.
Building the Bike Navigator View
Now, you’re ready to take the generic application shell you just built and customize the central page area so it displays an interactive “Bike Navigator” component. You’ll see how to build the Bike Navigator, which is an implementation of a view in Spring Rich terminology. The Spring view is similar to Eclipse RCP’s concept of a view.
When you’re done, you’ll have a
interactive view into your bike store’s inventory.
You’ll also have local handlers for the various
controller actions (or commands) supported by this view.
Specifically, you’ll code a local handler for the
shared Properties command, which will display the
properties of the selected Bike when executed.
How do I do that?
As you build your BikeNavigator, the first thing
you need to do is define a ViewDescriptor for it
in configuration code. Each view defined in Spring Rich has a
corresponding descriptor. The descriptor, a singleton, provides
metadata about the view, including its name, icon, and implementation
class. It also acts as a factory for creating
view instances of a specific implementation class, as many view
instances of the same class can exist on different windows. Note that
views are not singletons.
    <bean id="bikeNavigator"
     class="org.springframework.richclient.
            application.support.DefaultViewDescriptor">
        <lookup-method
               name="createView"
           bean="bikeNavigatorViewPrototype"/>
    </bean>
Notice the <lookup-method> element. It will
override this ViewDescriptor
implementation’s createView
method
at runtime with a implementation that will
return a new bikeNavigatorViewPrototype on each
invocation. This lets Spring configure and manage your custom
BikeNavigator view instances—which
you’ll define a specification for next.
Note
You don’t see descriptor properties like “name”, “image”, or “caption” because they are all configured automatically.
Once the ViewDescriptor
is
defined, you’ll create the bean definition and
implementation for the BikeNavigator view. This
prototype encapsulates the creation of a graphical
view control we select (any Swing JComponent). It
also encapsulates the controller logic to
coordinate between that control and our RentABike
business interface in response to user events. Below is the
BikeNavigator bean definition:
    <bean id="bikeNavigatorViewPrototype"
     class="com.springbook.richclient.BikeNavigator" singleton="false">
        <property name="rentABike">
            <ref bean="rentABike"/>
        </property>
    </bean>
</beans>
BikeNavigator is a prototype because the same type
of view may be active in several application windows at the same
time. You cannot share the same view instance because a Swing
component can only be a contained within a single
Container.
Note
Views are NOT singletons. Because they’re managed by Spring, they can fully leverage dependency injection. You inject the façade here.
That’s it for view configuration code. Now
it’s time to code the
BikeNavigator view implementation and controller
logic. You’ll inherit from
AbstractView, which
gives you basic
behavior common to all view implementations. For now,
you’ll only be able to view a list of bikes, and
view properties on an existing bike:
public class BikeNavigator extends AbstractView implements ApplicationListener {
    private JTree bikesTree;

    private PropertiesCommandExecutor propertiesExecutor =
        new PropertiesCommandExecutor( );

    private RentABike rentABike;
Note
The setter allows configuration of a RentABike reference using standard setter dependency injection.
               public void setRentABike(RentABike rentABike) {
               this.rentABike = rentABike;
               }
               protected void registerLocalCommandExecutors(
               PageComponentContext context) {
               context.register(GlobalCommandIds.PROPERTIES, propertiesExecutor);
               }
               protected JComponent createControl( ) {
               initBikesTree( );
               return new JScrollPane(bikesTree);
               }

    private void initBikesTree( ) {
        DefaultMutableTreeNode rootNode = new DefaultMutableTreeNode( );

        // get the Bikes from store inventory
        Collection bikes = rentABike.getBikes( );

        // Add tree nodes for each Bike
        for (Iterator it = bikes.iterator( ); it.hasNext( );) {
            rootNode.add(new DefaultMutableTreeNode(it.next( )));
        }

        // Create the Tree Model and JTree implementation
        bikesTreeModel = new DefaultTreeModel(rootNode);
        bikesTree = new JTree(bikesTreeModel);
        bikesTree.setRootVisible(false);
    }
               private class PropertiesCommandExecutor
               extends AbstractActionCommandExecutor {

               private BikeForm bikeForm;

               public PropertiesCommandExecutor( ) {
               // The command should only be enabled when a single object is
               // selected in the Bike Tree.
            addGuard(new SingleSelectionGuard(bikesTree));
        }

        public void execute( ) {
            // Create a new Bike Form for editing the selected Bike
        bikeForm = new BikeForm(getSelectedBike( ));
Note
The Bike Form will let us edit the selected Bike’s properties when the Properties command is executed.
            // Display the form in a Titled Dialog
            TitledPageApplicationDialog dialog =
                new TitledPageApplicationDialog(bikeForm, getWindow( )) {
                protected boolean onFinish( ) {
                    bikeForm.commit( );
getRentABike( ).saveBike((Bike)bikeForm.getFormObject( )); bikesTreeModel.nodeChanged(getSelectedTreeNode( ));
return true;
}
};
// Display the dialog on the screen
dialog.showDialog( );
}
}
}That’s it! You now have a Bike Navigator view defined providing a hierarchical view into current store inventory, realized by a Swing JTree. You also have a local command executor for the Properties command defined that will allow the user to edit an existing Bike in inventory using a BikeForm. In the next lab, you’ll implement the BikeForm. You’re not quite ready to execute it, because you don’t have the full implementation of the property editor yet.
What just happened?
You just defined the first domain-specific component of the RentABike application, the Bike Navigator View. You saw how views act as control factories for an underlying Swing widget that realizes a navigation function. You also saw how local command executors provide targeted controller logic that is only enabled when certain conditions are satisfied.
It’s time to put it all together. Let’s walk through the big picture of what “just happens” now when our rich client application starts up:
The
RentABikeLauncherbootstrapper kicks everything off. It delegates to theApplicationLauncherframework class, parameterizing the launcher with our startup and root application context definitions.The
ApplicationLauncherloads the startup context from the classpath and displays the application splash screen.The
ApplicationLaunchercreates the root application context from the classpath. It retrieves the “application” singleton from the context to initiate the lifecycle of yourRentABikeRich Client.The first major step in the app’s lifecycle is to create the main application window displaying the page identified by the
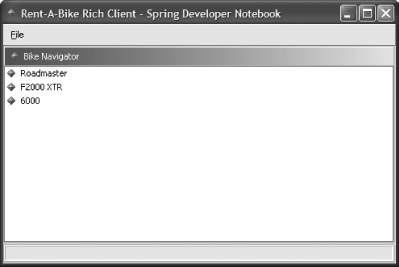
startingPageIdproperty. This “starting page” is thebikeNavigator. For your application, you only have a single page with a single view defined.Once the framework creates the window, the
ApplicationLifecycleAdvisorloads thewindowCommandBarDefinitionsconfiguration. The window creates and populates its menu bar, tool bar, page area, and status bar.The window is opened and displayed. The window’s command bars and the central page area containing your new Bike Navigator View are displayed (Figure 9-2).
The properties command is bound to the execute( )
method that we added to the
PropertiesCommandExecutor inner class in the
BikeNavigator controller. When you select a bike
and hit the ALT-ENTER key, Spring Rich looks for the command executor
that’s bound to targetable Properties command and
executes it.
Building the Bike Editor Forms
So far, the application looks good, but it doesn’t do too much that’s useful. You still need to create a BikeForm to display in a titled dialog, allowing the editing of properties on an existing bike. The same form will need to be used to add a new bike to store inventory.
In general the forms framework, with the data binding and validation framework, are three of the fundamental strengths of the Spring Rich Client Project.
How do I do that?
To create your bike form, you’ll first define the declarative validation rules for the Bike class. These rules will be defined independent of any presentation code, so they can easily be reused in different environments.
After that, you’ll see how to implement the
BikeForm itself, and how the framework auto-binds
form controls to backing domain object properties for you, with
as-you-type validation.
Finally, you’ll review the BikeForm integration with
the PropertiesCommandExecutor defined in the
previous lab (for editing an existing Bike), and see how to reuse the
BikeForm in a NewBikeWizard in
order to add new bikes to store inventory.
Validation
When a user edits or adds a bike, you want the framework to validate any new data. Furthermore, you want any valida tion errors to be clearly communicated to the user. Lastly, you want the framework to prevent forms that contain validation errors from being submitted.
To hook in validation rules, add the following bean to your root application context:
<beans>
<bean id="rulesSource"
class="com.springbook.richclient.RentABikeValidationRulesSource"/>
</beans>The above definition selects an implementation of the
RulesSource interface that defines validation
rules for the domain entities of your RentABike application. The
implementation is surprisingly simple:
com.springbook.richclient.RentABikeValidationRulesSource
public class RentABikeValidationRulesSource extends DefaultRulesSource {
public ValidationRulesSource( ) {
addRules(createBikeRules( ));
}
private Rules createBikeRules( ) {
return new Rules(Bike.class) {
protected void initRules( ) {
addRequired("model", maxLength(25));
add("weight", gt(0.0));
add("frame", range(0, 100));
addRequired("serialNo", regexp("[0-9a-fA-f]*"));
}
};
}
}The createBikeRules( ) factory method creates the
validation rules for your Bike domain object. The initRules(
) callback adds the following constraints on a
Bike’s properties:
The
modelproperty is required and has a max length of 25.The
weightproperty must be greater than 0.0.The
frameproperty must be in the range 0 to 100, inclusive.The
serialNoproperty is required and must match the provided regular expression.
You now need to implement the form that will be used to add and edit bikes, of course. This form will enforce the above validation rules, and will only be enabled for submit when there are no validation errors:
public class BikeForm extends AbstractForm {
public BikeForm(Bike bike) {
super(bike);
}
public BikeForm(FormModel bikeFormModel) {
super(bikeFormModel);
}
protected JComponent createFormControl( ) {
TableFormBuilder formBuilder = new TableFormBuilder(getFormModel( ));
formBuilder.add("manufacturer");
formBuilder.row( );
formBuilder.add("model");
formBuilder.row( );
formBuilder.add("frame");
formBuilder.row( );
formBuilder.add("serialNo");
formBuilder.row( );
formBuilder.add("weight");
formBuilder.row( );
formBuilder.add("status",
getFormModel( ).createBoundComboBox("status", Bike.STATUSES));
return formBuilder.getForm( );
}
}Pretty simple, huh? I can’t imagine building form
creation being much simpler than this! The
TableFormBuilder above automatically selects,
creates, and binds editing controls for each of the
Bike’s domain object properties. These include the
manufacturer, model, frame, serial number, weight, and status. The
builder also produces properly aligned labels with mnemonics for each
form field. Finally, the form provides as-you-type-validation for
each field, enforcing the declarative validation rules you just
configured!
Now let’s revisit your
PropertiesCommandExecutor implementation to see
again how the BikeForm displays the properties of
a selected Bike in the BikeNavigator view:
private class PropertiesCommandExecutor
extends AbstractActionCommandExecutor {
private BikeForm bikeForm;
public PropertiesCommandExecutor( ) {
// The command should only be enabled when a single object is
// selected in the Bike Tree.
addGuard(new SingleSelectionGuard(bikesTree));
}
public void execute( ) {
// Create a new Bike Form for editing the selected Bike
bikeForm = new BikeForm(getSelectedBike( ));Note
The Bike Form will let us edit the selected Bike’s properties when the Properties command is executed.
// Display the form in a Titled Dialog
TitledPageApplicationDialog dialog =
new TitledPageApplicationDialog(bikeForm, getWindow( )) {
protected boolean onFinish( ) {
bikeForm.commit( );
getRentABike( ).saveBike((Bike)bikeForm.getFormObject( ));Note
Save or update the bike in inventory, using the RentABike façade. Notify the Bike Tree that the selected node may have changed.
                    bikesTreeModel.nodeChanged(getSelectedTreeNode( ));
                    return true;
                }
            };

            // Display the dialog on the screen
            dialog.showDialog( );
        }
    }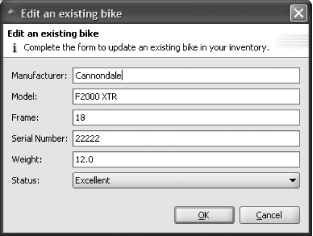
}You now have the form fully integrated with the
PropertiesCommandExecutor of the
BikeNavigator view. When Properties is invoked on
a selected Bike in the navigator tree, the
BikeForm will be displayed, as in Figure 9-3.
Now you’ll want this same Form to be
reused for creating new Bikes.
You’ll want to go back to Lab 2, where you created a
New Menu command group displayed in the File menu and on the Toolbar.
This New Menu group contained a single action command placeholder for
the New Bike command. You’re now ready to replace
that placeholder with a real command instance, which will be a
TargetableActionCommand pointing to a
“New Bike Wizard.”
Recall:
  com.springbook.richclient.window-command-bars.xml

  <bean id="newMenu"
   class="org.springframework.richclient.command.CommandGroupFactoryBean">
    <property name="members">
      <list>
<value>placeholder:newBikeCommand</value> </list>
</property>
</bean>You’ll replace the placeholder with:
  com.springbook.richclient.window-command-bars.xml

  <bean id="newMenu"
   class="org.springframework.richclient.command.CommandGroupFactoryBean">
    <property name="members">
      <list>
<ref bean="newBikeCommand"/> </list>
    </property>
  </bean>
<bean id="newBikeCommand"
class="org.springframework.richclient.command.TargetableActionCommand">
<property name="commandExecutor"/>
<ref bean="newBikeWizard"/>Note
Target the command at the New Bike Wizard. The wizard acts the ActionCommandExecutor for this command.
</property> </bean>
And of course, you can’t forget the definition of
the actual NewBikeWizard itself. Note the wizard
should be defined in richclient-definitions.xml
because it is a singleton service shared by all windows:
    com.springbook.richclient.richclient-definitions.xml

    <bean id="newBikeWizard"
     class="com.springbook.richclient.NewBikeWizard">
         <property name="rentABike">
           <ref bean="rentABike"/>
         </property>
    </bean>
The NewBikeWizard provides the workflow required
to add a new Bike to inventory. On finish (submit), this wizard uses
the rentABike to save the new Bike to the
database.
So what does the wizard work? Take a look at the code for the
NewBikeWizard in Example 9-7. By
now, the consistency and simplicity of the programming model should
really stand out.
Note
The form model for the wizard uses a compound form to edit a single domain object across multiple pages.
public class NewBikeWizard extends AbstractWizard implements ActionCommandExecutor {
    private WizardDialog wizardDialog;
    private FormModel formModel;
    private RentABike rentABike;
    public NewBikeWizard( ) {
        super("newBikeWizard");
    }
    public void setRentABike(RentABike rentABike) {
         this.rentABike = rentABike;
    }
    public void addPages( ) {
        addForm(new BikeForm(formModel));
    }
    public void execute( ) {
        if (wizardDialog == null) {
            wizardDialog = new WizardDialog(this);
            formModel = SwingFormModel.createFormModel(new Bike( ));
        } else {
            // reset the form to a new, "fresh" Bike instance
            formModel.reset( );
        }
        wizardDialog.showDialog( );
    }

    protected boolean onFinish( ) {
        Bike newBike = (Bike)getNewBike( );
        getRentABike( ).saveBike(newBike);
        return true;
    }

    private Bike getNewBike( ) {
        formModel.commit( );
        return (Bike)formModel.getFormObject( );
    }
}
What just happened?
You just built a BikeForm for editing the properties of existing Bikes, as well as new Bikes that have yet to be added to store inventory. You learned how to define validation rules enforced by the Form during the editing process, and how to launch the Form for display in command (controller) execution logic. Finally, you gained a brief insight into Spring Rich’s wizard framework.
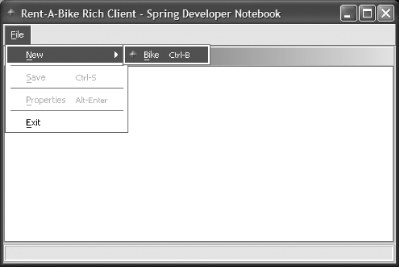
Now if you access the File
→ New
→ Bike command from the
Menu Bar, you’ll see Figure 9-4.
Select the Bike menu item, and the newBikeCommand
invokes the execute( ) method on the
NewBikeWizard, an
ActionCommandExecutor. A
WizardDialog then pops up displaying a
BikeForm for editing a new Bike domain object, as
in Figure 9-5. If the user selects
Finish, edits are committed to the backing form
object and the new Bike is saved to the database. If the user chooses
to Cancel, nothing happens.
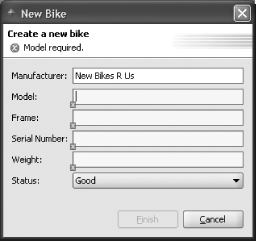
When a property has a validation error, the Finish button is disabled and an visual indicator is shown along with a descriptive error message. Once all validation constraints are satisfied, the validation error is removed and Finish becomes enabled.
What about...
...other Spring frameworks? In this book, we’ve tried to give you a taste of the most exciting open source project to come along since Hibernate. It’s not a complete picture, though. Spring also integrates workflow, management through JMX, dynamic languages with Groovy, richer AOP through AspectJ, and many other frameworks. More projects come monthly.
But you do have all of the tools at your disposal to know how to integrate them. You’ve seen how to structure a typical web application. You’ve learned to attach services to your business logic, adopt a new GUI framework, switch persistence strategies, and write a test with a mock, stub, or POJO. Now, we urge you to stay with Spring through one full development cycle. By doing development, testing, deployment and maintenance with Spring, you’ll see just how much of a difference that it can make for you.