
Chapter 9. Putting It All Together
La commedia é finita! (The comedy is finished!)
In this chapter, we will bring all of the elements discussed so far together into a complete embedded application. Working hard to understand each piece of a system and application is necessary, but certain aspects may remain confusing until all of the pieces are combined. You should leave this chapter with a complete understanding of the example program and the ability to develop useful embedded applications of your own.
Application Overview
The application we’re going to discuss is comprised of the components we have developed thus far, along with some additional functionality. It is a testament to the complexity of embedded software development that this example comes toward the end of this book rather than at its beginning. We’ve had to gradually build our way up to the computing platform that most books, and even high-level language compilers, take for granted.
The Monitor and Control application provides a means for you to exercise different aspects of an embedded system (hardware and software) by adding to the basic command set we provide in this book. You will quickly see, as your project progresses from design to production, how valuable this tool is to everyone working on the project.
Once you’re able to write the Monitor and Control program, your embedded platform starts to look a lot like any other programming environment. The hardest parts of the embedded software development process—familiarizing yourself with the hardware, establishing a software development process for it, and interfacing to the individual hardware devices—are behind you. You are finally able to focus your efforts on the algorithms and user interfaces that are specific to the product you’re developing. In many cases, these higher-level aspects of the program can be developed on another computer platform—in parallel with the lower-level embedded software development we’ve been discussing—and merely ported to the embedded system once both are complete. Once the application level code is debugged and robust, you can port that code to future projects.
Figure 9-1 contains a high-level representation of the Monitor and Control application. This application includes three device drivers and a module for the command-line interface. An infinite loop is used for the main processing in the system. An RTOS can be incorporated into this application should you decide to use one.
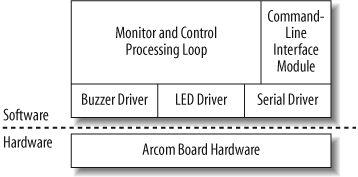
In addition to the Monitor and Control program’s processing loop and the CLI module, three device drivers are shown in the figure. These control one of the Arcom board’s LEDs, a buzzer, and a serial port. This layered design approach allows the drivers to be changed when the program is ported to a new hardware platform, with the application software remaining unchanged.
The main function that follows
contains the primary processing loop for the Monitor and Control
program, which includes functionality that we have explored in previous
chapters (such as sending characters to and receiving characters from a
serial port). Additional functionality includes a driver for the Arcom
board’s buzzer, the ability to assemble incoming characters into a
command, and the ability to process commands. See the online example
code for details about the buzzer driver. Because the Monitor and
Control program accepts user input, a prompt (>) is output when the program is waiting
for the user to enter a command.
#include "serial.h"
#include "buzzer.h"
#include "led.h"
#include "cli.h"

/**********************************************************************
 *
 * Function:    main
 *
 * Description: Monitor and control command-line interface program.
 *
 * Notes:
 *
 * Returns:     This routine contains an infinite loop.
 *
 **********************************************************************/
int main(void)
{
    char rcvChar;
    int  bCommandReady = FALSE;

    /* Configure the green LED control pin. */
    ledInit();

    /* Configure the buzzer control pin. */
    buzzerInit();

    /* Configure the serial port. */
    serialInit();

    serialPutStr("Monitor and Control Program\r\n");
    serialPutChar('>'),

    while (1)
    {
        /* Wait for a character. */
        rcvChar = serialGetChar();

        /* Echo the character back to the serial port. */
        serialPutChar(rcvChar);

        /* Build a new command. */
        bCommandReady = cliBuildCommand(rcvChar);

        /* Call the CLI command processing routine to verify the command entered
         * and call the command function; then output a new prompt. */
        if (bCommandReady == TRUE)
        {
            bCommandReady = FALSE;
            cliProcessCommand();

            serialPutChar('>'),
        }
    }

    return 0;
}
Working with Serial Ports
We looked at a serial driver in Chapter 7. The Monitor and Control program uses the same serial driver with some additional functionality.
One change to the serial driver is the addition of a “put string”
function, serialPutStr. This
function, which follows, allows strings to be sent out the serial port
through a single call rather than having to specify each character in
order. This is similar to the standard C printf function, which calls the serialPutChar function repeatedly until the
entire string has been transmitted out the serial port.
/**********************************************************************
 *
 * Function:    serialPutStr
 *
 * Description: Outputs a string to the serial port.
 *
 * Notes:
 *
 * Returns:     None.
 *
 **********************************************************************/
void serialPutStr(char const *pOutputStr)
{
    char const *pChar;

    /* Send each character of the string. */
    for (pChar = pOutputStr; *pChar != '\0'; pChar++)
        serialPutChar(*pChar);
}
Command-Line Interface Processing
The command-line interface module is responsible for building
the incoming command, parsing a completed command, and executing the
function associated with the command. The command-line interface module
contains two functions to handle these tasks: cliBuildCommand and cliProcessCommand.
The command_t struct has two
members: the command name (defined by the pointer name), and the function to execute when the
command is entered (defined by the pointer to a function function).
The command table, gCommandTable, is a command_t type array. The last command name
and function in the table are set to NULL in order to aid the command lookup
procedure. Additional commands can be added by following the format
shown, but new commands must be added before the terminating last
command.
You may notice that a macro called MAX_COMMAND_LEN is defined. Command names must
be less than or equal to the maximum command length. The following code
shows the command struct type and the command table:
#define MAX_COMMAND_LEN             (10)
#define COMMAND_TABLE_SIZE          (4)

typedef struct
{
    char const    *name;
    void          (*function)(void);
} command_t;

command_t const gCommandTable[COMMAND_TABLE_LEN] =
{
    {"HELP",    commandsHelp,},
    {"LED",     commandsLed, },
    {"BUZZER",  commandsBuzzer, },
    {NULL,      NULL }
};
As characters are received from the serial port, the main
processing loop calls the cliBuildCommand function, as we saw earlier in
this chapter. Once a completed command is received, indicated by a
carriage return (\r) character, the
buffer index is reset and the function returns TRUE. Otherwise, the buffer index is
incremented and FALSE is
returned.
cliBuildCommand stores the
incoming characters in a buffer called gCommandBuffer. The gCommandBuffer has enough room for a single
command of MAX_COMMAND_LEN size plus
one additional byte for the string-terminating character. Certain
characters are not stored in the command buffer, including line feeds
(\n), tabs (\t), and spaces.
Notice that the incoming characters are converted to uppercase
(with the macro TO_UPPER) prior to
insertion into the buffer. This makes the command-line interface a bit
more user-friendly; the user does not have to remember to use
capitalization to enter valid commands.
The local static variable idx
keeps track of the characters inserted into the command buffer. As new
characters are stored in the buffer, the index is incremented. If too
many characters are received for a command, the index is set to zero and
TRUE is returned to start processing
the command.
#define TO_UPPER(x)        (((x >= 'a') && (x <= 'z')) ? ((x) - ('a' - 'A')) : (x))

static char gCommandBuffer[MAX_COMMAND_LEN + 1];

/**********************************************************************
 *
 * Function:    cliBuildCommand
 *
 * Description: Put received characters into the command buffer. Once
 *              a complete command is received return TRUE.
 *
 * Notes:
 *
 * Returns:     TRUE if a command is complete, otherwise FALSE.
 *
 **********************************************************************/
int cliBuildCommand(char nextChar)
{
    static uint8_t idx = 0;

    /* Don't store any new line characters or spaces. */
    if ((nextChar == '\n') || (nextChar == ' ') || (nextChar == '\t'))
        return FALSE;

    /* The completed command has been received. Replace the final carriage
     * return character with a NULL character to help with processing the
     * command. */
    if (nextChar == '\r')
    {
        gCommandBuffer[idx] = '\0';
        idx = 0;
        return TRUE;
    }

    /* Convert the incoming character to uppercase. This matches the case
     * of commands in the command table. Then store the received character
     * in the command buffer. */
    gCommandBuffer[idx] = TO_UPPER(nextChar);
    idx++;

    /* If the command is too long, reset the index and process
     * the current command buffer. */
    if (idx > MAX_COMMAND_LEN)
    {
        idx = 0;
        return TRUE;
    }

    return FALSE;
}
Once a completed command is assembled, the cliProcessCommand function, which follows, is
called from the main processing loop. This function loops through the
command table searching for a matching command name.
The variable idx is initialized
to zero to start searching at the beginning of the command table and
then keeps track of the command currently being checked. The function
strcmp is used to compare the user
command with the commands in the table. If the command is found, the
flag bCommandFound is set to TRUE. This causes the search loop to exit and
the associated function to execute. If the command is not found, an
error message is sent out the serial port.
#include <string.h>

/**********************************************************************
 *
 * Function:    cliProcessCommand
 *
 * Description: Look up the command in the command table. If the
 *              command is found, call the command's function. If the
 *              command is not found, output an error message.
 *
 * Notes:
 *
 * Returns:     None.
 *
 **********************************************************************/
void cliProcessCommand(void)
{
    int bCommandFound = FALSE;
    int idx;

    /* Search for the command in the command table until it is found or
     * the end of the table is reached. If the command is found, break
     * out of the loop. */
    for (idx = 0; gCommandTable[idx].name != NULL; idx++)
    {
        if (strcmp(gCommandTable[idx].name, gCommandBuffer) == 0)
        {
            bCommandFound = TRUE;
            break;
        }
    }

    /* If the command was found, call the command function. Otherwise,
     * output an error message. */
    if (bCommandFound == TRUE)
    {
        serialPutStr("\r\n");
        (*gCommandTable[idx].function)();
    }
    else
        serialPutStr("\r\nCommand not found.\r\n");
}
All functions in the command table are contained in one file; this
keeps the entry point for all commands in a single location. The
commandsLed function toggles the
green LED, as shown in the following code. This function uses the same
ledToggle function covered in Chapter 3.
#include "led.h"

/**********************************************************************
 *
 * Function:    commandsLed
 *
 * Description: Toggle the green LED command function.
 *
 * Notes:
 *
 * Returns:     None.
 *
 **********************************************************************/
void commandsLed(void)
{
    ledToggle();
}
The commandsBuzzer function
toggles the buzzer on the Arcom board add-on module by calling the
function buzzerToggle, as shown
here:
#include "buzzer.h"

/**********************************************************************
 *
 * Function:    commandsBuzzer
 *
 * Description: Toggle the buzzer command function.
 *
 * Notes:
 *
 * Returns:     None.
 *
 **********************************************************************/
void commandsBuzzer(void)
{
    buzzerToggle();
}
The help command function, commandsHelp, loops through the gCommandTable and sends the command name out
the serial port. This gives the user a listing of all commands supported
by the command-line interface.
#include "cli.h"
#include "serial.h"

/**********************************************************************
 *
 * Function:    commandsHelp
 *
 * Description: Help command function.
 *
 * Notes:
 *
 * Returns:     None.
 *
 **********************************************************************/
void commandsHelp(void)
{
    int idx;

    /* Loop through each command in the table and send out the command
     * name to the serial port. */
    for (idx = 0; gCommandTable[idx].name != NULL; idx++)
    {
        serialPutStr(gCommandTable[idx].name);
        serialPutStr("\r\n");
    }
}
The Monitor and Control program gives you a baseline of
functionality for the development of a useful command-line interface.
The functionality of the CLI can be extended by adding new commands or
enabling users to input parameters for commands. To accommodate input
parameters, the command_t structure
can be expanded to contain the maximum and minimum values. When parsing
the command, you will need to parse the input parameters and validate
the parameter ranges with those contained in the command table.