Chapter 12. Exact Forms: Creating Sophisticated Documents
QuickBase gives you some terrific ways to put your information to work. For example, you can display data in a bunch of different ways using reports, share information by email, print charts (Chart Reports), and export QuickBase data into other programs (Exporting Data). And even though QuickBase is an online database, there’s an easy way to get your data into routine business documents, like invoices and letters. By customizing a special template called an exact form, you can insert QuickBase data into a Microsoft Word document. Then, just like any document, you can format, print, and send it out into the world.
Exact forms let you insert your QuickBase data into the appropriate places in a letter, report, or invoice. If you’ve ever used Word’s mail merge tool to grab names and addresses from one source and place them in just the right spot in letters or on envelopes, you’ll feel right at home with exact forms. And while you can use QuickBase to do a mail merge, you can use exact forms to do a whole lot more. Consider the possibilities:
Monthly invoices that automatically generate not just the total amount owed, but a list of current orders.
Personalized sales or fundraising letters.
Reports to shareholders or customers, presenting up-to-the-minute data.
Progress reports that show the current status of a project’s open tasks, sorted and grouped by team member and priority, to distribute at weekly meetings.
Whatever information your QuickBase application holds, you can get that information into a Word document of your own design. You can even tell QuickBase to insert your company logo or other stored image.
To create exact forms, here’s what you need (beside QuickBase, of course):
Microsoft Word 2000, 2002 (which is part of Office XP), or 2003. At this writing, these are the only versions that work with exact forms.
Microsoft Internet Explorer 6.0 (or higher) for Windows or Mozilla Firefox Web browser.
Administrator-level permission in QuickBase. In other words, if you can create an application, you can create an exact form.
Note
Currently, exact forms do not work with Word 2007.
Once you’ve got the right software and the right permission level, here’s the basic outline for creating exact forms:
Download the exact forms template from QuickBase and then open it on your computer.
Design your form in Word, saving the template to QuickBase when you’re done.
Go to your QuickBase application and print the exact form–generated documents.
This chapter shows you, step by step, how to get the most from this powerful QuickBase feature.
Downloading and Opening the Template
Because you create and edit exact forms in Microsoft Word, the first thing you need is QuickBase’s Exact Forms template, which lets you create a Word document and use field codes (Using Field Codes to Place Information) and formulas (Writing Formulas) that tell QuickBase what data to insert into your text. A Word template is a predesigned page you can use to generate new documents—in this case, a form. The QuickBase exact forms template also contains bits of code called macros (see the box in What’s a Macro?) that let QuickBase understand and use the codes and formulas in your form.
You only have to download QuickBase’s exact forms template once. After you’ve got it on your computer, just double-click it whenever you want to create a new exact form or edit an existing one.
Downloading the Exact Forms Template
You create exact forms using a special Word template that allows you to get that QuickBase data into a Word document. You can find the template from within any application:
From the menu bar, choose Help→Application Site Map.
QuickBase opens the Site Map, showing everything you can do in an application. Smack in the middle of the page is a section called Forms; in that section is an Exact Forms link.
Click the Exact Forms link.
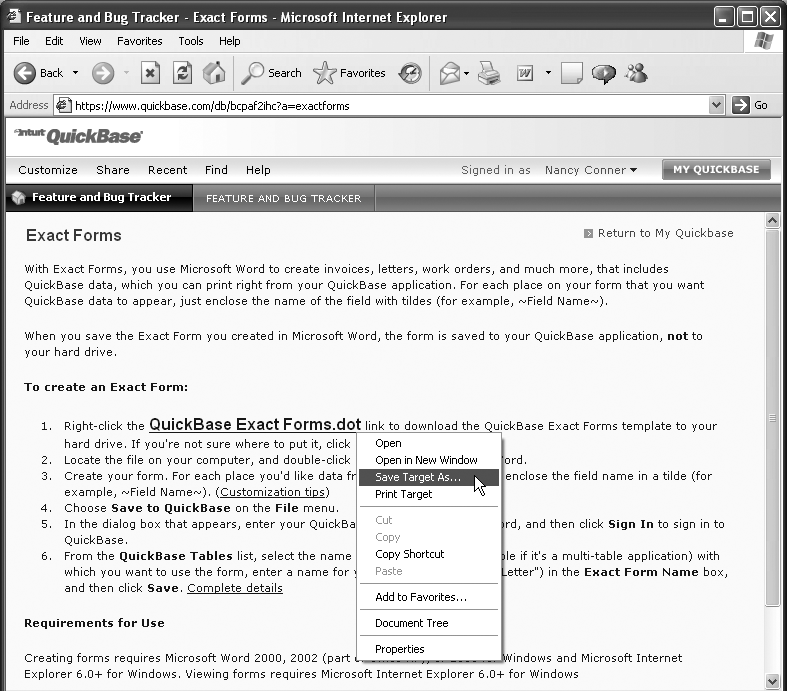
The Exact Forms page opens, showing you some general information about exact forms. Look for the QuickBase Exact Forms.dot link that lets you download the template. As shown in (Figure 12-1), the link appears in large letters in the middle of the page.
Right-click the QuickBase Exact Forms.dot link. From the shortcut menu that appears, select Save Target As (in Internet Explorer) or Save Link Target As (in Firefox).
A window opens, asking where you want to save the file.
Keeping the same name (QuickBase Exact Forms.dot), specify a location to save the template (the desktop is a good place, making it easy to find and open the template later).
Your computer downloads the file and saves it where you indicated. You’re ready to use the template to create an exact form.
Open the Template
After you’ve downloaded the template, look for it wherever you told your computer to save it. For example, if you downloaded the template to your desktop, look on the desktop for QuickBase Exact Forms.dot. Double-click the template to open it. When you open the template, Word launches (if it’s not already open). Depending on Word’s security settings, you may see a message box asking whether it’s okay for Word to run the macros in the template. (See the box in What’s a Macro? for the scoop on macros).
Tip
To view or change Word’s security settings for macros, choose Tools→Options (in Word). Click the Security tab, and then click the Macro Security button. Possible settings are Low, Medium, High, and Very High. In general, the High setting offers both good security and a measure of control over which macros Word disables.
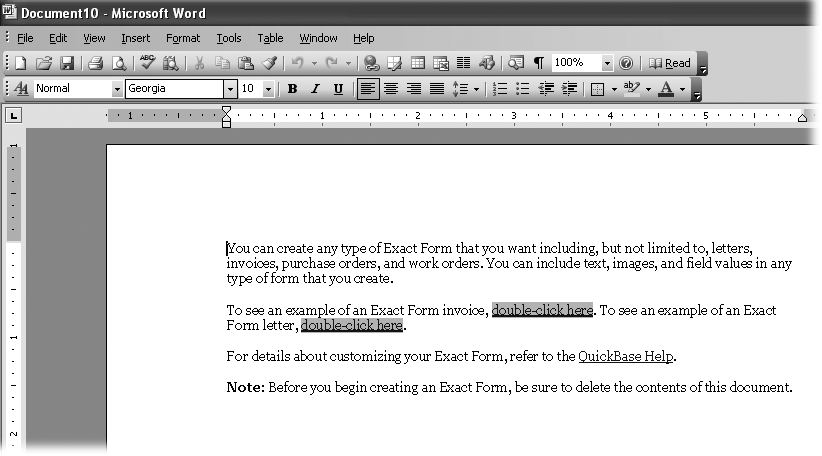
The template itself, shown in Figure 12-2, contains some advice for getting started and links to sample forms you can use for a little inspiration in designing your own. Before you start designing an exact form, don’t forget to delete this introductory text.
Note
If you have another Word document open when you’re working with the exact forms template, you might find that the options in the other document’s File menu change to list the template’s options (for example, Open becomes Open from QuickBase and Save becomes Save to QuickBase). Things go back to normal after you close the exact forms template. But if Word asks whether you want to save the changes to the template for your non-QuickBase document, select No. You don’t want to overwrite your standard template for most Word documents (that template goes by the name of normal.dot).
Designing Exact Forms
There’s an art to designing an exact form. You’ve got to become adept at field codes and a few other formulas, but the huge benefit of slipping current QuickBase data into your documents is worth the learning curve. Plus, the folks at Intuit have made it easy to get started. As shown in Figure 12-2, the QuickBase Exact Forms template already has some content to get you started. If you want to compose a letter or send out invoices, you’re in luck—the template has links to examples of these documents. Just double-click the appropriate link to open another Word document that contains the sample form. A tweak or two of the invoice, perhaps, and you’re ready to save your own exact form.
Using Field Codes to Place Information
Even if you’re designing your exact form from scratch, it’s easy to get started. The main thing to understand is field codes, which tell QuickBase which fields to use in your document. Whenever you want to insert data from a QuickBase record, type the field name surrounded by tildes (~), like this:
~First Name~ ~Last Name~
When QuickBase sees those field codes in your exact form, it looks in the field you’ve named and replaces the code with the actual field contents. So, when QuickBase looks at the record for Guy W. Sinclair, for example, where you’ve typed ~First Name~ into the exact form, QuickBase inserts Guy, and where you’ve typed ~Last Name~, QuickBase inserts Sinclair. And so on through all the records.
Warning
Pay careful attention to the capitalization and spelling of your application’s field names. For field codes to work, the field name within the code must match the field’s name exactly. For example, if you use ~lastname~ as a field code in your form but the field’s actual label in the application is Last Name, QuickBase won’t insert the contents of the Last Name field into your document.
Use field codes as placeholders for the data you want QuickBase to insert. Here’s an example of field codes in a letter. If you type this:
~First Name~ ~Last Name~
~Company Name~
~Address~
~City~, ~State~ ~Zip~
Dear ~First Name~,
Thank you for your order, ~PO Number~…
QuickBase inserts the contents of those fields, making the result look something like this;
Boris Karloff
Spare Parts, Inc.
123 Cemetery Lane
Frankenstein, MO 65016
Dear Boris,
Thank you for your order, QT-7462…
Inserting a Date Using Formulas
If you want to add a date to your exact form, you use a formula instead of a field code. The formula’s code tells Word what date to display, and also specifies the date’s format. For example:
To display today’s date in this format—November 23, 2007—use this formula: ~=date = new Date();qdb.format(date.getTime(), “date friendly”)~
To display today’s date in this format—11/23/2007—use this formula: ~=date = new Date();qdb.format(date.getTime(), “date”)~
Of course, you don’t always want today’s date when you’re printing out a batch of letters or invoices; the letters might not go into the mail until tomorrow or the next day. To prevent your exact forms from looking like old news before they even leave the office, use these formulas:
To display tomorrow’s date in this format—November 30, 2007—use this formula: ~=date = new Date();qdb.format(date.getTime()+(24*3600000), “date friendly”)~
To display tomorrow’s date in this format—11/30/2007—use this formula: ~=date = new Date();qdb.format(date.getTime()+(24*3600000), “date”)~
To display the day after tomorrow’s date in this format—December 1, 2007—use this formula: ~=date = new Date();qdb.format(date.getTime()+(24*2*3600000), “date friendly”)~
To display the day after tomorrow’s date in this format—12/1/2007—use this formula: ~=date = new Date();qdb.format(date.getTime()+(24*2*3600000), “date”)~
Note
You can keep going with the days—three days from today, four days from today, and so on—by replacing the n in (24*n*3600000) with the number of days you want. So four days from today would be (24*4*3600000), a week from today would be (24*7*3600000)—and so on, using whatever number you want.
Adding an Image Stored in QuickBase
There are two ways you can add an image to your exact form. The method you use depends on whether you want to insert an image that’s attached to a record or whether you want to add a particular image (like your corporate logo) to each document that you print out.
Inserting images from QuickBase records
If you have an image attached to each record in an application—a product photo, for example—you can include those images in an exact form. To add the image, just place the field’s name between tildes to create a field code. For example, if your image field is called ProdPic, type ~ProdPic~ in your exact form where you want to place the image.
Adding the same image to every document
Putting an image—your organization’s logo, for example—on every document you print is a neat trick, but it takes a little setting up. Before you can put an image on the documents generated by an exact form, you first have to store the image somewhere in QuickBase, so QuickBase can find it when printing out your documents. In addition, you must store the image in an application that’s accessible to “Everyone on the Internet.” (As Come to My QuickBase Party explains, when you create an application, one of the groups included in the new application is Everyone on the Internet.) Often, you’ll grant this role a permission level of No Access. But for your exact forms to print a logo on your documents, you need to make sure the application where you store the image is accessible to Everyone on the Internet.
Don’t worry, you don’t have to grant Everyone on the Internet full access to your application. Viewer-level permission works just fine. If your application already gives access to Everyone on the Internet—or if you don’t mind giving the Everyone on the Internet role some level of access—simply create a new field in the application to store the image. Assign your new field the field type File Attachment. Then add a new record (Add or Modify a Record) to the application, using the new File Attachment field to hold the image file.
Tip
If you don’t want to make your application accessible to Everyone on the Internet, create a new document library application. A document library can hold any kind of file, including graphics files. When you create your new document library, grant access to Everyone on the Internet, and then add a new record to store your logo there. You don’t have to use this application for anything else.
Once you’ve stored the image on QuickBase, you can add an image link to your exact form. Here’s how:
Make sure that your logo is stored in QuickBase, in an application accessible to Everyone on the Internet. Open the record that holds the image, and then click the file name (it might be something like logo.gif or image.png) to display it.
A new browser window opens, showing the record.
Right-click the image.
A context menu pops up.
Select Copy Shortcut (in Internet Explorer) or Copy Image Location (in Mozilla Firefox).
You computer copies the image location onto the Clipboard.
In Word, open the exact form in which you want to place the logo. Position the insertion point where you want the logo to appear, and then select Insert→Picture→From File.
The Insert Picture dialog box opens. At the bottom of the dialog box is a box called “File name.”
Click in the “File name” box, and then paste your image’s QuickBase location.
Word gives you three different ways to paste your image: press Ctrl+V; click the Standard toolbar’s Paste button, which looks like a miniature clipboard; or select Edit→Paste. Pick your favorite. Next, look at the Insert Picture dialog box’s Insert button—it’s not just a button, it also has a little, downward-pointing arrow.
Click the Insert button’s arrow. From the shortcut menu that appears, select Link to File.
Word inserts your image and creates a link in the document.
Inserting a Table of Detail Records
You can send out an invoice that simply shows the total amount your customer owes, but if you do, you’re likely to field some phone calls asking for the details—like a list of the products you’re invoicing. The smarter approach is to include those details right on the invoice. You can have your exact form find those details and embed them in your invoice using QuickBase’s Report Link field. In a nutshell, when you create a relationship that links two tables, you designate one table as the master table and the other as a details table. One record in the master table (Invoices, for example) links to many records in the details table (Orders, for example). The Report Link field is a field that appears in the master table as a hyperlink. When you click the link, QuickBase shows related records from the details table. Say you’re looking at the Invoices table and you want to get a quick peek at all the orders for a particular customer. The Orders field is a Report Link field that shows a hyperlink. You click the link, and QuickBase displays all orders for that customer. Report Link fields are a great way to let users zip from one table to related information in another. (Read all about Report Link fields in Report Link Fields.)
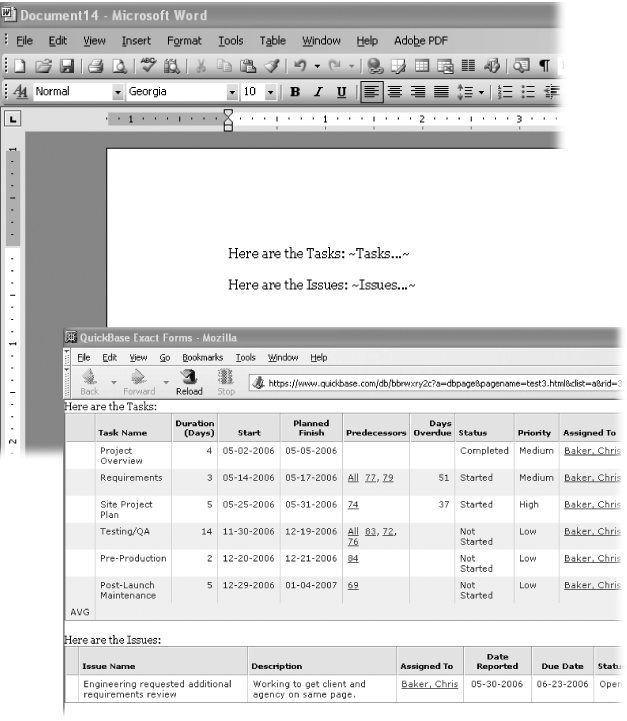
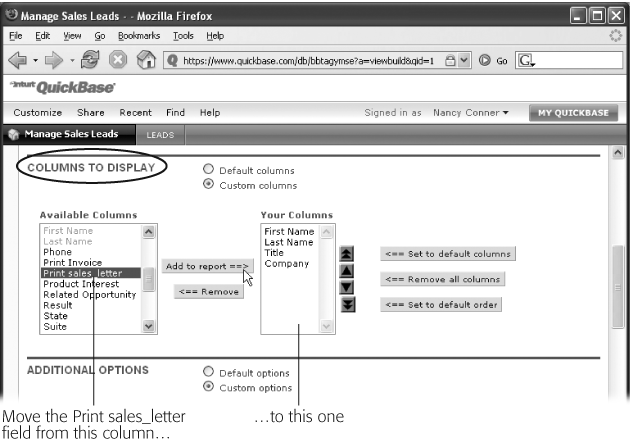
You can put Report Link fields to work in your exact forms. First, find the name of the Report Link field: For example, check out the list of field names that appear on the Fields tab when you select Customize→Tables, and look in the Type column for Report Link. Once you know the name of the Report Link field that links to the records you want, treat it like any other field code by inserting it in your exact form between tildes. So if you want your invoice to list individual orders and the name of the Report Link field is Orders, type ~Orders~ where you want the list to appear. When your exact form generates this month’s invoices, each invoice lists that customer’s individual orders related to that specific invoice. Figure 12-3 shows an example of Report Link fields at work.
Choosing Which Columns Appear in an Embedded Table
When you insert a table into the documents generated by an exact form, you can use formulas to specify which columns appear in the embedded table and how to sort and group its records. In essence, these formulas tell QuickBase to perform some sort of calculation on your table. Chapter 11 gives you the lowdown on working with formulas, but here’s how to use them to format tables that you embed in your exact form–generated documents.
To format embedded tables, you need to add database and field identifiers to your formulas:
Database identifier. QuickBase uses this unique string of text to identify a particular database. To find the database identifier (dbid), open the report you want and look at the Web address in your browser’s address bar. Between the first part of the Web address (https://www.quickbase.com/db/) and the question mark (?) is a string of letters or letters and numbers. This text string is the table’s database identifier. So in this Web address: https://www.quickbase.com/db/bbrwxryz9?a=q&qid=1, the database identifier is bbrwxryz9.
Field identifier. As its name suggests, a field identifier (fid) is how QuickBase tells one field in a table apart from all the others. You can find a field identifier for a particular table by selecting Customize→Tables. Make sure the Fields tab is selected and, if necessary, choose a table from the left-hand list. Find the field you want, and follow its row to the right, to the Field ID column, which shows the number that’s the fid for each field. When you’ve got the number, you’ve got that field’s fid.
Tip
If you don’t see a Field ID column on the Fields tab of the Tables page, click the lower-right button labeled Show Field IDs. QuickBase adds the Field ID column to the list of fields.
If you don’t tell QuickBase which columns you want to display in an embedded table, QuickBase uses the default order (Figure 2-16) for those columns. If, however, you want the embedded table to display only certain columns or to display columns in a particular order, you can tell QuickBase to do that by putting your own values into this formula:
~=qdb.GetURL("targetdbid",
         "API_GenResultsTable^query={'10'.EX.'"+ field["Source
         Field"]+"'}^clist=18.17.21.22.24^options=nvw.ned.phd.nfg.sortorder-A^slist=3");~
To get this formula to work, you have to make some substitutions with actual information from the application for which you’re creating the exact form:
Replace targetdbid (the target database identifier) with the database ID of the details table that will produce the embedded table in your document.
Replace the number 10 with the field identifier of the target field in the details table. (Usually, this is a reference field. To find a table’s reference fields, select Customize→Tables, make sure the Fields tab and the table you want are selected, and then look in the Info column.)
Replace the words Source Field with the actual name of the master table’s source field, usually the key field.
Replace the string of numbers 18.17.21.22.24 with a list of field identifiers that match the columns you want to display. Start with the fid of the column that you want to appear at the far left of your table, and separate fids with periods. In this case, the field whose fid is 18 would be the leftmost column, followed by the field whose fid is 17, and then 21, and so on.
Replace the number 3 with the fid of the field you want to use for sorting (Table Reports).
Besides choosing only certain columns and putting them in a certain order, you can also tell QuickBase to display just certain records. This comes in handy when you’re printing out invoices, for example, and you want the embedded table to show only those orders whose status is unpaid. The formula looks a lot like the previous formula for displaying certain columns, with a new section added:
~=qdb.GetURL("targetdbid",
         "API_GenResultsTable^query={'10'.EX.'"+ field["Source
         Field"]+"'}AND{'15'.EX.'criterion'}^clist=18.17.21.22.24^options=
         nvw.ned.phd.nfg.sortorder-A^slist=3");~
In this formula, the same substitutions you made for selecting certain fields apply. In the new section—AND{’15’.EX.'criterion'}—make these substitutions, as well:
For the number 15, substitute the field identifier from the details table that QuickBase will use to select a group of records from that table. For example, if you want to print only those records marked Unpaid in the Status field, use the fid of the Status field.
For the word criterion, substitute the actual criterion you want QuickBase to use in selecting certain records. In the example, you’d use the word Unpaid.
By selecting and printing only pertinent records in an embedded table, you can avoid confusing your customers (“Why does the invoice show this order I paid for last month?”) and maybe even spare a few trees.
There’s another neat trick you can do when embedding tables in exact form–produced documents. Normally, an embedded table doesn’t group the records it displays into subtotals. If you want the table to show subtotals, use this basic formula:
~=qdb.GetURL("targetdbid",
         "API_GenResultsTable^query={'10'.EX.'"+ field["Source
         Field"]+"'}^options=
         nvw.ned.phd.nfg.sortorder-A.groupby-V^slist=3");~
To make this formula your own, make the same substitutions you made earlier for targetdbid, the number 10, and the phrase Source Field. For the number 3, substitute the fid of the field in the details table that you want QuickBase to group for subtotaling.
Saving Your Exact Form
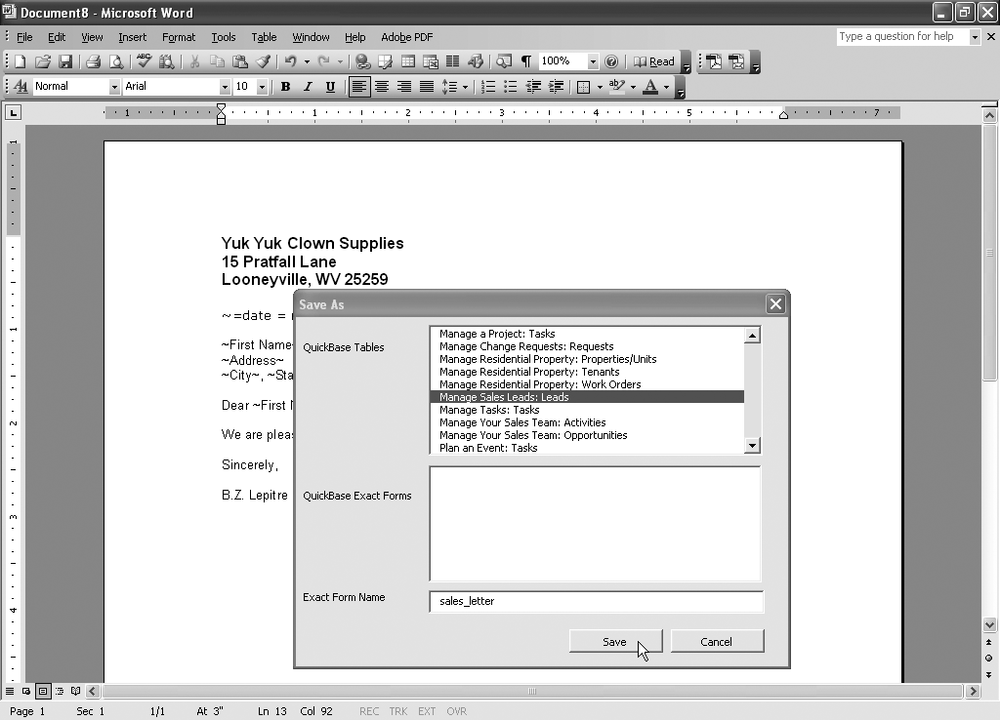
After you’ve created and customized your form, you’re ready to generate documents. Well, almost ready: First you have to save the form. Because your exact form draws information from your QuickBase tables to create documents, you save the form in QuickBase—not on your computer’s hard drive. So when you’ve created and customized your exact form, follow these steps to save it:
From within Word, select File→Save to QuickBase.
A dialog box opens, asking you to sign in to QuickBase.
Type your QuickBase user name (if it’s not already filled in) and password, and then click Sign In.
The Save As dialog box (Figure 12-4) opens, listing all the tables in your QuickBase applications.
Select the table that your exact form will get its data from.
If there are any exact forms currently associated with that table, they appear in the QuickBase Exact Forms box. If you’re updating an existing form, click that form’s name to put it in the Exact Form Name box.
Type the name of your new form in the Exact Form Name box, and then click Save.
QuickBase saves your form and displays a confirmation box.
Click OK.
Now you can open the application in QuickBase and print out documents from your exact form (the next section tells you how).
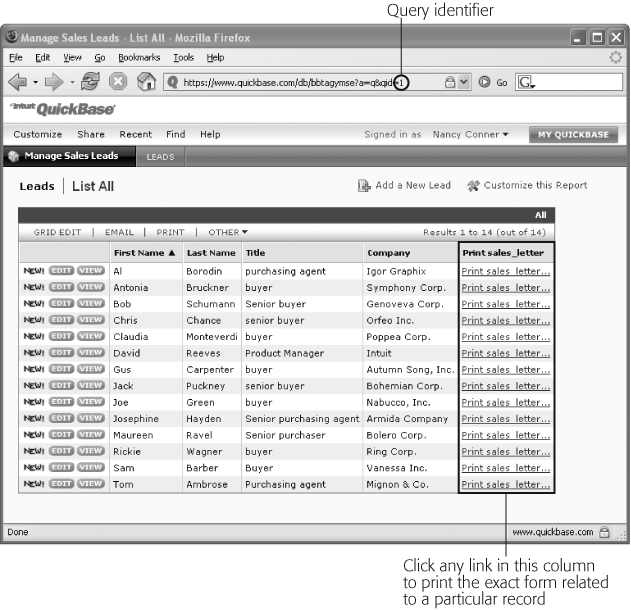
QuickBase saves your form as a set of HTML pages—one page for each record in the table. To store those pages, QuickBase creates a new field in the table where you save the form. In Figure 12-5, the new field is the far-right column labeled “Print sales_letter.” (This column header reflects the name you give your exact form when you save it. So if you name the form Invoice, for example, the column says Print Invoice). Each row in the Print column holds a link that opens the document your exact form generates: the finished sales letter or invoice (or whatever) for that record. Click any link to open a new browser window that shows the document for that record. When you print your documents, as described in the next section, you’re actually printing these HTML pages.
Note
When you exit Word or close the document that contains the exact form you’ve created, Word (as is its habit) asks you whether you want to save the changes. As long as you’ve saved the form to QuickBase, which is where you need the form saved, choose No. Your QuickBase exact forms don’t do you any good sitting on your computer’s hard drive—you need to save them in QuickBase.
Printing Your Documents from an Exact Form
Now that you’ve done the work of creating, customizing, perfecting, and saving your exact form, you don’t want it just to sit in QuickBase, never seeing the light of day. The whole point of creating an exact form is to make it easy to get the details of a QuickBase application into printed documents. Printing an exact form is about as easy as clicking a link:
In the application that holds the exact form, open a report where you can see the Print <Your Exact Form Name> field. Find the record you want to print, and thenclick the link in the Print <Your Exact Form Name> column.
A new browser window opens, displaying the document.
Check to make sure the document looks the way you want it to. (If it doesn’t, go back and make adjustments to your exact form, and then save the changes.) Click File→Print.
The Print dialog box opens.
Check the print settings and click OK.
Your printer spews out a hard copy of the document, with the QuickBase data inserted.
Tip
If you don’t want the words QuickBase Exact Forms, date, time, and all that other stuff to print at the top of your documents, choose File→Page Setup after step 1 of the above instructions. In the Page Setup box, remove unwanted content from the header and footer. In Internet Explorer, click inside the Header and Footer text boxes and delete any content there. In Firefox, click the Margins & Header/Footer tab, and then set all parts of the header and the footer to “blank.” Click OK, and then jump back into the printing process at step 2.
Printing out one document generated by an exact form is all well and good, but you’re more likely to need to print whole batches of letters, invoices, work orders, purchase orders, and so on.
To print exact-form documents for all the records in a table, start by finding the query identifier for the report that contains the records you want to print. A query identifier (also known as a qid) is how QuickBase distinguishes one particular report from all the others. The qid is easy to find. Open the report you want (such as a Customers table holding the exact form), and then look at the Web address in your browser’s address bar. The very last number of the Web address is that report’s qid (Figure 12-5). It appears at the end of a text string that looks like this: &qid=. Immediately after the equals sign is a number (which can be more than one digit) that represents the query identifier. When you’ve found the qid, either memorize the number, write it down, or select and copy it.
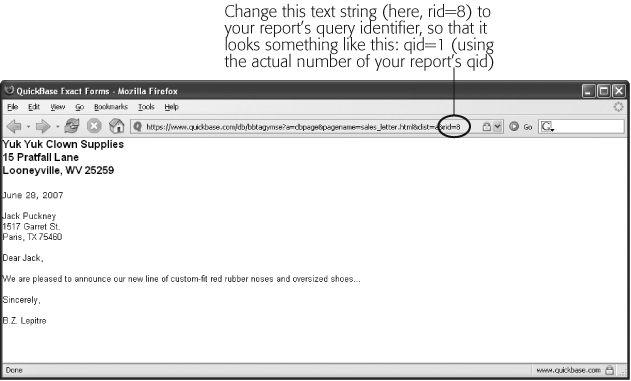
After you know the qid for the report that holds the records you want to print, click the “print <Your Exact Form Name>” link for any record. A new browser window opens, just as in step 1 of printing individual records. To make QuickBase print all the records in your chosen report instead of just that one, you’ll make some changes to the Web address that appears in the address bar of this window. At the end of the Web address is the text string &rid= followed by some number, as shown in Figure 12-7. Change this text string to point to your report’s query identifier. So, for example, if your qid number is 15, change rid to qid and change the number after the equals sign to 15. In other words, you’re changing the letters rid to qid and making sure the number at the end is the query identifier of the report you want.
After you’ve adjusted the Web address, click Enter. QuickBase displays all the records of your report in one document. When you print the document (Print a Report), you get all the records, one per page.
Editing an Exact Form
Some exact forms you can use over and over again, just as they are. Once you’ve created an exact form to print out invoices, for example, you can use that same form at intervals to generate invoices for the current records in the Invoices table.
Other exact forms, though, you’ll want to change over time. For example, a quarterly fundraising letter for a nonprofit will probably say something a little different each time you send it out. After all, you’ll want to keep potential donors informed of recent developments, new initiatives, and why you need more money on top of what they already sent last quarter. For a case like this, you don’t have to create a whole new exact form for each new version of the fundraising letter—you can edit an existing form, fleshing out your new letter on the bones of the old.
When you want to modify an exact form you created previously, here’s what you do:
Open the exact forms template (QuickBase Exact Forms.dot) by double-clicking it.
If you don’t already have Word open on your computer, the template starts it up. The template opens in Word.
From within Word, choose File→Open from QuickBase.
A QuickBase sign-in box appears.
Type in your sign-in information and click Sign In.
The Open box appears, looking very much like the Save As box shown back in Figure 12-4.
In the Open box’s QuickBase Tables list, find and select the table that has the exact form you want to modify.
When you select a table that has exact forms associated with it, the names of the forms appear in the QuickBase Exact Forms section.
Choose the exact form you want to change, and then click Open.
Word opens the form, ready for you to edit.
Now you can make whatever changes you want—rearrange fields, add new text, alter the date from tomorrow to next Tuesday, and so on. (Downloading and Opening the Template describes your various options for customizing an exact form.)
When your new and improved form is all set, save it to QuickBase (Saving Your Exact Form). If you’re editing an existing form, then you’ve got two options for how you save it:
If you want to overwrite the previous version of the form, choose File→Save to QuickBase. QuickBase updates the existing exact form and displays a confirmation prompt to tell you it’s saved your changes.
If you want to preserve the previous version of the form and save this one with a different name, choose File→Save to QuickBase As. The Save As dialog box (shown in Figure 12-4) appears. Select the table where you want to save the form, give the form a descriptive name in the Exact Form Name text box (something like Fundraising Letter Spring 08 works well), and then click Save. QuickBase confirms that it’s saved the form. Now you can go to the application and print out your documents (Printing Your Documents from an Exact Form).
Deleting an Exact Form
They say all good things must come to an end, so there may well come a time when you no longer need an exact form you created. Just as you open, save, and print exact forms from your QuickBase application, you also delete them from there.
You can delete an exact form in a flash:
Open the application that holds the form and select Customize→Application, and then click the Pages tab.
The application’s Pages tab, shown in Figure 12-8, opens. Here you see all the different pages associated with your QuickBase application.
Find the exact form you want to delete. Its name ends with .html and its type, of course, is Exact Form. Click the far right Delete button.
QuickBase asks whether you’re sure you want to delete the form. (Be extra certain, because once you’ve deleted it, you can’t get it back.)
Click “Yes, delete it.”
Poof! Your exact form disappears.
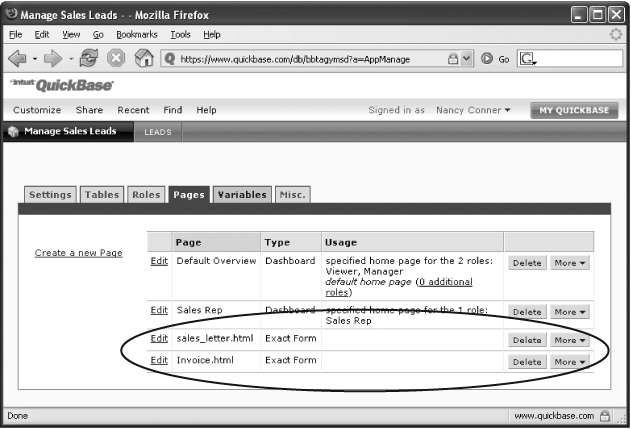
Note
In Figure 12-8, you may have noticed that there’s an Edit link to the left of each exact form. If you click it, though, you’d better be fluent in HTML (hypertext markup language). When you click Edit, QuickBase opens a text editor that displays your exact form—along with all the code QuickBase uses to display it. If you don’t know HTML, you’re likely to mess up your form by trying to edit it here. Bottom line: The best, easiest, most foolproof way to edit an exact form is to follow the steps listed in Editing an Exact Form .