
IN THIS CHAPTER
In this chapter, we'll take all the pieces of half-baked gameness from other chapters and blend them together to achieve a full-fledged, professional version of Micro Racer. But first, let's recap.
The bad news, plainly put, is that programming advanced games for handheld devices is a total pain. Compared to a desktop system, the screens are miniscule, the user interface is barbaric, the memory is limited, network connectivity is slow and choppy, and the processor is laughable.
Programming in a language like Java only adds a layer onto this hard-to-digest cake. Sun's Kilobyte virtual machine (KVM) gets its name because it takes up a few kilobytes of space. But even those few bytes are wasteful. The KVM also usurps a fair bit of memory. In addition, Java classes have the added overhead of a slow startup. While startup is going on, the KVM is going through the class, allocating heap space and verifying the bytecode.
Additionally, a Java programmer is restricted to the capabilities of the virtual machine. Because Java must work on a wide variety of devices, it is written for the lowest common denominator.
For example, here are some big stumbling blocks:
No transparent images. Without transparency, overlapping sprites look really prickly. Any image that might overlap another image or background element will need to be rectangular in order to look good!
You cannot grab, copy, or edit the pixels of RGB images on-the-fly. This means that ultra-cool graphic effects like fading in, explosions, and dynamic shadows are impossible.
There is no fill-polygon or fill-triangle method, which makes rendering 3D images quite difficult.
You cannot copy raw pixel data to the screen (known as blitting). This makes it unfeasible to do any texture-mapping or particle effects, and so on.
Other than elementary system beeps, there is no audio at all. I'll say that again: There is no audio at all!
There is no floating-point math. This makes some 3D and physics, and even sprite movement, difficult.
There is no native support or Java Native Interface (JNI). That means you can't dial the phone, work with any of the ringtones, work with any native user interface widgets, and so on.
Additionally, Anfy Team in Italy has put together a detailed list of gaming and graphics-related stuff that MIDP is missing. You can see it at http://www.anfyteam.com/dev/j2me/midpimage.html.
Because of all the restrictions on a small device, there is no way of fitting in a just-in-time (JIT) compiler. This means that code will run quite slowly. In fact, while playing around with some casual tests, a J2ME application runs about three to eight times slower than a native Palm application written in a compiled language, such as C.
Throughout this book we have discussed techniques to sidestep or deal with many of the preceding problems. You have learned how to create your own transparency, make the most out of slow networks, and simulate floating-point math.
In addition, more and more manufacturers are coming out with snazzier extensions to MIDP, allowing for image manipulation, transparency, and enhanced audio. i-mode phones come with some great sound and graphics features out of the box. Siemens, with their nifty game API, are the first to deliver on the promise of extensions. Other companies such as Ericsson and Nokia have game APIs in store and are likely to follow suit. Of course, using one of these APIs means that your game will only work on one particular brand of phone.
It's important to remember that Java is perhaps the easiest modern language to develop in. With garbage collection of old objects and the lack of memory allocation and pointers, it's a great way to create quick prototypes and develop them out into full apps. The object-oriented nature of Java makes it easy to maintain, enabling developers to make sweeping code changes with a little modification to a superclass.
Writing a native handheld application requires countless hours of debugging, emulating, testing, deploying, re-debugging, and packaging. Write to the wrong memory location, and you can easily fry the machine.
If you waste a little memory on a desktop or server application, nobody will bat an eye. But when dealing with a tiny space like a mobile phone, every bad byte hurts. Memory leaks in Java are possible, but they are much easier to avoid.
Perhaps the most compelling argument for using Java is that—you guessed it—you can write once and run everywhere. A game written for a Motorola cell phone can also run on a Nokia, an Ericsson, a Siemens, or a Palm. The same code could even be compiled and run as an applet in a Web browser, as an application on a million-dollar server machine, in your car's dashboard, or—eventually—in a Java-powered neural link to your own brain!
Finally, don't forget about the promise of wireless devices. Although it might seem silly to try to achieve a rich, meaningful immersion on a tiny 100×100 pixel screen, there's one thing mobile phone games give you that even the best consoles can't provide: Micro games are always with you, and can be played anywhere you go. This not only means that games can now be more convenient, but wholly new types of games can be designed that take advantage of new lifestyles.
In Chapters 15, 16 and 17, we developed a sprite system and figured out how to create, move, and animate our hero (the race car) and the enemy cars. We also figured out how to detect and deal with collisions.
In Chapter 18, we added sound.
In Chapter 19, we discussed ways of saving information as the local database record. This is a useful way of keeping track of how much money you have to spend, and what special attributes your car has.
In Chapter 20, we created the Garage, an online community you can visit to buy and sell car parts.
So what really remains is to tie everything together. Basically, our game needs to become more than a simple action game—we need to create a complex data structure that lets the player know how good her car is. We need to structure the car in terms of its chassis, engine, tires, weapons, and power-ups. This way, when the player goes online to the Garage to buy components, these items will have meaningful values.
Right now, the car doesn't have any weapons at all! Let's look at how to add some simple weapons, such as oil slicks, machine guns, and flamethrowers.
Another important element will be power-ups. We should scatter ammo, tires, new weapon types, and more throughout the track so that players can spiff up their current weapon. This will make it worth more if they try to sell it online.
To deal with this new complexity and power, we should also create smarter computer-controlled opponents. Some of the enemies can have weapons of their own! This will involve more advanced artificial intelligence techniques.
Finally, we should create several types of tracks to make the game more interesting, and inspire players to try various levels.
To add weapons, all we need to do is create a Weapon class. In theory, various weapons can extend from this class, modifying variables and overriding methods as necessary.
To avoid having too many classes, however, we can start by packing several similar weapons within the same class. The class in Listing 24.1 handles a flamethrower and oil slick.
Example 24.1. The Weapon Class
public class Weapon
{
  private int weapontime = 5;
  private int weaponammo = 5;
  private String name;
  private String description;
  public static final int FLAME = 0;
  public  static final int OIL = 1;
  private int weapontype = FLAME;
  private boolean upforsale = false;
  private String displayname = "";

  Weapon(int type,int time,int ammo,String n,String d)
  {
    weapontype = type;
    weapontime = time;
    weaponammo = ammo;
    name = n;
    description = d;
    displayname = name.substring(0,5);
  }

  public int getWeaponTime()
  {
    return weapontime;
  }

  public void setWeaponTime(int t)
  {
    weapontime = t;
  }

  public int getWeaponAmmo()
  {
    return weaponammo;
  }

  public void setWeaponAmmo(int a)
  {
    weaponammo = a;
  }

  public int getWeaponType()
  {
     return weapontype;
  }

  public void setWeaponType(int t)
  {
     weapontype = t;
  }

  public boolean fire()
  {
     if (—weaponammo <= 0)
     {
        weaponammo = 0;
    return false;
     }
     return true;
  }

  public void setName(String n)
  {
    displayname = n.substring(0,5);
      name = n;
  }

  public String getName()
  {
      return name;
  }

  public void setDescription(String n)
  {
      description = n;
  }

  public String getDescription()
  {
      return description;
  }

  public boolean getUpForSale()
  {
    return upforsale;
  }

  public void setUpForSale(boolean u)
  {
    upforsale = u;
  }

  public String getDisplayName()
  {
    return (displayname +": "+weaponammo);
  }
}
Notice how each weapon has five main variables that need to be set when the weapon is constructed:
Time—How long the weapon lasts when it is triggered. For example, a flamethrower might stay “on” for five frames.
Ammo—How many units of ammunition the weapon currently has. Every time the weapon is used (by calling the
fire()method), this number is decremented.Type—The type of weapon used. This will help the graphics engine figure out which image to paint.
Name—The name of the weapon. This can change as the player upgrades it in the Garage.
Description—A good description of the weapon. This will be important when the player tries to sell it online.
The actual visual weapon frames themselves can be loaded using the Cache class:
public static Image oilImage;
public static Image flameImage;

static
{
  flameImage = Image.createImage("/flame.png");
  oilImage = Image.createImage("/oil.png");
}
Our existing GameCanvas class can then handle the weapon as shown in Listing 24.2. This listing just shows the parts of the class relevant to dealing with a weapon.
Example 24.2. Adding Weapons to GameCanvas
public class GameCanvas extends Canvas
{
  private Sprite theweapon;
  private boolean weaponon = false;
  private int weaponcount = 0;
  private Weapon weapon;

  public GameCanvas(Game midlet, Form form)
  {
    try
    {
      // Use weapon 0 for now
      weapon = game.cs.getWeapons()[0];
      theweapon = new Sprite(Cache.flameImage,10,14, 2);
      theweapon.setX(Float.createFloat((Cache.width - player.getWidth()) / 2));
      theweapon.setY(Float.createFloat(Cache.height - (player.getHeight() *2) - 14));
      theweapon.setVisible(true);
    }
    catch (Exception ex)
    {
       System.out.println("Problem Creating Sprites!");
    }
  }

  public void keyPressed(int keyCode)
  {
    key = getGameAction(keyCode);
    // When the fire key is pressed, trigger the weapon.
    if (key == FIRE)
    {
      if (!weaponon && weapon.fire())
      {
      weaponon = true;
          weaponcount = 0;
      }
    }
  }

  public void paint(Graphics gr)
  {
    // Paint other things
    ...
    // Paint the racecar
    ...
    // Draw the weapon
    theweapon.setX(player.getX());
    if (weaponon)
    {
           // Draw flame in front
           if (weapon.getWeaponType() == Weapon.FLAME)
           {
             theweapon.setVisible(true);
           }
           // See if the weapon should be switched off
           if (++weaponcount > weapon.getWeaponTime())
           {
              weaponon = false;
              theweapon.setVisible(false);
           }
           theweapon.paint(g);
    }
    // Draw other interface items here
    ...
    if (weapon != null)
    {
      g.drawString(weapon.getDisplayName(), (getWidth() - ROAD_WIDTH) /
        2 + 1, 15, Graphics.TOP | Graphics.LEFT);
    }
    gr.drawImage(scene, 0, 0, Graphics.TOP | Graphics.LEFT);
  }

  private void checkCollision()
  {
    // Did enemy hit weapon?
    if (weaponon)
    {
      Sprite collidedwith = enemyList.collideSprite(theweapon);
      // Get rid of enemy.
      if (collidedwith != null)
         enemyList.deleteSprite(collidedwith);
    }
  }
}
The weapon is initialized as a sprite. For now, we'll just use one type of weapon, the flamethrower. Notice that the weapon is retrieved from the
csobject in the game. This is our data store object, which we will discuss later in this chapter.When the user hits the FIRE button, the weapon is triggered. The
weaponcountis set to zero.If the weapon has no more ammo, then it will not fire. See the
fire()method in theWeaponclass.The next time the car is painted, the weapon sprite is drawn in the appropriate place, which is generally right in front of the car. More advanced weapons, like missiles, can even move across the screen.
The
weaponcountis incremented. If theweaponcountis more than theweapontime, then the weapon is switched off. The weapon will no longer be painted.If an enemy car collides with the weapon, the enemy is removed from the board.
If you want, you can modify the Micro Racer code to treat collisions more realistically. For example, you could deduct a certain number of hit points from the enemy. Various weapons would exert various types and amounts of damage. If the enemy's hit count reached zero, then a fantastic crashing animation would be shown as the enemy exploded in a ball of flame.
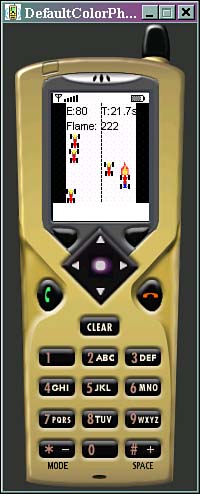
The final game, with weapons and all, appears in Figure 24.1.
It doesn't take a whole lot to make our enemies smarter. Right now, cars are randomly dropped on the track and simply move downward. Let's spice things up a bit by making some enemies move back and forth randomly. Let's also change the velocity, so some cars are faster than others.
This isn't really artificial intelligence (it's more like artificial stupidity). But at least it makes things a little more interesting. To add real artificial intelligence, you'd want to give different drivers personality traits—some would be aggressive, some timid, and so on. Various cars would react to where you go and what weapons you fire in complex and human-like ways. Additionally, enemy cars would need to react to each other. They should not bump against each other or, as is currently the case, overlap with each other.
First, create some random starting positions and velocities using a better initEnemies() method:
public void initEnemies()
{
  ...
  enemyList = new SpriteManager(Cache.width, Cache.height);
  int size = length / Cache.height * 4 - 1;
  Random rnd = new Random();
  for (int i = 1; i <= size; i++)
  {
    try
    {
      Sprite sprite = new Sprite(Cache.enemyImage,
          Cache.enemyImage.getWidth(), Cache.enemyImage.getHeight(), 1);
      // Figure out where the enemy starts
      int x = rnd.nextInt() % (ROAD_WIDTH -
          Cache.enemyImage.getWidth());
      x = (x < 0 ? -x : x);
      // Draw at a random X
      sprite.setX(Float.createFloat((Cache.width - ROAD_WIDTH) / 2 + x));
      // Scatter the enemy's Y position
      sprite.setY(Float.createFloat(- i * Cache.height / 4));
      // Modify the speed slightly
      x = rnd.nextInt() % 1000;
      long veer = Float.createFloat(0,x);
      long newspeed = Float.add(veer,enemyspeed);
      sprite.setVy(newspeed);
      // Move the enemy back and forth
      x = rnd.nextInt() % 2;
      long sidemove = Float.createFloat(x);
      sprite.setVx(sidemove);
      enemyList.addSprite(sprite);
    } catch (Exception ex) {}
  }
}
Then, in the moveSprites() method, be sure that an enemy doesn't drive off the road. If a car swerves too far to the left or right, reverse its horizontal (x) velocity:
private void moveSprites()
  {
    ...
    for (int i = 0; i < enemyList.size(); i++)
    {
      Sprite sprite = enemyList.getSprite(i);
      sprite.setY(Float.add(sprite.getY(), sprite.getVy()));
      // Make sure not hitting the side walls
      sprite.setX(Float.add(sprite.getX(), sprite.getVx()));
      if ((Float.getInteger(sprite.getX()) < (Cache.width - ROAD_WIDTH) / 2) ||
          (Float.getInteger(sprite.getX())  +
           sprite.getWidth() > (Cache.width + ROAD_WIDTH) / 2))
      {
              // Move in other direction
              sprite.setVx(-sprite.getVx());
      }
    }
    ...
  }
As it stands, the timer in Micro Racer doesn't serve much of a purpose. After all, the player's race car can only move at one speed. Well, it shouldn't be too hard to make things more interesting. For starters, we should use the up and down arrow keys to speed up or slow down our racecar.
This is simple enough, and occurs in the moveSprites() method, which works with a global myspeed variable:
private long myspeed = 0;

private void moveSprites()
{
  switch (key)
  {
    case Canvas.LEFT:
        if (Float.getInteger(player.getX()) >
            (Cache.width - ROAD_WIDTH) / 2)
            player.setX(Float.sub(player.getX(),
            Float.createFloat(2)));
        break;
    case Canvas.RIGHT:
        if (Float.getInteger(player.getX()) + player.getWidth() <
            (Cache.width + ROAD_WIDTH) / 2)
            player.setX(Float.add(player.getX(),
            Float.createFloat(2)));
        break;
    case Canvas.UP:
      if (Float.getInteger(myspeed) > 10)
      break;
  myspeed = Float.add(myspeed,1);
      for (int i = 0; i < enemyList.size(); i++)
      {
        Sprite sprite = enemyList.getSprite(i);
        sprite.setVy(Float.add(sprite.getVy(),myspeed));
      }
      break;
    case Canvas.DOWN:
      if (Float.getInteger(myspeed) < -10)
      break;
  myspeed = Float.sub(myspeed,1);
      for (int i = 0; i < enemyList.size(); i++)
      {
        Sprite sprite = enemyList.getSprite(i);
        sprite.setVy(Float.add(sprite.getVy(),myspeed));
      }
      break;
  }
...
}
Notice that the longer you hold down the up button, the more each enemy's velocity increases. The finish line's velocity will also increase, as will the power-ups.
The total effect of this is that everything will move downward at a faster rate, making it seem like you are speeding up!
To really get the most of this effect, we'll position the race car slightly above the bottom of the screen by modifying the Y position in the GameCanvas constructor:
player.setY(Float.createFloat(Cache.height - (player.getHeight() *2)));
To add a power-up, we just need to create a few random Sprites in the GameCanvas class. This part is pretty easy, and similar to adding enemies. The only difference is that power-ups don't move from side to side!
For the sake of simplicity, let's just create two types of power-ups—one that gives you an extra point of ammo, and one that gives you anywhere from 5 to 20 dollars. We'll scatter these power-ups throughout the track.
First off, create a new power-up graphic and load it using the global Cache class:
public static Image powerupImage;
static
  {
    try
    {
      powerupImage = Image.createImage("/power.png");
    } catch (Exception ex) {}
  }
Simply create another class-wide SpriteManager object to hold the power-ups, and throw in a new initPowerups() method as follows:
private SpriteManager powerUpsMoney;

public void initPowerups()
{
  powerUpsMoney = new SpriteManager(Cache.width, Cache.height);
  // The number of power ups is half the number of enemies.
  // That seems fair!
  int size = (length / Cache.height * 4 - 1) / 2;
  Random rnd = new Random();
  for (int i = 1; i <= size; i++)
  {
    try
    {
      Sprite sprite = new Sprite(Cache.powerupImage,Cache.powerupImage. getWidth(), Cache
.powerupImage.getHeight(), 1);
      // Figure out how where to put it...
      int x = rnd.nextInt() % (ROAD_WIDTH - Cache.enemyImage.getWidth());
      x = (x < 0 ? -x : x);
      // Draw at a random X
      sprite.setX(Float.createFloat((Cache.width - ROAD_WIDTH) / 2 + x));
      // Scatter the power ups Y position
      sprite.setY(Float.createFloat(- i * Cache.height / 4));
      powerUpsMoney.addSprite(sprite);
    }  catch (Exception ex) { }
  }
}
.powerupImage.getHeight(), 1);
// Figure out how where to put it...
int x = rnd.nextInt() % (ROAD_WIDTH - Cache.enemyImage.getWidth());
x = (x < 0 ? -x : x);
// Draw at a random X
sprite.setX(Float.createFloat((Cache.width - ROAD_WIDTH) / 2 + x));
// Scatter the power ups Y position
sprite.setY(Float.createFloat(- i * Cache.height / 4));
powerUpsMoney.addSprite(sprite);
} catch (Exception ex) { }
}
}
You can call initPowerups() in your Tracks class, right after you call initEnemies(). This enables you to give different tracks different types or amounts of goodies.
To create the weapon power-ups, you would simply create yet another SpriteManager instance called powerUpsWeapon. You can then paint your power-ups within the GameCanvas in the exact same way you paint your enemies:
public void paint(Graphics gr)
{
  ...
  // paint power ups first since they are on the ground
  powerUpsMoney.paint(g);
  powerUpsWeapon.paint(g);
  // Then paint other things
  ...
}
Likewise, you can move the power-ups based on your car's current speed:
private void moveSprites()
{
  ...
  for (int i = 0; i < powerUpsMoney.size(); i++)
  {
    Sprite sprite = powerUpsMoney.getSprite(i);
    long powerUpSpeed = myspeed;
    if (Float.getInteger(powerUpSpeed) <= 3)
        powerUpSpeed = Float.createFloat(3);
    sprite.setY(Float.add(sprite.getY(), powerUpSpeed));
  }
  ...
}
Finally, you can check when your race car touches a power-up. Remove the power-up and award more ammo as follows:
private void checkCollision()
{
  ...
  // Did we hit a power up?
  Sprite collidedwith = powerUpsWeapon.collideSprite(player);
  if (collidedwith != null)
  {
      // Remove the power up
      powerUpsWeapon.deleteSprite(collidedwith);
      Random rnd = new Random();
      // Add 1 ammo point
      weapon.setWeaponAmmo(weapon.getWeaponAmmo()+1);
  }
  collidedwith = powerUpsMoney.collideSprite(player);
  if (collidedwith != null)
  {
      // Remove the power up
      powerUpsMoney.deleteSprite(collidedwith);
      Random rnd = new Random();
      // Add from 5 to 15 dollars
      int x = rnd.nextInt() % 15;
      x = (x < 0 ? -x : x);
      x += 5;
      game.cs.setCash(game.cs.getCash()+x);
  }      ...
}
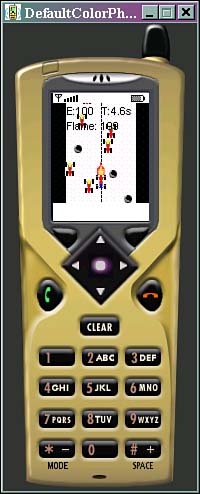
The game.cs variable seen in the preceding code is discussed in the next section. It points to your CarStore class, which handles all weapons and cash and keeps the values persistent from game to game. Your final game will have little power-up blobs, as shown in Figure 24.2:
To make Micro Racer interesting, data has to be persistent from game to game—how much money you have, which weapons you've got, how much ammo each weapon has, and so on. The more inventory we make persistent, the more continuous and meaningful objects in the gameworld become.
To create storage for money and weapons, check out the CarStore class from Chapter 19, “Be Persistent: MIDP Data Storage.” We will modify it slightly so that it reads and writes each weapon's name and description, along with the ammo, weapon time, and weapon type:
// Write the weapon's name
dout.writeUTF(weapons[i].getName());

// Write the weapon's description
dout.writeUTF(weapons[i].getDescription());
And for reading
// Read the Weapon's name
name = din.readUTF();
System.out.println("Got the Weapon name: "+name);

// Read the Weapon's description
description = din.readUTF();
The trick now is to create a global CarStore class. We'll call it cs and put it in our Game class, as shown in Listing 24.3.
Example 24.3. Creating a Car Store and Dealing with It
import javax.microedition.midlet.*;
import javax.microedition.lcdui.*;

public class Game extends MIDlet
{
  private Display display;

  public static CarStore cs = new CarStore();

  public StartForm form;

  public GarageClient garage;

  public void startApp()
  {
    // To begin, read values from storage
    if (!cs.readStore())
    {
        // If we have problem use default values....
        cs.setCash(100);
        Weapon[] weapons = new Weapon[2];
        weapons[0] = new Weapon(Weapon.FLAME, 6, 7,"Flame Thrower", "Toasts Cars In Front");
        weapons[1] = new Weapon(Weapon.OIL, 15, 2,"Oil Slick","Makes Cars Slide");
        cs.setWeapons(weapons);
    }
    // Be sure we have at least SOME ammo
    for (int i=0; i < cs.getWeapons().length; i++)
    {
        if (cs.getWeapons()[i] != null && cs.getWeapons()[i].getWeaponAmmo() <= 0)
            cs.getWeapons()[i].setWeaponAmmo(10);
    }
    garage = new GarageClient(this);
    display = Display.getDisplay(this);
    form = new StartForm(this);
    display.setCurrent(form);
  }

  public void pauseApp() { }

  public void destroyApp(boolean b)
  {
       System.out.println("DestroyApp() called.  Writing data to RecordStore");
       System.out.println("Writing to the store!");
       cs.writeToStore();
  }

  public Display getDisplay()
  {
    return display;
  }

  public void exit()
  {
    destroyApp(false);
    notifyDestroyed();
  }
}
This is what happens in the preceding code:
When the game begins, it attempts to read the current list of weapons and the current amount of cash from storage.
If the reading fails, it might be because this is the first time the game has been played. The game gives the player some default values: Seven rounds of a basic flame thrower, two oil slicks, and $100 cash.
If the reading succeeds, then the
CarStoreclass will contain an array of weapons as well as the current amount of cash. You can grab these items any time throughout the game by usingcs.getWeapons()orcs.getCash().When the game is over,
destroyApp()is automatically called. The game takes this final opportunity to store the current list of weapons and current cash balance.
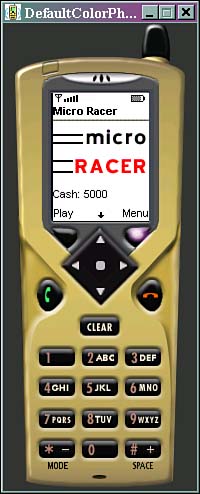
That's it! By putting this code in the constructor of StartForm, the player can display the current balance and weapon list on the start screen the next time the game is started:
append("Cash: "+game.cs.getCash());
for (int i=0; i < game.cs.getWeapons().length; i++)
{
  append("Weapon#"+(i+1)+": "+game.cs.getWeapons()[i].getName());
}
The starting form will appear as in Figure 24.3.
The final task in creating our game is to make it truly multiplayer-capable by merging the storage components and online components. The key to doing this is clever and robust data structures. We already have a Weapon class, which has everything we need to know about a weapon, and we have the persistent CarStore class.
So, all we need to do is tie together the GarageClient code from Chapter 20, “Connecting Out: Wireless Networking.” Just strip out all the code that makes GarageClient a main MIDlet and turn it into an ordinary class.
You can construct the class as follows, passing in a reference to the game class:
private Game game;
GarageClient(Game g)
{
       game = g;
}
To trigger everything, we can create a public Login method within the GarageClient as follows:
public void Login()
{
  game.getDisplay().setCurrent(loginform);
}
Finally, we need to go through the GarageClient class and find all the local variables that contain the amount of cash a player has or which weapons the player wants to buy or sell. We need to replace all these variables with a connection to the CarStore class. For example, in the commandAction() method, we can deal with a player's SELLIT command as follows:
else if (c == SELLIT)
{
  String price = pricefield.getString();
  int i = itemgroup.getSelectedIndex();

  // Be sure item wasn't already put up for sale
  if (game.cs.getWeapons()[i].getUpForSale())
    return;

  // Marshal data for item in a String
  String theitem = game.cs.getWeapons()[i].getName()+"!"+game.cs.getWeapons() [i]
.getDescription()+"!"+price;

  // Remove the item from the local list of my items
  game.cs.getWeapons()[i].setUpForSale(true);
  SellIt si = new SellIt(theitem);
}
Likewise, our main Game class can have a global pointer to the garage:
public GarageClient garage;

public void startApp()
{
  garage = new GarageClient(this);
}
That's pretty much it. A player need only select the Garage command from the main menu to reach the online Garage. The player will then be able to sell her current weapons, as you can see in Figure 24.4.

Micro Racer would be even better if it had various types of engines, wheels, chassis, and more. These items could then be added onto any car to achieve better speed, more energy, more accurate control, and so on.
It would also be nice if the various tracks did more than run at different speeds and lengths. It would be nice to actually make a mountain track with plenty of twists and turns, a forest track full of fallen trees, and a city track with intersections, pedestrians, and maybe even police cars.
The biggest addition to the game could be in its graphics. The artwork could be modified based on which track you selected. New tracks with new challenges could even be added weekly to a special game server and then downloaded to the phone.
It would also be nice if the car was more realistic looking, and if the car graphic itself seemed to veer and animate as you moved to the side or hit the brakes. The game could also use some killer death animations, for the times when you destroy an enemy—or an enemy knocks you off the road.
If your game uses pure MIDP and only pure MIDP, then it should be easy to deploy it to almost any phone. Although the means of downloading or installing a JAR file differs from brand to brand, the same code should work without too many problems.
But what if you want to make the most out of each type of phone? It would be nice to create a game that used the best graphic and sound features of each device. For example, using the Siemens API, our driving game might have a neat, energetic soundtrack playing in the background. When the player's car crashes, you might also want the phone to vibrate.
To use the same code base for various extension APIs, simply create interfaces for any external features. For example, let's suppose we want a special sound to play and the phone to vibrate when the player's car crashes. Create an interface called CrashCarEffect as shown in Listing 24.4.
Example 24.4. The CrashCarEffect Interface
public interface CrashCarEffect
{
    public void ICrashed();
}
Now write two classes that implement CrashCarEffect. One will be a dummy class for a basic MIDP phone that does absolutely nothing, and is shown in Listing 24.5.
Example 24.5. The DummyCrash Class
public class DummyCrash implements CrashCarEffect
{
    public void ICrashed() {  }
}
The other will be a special class that only works on Siemens phones, seen in Listing 24.6.
Example 24.6. The SiemensCrash Class
import javax.microedition.midlet.*;
import javax.microedition.lcdui.*;
import com.siemens.mp.game.*;
public class SiemensCrash implements CrashCarEffect
{
  public void ICrashed()
  {
    // Vibrate a bit
    Vibrator.triggerVibrator(100);
    // Play a defeat sound
     MelodyComposer  comp = new MelodyComposer();
     comp.setBPM(120);
     try
     {
       comp.appendNote(MelodyComposer.TONE_E1,
           MelodyComposer.TONELENGTH_1_4);
       comp.appendNote(MelodyComposer.TONE_D1,
           MelodyComposer.TONELENGTH_1_2);
       comp.appendNote(MelodyComposer.TONE_C3,
          MelodyComposer.TONELENGTH_1_4);
     } catch (Exception ex) {}
     Melody melody = comp.getMelody();
     melody.play();
  }
}
Now, in your game code, use the System.getProperty() function to figure out what device the player is using. You can then dynamically load the appropriate class using Class.forName() and newInstance().
For example, we can modify the checkCollision() method in our game's GameCanvas class, as seen in Listing 24.7.
Example 24.7. Using Different Classes for Different Phones
private void checkCollision()
{
  if (enemyList.collide(player))
      player.setEnergy(player.getEnergy() - COLLIDE_ENERGY);
  if (player.getEnergy() <= 0)
  {
      CrashCarEffect tempclass = null;
      String vendor = System.getProperty("microedition.platform");
      try {
      if( vendor != null && vendor.indexOf("Siemens") != -1 )
        tempclass = (CrashCarEffect)Class.forName("SiemensCrash") .newInstance();
      else
       tempclass = (CrashCarEffect)Class.forName("DummyCrash").newInstance();
      }
      catch (Exception e) {  }
      if (tempclass != null)
         tempclass.ICrashed();
      running = false;
  }
}
Although the SiemensCrash class will not compile using the Wireless Toolkit or standard MIDP development tools, you can toss it into the JAR file anyway. It will just be ignored by phones that do not support it. Alternatively, you could create two different JAR files—one for Siemens users and another for everyone else.
Using the same technique, you can create special interfaces for every major game event, then create device-specific classes for iAppli, Siemens, and so on.
What more is there to say?
Throughout this chapter, we've combined all the code we've accumulated so far to create a pretty cool little game (if we do say so ourselves).
However, keep in mind that Micro Racer is a work in progress. We encourage you to take this code and really flesh it out, creating various types of weapons, car parts, tracks, enemies, online community features, and so on.
You should also dust off your artistic skills, or partner up with a good game designer. Better animations and graphics will go a long way toward making Micro Racer seem enticing, sleek, and professional. Better yet, just take some of the concepts you've learned and create something truly original! You have a blank game canvas in front of you. Get out there and wow them!