8. Inheritance
In this chapter you'll learn about one of the key principles that makes object-oriented programming so powerful. Through the concept of inheritance, you will learn how you can build on existing class definitions and customize them for your own applications.
It All Begins at the Root
You learned about the idea of a parent class in Chapter 3, “Classes, Objects, and Methods.” A parent class can itself have a parent. The class that has no parent is at the top of the hierarchy and is known as a root class. In Objective-C, you have the ability to define your own root class, but it's something you normally won't want to do. Instead, you'll want to take advantage of existing classes. All the classes we've defined up to this point are descendants of the root class called Object, which you specified in your interface file like this:
@interface Fraction: Object
...
@end
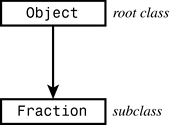
The Fraction class is derived from the Object class. Because Object is at the top of the hierarchy (that is, there are no classes above it), it's called a root class, as shown in Figure 8.1. The Fraction class is known as a child or subclass.
Figure 8.1. Root and subclass.
From a terminology point of view, we can speak of classes, child classes, and parent classes. Analogously, we can talk about classes, subclasses, and superclasses. You should become familiar with both types of terminology.
Whenever a new class (other than a new root class) is defined, certain properties are inherited by the class. For example, all the instance variables and the methods from the parent implicitly become part of the new class definition. That means the subclass can access these methods and instance variables directly, as if they were defined directly within the class definition.
A simple example, albeit contrived, will help illustrate this key concept of inheritance. Here's a declaration for an object called ClassA with one method called initVar:
@interface ClassA: Object
{
int x;
}
-(void) initVar;
@end
The initVar method simply sets the value of ClassA's instance variable to 100:
@implementation ClassA;
-(void) initVar
{
x = 100;
}
@end
Now, let's also define a class called ClassB:
@interface ClassB: ClassA
-(void) printVar;
@end
The first line of the declaration
@interface ClassB: ClassA
says that instead of ClassB being a subclass of Object, ClassB is a subclass of ClassA. So, although ClassA's parent (or superclass) is Object, ClassB's parent is ClassA. This is shown in Figure 8.2.
Figure 8.2. Subclasses and superclasses.
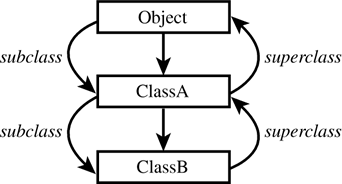
As you can see from Figure 8.2, the root class has no superclass and ClassB, which is at the bottom of the hierarchy, has no subclass. Therefore, ClassA is a subclass of Object, and ClassB is a subclass of ClassA and also of Object (technically, it's a sub-subclass, or grandchild). Also, Object is a superclass of ClassA, which is a superclass of ClassB. Object is also a superclass of ClassB because it exists further down its hierarchy.
Here's the full declaration for ClassB, which defines one method called printVar:
@interface ClassB: ClassA
-(void) printVar;
@end
@implementation ClassB;
-(void) printVar
{
printf ("x = %i
", x);
}
@end
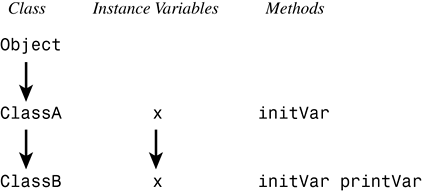
The printVar method prints the value of the instance variable x, yet you haven't defined any instance variables in ClassB. That's because ClassB is a subclass of ClassA—it therefore inherits all of ClassA's instance variables (in this case there's just one). This is depicted in Figure 8.3.
Figure 8.3. Inheriting instance variables and methods.
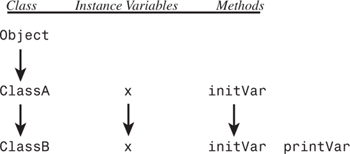
(Of course, Figure 8.3 doesn't show any of the methods or instance variables that are inherited from the Object class, of which there are several.)
Let's see how this works by putting it all together in a complete program example. For the sake of brevity, we'll put all the class declarations and definitions into a single file (see Program 8.1).
// Simple example to illustrate inheritance
#import <objc/Object.h>
#import <stdio.h>
// ClassA declaration and definition
@interface ClassA: Object
{
int x;
}
-(void) initVar;
@end
@implementation ClassA;
-(void) initVar
{
x = 100;
}
@end
// Class B declaration and definition
@interface ClassB : ClassA
-(void) printVar;
@end
@implementation ClassB;
-(void) printVar
{
printf ("x = %i
", x);
}
@end
int main (int argc, char *argv[])
{
ClassB *b = [[ClassB alloc] init];
[b initVar]; // will use inherited method
[b printVar]; // reveal value of x;
[b free];
return 0;
}
x = 100
You begin by defining b to be a ClassB object. After allocating and initializing b, you send a message to apply the initVar method to it. But looking back at the definition of ClassB, you'll notice that you never defined such a method. The fact is that initVar was defined in ClassA, and because ClassA is the parent of ClassB, ClassB gets to use all of ClassA's methods. So, with respect to ClassB, initVar is an inherited method.1
After sending the initVar message to b, you invoke the printVar method to display the value of the instance variable x. The output of x = 100 confirms that printVar was capable of accessing this instance variable. That's because, like the initVar method, it was inherited.
Remember that the concept of inheritance works all the way down the chain. So, if you defined a new class called ClassC, whose parent class was ClassB, like so
@interface ClassC: ClassB;
...
@end
then ClassC would inherit all of ClassB's methods and instance variables, which in turn inherited all of ClassA's methods and instance variables, which in turn inherited all of Object's methods and instance variables.
Be sure you understand that each instance of a class gets it own instance variables, even if they're inherited. A ClassC and a ClassB object would therefore each have their own distinct instance variables.
Finding the Right Method
When you send a message to an object, you might wonder how the correct method is chosen to apply to that object. The rules are actually quite simple. First, the class to which the object belongs is checked to see whether a method is explicitly defined in that class with the specific name. If it is, that's the method that is used. If it's not defined there, the parent class is checked. If the method is defined there, that's what is used. If not, the search continues. Parent classes are checked until one of two things happens: Either you find a class that contains the specified method or you don't find the method after going all the way back to the root class. If the first occurs, you're all set; if the second occurs, you have a problem and a warning message is generated that might look something like this:
test1.m: In function 'main':
test1.m:39: warning: 'ClassB' does not respond to 'inity'
In this case, you inadvertently sent a message called inity to a variable of type class ClassB. The compiler told you that variables of that type of class do not know how to respond to such a method. Again, this was determined after checking ClassB's methods and its parents' methods back to the root class (which in this case is Object).
In some cases, a message is not generated if the method is not found. It involves using something known as forwarding. This idea is briefly discussed in Chapter 9, “Polymorphism, Dynamic Typing, and Dynamic Binding”.
Extension Through Inheritance—Adding New Methods
Many times the idea of inheritance is used to extend a class. As an example, let's assume you've just been assigned the task of developing some classes to work with 2D graphical objects such as rectangles, circles, and triangles. For now, we'll just worry about rectangles. In fact, let's go back to exercise 7 from Chapter 4, “Data Types and Expressions,” and start with the @interface section from that example:
@interface Rectangle: Object
{
int width;
int height;
}
-(void) setWidth: (int) w;
-(void) setHeight: (int) h;
-(int) width;
-(int) height;
-(int) area;
-(int) perimeter;
@end
You have methods to set the rectangle's width and height, return those values, and calculate its area and perimeter. Let's also add a method that will allow you to set both the width and the height of the rectangle with the same message call, which is as follows:
-(void) setWidth: (int) w andHeight: (int) h;
Assume you typed this new class declaration into a file called Rectangle.h. Here's what the implementation file Rectangle.m might look like:
#import "Rectangle.h"
@implementation Rectangle;
-(void) setWidth: (int) w
{
width = w;
}
-(void) setHeight: (int) h
{
height = h;
}
-(void) setWidth: (int) w and Height: (int) h
{
width = w;
height = h;
}
-(int) width
{
return width;
}
-(int) height
{
return height;
}
-(int) area
{
return width * height;
}
-(int) perimeter
{
return (width + height) * 2;
}
@end
Each method definition is straightforward enough. Program 8.2 shows a main routine to test it.
#import "Rectangle.h"
#import <stdio.h>
int main (int argc, char *argv[])
{
Rectangle *myRect = [[Rectangle alloc] init];
[myRect setWidth: 5 andHeight: 8];
printf ("Rectangle: w = %i, h = %i
",
[myRect width], [myRect height]);
printf ("Area = %i, Perimeter = %i
",
[myRect area], [myRect perimeter]);
[myRect free];
return 0;
}
Rectangle: w = 5, h = 8
Area = 40, Perimeter = 26
myRect is allocated and initialized; then its width is set to 5 and its height to 8. This is verified by the first printf call. Next, the area and the perimeter of the rectangle are calculated with the appropriate message calls, and the returned values are handed off to printf to be displayed.
After working with rectangles for a while, suppose you now need to work with squares. You could define a new class called Square and define similar methods in it as in your Rectangle class. Alternately, you could recognize the fact that a square is just a special case of a rectangle—one whose width and height just happen to be the same.
Thus, an easy way to handle this is to make a new class called Square and have it be a subclass of Rectangle. That way, you get to use all of Rectangle's methods and variables, in addition to defining your own. For now, the only methods you might want to add would be to set the side of the square to a particular value and retrieve that value. The interface and implementation files for your new Square class are shown in Programs 8.3.
Program 8.3. Square.h Interface File
#import "Rectangle.h"
@interface Square: Rectangle;
-(void) setSide: (int) s;
-(int) side;
@end
Program 8.3. Square.m Implementation File
#import "Square.h"
@implementation Square: Rectangle;
-(void) setSide: (int) s
{
[self setWidth: s andHeight: s];
}
-(int) side
{
return width;
}
@end
Notice what you did here. You defined your Square class to be a subclass of Rectangle, which is declared in the header file Rectangle.h. You didn't need to add any instance variables here, but you did add new methods called setSide: and side.
Even though a square has only one side, and you're internally representing it as two numbers, that's okay. All that is hidden from the user of the Square class. You could always redefine your Square class later if necessary; any users of the class wouldn't have to be concerned with the internal details because of the notion of data encapsulation discussed earlier.
The setSide: method takes advantage of the fact that you already have a method inherited from your Rectangle class to set the values of the width and height of a rectangle. So, setSide: calls the setWidth:andHeight: method from the Rectangle class passing the parameter s as the value for both the width and the height. There's really nothing else you have to do. Someone working with a Square object can now set the dimensions of the square by using setSide: and take advantage of the methods from the Rectangle class to calculate the square's area, perimeter, and so on. Program 8.3 “Test Program,” shows the test program and output for your new Square class.
Program 8.3. Test Program test2.m
#import "Square.h"
#import <stdio.h>
int main (int argc, char *argv[])
{
Square *mySquare = [[Square alloc] init];
[mySquare setSide: 5];
printf ("Square s = %i
", [mySquare side]);
printf ("Area = %i, Perimeter = %i
",
[mySquare area], [mySquare perimeter]);
[mySquare free];
return 0;
}
Square s = 5
Area = 25, Perimeter = 20
To compile your program, remember that you have to tell the compiler that your program consists of three files: Rectangle.m and Square.m, which define the class methods, and test2.m, which contains your test routine. (Remember, you don't specify the .h header files to the compiler because they're imported directly into the programs.) If you're building your program from the command lines, here's what your gcc command line might look like:
gcc Square.m Rectangle.m test2.m –o test2 –l objc
The way you defined the Square class is a fundamental technique of working with classes in Objective-C: taking what you or someone else has done before and extending it to suit your needs. In addition, a mechanism known as categories enables you to add new methods to an existing class definition in a modular fashion—that is, without having to constantly add new definitions to the same interface and implementation files. This is particularly handy when you want to do this to a class for which you don't have access to the source code. You'll learn about categories in Chapter 11, “Categories, Posing, and Protocols.”
A Point Class and Memory Allocation
The Rectangle class stores only the rectangle's dimensions. In a real-world graphical application, you might need to keep track of all sorts of additional information, such as the rectangle's fill color, line color, location (origin) inside a window, and so on. You can easily extend your class to do this. For now, let's deal with the idea of the rectangle's origin. Assume that the “origin” means the location of the rectangle's lower-left corner within some Cartesian coordinate system (x, y). If you were writing a drawing application, this point might represent the location of the rectangle inside a window, as depicted in Figure 8.4.
Figure 8.4. A rectangle drawn in a window.
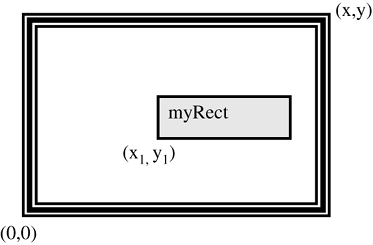
In Figure 8.4 the rectangle's origin is shown at (x1, y1).
You could extend your Rectangle class to store the x, y coordinate of the rectangle's origin as two separate values. Or you might realize that, in the development of your graphics application, you'll have to deal with a lot of coordinates and therefore decide to define a class called Point (you might recall this problem from exercise 7 in Chapter 3):
#import <objc/Object.h>
@interface Point: Object
{
int x;
int y;
}
-(void) setX: (int) xVal;
-(void) setY: (int) yVal;
-(void) setX: (int) xVal andY: (int) yVal;
-(int) x;
-(int) y;
@end
Point has an x value and a y value, as well as methods that enable you to set them individually (setX: and setY:), set them collectively (setX:andY:), and retrieve their values.
Now let's get back to your Rectangle class. You want to be able to store the rectangle's origin, so you're going to add another instance variable called origin to the definition of your Rectangle class:
@interface Rectangle: Object
{
int width;
int height;
Point *origin;
}
...
It would seem reasonable to add a method to set the rectangle's origin, as well as retrieve it:
-(void) setOrigin: (Point *) pt;
-(Point *) origin;
The @class Directive
Now, you can work with rectangles (and squares as well!) with the ability to set their widths, heights, and origins. First, let's take a complete look at your Rectangle.h interface file:
#import <objc/Object.h>
@class Point;
@interface Rectangle: Object
{
int width;
int height;
Point *origin;
}
-(void) setWidth: (int) w;
-(void) setHeight: (int) h;
-(void) setOrigin: (Point *) pt;
-(Point *) origin;
-(int) width;
-(int) height;
-(int) area;
-(int) perimeter;
@end
When you start getting a lot of methods for your classes, you should “group” them together in terms of ones that set instance variables (your “setters”), retrieve values (your “getters”), or perform computations, for example. That's what was done previously.
You used a new directive in the Rectangle.h header file:
@class Point;
You needed this because the compiler needs to know what a Point is when it encounters it as one of the instance variables defined for a Rectangle. It's also used in the argument and return type declarations for your setOrigin: and origin methods, respectively. You do have another choice. You can import the header file instead, like so:
#import "Point.h"
The use of the @class directive is more efficient because the compiler doesn't need to process the entire Point.h file (even though it is quite small); it just needs to know that Point is the name of a class. If you needed to reference one of the Point classes methods, the @class directive would not suffice because the compiler would need more information. It would need to know how many arguments the method takes, what their types are, and what the method's return type is.
Let's fill in the blanks for your new Point class and Rectangle methods so you can test everything in a program. First, Program 8.4 shows the implementation file for your Point class.
Program 8.4. Point.m Implementation File
#import "Point.h"
@implementation Point;
-(void) setX: (int) xVal
{
x = xVal;
}
-(void) setY: (int) yVal
{
y = yVal;
}
-(void) setX: (int) xVal; andY: (int) yVal
{
x = xVal;
y = yVal;
}
-(int) x;
{
return x;
}
-(int) y;
{
return y;
}
@end
Program 8.4, "Added Methods," shows the new methods for our Rectangle class, followed by the test routine and output.
Program 8.4. Rectangle.m Added Methods
-(void) setOrigin: (Point *) pt
{
origin = pt;
}
-(Point *) origin
{
return origin;
}
#import "Rectangle.h"
#import "Point.h"
#import <stdio.h>
int main (int argc, char *argv[])
{
Rectangle *myRect = [[Rectangle alloc] init];
Point *myPoint = [[Point alloc] init];
[myPoint setX: 100 andY: 200];
[myRect setWidth: 5 andHeight: 8];
[myRect setOrigin: myPoint];
printf ("Rectangle w = %i, h = %i
",
[myRect width], [myRect height]);
printf ("Origin at (%i, %i)
",
[[myRect origin] x], [[myRect origin] y]);
printf ("Area = %i, Perimeter = %i
",
[myRect area], [myRect perimeter]);
[myRect free];
[myPoint free];
return 0;
}
Rectangle w = 5, h = 8
Origin at (100, 200)
Area = 40, Perimeter = 26
Inside the main routine you allocated and initialized a rectangle identified as myRect and a point called myPoint. Using the setX:andY: method, you set myPoint to (100, 200). After setting the width and the height of the rectangle to 5 and 8, respectively, you invoked the setOrigin method to set the rectangle's origin to the point indicated by myPoint. The values are then retrieved and printed by the three printf calls. The message expression
[[myRect origin] x]
takes the Point object returned by the origin method and applies the x method to it to get the x-coordinate of the rectangle's origin. In a similar manner, the message expression
[[myRect origin] y]
retrieves the y-coordinate of the rectangle's origin.
Classes Owning Their Objects
Can you explain the output from Program 8.5?
#import "Rectangle.h"
#import "Point.h"
#import <stdio.h>
int main (int argc, char *argv[])
{
Rectangle *myRect = [[Rectangle alloc] init];
Point *myPoint = [[Point alloc] init];
[myPoint setX: 100 andY: 200];
[myRect setWidth: 5 andHeight: 8];
[myRect setOrigin: myPoint];
printf ("Origin at (%i, %i)
",
[[myRect origin] x], [[myRect origin] y]);
[myPoint setX: 50 andY: 50];
printf ("Origin at (%i, %i)
",
[[myRect origin] x], [[myRect origin] y]);
[myRect free];
[myPoint free];
return 0;
}
Origin at (100, 200)
Origin at (50, 50)
You changed the Point myPoint from (100, 200) in the program to (50, 50) and apparently it also had the effect of changing the rectangle's origin! But why did that happen? You didn't explicitly reset the rectangle's origin with another setOrigin: method call, so why did the rectangle's origin change? If you go back to the definition of your setOrigin: method, perhaps you'll see why:
-(void) setOrigin: (Point *) pt
{
origin = pt;
}
When the setOrigin: method is invoked with the expression
[myRect setOrigin: myPoint];
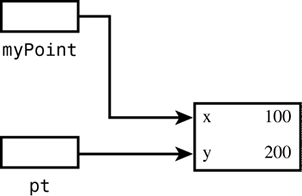
the value of myPoint is passed as the argument to the method. This value points to where this Point object is stored in memory, as depicted in Figure 8.5.
Figure 8.5. The Point myPoint in memory.

That value stored inside myPoint, which is a pointer into memory, is copied into the local variable pt as defined inside the method. Now, both pt and myPoint reference the same data stored in memory. This is depicted in Figure 8.6.
Figure 8.6. Passing the rectangle's origin to the method.
When the origin variable is set to pt inside the method, the pointer stored inside pt is copied into the instance variable origin, as depicted in Figure 8.7.
Figure 8.7. Setting the rectangle's origin.
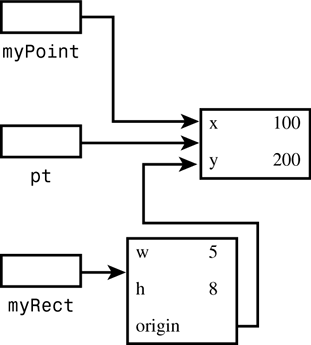
Because myPoint and the origin variable stored in myRect reference the same area in memory (as does the local variable pt), when you subsequently change the value of myPoint to (50, 50), the rectangle's origin is changed as well.
The way to avoid this problem is to modify the setOrigin: method so that it allocates its own point and sets the origin to that point. This is shown here:
-(void) setOrigin: (Point *) pt
{
origin = [[Point alloc] init];
[origin setX: [pt x] andY: [pt y]];
}
The method first allocates and initializes a new Point. The message expression
[origin setX: [pt x] andY: [pt y]];
sets the newly allocated Point to the x, y coordinate of the argument to the method. Study this message expression until you fully understand how it works.
The change to the setOrigin: method means that each Rectangle instance now owns its origin Point instance. And, even though it is now responsible for allocating the memory for that Point, it should also now become responsible for freeing that memory. In general, when a class contains other objects, at times you will want to have it own some or all of those objects. In the case of a rectangle, it makes sense for it to own its origin because that is a basic attribute of a rectangle.
But how do you free the memory used by your origin? Freeing the rectangle's memory does not also free the memory you allocated for the origin. One way to free the memory is to insert a line such as the following in main:
[[myRect origin] free];
This frees the Point object returned by the origin method. You must do this before you free the memory for the Rectangle object itself because none of the variables contained in an object are valid after its memory is released. So, the correct code sequence would be as follows:
[[myRect origin] free]; // Free the origin's memory
[myRect free]; // Free the rectangle's memory
It's a bit of a burden to have to remember to free the origin's memory yourself. After all, you weren't the one who allocated it; the Rectangle class did. In the next section, “Overriding Methods,” you learn how to have the Rectangle free the memory.
With your modified method, recompiling and rerunning Program 8.5 produces the following warning messages shown as Program 8.5A.
Program 8.5A. Compiler Warning Messages
rectangle.m: In function '-[Rectangle setOrigin:]':
rectangle.m:16: warning: 'Point' may not respond to '-x'
rectangle.m:16: warning: cannot find method '-x'; return type 'id' assumed
rectangle.m:16: warning: 'Point' may not respond to '-y'
rectangle.m:16: warning: cannot find method '-y'; return type 'id' assumed
rectangle.m:16: warning: 'Point' may not respond to '-setX:andY:'
rectangle.m:16: warning: cannot find method '-setX:andY:'; return type 'id' assumed
Oops! The problem here is that you've used some methods from the Point class in your modified method, so now the compiler needs more information about it than is provided by the @class directive. In that case, go back and replace that directive with an import instead, like so:
#import "Point.h"
Origin at (100, 200)
Origin at (100, 200)
That's better! This time changing the value of myPoint to (50, 50) inside main had no effect on the rectangle's origin because a copy of the point was created inside the Rectangle's setOrigin: method. You should note that, if you try to run the program with the warning messages shown previously, the correct output will still be produced. That's because the compiler issued warning messages and not error messages. In the former case, an executable is still produced, whereas in the latter it is not. When warning messages are produced by the compiler, it makes certain assumptions. Sometimes those assumptions are valid; other times they are not. In any case, it is better to remove as many warning messages as possible because they often indicate poorly written programs or logic errors that you should address.
Overriding Methods
We noted in an earlier section that you can't remove or subtract methods through inheritance. However, you can change the definition of an inherited method by overriding it.
Returning to your two classes, ClassA and ClassB, assume you want to write your own initVar method for ClassB. You already know that the initVar method defined in ClassA will be inherited by ClassB, but can you make a new method with the same name to replace the inherited method? The answer is yes, and you do so simply by defining a new method with the same name. A method defined with the same name as that of a parent class replaces, or overrides, the inherited definition. Your new method must have the same return type and take the same number and type of arguments as the method you are overriding.
Program 8.6 shows a simple example to illustrate this concept.
// Overriding Methods
#import <objc/Object.h>
#import <stdio.h>
// ClassA declaration and definition
@interface ClassA: Object
{
int x;
}
-(void) initVar;
@end
@implementation ClassA;
-(void) initVar
{
x = 100;
}
@end
// ClassB declaration and definition
@interface ClassB: ClassA
-(void) initVar;
-(void) printVar;
@end
@implementation ClassB;
-(void) initVar // added method
{
x = 200;
}
-(void) printVar
{
printf ("x = %i
", x);
}
@end
int main (int argc, char *argv[])
{
ClassB *b = [[ClassB alloc] init];
[b initVar]; // uses overriding method in B
[b printVar]; // reveal value of x;
[b free];
return 0;
}
x = 200
It's clear that the message
[b initVar];
causes the initVar method defined in ClassB to be used, and not the one defined in ClassA, as was the case with the previous example. This is illustrated in Figure 8.8.
Figure 8.8. Overriding the initVar method.
Which Method Is Selected?
We mentioned how the system searches up the hierarchy for a method to apply to an object. If you have methods in different classes with the same name, the correct method is chosen based on the class of the receiver of the message. Program 8.7 uses the same class definition for ClassA and ClassB from before.
#import <stdio.h>
#import <objc/Object.h>
// insert definitions for ClassA and ClassB here
int main (int argc, char *argv[])
{
ClassA *a = [[ClassA alloc] init];
ClassB *b = [[ClassB alloc] init];
[a initVar]; // uses ClassA method
[a printVar]; // reveal value of x;
[b initVar]; // use overriding ClassB method
[b printVar]; // reveal value of x;
[a free];
[b free];
return 0;
}
Here's what happens when you compile this program using gcc:
gcc main.m -lobjc
main.m: In function 'main':
main.m:48: warning: 'ClassA' does not respond to 'printVar'
What happened here? We talked about this in an earlier section. Take a look at the declaration for ClassA:
// ClassA declaration and definition
@interface ClassA: Object
{
int x;
}
-(void) initVar;
@end
Notice that no printVar method is declared. That method is declared and defined in ClassB. Therefore, even though ClassB objects and their descendants can use this method through inheritance, ClassA objects cannot because the method is defined further down in the hierarchy.2
Returning to our example, let's add a printVar method to ClassA so you can display the value of its instance variables:
// ClassA declaration and definition
@interface ClassA: Object
{
int x;
}
-(void) initVar;
-(void) printVar;
@end
@implementation ClassA;
-(void) initVar
{
x = 100;
}
-(void) printVar
{
printf ("x = %i
", x);
}
@end
ClassB's declaration and definition remains unchanged. Now, let's try compiling and running this program again.
x = 100
x = 200
Now we can talk about the actual example. First, a and b are defined to be ClassA and ClassB objects, respectively. After allocation and initialization, a message is sent to a asking it to apply the initVar method. This method is defined in the definition of ClassA, so it is this method that is selected. The method simply sets the value of the instance variable x to 100 and returns. The printVar method, which you just added to ClassA is invoked next to display the value of x.
Similarly with the ClassB object, b: It is allocated and initialized, then its instance variable x is set to 200, and finally its value displayed.
Be sure you understand how the proper method is chosen for a and b based on which class they belong to. It is a fundamental concept of object-oriented programming in Objective-C.
As an exercise, consider removing the printVar method from ClassB. Would that work? Why or why not?
Overriding the free Method and the Keyword super
Now that you know how to override methods, let's return to Program 8.9 to learn a better approach to releasing the memory occupied by the origin. The setOrigin: method now allocates its own Point origin object, and you are responsible for freeing its memory. The approach used in Program 8.6 was to have main release that memory with a statement such as follows:
[[myRect origin] free];
So you don't have to worry about freeing up all the individual members of a class, you can override the inherited free method (it's inherited from Object) and free the origin's memory there. However, if you decide to override free, you also have to be sure to release the memory taken up not only by your own instance variables, but by any inherited ones as well.
To do this, you need to take advantage of the special keyword super, which refers to the parent class of the receiver of the message. You can send a message to super to execute an overridden method. This is the most common use for this keyword. So, the message expression
[super free];
when used inside a method invokes the free method that is defined in (or inherited by) the parent class. The method is invoked on the receiver of the message—in other words, on self.
Therefore, the strategy for overriding the free method for your Rectangle class is to first release the memory taken up by your origin and then invoke the free method from the parent class to complete the job. This releases the memory taken up by the Rectangle object itself. Here is the new method:
-(id) free
{
if (origin)
[origin free];
return [super free];
}
The free method is defined to return a value of type id. You know this by looking inside the header file objc/Object.h where it is declared. Inside the free method, a test is made to see if origin is nonzero before freeing it. It's possible that the origin of the rectangle was never set, in which case it will have its default value of zero. Then we invoke the free method from the parent class, which is the same method the Rectangle class would have inherited were it not overridden.
It is pointed out that you can also write the free method more simply as
-(id) free
{
[origin free];
return [super free];
}
since it's okay to send a message to a nil object.
With your new method, you now have to free only just the rectangles you allocate without having to worry about the Point objects they contain. The two free messages shown in Program 8.5
[myRect free];
[myPoint free];
will now suffice to free all the objects you allocated in the program, including the Point object that setOrigin: creates.
There is still one issue that remains: If you set the origin of a single Rectangle object to different values during the execution of your program, you must release the memory taken up by the old origin before you allocate and assign the new one. For example, in the following code sequence
[myRect setOrigin: startPoint];
...
[myRect setOrigin: endPoint];
...
[startPoint free];
[endPoint free];
[myRect free];
the copy of the Point startPoint stored in the origin member of myRect is never released because it is overwritten by the second origin (endPoint) that is stored there. That origin is released properly when the rectangle itself is freed, based on your new free method.
You need to ensure that, before you set a new origin in your rectangle, the old one is freed. This can be handled in the setOrigin: method as follows:
-(void) setOrigin: (Point *) pt
{
if (origin)
[origin free];
origin = [[Point alloc] init];
[origin setX: [pt x] andY: [pt y]];
}
Now you have a clean implementation of your Rectangle class that does not leak memory. And that is fundamental to good programming practice in Objective-C (or in any other programming language, for that matter!).
Extension Through Inheritance—Adding New Instance Variables
Not only can you add new methods to effectively extend the definition of a class, but you can also add new instance variables. The effect in both cases is cumulative. You can never subtract methods or instance variables through inheritance; you can only add, or in the case of methods, add or override. Let's return to your simple ClassA and ClassB classes and make some changes. You'll add a new instance variable y to ClassB, like so:
@interface ClassB: ClassA
{
int y;
}
-(void) printVar;
@end
Even though ClassB might appear to have only one instance variable called y based on the previous declaration, it actually has two3: It inherits the variable x from ClassA and adds its own instance variable y.
Let's put this together in a simple example to illustrate this concept (see Program 8.8).
// Extension of instance variables
#import <objc/Object.h>
#import <stdio.h>
// Class A declaration and definition
@interface ClassA: Object
{
int x;
}
-(void) initVar;
@end
@implementation ClassA;
-(void) initVar
{
x = 100;
}
@end
// ClassB declaration and definition
@interface ClassB: ClassA
{
int y;
}
-(void) initVar;
-(void) printVar;
@end
@implementation ClassB;
-(void) initVar
{
x = 200;
y = 300;
}
-(void) printVar
{
printf ("x = %i
", x);
printf ("y = %i
", y);
}
@end
int main (int argc, char *argv[])
{
ClassB *b = [[ClassB alloc] init];
[b initVar]; // uses overriding method in ClassB
[b printVar]; // reveal values of x and y;
[b free];
return 0;
}
x = 200
y = 300
The ClassB object b is initialized by invoking the initVar method defined within ClassB. Recall that this method overrides the initVar method from ClassA. This method also sets the value of x (which was inherited from ClassA) to 200 and y (which was defined in ClassB) to 300. Next, the printVar method is used to display the value of these two instance variables.
There are many more subtleties to the idea of choosing the right method in response to a message, in particular when the receiver can be one of several classes. This is a powerful concept known as dynamic binding, and it is the topic of the next chapter.
Abstract Classes
What better way to conclude this chapter than with a bit of terminology? We introduce it here because it's directly related to the notion of inheritance.
Sometimes classes are created just to make it easier for someone to create a subclass. For that reason, these classes are called abstract classes or, equivalently, abstract superclasses. Methods and instance variables are defined in the class, but no one is expected to actually create an instance from that class. For example, consider the root object Object. Can you think of any use for defining an object from that class?
The Foundation framework, covered in Part II, has several of these so-called abstract classes. As an example, the Foundation's NSNumber class is an abstract class that was created for working with numbers as objects. Integers and floating-point numbers typically have different storage requirements. So, separate subclasses of NSNumber exist for each numeric type. Because these subclasses, unlike their abstract superclasses, actually exist, they are known as concrete subclasses. Each concrete subclass falls under the NSNumber class umbrella and is collectively referred to as a cluster. When you send a message to the NSNumber class to create a new integer object, the appropriate subclass is used to allocate the necessary storage for an integer object and to set its value appropriately. These subclasses are actually private. You don't access them directly yourself; they are accessed indirectly through the abstract superclass. The abstract superclass provides a common interface for working with all types of number objects and relieves you of the burden of having to know which type of number you have stored in your number object and how to set and retrieve its value.
Admittedly, this discussion might seem a little “abstract” (sorry!); don't worry, just a basic grasp of the concept is sufficient here.
Exercises
- Add a new class called
ClassC, which is a subclass ofClassB, to Program 8.1. Make aninitVarmethod that sets the value of its instance variablexto300. Write a test routine that declaresClassA,ClassB, andClassCobjects and invokes their correspondinginitVarmethods. - When dealing with higher-resolution devices, you might need to use a coordinate system that enables you to specify points as floating-point values, rather than as simple integers. Modify the
PointandRectangleclasses from this chapter to deal with floating-point numbers. The rectangle's width, height, area, and perimeter should all work with floating-point numbers as well. - Modify Program 8.1 to add a new class called
ClassB2that, likeClassB, is a subclass ofClassA.What can you say about the relationship between
ClassBandClassB2?Identify the hierarchical relationship between the
Objectclass,ClassA,ClassB, andClassB2.What is the superclass of
ClassB?What is the superclass of
ClassB2?How many subclasses can a class have, and how many superclasses can it have?
- Write a
Rectanglemethod calledtranslate:that takes a vectorPoint(xv, yv) as its argument. Have it translate the rectangle's origin by the specified vector. - Define a new class called
GraphicObject, and make it a subclass ofObject. Define instance variables in your new class as follows:int fillColor; // 32-bit color
BOOL filled; // Is the object filled?
int lineColor; // 32-bit line colorWrite methods to set and retrieve the variables defined previously.
Make the
Rectangleclass a subclass ofGraphicObject.Define new classes,
CircleandTriangle, that are also subclasses ofGraphicObject. Write methods to set and retrieve the various parameters for these objects and also to calculate the circle's circumference and area and the triangle's perimeter and area. - Write a
Rectanglemethod calledintersect:that takes a rectangle as an argument and returns a rectangle representing the overlapping area between the two rectangles. So, for example, given the two rectangles shown in Figure 8.9, the method should return a rectangle whose origin is at (400, 380), whose width is 50, and whose height is 60.Figure 8.9. Intersecting rectangles.
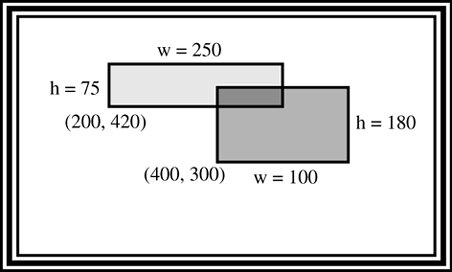
If the rectangles do not intersect, return one whose width and height are zero and whose origin is at (0,0).
- Write a method for the
Rectangleclass calleddrawthat draws a rectangle using dashes and vertical bar characters. The following code sequenceRectangle *myRect = [[Rectangle alloc] init];
[myRect setWidth: 10 andHeight: 3];
[myRect draw];
[myRect free];would produce the following output:
----------
| |
| |
| |
----------
