14. Introduction to the Foundation Framework
A framework is a collection of classes, methods, functions, and documentation logically grouped together to make developing programs easier. On the Mac under OS X, about 50 frameworks exist for developing applications, working with the Mac's Address Book structure, burning CDs, developing QuickTime applications, using audio devices, and so on.
The framework that provides the base or foundation for all your program development is called the Foundation framework. This framework is the subject of this second part of this book. It allows you to work with basic objects, such as numbers and strings, and with collections of objects, such as arrays, dictionaries, and sets. Other capabilities provide for working with dates and times, automated memory management, working with the underlying file system, storing (or archiving) objects, and working with geometric data structures such as points and rectangles.
The Application Kit framework contains an extensive collection of classes and methods to develop interactive graphical applications. These give the capability to easily work with text, menus, toolbars, tables, documents, the pasteboard, and windows. On Mac OS X the term Cocoa collectively refers to the Foundation framework and the Application Kit framework. After you have finished the material in this book, you will be well suited to learning how to develop Cocoa applications. Many resources for this subject are listed in Appendix E, “Resources.”
The Foundation framework can be found on the Mac as noted. It also exists as part of the free GNUStep distribution, which means you can use it on any Unix system that has GNUStep installed or under Windows as part of the CygWin or MinGW system. Linux users can install LinuxSTEP as their development environment. As with the programs developed in the first part of this book, all the programs using the Foundation framework run under all these environments. Consult Appendix E for links to Web sites where you can download these development environments.
Foundation Programs on the Mac
This section tells how to access the large volumes of documentation and how to compile Foundation programs on Mac OS X.
Foundation Documentation
For reference purposes, you should know that the Foundation header files are stored in the directory /System/Library/Frameworks/Foundation.framework/Headers. Take a look at that directory and familiarize yourself with its contents. You should also take advantage of the Foundation framework documentation stored on your system. This documentation exists both in the form of a single Acrobat .pdf file (at /Developer/Documentation/Cocoa/Reference/Foundation/ObjC_classic/Foundation.pdf) and as HTML files for viewing by a browser (at /Developer/Documentation/Cocoa/CocoaTopics.html or /Developer/Documentation/Cocoa/Cocoa.html under panther). Contained in this documentation is a description of all the Foundation classes and all the implemented methods and functions.
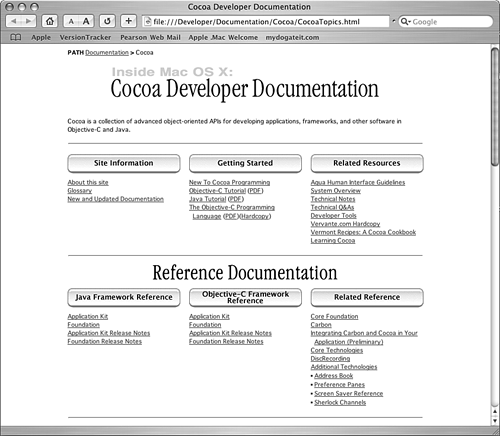
If you're using the HTML files, open the CocoaTopics.html file in your browser and click Foundation under the heading Objective-C Framework Reference (see Figure 14.1). Under the topic heading Programming Topics further down on the page you will also find a wide assortment of documents covering specific programming issues, such as Memory Management, Strings, and File Management. The reference documentation is also available online from Apple's Web site at the following URL: http://developer.apple.com/documentation/Cocoa/Reference/Foundation/ObjC_classic/index.html. The online documentation might be more current than that stored on your hard disk, so you should take that into consideration.
Figure 14.1. Online Foundation documentation.

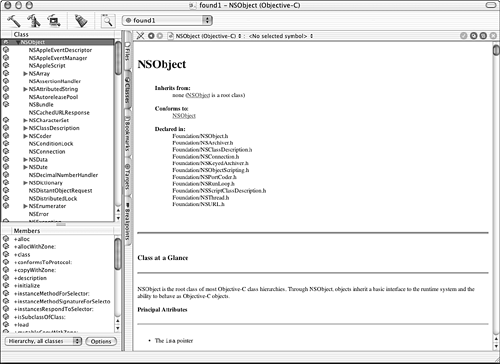
If you're using Project Builder (or X code), one of the nice things is that you have easy access to all the documentation stored on your disk, which includes the header files, method descriptions, and related programming topics, through the sideways Classes tab. For example, Figure 14.2 shows the Programming Topics documentation for the NSObject class in the rightmost window. You get this by clicking the book icon next to NSObject in the upper-left window. Clicking NSObject itself gives you the actual interface section for the class. The lower-left window gives you access to the instance methods for a particular class, in this case for NSObject.
Figure 14.2. Accessing documentation through Project Builder.

Compiling Foundation Programs Using Project Builder
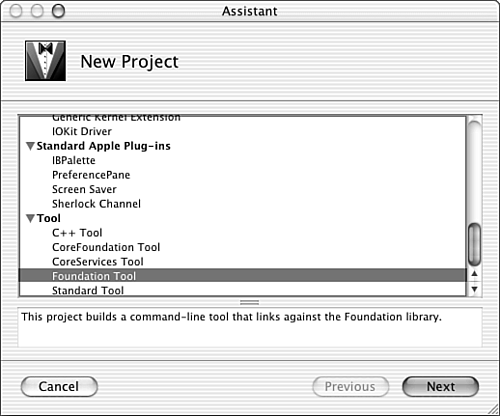
If you're using Project Builder, you should select Foundation Tool under the New Project window when it appears. This is shown in Figure 14.3.
Figure 14.3. Selecting Foundation Tool from Project Builder.

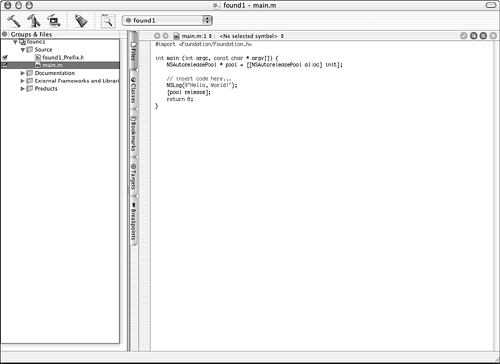
In the menu screen that follows, you should specify the project name and its location in the normal way. After that, the new project is created. If you examine the template file that is created for you (main.m), it will look similar to Figure 14.4.
Figure 14.4. The initial main.m file that is created in Project Builder.

There are some new things in the main.m file, which we will talk about in Chapter 15, “Numbers, Strings, and Collections.” You can delete the NSLog function call from the template file; the rest can remain.
You can then enter the lines for your program into the editor window and can subsequently build and run your application as you did with all the previous program examples.
Compiling Foundation Programs Using Terminal
You can easily compile programs using gcc to work with the Foundation framework. All you have to do is add the –framework foundation option on the gcc command line. This can then be followed by the list of Objective-C files to be compiled. So, the command line
$ gcc –framework Foundation main.m
compiles the program main.m and automatically links it with the appropriate libraries. Note that you do not use the –l objc option any longer.
Assuming your program was divided into three files called addressbook.m, addresscard.m, and main.m, the command line
$ gcc –framework Foundation addressbook.m addresscard.m main.m –o addrbk
would compile the three specified Objective-C files and name the executable output file addrbk.
Foundation Programs Under GNUStep
If you've installed MinGW or CygWin on your Windows system, you should note that GNUStep is not part of the standard MinGW distribution, so you'll have to get it yourself from www.gnustep.org and follow the directions for installation.
After GNUStep is installed, you can compile your programs using gcc. You can use two approaches here. One is to create your own gcc command line, and the other is to use the make utility and create a GNUmakefile. In either case, you need to ensure that the GNUStep environment variables are set up properly on your system. This is done by executing the GNUStep.sh file when you start your shell. Check with your system administrator if you were not the one who installed GNUStep on your system to ensure that your GNUStep environment is properly set up.
If you use the gcc command line approach, your command line might vary based on how GNUStep was installed on your system. In the general case, it might look something like this:
$ gcc –fconstant-string-class=NSConstantString –I header-dirs
–L lib-dirs source-files -lobjc –lgnustep-base
(The at the end of the line is for continuing the command line over the following line.)
The directory –I header-dir option specifies the directory containing the header files needed by your program. You will need more than one of these. Similarly, the –L lib-dir option specifies the location of the GNUStep library files, which you will also need more than one of. On my Windows XP system with GNUStep installed in the directory C:gnustep (which can also be referenced through the variable $GNUSTEP_ROOT), I would use the following command line to compile the program main.m:
$ gcc –fconstant-string-class=NSConstantString
-I /c/gnustep/system/library/headers
-I /c/gnustep/system/library/headers/gnustep
-I /c/gnustep/system/library/headers/ix86/mingw32
-L /c/gnustep/system/library/libraries/ix86/mingw32
-L /c/gnustep/system/library/libraries/ix86/mingw32/gnu-gnu-gnu
main.m –lobjc –lgnustep-base
Obviously, you won't want to type this in each time. So, you should create a simple shell script that enables you to specify the name of the file(s) to compile, like this:
$ fgcc main.m
You can also use a special program called make to build your programs more easily. To use make, you must make sure you have the GNU make utility installed. Then, you'll need to create a makefile under the name GNUmakefile.
Assuming you are compiling a program called main.m and want the executable named test1.exe (under Windows), your GNUmakefile would look like this:
$ cat GNUmakefile
include $(GNUSTEP_MAKEFILES)/common.make
TOOL_NAME = test1
test1_OBJC_FILES = main.m
include $(GNUSTEP_MAKEFILES)/tool.make
$
Here, test1 should be replaced in two spots by the name of your program. If your program contains more than one source file, they all should be listed on the OBJC_FILES line, as in the following:
TOOL_NAME = addrbook
addrbk_OBJC_FILES = addressbook.m addresscard.m main.m
To compile your test1 program (assuming that the source file and the makefile are in the current directory), you can issue the make command:
$ make
Making all for tool test1...
Compiling file main.m ...
main.m:1:2: warning: #import is obsolete, use an #ifndef wrapper in the header
file
Linking tool test1 ...
$
The executable for the program is not placed in your current directory. Instead it is buried in a directory called shared_obj, which is created for you if it doesn't already exist. In our example, you can locate your executable as follows:
$ cd shared_obj/ix86/mingw32/gnu-gnu-gnu
$ test1
Programming is fun.
$
You can also have all your programs installed into the same directory by setting and exporting the variable GNUSTEP_INSTALLATION_DIR. This variable can also be set inside the makefile and should be a path to a directory to which you can write. After your program compiles and links successfully, typing in
$ make install
places your executable into that directory. More precisely, the executable is placed into the directory $GNUSTEP_INSTALLATION_DIR/ Tools/ix86/mingw32/gnu-gnu-gnu (or something slightly different, depending on your machine and development environment). This directory path can then be added to your PATH so you can execute your installed programs from anywhere.
Before leaving this section, we should talk a little about documentation. Appendix E lists resources for locating the online GNUStep Foundation framework documentation. You can also look at Apple's online documentation. You will find that, for the most part, its Foundation documentation (as far as class and method descriptions are concerned) corresponds closely to your GNUStep implementation.
The Root Object: NSObject
Before leaving this chapter, we should mention that you will be using a new root object in your Foundation programs. In all the programs up to this point, you used the root object Object. The Foundation framework uses a different root object called NSObject. If you're not including <Foundation/Foundation.h> (it's put there automatically by Project Builder), include the line
#import <Foundation/NSObject.h>
at the beginning of each of your Foundation programs. Any new class you define when working with the Foundation framework should also have NSObject as its root class, unless, of course it's a subclass of some other object.
You should also note that, as far as memory allocation strategy is concerned, the free method is no longer used to release an object's memory. Instead, you will use NSObject's release method. Foundation also uses a new memory allocation strategy that involves what is known as the autorelease pool. You'll learn more about that in the upcoming chapters.
Exercises
- Locate the header file
NSObject.hand examine its contents. - Look up the documentation for the Foundation's
NSArrayclass; then find the documentation for theobjectAtIndex:method. If you're using a Mac OS X system, locate the documentation on your disk and also online. If you're using Project Builder, locate the documentation on your disk through the application. Don't worry if you don't fully understand the description of the class or the method (we'll cover that in the next chapter). This exercise is just to get you familiar with how to use the documentation. - Modify the
Fractionclass defined in Part I, “The Objective-C Language,” to run under the Foundation framework. Be sure you change the root object in that class toNSObject. Compile and run a test program.
