
B Management Commands
You use the management console to communicate with the management daemon, which controls a cluster from the center. You can access the management console from any PC via the binary ndb_mgm, and then ndb_mgm can either pick up its connect string from my.cnf or you can specify it directly (see Appendix A, “MySQL Cluster Binaries”). The management daemon, ndb_mgmd, must be running on the management server in order for any commands issued to the client to take effect (otherwise, you get an error).
You will make regular use of several commands to see the status of a cluster, to stop and start nodes, and to check on the memory usage of cluster nodes. The following sections cover them in detail.
The SHOW command shows you the current status of each node in the cluster, and if the node is connected, this command shows what version it is and so on. This is the quickest way of establishing how healthy your cluster is, and it is exceptionally useful when troubleshooting. For example, the following example tells you that you have two storage nodes starting, one management node already connected, and no SQL (sometimes referred to as “API” in the management console) nodes connected:
ndb_mgm> SHOW
Cluster Configuration
[ndbd(NDB)] 2 node(s)
id=2 @192.168.254.13 (Version: 5.0.10, starting, Nodegroup: 0, Master)
id=3 @192.168.254.11 (Version: 5.0.10, starting, Nodegroup: 0)
[ndb_mgmd(MGM)] 1 node(s)
id=1 @192.168.254.12 (Version: 5.0.10)
[mysqld(API)] 5 node(s)
id=4 (not connected, accepting connect from any host)
id=5 (not connected, accepting connect from any host)
The <id> START command starts nodes that already have the ndbd (storage node daemon) running and listening. Normally, when you run ndbd, it attempts to connect to the management node immediately, and it exits with an error if it cannot connect. If you start it with the -n (“no start”) flag, it starts but waits for the management client to ask it to start.
So, if you run ndbd -n on Storage Node 3, the management client reports the following when asked to show the current status:
id=3 @192.168.254.11 (Version: 5.0.10, not started)
You can then start the node by issuing 3 START.
Note
The management client only reports “Database node 3 is being started.” You should verify that the node actually does start because the client does not hang around to tell you if the node startup fails.
The <id> STOP command stops a storage node (the ndbd process exits). The <id> RESTART command restarts a storage node (without the --initial parameter).
The <id> STATUS command gives you information on the current status of a node. For example, during the startup phase, it gives you the state:
ndb_mgm> 2 STATUS
Node 2: starting (Phase 2) (Version x.x.x)
Note that you can issue the command ALL instead of an ID number to get the status of all nodes (that is, ALL STATUS). This is particularly useful for detecting when nodes are in and out of single-user mode. (See the section “The ENTER SINGLE USER MODE <sql-node-id> Command” later in this appendix.)
The <id> DUMP 1000 command causes the specified data nodes to send information to the management server about the current usage and availability of IndexMemory and DataMemory. The management node then outputs that information into the cluster log, where you can view it. This command is planned to be deprecated and replaced with a more efficient way of viewing the data in a later version of MySQL Cluster. You should never use any number other than 1000 with DUMP as doing so can lead to unwanted results.
This command is odd because it does not return the data to the management client for printing onscreen, as most other commands do. Instead, it initiates a process (which may take some time with large clusters) that records this information and then stores it in the cluster log on the management node:
ndb_mgm> ALL DUMP 1000
Sending dump signal with data:
0x000003e8 Sending dump signal with data:
0x000003e8
When you have completed the command, the cluster log contains information such as the following, where the first number is the percentage of use, and the numbers in parentheses specify the exact usage:
2005-08-22 18:22:11 [MgmSrvr] INFO -- Node 2:
Data usage is 2(59 32K pages of total 2560)
2005-08-22 18:22:11 [MgmSrvr] INFO -- Node 2:
Index usage is 1(42 8K pages of total 2336)
2005-08-22 18:22:12 [MgmSrvr] INFO -- Node 3:
Data usage is 2(59 32K pages of total 2560)
2005-08-22 18:22:12 [MgmSrvr] INFO -- Node 3:
Index usage is 1(42 8K pages of total 2336)
The logging flexibility of MySQL Cluster is enormous. The following sections cover the commands you can use to log precisely what you want to log and where.
The CLUSTERLOG commands enable and disable cluster logging. You can pass a severity level to these command, but we suggest that you use the CLUSTERLOG FILTER command (see the section “The CLUSTERLOG FILTER <severity> Command,” later in this appendix) to do that.
This command should make it clear that it has worked:
ndb_mgm> CLUSTERLOG ON
Cluster logging is enabled
The CLUSTERLOG TOGGLE command toggles the cluster log (that is, it inverts the current setting, so if it is currently enabled, TOGGLE disables it and vice versa). It also tells you whether cluster logging is enabled or disabled after you have issued the command, as CLUSTERLOG ON and CLUSTERLOG OFF do, as in the following example:
ndb_mgm> CLUSTERLOG TOGGLE;
Cluster logging is enabled.
ndb_mgm> CLUSTERLOG TOGGLE;
Cluster logging is disabled
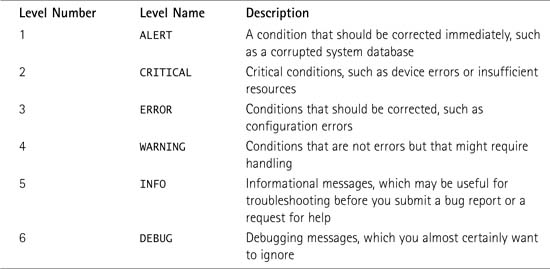
The CLUSTERLOG INFO command prints information about the current cluster logging status, telling you what severities (see Table B.1 in the following section) are currently being logged globally:
ndb_mgm> CLUSTERLOG INFO
Severities enabled: INFO WARNING ERROR CRITICAL ALERT
The CLUSTERLOG FILTER <severity> command enables or disables logging of each severity level. If a severity level is turned on, all events with a priority less than or equal to the category thresholds are logged. You set the thresholds for each category individually for each node or globally by using the CLUSTERLOG command, which is covered shortly. If the severity level is turned off, no events belonging to that severity level are logged. This is a global setting (that is, it affects all nodes in the cluster).
The severity levels shown in Table B.1 are used in MySQL Cluster.
Calling CLUSTERLOG FILTER simply inverts the current selection, so issuing CLUSTERLOG FILTER ALERT twice when the filter starts off enabled results in disabling and then enabling logging (remember that you can see which severity levels are currently being logged with the command CLUSTERLOG INFO):
ndb_mgm> CLUSTERLOG FILTER ALERT
ALERT disabled
ndb_mgm> CLUSTERLOG FILTER ALERT
ALERT enabled
The <id> CLUSTERLOG <category>=<threshold level> command initiates logging of <category> events with priority less than or equal to <threshold> in the cluster log. Note that this can be set globally (do not specify an <id> field) or for each node individually (specify <id>). Note that the severity level must be enabled for any logging to take place; if you have disabled filtering for all CRITICAL errors, there will be no messages that belong to the CRITICAL severity level in your log file, regardless of what you set with the CLUSTERLOG command. You can check what severity levels are currently enabled by using the CLUSTERLOG INFO command.
For example, by using this command, you can set a threshold of 7 for STARTUP events, but a threshold of 2 for BACKUP events. In this way, you can log what you want to log as much as you like, while reducing the amount of junk in the log files. You can also set different log levels for each node. This has clear uses; for example, when trying to track down a connection error on one node, you can get an enormous amount of information logged that is all relevant to that particular node’s connection errors but not accumulate enormous quantities of irrelevant logging information from other nodes that are functioning fine.
You can use the following categories:
STARTUP (default: 7)
SHUTDOWN (default: 7)
STATISTICS (default: 7)
CHECKPOINT (default: 7)
NODERESTART (default: 7)
CONNECTION (default: 7)
INFO (default: 7)
ERROR (default: 15)
CONGESTION
DEBUG
BACKUP
The threshold level is a number between 0 and 15, where 0 is the most important events, and 15 is purely for information and debugging. Each level also includes the lower levels as well. For example, if you specify a threshold of 4, it automatically includes 3, 2, 1, and 0.
For example, to log events with a threshold level (importance) of less than or equal to 5 from connections involving Node 2, you would enter this:
ndb_mgm> 2 CLUSTERLOG CONNECTION=5
Executing CLUSTERLOG CONNECTION=5 on node 2 OK!
The following sections cover some other commands that you may find useful.
Single-user mode allows you to restrict database system access to a single SQL node. When you enter single-user mode, all connections to all other SQL nodes are closed gracefully, and all running transactions are aborted. No new transactions are allowed to be started.
Entering single-user mode is pretty straightforward:
ndb_mgm> ENTER SINGLE USER MODE 4
Entering single user mode
Access will be granted for API node 4 only.
Use ALL STATUS to see when single user mode has been entered.
When the cluster has entered single-user mode, only the designated SQL node is granted access to the database. You can use the ALL STATUS command to see when the cluster has entered single-user mode:
ndb_mgm> ALL STATUS
Node 2: single user mode (Version 5.0.10)
Node 3: single user mode (Version 5.0.10)
This shows you when the storage nodes have switched over to single-user mode. So in this example, the storage nodes have IDs of 2 and 3.
The EXIT SINGLE USER MODE command returns to normal mode. SQL nodes waiting for a connection (that is, for the cluster to become ready and available) are then allowed to connect. The MySQL server denoted as the single-user SQL node continues to run (if it is connected) during and after the change.
The SHUTDOWN command shuts down all nodes in the cluster, including the management daemon and all storage nodes. Note that it does not actually stop SQL nodes (MySQL servers), but it does remove their ability to do anything to tables in the cluster. Note that you cannot run this command when in single-user mode.
Running this command is fairly straightforward:
ndb_mgm> shutdown
2 NDB Cluster storage node(s) have shutdown.
NDB Cluster management server shutdown.
The PURGE STALE SESSIONS command is used in some older versions of MySQL Cluster to fix a bug. It resets reserved node IDs that should be reset each time a node shuts down but sometimes are not. Normally, this command returns “No sessions purged.” If you have problems connecting a node, with errors implying that it is already connected, you can try this command to see if it fixes the problem. This command is not dangerous and will not cause your cluster any damage; the worst-case scenario is that it may do nothing at all. Typically, it will return the following output, which means that it has done nothing:
ndb_mgm> PURGE STALE SESSIONS;
No sessions purged
The START BACKUP command causes MySQL Cluster to begin making a backup. You can use an optional parameter with START BACKUP to determine what action to take after starting the backup. The three possible options are NOWAIT, WAIT STARTED, and WAIT COMPLETED. If you do not specify a level, the default is WAIT COMPLETED. If you specify the NOWAIT option, the START BACKUP command returns immediately, while the request is sent to the management daemon to start the backup. WAIT STARTED causes the command to return after all the data nodes acknowledge the command to begin the backup. Finally, WAIT COMPLETED returns only after all the data nodes have confirmed that the backup completed successfully.
In most cases, you will want to use WAIT COMPLETED, which tells you when the backup completes:
ndb_mgm> START BACKUP WAIT COMPLETED
Waiting for completed, this may take several minutes
Node 2: Backup 6 started from node 1
Node 2: Backup 6 started from node 1 completed
StartGCP: 1580 StopGCP: 1583
#Records: 4098 #LogRecords: 0
Data: 65688 bytes Log: 0 bytes
The ABORT BACKUP <backup id> command causes the nodes to interrupt the backup in progress. It is not possible to resume after the abort, and a new START BACKUP is required to begin a new backup process. You can use ABORT BACKUP on backup IDs that are not in progress without getting any errors. If you successfully abort a backup, you get a message confirming that it was successful. For example, to abort backup ID 10, you would use the following command:
ndb_mgm> ABORT BACKUP 10
Abort of backup 10 ordered
Node 2: Backup 10 started from 1 has been aborted. Error: 1321