

✓ | The basic concepts of a relational database. |
✓ | How to design a database—that is, how to properly arrange the fields in an application into appropriate tables. |
✓ | How to give a database physical reality by defining it in Microsoft Access. |
✓ | About Structured Query Language (SQL), the language most often used for manipulating information in databases. |
The basic purpose of a database is to store data in an organized way, which has two benefits. First, the data is readily available for a variety of uses throughout your organization. Second, because the database has a known structure, the system that stores it can provide powerful tools for extending its use. If you’ve never used databases before, you might be surprised at how quickly these simple concepts can become complicated.
Databases exist to serve the needs of applications. An application, in turn, is a unit of software that exists to serve the needs of some activity: a business system, a game, a public service, an advertisement, or almost any real-world process you can imagine. In a perfect world, the needs of the activity determine the requirements of the application, and the needs of the application determine the requirements of the database. The applications in this book are Web pages that exchange data with visitors on the World Wide Web.
The job of a database designer is first to implement all requirements derived from the application and second to avoid placing reverse requirements (that is, restrictions) on the application or activity.
Almost all the examples in this book use Microsoft Access 2002 databases. Access 2002 isn’t the most powerful, fastest, or most flexible database in the world, but it could easily be the most available. Millions of copies have been sold with various versions of Microsoft Office. In addition, you don’t need to buy expensive licenses in order to implement Access 2002 on a given number of servers or workstations.
If your application requires high reliability or high transaction volumes, you’ll want to consider an industrial-strength database, such as Microsoft SQL Server. Migrating from Access to SQL Server is a fairly straightforward process if you’re suitably prepared.
Although databases physically consist of computer files, applications that use databases don’t manipulate these files directly. Instead, applications send commands to and receive responses from a database management system (DBMS). SQL Server and Access are examples of database management systems. A DBMS relieves the programmer of many tedious and intricate tasks involved in processing the database and guards against the introduction of invalid data.
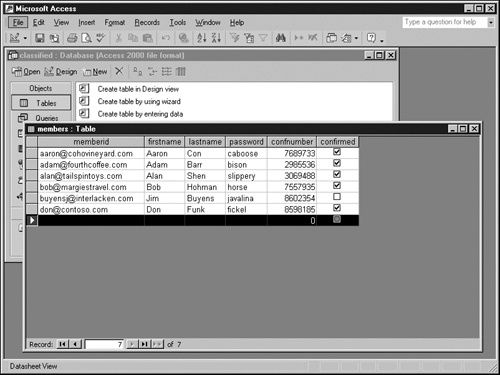
Nearly all modern databases conform to the so-called relational model, and are, therefore, relational databases. The basic unit of organization in any relational database is the table. The columns in a table represent fields, and the rows are records. The next table, for example, stores information about the registered visitors to an Internet site that offers classified advertising.
In this table, the first field in each record contains the same kind of data: a member identification code called memberid. The second field contains the member’s first name; the third field contains the member’s surname, and so on. There’s nothing special about the order of the fields; you could rearrange fields, add fields, or delete fields without affecting the functionality of the table in any way. However, within the same table, you can’t make memberid the first field in one record and the second field of another, nor can you make one record contain a field (for example, spouse’s license plate number) that another record doesn’t.
members Table | |||||
|---|---|---|---|---|---|
memberid | firstname | lastname | password | confnumber | confirmed |
Aaron | Con | caboose | 7689733 | Yes | |
Adam | Barr | bison | 2985536 | Yes | |
Alan | Shen | slippery | 3069488 | Yes | |
Bob | Hohman | horse | 7557935 | Yes | |
Jim | Buyens | javelina | 8602354 | No | |
Don | Funk | fickle | 8598185 | Yes | |
Every relational DBMS must provide the following three functions for accessing data:
Select. Presents a view of a table showing only those records having specified values in specified fields. In English, the following command would request a select operation: "Please retrieve all records from the members table where firstname is Aaron."
Project. Presents a view of a table that doesn’t include all its fields. A project command might be, "Please retrieve only the firstname and lastname fields from the members table."
Join. Presents a combined view of two tables as if they were one table. The result is a temporary table that the DBMS builds by matching record values in one table to record values in another and then combining fields from both matching records.
To show an example of a join operation requires a second table, such as the ads table shown below. This table contains a list of items that members are offering for sale. Notice that the members table and the ads table each contain a memberid field. You could therefore tell the DBMS, "Match the ads table and the members table based on memberid, and show me a view that includes ads.adid, ads.headline, ads.askingprice, ads.memberid, members.firstname, and members.lastname."
ads Table | |||
|---|---|---|---|
adid | headline | askingprice | memberid |
1 | 1957 Beater 2-Door | $100.00 | |
2 | 2001 Super Stretch | $100,000.00 | |
3 | 200 MHz 80 GB PDA Server | $2,140.00 | |
5 | Shozbot Ultra 150 | $1,234.00 | |
6 | WWII Three Wheeler | $975.00 | |
The notation members.memberid means "the memberid field from the members table." This common notation is used when working with tables and fields—one you should learn quickly.
Note
The values in the adid column of the ads table are purposely nonconsecutive. Even if the database assigns consecutive key values, sooner or later someone will delete a record and a break in the sequence numbering will occur. This isn’t an error; it’s just real life.
The results of this join operation appear next. Although the result of a join consists of rows and columns, it isn’t a table in a database sense. Instead, the results are a much more fleeting object called a result set. Some of the fields come from the ads table and some from the members table, but the records in each case contain equal values in the memberid field.
ads/adid | ads/headline | ads/askingprice | ads/memberid | members/firstname | members/lastname |
|---|---|---|---|---|---|
1 | 1957 Beater 2-Door | $100.00 | Jim | Buyens | |
2 | 2001 Super Stretch | $100,000.00 | Bob | Hohman | |
3 | 200 MHz 80 GB PDA Server | $2,140.00 | Don | Funk | |
5 | Shozbot Ultra 150 | $1,234.00 | Aaron | Con | |
6 | WWII Three Wheeler | $975.00 | Jim | Buyens | |
If you have sharp eyes, you might have noticed that these join results don’t show all the fields from both tables—because the query didn’t ask for all the fields, even though it could have. In fact, this query joins two tables and projects the results. This option is perfectly acceptable; you can combine select, project, and join operations at will.
Note
The result of a join is always called a result set, even if it’s empty or contains a single record.
A single relational database can contain any number of tables. This possibility raises questions of how many tables a database should have and what fields belong in what tables. Such decisions are the basis of database design. A good design makes the database easy to work with and provides flexibility to support future requirements. A bad design gets in the way of select, project, and join operations, making the database inflexible and hard to work with.
Like so many things in life, database design is part art and part science. You can approach database design informally, armed with experience and rules of thumb, or formally, applying rigorous scientific methods. First, the informal approach.
The approach detailed in the following steps—each described in a separate section—will generally produce a fairly workable database design. This is the approach most database designers use for real work. The formal approach described later serves more often to check and validate an informal design than to generate a design from scratch.
Every application involves a number of entities whose properties and relationships are fundamental to the application. Here are some examples:
Class Scheduling System. Teachers, students, classrooms, curricula, and class sessions
Airline Ticket System. Customers, crew members, flights, airplanes, seats, airports, gates
Sports League. Players, teams, venues, scheduled games, player game statistics, coaches, referees
Order Entry System. Customers, orders, order line items, bills of lading, bill of lading line items, customer invoices, customer invoice line items, stocked items, warehouses, warehouse bins, suppliers, purchase orders, purchase order line items, receiving tickets, receiving ticket line items, supplier invoices, supplier invoice line items
Note that at this point in the process, you should be interested only in the application’s high-level objects. Some thinking ahead is smart, but for the most part, you should delay worrying about the attributes of each entity.
The next step is to initialize a table for each major entity in your application. You can do this on paper, in any sort of electronic document, or in a DBMS such as Access or SQL Server—it really doesn’t matter at this point. Give each table a succinct name that’s easy to remember and easy to spell. For example, if you create a table to define and describe salable products, you might name it products.
Now, for each table you’ve defined, define one or more fields that will uniquely identify each record in the table. This will be the table’s primary key. A primary key can never be blank, and every record in the table must have a different primary key. In other words, requesting a record by means of its primary key should return one and only one record.
The computer doesn’t care what you use for a key, but human beings do. Therefore, it’s best to identify entities with natural keys wherever possible. A natural key is one that already identifies the entity to human beings or other applications. For example, it probably makes sense to identify each book in a books table by its International Standard Book Number (ISBN) rather than by some new code you invent.
On the other hand, some natural keys make very poor database keys. Keys that are long or case-sensitive, that are subject to even occasional change, or that contain spaces or punctuation, generally make poor database keys. If the natural key has one or more of these defects, you should probably create a new and completely arbitrary key of your own. A system that manages medical clinics, for example, shouldn’t identify clinics by means of clinic names such as "Central Barnesville Clinic," "First Avenue Clinic," and "North Ellerby Medical Center." Getting the application’s user to correctly spell such keys will be a never-ending battle. Instead, assign clinic codes, such as 1, 2, and 3.
To begin this step, think about the information your application needs to know about each major entity you’ve defined (that is, each table). A customer table would probably have a customer number field, of course, but it would also have fields such as name, street address, city, state, country, postal code, e-mail address, phone number, fax number, and so on.
It’s not critical at this point to identify every single field your application needs, but the sooner you identify a field, the easier adding it to your database design will be. If the application involves printed forms of any kind, you can probably discover what fields you need by looking at those forms. In fact, any sort of sample document serves the same purpose.
You should expect that every application will have a different combination of tables—and different fields within each table. There’s no such thing as a single, universal database design suitable for all applications.
While you add the entity attributes, you’ll probably discover some attributes that occur more than once for each primary key. In a database of classified ad members, for example, you might consider recording each member’s personal interest by adding an interest field to the members table. Then you might discover that some members have more than one interest. Similarly, in a training class system, some instructors might have more than one assigned class. In an automobile registration system, some people might own more than one car.
Note
Presumably, the classified ad system would identify interests by means of a code value rather than a phrase. The use of code values makes it much easier to find all members with a given interest.
One solution, although a poor one, is to define a series of fields such as interest1, interest2, and interest3 in the members table. However, this approach has three problems. First, on some records in the members table, one or more of these fields might be blank. Blank fields are usually a clue that something isn’t organized correctly. Second, having multiple interest fields in the same record makes it hard to select, project, and join based on interest. Which of the three interest fields should you use, and what about the data still contained in the others? Third, what if some member has four interests? The database can’t accommodate more than three.
A better solution is to create a member_interest table which contains one record for each combination of member and interest. Such a table would probably have a primary key consisting of two fields: an interestid and a memberid. This design is flexible because it supports the concept of one member having zero to many interests, as well as the one interest having zero to many members. If any additional data pertains to a particular combination of member and interest—such as date indicated—the same record can easily accommodate it.
To complete this phase of the design, you should review each field in each table and verify that the table’s primary key provides a reasonable way to look up that field. To see how this works, first suppose you’ve tentatively designed a member_interest table with the following fields. Then play the old game: which of these objects doesn’t belong?
Interest ID (first field of primary key)
Member ID (second field of primary key)
Date Indicated
Interest Name
If you guessed that Interest Name is the object that doesn’t belong, you’re right. The Interest Name field isn’t a property of a specific member’s interest, it’s a property of the interest in general and therefore belongs in an interests table (whose primary key would be an interestid field only).
Here’s another way of looking at this. Finding the name of an interest shouldn’t require supplying both an interestid and one of its memberid values; supplying an interestid value alone should be sufficient. Therefore, Interest Name doesn’t belong in a table whose primary key is both interestid and memberid.
What if you needed to know the interest names for a given interest member? You’d join the member_interest and interests tables based on interestid.
As a final step, review all the tables in your proposed database, identify those that have real-world relationships, and make sure you’ve provided a way to join them. In essence, you verify that any tables you’ll need to join have fields in common that you can use as keys.
Note that the keys in a join needn’t have exactly the same names. In theory, you can join tables based on any fields you want. In practice, however, joins are almost always between similar fields: employeeid in one table and employeeid in another, for example. It just doesn’t make sense to join two tables based on part numbers in one table equaling street addresses in another.
Tip
If two fields in different tables have the same meaning, it’s good practice to give them the same name. Calling the same field employeeid in one table and employeenum in another only creates confusion, even though the database itself will still work.
Now is a good time to think about code tables. If you’ve created or used any code values in your database design, it’s often valuable to have a table relating code values to code descriptions. Among other things, you can use such tables in joins to display meaningful descriptions rather than obscure codes, and in HTML forms to populate list boxes. In the classified ad example, the table that related interestid to interest name would be such a code table.
The section "Implementing a Database Design in Access 2002" later in this chapter will explain how to make your database design a physical reality. In the meantime, you might be interested in reviewing the formal rules behind the informal approach.
A true relational database is one that follows the so-called relational model first articulated by E. F. Codd, a research fellow at IBM. The relational model describes databases, tables, records, fields, and operators such as select, project, and join in a formal, mathematical way. One of the relational model’s great strengths is that it’s mathematically complete—a term that in common English means it contains no inconsistencies or missing links. The result is a database model with unprecedented applicability to an extremely wide range of problems.
In relational technology, the process of organizing fields into tables is called normalization because with each step, the design approaches the relational standard (that is, the relational norm) more closely. Experts have proposed many degrees of normalization, but everyone seems to agree on the first five:
First normal form. A given field in a given record can contain only one value. This limitation prohibits any sort of repeating group within a single record. To implement repeating groups properly, design a table with repeating records.
In the preceding section, creating interest1, interest2, and interest3 fields would have violated first normal form. Creating a separate member_interest table satisfies this form.
Second normal form. Every nonkey field must depend on all the fields in the primary key. Recall, for example, the member_interest table whose primary key consisted of two keys: interestid and memberid. For this table to contain an interest name field would violate second normal form, because interest name depends on only one of the two keys: interestid. The solution is generally to move the offending field to a more appropriate table.
This form also specifies that two or more tables can’t have the same primary key. If your design has two or more tables with the same primary key, you should combine those tables into one.
Third normal form. No nonkey field depends on another nonkey field. The member_interest table contains an interestid field. Third normal form maintains that you shouldn’t put an interest_name field in the member_interest table because interest_name depends not on memberid and interestid, the table’s primary keys, but on interestid alone.
As with second normal form, achieving third normal form requires moving any noncompliant fields to a more appropriate table.
Fourth normal form. This form prohibits multiple, independent, one-to-many relationships between primary key fields and nonkey fields. To understand this form, recall that the database needs to keep track of multiple items for sale by a given member and also multiple interests for the same member. Items for sale and interests have nothing to do with each other—they’re independent—so you shouldn’t try to accommodate both repeating groups in the same table. To achieve fourth normal form, you need to create a separate table for each independent one-to-many relationship.
Fifth normal form. This form is very extreme and frequently ignored. It requires breaking a table into the smallest possible pieces to eliminate all redundancy. For example, suppose the classified ad system has a policy that all items must cost either $10, $15, or $20. This rule means the ads table will have dozens, hundreds, or thousands of records containing one of these three values. Fifth normal form says you should create a price table keyed by some code—perhaps high, medium, and low—and then put the price code, rather than the actual price, in the ads table.
This example isn’t terribly realistic for a classified ad system, but it makes a lot of sense for sites that sell items like posters, calendars, and baseball caps. Assigning price codes of high, medium, and low makes it very easy to adjust prices. For example, changing the prices of medium-priced items from $15 to $16 requires changing just a single record.
As you might have noticed, the normal forms are more like auditing rules than procedures. In theory, you could start with any random assortment of fields, repeatedly apply the normalization rules, and end up with a logically correct design. In practice, this is extremely tedious and boring.
Achieving normal form is generally a matter of breaking large tables into multiple smaller ones until all data in each table is clearly and uniquely associated with other data in the same table. This approach makes the data easier to maintain and the application easier to code. You can always use the join operation to reassemble tables you’ve split apart in the pursuit of normalization.
After they’ve designed and normalized a number of databases, most developers acquire a certain mindset and no longer subject each table to a sequential normalization process. When the need to accommodate another field develops, they instinctively put it in the right table or, if required, create a new table. Such is the nature of experience.
Once you’ve designed your database, you’ll naturally want to enter its structure into your DBMS and populate it with some data. To practice, you’ll define an Access 2002 database that contains the members and ads tables shown earlier in this chapter.
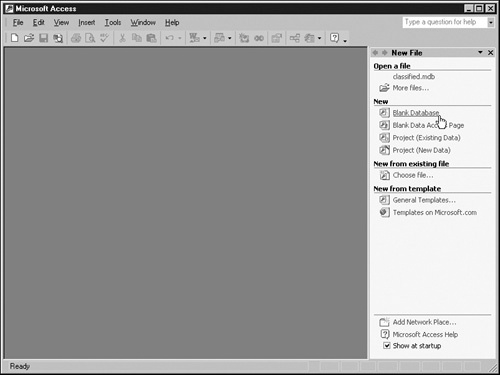
Access databases consist of a single file with an .mdb filename extension. No matter how many tables, queries, forms, reports, macros, and modules you create, they all reside within that one file. Therefore, the first step in any Access project is to initialize a blank database. Here’s the procedure:
Start Access 2002.
Click Blank Database in the New File pane at the right of your screen. The graphic below illustrates this action:
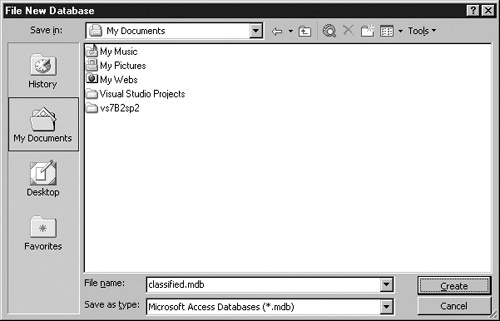
Access will display the File New Database dialog box and prompt you for a file name, as shown in the next graphic. For this example, name the database classified.mdb, select a convenient folder, and click Create.
Access 2002 provides three ways to create a new table. Each way offers a different degree of automation, but they all produce essentially the same results.
Create Table In Design View. This approach displays a grid listing all the fields in a table. Initially, of course, the grid is empty. To add a field, first type its name into any blank line and then set its properties.
Create Table By Using Wizard. This approach starts by presenting a list of commonly used tables and associated fields. From this list, select the fields you want in your new table. Access then creates the table, asks about any relationships with other tables, and offers to open the table for data entry.
Create Table By Entering Data. This option opens an unnamed table in a view that resembles a spreadsheet. If you already have some data prepared, you can use the File menu to import it or the Edit menu to paste it. When you close the unnamed table, Access will examine the data in each field and do its best to determine appropriate field properties. Access will also prompt you for a meaningful table name.
Among these three options, Design View provides the least automation but the most control over results. Design View is also the best way to add, modify, or delete fields in existing tables. The following example, therefore, uses Design View:
Locate the Database window in Access, and double-click Create Table In Design View.
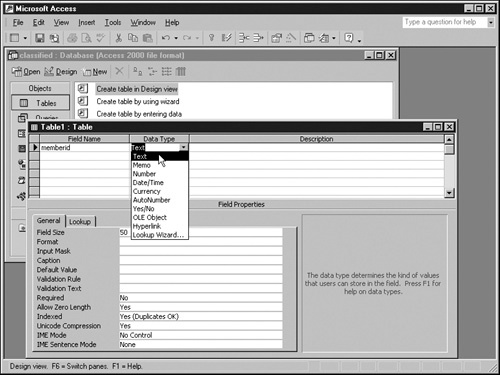
When the Table window shown in the next graphic appears, click the first cell under Field Name, enter the field name memberid, and press Enter.
Click the drop-down list button to the right of the field name you just entered, and select the most appropriate data type. For the memberid field, choose Text. For key fields, select only Text, Number, Date/Time, or AutoNumber.
Review the property settings in the lower half of the Table window, particularly the following. Some of these properties don’t occur for certain field types.
Field Size. This property controls the maximum length of a value the field can contain. For text, this is a maximum number of characters. For numbers, it refers to the internal storage format: Byte means 8 bits, Integer means 16 bits, Long Integer means 32 bits, Single and Double mean floating point, and so on.
For numeric data types, there will also be a Decimal Places property that controls the number of digits stored at the right of the decimal.
Default Value. If you enter a value here and an application later tries to create a record without supplying a data value, Access will assign this value.
Required. Many database systems, including Access, differentiate between fields that have empty values (such as zero or a null string) and fields that have no value at all. If a field’s Required property is Yes, Access will reject any records that have no value at all in the given field.
Allow Zero Length. If you set this property to No and an application later tries to create a record with the field left blank, Access will refuse to save the record and return an error code.
For each remaining field in the table, enter the name in the first available cell in the Field Name column, and then select the type and properties for that field. Here are the correct entries:
Field Name
Data Type
Field Size
Decimal Places
firstname
Text
50
-
lastname
Text
50
-
password
Text
16
-
confnumber
Number
Long Integer
0
confirmed
Yes/No
-
-
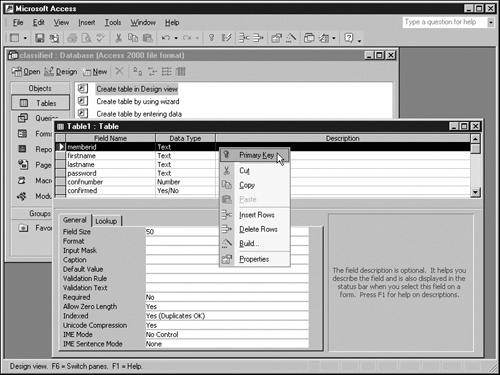
Once you’ve entered all the field names, select the fields that will form the table’s primary key. (To select multiple fields, hold down the Shift or Ctrl key while clicking.) Then right-click the selection and choose Primary Key from the shortcut menu. The graphic on the next page shows the memberid field selected as the primary key.
Save the table by choosing Save from the File menu. Access will prompt you for the table’s name. Type members and press Enter.
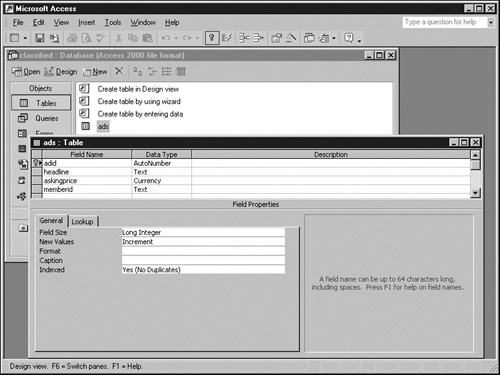
Repeat steps 1–7 to create a new Access table for the ads table in the classified.mdb database. Here are the necessary field names and data types:
Field Name
Data Type
Field Size
Decimal Places
adid
AutoNumber
Long Integer
-
headline
Text
50
-
askingprice
Currency
-
Auto
memberid
Text
50
-
Giving the adid field a data type of AutoNumber tells Access to assign a numeric value automatically each time you add a record to the table. Access will then assign 1 to the first record, 2 to the second record, 3 to the third record, and so forth. Once Access assigns these values, they’re fixed. Adding or deleting other records doesn’t affect AutoNumber values Access has already assigned.
Currency fields always provide 15 digits to the left of the decimal point and 4 to the right. Because it prevents rounding errors on the low-order digits, this data type is usually the best for monetary values.
Soon after creating a table, you’ll probably want to put some data in it. There are several ways to do this. To add the data to the members table, follow these steps:
Select Tables in the Objects bar.
Locate the desired table in the resultant listing.
Double-click the desired table. Access will display the table in Datasheet view, which makes the table resemble a spreadsheet.
To create a new record, enter whatever field values you want in the last line of the grid. This line will have an asterisk in the gray column on the far left. The asterisk changes to an arrow when you start typing a new record.
To save the new record, either press Enter while the cursor is anywhere within the record, or simply move the cursor to another record.
Repeat steps 4 and 5 to enter the values for each record in the members table. You can see these values in the graphic below.
Repeat steps 2 through 6 to create the records in the ads table. Access will automatically number the adid field. Note that if you make a mistake and need to delete a record, that addid number will be permanently absent from the database, which isn’t a problem.
If you’re working with data that already exists in another source, you can paste it into any table you’ve opened in Datasheet view. To paste data from a spreadsheet, follow these steps:
Open the table in Datasheet view.
Open the spreadsheet or other data source.
Make sure the fields in the data source and the fields in Access are arranged exactly the same, from left to right. The first column you copy from the data source will appear in the first Access column, the second data source column in the second Access column, and so on.
Select the data from the source, and copy it to the Windows Clipboard. Typically, this involves dragging the mouse across the data and then choosing Copy from the Edit menu.
In Access, make sure the window for the correct table is highlighted, and then choose Paste Append from the Edit menu. If your data source contained any lines or records that Access couldn’t add to the database, Access will create a new table called Paste Errors and put the erroneous records there. If necessary, you can open that table, correct the faulty records, copy them to the Clipboard, and then repeat step 5.
Datasheet view is also quite handy for changing and deleting records. To change a record, highlight the data in any field and just start typing. To delete a record, click anywhere within it and then choose Delete Record from the Edit menu.
Most applications require the use of several—perhaps even dozens—of tables. Although not required, it’s usually a good idea to document the relationships you intended these tables to have when you designed them. If you like, Access can then enforce these relationships and maintain consistency among your tables.
The next graphic shows the structure of the ads table. These tables are related through the memberid field in two ways:
A given members record can have zero, one, or many ads records.
A given ads record must have exactly one members record, identified by an existing memberid.
Here’s the procedure to tell Access about this relationship:
Open the classified.mdb database in Microsoft Access.
Choose Relationships from the Tools menu.
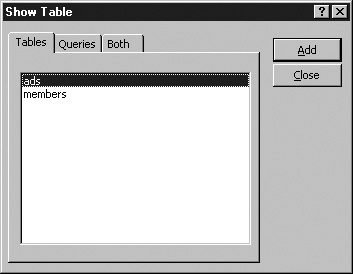
The first time you open Relationships for a database, Access will display the Show Table dialog box shown in the next graphic.
If you’ve previously opened Relationships for the current database, Access won’t display the Show Table dialog box automatically. Instead, it will just show the Relationships window. To display the Show Table dialog box, either right-click the Relationships background area and choose Show Table from the shortcut menu, or choose Show Table from the Relationships menu.
Add any tables with relationships you want to document. Either double-click a table name in the Show Table dialog box, or select the table and click Add. For this example, double-click the members table and the ads table.
Close the Show Table dialog box.
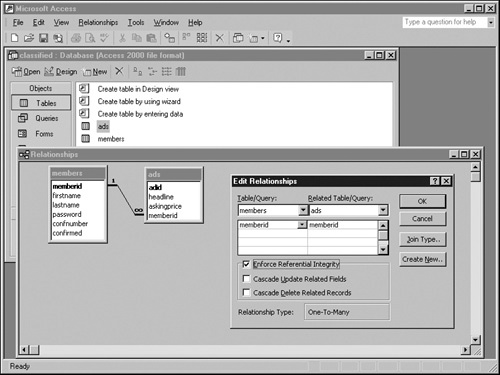
Drag and drop the memberid field from the members table onto the memberid field in the ads table. Access will display the Edit Relationships dialog box, as shown in the graphic below. Select the Enforce Referential Integrity check box, and click Create.
Close the Relationships window.
Access uses relationship information in two ways: First, whenever you select two or more tables for making a query, the default relationships will be the ones you defined in the Relationships window.
The second use of relationships occurs only if you select the Referential Integrity option. Doing so tells Access that no records should exist in the table named in the Related Table/Query (right) side of the Edit Relationships dialog box, unless a matching record exists in the corresponding table named in the Table/Query (left) side. If this seems confusing, refer again to the previous graphic and consider the following points:
Selecting the Enforce Referential Integrity box tells Access to reject the addition of any ads record whose memberid value doesn’t exist in the members table.
Selecting the Cascade Update Related Fields box tells Access that if someone changes the memberid field of a members record, Access should change the memberid field of all matching ads records.
Selecting the Cascade Delete Related Records box tells Access that if someone deletes a members record, Access should automatically delete any ads records having the same memberid.
Relationships and their implementation involve complex ideas that might take you some time to appreciate, let alone debug. Suppose, for example, that you established the cascading deletes between the member and ads tables. If an administrator then deleted a member record, Access would automatically delete all that member’s ads records. If the administrator then re-created the member record, the ads records would still be missing. You could stare at the member maintenance code for hours and never suspect it would affect the ads table. Regardless of the type of database, referential integrity, cascading updates, and cascading deletes are famous for their unexpected consequences.
Given all that, you might choose not to deal with relationships at all. As your experience grows, however, you’ll find relationships a more and more valuable tool, and it’s good to know that Access is ready when you are.
Given the frequent mention thus far of the relational operators select, project, and join, you might be wondering how Access makes use of them. The following example joins the members table and the ads table based on memberid, projects some of the fields into a grid, and selects all records from the results. Here’s the procedure:
Start Microsoft Access, and open the classified.mdb database.
Locate the classified Database window, and click the Queries icon in its Objects bar.
Locate the Create Query In Design View option, and double-click it. Access will display a Show Table dialog box much like the one shown in step 3 of the previous procedure. Double-click each of the tables to add them to the query, and click Close.
Make sure a relationship is in effect—indicated by a connecting line—between the memberid field in the members table and the memberid field of the ads table. If not, establish one by dragging the memberid field from the members table and dropping it on the memberid field in the ads table.
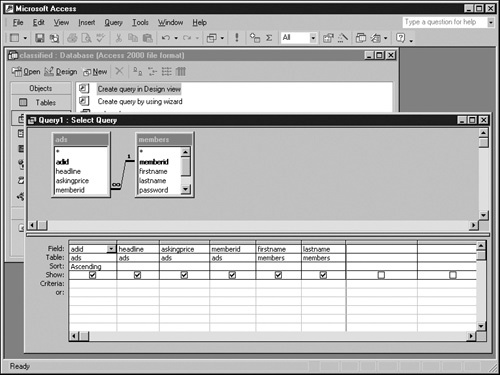
Drag the following fields from the diagram in the top half of the Select Query window to the field grid in the bottom half. Drop them in order from left to right: ads.adid, ads.headline, ads.askingprice, ads.memberid, members.firstname, members.lastname.
To display the query results in adid order, click anywhere in the Sort field beneath the adid field. A drop-down list button will appear. Click the button, and select Ascending from the resulting list. Do that for any other field you want. The Select Query window should now resemble that shown in the following graphic. Save the query as admembers. Once you’ve saved a query, opening it at any time reruns the query using current data. In addition, you can use saved queries as if they were tables when you create other queries. When the Show Table dialog box mentioned in step 3 appears, just click the Query tab.
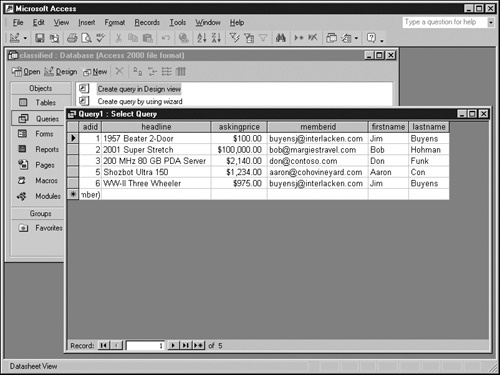
To run the query and view the results, select Datasheet View from the View menu. You should get the results shown in the following graphic.
Many queries involve record selection criteria, or as you might call them, search values. In SQL parlance, this is a select. To make the query you just created perform a select operation, enter the value you want in the Criteria row of the Select Query window shown in step 6 of the "Create a query" procedure earlier in this chapter.
Selecting based on constants is a valuable technique, but it’s sometimes awkward for recurring use. Specifically, every time you want to query a different value, you have to open Design view, locate the proper column, and update the Criteria value. It would be much more convenient to tell Access that it needed to prompt you for one or more Criteria values every time it ran the query. Access could then run the query with the values you specified. Parameter queries provide exactly this facility.
To see a parameter query in action, refer to the next graphic. This query retrieves all records from the members table having a given value in the lastname field. A parameter named qlastname specifies the desired value. The entry that makes this happen is the value [qlastname], where the Criteria row and the lastname column intersect.
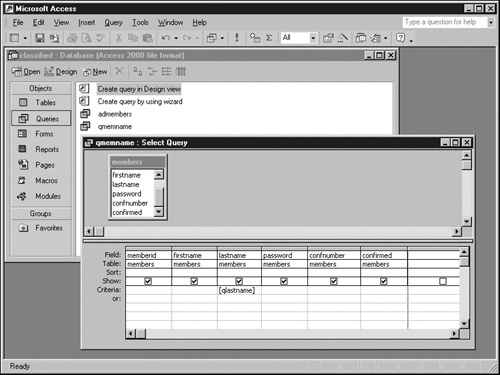
The square brackets around qlastname identify this entry as a database field. If you entered just the characters qlastname in the Criteria row, Access would, by default, treat your entry as a constant, surround it with quotation marks, and retrieve all member records with an lastname value of qlastname. Surrounding an expression with square brackets tells Access (and SQL) that the expression names a database field.
Of course, qlastname isn’t the name of any field in any table involved in the query. Because of this, Access assumes that qlastname is the name of a parameter you plan to supply whenever you run the query. If you’ve ever hand-typed a field name, misspelled it, and then wondered why Access displayed an Enter Parameter Value prompt, now you know.
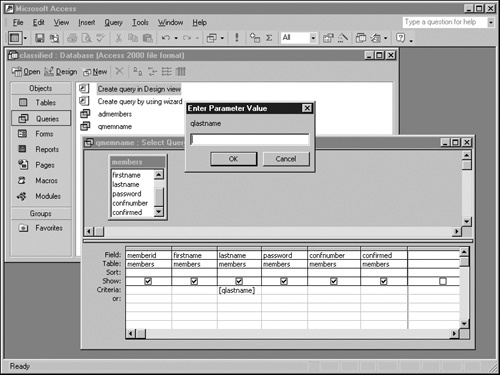
The next graphic shows what happens when you try to run this query (that is, when you switch the query window to Datasheet view): the query won’t run until you supply a value for the qlastname parameter.
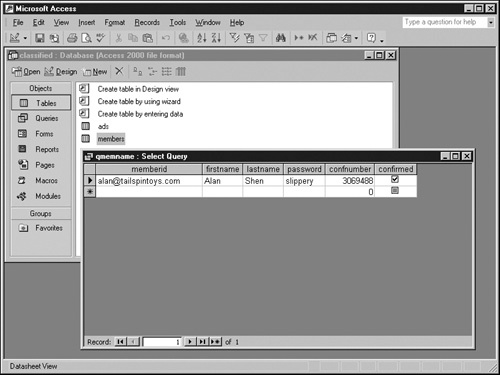
If you supply the value Shen, the query displays only records having that value in the lastname field. The next graphic illustrates this result.
Chapter 7 explains how to run a parameter query from a Web page. This approach has two advantages:
You can develop a query in Access and provide it to Web visitors without ever looking at a SQL statement.
All the queries for an application are in the database rather than in the Web pages. If you ever have to change the database structure, queries stored in the database are much easier to find and correct than queries widely scattered through Web pages and other application programs.
The primary disadvantage of using stored parameter queries in Web pages is the additional complexity required to invoke them. Chapter 7 explains this as well.
The next graphic shows a modified version of the query you created in the "Create a query" procedure earlier in this chapter. It selects only those records with an askingprice less than 1,000.
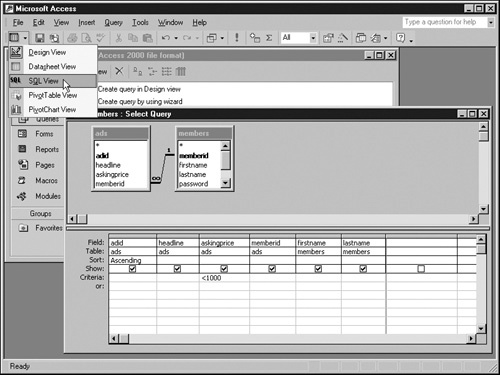
The graphic also shows that the View menu contains more than just Design View and Datasheet View, which you’ve seen before. It also provides a third view—called SQL View—that displays the structured query language (SQL) statement that corresponds to the current specifications in Design View. The next graphic shows this feature in action.
SQL is the way that applications usually send commands to relational databases. SQL is a powerful and complex language deserving whole books of explanation; the material in this section is just an overview. Nevertheless, it describes most of the SQL used for Web database pages. The table on the next page lists the most fundamental SQL commands.
Most developers use the data manipulation commands SELECT, INSERT, UPDATE, and DELETE far more often than the data definition and data administration commands CREATE, DROP, GRANT, and REVOKE. There are two reasons for this:
First, most modern database systems provide graphical tools for data definition and data administration. These tools are so easy to use that few developers bother with the CREATE, DROP, GRANT, and REVOKE commands.
Most applications do far more data updating than data restructuring.
Category | Command | Description |
|---|---|---|
Data definition | CREATE | Creates a new database, table, index, or stored query |
DROP | Deletes an existing database, table, index, or view | |
Data administration | GRANT | Permits specified users to perform a given action |
REVOKE | Rescinds permission for specified users to perform given actions | |
Data manipulation | DELETE | Removes all records matching given criteria |
INSERT | Adds a new record | |
SELECT | Returns a set of all records that match given criteria | |
UPDATE | Changes the value of specified fields in all records that match given criteria | |
It’s customary to capitalize all keywords used in SQL statements, even if the database system is case-insensitive.
Note
An index is a table of presorted record values. Having an index speeds up access and sorting based on the corresponding fields.
The rest of this section concentrates on the SELECT, INSERT, UPDATE, and DELETE statements.
To clarify the SELECT statement, consider a simple example that selects ads with an asking price of less than $1,000. (This time, no information from the members table appears.) The SELECT statement to perform this query looks like this:
SELECT ads.adid, ads.headline, ads.askingprice, ads.memberid
FROM ads
WHERE (ads.askingprice < 1000);
This statement selects all records from the ads table whose askingprice field has a value less than 1,000. For each matching record, it shows the four fields named in the first line.
Queries like the one above are all well and good, but SQL provides no way for your program to access the resulting records—and keep in mind that there can be more than one. You need some way other than SQL to read those records one at a time and to get the field values into your ASP.NET code so that you can format them into a Web page.
Each database system has its own way of doing this; Access and SQL Server have more than one way. This book uses an approach called ADO.NET, which Chapter 7 explains. For now, it’s enough to know that when a SELECT statement returns data, you need to use programming methods (APIs) other than SQL to examine the returned records.
The keyword SELECT identifies the command, initiates it, and identifies the fields the command should return. Here’s how to code the arguments for a SELECT statement:
After the word SELECT, specify the fields you want to appear in the result set. Separate multiple fields with commas, and arrange them in the order you want them to appear.
If the same field name appears in more than one table mentioned in the FROM clause (described in the next section), specify it as tablename.fieldname.
If a table name or field name contains spaces or special characters, enclose it in square brackets (for example, members.[first name]).
To include all field names from a table, use an asterisk (for example, ads.*).
With most database systems, you can specify functions and formulas as if they were field names. For example, to get the absolute value of the balance field from the account table, you could code
abs(account.balance) AS absbal
This code would add a field named absbal to the result set, with data values equal to the absolute value of the balance field from the account table. If the SELECT statement contains a GROUP BY clause (described later in this chapter), the SELECT clause can include aggregate functions such as sum, avg, count, min, max, first, and last.
To assign a field a different name than it has in the database, code the field’s database name, the word "As," and then the name you want to query to use. Here’s an example:
SELECT members.[password] As pswd, ...
When using database systems other than Access and SQL server, you might need to omit the word "As." Oracle is a case in point. The lack of a comma between two names tells the database system that the second name is renaming the first.
FROM identifies the table or join to use in formulating the result set. To select fields from an existing table, specify the table’s name. To select from a join of two tables, specify an expression that looks like this:
FROM left-table   jointype   right-table
  ONleft-table.joinfield = right-table.joinfield
That is, for example:
FROM ads INNER JOIN members
  ON ads.memberid = members.memberid
There are three common JOIN types:
INNER JOIN. The result set will contain only records in which the joined fields from both tables are equal.
LEFT JOIN. The result set will contain all records from the left table and only those records from the right table in which the joined fields are equal. When a record from the left table has no matching record in the right table, the result set will contain nulls in any field sourced from the right table.
RIGHT JOIN. The result set will contain all records from the right table and only those records from the left table in which the joined fields are equal. When a record from the right table has no matching record in the left table, the result set will contain nulls in any field sourced from the left table.
Oracle uses a completely different syntax for joins. When using that DBMS, you just mention the two tables in a FROM clause and then specify an equality expression in the WHERE clause. Here’s an example.
 FROM ads, members
WHERE ads.memberid = members.memberid
This performs an inner join. To perform a left join, you code the characters (+) on the right side of the equality expression.
 FROM ads, members
WHERE ads.memberid = members.memberid (+)
To perform a right join, put the (+) on the left side of the equality expression (just before the equal sign).
WHERE specifies criteria for selecting records. Most criteria have the format field name, operator, value, as in
members.lastname = 'Shen'
As shown in the preceding code, single quotation marks identify text constants. Access demands that pound signs identify date constants, as in #12/31/1999#, but SQL Server and Oracle use apostrophes. Numeric constants have no surrounding delimiters, as in year = 1950.
You can group criteria using parentheses, the AND operator, and the OR operator.
GROUP BY, when present, tells the database system to consolidate similar records based on equal values in a supplied list of fields. If you specify GROUP BY firstname, lastname, the database system will, before presenting the result set, consolidate all records having the same set of values in those fields.
HAVING works a lot like WHERE, except that it operates after applying the GROUP BY clause. Suppose, for example, you code the following SELECT statement for the ads table in the classified ads database:
SELECT firstname, lastname, sum(askingprice) as totprices
  FROM ads
 GROUP BY firstname, lastname
If you coded HAVING totprices > 1000, the database system would first aggregate all ads records by firstname and lastname, and then, from those results, select any record whose aggregate totprices value was greater than 1,000.
ORDER BY controls the order of records in the result set. You can specify any fields in the result set, separated by commas and in any order, and the database system will sort the result set accordingly: first field first, second field second, and so forth. To sort any field in descending sequence, specify the keyword DESC after its field name. Here’s a typical ORDER BY clause:
ORDER BY lastname, firstname, askingprice DESC
The DELETE statement is one of the easiest SQL statements to code. All you need to know is the name of the table that contains the data and the field values that describe it. Here’s an example:
DELETE FROM ads WHERE askingprice > 50000
The syntax of the WHERE clause is exactly the same as it is for SELECT statements. Be careful when coding this clause, however, and especially careful if, for whatever reason, you omit it. There’s no limit to the number of records a DELETE statement can delete!
If you code a WHERE clause that matches more records than you want, more records than you want will disappear from your database.
If you omit the WHERE clause entirely, the DELETE statement will delete every record in the given table.
The general form of an INSERT statement appears below. The order of the fields and values isn’t significant, except that you must code both of them in the same order.
INSERT tablename (fieldname_3,  fieldname_1,  fieldname_2)
          VALUES (   'value_3',    value_1,     #value_2#)
Note
Spaces, line endings, and other "white space" characters aren’t significant in SQL statements except to separate terms. You can include or omit as many white space characters as you like.
If you omit the list of field names, the database system will expect the value list to contain one value for each field in the database. It will also expect these values to appear in the same order that the corresponding fields appear in the table definition. This requirement often leads to unexpected consequences when, during the life of an application system, someone adds or rearranges fields. For this reason, coding the field names is usually the safe choice.
Note that the example shows single quotation marks around a string value, pound signs around a date value, and no delimiter around a numeric value. In fact, the required notation varies from one DBMS to another. SQL Server, for example, uses single quotes rather than pound signs around dates, and some DBMSs accept or require single quotes around numeric values as well. Resolving such issues might require a bit of trial and error or consultation with the documentation.
A problem arises when you try to insert string values that contain apostrophes. In the following statement, for example:
INSERT ads (headline, askingprice, memberid)
VALUES ('Can't miss opportunity', 2500, '[email protected]')
the DBMS will interpret ’Can’ as a value and t miss opportunity’ as illegal characters in the SQL statement. To avoid this problem, replace all apostrophes in your data with double apostrophes, as shown in the following example. Only one apostrophe will be present when you later retrieve the data.
INSERT ads (headline, askingprice, memberid)
VALUES ('Can''t miss opportunity', 2500, '[email protected]')
Finally, notice that this INSERT statement specifies neither a field name nor a value for the adid field because adid is an AutoNumber field and Access automatically supplies a value that you can’t override.
Here’s a typical UPDATE statement. The name that follows the UPDATE command specifies the table you want to update. The SET clause specifies the values you want to set, and the WHERE clause specifies the records you want to update.
UPDATE ads
    SET ads.askingprice = 150, memberid = '[email protected]'
    WHERE ads.adid = 1
There’s no need to include SET expressions for fields you don’t want to update. The example, above, for example, makes no change to the headline field. As with the INSERT statement, you must code correct delimiters around any values.
As with the DELETE statement, there are no limits to the number of records an UPDATE statement can affect. If you forget the WHERE clause, an UPDATE statement modifies every record in the given table. If you want to modify only one record, the WHERE clause should specify a unique key.
If this still seems a bit difficult, take heart. In most cases, you can follow these steps to get Access to create your SQL statements for you:
Start Access and open your database.
Create a query as described under "Create a query" earlier in this chapter. This example will use the query shown in the graphic in Creating a Page Banner User Control.
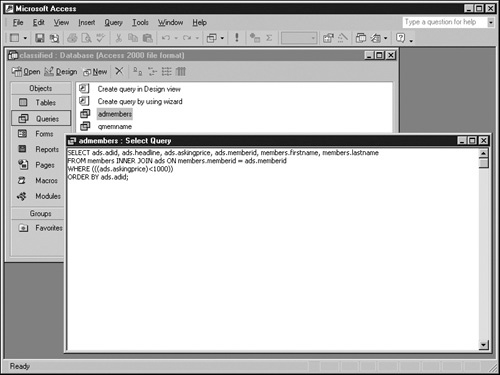
When the query is producing the results you want, choose SQL View from the View menu.
As you already saw in the graphic in Create a user control that displays a page banner, Access will display the SQL statement that produced the successful query from step 3. Select the SQL code and copy it to the Clipboard.
Open the ASP page where you need to use the query.
Within any ASP script block, enter a line of code, such as
strSQL = ""
Set the cursor between the two quotation marks, and then paste the SQL statement you copied in step 5. Now you will have
strSQL = "SELECT ads.adid, ads.headline, ads.askingprice,
ads.memberid FROM ads WHERE (((ads.askingprice)<1000));"
If pasting the SQL statement inserted any line breaks, change them to spaces.
Locate every quotation mark you pasted from Access, and change each one to a single quote.
If the table names and field names contain owner prefixes such as dbo_, delete them. Access inserts these prefixes when it links to tables in another DBMS such as SQL server or Oracle, but ADO.NET considers such prefixes both unnecessary and invalid.
An optional final step is to format the Visual Basic statement so that the SQL code is easily readable. To do this, break long constants like those in step 7 into smaller segments, join the segments with concatenation characters (ampersands), and insert continuation characters and line endings as required. Finally, indent each line so that the code takes on a tabular appearance. Here’s an example:
strSQL = "SELECT ads.adid, " & _
                "ads.headline, " & _
                "ads.askingprice, " & _
                "ads.memberid " & _
         "FROM ads " & _
         "WHERE (((ads.askingprice)<1000)); "
The number-one mistake when performing this step, by the way, is omitting the space before the ending quote on each line. (This assumes, of course, that you’re breaking lines between words.)
At this point, the world is your oyster. Your code can replace any portion of the SQL statement, or even all of it, with whatever options or values you like. Perhaps, for example, you’d like to replace the literal 1000 with an expression containing a value received from your Web visitor. Perhaps you’d like to append different ORDER BY strings, depending on the setting of a list box or a set of radio buttons. Go for it. Later chapters will provide further instruction and numerous examples.
Of course, there’s more to developing database Web pages than knowing a few things about SQL statements, knowing how to copy and paste SQL statements generated by Access, and knowing how to construct SQL strings in Visual Basic .NET. You still need to understand how to send SQL statements to the database software, how to obtain the results in your Visual Basic .NET code, how to collect input from the Web visitor, and how to send results to the same visitor. Chapter 7 will explain the technology to do all these things and more, and Chapter 8 through Chapter 14 will provide a number of practical examples. What could be more fun than that?
For more information about SQL statement syntax, search the MSDN Web site (msdn.microsoft.com/library) for the term Transact SQL Reference.
For a summary of differences between SQL for Microsoft Access and SQL for Microsoft SQL Server, browse the MSDN Web site: msdn.microsoft.com/library/officedev/off2000/acconComparingAccessSQLSSQLSyntax.htm.
This chapter introduced the basic concepts of relational databases and explained how to design such databases and implement them in Access. It also explained the fundamentals of SQL.
Chapter 7 will introduce ADO.NET, which provides the interface between program code in an ASP.NET page and information in a database. The chapter will continue by explaining how to open database tables and manipulate data records.