

✓ | How ADO.NET differs from all previous versions of ADO. |
✓ | How to open a database connection using ADO.NET. |
✓ | How to read database information using ADO.NET. |
✓ | How to retrieve, update, and replace database information using ADO.NET. |
Based on preceding chapters, you should be convinced that ASP.NET and Visual Basic .NET are radically enhanced compared to earlier versions of ASP and Visual Basic. Given that, you’re probably expecting to learn that Microsoft has radically enhanced ActiveX Data Objects (ADO) as well. After all, ASP, Visual Basic, and ADO were the triumvirate that made Web database development on Microsoft Web servers so popular.
In fact, the changes to ADO go beyond radical enhancement. ADO.NET brings a whole new approach—a new paradigm—to database access. If you’ve used ADO in the past, get ready to forget everything you know. If you’re new to Web database programming, be glad you’re starting fresh. And if you’re coming from a traditional, non-Web development background, get ready for the greatest shock of all.
Until ADO.NET came along, most application programming interfaces (APIs) that worked with database management systems (DBMSs) gave at least the appearance of working in real time. When you submitted a query and retrieved a record, for example, you assumed that the data was perfectly up to date. Furthermore, if you told the DBMS that you might update the record, the DBMS would set up a lock so that no one else could update the record until your program finished processing it.
ADO.NET changes all that by assuming that the application program and the DBMS operate statelessly. In practical terms, this change means your ASP.NET page and the DBMS interact in only three ways:
The ASP.NET page sends a command to the DBMS for immediate execution. The DBMS executes the command, sends status back to the ASP.NET page, and then forgets that the page exists. If you send the DBMS two commands in this way, the DBMS neither stores nor recognizes any commonality between them.
Alternatively, the ASP.NET page can ask the DBMS to send a group of records that the page will read once and then discard from its local memory. (Of course, the original records remain in the database.)
Using the third and final option, the ASP.NET page gets a group of records from the DBMS, stores them in memory, and then inspects, adds, modifies, or deletes any of these in-memory records it wants. ADO.NET provides a special object that makes this relatively easy, but it doesn’t tell the DBMS to lock the records. Other programs or Web pages can change the database while the first Web page is still working with the data.
If the ASP.NET page makes changes to the in-memory records, it can tell ADO.NET to send updates back to the DBMS. ADO.NET determines what changes this requires by comparing current in-memory values to those originally received.
When the Web page tells ADO.NET to send the data back to the database, ADO.NET checks to make sure that the records in the database haven’t changed. (It does this by comparing current database values to those it originally received.) If no one else has updated those records, the update succeeds. If any data values have changed, ADO.NET sends the Web page an exception.
As you may have noticed, ADO.NET interacts with database systems the same way that browsers interact with Web servers. The client sends the server a request, the server performs the requested work, and the server then forgets everything about the client. The ASP.NET page running on the Web server is the client and the DBMS is the server.
This arrangement is no accident. In a fully-developed .NET world, Web servers and other centralized resources will act as gateways not only to DBMSs but also to XML data sources, text files, vending machines, appliances, traffic sensors, and Web services of all kinds. In most cases, HTTP or other Web protocols will provide the connectivity. But .NET programs need a standard way of accessing, processing, and reporting this myriad of information, and that is exactly what ADO.NET provides.
The following table lists the major ADO.NET objects that provide these functions. The rest of this chapter explains their use, but three points are worth mentioning up front.
First, notice that the SqlConnection, SqlCommand, SqlDataReader, and SqlDataAdapter objects each have counterparts with names beginning with OleDb. The objects that begin with Sql use proprietary, high-speed protocols that communicate only with Microsoft SQL Server. The OleDb objects communicate with Access, Oracle, and other databases for which Object Linking and Embedding database (OLE DB) drivers exist.
Tip
OLE DB applications seldom appear sluggish because of driver inefficiencies. Nevertheless, because the ADO.NET OleDb objects use more layers of software than the corresponding Sql objects, the Sql objects will generally be faster.
Second, despite the claim that ADO.NET operations are stateless, you might have noticed the presence of two connection objects: SqlConnection and OleDbConnection. Physically connecting to a database server can be a relatively complex and time-consuming operation, and these objects exist so you only have to connect once per execution of an ASP.NET page. However, don’t assume that the database server remembers anything about the connection from one command to the next. The connection objects are communication channels, not a state mechanism.
Every ASP.NET page that uses ADO.NET must include the first Import statement shown in the following example. In addition, every page that uses the OleDb objects must include the second statement. Every page that uses the Sql objects must include the third.
<%@Import Namespace="System.Data"%>
<%@Import Namespace="System.Data.OleDb"%>
<%@Import Namespace="System.Data.SqlClient"%>
For more information about any object or topic discussed in this chapter, search the MSDN Web site (msdn.microsoft.com/library) for the terms System.Data, System.Data.OleDb, and System.Data.SqlClient.
Managing ADO.NET connections is a fairly simple task encumbered with one nagging detail. The basic steps are as follows:
Declare a connection object.
Provide a connection string.
Call the connection object’s Open method.
Specify the connection object’s name whenever an ADO.NET method requires it.
Call the connection object’s Close method.
Here, for example, are some statements that define, open, and close an ADO.NET connection to an Access database. The first statement defines an OleDbConnection variable, and the second (which spans two lines) constructs the connection string:
Dim conClasf As OleDbConnection
strClasf = "Provider=Microsoft.Jet.OLEDB.4.0;" & _
    "Data Source=C:InetPubwwwrootwebdbpgmch07classified.mdb"
conClasf = New OleDbConnection(strClasf)
conClasf.Open()
The third statement, which appears on line 4, actually creates the OleDbConnection object, and the last statement opens it. To close the connection, you would code conClasf.Close() before the Web page exits.
These few statements can open a connection to any database in the world, provided you have physical connectivity and the correct OLE DB drivers installed on the Web server. The only thing you need to modify is the connection string, and that’s the nagging detail.
A connection string is simply a line of text that specifies one or more name=value parameters. Semicolons separate adjacent parameters. The following table provides a list of the most frequently used parameters and some typical values. You shouldn’t code a Provider setting for the SqlConnection object, but otherwise the OleDbConnection and SqlConnection objects both expect the same parameters.
Common ADO.NET Connection String Parameters | |||
|---|---|---|---|
Parameter | Typical Values | ||
Access | SQL Server | Oracle | |
Provider | Microsoft.Jet.OLEDB.4.0 | SQLOLEDB | SDAORA |
Data Source | whatever.mdb | localhost | ora815 |
User ID | jim | jim | jim |
Password | sesame | sesame | sesame |
Integrated Security | n/a | SSPI | n/a |
Initial Catalog | n/a | Pubs | n/a |
Provider specifies the name of the database driver. Code this value exactly as shown in the table unless the connection string is for a SqlConnection object; in that case, omit it.
Data Source specifies the physical location of the database. The required value varies by database system.
Access requires the physical path and filename of the .mdb file.
SQL Server requires the name of the computer running SQL Server and, if applicable, the instance ID. If a computer named HONKER is running two instances of SQL Server and you want the instance called SQL2K, code
Data Source=HONKERSQL2K
Oracle requires an Oracle-assigned server name.
User ID specifies a user name required to open the database. If opening the database doesn’t require a user name, omit this parameter completely.
Password specifies a password required to open the database. If opening the database doesn’t require a password, omit this parameter completely.
Integrated Security, if set to SSPI, specifies that a SQL Server database should use the current user’s Windows logon ID for access. Don’t code this parameter for Access or Oracle databases, or when you code the User ID and Password parameters.
Note
In most cases, the Windows logon ID of an ASP.NET page will be either the System account, which has no privileges over the network, or an anonymous account on the local computer. Neither of these is very suitable for accessing SQL Server databases. As a result, Web applications generally use SQL Server user names and passwords rather than integrated security.
Initial Catalog specifies the name of the SQL Server database you want to open. Omit this parameter for other database types.
In the case of Microsoft Access, the Server.MapPath method is often useful for getting the physical path and filename of the .mdb file. Suppose, for example, that you know the following:
Your Web page resides in a folder named webdbpgm/ch07.
An Access database named classified.mdb resides in a folder named webdbpgm/contoso.
The database’s URL, relative to the Web page, is therefore ../contoso/classified.mdb.
This information is all well and good, but it doesn’t include the information you need for your connection string: the physical path to the .mdb file. Fortunately, the Server.MapPath method can translate a relative URL, such as ../contoso/classified.mdb, to a physical file path. To use this method, assemble the connection string with code like this:
strClasf = "Provider=Microsoft.Jet.OLEDB.4.0;" & _
    "Data Source=" & _
    server.mappath("../contoso/classified.mdb") & ";"
A procedure in the next section will explain how to create a Web page that opens a database connection.
Tip
From a security viewpoint, it’s usually a bad idea to put Access databases in the same folder as Web pages that use them. If you do so, anyone who can guess the name of your database can download it as easily as requesting a Web page. It’s much better to isolate the database in a folder that’s accessible locally on the Web server but inaccessible to Web visitors.
When you need to process a single SQL statement that doesn’t return any records, a SqlCommand or OleDbCommand object is probably your best bet. Each of these objects accepts two required properties: a database command and a database connection. Then when you call the command object’s ExecuteNonQuery method, the object sends the given command to the given database and returns the number of the database table rows that the command affected.
Assuming that conClasf is an open database connection, that strSQL contains the command you want to execute, and that intRowsAff is a variable you declared as Integer, any of the following code samples would run the command:
Dim cmdClasf As OleDbCommand
cmdClasf = New OleDbCommand(strSQL, conClasf)
intRowsAff = cmdClasf.ExecuteNonQuery()

Dim cmdClasf As New OleDbCommand
cmdClasf.CommandText = strSQL
cmdClasf.Connection = conClasf
intRowsAff = cmdClasf.ExecuteNonQuery()

Dim cmdClasf As New OleDbCommand (strSQL, conClasf)
intRowsAff = cmdClasf.ExecuteNonQuery()
The first sample starts out by declaring the cmdClasf variable as an OleDbCommand object. It then creates the object, supplying the SQL statement and the database connection as arguments. Finally, it tells the command object to run the command and store the number of affected rows in intRowsAff.
The second sample declares the object variable and creates the object in one statement. Then it assigns the SQL statement to the object’s CommandText property and the database connection to its Connection property. Finally, it runs the command just as the first sample did.
The third statement defines the object variable, creates the object, and assigns command and connection properties all in one statement. A second statement then runs the command. This sample occupies the fewest lines of code, but it requires that you place a Dim statement in the middle of your processing code.
Tip
Many programmers prefer putting all Dim statements at the beginning of the class, function, subroutine, or module where they occur. This habit makes the variables easier to find if, for example, the programmer forgets how to spell one.
The following table lists the properties of the SqlCommand and OleDbCommand objects that programmers most often use. You don’t need to set the Command.Type property unless the command is something other than a SQL statement. If the command is the name of a stored procedure, you must code the following statement before you call the Execute method:
<command object>.CommandType = CommandType.StoredProcedure
If the command is the name of a table you want to retrieve in its entirety, you must code the following before calling the Execute method:
<command object>.CommandType = CommandType.TableDirect
This technique is valid only with the OleDbCommand object, and only if you plan to call that object’s ExecuteReader or ExecuteScalar method. You’ll find more explanation of both these methods later in this chapter.
Common SqlCommand or OleDbCommand Properties | ||
|---|---|---|
Property | Description | |
CommandText | Gets or sets the command you want the data source to execute. | |
CommandType | Tells the data source how to interpret the command. The permissible values are as follows: | |
CommandType.StoredProcedure | The command invokes a stored procedure. | |
CommandType.TableDirect | The command is a table name. | |
CommandType.Text | The command is a SQL statement. This is the default. | |
Connection | Gets or sets the connection object to use for this command. | |
Transaction | Gets or sets the transaction in which the command executes. | |
The Transaction property of a command object can point to a Transaction object you create elsewhere in your Web page. Later in this chapter, a section titled "Managing Transactions" will explain the use of transactions.
The following table lists the methods of the command object that you’re most likely to use. The CreateParameter method creates an object suitable for passing a value to a stored procedure. The ExecuteReader and ExecuteScalar methods both execute commands that return data from the database. ExecuteReader returns a DataReader object, and ExecuteScalar returns the contents of exactly one field. The next section in this chapter will explain how to use these methods.
Common SqlCommand or OleDbCommand Methods | |
|---|---|
Method | Description |
CreateParameter | Creates a new OleDbParameter object. |
ExecuteNonQuery | Executes a SQL statement and returns the number of rows affected. |
ExecuteReader | Sends the command through the connection and returns the results in a new DataReader object. |
ExecuteScalar | Sends the command through the connection and returns the value in column one, row one of the result set. |
No matter which one of a command object’s Execute methods you call, there are many things that can go wrong. You can (and should) detect many of these possible problems by checking the number of affected records. If, for example, you expected to delete or modify one record and the ExecuteNonQuery method reports that it affected 0 or 500 records, you have a problem. Perhaps you should send the Web visitor a message, for example, or perhaps you should fix your code.
Many other kinds of problems cause exceptions. Some of these problems appear in the following list, but it’s far from comprehensive.
Attempting to add a record with a primary key that already exists.
Trying to add a record that contains invalid data. For example, a string might exceed the allowable length; the value for a numeric field might not be numeric; or edits coded within a database definition might fail.
Trying to update a record with invalid data.
Submitting an invalid command. This problem often occurs because the Web visitor enters an apostrophe in a text field and you haven’t taken the precaution of replacing all apostrophes with double apostrophes.
You can, of course, let these errors bomb your Web page and display a system error page in its place. If this isn’t acceptable (and it usually won’t be), you’ll need to code the Execute method within a Try...Catch...End Try block and write code that deals with the error.
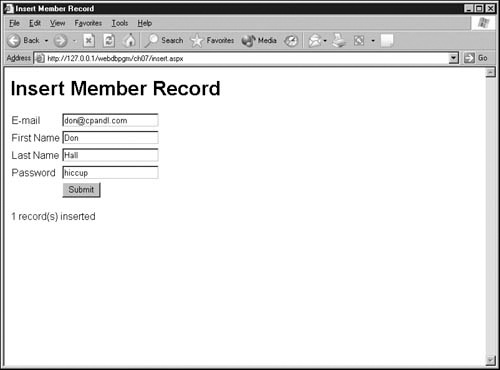
This procedure will explain how to create a Web page that adds records to the members table that you’ve seen several times in previous chapters. The following figure illustrates the desired result. To add a member, you enter the e-mail address, first name, last name, and password, and then click Submit:
This page doesn’t have all the features you’d want for registering visitors on an Internet Web site, but it’s a start. If you’d rather look at the finished code than enter it yourself, open the insert.aspx page in the ch07 folder of the sample files that you installed from the companion CD. Otherwise, proceed as follows:
Create a new, empty Web page containing the usual <html>, <head>, and <body> tags and their usual closing tags. Apply any page-level formatting you want. For example, the sample results include the following statement, which links to a shared cascading style sheet file named normal.css:
<link rel="stylesheet" type="text/css" href="../normal.css">
Add an @Page directive and a code declaration block at the very top of the Web page (that is, before the <html> tag.) Also, import the System.Data and System.Data.OleDb namespaces. The top of the page should now look like this:
<%@Page language="vb" explicit="true" debug="true"%>
<%@Import Namespace="System.Data"%>
<%@Import Namespace="System.Data.OleDb"%>
<script runat="server">
</script>
<html>
Add the page heading Insert Member Record, surrounded by <title> and </title> tags, immediately after the <head> tag. Then add the same heading, surrounded by <h1> and </h1> tags after the <body> tag.
Add an ASP.NET Web form immediately after the <h1> line you added in step 3. In other words, add the following statements:
<form method="POST" runat="server">
</form>
Between the two tags you added in step 4, create a two-column, five-row HTML table. Creating the table requires the following statements, with the <tr></tr> block repeated five times:
<table border="0" cellpadding="2" cellspacing="0">
  <tr>
    <td></td>
    <td></td>
  </tr>
</table>
Enter the titles E-mail, First Name, Last Name, and Password in the leftmost cells of table rows 1–4. For example, change the first pair of <td></td> tags to <td>E-mail</td>.
Add Text HTMLInput controls to the rightmost cells of table rows 1–4. Name these controls txtMemberid, txtFirstname, txtLastname and txtPassword. The code for the first row appears in the following example. The next three rows follow the same pattern.
<tr>
  <td>E-mail</td>
  <td><input type="text" id="txtMemberid" size="20"
       runat="server" /></td>
</tr>
Add a Submit button to the rightmost cell of row 5. The HTML for this row will then resemble the following.
<tr>
  <td></td>
  <td><input type="submit" value="Submit" id="btnSub"
       runat="server" /></td>
</tr>
Insert two label controls, each in its own paragraph, after the </form> tag you added in step 4. Name these controls lblRecsAff and lblErrMsg as shown:
<p><asp:label id="lblRecsAff" runat="server" /></p>
<p><asp:label id="lblErrMsg" runat="server" /></p>
Save the page in a folder that’s accessible via your Web server, giving it a file name of insert.aspx.
This completes the visual design of the Web page. If you load it into your browser it should resemble the figure in Code an event handler that runs a database query, but it won’t add any records to the database. The next procedure will add that capability.
The next procedure will complete the insert.aspx page by adding the code that inserts records.
Load the insert.aspx page into your browser, taking care to specify an HTTP URL and not an ordinary file location. The page should look OK, but clicking the Submit button will have no effect. To make the page actually insert records, continue with the following steps.
Create a Page_Load subroutine inside the code declaration block you added in step 2 of the previous procedure. The block should then look like this:
<script runat="server">
Sub Page_Load(sender As Object, e As EventArgs)
End Sub
</script>
The page shouldn’t try to insert a record the first time it runs. The first execution simply displays the page so the Web visitor can enter data. Therefore, add the following statements between the Sub and End Sub statements you just entered:
If Page.IsPostBack then
  InsertRecord()
End If
Recall that the Page.IsPostBack property is False during the first execution of a page and True thereafter.
The second line you entered in the previous step executes a subroutine named InsertRecord. To create this subroutine, add the following statements after the End Sub statement that ends the Page_Load subroutine:
Sub InsertRecord()
End Sub
Declare the following variables within the subroutine you created in step 4:
Dim conClasf As OleDbConnection
Dim cmdClasf As New OleDbCommand
Dim strClasf As String
Dim strSQL As String
Dim intRowsAff As Integer
The two Label controls you created in step 9 of the previous procedure will display the results of attempting to add a members record. As usual, ASP.NET saves and restores the values of these controls as ViewState information. Once you put a message in, say, the lblErrMsg control, the message will keep appearing in all subsequent executions of the same page (until, of course, your code clears out or replaces the message).
To avoid this effect, code the following statements to clear these controls every time the page runs:
lblErrMsg.Text = ""
lblRecsAff.Text = ""
These statements wouldn’t be necessary if originally you’d coded both the lblErrMsg control and the lblRecsAff control with EnableViewState="False" attributes. The code would have told ASP.NET not to recycle the values of these controls.
Build a connection string that points to an Access database named classified.mdb and located in the same folder as the insert.aspx page. Then use this string to open and close the OleDbConnection object named conClasf that you declared in step 5. Put this code immediately after the code you entered in step 6:
  strClasf = "Provider=Microsoft.Jet.OLEDB.4.0;" & _
             "Data Source=" & _
             server.mappath("classified.mdb") & ";"
  conClasf = New OleDbConnection(strClasf)
  conClasf.Open
'   Code to insert record will go here.
  conClasf.Close
Constructing the SQL statement that actually inserts the new record is a bit of work. To begin, code the statement as if all the data consisted of constants. Be sure to enclose the name of the password field in square brackets; otherwise, Access will interpret password as a reserved word. For now, assume you want to insert the letter x in the first four fields, 0 in confnumber, and False in confirmed.
strSQL = "INSERT INTO members (" & _
          "memberid,   " & _
          "firstname,  " & _
          "lastname,   " & _
          "[password], " & _
          "confnumber, " & _
          "confirmed "   & _
") VALUES ('x', 'x', 'x', 'x', 0, False) "
Put this code immediately after the code you entered in the previous step.
To replace the four x’s with form field values, you must process each x character using the following sequential steps:
Delete the letter x.
Insert two quotation marks where the x used to be.
Insert two spaces between the quotation marks.
Insert two ampersands between the spaces.
Insert two spaces between the ampersands.
Code the form field expression between the two spaces.
Here’s how this looks after changing the first x:
") VALUES ('" & txtMemberid.Value & "', 'x', 'x', 'x', 0,
False)"
As you can see, this line is going to become quite long. Therefore, insert a space, a continuation character (the underscore) and a line ending after the second ampersand. Continue this process until you end up with this:
") VALUES ('"    & txtMemberid.Value  & _
          "', '" & txtFirstname.Value & _
          "', '" & txtLastname.Value  & _
          "', '" & txtPassword.Value  & _
          "', 0, False) "
The next step is to guard against any apostrophes the Web visitor might enter. As you might recall, this requires coding two apostrophes everywhere the data contains one. The Visual Basic Replace function is perfectly suited to this job. Consider, for example, the following code:
x = Replace(x, "a", "aa")
It replaces each a in the variable x with two a’s. The code is just as effective (though harder to read) with apostrophes as it is with a’s. Therefore, change each Text HTMLInput control value from an expression like txtMemberid.Value to one like
Replace(txtMemberid.Value, "'", "''")
The result, including some additional line breaks for readability, appears here:
") VALUES ('" & _
  Replace(txtMemberid.Value, "'", "''")  & _
  "', '" & _
  Replace(txtFirstname.Value, "'", "''") & _
  "', '" & _
  Replace(txtLastname.Value, "'", "''")  & _
  "', '" & _
  Replace(txtPassword.Value, "'", "''")  & _
  "', 0, False) "
The confnumber field should contain a random confirmation number between 1 million and 10 million. Other parts of the system will include this number in a link and mail it to the Web visitor. When the visitor receives the mail and clicks the link, another Web page will check the confirmation number and, if it matches, set the confirmed field in the database to True. This value guarantees that the given e-mail address was valid (at least at the time of registration).
The Visual Basic Rnd() function is very good at generating pseudo-random numbers between 0 and 1. To get a random number between 1 million and 10 million, first call the Randomize function, then multiply the value of Rnd() by 9 million, and then add 1 million.
Note
Pseudo-random numbers come from a formula that produces such erratic results that the results might as well be random. However, unless you give the formula a random starting point, it will generate the same series of "random" numbers every time you use it. The Visual Basic Randomize function initializes the Rnd() function to a random starting point based on the system time.
After you add the code to do this, the full block of code that constructs the SQL statement looks like this:
Randomize
strSQL = "INSERT INTO members (" & _
          "memberid, "   & _
          "firstname, "  & _
          "lastname, "   & _
          "[password], " & _
          "confnumber, " & _
          "confirmed "   & _
") VALUES ('" & _
          Replace(txtMemberid.Value, "'", "''") & _
          "', '" & _
          Replace(txtFirstname.Value, "'", "''") & _
          "', '" & _
          Replace(txtLastname.Value, "'", "''") & _
          "', '" & _
          Replace(txtPassword.Value, "'", "''") & _
          "', " & _
          Clng(Rnd() * 9000000) + 1000000 & _
          ", " & _
          "False) "
Save the page and load it once again into your browser. It still won’t insert any records, but it will check your code for acceptable Visual Basic syntax. Correct any syntax errors, and then proceed.
Follow the SQL statement you completed in step 11 with a statement that creates an OleDbCommand object. Be sure to specify the SQL statement you just coded and the OleDbConnection object from step 7:
cmdClasf = New OleDbCommand(strSQL, conClasf)
Code a Try ...Catch ...End Try statement, and then, between Try and Catch, code a statement that executes the command object from step 13 and saves the number of affected records in the intRowsAff variable you declared in step 5.
Between Catch and End Try, code a statement that copies the exception message into the lblErrMsg label control:
Try
  intRowsAff = cmdClasf.ExecuteNonQuery()
Catch ex As Exception
  lblErrMsg.Text = ex.Message
End Try
Finally, after the End Try, add a statement that tells the Web visitor how many records the page inserted. Unless you’ve erred grievously, this will be either zero or one.
lblRecsAff.Text = intRowsAff & " record(s) inserted"
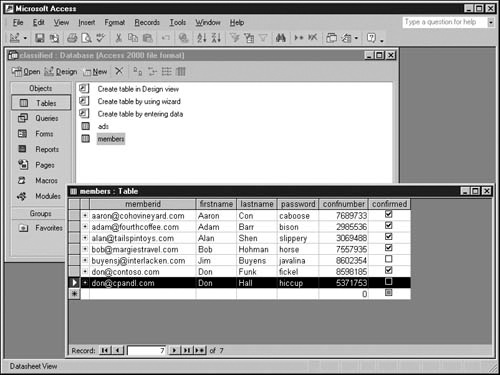
Coding for the insert.aspx page is now complete. The worst part by far is assembling the SQL INSERT statement, but there’s a rhythm to performing such tasks and they do get easier after your first couple of attempts. To verify that the records actually did get into the members table, open the database in Access and display the members table. If that table is already open, new records might not be visible until you close and reopen it. The figure below shows Access displaying the record added in the previous figure.
Here’s the complete code for the insert.aspx page:
<%@Page language="vb" explicit="true" debug="true"%>
<%@Import Namespace="System.Data"%>
<%@Import Namespace="System.Data.OleDb"%>
<script runat="server">
Sub Page_Load(sender As Object, e As EventArgs)
  If Page.IsPostBack then
    InsertRecord()
  End If
End Sub
Sub InsertRecord()
  Dim conClasf As OleDbConnection
  Dim cmdClasf As New OleDbCommand
  Dim strClasf As String
  Dim strSQL As String
  Dim intRowsAff As Integer

  lblErrMsg.Text = ""
  lblRecsAff.Text = ""
  strClasf = "Provider=Microsoft.Jet.OLEDB.4.0;" & _
             "Data Source=" & _
             server.mappath("classified.mdb") & ";"
  conClasf = New OleDbConnection(strClasf)
  conClasf.Open
  Randomize
  strSQL = "INSERT INTO members (" & _
            "memberid, "   & _
            "firstname, "  & _
            "lastname, "   & _
            "[password], " & _
            "confnumber, " & _
            "confirmed "   & _
  ") VALUES ('" & _
            Replace(txtMemberid.Value, "'", "''") & _
            "', '" & _
            Replace(txtFirstname.Value, "'", "''") & _
            "', '" & _
            Replace(txtLastname.Value, "'", "''") & _
            "', '" & _
            Replace(txtPassword.Value, "'", "''") & _
            "', " & _
            Clng(Rnd() * 9000000) + 1000000 & _
            ", " & _
            "False) "
  cmdClasf = New OleDbCommand(strSQL, conClasf)
  Try
    intRowsAff = cmdClasf.ExecuteNonQuery()
  Catch ex as exception
    lblErrMsg.Text = ex.Message
  End Try
  lblRecsAff.Text = intRowsAff & " record(s) inserted"
  conClasf.Close
End Sub
</script>
<html>
<head>
<title>Insert Member Record</title>
<link rel="stylesheet" type="text/css" href="../normal.css">
</head>
<body>
<h1>Insert Member Record</h1>
<form method="POST" runat="server">
<table border="0" cellpadding="2" cellspacing="0">
  <tr>
    <td>E-mail</td>
    <td><input type="text" id="txtMemberid" size="20"
         runat="server" /></td>
  </tr>
  <tr>
    <td>First Name</td>
    <td><input type="text" id="txtFirstName" size="20"
         runat="server" /></td>
  </tr>
  <tr>
    <td>Last Name</td>
    <td><input type="text" id="txtLastname" size="20"
         runat="server" /></td>
  </tr>
  <tr>
    <td>Password</td>
    <td><input type="text" id="txtPassword" size="20"
         runat="server" /></td>
  </tr>
  <tr>
    <td></td>
    <td><input type="submit" value="Submit" id="btnSub"
         runat="server" /></td>
  </tr>
</table>
</form>
<p><asp:label id="lblRecsAff" runat="server" /></p>
<p><asp:label id="lblErrMsg" runat="server" /></p>
</body>
</html>The previous section explained how the ExecuteNonQuery method of an OleDbCommand or SqlCommand object can send commands to a database system for execution. These commands can insert, update, and delete database records, but they can’t retrieve records and present them to your ASP.NET page for display or other processing. Instead, ADO.NET provides the following two approaches for running queries:
You can use a data reader, which involves the following steps:
Load an OleDbCommand object with a command that runs a query (that is, a SELECT statement).
Call the OleDbCommand object’s ExecuteReader method to create an OleDbDataReader object.
Use the OleDbDataReader to retrieve the query results.
As you might expect, there’s also a SqlDataReader object that works the same way with SqlCommand objects. Both data readers provide one-time, forward, read-only access to the data. These are serious limitations, but in fact, this type of access will probably satisfy a high percentage of your data needs, and it runs very fast. The rest of this section explains how to use data readers.
You can use a DataAdapter object, which involves a much different procedure.
Create an OleDbDataAdapter or SqlDataAdapter object and load it with a SELECT statement.
Create a DataSet object, which can hold one or more DataTables in memory.
Use the DataAdapter’s Fill method to run the query and store the results as a DataTable object within the DataSet object.
Use the DataTable’s properties and methods to retrieve the query results.
This second approach has many advantages. You can access the contents of a DataTable any way you want: forward, backward, by given row, and so forth. You can also insert, update, and delete rows, and then write your changes back to the database. You can even create new views of a DataTable that sort the data, filter it, or relate it to other DataTables.
Of course, the added features of DataAdapters, DataSets, and DataTables come at a price. A Web page that uses these objects is both tougher to code and slower to run than a Web page that uses command objects and data readers. The topic "Using the DataAdapter, DataSet, and DataTable Objects" later in this chapter will explain how to use these objects.
Using either the OleDbDataReader object or the SqlDataReader object is a fairly simple process. First you create a SQL statement that runs a query. Here’s an example:
strSQL = "SELECT * " & _
           "FROM members " & _
          "WHERE firstname = 'Don' " & _
       "ORDER BY lastname "
Next, you specify this statement and an open database connection as properties of an OleDbConnection or SqlConnection object, just as you did in the previous section. Any of the following forms will work:
Dim cmdClasf As OleDbCommand
cmdClasf = New OleDbCommand(strSQL, conClasf)

Dim cmdClasf As New OleDbCommand
cmdClasf.CommandText = strSQL
cmdClasf.Connection = conClasf

Dim cmdClasf As New OleDbCommand (strSQL, conClasf)
To run the query, invoke the command object’s ExecuteReader method and assign the results to a variable you declared as a data reader.
Dim rdrMembers As OleDbDataReader
rdrMembers = cmdClasf.ExecuteReader
If your reason for creating a data reader was to display a tabular listing of its contents, the DataGrid, DataList, and Repeater Web server controls make this a snap. To use a DataGrid, for example, you include a tag like this in the body of the Web page:
<asp:DataGrid id="gridMbrs" runat="server" />
Then, after the statement that runs the ExecuteReader method, you code
gridMbrs.DataSource = rdrMembers
gridMbrs.DataBind
The procedure near the end of Chapter 1 used a data reader and a DataGrid in exactly this way.
To process each row of the results with your own code, call the data reader’s Read method until it returns False. Here’s an example:
While rdrMembers.Read
'  Code to process each row of query results goes here.
End While
Inside this loop, the expression
rdrMembers.Item(<field-id>)
returns the value of the given field for the current row. Instead of <field-id>, you should supply either the name of the field (such as firstname) or its numeric position (such as zero for the first field). The following properties and methods might also be useful:
GetName(). Given a column number, returns its name.
GetOrdinal(). Given a column name, returns its number.
GetFieldType(). Given a column name or number, returns its data type.
FieldCount. Returns the number of fields in the current row.
Whenever a DataReader is open, it takes exclusive control of its Connection object. You can’t use the Connection to process any additional commands, such as creating another DataReader, until you close the DataReader. What’s more, if you use a DataReader to run a command that creates output parameters or return values, they won’t be available until you close the DataReader. Therefore:
Close any DataReaders as soon as you’re done using them. To do this, call the DataReader’s Close method.
If you think you need to have two DataReaders open at the same time, first consider coding a single SQL statement that joins the required tables into a single result set (and therefore a single DataReader). If that’s truly impossible, open a second connection to the same database.
To see a sample Web page that uses these methods to display query results, open the file datareader.aspx in the ch07 folder that you installed from the companion CD.
In all the examples you’ve seen so far, an ASP.NET page requested service from the database system by building and sending a SQL statement. This setup has the advantage of keeping all the code for a given Web page in one place, but it also has three disadvantages:
It often means repeating the same SQL code in many different pages.
If you need to change a database or table, locating and correcting all the affected SQL statements can be difficult.
In large organizations, it requires giving SQL experts access to program code and programming experts access to SQL code, which might be in conflict with job descriptions.
To address these issues, most database systems support stored queries, stored procedures, or both. A stored query is a SQL statement that resides within the database system and that applications invoke by name. A stored procedure is some other piece of code—usually coded in a language such as Transact-SQL or Visual Basic for Applications—that meets the same criteria. Because stored procedures can contain SQL statements, stored procedures is the all-encompassing term.
Both ADO.NET command objects—OleDbCommand and SqlCommand—can execute stored procedures. The process is simple:
Set the object’s CommandType property to CommandType.StoredProcedure.
Instead of storing a SQL statement in the command object’s CommandText property, store the name of the stored procedure.
For more information about the CommandType property of a command object, refer to the table "Common SqlCommand or OleDbCommand Properties," in Creating an Interactive Query that Uses a DataGrid.
The following statement prepares an OleDbCommand object to run an ordinary SELECT statement. This is the "before" case, which doesn’t use a stored procedure. The variable conClsf points to an OleDbConnection object.
cmdMbrs = New OleDbCommand( _
          "SELECT * FROM members WHERE lastname = 'Funk' ",
          conClsf)
If the database system had a stored procedure named getfunk that contained the same SQL statement, you could code the following statements and get the same results. Note that the command text is getfunk rather than a SQL statement, and that the second statement sets the command object’s CommandType to CommandType.StoredProcedure.
cmdMbrs = New OleDbCommand( _
          "getfunk",
          conClsf)
cmdMbrs.CommandType = CommandType.StoredProcedure
Of course, it’s unlikely that anyone would create a stored procedure that, like the one shown, searches for a single, fixed last name. It’s far more common for stored procedures to contain replaceable parameters, such as the qlastname parameter in the qmemname stored procedure that appeared in the procedure "Create a parameter query," in Creating a Page Banner User Control. The qmemname stored procedure can search for any lastname you want, provided that you specify the desired value in the qlastname parameter.
Of course, an ASP.NET page can’t specify parameter values by filling in dialog boxes like the one shown in Chapter 6. Instead, the page must use program code. Fortunately, this requires only one additional statement for each parameter you need to specify. To specify a qlastname of Funk, for example, you would code
cmdMbrs.Parameters.Add("qlastname", _
                       New OleDbParameter).Value = "Funk"
This stores the value Funk as a Variant, which is a special data type that can contain numeric, string, binary, or date data, the special value Empty, or the special value Null. (Although Visual Basic .NET no longer supports the Variant data type, OLE DB does.) If you’d rather store the parameter as a specific data type, you can add the parameter as follows:
cmdMbrs.Parameters.Add("@qlastname", _
                       OleDbType.VarChar, 20).Value = "Funk"
In this case, VarChar means a variable number of characters and 20 specifies the maximum number of characters. You can specify any valid OLE DB data type and length that can accommodate the value you want to supply; you don’t have to specify the same type as the corresponding database field. Beware, however, of specifying a data type that OLE DB can’t convert as necessary when it runs the stored procedure.
If you don’t want to give the parameter a value when you define it, you can omit the .Value assignment, as shown in the following two examples:
cmdMbrs.Parameters.Add("qlastname", New OleDbParameter)

cmdMbrs.Parameters.Add("@qlastname", _
                       OleDbType.VarChar, 20)
To assign the value at a later time, code
cmdMbrs.Parameters("qlastname").Value = "Barr"All the parameters described so far are Input parameters; that is, they provide values that the stored procedure treats as input. This is the default, and the only type of parameter that Access supports. Database systems such as SQL Server and Oracle support the additional parameter directions shown in the following table.
OleDbParameter Direction Values | |
|---|---|
ParameterDirection | Description |
Input | The stored procedure receives a value from the calling program. |
InputOutput | The stored procedure receives a value from the calling program and sends data back. |
Output | The stored procedure sends data to the calling program. |
ReturnValue | The stored procedure sends a status code to the calling program. |
The use of stored procedures isn’t confined to OLE DB. SQL Server supports them equally well. As usual, the SQL Server objects have the same names as the OLE DB objects, except that they begin with Sql instead of OleDb.
One common use of stored procedures and output parameters involves using SQL Server to insert a row that contains an Identity field. An Identity field, in this sense, is a numeric field that SQL Server populates with a sequence number incremented by some value (usually one) every time it inserts a record. When you add a record to a table that contains an Identity field, you must not assign your own value to the Identity field.
Identity fields are great for assigning a unique key to each record, but unfortunately, discovering the Identity value of a newly inserted row is a bit of a trick. The Identity value doesn’t, for example, appear by magic in any standard ADO.NET object after ADO.NET updates the database table.
Fortunately, stored procedures and output parameters provide an easy way to get Identity values. To use this approach, you first create a SQL Server stored procedure that contains both the INSERT statement you want to run and a second statement like this one:
SET @Identity = @@Identity
Assuming that you name the stored procedure insertmbr, the following statements will execute it and return the Identity value. The statements in blue deal specifically with retrieving the Identity value.
cmdMbrs = New SqlCommand( _
          "insertmbr",
          conClsf)
cmdMbrs.CommandType = CommandType.StoredProcedure
cmdMbrs.Parameters.Add("@identity")
cmdMbrs.Parameters("@identity").Direction = _
    ParameterDirection.Output
cmdMbrs.ExecuteNonQueryintIdentity = cmdMbrs.Parameters("@identity ").Value
What SQL Server calls an Identity field, Access calls an AutoNumber field. Unfortunately, because Access doesn’t support output parameters, you can’t use the technique just described to get the value of an AutoNumber field in a record just added to an Access database. This turns out to be a decidedly nontrivial problem, and it’s the subject of a procedure titled "Use a DataAdapter to insert four AutoNumbered records" later in this chapter.
To inspect a sample Web page that runs a parameter query against an Access database, open the file qmemname.aspx in the ch07 folder that you installed from the companion CD.
For more information about using parameters, search the MSDN Web site (msdn.microsoft.com/library) for the terms OleDbParameterCollection and SqlParameterCollection.
If you’ve ever used ActiveX Data Objects(ADO), Remote Data Objects (RDO), or Data Access Objects (DAO), you probably used a Recordset object to receive the results of a query. Recordsets are much more flexible than ADO.NET command objects and data readers: you can easily move forward and backward through the results of a query, and you can add, modify, and delete database records by performing those operations on any recordset derived from the corresponding tables (provided, of course, that you specified the proper options when you opened the recordset). Even if you never used ADO, RDO, or DAO, receiving query results in an object you can manipulate at will has great appeal.
ADO.NET doesn’t support Recordset objects, but it does support a similar object called a DataTable. A DataTable is an in-memory object that stores data in columns and rows, just as a database system does. Columns, which are comparable to fields, have names and data types. Rows are comparable to records. In this respect, the organization of a DataTable is very much like the organization of a Recordset. Nevertheless, DataTables differ from Recordsets in two important ways:
DataTables don’t necessarily exist on their own. A DataTable can exist within another object called a DataSet. A DataSet contains one or more DataTables, just as a database contains one or more tables. A DataSet is another in-memory object.
DataTables don’t remain connected to a table or query within the database system. To load a DataTable from a database table or query, you must
Create and configure a connection object to access the database.
Create and configure a DataAdapter object to query the database. (The DataAdapter passes the SQL statement and connection object you specify to a connection object that the DataAdapter internally creates and manages.)
Call the DataAdapter’s Fill method to run the query and store the results in the DataTable object. The Fill method retrieves not only the data, but also the schema: that is, the field name, the data type, the maximum length, and other properties of each field.
At this point, all the methods of the DataTable object are available for moving through the result set and retrieving whatever field values or schema information you want. The DataTable, however, is only an in-memory copy of the data and doesn’t remain connected to the database.
In practice, this needn’t be as complicated as it seems. Converting the now-ubiquitous Chapter 1 example to use DataAdapter, DataSet, and DataTable objects instead of a data reader basically requires that you remove the following statements:
cmdMbrs = New OleDbCommand( _
          "select * from members order by memberid", _
          conClsf)
rdrMbrs = cmdMbrs.ExecuteReader

gridMbrs.DataSource = rdrMbrs
gridMbrs.DataBind
and replace them with these statements:
dapMbrs = New OleDbDataAdapter( _
          "select * from members order by memberid ", _
          conClsf)
dstMbrs = New DataSet()
dapMbrs.Fill(dstMbrs, "Members")

gridMbrs.DataSource = dstMbrs.Tables("Members")
gridMbrs.DataBind
Here are the significant points of this new code:
The first statement creates an OleDbDataAdapter object. The constructor method for this object automatically creates an OleDbCommand object that contains the given SQL statement and refers to the given connection.
The second statement, which begins on line 4, creates a new DataSet object. Notice that this isn’t an OleDbDataSet or SqlDataSet object. DataSet, DataTable, DataRelation, and DataView objects have no direct connection to any database system. This means, among other things, that there aren’t separate versions for SQL Server and OLE DB.
The third statement runs the command that statement 1 stored in the data adapter dapMbrs, and then it stores the results in the data set dstMbrs. Within dspMbrs, the data will reside in a DataTable object named Members. The DataSet object creates the DataTable object automatically.
The next-to-last statement sets the data source of a DataGrid object named gridMbrs to be the members table in the dstMbrs data set.
The last statement fills the DataGrid object with data.
If you decide to try these modifications on the members.aspx file from Chapter 1, you should also remove the declaration, Close, and Dispose statements for the cmdMbrs command object and the rdrMbrs data reader. You’ll also need to declare dapMbrs as an OleDbDataAdapter and dstMbrs as a DataSet. To review a completed and tested version of this Web page, open the file members-da.aspx in the ch07 folder that you installed from the companion CD.
To inspect the contents of a data table programmatically, use either a numeric subscript or a For Each loop to access its Rows collection. The following expression, for example, returns the value of the lastname field from row 3 of the members table. Row subscripts are zero-based and have a valid range from 0 to <table-name>.Rows.Count -1.
dstMbrs.Tables("Members").Rows(2).Item("lastname")The following block of code retrieves the contents of each firstname field in the same table and writes them into the Trace log. To see this code operate, run the members-da-trace.aspx file in the ch07 folder that you installed from the companion CD.
Dim rowMbr as DataRow
For Each rowMbr In dstMbrs.Tables("Members").Rows
  Trace.Write(rowMbr("firstname"))
Next
To modify the contents of any row, simply assign a new value to any of its fields. Here’s an example:
dstMbrs.Tables("Members").Rows(2).Item("firstname") = "John"
dstMbrs.Tables("Members").Rows(2).Item("lastname") = "Wood"
To delete a row, call either its Delete method or its Remove method as shown:
dstMbrs.Tables("Members").Rows(2).Delete
dstMbrs.Tables("Members").Rows.Remove(2)
These two statements are decidedly not equivalent.
The Delete method removes the row from the active view but remembers that the row formerly existed. If you Delete a row and then tell the DataAdapter to write the data table back into the database, the DataAdapter will delete the row from the database.
The Remove method deletes the row completely, including any record that it ever existed. If you Remove a row and then tell the DataAdapter to write the data table back into the database, the DataAdapter won’t delete the row, because the Remove method discards the fact that the row ever existed.
To insert a row, you must first create a new DataRow object, then fill it with data, and then add the row to the table. Here’s some code that does this. Invoking the NewRow method of the Members data table creates a disconnected row with the same field names, data types, and constraints as the Members DataTable. The Add method on the last line adds the new row to the data table (but not to the database).
Dim rowMbrs As DataRow
rowMbrs = dstMbrs.Tables("Members").NewRow()
rowMbrs("memberid") = "[email protected]"
rowMbrs("firstname") = "Ted"
rowMbrs("lastname") = "Bremer"
rowMbrs("password") = "bricks"
rowMbrs("confnumber") = 2340890
rowMbrs("confirmed") = False
dstMbrs.Tables("Mbrs").Rows.Add(rowMbrs)
When you add rows, update fields, and delete rows in a DataSet, your changes affect only the in-memory data. The original database remains unconnected and unchanged. You can reopen the connection and write your changes back to the database, but only if all the following are true:
You loaded the DataTable from a single table. If you loaded the DataTable from a query that combined the contents of two or more tables, you can’t send updates back into the database.
The database table has a primary key that uniquely identifies each record.
You retrieved all the fields that make up the primary key and included them in the DataTable.
You supplied the data adapter with command objects that contain model INSERT, UPDATE, and DELETE statements. ADO.NET provides OleDbCommandBuilder and SqlCommandBuilder objects that can build these command objects and model statements for you, but it’s still your responsibility to call the CommandBuilder object.
Once you’ve satisfied all these conditions, writing changes back to the database is as simple as calling the data adapter’s Update method and passing as arguments the name of the data set and the name of the data table. In the code below, line 1 declares an OleDbCommandBuilder object named bldMbrs. Line 2 actually creates the object and associates it with the dapMbrs data adapter. The next three lines create model INSERT, UPDATE, and DELETE commands, and the last statement tells the data adapter to update the database in accordance with all changes made in memory to the Members DataTable.
Dim bldMbrs As OleDbCommandBuilder
bldMbrs = New OleDbCommandBuilder(dapMbrs)
dapMbrs.InsertCommand = bldMbrs.GetInsertCommand()
dapMbrs.UpdateCommand = bldMbrs.GetUpdateCommand()
dapMbrs.DeleteCommand = bldMbrs.GetDeleteCommand()
dapMbrs.Update(dstMbrs, "Members")
If you know the Update method won’t use a given model statement, there’s no point in creating one. If all your changes were Deletes, for example, you don’t need to create Insert and Update command objects.
Also, keep in mind that after filling the DataTable, the data adapter disconnected from the database. The database records the data adapter retrieved aren’t locked, and someone else could update them before you issue the Update method. If this happens, the Update method will throw an exception. It’s therefore a very good idea to enclose all calls to a data adapter’s Update method within Try ...Catch ...End Try blocks and recover gracefully. For example, you might need to requery the data and send it back to the Web visitor along with a prompt that asks whether he or she would like to try the operation again.
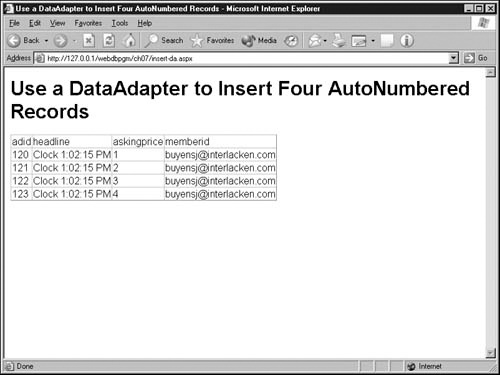
This procedure and the next explain how to add records to a Microsoft Access database and get back the AutoNumber value that Access assigns to each one. The second procedure warrants special attention, because, as you’ll discover, the method for getting AutoNumber values back from Access is anything but obvious. Even if you don’t use Access, these procedures clearly illustrate how to write changes to a DataTable object back to the originating database, and also how to use a command object’s ExecuteScalar method. The following figure shows how the inserted record appears in a Web page. The point of this procedure lies in its technique and not in its fabulously interesting content.
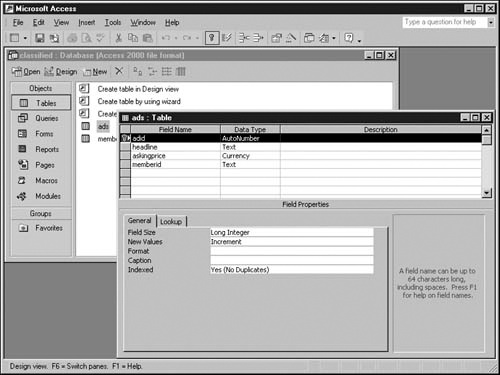
The next figure shows how Access displays the structure of the table this Web page updates. The name of the AutoNumber field is adid, and this field is also the table’s primary key.
If you prefer to inspect the finished code rather than type it in yourself, open the file insert-da.aspx in the ch07 folder that you installed from the companion CD.
Create a new, blank Web page containing all the usual structural tags. Add the text Use a DataAdapter to Insert Four AutoNumbered Records to both a title in the <head> section and an <h1> heading in the <body> section. Apply any page-level formatting you want. For example, the sample results include the following statement, which links to a shared cascading style sheet file named normal.css:
<link rel="stylesheet" type="text/css" href="../normal.css">
Add a DataGrid server control named gridAds to the <body> section. To do this, add the following line after the <h1> line you added in step 1:
<asp:DataGrid id="gridAds" runat="server" />
Add an @Page directive, the necessary @Import directives, a code declaration block, and a Page_Load subroutine, all before the <html> tag. The top of the page should now look like this:
<%@ Page Language="vb" Debug="true" Explicit="True" %>
<%@ Import Namespace="System.Data" %>
<%@ Import Namespace="System.Data.OleDb" %>
<script runat="server">
Public Sub Page_Load(sender As Object, e As EventArgs)
'  Program code will go here.
End Sub
</script>
<html>
Declare the following variables inside the Page_Load subroutine and delete the comment shown in step 3:
Dim conClasf As OleDbConnection
Dim dapAds As OleDbDataAdapter
Dim dstAds As DataSet
Dim dtbAds As DataTable
Dim rowAds As DataRow
Dim bldAds As OleDbCommandBuilder
Dim strSQL As String
Dim intPrice As Integer
Open and close a connection to an Access database named classified.mdb and located in the same folder as the Web page:
conClasf = New OleDbConnection( _
  "Provider=Microsoft.Jet.OLEDB.4.0;" & _
  "Data Source=" & server.mappath("classified.mdb") & ";")
conClasf.Open
' Code to insert records will go here.
conClasf.Close
Code a SQL statement that will query the ads table but not return any records. This might seem a strange thing to do, but if your only objective is to insert records, why put the database system through the work of retrieving records? This statement should replace the comment shown in step 5:
strSQL = "SELECT * FROM ads WHERE 1=0"
Create a new OleDbDataAdapter object that uses the SQL statement from step 6 and the database connection from step 5. Put this statement immediately after the statement you coded in the previous step:
dapAds = New OleDbDataAdapter(strSQL, conClasf)
Create a new DataSet object named dstAds.
dstAds = New DataSet()
Tell the OleDbDataAdapter object to create a DataTable object named ads inside the DataSet object dstAds, and then to fill it with data. The data source will be the SQL statement and database connection you assigned in step 7 to the DataAdapter named dapAds.
dapAds.Fill(dstAds, "ads")
Create a new OleDbCommandBuilder object named bldAds and associated with the data adapter dapAds.
bldAds = New OleDbCommandBuilder(dapAds)
Tell the new command builder to create a model INSERT statement based on the last query it processed. Because this Web page won’t be updating or deleting any records, there’s no need to create model UPDATE and DELETE statements.
dapAds.InsertCommand = bldAds.GetInsertCommand()
Code a loop that runs four times, varying the intPrice variable from 1 to 4, so that each record the Web page inserts has a unique and recognizable value:
For intPrice = 1 To 4
' Code to insert a record will go here.
Next
Replace the comment in step 12 with the following code, which adds one record to the DataTable object dstAds.Tables("ads"). This is the ads table within the dstAds DataSet.
rowAds = dstAds.Tables("ads").NewRow()
rowAds("headline") = "Clock " & timeofday
rowAds("askingprice") = intPrice
rowAds("memberid") = "[email protected]"
dstAds.Tables("ads").Rows.Add(rowAds)
Note that this code sets the headline field to the value Clock followed by the time of day, which ensures that you get different content every time you run the page. Note also that the code sets the askingprice field to the incremented variable intPrice, which ensures that each record from the same page execution is different. Both of these arrangements are strictly for convenience in debugging.
More important is the fact that the code doesn’t store a value in the AutoNumber adid field. Because adid is an AutoNumber field, Access will assign a unique value to each record.
Tell the DataAdapter dapAds to send all changes made to the dstAds DataSet back to the database system for updating. In the case of this Web page, this one statement adds all four records to the database. Put this statement immediately after the Next statement you coded in step 12.
dapAds.Update(dstAds, "ads")
Display the records you just added. Because their contents remain in the DataTable, and because in step 2 you added a DataGrid Web server control named gridAds to the page, this requires coding only the following statements. Put them immediately after the code you entered in step 14.
gridAds.DataSource = dstAds.Tables("ads")
gridAds.DataBind
Save the page in a folder that’s accessible via your Web server, giving it a file name of insert-da.aspx.
Load the insert-da.aspx page into your browser, taking care to specify an HTTP URL and not an ordinary file location.
At this point in its development, the insert-da.aspx page will add four records to the ads table each time you request the page. However, the page will have no access to the AutoNumber value that Access assigns to the adid field of each record. The next procedure explains how to get this information.
The steps in this procedure are necessary only if you’re adding records to a Microsoft Access database, the table’s primary key contains an AutoNumber field, and code elsewhere in the same Web page needs the value of that field. If all these conditions are true, proceed as follows:
After the End Sub statement that ends the Page_Load sub-routine, define a subroutine named OnRowUpd that expects the two arguments shown here:
Sub OnRowUpd(sender As Object, _
             e As OleDbRowUpdatedEventArgs)
End Sub
By means described in the next step, this subroutine will run automatically every time the data adapter updates a row in the database. This is the only time that Access exposes the value of an AutoNumber field to ADO.NET, and therefore to your ASP.NET Web page. The data type OleDbRowUpdatedEventArgs identifies a specialized object passed to subroutines that handle the OleDbRowUpdated event.
Designate the subroutine you just coded as an event handler for the RowUpdated event of the dapAds data adapter. Just in case this one has you stumped, here’s the necessary statement. It goes immediately before the loop you coded in step 12 of the previous procedure to insert the four records.
AddHandler dapAds.RowUpdated, _
  New OleDbRowUpdatedEventHandler(AddressOf OnRowUpd)
This statement actually doesn’t read too badly. It adds an event handler for the dapAds data adapter’s RowUpdated event. This will be an event handler of type OleDbRowUpdatedEventHandler, and the address for running it is the address of the OnRowUpd subroutine you defined in step 1.
Now, every time the dapAds data adapter finishes adding a row to the database, it will call the OnRowUpd subroutine you coded in step 1. Sweet.
Within the OnRowUpd subroutine you coded in step 1, declare the following variables:
Dim intNewId As integer = 0
Dim cmdId As OleDbCommand
Following these declarations, verify that the operation that triggered the event handler was an INSERT to the ads table. This is another tricky piece of code that’s much easier to read than to discover:
If e.StatementType = StatementType.Insert Then
  If e.TableMapping.DataSetTable = "ads" Then
'   Code to retrieve AutoNumber value will go here.
  End If
End If
Note that both If statements test properties of the OleDbRowUpdatedEventArgs object that the OnRowUpd subroutine receives as an argument. To find out more about this object, search the MSDN Web site for the terms OleDbRowUpdatedEventArgs and Framework.
If the desired operation is taking place, create an OleDbCommand object that will query the database for the current AutoNumber value. For compatibility with SQL Server, this field has the name @@identity. The following code replaces the comment you inserted in step 4:
cmdId = New OleDbCommand("select @@identity", _
                         e.Command.Connection)
The Command property of the OleDbRowUpdatedEventArgs object e points to the OleDbCommand object that’s performing the INSERT. The Connection property of that command object points to the corresponding database connection. Following these pointers and using this connection object will ensure that the select @@identity statement goes against the correct connection.
Run the command object you just created, and send the first column of the first row of the results into the variable intNewId. Note that the select @@identity statement returns only one column and one row. The command object’s ExecuteScalar method is perfect for this job. Insert the following line of code after the code you created in step 5:
intNewId = cmdId.ExecuteScalar()
Save the intNewId value from the previous step in the adid column of the current DataTable row. Fortunately, the Row property of the OleDbRowUpdatedEventArgs object e provides a pointer to this row. Insert the following line of code after the code you created in step 6:
e.Row("adid") = intNewId
This completes the coding for this example. Saving the page and loading it (through a Web server) into your browser should add four records and display their adid values for you and all the world to see.
It’s surprising to some extent that getting the value of an AutoNumber field in a new Access record is so difficult. Perhaps some new release of ADO.NET will do this automatically. In the meantime, writing an event handler to capture the AutoNumber value requires only nine statements, adds to your competence as a programmer, and will surely impress friends and relatives alike.
The complete code listing for this example is as follows:
<%@ Page Language="vb" Debug="true" Explicit="True" %>
<%@ Import Namespace="System.Data" %>
<%@ Import Namespace="System.Data.OleDb" %>
<script runat="server">
Public Sub Page_Load(sender As Object, e As EventArgs)
  Dim conClasf As OleDbConnection
  Dim dapAds As OleDbDataAdapter
  Dim dstAds As DataSet
  Dim dtbAds As DataTable
  Dim rowAds As DataRow
  Dim bldAds As OleDbCommandBuilder
  Dim strSQL As String
  dim intPrice As Integer

  conClasf = New OleDbConnection( _
    "Provider=Microsoft.Jet.OLEDB.4.0;" & _
    "Data Source=" & server.mappath("classified.mdb") & ";")
  conClasf.Open

  strSQL = "SELECT * FROM ads WHERE 1=0"
  dapAds = New OleDbDataAdapter(strSQL, conClasf)
  dstAds = New DataSet()
  dapAds.Fill(dstAds, "ads")

  bldAds = New OleDbCommandBuilder(dapAds)
  dapAds.InsertCommand = bldAds.GetInsertCommand()

  AddHandler dapAds.RowUpdated, _
     New OleDbRowUpdatedEventHandler(AddressOf OnRowUpd)

  For intPrice = 1 To 4
    rowAds = dstAds.Tables("ads").NewRow()
    rowAds("headline") = "Clock " & timeofday
    rowAds("askingprice") = intPrice
    rowAds("memberid") = "[email protected]"
    dstAds.Tables("ads").Rows.Add(rowAds)
  Next

  dapAds.Update(dstAds, "ads")

  gridAds.DataSource = dstAds.Tables("ads")
  gridAds.DataBind

  conClasf.Close
End Sub

Sub OnRowUpd(sender As Object, _
             e As OleDbRowUpdatedEventArgs)
  Dim intNewId As integer = 0
  Dim cmdId As OleDbCommand
  If e.StatementType = StatementType.Insert Then
    If e.TableMapping.DataSetTable = "ads" Then
      cmdId = New OleDbCommand("select @@identity", _
                               e.Command.Connection)
      intNewId = cmdId.ExecuteScalar()
      e.Row("adid") = intNewId
    End If
  End If
End Sub
</script>
<html>

<head>
<title>Use a DataAdapter to Insert Four AutoNumbered
Records</title>
<link rel="stylesheet" type="text/css" href="../normal.css">
</head>
<body>
<h1>Use a DataAdapter to Insert Four AutoNumbered Records</h1>
<asp:DataGrid id="gridAds" runat="server" />
</body>
</html>The DataTable object introduced in the previous section—despite existing only temporarily in memory—is analogous to a database table. The DataSet object—which contains one or more DataTable objects—is analogous to a database. This similiarity might lead you to wonder whether ADO.NET provides objects similar to views and logical relationships as well. The title of this section might also provide a clue.
A DataView provides an alternate way of looking at the contents of a DataTable. A DataView can show the data in a different sequence, with certain columns removed, and with certain rows filtered by data value. You can search, modify, and move about the contents of a DataView at will. The original DataTable object doesn’t have these capabilities.
The RowFilter property of a DataView restricts the view rows containing certain data values. Changing the Sort property displays the data in a different order. Changing these properties has no effect on the original DataTable.
Suppose, for example, that you had a DataTable named dtbPix that was sorted on a field named filename. To view this table in descending order by a field named filesize and then by filename, you could code
Dim dvwPix As DataView
dvwPix = New DataView(dtbPix)
dvwPix.Sort = "filesize DESC, filename"
If you want to see only rows with a filesize value less than 1024, code
dvwPix.RowFilter = "filesize < 1024"
The Item property returns the contents of a single row. If you change a field in any row, this changes the same field in the original table. The AddNew and Delete methods simultaneously add rows to and delete them from a DataView and its underlying DataTable.
You can bind DataGrid, DataList, Repeater, and other objects to a DataView in exactly the same way that you bind them to a data reader or DataTable. In fact, this is a major reason for using DataViews.
A DataRelation object relates two DataTable objects to each other based on column values from each DataTable. The data type for the columns in each table must be identical. One table serves as the master or parent in the relationship, and the other as a subordinate or child. In other words, the relationship is one to zero-or-many.
The following code creates a relation between a DataTable named teams and a DataTable named players, both of which reside in a DataSet named dstLeague.
Dim relPlaysFor As DataRelation
relPlaysFor = New DataRelation("PlaysFor", _
  dstLeague.Tables("Teams").Columns("TeamID"), _
  dstLeague.Tables("Players").Columns("TeamID"))
dstLeague.Relations.Add(relPlaysFor)
The first statement declares a variable for the DataRelation object.
The second actually constructs the DataRelation object, specifying a relationship name, the primary column, and then the secondary column.
The third statement adds the relation’s object variable relPlaysFor to the DataSet dstLeague.
When ADO.NET creates a DataRelation, it first verifies that the existing tables are compatible. All values in the secondary table must already exist in the primary table, for example, and all values in the primary table must be unique. (You can modify these constraints by modifying the DataRelation’s ChildKeyConstraint and ParentKeyConstraint properties.) If ADO.NET can’t establish the relationship, it throws an exception.
If the DataRelation successfully goes into effect, it will disallow any change that would violate the relation. It does this, of course, by throwing an exception.
You might wonder why, when you have a full-blown database management system at your disposal, you would bother creating, loading, and scrapping DataView and DataRelation objects every time your Web page loads. This is an excellent question, and in fact, you’ll generally be better off using the capabilities of your database system.
Don’t forget, however, that DataSets, DataTables, DataViews, and DataRelations exist independently of any database system. You can create, load, manipulate, and bind to these objects even in Web pages that never open a database connection, run a query, or issue a database command. You might be handling data from the local file system, for example, or from an XML file, or from a Web service.
Chapter 8 includes a procedure that uses DataView objects to sort and display file and folder information obtained from the Web server’s file system.
The word transaction has quite a few different meanings, depending on the context. Sometimes it means one unit of business activity, such as one sale, one service call, or one package delivery. Sometimes it means one electronic interaction, such as one request made on the Web server. In the context of database systems, however, the word transaction has a very specific meaning: it means a group of database updates that should take place on an all-or-none basis.
The most famous and archetypical transaction of all time involves a transfer of funds from one bank account to another. First, the program debits the source account. If this works, so far so good, and the program proceeds to credit the destination account. If that fails, the program needs to undo the debit somehow. Because the debit and the credit must take effect together or not at all, they form one transaction. Modern database systems support transactions quite easily using the following paradigm:
The program starts the transaction by calling a suitable method. In ADO.NET, this is a BeginTransaction method.
As the program issues database commands, the database system keeps "before" and "after" versions of each record it changes.
If the program detects a serious error, it calls a Rollback method. The database system then returns all changed records to their original state.
If the program completes its work successfully, it calls a Commit method. This tells the database system that it can finish writing all changes into the database and discard any "before" and "after" versions it has on hand.
ADO.NET follows this pattern fairly closely. However, there are a few details you need to consider. Here’s how to perform transaction processing under ADO.NET:
Open the database connection you want to use. Assume it has a name of conClasf.
Use this connection object to create a transaction object. Here’s an example:
Dim trnClasf as OleDbTransaction
trnClasf = conClasf.BeginTransaction()
For each command object involved in the transaction, set its Transaction property to specify the transaction object you created in step 2. Here’s an example:
cmdClasf.Transaction = trnClasf
Do this after you’ve set the command object’s Connection property, but before you use the command object to run any commands that are part of the transaction.
Don’t forget to include command objects created automatically within data adapters.
Execute all database commands that are part of the transaction within a Try ...Catch ...End Try structure. Make sure the catch block contains a Rollback command, as shown:
Try
' Database update code goes here.
Catch ex as Exception
  trnClasf.Rollback
'   Other recovery statements go here.
End Try
You should also call the transaction object’s Rollback method and terminate further database processing if you detect unexpected conditions that don’t cause an exception—an unexpected Not Found condition, for example.
If all database updates finish successfully, commit your changes as shown:
trnClasf.Rollback
Note that you start the transaction using a method of the connection object, then include specific commands by setting properties of command objects, and then roll back or commit changes using a method of the Transaction object. Using all these different objects might seem a little odd, but it does permit coordination of two or more transactions at the same time. Simply create and then control two or more Transaction objects.
Finally, be warned that the techniques presented here work only when all the database commands in the same transaction go through the same database connection, which rules out transactions that involve multiple database servers of the same or different types. If you need to coordinate database transactions that span multiple servers, investigate Windows 2000 Component Services or, on Windows NT 4.0, Microsoft Transaction Server.
This chapter explained the essential nature and features of ADO.NET, the software component that provides database processing for .NET programs of all kinds, including, of course, ASP.NET Web pages. Because it includes provisions for dealing with widely distributed and disconnected data sources, ADO.NET differs markedly from earlier database interfaces. Nevertheless, it’s a powerful and practical way to access data.
The next chapter begins part III of the book, which deals primarily with working examples of realistic Web pages. Chapter 8 begins by explaining how to access the Windows file system and perform simple graphics transformations.