

In this chapter, you’ll learn: | |
✓ | How to obtain and configure a Web server suitable for developing ASP.NET pages. |
✓ | What capabilities to look for when selecting a Web presence provider. |
A fundamental concept of ASP.NET is that program code within ASP.NET Web pages runs on the Web server. This ability is what isolates such pages from variations among browsers, and it’s also the reason they can access databases and other services that reside on the Web server. However, this also means that to test an ASP.NET page, you must put it on a Web server and request it over the network. Loading an ASP.NET page directly from disk into a browser simply doesn’t work.
If your IT department provides an ASP.NET Web server suitable for testing, your problems are over. Store your work in progress on that server, and request your pages from it. All you have to worry about is getting the page coded properly.
If you work in a more isolated environment, such as a home or small office, you can install a Web server on your own computer and test ASP.NET pages there. Then, when everything is working as you want it to, you can copy the pages to your production Web server.
Either way, this chapter explains what Web server resources you need and how to set them up. Even if you don’t set up the server yourself, knowing what’s involved will help you request the correct resources.
If the Web pages you’ve created up to now have been simple HTML pages, you’ve probably needed only one Web server: the one your Web visitors access. You probably developed these pages on your own computer and tested them by opening the disk files with your browser. When you decided a page was ready for prime time, you put it on the Web server using file sharing, FTP, or a Web publishing system, such as Microsoft FrontPage.
Such an arrangement is usually sufficient for developing simple HTML pages, but developing ASP.NET pages usually requires two Web servers: one for you to use while developing and another for Web visitors to use when accessing the finished application. There are three reasons for this:
You can’t run an ASP.NET page by loading it directly from your local disk into your browser. ASP.NET pages orchestrate a variety of software resources that exist only in a true Web server environment.
You probably don’t want Web visitors running your ASP.NET pages until you think those pages are ready. This is especially true when you’re modifying an existing page; your visitors could end up seeing a page that isn’t exactly the old version, isn’t exactly the new version, and isn’t exactly working.
If you have limited bandwidth to your production Web server, the speed, reliability, and cost of that connection can prohibit extensive development directly on the server.
Microsoft’s flagship Web server—and the only one suited for developing, testing, and hosting ASP.NET Web sites—is Microsoft Internet Information Services (IIS). IIS runs on several editions of Microsoft Windows and, as shown in the following table, is currently at version 5.01.
Internet Information Server Versions | |
|---|---|
IIS Version | Released With |
1.0 | Post-release feature for Microsoft Windows NT Server 3.51 |
2.0 | Windows NT Server 4.0 |
3.0 | Post-release feature for Windows NT Server 4.0 |
4.0 | Windows NT 4.0 Option Pack |
5.0 | Microsoft Windows 2000 |
5.01 | Microsoft Windows XP Professional |
Reduced versions of IIS, called Microsoft Personal Web Server, were also available for Microsoft Windows 95 and Microsoft Windows 98. No Microsoft Web servers are available for Microsoft Windows Me or for Microsoft Windows XP Home Edition, and, as a result, neither of these platforms are suitable for ASP.NET development.
Running ASP.NET pages, however, requires more than just a Web server. It also requires the Microsoft .NET Framework. The framework runs only on Windows XP Professional and Windows 2000, and therefore, to develop and test ASP.NET pages, you’ll need one of those operating systems. If you haven’t upgraded already, now is probably the time.
The .NET Framework includes the common language runtime; the Visual Basic .NET, Visual C# .NET, and JScript .NET compilers; and all the runtime files you need on the Web server to run ASP.NET Web pages. The procedure for obtaining the framework might change from version to version, but at least initially, it’s a free download from Microsoft’s Web site. Browse www.microsoft.com/net/, and click Downloads. Also watch this site for upgrades and fixes, which will surely appear over time.
Note
Although it includes compilers for Visual Basic .NET, Visual C# .NET, and JScript .NET, the .NET Framework doesn’t include the Visual Studio .NET graphical development environment. ASP.NET automatically invokes these compilers when you run ASP.NET pages, or you can invoke them yourself from the command line.
The term ADO.NET (ActiveX Data Objects.NET) collectively identifies the .NET Framework database components. Like all past versions of ADO, ADO.NET software comes in a package called Microsoft Data Access Components (MDAC). New releases of ADO appear even more frequently than those of IIS, and usually coincide with new releases of Microsoft Access or Microsoft SQL Server. However, some ADO releases are strictly for bug fixes or other interim maintenance. MDAC 2.7 is the first version of MDAC that includes ADO.NET. Microsoft’s initial distribution of the .NET Framework includes MDAC 2.7.
Tip
In general, you should always install the latest version of MDAC. You can look for new versions by browsing www.microsoft.com/data/.
MDAC doesn’t include full copies of Microsoft Access, or SQL Server, or any other database software. It merely provides background drivers that other software, such as ASP.NET, can use. If you want to use SQL Server or Oracle databases, for example, you must purchase a copy of SQL Server or Oracle and install it somewhere on your network. MDAC provides only the software clients need to access those databases. MDAC does, however, provide all the software an ASP.NET page needs to read and update Microsoft Access databases.
Note
To spare you the time and expense of installing a network database such as SQL Server, all the examples in this book use Access databases.
Microsoft has expended considerable effort so that installing the .NET Framework on a Web server has no effect on existing Active Server Pages. The same is true of MDAC 2.7. Microsoft understands that if installing the .NET Framework caused millions of legacy ASP pages to fail, acceptance of the new software would be slow at best. Legacy ASP and ADO pages will continue to work for many years, despite occasional upgrades to the underlying software base.
You can install IIS either initially, when you install the operating system, or later, from Control Panel. If you’re not sure whether you installed IIS previously, here are some ways to check.
Check for the presence of Internet Services Manager.
On the Start menu, click Programs and then Administrative Tools.
If you see a choice called Internet Services Manager, IIS is already installed.
If IIS is installed, open Internet Services Manager.
Under Internet Information Services, expand the entry that has your computer name.
Under the entry for your computer, expand the entry titled Default Web Site.
To check the overall configuration for the computer, right-click the computer name and choose Properties from the shortcut menu.
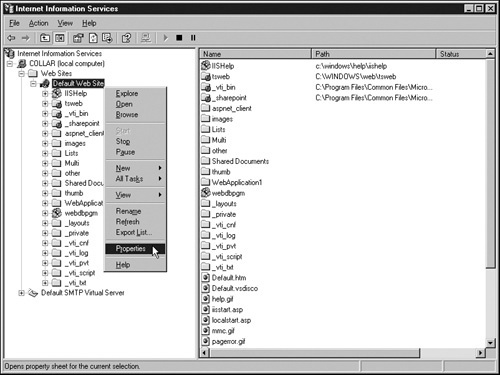
To check the overall configuration for a particular Web server, right-click the Web server name and choose Properties from the shortcut menu. The next graphic shows this operation in progress:
To check the overall configuration for a particular content folder, right-click the folder name and choose Properties from the shortcut menu.
Check for the presence of IIS services. This is another path to the same information that the previous bullet describes.
On the Start menu, click Programs, then Administrative Tools, and then Computer Management.
Under Computer Management (Local), open Services And Applications.
If a subheading titled Internet Information Services appears, IIS is already installed.
Expand the Internet Information Services entry and then the entry titled Default Web Site. Right-clicking entries and choosing Properties displays the same information as steps 6–8 under the previous bullet.
Check for a Web server response. This verifies that the Web server is installed and working, but not that the Web server is IIS.
If you can see the Web server’s configuration in Internet Services Manager or Computer Management but you get a Cannot Find Server Or DNS Error message or some other form of timeout from your browser, the Web server probably isn’t started. To correct this, right-click the Web server in Internet Services Manager or Computer Management and then click Start on the shortcut menu.
If you get a browser response but none of the IIS configuration software is installed, the computer might be running a third-party Web server, such as Apache. Your alternatives in this case are:
Remove the third-party Web server, and then install IIS as described in the next section.
Stop the third-party Web server, and then install IIS as described in the next section. Thereafter, always be sure to stop one server before starting the other.
Install IIS as described in the next section, and then make sure the two Web servers are listening on different IP addresses or different port numbers.
If your computer has no Web server software at all installed, follow the instructions in the next section to install IIS.
Installation of IIS on Windows 2000 and Windows XP Professional begins with this dialog box. (For clarity, the Components list box is artificially lengthened.)
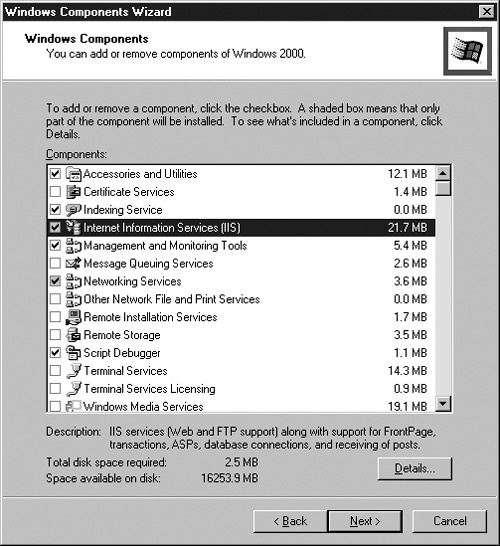
The dialog box appears during initial setup and whenever you follow these steps:
The list of components will vary depending on whether you run Windows 2000 Professional, Windows 2000 Server, or Windows XP Professional. The previous figure shows the options for Windows 2000 Server, which has the most complete list. The following options relate to ASP.NET development:
Indexing Service is a full-text search engine that can index the pages in a Web site. You should install this option if your Web site (or any other application on the server) would benefit from full-text searching.
Internet Information Services (IIS) comprises the Web server itself. You should definitely choose this option if you want to use the computer for ASP.NET development.
Script Debugger provides an interactive debugging facility for Web pages, complete with step-by-step execution, breakpoints, and runtime access to variables. You can install this option if you want, but installing the .NET Framework later will replace it.
IIS includes subcomponents you can install or exclude as necessary. To view the list of subcomponents and make selections, select Internet Information Services (IIS) and then click Details. You’ll see the following dialog box.

Note
Even if you have Windows 2000 or Windows XP Professional, you should check Microsoft’s Web site for newer versions, patches, or updates.
Installable components for IIS include the following:
Common Files refers to various files used by one or more other subcomponents. If you specify any other subcomponents, you’ll probably need to specify this one, too.
Documentation includes information about administering and programming the other subcomponents. Select this check box.
File Transfer Protocol (FTP) Server accepts incoming connections from remote users using FTP client software. Install this subcomponent only if you want to support such connections.
FrontPage Server Extensions provide enhanced Web publishing capability for the FrontPage client software.
Windows 2000 includes the FrontPage 2000 Server Extensions, which are obsolete. If you want FrontPage extensions, you should install them from the Microsoft FrontPage 2002 CD or from download files available at Microsoft’s Web site.
Windows XP includes the FrontPage 2002 Server Extensions. You can install these if you want, but it’s a good idea to check Microsoft’s Web site for a newer version.
Tip
To look for the latest version of the FrontPage Server Extensions, browse www.microsoft.com/frontpage, and click the Downloads hyperlink.
Internet Information Services Snap-In provides software for administering the Web server through Microsoft Management Console (MMC). Always select this check box.
Internet Services Manager (HTML) provides a series of Web pages for administering the Web server remotely. Select this check box only if you anticipate administering the Web server from locations having only HTTP connectivity.
NNTP Service accepts and forwards Internet newsgroup feeds. It also supports connections from individual users running newsgroup clients (newsreaders). Select this check box only if you expect to send and receive Internet news feeds or if you want to set up your own news server. This option is available only on Windows 2000 Server.
SMTP Service accepts incoming electronic mail messages and periodically tries to forward them to another server. It stores such messages only until forwarding is successful and then deletes them. There’s no support for client e-mail software to receive messages.
ASP.NET has a built-in feature for sending e-mail, and that feature uses the SMTP Service. If you plan to test any ASP.NET pages that send e-mail, you should install this feature.
Visual InterDev RAD Remote Deployment Support adds more functions to the FrontPage Server Extensions. These functions register server-side components and set up Microsoft Transaction Server packages at the request of developers using Visual InterDev remotely. Install this feature only if you have developers using Visual InterDev who need such support.
World Wide Web Server provides Web visitors with access to ordinary Web pages, ASP pages, and other server-side programs via HTTP. For ASP.NET development, always install this feature.
When you’re satisfied that all your choices are correct, click Next. Windows might prompt you for the Windows 2000 or Windows XP setup CD, but it shouldn’t require a reboot.
When the setup process ends, you should be able to verify the presence of IIS as described earlier in this section. If not, recheck your work and try again.
If any service packs exist for your operating system, apply them now. This is important even if you installed the same service pack before. The objective is to install any fixes or upgrades that apply to IIS.
If you want to install the FrontPage Server Extensions and didn’t do so during IIS setup, now is a very good time. This ensures that the extensions are installed and working properly before you install the .NET Framework.
If you want to install SQL Server, this is an opportune moment for that task as well. Doing so conforms to the time-honored policy of installing the newest (and presumably most mysterious) piece of software last. That way, you can debug other installations in a more familiar environment, and you can get a better idea of what failed when you install the new environment.
At minimum, running ASP.NET requires the common language runtime, one or more .NET compilers, ADO.NET, and the ASP.NET Web server software. Microsoft will likely distribute not only ASP.NET, but other .NET software as well, by means of downloads from its Web site, CDs and DVDs distributed through various channels, and bundling with other software programs and operating system upgrades.
Eventually, the .NET technologies will be a part of every Windows operating system, and ASP.NET will be a part of IIS. Until then, installing ASP.NET will remain a two-step process: First install IIS, and then install the Microsoft .NET Framework Software Development Kit (SDK). Installing the SDK upgrades IIS to ASP.NET.
Note
Microsoft’s long-term goal is for every piece of software to run under the .NET Framework. As a result, you should expect a wide variety of software, as part of its setup procedure, to check for existence of the .NET Framework and install it on demand.
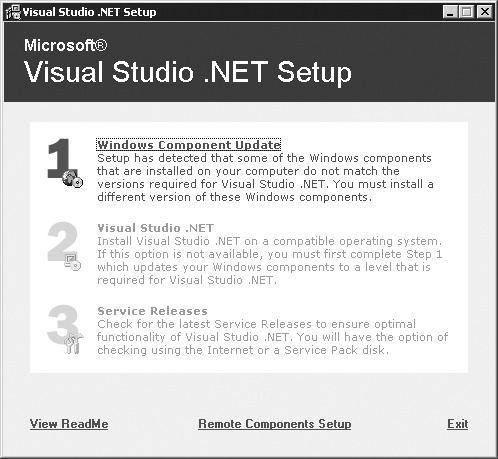
If you have Visual Studio .NET, installing it will display the page shown here. Clicking Windows Component Update will install the .NET Framework, the .NET SDK, and MDAC 2.7 on your computer and, if IIS is present, on IIS as well.
Visual Studio .NET also provides copies of the .NET Framework and MDAC 2.7 that you can install independently (that is, without installing the rest of Visual Studio). To perform these installations, run the following programs from the Component Update CD (where d is the letter of your CD-ROM drive).
d:dotNetFrameworkdotnetfx.exe
d:MDACmdac_typ.exe
If you download the .NET Framework and SDK from Microsoft’s Web site, the setup program will disply the dialog box shown below. The most important choice here is to install the Software Development Kit. Installing the SDK Sample is optional.
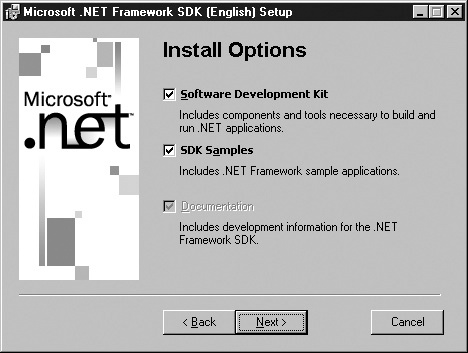
If the Framework SDK setup program suggests installing a new version of MDAC (the Microsoft Data Access Components), you should almost certainly do so. ADO.NET requires version 2.7 or better of MDAC.
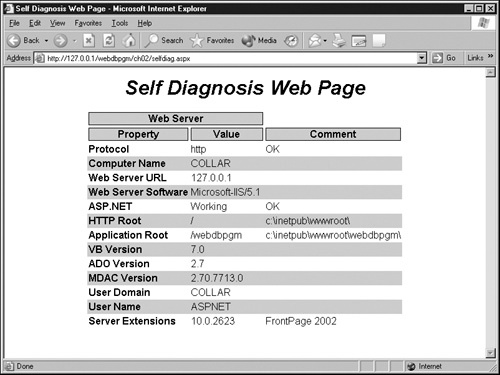
If you’re unsure about the status of your system, try this:
Locate the selfdiag.aspx page in the ch02 folder you installed from the companion CD.
Copy this file to a location within your Web server’s content tree. This will probably be a location within the C:InetPubwwwroot folder.
Start your browser and display the page using an HTTP URL. For example, browse:
http://127.0.0.1/webdbpgm/ch02/selfdiag.aspx
and not
C:InetPubwwwrootwebdbpgmch02selfdiag.aspx
You should get results similar to those in the following graphic.
If you get a message stating, "You’re loading this page into your browser directly from disk," change the browser’s Location field so it specifies an HTTP URL.
If an external editor of some type opens the file, again, you’re probably trying to browse it directly from disk. Change the browser’s Location field so that it specifies an HTTP URL.
If you get a blank page, a mixture of strange-looking HTML and Visual Basic, or a prompt to save the page as a file, you probably haven’t installed ASP.NET on the Web server.
If the value that appears after ASP.NET is Working, then ASP.NET pages are running at some level.
Verify that the following items are of the versions indicated.
VB Version: 7.0 or later.
ADO Version: 2.7 or later.
MDAC Version: 2.70.7713.1 or later.
If not, you need to install a newer version of the Framework SDK or a newer version of MDAC.
The User Domain and User Name fields identify the user account that runs ASP.NET pages. The default is a local computer account named ASPNET. The privileges an administrator grants this account define the limits of what your ASP.NET pages can do.
The Server Extensions field is strictly for your information. The presence or absence of the FrontPage Server Extensions has no effect on the operation of ASP.NET.
This section explains how to configure the most important Web server settings that affect normal operation of ASP.NET Web pages. If there’s a consistent problem affecting all your pages, checking these settings is definitely worth a try.
Every Web server associates a specific folder with the URL "/". This folder is the HTTP root. When a Web visitor requests a URL, the Web server looks for the requested path and file name relative to the HTTP root. The following table shows some examples of this concept in action. Assume that the HTTP root is the folder C:InetPubwwwroot.
Resolving URLs Relative to an HTTP Root Location | |
|---|---|
Requested URL | File Delivered |
http://<server>/default.htm | C:InetPubwwwrootdefault.htm |
http://<server>/xyz/info.htm | C:InetPubwwwrootxyzinfo.htm |
http://<server>/images/logo.gif | C:InetPubwwwrootimageslogo.gif |
Because this Web server’s HTTP root is C:InetPubwwwroot, it normally resolves URLs relative to that location. This is a simple and elegant scheme, but not a flexible one. Sooner or later, every Web administrator needs a URL path and the corresponding physical path to be different.
Suppose, for example, that installing a software product named Flakey Bits installs Web-based documentation files at E:Program FilesFlakeyBitsdocs.
You could copy this documentation to a new folder named C:InetPubwwwrootFlakeyDocs, but it would be far more direct to somehow associate the URL http://<server>/FlakeyDocs with the physical location E:Program FilesFlakeyBitsdocs. Most Web servers, including those from Microsoft, support such requirements with a facility called virtual directories. A virtual directory associates a URL path with a physical path that isn’t necessarily within the HTTP root.
Over time, Web servers have adapted the virtual directory concept to control much more than path translations. Any folder setting or property that pertains to Web server use—and not to ordinary file use—tends to reside in a virtual directory entry. This is true even if the virtual path and the physical path are the same.
One such setting pertains to a folder’s executable property. This property tells the Web server whether it’s OK to run ASP.NET pages and other executable objects located within a given folder. If you put an ASP.NET page in a folder that isn’t executable, the Web server won’t run it.
The following procedures guide you through the process of creating a virtual directory and marking it as executable. If you’re the Web server’s administrator (perhaps because you’re configuring a Web server on your own PC), you can do these things yourself. Otherwise, you’ll need to get the server’s administrator to do them for you.
The following steps explain how to create an executable virtual directory on Windows 2000 or Windows XP Professional:
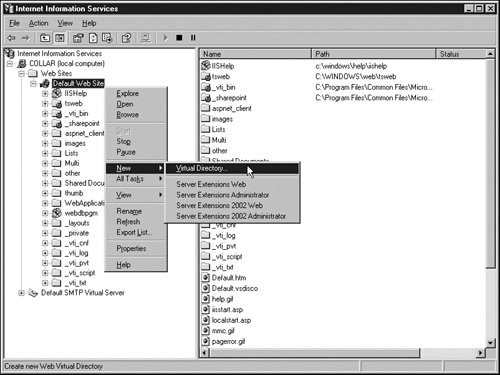
From the Start menu, choose Programs, Administrative Tools, and Internet Services Manager. (Any configuration of Microsoft Management Console that includes the Internet Information Services Snap-In will work as well.)
If the computer that will contain the executable virtual directory isn’t listed under Internet Information Services, right-click Internet Information Services, choose Connect, enter the computer name, and click OK.
If the computer that will contain the executable virtual directory is preceded by a plus sign, click the plus sign to show the next level of detail.
Right-click the Web server that will contain the executable virtual directory, choose New from the shortcut menu, and then choose Virtual Directory. The following graphic shows this operation in progress:
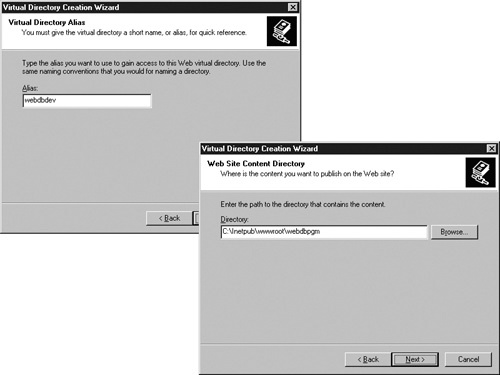
When the Virtual Directory Creation Wizard appears, click Next to bypass the opening page, and then enter the virtual directory alias you have in mind. This is the path that Web visitors will see in their URLs. The following graphic shows this page and the next:
Click the Next button and then, on the wizard’s third page, enter the Web Site Content Directory. This can be any directory that physically exists on the server, or a file-sharing location specified in Universal Naming Convention (UNC) format.
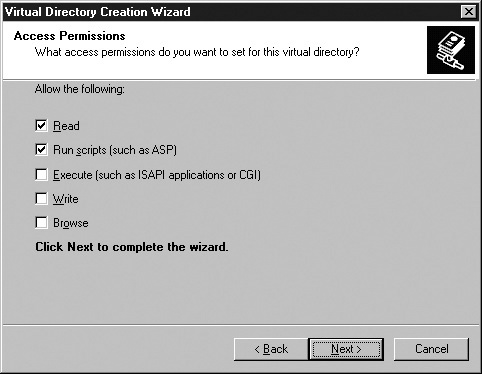
Click the Next button again to display the page shown in the graphic below, which offers these security options for the new virtual directory:
Read specifies that the Web server can respond to ordinary GET requests for files in the virtual directory. That is, it can deliver HTML, GIF, JPEG, and other such files in the usual way.
Run Scripts specifies that the Web server can respond to GET and POST requests that specify a location within the virtual directory and that cause a script interpreter to run Web pages containing server-side scripts. For Active Server Pages to work properly, you must select this check box.
Execute specifies that the Web server can execute any program files (such as .exe and .dll files) that are within the virtual directory and specified as part of a URL.
Write specifies that the Web server can receive files from Web visitors and create or overwrite corresponding files in the virtual directory. This option is rarely used, except when Web designers use certain HTML editors.
Browse specifies that when a Web visitor submits a URL with no file name, and the specified path doesn’t contain a default Web page, the Web server will respond with a clickable directory listing of files in that directory.
Click Next once more to get the wizard’s closing page, and then click Finish. The new virtual directory should appear beneath the Web server’s entry in Microsoft Management Console (MMC).
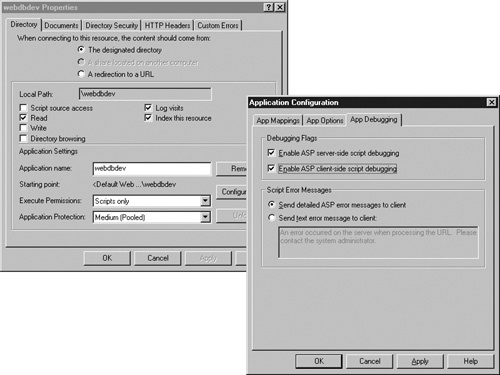
To review or modify your results, right-click the new virtual directory in MMC and then choose Properties from the shortcut menu to display the dialog box shown below on the left. Clicking the Configuration button displays the dialog box at the right, where the first option on the App Debugging tab enables or disables interactive script debugging.
The Read, Write, and Directory Browsing options along the left edge correspond to the Read, Write, and Browse options in the wizard. The options in the Execute Permissions list box correspond to the wizard’s Run Scripts and Execute options.
The Virtual Directory Properties dialog box shown on the left in the previous graphic obviously contains a myriad of options that the Virtual Directory Creation Wizard doesn’t configure. Fortunately, the default settings are perfectly acceptable for most work. If not, you can get additional guidance by clicking the Help button or consulting a book about IIS.
In the most generic sense, an application is a group of programs that work together to provide a single function. Suppose, for example, that you develop one set of Web pages to sell lottery predictions and another to show off your collection of antique beer steins. These are two separate applications.
IIS—and now ASP.NET as well—supports the presence of multiple applications on the same Web server. Each application you create occupies its own folder tree. Dividing the server into applications has these benefits:
You can configure Web server settings for the entire application all at once. This results in less work and more uniformity than configuring Web pages or folders one by one.
Changes you make to one application have no effect on any other application. This improves the stability and reliability of each application and of the Web server as a whole.
Each IIS application begins in a folder called the application root. Physically, this is just an ordinary folder; the only thing that makes it an application root is that you’ve told the Web server to consider it one.
The decision as to which groups of Web pages belong in separate applications is a subjective one and totally up to you. However, your life will generally be easier if you create a separate IIS application for each relatively independent project or system you work on.
To define a folder as an application root, you must be an administrator on the Web server. Furthermore, you must have physical access to the server keyboard or network access through Windows Networking. Neither of these requirements should present a problem if you’re configuring a Web server on your own PC. But if someone else controls the server, he or she will need to perform this task for you.
Here’s the procedure for creating an IIS application:
Create a folder that’s accessible to the Web server. This can be a virtual directory, as described earlier in this chapter, or a physical folder anywhere within the server’s HTTP root.
Start Internet Services Manager by clicking Start, Programs, Administrative Tools, and Internet Services Manager.
When the Internet Services Manager window appears, open the entry for the computer and the Web server where the application will reside.
Within the Web server entry, right-click the folder that will become the application root. To make this folder visible, open as many other folders as necessary.
Choose Properties from the shortcut menu.
When the <folder name> Properties dialog box appears, click the Directory tab. For a picture of this dialog box, refer back to the graphic in Coding ASP.NET Elements.
Under Application Settings, click Create.
Click OK to close the <folder name> Properties dialog box.
While using Internet Services Manager, you might notice various dialog boxes that configure the properties of an application. All of these dialog boxes pertain strictly to classic Active Server Pages applications, and not at all to ASP.NET applications. To configure the properties of an ASP.NET application, you must create or modify a file named web.config.
Tip
Classic ASP applications and ASP.NET applications can exist in the same folder tree, but they don’t share any configuration settings and they don’t communicate with each other except as ordinary Web pages. Because of this, it’s generally awkward to create a system of mixed ASP and ASP.NET pages.
The web.config file is an XML file. Like all XML files, it consists of tags enclosed in angle brackets, and every opening tag requires a closing tag. Here, for example, are the contents of a simple web.config file:
<configuration>
 <system.web>
   <compilation debug="true"/>
   <customErrors mode="Off"/>
 </system.web>
</configuration>
To understand the structure of this file, try the following procedure.
Open your favorite text editor and create a new, blank file.
Begin creating the file by entering the two lines of text shown below. Every web.config file must begin with the first of these lines and end with the second.
<configuration>
</configuration>
Insert the following pair of lines between the two lines you already entered. These respectively mark the beginning and end of all system.web configurations.
<system.web>
</system.web>
Insert the following lines between the two lines you inserted in step 3. Note the presence of trailing slashes just before the end of each tag. These slashes are a substitute for complete ending tags.
<compilation debug="true"/>
<customErrors mode="Off"/>
The first line specifies that within this application, all .NET compilers should add debugging information to the compiled output. This step makes the resulting modules larger and slower, but produces much more specific error messages when a Web page fails. This setting is common while developing an application but rare on production Web sites.
The second line specifies that when an ASP.NET page fails, the Web visitor, whether local or remote, will receive an ASP.NET rich error page. In practical terms, this means the browser will display compilation details and a listing of the failing source code (with the failing statement highlighted).
The <compilation> and <customErrors> tags are far from being the only tags ASP.NET looks for inside the <system.web> section. In fact, any of the tags listed in the following table are valid. As you can see, a complete explanation of each section would consume a major part of this book.
Configuration Section | Description |
|---|---|
<appSettings> | Configures custom settings for an application. You can declare this at the machine, site, application, and subdirectory levels. |
<authentication> | Configures ASP.NET authentication support. |
<authorization> | Configures ASP.NET authorization support. |
<browserCaps> | Configures settings for the browser capabilities component. |
<compilation> | Contains all ASP.NET compilation settings. |
<customErrors> | Defines custom error messages for an ASP.NET application. |
<globalization> | Configures the globalization settings of an application. |
<httpHandlers> | Maps incoming URL requests to IHttpHandler classes. |
<httpModules> | Adds, removes, or clears HTTP modules within an application. |
<httpRuntime> | Configures ASP.NET HTTP runtime settings. You can declare this section at the machine, site, application, and subdirectory levels. |
<identity> | Controls the identity of the Web application. |
<machineKey> | Configures keys to use for encrypting and decrypting cookie data for authenticating forms. ASP.NET uses these keys to authenticate viewstate data and forms authentication tickets. You can declare this section at the machine, site, application, and subdirectory levels. |
<pages> | Identifies page-specific configuration settings. |
<processModel> | Configures the ASP.NET process model settings on Internet Information Services (IIS) Web server systems. |
<securityPolicy> | Defines valid mappings of named security levels to policy files. You can declare this section at the machine, site, application, and subdirectory levels. |
<sessionState> | Configures the session state HttpModule. |
<trace> | Configures the ASP.NET trace service. |
<trust> | Configures the code access security permission set for the application. You can declare this section at the machine, site, application, and subdirectory levels. |
<webServices> | Controls settings for ASP.NET Web Services. |
Because your goal at this point is presumably to become a beginning ASP.NET developer and not a web.config expert, the book will discuss additional settings only as the need arises. For more detailed information, go to the MSDN Library Web site at msdn.microsoft.com/library, and search on ASP.NET Syntax or ASP.NET Configuration Sections.
In case you’re still wondering about the customErrors setting, here’s a brief further explanation. When an ASP.NET page fails, ASP.NET can display three kinds of error pages:
A rich error page that displays the detailed error message, compilation details, the failed source code, and a high-level execution trace.
A basic error page that doesn’t list source code and provides only high-level information about the error.
A page you designed yourself. You might do this, for example, to obscure the nature of the error as much as possible and to provide an error page that matches the rest of your site in appearance.
Although you, the developer, want as much information about a failure as you can get, that doesn’t mean you want your Web visitors to know. This privacy isn’t so much to save you embarrassment as it is to keep visitors from trying to solve problems on their own or hack into your server.
Here’s a customErrors section that specifies three custom error pages. If an HTTP error 404 (Page Not Found) occurs within the scope of this application, ASP.NET will send the Web visitor a page named error404.aspx. If error 405 (Resource Not Allowed) occurs, the visitor will get a page named clueless.aspx. If any other error occurs, ASP.NET will send a page named error.aspx:
<customErrors defaultredirect="error.aspx" mode="on">
 <error statuscode="404" redirect="error404.aspx"/>
 <error statuscode="405" redirect="clueless.aspx"/>
</customErrors>
The following table summarizes the effect of the mode setting. The default is normally mode="RemoteOnly" and no custom error pages.
Effect of customErrors mode Setting | |||
|---|---|---|---|
customErrors mode | Custom Error Page Defined | Error Page Received | |
LocalVisitor | RemoteVisitor | ||
RemoteOnly | Yes | Rich | Custom |
No | Rich | Basic | |
On | Yes | Custom | Custom |
No | Basic | Basic | |
Off | Yes | Rich | Rich |
No | Rich | Rich | |
This section describes how to inspect and configure two additional types of Web server settings through Internet Services Manager. These aren’t the sort of settings you need to work with every day (or even every month), but when you need them, you need them badly. Understanding these configurations will help you understand some important things about how ASP.NET and Web servers work.
Whenever a Web visitor requests content from an executable directory, Microsoft Web servers look up the requested filename extension in a table of application mappings. This table assigns, or maps, a script interpreter to each filename extension in the table. Follow these steps to view the table:
Start Internet Services Manager (or any other instance of Microsoft Management Console that includes the Internet Information Services Snap-In).
Under the Internet Information Server heading, right-click the computer you want to administer, and then choose Properties from the shortcut menu.
Make sure the Internet Information Services tab is selected.
Ensure that the Master Properties selection list specifies WWW Service, and then click Master Properties Edit.
When the WWW Service Master Properties dialog box appears (shown on the next page), select the Home Directory tab.
Click the Configuration button to display the Application Mappings dialog box shown below. The very first tab—App Mappings—lists the associations between filename extensions and script interpreters currently in effect. The graphic shows, for example:
C:WINNTSystem32inetsrvasp.dll will process any requested files having the filename extension .asp. The asp.dll program processes classic ASP pages.
C:WINDOWSMicrosoft.NETFrameworkv1.0.3705aspnet_isapi.dll will process files having the extensions .asax, .ascx, and a number of others (including .aspx) beyond the visible portion of the list. The aspnet_isapi.dll program processes ASP.NET pages.
Use the buttons beneath the Application Mappings list to add, modify, or remove mappings. (This should seldom, if ever, be necessary.)
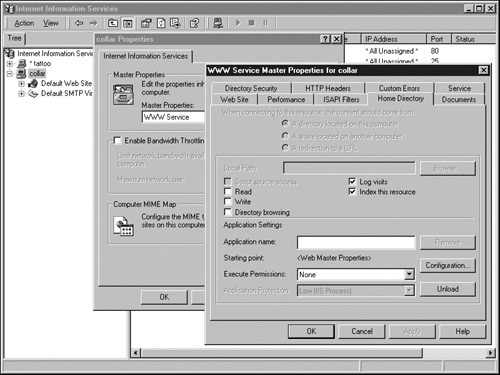

The Home Directory tabs for each Web server and the Directory tab for each virtual directory also contain Configuration buttons that display App Mappings tabs. These override the master properties App Mappings table at the Web server and the virtual directory levels, respectively.
Web servers provide hundreds of configuration options, far too many for a book such as this to cover comprehensively. However, one more setting relates directly to ASP.NET development.
When a Web server responds to an incoming request, it transmits one or more header records before it transmits the actual content. These header records contain status codes, server identifications, file dates, cookies, and other information required for the Web server and the visitor’s browser to communicate intelligently. The actual data stream consists of one or more headers, a blank line, and then the actual content.
One of these headers—the Content-Type header—identifies the type of content a Web response contains. The following table shows some typical Content-Type headers.
Typical HTTP Content-Type Headers | |
|---|---|
Type of Response | Content-Type Header |
GIF | Content-Type: image/gif |
HTML | Content-Type: text/html |
JPEG | Content-Type: image/jpeg |
WAV | Content-Type: audio/x-wav |
The browser uses this information to determine how to handle the file: whether to display it as HTML in the browser window, display it as an image, play it as a sound, and so on. You might think that filename extensions would control such decisions, but some operating systems, such as Macintosh OS, don’t use filename extensions. The Web’s early innovators therefore chose to describe responses with an existing standard called Multipurpose Internet Mail Extensions (MIME). Codes such as text/html are MIME types.
Most Windows-based Web servers assign MIME types based on filename extensions. This implies that the Web server has a table somewhere that lists filename extensions and their corresponding MIME types. Follow these steps to display this table:
Follow steps 1 through 3 under "Assign an interpreter to a filename extension" in Note.
Click Edit in the Computer MIME Map frame.
The File Types dialog box shown below will appear next. To examine entries, scroll up and down the Registered File Types list. To add, remove, and modify entries, use the New Type, Remove, and Edit buttons.
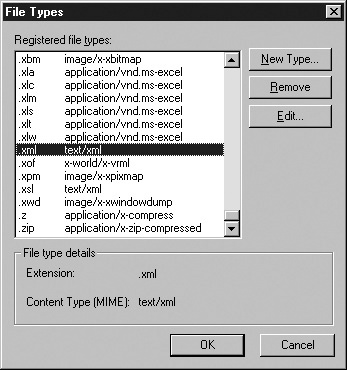
Like the application mapping list, the MIME type list appears again at the Web server and virtual directory levels. However, at these lower levels, the list is blank except for any overrides in effect.
ASP.NET files can override the standard MIME type mapping by specifying a value in the Response.ContentType property. For example, if you write an ASP.NET page that creates XML rather than HTML, the page should contain the following line of code:
Response.ContentType = "text/xml"
ASP.NET pages aren’t restricted to creating text output. If you choose, you can also make them deliver pictures and other binary file types. Chapter 8, for example, will explain how to create an ASP.NET page that reads a full-sized picture from the Web server’s disk and sends a reduced-sized thumbnail to the Web visitor. If an ASP.NET page sends a GIF picture to the browser, it must include the following line of code:
Response.ContentType = "image/gif"
This tells the browser to expect a picture in GIF format. If the picture is in JPEG format, the required line of code is:
Response.ContentType = "image/jpeg"
When browsers mishandle content, the cause is often a missing or incorrect MIME type assigned on the Web server. However, it’s also possible that the browser is configured incorrectly (or not configured) to handle a valid MIME type. For Microsoft Internet Explorer, these settings are integrated with the operating system’s file-type list. Perform the following steps to view this list on a client computer running Windows 2000 or Windows XP:
Successfully delivering an ASP page from a Windows 2000 or Windows XP Web server requires not only correct virtual directory settings but also correct NTFS file system security. And just to keep things simple (or complicated, depending on your perspective), virtual directory security and NTFS security are completely independent—changing one has no effect on the other.
All Microsoft Windows 2000 and Windows XP Web servers initially use an anonymous user account to satisfy Web requests. This account is usually named IUSR_<computername>. Whenever an unidentified Web visitor requests a file, the Web server tries to access that file using the anonymous account. If the access fails, the Web server sends the browser a Not Authorized message. The Web visitor can then try to enter a user name and password that do have NTFS permission to access the given page.
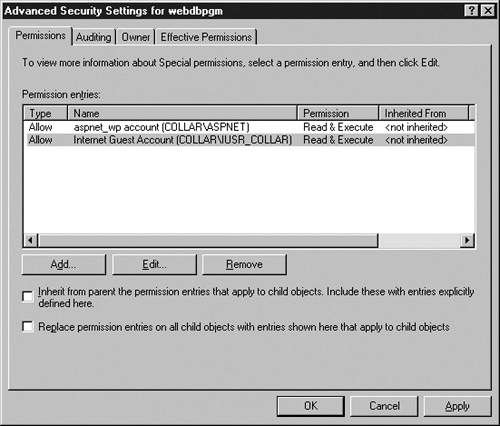
ASP.NET pages, however, don’t run under the same anonymous account as ASP pages or anything else that runs on the server. By default, ASP.NET pages run under a local computer account named ASPNET. If you don’t grant this account at least Read access to the files in your application, you’ll get an Access Denied error message rather thant the Web page you expect.
The graphic on the next page shows typical NTFS access control settings that provide anonymous access to a Web page (or Web folder) on a Windows XP Professional system named COLLAR. To display this dialog box, right-click the desired file or folder in Windows Explorer, choose Properties, click the Security tab, and then click Advanced.
Even if the anonymous account has NTFS permission to read a page, the request might still generate an Access Denied message. This situation occurs when the anonymous account can’t access some piece of software or some other file the ASP page uses. The ASP script interpreter, the ADO software, and the database must all be accessible to whatever account—anonymous or not—the Web visitor uses. This is an excellent reason to understand all the software components your pages use.
When it comes to Access databases, you’ll often need to give the anonymous account Change permission, even for Web pages that only read the database. This is because—depending on how you open the database—the Microsoft Access driver might need to update the database with record-locking information.
Caution
Never use the built-in account Everyone in NTFS access control lists. Any permissions you grant the Everyone account are available to anyone in the world, with no authentication whatsoever.
The need to provide different security on an Access database (Change) and any related ASP pages (Read-Only) is an excellent reason to keep these files in different folders. In addition, locating an Access database anywhere within a Web server’s content space means that anyone who can guess the database’s URL can download it. Suppose, for example, that you located a database as coded in the following connection string:
"Provider=Microsoft.Jet.OLEDB.4.0;" & _
"Data Source=" & server.mappath("../ch01/classified.mdb") & ";"
This database has the URL ../ch01/classified.mdb relative to the current Web page. If the Web server provides Read access to that URL, a Web visitor can download the database. To prevent this, configure the Web server (but not NTFS) to deny access to the folder that contains the database. Alternatively, put the database somewhere outside the Web server’s HTTP root, and hard-code its file location within a connection string. The connection string in the following code uses a hard-coded file location:
"Provider=Microsoft.Jet.OLEDB.4.0;" & _
"Data Source=C:InetPubWebDbsClassifiedclassified.mdb;"
Note that defining a virtual directory that points to the C:InetPubWebDbsClassified folder would defeat the purpose of moving the database outside the HTTP root.
A Web presence provider (WPP) is someone who operates Web servers for other people to use. In an organizational setting, this might be an information technology department. On the Internet, it might be an independent company that provides Web servers for a monthly or annual fee. Some companies also provide connectivity services, such as dial-up or leased lines. Web server capabilities vary from provider to provider and, of course, according to what you’re willing to pay for. The first step in selecting a provider is therefore to understand what capabilities you need.
To run the type of ASP.NET pages described in this book, your production Web server should contain the following software:
Windows 2000 Server.
Internet Information Server Release 5.
The ASP.NET Framework.
Microsoft Data Access Components 2.7 or later.
In addition, the following components might be either useful or required, depending on the situation:
If your database is large or heavily used, you might need to run it on Microsoft SQL Server. Access 2002 has an Upsizing Wizard that converts Access databases to SQL Server databases, including both the schema and the data.
If you plan to use either FrontPage or Visual InterDev as a development tool, your production server should have the FrontPage 2002 Server Extensions installed.
If your current service provider or IT department can’t provide the required software, you’ll probably have to search elsewhere. One place to start looking is the Registered Web Presence Providers page at http://www.microsoftwpp.com/.
This chapter explained how to install and configure a Web server suitable for developing and testing ASP.NET Web pages. This information is important because it’s the Web server—and not the browser—that runs the code in an ASP.NET page. If a browser and a Web server are running on the same computer, the browser can trigger execution of ASP.NET pages by requesting URLs that begin with http://127.0.0.1.
Chapter 3 will explain the basic operating concepts that govern all ASP.NET pages.