
Key concepts in this chapter are:
Applying role-based security techniques to your applications
Using Microsoft Windows role-based security
Enabling or disabling application options depending on the user’s role
Using role-based authorization in ASP.NET applications
Role-based security allows you to programmatically control what actions users are permitted to perform. This security strategy has its basis in roles that we as employees, managers, customers, and vendors play in life.
Each role encompasses its own set of rights or permissions. For example, part of a manager’s role is to review the compensation for each of her employees. The manager’s role grants the manager permission to access the salary information for an employee. The employee’s role grants the employee the right to view his own compensation, but no one else’s.
As employees, people play different roles in the execution of a shared goal or task. For example, suppose your company’s goal is to sell miniature plastic dinosaurs online. Your customers, suppliers, accountants, lawyers, and product-support personnel all play different roles in not only the sale of plastic dinosaurs, but also in handling the aftermath of the sale. You need people in various roles to manage the resulting revenue, inventory levels, and customer complaints.
In some cases, your employees might fulfill more than one role. For example, an employee might handle incoming shipments and also have access to a supplier’s invoice system. If the employee is honest, you have nothing to worry about; if he is not honest, the employee could, for example, take a shipment and erase any record of it from the supplier’s invoice system, leaving you a truckload short of plastic dinosaurs. Such a system could also lend itself to honest mistakes. For example, suppose an employee is expected to manually handle both parts of a transaction—such as separately updating the incoming shipment’s registry and the supplier’s database. The employee might update the shipment registry but then get interrupted and forget to request the shipment. When you design your online system, you should strive to accomplish the following goals:
Allow each person to accomplish her assigned task and no more. This is known as the principle of least privilege.
Divide areas of responsibility so that no single person can intentionally or unintentionally compromise or deliberately cheat the system.
Allow the system to be audited by those not involved in the transactions; and prevent those involved in the transactions from being able to view the audit logs.
You can accomplish these goals by incorporating role-based security in your application. Microsoft Visual Basic .NET provides the building blocks necessary to implement role-based security: objects based on the concept of Identity and Principal. You can use Identity and Principal to limit what the user can do within your application. This satisfies the first goal of letting a person do what she needs to do but no more—the principle of least privilege. Identity identifies the user by username and Principal combines Identity with a list of roles that the user plays. Identity and Principal enable you to divide areas of responsibility by assigning different users to different roles, and they allow users to share areas of responsibility where needed by assigning more than one user to the same role. As an example, the employee management system (EMS) for our fictional company uses objects based on Identity and Principal, as demonstrated later in this chapter, to enforce roles such as the following:
Employee—To allow all employees of the organization to view their own personnel information.
Manager—To allow a manager to view personnel information for all of her direct reports.
Human Resource Officer—To permit adding employees to and removing employees from the employee management system.
Human Resource Administrator—To add or remove roles that other employees perform, such as adding the manager’s role to an employee who has been promoted to manager.
Auditor—To allow one or more users not involved in the transactions to verify the integrity of the system. The Auditor can view all actions taken by the other roles, but cannot change any of the information.
When you give people access to applications, you are assigning two privileges: who can use the application, and who can do what in the application. In security terms, these privileges are enforced using two mechanisms referred to as authentication and authorization. Authentication verifies you are who you say you are, and authorization verifies you are permitted to perform a specific activity. If you provide a login dialog box—as shown in Chapter 1—you are providing a means of authentication. The user must be authenticated before being allowed to use your application. Once authenticated, the user is given authorization to perform only those tasks that your application allows him to perform. This chapter covers how you can use role-based security techniques to control what users can do—or what authorization they have—after they have successfully logged on.
Note
The GenericIdentity and GenericPrincipal objects are used to implement a custom role-based security model within your application as shown in the next exercise. The other Identity objects—WindowsIdentity, FormsIdentity, and PassportIdentity—are useful for integrating existing authentication models in your application. Of these objects, only WindowsIdentity has an associated Principal object—the WindowsPrincipal. The reason for this is that Windows has a built-in authorization model providing groups as a way of associating roles with users. The WindowsPrincipal contains the group names—such as administrators, power users, and users—as the list of roles for which the user is a member. The Forms and Passport authentication models do not provide associated authorization models and do not provide a built-in set of roles; therefore, Principal objects having names such as FormsPrincipal or PassportPrincipal do not exist.
The employee management tool used by our fictional company is in sore need of a role-based security system. The employee RKing is a human resources administrator who should be allowed privileges only to change employee roles and manage his own information. However, in the current state of the employee management system (EMS), he can perform tasks he shouldn’t be allowed to perform. For example, he can freely add and delete employees from the system, which is a task reserved for a separate human resources role—the human resources officer—in our fictitious company. How do you stop RKing from being able to add and delete employees from the system? Let’s take a look at the employee management system, which stores the list of employees, roles, and employee-role assignments in the database EmployeeDatabase.mdb. The database has the structure shown in Figure 2-1.
As you can see in Figure 2-1, EmployeeDatabase.mdb contains three tables: the Employee table, Role table, and EmployeeRole table. You were introduced to the Employee table in Chapter 1. The Role table contains a list of roles: Employee, Manager, HR Administrator, HR Officer, and Auditor. The EmployeeRole table contains a list of employees and the roles they are assigned to. For example, RKing is in the role of both Employee and HR Administrator. Currently, these database entries don’t actually allow or prevent users from performing tasks.
Disable functionality based on roles
In this exercise, you’ll load the roles from the database and assign them to the logged-on user. Because user roles correspond directly to the tasks or permissions listed on the main menu of the application, only those tasks that the person is allowed to perform will be shown.
Run Visual Basic .NET, and open the practice-file solution CH02_RoleBasedEMSStartEMS.sln. (You can download the sample files from this book’s Web site.)
Add a new module named RoleBasedSecurity.vb and the following Imports statements to the top of the file:
Imports System.Security.Principal
Imports System.Threading
Imports System.Data.OleDb
Imports System.Collections.Specialized
Insert the following code after the Module RoleBasedSecurity statement and before the End Module statement:
Friend Function LoadRoles(ByVal UserName As String) As String()

  Dim cn As New OleDbConnection(G_CONNECTIONSTRING)
  Dim strSQL As String = _
            "Select Role from EmployeeRole where Username ='" & _
            UserName & "'"
  Dim cmd As New OleDbCommand(strSQL, cn)
  Dim dr As OleDbDataReader
  Dim collRole As New StringCollection()
  Dim strRole() As String

  cn.Open()
  dr = cmd.ExecuteReader
  collRole.Clear()
  While dr.Read
    collRole.Add(CStr(dr("Role")))
  End While

  ReDim strRole(collRole.Count - 1)
  collRole.CopyTo(strRole, 0)
  Return strRole
End Function
This code loads the application-defined roles from the EMS database and returns an array of strings containing the role names—for example, Employee and Manager for an employee who is also a manager.
Add the following function to the module RoleBasedSecurity after the LoadRoles function inserted in the previous step and before the End Module statement:
Friend Sub SetPrincipalPolicy(ByVal UserName As String)
  Dim strUserRoles() As String = LoadRoles(UserName)
  Dim UserIdentity As New GenericIdentity(UserName)
  Dim UserPrincipal As GenericPrincipal
  UserPrincipal = New GenericPrincipal(UserIdentity, strUserRoles)
  AppDomain.CurrentDomain.SetPrincipalPolicy( _
    PrincipalPolicy.UnauthenticatedPrincipal)
  Thread.CurrentPrincipal = UserPrincipal
End Sub
This code loads the roles and assigns them to the GenericPrincipal object of the current running thread.
In clsEmployee.vb, add the following call to SetPrincipalPolicy near the end of the Create function before the Catch ex As Exception statement:
SetPrincipalPolicy(employee.m_Username)
Open the form frmDashboard, and double-click the form background to create a Form_Load event. Add the following code to the event:
Private Sub frmDashboard_Load(ByVal sender As System.Object, _
                         ByVal e As System.EventArgs) Handles MyBase
.Load
  With System.Threading.Thread.CurrentPrincipal
    Me.btnAddNew.Visible = .IsInRole("HR Officer")
    Me.lblAddNew.Visible = .IsInRole("HR Officer")
    Me.btnRemove.Visible = .IsInRole("HR Officer")
    Me.lblRemove.Visible = .IsInRole("HR Officer")
    Me.btnManage.Visible = .IsInRole("HR Administrator")
    Me.lblManage.Visible = .IsInRole("HR Administrator")
    Me.btnMyInfo.Visible = .IsInRole("Employee")
    Me.lblMyInfo.Visible = .IsInRole("Employee")
  End With
End Sub
Press F5 to run the application, and log on to the employee management system using the username RKing and password RKing.
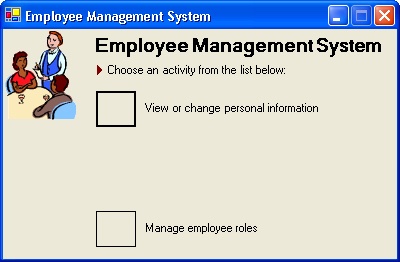
After you have logged on, the dashboard will look like Figure 2-2. The Add New Employee and Remove Employee buttons are made invisible because RKing doesn’t have permission to use them. This underscores an important principle of user-interface design: If the user can never use a particular feature, hide it from view or disable it.
The previous exercise demonstrates how to assign the user name to a GenericIdentity object, assign the GenericIdentity object to a GenericPrincipal object along with a list of associated roles defined in the database, and assign the GenericPrincipal object to the current thread your code is running on. The code presented in the exercise restricts the user to specific tasks by querying the user assigned to the current thread and determining whether the user is in a role that is allowed to perform the requested action.