
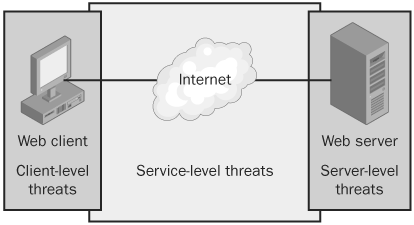
The topic of Web threats is one that you could spend an entire book discussing, and lots of thick and juicy books out there are doing just that. This chapter doesn’t attempt to cover all that information and earns its keep in this book by showing you how to get started penetration testing your organization for Web threats. It examines common Web threats from three different angles—the client level, the server level, and the service level—as shown in Figure 24-1.
This chapter also describes countermeasures and provides tests to verify that those defenses have teeth—sharp ones! The guinea pigs used in the examples are Microsoft Internet Explorer and Internet Information Services (IIS); however, the threats discussed in this chapter are vendor-neutral, so you will still find the information important regardless of the Web solution your organization has chosen. There’s a fair amount of material to cover, so let’s start.
The use of Web content has quickly expanded into the user space. E-mail clients, for instance, now support HTML-based messages, and some application GUIs are HTML-based. Also reaching further into the user space is the Web attack surface area. Attackers now commonly target the client just as much as they have the Web server; here are some common threats they pose:
Cross-site scripting attacks
Unpatched Web clients
A cross-site scripting attack (XSS) occurs when an attacker injects malicious HTML data into Web content on your organization’s Web servers, causing the script to execute on the browser of the client viewing the Web content. You refer to the attack as "cross-site" because the script being executed is in the security context established between the client and the website, not in the security context between the attacker and the client. In the case of XSS, the attacker is using the Web server content to attack the client rather than attack in the traditional direct fashion. Let’s take a look at an example to see how XSS attacks work.
Note
Cross-site scripting can be known by the initials CSS or XSS. Currently, it is more commonly referred to as XSS to avoid confusion with the abbreviation for "cascading style sheets."
On the CD
The companion CD includes a compressed file named XSSExample.zip that contains a sample ASP.NET website that demonstrates XSS attacks as well as countermeasures you can use to mitigate them.
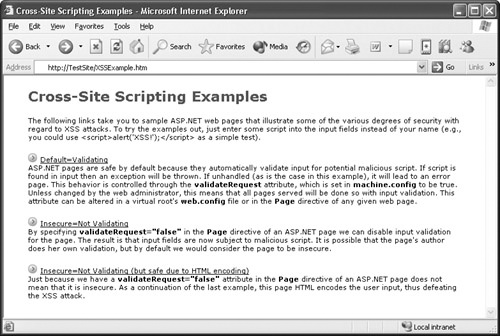
When you load the XSSExample site, you have three options to choose from, as shown in Figure 24-2. The first and third options illustrate two countermeasures you can use to mitigate XSS attacks and are discussed later in this chapter. The second option on this test site illustrates XSS attacks.
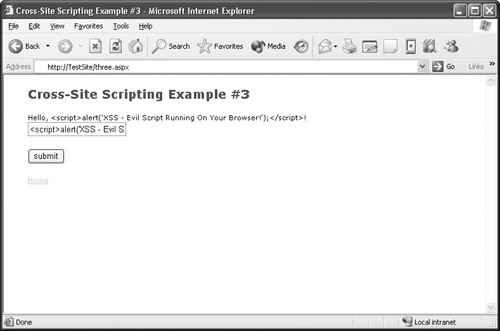
When you click the second option, you are presented with a simple field. Whatever you type in that field gets echoed back to you. If you type Brenda Diaz, the page produces the output "Hello, Brenda Diaz!" Nothing dangerous so far. Now see what happens when you enter something like <script>alert(’XSS – Evil Script Running on Your Browser!’);</script>. This time, a dialog box with the message "XSS – Evil Script Running on Your Browser!" pops up, as shown in Figure 24-3.
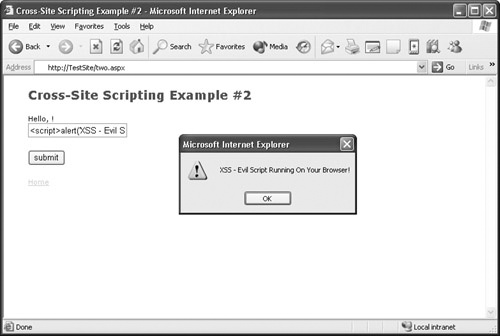
Here’s what happened: when you entered <script>alert(’XSS – Evil Script Running on Your Browser!’);</script>, the page returned the output "Hello, <script>alert(’XSS – Evil Script Running on Your Browser!’);</script>". However, instead of producing that message, your browser executed the script tag and generated that dialog box. There you have it: script executed by the browser of the client that is viewing Web content. Attackers won’t be so nice and use a message like the one used in this example. They will combine this ability to execute scripts with other vulnerabilities to steal sensitive data and execute commands on user systems.
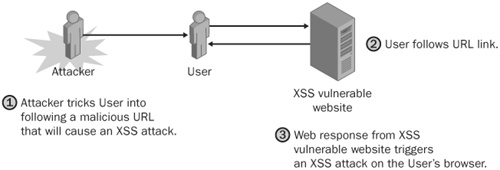
One final piece is needed to turn this into a full-fledged XSS attack—luring the user to visit a website where such an attack is possible, as shown in Figure 24-4. As you learned in Chapter 23, the attacker can use a variety of social engineering attacks to get a user to visit a malicious URL. Or perhaps the attacker will use an e-mail–based attack (discussed in Chapter 25), in which he generates malicious HTML e-mails or conducts phishing attacks whereby he disguises in e-mail a malicious website for a trusted one.
This book is, of course, about penetration testing, so let’s take a look at different methods of finding XSS vectors on your organization’s website. This process basically amounts to:
Finding all the sources of input for that Web application and determining whether that input is being used as part of the dynamically generated Web output
If that input is being used as part of output for dynamically generated Web content, determining whether that input is being properly validated or encoded
If you have experience reviewing code, you can review the source pages or code of your organization’s website and applications. Table 24-1 lists common Web input sources to look out for and provides examples. The information in this table by no means is a complete list.
Table 24-1. Common Input Sources for XSS Attacks
Input source | Examples |
|---|---|
Form fields | Response.Write(Request.Form("ElementName")); |
Query strings | Response.Write(Request.QueryString("VariableName")); |
Server request headers | Response.Write(Request.ServerVariables("ServerVariable")); |
Session variables | Response.Write(Session("Variable")); |
Application variables | Response.Write(Application("Variable")); |
Cookie data | Response.Write(Request.Cookies("CookieName"). Values("ValueName")); |
Data sources | SQL Server and ODBC connections |
HTML tags with embeddable script | <applet>, <body>, <embed>, <frame>, <script>, <frameset>, <html>, <iframe>, <img>, <style>, <layer>, <ilayer>, <meta>, <object>, <table>, <body>, <bgsound>, <p>, <link>, <input>, <div> |
If the input source you identify is in any way used to generate output such as a Web response or an error page, you need to verify that one or more of the application-level countermeasures discussed in the next section have been applied. If they have not, that input source has strong potential to be an XSS attack vector.
If you don’t have code-reviewing experience, you can alternatively try to enter HTML data such as <script>alert(’XSS’);</script> into various Web input fields and sources on your organization’s website to see whether the response generated causes a dialog box with the message "XSS" to appear.
For an attacker to successfully carry out an XSS attack, he needs to:
Inject HTML data into Web content
Trick the user into visiting the XSS vulnerable website
Cause that injected HTML data to execute on that user’s browser
If you take away the attacker’s ability to perform any one of these steps, you can effectively mitigate the threat of XSS attacks against your organization’s users and websites. Here are some good countermeasures to use at the Web application level:
Educate developers. Educate developers about the threat of XSS attacks. In particular, tell them to sanitize and validate all input that could potentially be used as part of dynamically generated Web responses.
Encode output. One way to sanitize HTML output and prevent client browsers from treating HTML as executable output is to encode it. You can do this with the .NET Framework by encoding HTML output with the System.Web.HttpUtility.HtmlEncode method. Encode URLs with the System.Web.HttpUtility.UrlEncode method. The third example provided in the XSSExample site demonstrates how encoding output can be used to defeat XSS attempts (Figure 24-5).
Use the ASP.NET validateRequest attribute. By default, ASP.NET validates input against a potentially malicious script that could create an XSS attack. You can control this validation behavior by setting the validateRequest attribute to true (default) or false in the Machine.config file. Check to make sure your organization’s websites are protected by this feature. Figure 24-6 shows how using validate-Request can defeat an XSS attack.
Use the innerText property instead of innerHTML. Verify that when you are generating dynamic Web content, you are doing so with the innerText property, which renders content safe and unexecutable, instead of the innerHTML.
You can use the following client-level countermeasures to protect users from XSS attacks:
Educate users. The attacker can inject all the HTML data she wants, but none of that will matter if there isn’t a user browser to execute that data. That said, educate users about the threat of XSS attacks and tell them to view Web content only from sources they trust.
Implement browser security. In the browser, disable the use of Java-Script or Active Scripting for untrusted zones such as the Internet zone.
Web browsers can also be targets of attack, and why wouldn’t they be? When you think about it, all a Web browser really does is parse input from external, potentially untrusted sources, making the likelihood for exploitation very high. Attackers could modify Web responses with man-in-the-middle (MITM) attacks (see Chapter 21) or lure users to URLs where they can exploit weaknesses in things like ActiveX controls. As revealed in bulletins such as MS04-004 (http://www.microsoft.com/technet/security/bulletin/MS04-004.mspx), attacks against Web browsers can lead to additional threats such as spoofing and remote code execution.
Unpatched Web browsers can be leveraged in other attacks such as those launched over e-mail and those initiated through social engineering. During your penetration tests, you should not only look at the current patch levels of user systems, you should determine whether your organization’s policy on patching desktop software like Web browsers meets security requirements. Also, look at how this policy is enforced. Are patches automatically pushed on to user desktops, or are users required to install patches themselves (which thus far has been a losing proposition)?
More Info
For more information about attacks using e-mail, see Chapter 25. For information about how attackers use social engineering to launch attacks, see Chapter 23.
In the late 1990s, rarely could you visit a technology news site without being inundated with stories about how this company and that company had their Web pages modified (commonly referred to as defaced). These days, other than the fact that these types of stories are hardly newsworthy anymore, very little has changed—Web servers are still constantly barraged from both internal and external sources. Some reasons for this could be the following:
Web servers are much easier to reach than other servers. Web servers are often connected directly to the Internet and don’t have the luxury of the perimeter firewall for additional protection.
The targets are numerous. The sheer number of Web servers with which attackers can play outnumbers any other type of server, such as databases and remote access servers.
Web servers are often easier to attack. Attacks against Web servers are usually done remotely and, a majority of the time, without requiring authentication (that is, they require less skill).
Attackers seek notoriety. Attackers looking for a way to gain respect, leave their mark, and showcase their skill level will try to compromise high-profile sites.
Note
Chapter 4, explores in more detail the motivations of attackers.
Compromising websites creates public embarrassment and financial loss. When websites are compromised, a loss in consumer confidence typically follows, which leads to a loss in profit. This motivation is very popular among disgruntled ex-employees.
Now let’s take a look at the following common Web server threats:
Repudiation
Information disclosure
Elevation of privileges
Denial of service
If your Web server gets compromised or attacked by a denial of service (DoS) attack, you want to determine how the attacker intruded. You need, at a minimum, logs of all activity that has occurred on your organization’s Web servers leading up to the moment after the compromise. You also need ways to verify that logging is indeed working.
Logging is enabled on IIS support websites by default. To verify that it is enabled, follow these steps:
Open the Internet Information Services (IIS) Manager.
Open the Properties page of the website you want to enable logging on.
On the Web Site tab, verify that Enable Logging is selected, as shown in Figure 24-7.

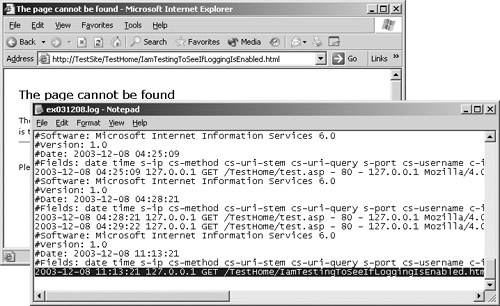
Verifying that logging is enabled on your organization’s Web servers is very important. You don’t want to find out after an intrusion that logging was not enabled and that you or your organization’s forensics teams have no Web server logs to work with. To verify that logging is enabled for a Web browser, follow these steps:
Access your organization’s website and request a resource. The resource doesn’t have to be valid, but make sure that it’s unique and will be easy to spot when you examine the logs later—for example, http://TestSite/TestHome/IAmTestingToSeeIfLoggingIsEnabled.html.
As shown in Figure 24-8, open your Web server’s Web logs and make sure that your request was logged. In our example, you would make sure that the request for IAmTestingToSeeIfLoggingIsEnabled.html was recorded.
Remember that the more detailed your logs are, the more useful they will be when you analyze past or current attacks. Both IIS and other Web servers like Apache allow administrators to configure which information gets logged, such as the user name of the user accessing the website and cookie information. Recording the user name, for example, is particularly useful when you have user authentication enabled on your Web servers.
More Info
As you learned in Chapter 22, attackers also target log files. Refer to this chapter for more details about threats to log files and the countermeasures you can use to mitigate these threats.
Attacking and exploiting a system is mostly about connecting the right dots to find the correct weakness or series of weaknesses. The more information attackers have about your organization’s systems, the more likely they will find these dots and connect them. Information such as Web server type and versions, for instance, can tip attackers off as to what family of attacks they should try and which ones they do not have to bother with. Let’s see how you can limit the amount of information an attacker can take from your organization’s Web servers and how you can verify that defenses are indeed working. In this section, you’ll be looking at the following common sources of Web server information leaks:
Server header exposure
Directory browsing
Each time a user requests a resource from a Web server, such as an HTML file, an image, or a sound clip, a set of headers and values is returned along with the actual resource. One such header is the Server header, which indicates the Web server’s version and sometimes the operating system the server is running on. Look at the following Web server response:
HTTP/1.1 404 Object Not Found
Server: Microsoft-IIS/5.0
Date: Mon, 24 Nov 2003 06:31:25 GMT
Content-Type: text/html
Content-Length: 111
<html><head><title>Site Not Found</title></head>
<body>No web site is configured at this address.</body></html>
The Server header in the second line of the response suggests that the Web server that generated this response is an IIS 5.0 server. If it were an Apache Web server, this header might have a value like Apache/2.0.48 (Win32). If you are the attacker, having this value makes your job immediately easier because you now know which types of attacks to try; when you know the server you are attacking is an IIS 5.0 server, you won’t bother trying attacks specific to Apache servers or even other version of IIS such as 4.0 or 6.0.
You can easily prevent the Server header from being exposed in the responses generated by an IIS server by using the URLScan RemoveServerHeader option. Here’s how:
Tip
If your organization prefers not to remove the Server header from the Web responses, you could alternatively change the header value that is returned to something that does not give away the server’s type and version. For example, if you wanted the Server header to report the value Commodore VIC-20, you could set the URLScan AlternateServerName option to the following:
AlternateServerName=Commodore VIC-20
Removing the Server header from your organization’s Web server responses does not eliminate all possible ways an attacker can determine type and version information. There are several other ways of gaining this type of information from a Web server; however, you have eliminated a very common method of doing this. Several tools and popular services that attackers use, such as automated vulnerability scanners and NetCraft Ltd.’s Webserver Search (http://www.netcraft.com) tool, depend on this header being present when they are fingerprinting Web servers. When it isn’t, they don’t work very well or at all, so you’ve definitely still made gains.
To verify that the Server header is removed from Web responses, follow these steps:
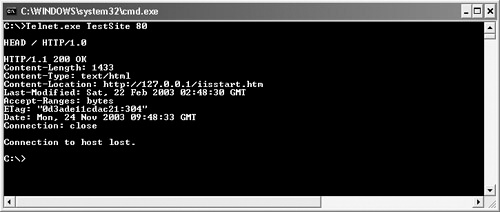
Telnet to your Web server’s listening port, which in most cases will be TCP port 80. The command to do this is telnet.exe TestSite 80.
Request any resource from the server by typing a command such as HEAD / HTTP/1.0 and then pressing Enter twice.
Review the response from the server, such as the one shown in Figure 24-9, and verify that the Server header does not appear anywhere in the response or does not indicate the Web server’s type and version.
On the CD
A C# program named CheckWebServerHeader.exe (along with the source code) is included on the companion CD. This tool automates the verification process described in the proceeding steps. It also has the benefit of working with most Web servers running Secure Socket Layers (SSL), whereas the preceding steps do not.
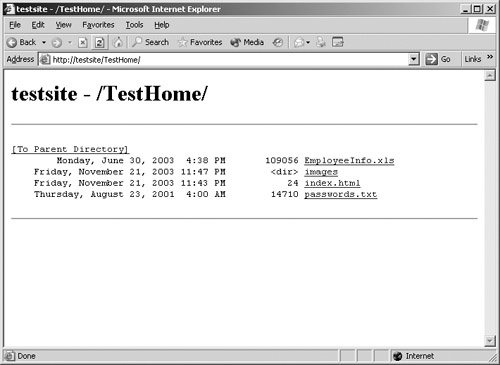
Directory browsing is a feature found on almost every type of Web server. When no default document such as Default.htm is found, this feature allows visiting users to view a server-generated list of the contents on a website or in a virtual directory. Essentially, the Web server is saying to the user, "I couldn’t find a default document to load, but here’s what I do have. Please pick." Figure 24-10 shows an example of directory browsing enabled on the virtual directory TestHome.
Like any product feature, this one has the potential to be abused. For example, if your organization stored on your website or in a virtual directory sensitive files such as user names and passwords, directory browsing would give attackers almost immediate access to these files. Even if this sensitive data was stored in files with difficult-to-guess names such as NHccbxAIA1PLAR0_uMmPZCV7c.txt, directory browsing could be used to easily access it.
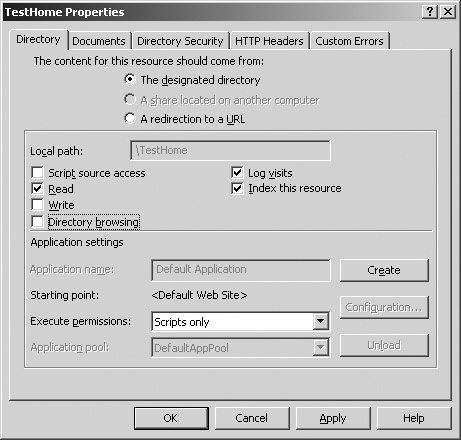
Disabling directory browsing on IIS is straightforward. By default, websites and virtual directories on IIS are not able to be browsed. To manually disable directory browsing, use the following steps:
Open the Internet Information Services (IIS) Manager.
Open the Properties page of the website or directory you want to disable directory browsing on.
On the Directory tab (Figure 24-11), verify that Directory Browsing is not selected, and then click Apply to apply the settings.
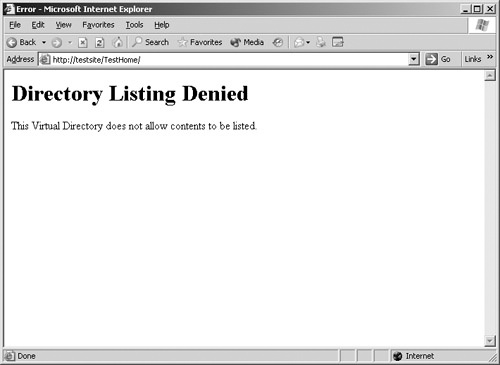
Now that you’ve gone through the process of disabling directory browsing on your Web server, your next step is to verify that it is indeed disabled. This verification test applies to all Web servers, not just to IIS. Follow these easy steps:
Using a Web browser, load the website or virtual directory you just protected. In our example, directory browsing of the TestHome directory was disabled, so you would navigate to the http://TestSite/TestHome directory.
Examine the response from the server. If directory browsing is correctly disabled, either you get a message indicating that directory browsing is not allowed (Figure 24-12) or you get some other error message.
Elevation of privileges threats on a Web server can be caused in myriad ways: implementation, configuration, missing patches—you name it. Covering all the known causes is outside the scope of a single chapter, so this section examines the threat of elevation of privileges caused by the following common sources:
Unpatched Web servers
Unknown vulnerabilities
Nonessential services
Canonicalization attacks
Like swimming in the ocean with a bucket of chum, deploying a Web server with missing patches is a very bad idea. There are generally no ifs, ands, or buts about this. If your car manufacturer recommended that you use at least five bolts to secure your wheels, why would you ever want to use any fewer? Web servers are typically deployed in some of the most hostile environments, so unless you have a very strong business reason for not doing so and your organization is willing to assume that risk, your Web servers need to be sufficiently patched.
There are two key countermeasures against the threat posed by missing patches on your organization’s Web server. The first is to use devices such as application firewalls, network firewalls, or intrusion prevention systems (IPS) to sanitize malicious network traffic or block it from reaching those Web servers. This countermeasure, however, is not recommended as the only one you use. Your Web servers are still vulnerable until those missing patches are applied; if the attacker is able to find another route to your organization’s Web servers or cause one of these protective devices to fail, your Web servers are easy pickings.
The second countermeasure is to simply apply those missing patches. If your organization is using IIS, the easiest way to detect missing patches for your organization’s Web server is to use automated tools like Microsoft Baseline Security Analyzer (MBSA), shown in Figure 24-13. For other vendors, you’ll have to compare the Web server’s patch level against a current patch list provided by your vendor.

Important
Not only does the Web server need to be up-to-date on patches—the operating system on which the Web server runs must also be well patched. If you are using Windows as the operating system on which your Web server runs, MBSA can also be used to detect missing operating system patches.
Once you determine what the latest appropriate patches are and apply them, you need a way to verify that those patches are indeed properly installed. You can do this in several ways:
Manual verification. You can review the list of patches installed on a system. On the Windows operating system, one way to review the list of currently installed programs is to click Control Panel, Add Or Remove Programs, and Change Or Remove Programs; and then review the list of installed patches under the Currently Installed Programs section. Another way is to review the file versions of the affected files addressed by the patch.
For example, in a recent security bulletin for MS03-051 (http://www.microsoft.com/technet/security/bulletin/MS03-051.mspx) that addressed a buffer overrun in Microsoft FrontPage Server Extensions, file version information about the fixed DLL file was included so that customers could verify that the patched file was installed. In the case of this particular bulletin, customers could verify that the installed file Fp4awel.dll was version 4.0.2.7802.
Verification with automated security assessment tools. Using the same tools you used to initially detect missing patches on your Web server, such as MBSA or Nessus (http://www.nessus.org), is a great way to verify that those patches are installed. In fact, any time you make an update to your Web server, it’s a good idea to rescan the server to make sure you did not introduce any new vulnerabilities or miss any patches you weren’t aware of.
Verification with exploit code. There’s a saying that goes something like "there’s nothing like the real thing," and understandably, if you’re testing your defenses against attackers, you want to be using the same techniques and tools they use. Although doing this does help verify the correctness of patches to some degree, these tools could be created by potentially untrustworthy sources. Do you really know exactly what the code is doing? Are you absolutely sure that it’s not doing something malicious in the background aside from what it’s reporting to be doing, such as installing a rootkit on your machines? Even with source code, deciphering exactly what an exploit is doing is often difficult, such as in the case of buffer over-runs with messy shell code. Unless you are 110 percent sure of exactly what the code is doing, avoiding this method is often best. If your organization still prefers to use this method for patch verification, thoroughly test the exploit code against test machines in an isolated environment before directing that code at production servers.
Patching systems buys you protection against known attacks; however, you also need to worry about unknown vulnerabilities or vulnerabilities not publicly disclosed, which are called zero-day vulnerabilities. Unknown buffer overruns (see Chapter 17) are particularly concerning when it comes to Web servers. They are the focus of this section, because the attacks are executed remotely with high damage potential and often without requiring authentication. If you’re lucky, a buffer overrun against your organization’s Web page simply creates a DoS condition, making the page unavailable for a period of time. (Either the server recovers by itself or the administrator has to restart it.) If you’re unlucky, which is more likely, the attacker can use buffer overruns to inject arbitrary code onto your Web server and potentially gain further access to your organization’s networks.
Because the attacks just discussed are not publicly known, they are not easily detected. You could conduct your own research or use automated tools such as protocol fuzzers, but these alternatives can be time consuming, and you might or might not discover something new. You can, however, take several precautions to help mitigate or eliminate the threat of unknown buffer overruns on your Web server without knowing the exact vulnerability ahead of time:
Disable unused services. Disabling unused services reduces the number of available services that attackers can exploit using buffer overruns.
Validate input. Web applications running on the Web server should perform input validation for type and length on all data received.
More Info
Design considerations that address input validation are discussed in detail in books such as Writing Secure Code, Second Edition (Microsoft Press, 2003), by Michael Howard and David LeBlanc; and Building Secure Software: How to Avoid Security Problems the Right Way (Addison-Wesley, 2001), by John Viega and Gary McGraw.
Use application filters. To help reduce the threat of buffer overruns against your Web service, you can use filters such as URLScan, or use application firewalls to limit the size of HTTP requests sent by users—and attackers. (In this section, you will learn how to use various URLScan options to protect your organization’s Web servers as well as how to verify that these options are well-configured.)
URLScan provides IIS administrators with several options to help protect Web servers against buffer overrun attacks:
MaxURL
MaxQueryString
"Max-" header prefix
MaxAllowedContentLength
The MaxUrl option limits the length of Web request URLs. By default, the restricted length is 260 bytes, but you can set this length by adjusting the MaxUrl value under the RequestLimits section in the URLScan.ini file:
[RequestLimits]
...
MaxUrl=260    ; Customize this value to your needs
Note
To verify this option, you can simply make a Web request to your protected Web servers using a URL that exceeds the number of bytes defined by this option. For example, if MaxUrl is set to 700, a Web request for http://TestSite/[Ax800] will be blocked by URLScan. This example and several others use notation such as [AxSomeNumber]. This is a short form representing the letter A repeated several times. In our example, [Ax800] would be expanded to the letter A repeated 800 times.
A URLScan log entry like the following would be recorded:
[12-08-03 – 15:28:53] Client at 192.168.1.101:  URL length exceeded
maximum allowed.  Request will be rejected.  Site Instance='1',
Raw URL='/[Ax800]'
The MaxQueryString option is used to limit the length of Web request query strings. The query string is the portion of the request that follows the question mark character (?) and is used to pass parameters to the handling Web applications. For instance, in a request such as http://TestSite/myapp.asp?name=Microsoft, name=Microsoft represents the query string. This option has a default value of 2048 bytes, but you can set this value by adjusting the MaxQueryString value under the RequestLimits section in the URLScan.ini file:
[RequestLimits]
...
MaxQueryString=2048  ; Customize this value to your needs
After you apply the change, you can verify this value easily. Just make a Web request to your organization’s Web servers by using a query string that is larger than the allowed length, as done in the following code:
http://TestSite/index.html?foo=[Ax3000]
Any request with a query string greater than the value set for the MaxQueryString option will result in a server "404 - File Not Found" error message as well as a URLScan log entry that specifies something like this:
[12-08-03 - 15:28:53] Client at 192.168.1.101:  Query string length exceeded
maximum allowed.  Request will be rejected.  Site Instance=1, QueryString=
name=[Ax3000], Raw URL=/index.html
URLScan allows you to restrict the lengths of certain headers by using the "Max-" prefix. For example, say you want to restrict the header CustomHeader to 10 bytes. You do this by adding the following entry into the RequestLimits section of the URLScan.ini file:
[RequestLimits]
...
Max-CustomHeader=20   ; Adjust this value as needed
URLScan blocks any request containing the header "CustomHeader" whose length exceeds 20 bytes. To verify this option, you can try the following:
Telnet to your protected Web server; for example, type Telnet TestSite 80. (This should be port 80 in most cases.)
Type a generic request such as GET / HTTP/1.0 and press Enter once.
Type CustomHeader: [Ax30] so that the "CustomHeader" header exceeds the length specified in your URLScan.ini file.
Press Enter twice. The server responds with an error message, and a URLScan log entry like the following is generated:
[12-08-03 – 15:28:53] Client at 192.168.1.101:  Header CustomHeader:
exceeded 20 bytes.  Request will be rejected.  Site Instance=1, Raw URL=/
URLScan provides the MaxAllowedContentLength option, which restricts the maximum built-in value for the Content-Length header. By default, MaxAllowedContentLength is 30000000, but you can set it to your own value under the RequestLimits section:
[RequestLimits]
...
MaxAllowedContentLength=5000   ; Adjust this value as needed
Caution
This option does not prevent more data than its value specifies when the transfer being used in the Web request is a chunked-transfer.
Verifying the MaxAllowedContentLength option is similar to conducting the "Max-" header prefix test except that you specify the Content-Length header to some value greater than the value you set in the URLScan.ini file. Your Web server should reject your request and log an entry into the URLScan log file that is similar to the following:
[12-08-03 – 15:28:53] Client at 192.168.1.101:  Content-Length 40000000 exceeded
maximum allowed.  Request will be rejected.  Site Instance=1, Raw URL=/
One of the best defenses against all attacks, known or otherwise, is to reduce the number of available services attackers can leverage. For example, if your organization needs to serve up only static HTML Web pages, there is no reason for your Web servers to have services like ASP or PHP: Hypertext Preprocessor (PHP) enabled, right? It’s as simple as this: if you reduce the attacker surface area that an attacker can work with, such as disabling nonessential services, the attacker has nothing to exploit.
Two common types of nonessential services that an attacker might try to exploit when attempting to compromise a Web server are those provided by the operating system and those provided by the Web server itself. Let’s take a look at these threats and some good countermeasures.
Note
Not only are there security benefits for disabling nonessential services, there are also performance and reliability benefits. The fewer services your systems need to support, the faster these systems run, and the number of possible failure points is reduced.
Each operating system will enable different services by default. For example, Windows XP by default enables the Messenger and Print Spooler services. On some UNIX systems, services like the Time and the Secure Shell (SSH) daemon might be enabled by default. If these services aren’t explicitly needed by your organization, they most likely will not be configured properly, patched, or running in a secure state—making them the perfect target for attackers. And because these services are nonessential, they are also most likely not used, and attacks against them will probably go unnoticed by IT staff and users.
If your organization’s Web server is running on the Windows operating system, you can easily enumerate all the operating system services with the following Sc.exe command:
C:>sc.exe \<ServerName> queryex | findstr "SERVICE_NAME"
SERVICE_NAME: ALG
SERVICE_NAME: Browser
...
SERVICE_NAME: winmgmt
Replace <ServerName> with the host name or the IP address of your organization’s Web server. The output you see indicates all the Windows services that are currently running on the Web server.
Any operating service that your organization does not require but is running on its Web servers should be disabled immediately. If you are using Windows, you can disable that service by stopping it and setting its startup type to Disabled on the service property page. For other operating systems, refer to their user guides regarding how to disable services. You can also use the Sc.exe command to stop and disable a Windows service:
To stop a service, run sc.exe \<ServerName> stop <ServiceName>. Replace <ServerName> with the server you want to configure, and <ServiceName> with the name of the service you want to stop. For example:
C:>sc.exe \WebServer stop Messenger
To disable that service from automatically starting when the operating system boots up, run sc.exe \<ServerName> config <Service-Name> start= disabled. For example:
C:>sc.exe \WebServer config Messenger start= disabled
Not only should you disable nonessential services provided by the operating system that the Web server is running on, you should also disable such services provided by the Web server itself. These likely will also be targets of attack.
The process for detecting the Web services provided by your Web server will vary depending on which vendor your organization uses; however, generally you can determine this by inspecting the Web server’s configuration file or using the Administration console. By default, IIS 6.0 comes with everything enabled except a limited number of Web service extensions such as Active Server Pages.
To mitigate the threat of nonessential Web services on IIS, you will need to do the following:
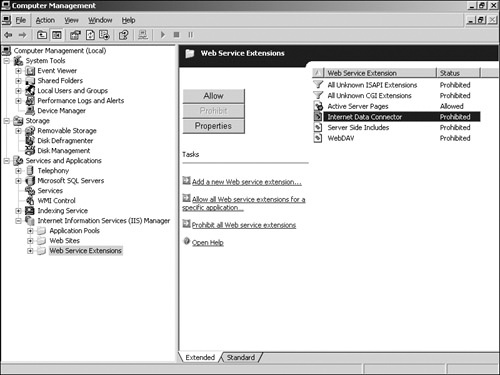
Open the Internet Information Services (IIS) Manager.
View the Web Service Extensions folder, shown in Figure 24-14.
Prohibit any extensions not required by your organization.
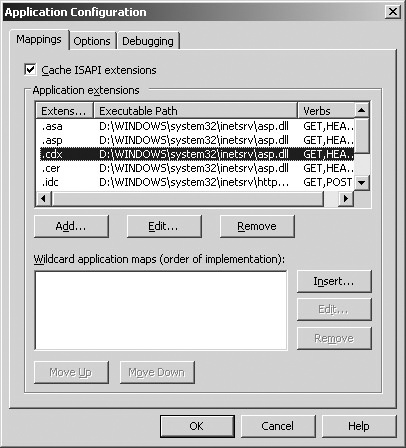
If you require some level of granularity, for instance, you want to allow only the .asp or .aspx extensions and not .asa, .cdx, or .ashx, continue with the following steps and remove the application extension mappings.
Open the Internet Information Services (IIS) Manager again.
Open the Properties page of the website you are protecting.
On the Home Directory tab, click Configuration.
On the Application Configuration page, click Remove for any application extensions mappings your organization does not require, as shown in Figure 24-15.
You can further restrict the allowed extensions on an IIS server using URLScan:
Open the URLScan.ini configuration file for URLScan by using a text editor.
In the AllowExtensions section, list the extensions you want to allow on your organization’s Web server. For instance, if you want to allow .htm, .html, and .jpg extensions only, your URLScan.ini file would contain something like this:
[AllowExtensions]
.htm
.html
.jpg
In the DenyExtensions section, list the extensions you want to explicitly deny. For example, if you want to deny ASP requests, your URLScan.ini file would contain something like this:
[DenyExtensions]
.asp
.cer
.cdx
.asa
Apply the URLScan settings, and restart your Web server.
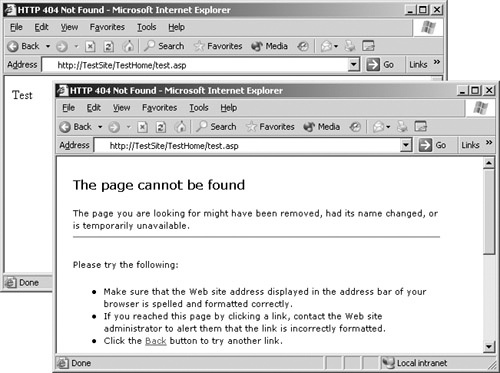
As you’ve just seen, disabling unused services is pretty straightforward. Testing to verify that a service is disabled is also very straightforward. To do this, you need to verify that the service you just disabled does not respond to any further service requests. For example, suppose you had a valid ASP document named Test.asp at http://TestSite/TestHome/test.asp. Once you disable the .asp extension, any further requests for the file should result in an "HTTP 404 - File Not Found" error message or some other error message, as shown in Figure 24-16.
As you learned in Chapter 22, attackers try to mask their attacks as various other but equivalent forms. The URL http://TestSite/cmd%252eexe, for example, is equivalent to http://TestSite/cmd.exe because %252e double-decodes to the period character (.). If security decisions are made based on the non-canonicalized forms of input data (such as the former), attackers might be able to bypass some of your security defenses (input validation, detection systems, and so on). At that point, trouble is bound to follow.
If you are using IIS, you can use the VerifyNormalization option of URLScan to detect and block many instances of these types of attacks:
To verify that your defenses are detecting and blocking these types of attacks, follow these steps:
Using a Web browser, navigate to your organization’s Web server. In this example, we’ll use http://TestSite.
Make a request for any document, valid or invalid, using a double-encoded string. An example would be http://TestSite/index%252ehtml, which, when normalized, resolves to http://TestSite/index.html.
View your URLScan or application firewall logs and verify that your attempts were detected and blocked. A log entry, such as the following produced by URLScan, should be present:
Client at 192.168.1.100:  URL normalization was not complete after
one pass.  Request will be rejected.  Site Instance='1', Raw URL=
'/index%252ehtml'
You can also verify that canonicalization attacks are being blocked by using automated vulnerability scanners that contain signatures or logic for canonicalization attacks.
Besides gaining elevated access or pilfering information, another way to attack your organization’s Web servers is by disrupting their performance. This class of attack is known as a denial of service (DoS) attack. During a DoS attack, attackers try to disrupt the Web server and the applications and services that run on top of it so that legitimate users are blocked entirely from accessing the site. Or they degrade performance to the point at which the site becomes unusable. An unavailable Web server, whether because of an attack or some other reason, usually creates bad public relations and, even more likely, a significant loss in profit because of lost online services.
More Info
See Chapter 16, for more details about DoS attacks.
Web services provide a way for applications to interoperate across different programming platforms and operating systems by using standard open protocols such as the Simple Object Access Protocol (SOAP) or XML-RPC. Figure 24-17 illustrates this communication.
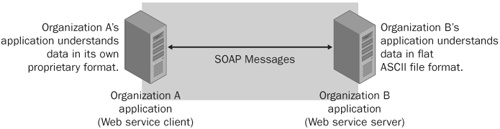
Figure 24-17. Web services allowing two disjointed applications to communicate over a common protocol.
Financial applications, for example, don’t have to understand the protocols used internally by financial institutions, because they can take advantage of Web services published by financial institutions to update user data such as account balances and payment history.
Threats to Web services differ from service to service, but here are some common threats that you should look for in your penetration tests (assuming your organization provides a Web service):
Unauthorized access
Network sniffing
Tampering
Information disclosure
Unless your organization provides free public Web services, special care should be taken to ensure that only authorized users are accessing these services. This is even more important when your Web service handles sensitive information such as credit card numbers and social security numbers. When you are testing your organization’s Web service for unauthorized access threats, look for credentials being passed as clear-text in SOAP messages, use of weak authentication schemes, or worse yet, no authentication at all.
Network sniffing refers to an attacker eavesdropping on communications between hosts. Your organization’s Web service could be transmitting sensitive data, so the communications of these services are prime targets for attackers. Attackers might also try at a later time to reply to the communications they’ve captured. During your penetration tests, look for weaknesses such as transmitting credentials clear-text in SOAP messages, failing to use transport security, and not authenticating messages.
Note
Chapter 19, provides a more detailed discussion about this threat.
In addition to the countermeasures to network sniffing threats discussed in Chapter 19 are those provided by the Web Services Enhancements (WSE) for the .NET Framework. More information about WSE can be found at http://msdn.microsoft.com/webservices/building/wse/default.aspx.
Even though messages are en route between your organization’s Web services and clients, attackers might try to tamper with the data in those messages through MITM attacks, for example. Look for Web service communications that are not protected by transport security or by some authentication scheme.
Your organization’s Web service might expose extraneous information in error messages that could aid an attacker in later attacks. Look for detailed exception traces because of improperly handled exception data. Also, look for configuration data about your organization’s Web service, such Web Service Description Language (WSDL) files (static or dynamically generated), that might be exposed to unauthorized users.
Perform a code and design review of your organization’s Web service to ensure that all exceptions are being caught, especially those that inherit from System.Web.Services.Protocols.SoapException. Protect WSDL files with access control lists (ACLs), and disable documentation protocols that dynamically generate this data if these protocols are not required. Remember, only the minimal amount of exception information should ever be returned to users. (See Chapter 8.)
More Info
For more information about building secure Web services, refer to http://msdn.microsoft.com/library/default.asp?url=/library/enus/secmod/html/secmod85.asp.
Q. | I already use protective applications like URLScan or some application firewall to protect my Web servers. Does this mean I don’t have to worry about patching or securely configuring my systems? |
A. | If only it were truly that easy. The answer unfortunately is no. Simply relying on one protective layer and omitting another, such as patching your systems, is not a good idea. What happens when the applications you’re using to protect your Web servers have vulnerabilities themselves? As an example, consider the case of the two canonicalization bugs (http://www.securityfocus.com/bid/2742) found in eEye Digital Security’s application firewall, SecureIIS, which can be used to protect IIS installations. The answer to my question is that you’re in hot water. Always think defense-in-depth and layer those defenses. |
Q. | My organization doesn’t use IIS for our Web servers. What should I do now? |
A. | The threats presented in this chapter apply to all Web servers (Apache, IIS, and so on). IIS is used only to illustrate the material; you can implement similar defenses against the threats discussed by referring to your vendor’s product documentation. In addition to other defense layers, you can use third-party protection software such as Sanctum’s AppShield (http://www.sanctuminc.com) to further protect Web servers, or use the ModSecurity module (http://www.modsecurity.org) for Apache protection. |
Q. | What’s the number one countermeasure I should take from this chapter? |
A. | That’s a no-brainer: patches, patches, patches! |
Q. | My organization’s desktops do not use Internet Explorer for Web browsing. Do I still need to cover XSS attacks in my penetration tests? |
A. | Yes! Even if you are using a different Web browser such as Safari, Firefox, or Opera, you still need to be concerned with XSS attacks. In fact, don’t just test Web servers; test any device that returns Web responses. The Microsoft ISA Server HTTP error handler, for instance, was found by Brett Moore of Security-Assessment.com to be susceptible to XSS attack. (See http://www.microsoft.com/technet/security/bulletin/MS03-028.mspx for more details.) |
Q. | Are there any additional tools to help me lock down my IIS servers? |
A. | Yes. The Microsoft IISLockDown tool (http://download.microsoft.com/download/iis50/Utility/2.1/NT45XP/EN-US/iislockd.exe) automates several of the IIS countermeasures discussed in this chapter, and many more. |
Q. | For XSS attacks, can I just grep for and remove "<script></script>" tags as a countermeasure? |
A. | Again, if only it were that easy. There are numerous ways to create an XSS attack, not just through the "<script></script>" method used in this chapter’s example. For instance, the data could be encoded in Unicode, or perhaps the application wraps the malicious input with script tags for the attacker. Instead of spending resources trying to detect every possible variation, your organization should invest its time and money into building secure websites and implementing good countermeasures. |