


IBM Platform Cluster Manager Advanced Edition
This chapter explains the architecture overview, deployment, and sample usage of IBM Platform Cluster Manager Advanced Edition. We review the product installation to create IBM Platform Load Sharing Facility (LSF) clusters, IBM Platform Symphony clusters, and clusters with physical and virtual machines. We also show the self-service web portal interface that helps the on-demand cluster provisioning.
We describe the following topics in this chapter:
7.1 Overview
IBM Platform Cluster Manager Advanced Edition delivers comprehensive high performance computing (HPC) cluster management that allows the provisioning of multiple cluster environments featuring a self-service environment for minimal administrator intervention. Important product features and corresponding benefits are described in Table 7-1.
Table 7-1 IBM Platform Cluster Manager Advanced Edition features
|
Feature
|
Benefits
|
|
Multi-tenancy HPC
|
Different service catalogs, resource limits for sharing and per account reporting.
|
|
Multi-platform HPC cluster
|
Cluster technologies, such as IBM Platform Symphony, IBM Platform LSF, and other third-party products, are available on demand on your service catalog.
|
|
On-demand HPC self-service cluster provisioning
|
By eliminating the need to submit a request and wait for someone to approve or act upon it, users can get the resources whenever they want in accordance with the defined policies and usage limits.
|
|
HPC physical and virtual resources
|
You can choose the type of machine to perform the job.
|
|
Rapid HPC cluster provisioning
|
Clusters are built in minutes instead of hours or days.
|
|
Cluster scaling
|
Dynamically grow and shrink (flex up/down) the size of a deployed cluster based on workload demand, calendar, and sharing policies. Share hardware across clusters by rapidly reprovisioning to meet the infrastructure needs (for example, Windows and Linux, or a different version of Linux).
|
|
Shared HPC Cloud services enablement
|
Extend to external “as-a-service” (for example, IBM SmartCloud™) for peak computing demand.
|
7.1.1 Unified web portal
When the product is installed and configured for the first time, you can access the web portal, by default at TCP port 8080, of the management server. The first page that it shows after you log in is the Resources cockpit. As shown in Figure 7-1 on page 213, there are four major tabs to select on the left side:
•Resources
Allows you to manage hosts and clusters in the cluster. Also, here you can administer and view related elements, such as resource groups capacity reports, resources policies (for instance, virtual machine (VM) placement policy), alarm configuration and display, IP pools for VMs, and hardware resources inventory.
•Clusters
Allows you to manage cluster definitions and clusters. There are also sections for managing cluster-related alarms and policies.
•Accounts
Allows you to use and manage the accounts for the portal. For each defined account, there is a link that shows the account profile and settings, including subaccounts, that enable a multi-tenant environment.
•System
Allows you to manage the Platform Cluster Manager Advanced Edition installation and system configuration.

Figure 7-1 Cockpit view that is the initial page in the unified web portal
7.1.2 Physical and virtual resource provisioning
IBM Platform Cluster Manager Advanced Edition can provision physical and virtual machines by using the predefined resource adapters: Platform Cluster Manager (PCM) and kernel-based virtual machine (KVM). Physical machines can be added by specifying their Media Access Control (MAC) addresses or by listening to the private network for auto detection.
For virtual machines, the KVM hypervisor hosts are first added and provisioned as physical machines through the PCM adapter. Then, when a cluster instance that is based on KVM cluster definition is created, the hypervisors are ready to host virtual machines.
You can add, delete, power on/off, and SSH to the machines from the portal. For example, from the Machines tab, in the Resources cockpit, you can see a list of all physical and virtual resources, as well as the KVM hypervisor hosts (see Figure 7-1). The menus for various management tasks are also available. If the machine is virtual, a remote console can be opened.
7.1.3 Cluster management
From the cockpit of the Clusters main tab, you can view clusters and perform administrative tasks, such as power on/off clusters, delete expired or cancelled clusters, and add or remove machines from active clusters. As shown in Figure 7-2, you can also see the provisioning status and expiration date on which the cluster will be shut down and its resources put back into the pool. An administrator can instantiate clusters on behalf of a user.
Figure 7-2 Administrator view of all cluster instances
7.1.4 HPC cluster self-service
An administrator can create and manage cluster definitions. Definitions behave like templates that users select at cluster instantiation time. To create a cluster definition, you use the Cluster Designer window that appears after clicking New in the Cluster Definition link (see Figure 7-3 on page 215). For the cluster definition in the Cluster Designer, you can specify the definition name, user and deployment variables, flex up/down policies, and cluster expiration options.
In the Cluster Designer, you can specify one or more tiers that conform the cluster (for example, LSF Master tier and LSF Compute tier). Each tier definition has properties that relate to the following areas:
•Host name
•Number of machines per tier (for example, an LSF cluster can only have one master)
•OS type
•IP assignment
•Server selection policy
•Administrator/root password generation
Figure 7-3 Cluster designer window for new cluster definitions
When cluster definitions are published, they are available to users so the users can instantiate new clusters. The cluster instantiation page shows in Figure 7-4.

Figure 7-4 Cluster instantiation
7.1.5 Cluster usage reporting
To track resource usage, users can produce allocation reports of clusters as shown in Figure 7-5. The reports can also be generated to display usage grouped by accounts or by users. The Report tab appears for each account or subaccount. The Report tab is a convenient way to display the usage of a particular subaccount and all the descendant subaccounts in the hierarchy. From the administrator point of view, the allocation reports can be utilized as a component for a charge-back scheme.

Figure 7-5 Cluster allocation report
7.1.6 Deployment topology
To deploy IBM Platform Cluster Manager Advanced Edition, you must ensure that your environment has the appropriate network topology. A typical scenario is depicted in Figure 7-6 on page 217. You need to have a public network and a private network for provisioning.

Figure 7-6 IBM Platform Cluster Manager Advanced Edition deployment topology
Cluster resources are provisioned and administered within the private network (eth0). The provision engine and management server are connected to this private network and to the public network (eth1) so that client computers connect to the portal for cluster creation and monitoring.
In our environment, the setup has a slight variation, mainly on the interface number for public and private networks for all machines: eth0 for public and eth1 for private. The cluster has InfiniBand interfaces on all machines so the topology looks like Figure 7-7.

Figure 7-7 Test environment topology
Also, in our test environment, the management server and the provision engine are installed in the same server.
7.2 Implementation
This section provides the implementation details.
7.2.1 Preparing for installation
We followed the instructions that are provided in the IBM Platform Cluster Manager Advanced Edition Installation Guide, SC27-4759-00. We focused special attention on the disk space. We needed 96 GB of available disk space (16 GB for the management server and 80 GB for the provisioning engine). Alternatively, for the provisioning engine, ensure that the / partition has at least 52 GB of free space.
|
Important: Add the master management server host’s IP address and host name to the /etc/hosts file, for example:
10.0.2.56 i05n56.itso.pok i05n56-eth1.itso.pok i05n56-eth1 i05n56
|
7.2.2 Installing the software
We installed IBM Platform Cluster Manager Advanced Edition on a cluster of IBM dx360m3 iDataPlex nodes, which are described in Figure 3-4 on page 23. In addition to the public and private networks that are shown in that diagram, each of our nodes has a hardware management connection, which is implemented through a shared access VLAN on the public network. The basic installation process is shown in Example 7-1 with typed inputs shown in bold.
|
Important: The package redhat-lsb must be installed.
|
Single host installation
Example 7-1 shows the single host installation output.
Example 7-1 Single host installation output
[root@c596n13 ~]# ./pcmae_3.2.0.0_mgr_linux2.6-x86_64.bin
IBM Platform Cluster Manager Advanced Edition 3.2.0.0 Manager Installation
The command issued is: ./pcmae_3.2.0.0_mgr_linux2.6-x86_64.bin
Extracting file ...
Done.
International Program License Agreement
Part 1 - General Terms
BY DOWNLOADING, INSTALLING, COPYING, ACCESSING, CLICKING ON
AN "ACCEPT" BUTTON, OR OTHERWISE USING THE PROGRAM,
LICENSEE AGREES TO THE TERMS OF THIS AGREEMENT. IF YOU ARE
ACCEPTING THESE TERMS ON BEHALF OF LICENSEE, YOU REPRESENT
AND WARRANT THAT YOU HAVE FULL AUTHORITY TO BIND LICENSEE
TO THESE TERMS. IF YOU DO NOT AGREE TO THESE TERMS,
* DO NOT DOWNLOAD, INSTALL, COPY, ACCESS, CLICK ON AN
"ACCEPT" BUTTON, OR USE THE PROGRAM; AND
* PROMPTLY RETURN THE UNUSED MEDIA, DOCUMENTATION, AND
Press Enter to continue viewing the license agreement, or
enter "1" to accept the agreement, "2" to decline it, "3"
to print it, "4" to read non-IBM terms, or "99" to go back
to the previous screen.
1
Warning! The environment variable SHAREDDIR has not been defined. SHAREDDIR is
used to enable failover for management servers. If you choose to continue the
installation without defining SHAREDDIR, and you later want to enable failover,
you will need to fully uninstall and then reinstall the cluster using the
SHAREDDIR variable. Before defining SHAREDDIR, ensure the shared directory
exists and the cluster administrator OS account has write permission on it.
Once defined, the Manager installer can automatically configure
failover for management servers.
Do you want to continue the installation without defining SHAREDDIR?(yes/no)
yes
IBM Platform Cluster Manager Advanced Edition does not support failover of the management server,
if the management server and provisioning engine are installed on a single host.
Do you want to install the provisioning engine on the same host as your management server?(yes/no)
yes
The management server and the provisioning engine will be installed on a single host
The installer is validating your configuration
Total memory is 24595808 KB
Redhat OS is 6.2
SELinux is disabled
Password hashing algorithm is MD5
createrepo is installed
c596n13.ppd.pok.ibm.com is valid
The installer is processing your installation parameter values to prepare for the provisioning engine installation
Specify the file path to the installation media for the RHEL 6.2 (64-bit) operating system.
This can be the file path (or mount point) to the installation ISO file or to the device containing the installation disc:
* For a mounted ISO image: /mnt/
* For a file path to the ISO image file: /root/rhel-server-6.2-x86_64-dvd.iso
* For an installation disc in the CDROM drive: /dev/cdrom
Specify the file path for the RHEL 6.2 (64-bit):
/mnt
/mnt is valid
Specify the provisioning network domain using a fully-qualified domain name:
itso.pok
Domain:itso.pok is valid
Specify the NIC device of the provisioning engine that is connected to
the provisioning (private) network. All physical machines must have same NIC device
connected to the provisioning (private) network, and must boot from this NIC device.
The default value is eth0:
eth1
Network:eth1 is valid
Specify the NIC device of provisioning engine that is connected to
the corporate (public) network. The default value is eth1:
eth0
Network:eth0 is valid
The installer will use itso.pok for the domain for the provisioning engine host,
and update the master management server host from c596n13.ppd.pok.ibm.com to c596n13.itso.pok
RPM package ego-linux2.6-glibc2.3-x86_64-2.0.0-199455.rpm will be installed to: /opt/platform
RPM package vmo4_1Manager_reqEGO_linux2.6-x86_64.rpm will be installed to: /opt/platform
This program uses the following commands to install EGO and VMO RPM
to the system:
rpm --prefix /opt/platform -ivh ego-linux2.6-glibc2.3-x86_64-2.0.0-199455.rpm
rpm --prefix /opt/platform -ivh vmo4_1Manager_reqEGO_linux2.6-x86_64.rpm
Starting installation ...
Preparing... ##################################################
Warning
=======
The /etc/services file contains one or more services which are using
the same ports as 7869. The entry is:
mobileanalyzer 7869/tcp # MobileAnalyzer& MobileMonitor
Continuing with installation. After installation, you can run egoconfig
setbaseport on every host in the cluster to change the ports used by the cluster.
Warning
=======
The /etc/services file contains one or more services which are using
the same ports as 7870. The entry is:
rbt-smc 7870/tcp # Riverbed Steelhead Mobile Service
Continuing with installation. After installation, you can run egoconfig
setbaseport on every host in the cluster to change the ports used by the cluster.
The installation will be processed using the following settings:
Cluster Administrator: pcmadmin
Cluster Name: itsocluster
Installation Directory: /opt/platform
Connection Base Port: 7869
ego-linux2.6-glibc2.3-x86_64##################################################
Platform EGO 2.0.0 is installed at /opt/platform.
A new cluster <itsocluster> has been created.
The host <c596n13.itso.pok> is the master host.
The license file has been configured.
The file "/etc/rc.d/init.d/ego" already exists. This file controls what
Platform product services or processes run on the host when the host is
rebooted.
If you choose to overwrite this file, and the host is part of another
cluster using an earlier/different installation package, Platform product
services or process will not automatically start for the older cluster when
the host is rebooted.
If you choose not to overwrite this file, important Platform product services
or daemons will not automatically start for the current installation when the
host is restarted.
Do you want to overwrite the existing file?(yes/no) yes
removed : /etc/rc.d/init.d/ego
egosetrc succeeds
Preparing... ##################################################
vmoManager_reqEGO_linux2.6-x##################################################
IBM Platform Cluster Manager Advanced Edition 3.2.0.0 is installed at /opt/platform
Info: Checking SELINUX ...setenforce: SELinux is disabled
The current selinux status
SELinux status: disabled
Select database type
Starting to prepare the database
Checking whether the Oracle client exists...
Specify the file path to the oracle-instantclient11.2-basic-11.2.0.2.0.x86_64.rpm oracle-instantclient11.2-sqlplus-11.2.0.2.0.x86_64.rpm RPM packages, IBM Platform Cluster Manager Advanced Edition will install these packages automatically:
/root
Checking /root/oracle-instantclient11.2-basic-11.2.0.2.0.x86_64.rpm exists ... OK
Checking /root/oracle-instantclient11.2-sqlplus-11.2.0.2.0.x86_64.rpm exists ... OK
Do you want IBM Platform Cluster Manager Advanced Edition to install Oracle-XE 11g as an internal database?(yes/no)
yes
Checking /root/oracle-xe-11.2.0-1.0.x86_64.rpm exists ... OK
Preparing... ########################################### [100%]
1:oracle-instantclient11.########################################### [100%]
Preparing... ########################################### [100%]
1:oracle-instantclient11.########################################### [100%]
Starting to install the related libraries...
Extracting the dependent libraries...
Finished extracting the dependent libraries
Verifying RPM packages...
Finished installing related libraries
Install Oracle
Preparing... ########################################### [100%]
1:oracle-xe ########################################### [100%]
Executing post-install steps...
You must run '/etc/init.d/oracle-xe configure' as the root user to configure the database.
Oracle Database 11g Express Edition Configuration
-------------------------------------------------
This will configure on-boot properties of Oracle Database 11g Express
Edition. The following questions will determine whether the database should
be starting upon system boot, the ports it will use, and the passwords that
will be used for database accounts. Press <Enter> to accept the defaults.
Ctrl-C will abort.
Specify the HTTP port that will be used for Oracle Application Express [8080]:
Specify a port that will be used for the database listener [1521]:
Specify a password to be used for database accounts. Note that the same
password will be used for SYS and SYSTEM. Oracle recommends the use of
different passwords for each database account. This can be done after
initial configuration:
Confirm the password:
Do you want Oracle Database 11g Express Edition to be started on boot (y/n) [y]:
Starting Oracle Net Listener...Done
Configuring database...Done
Starting Oracle Database 11g Express Edition instance...Done
Installation completed successfully.
Oracle XE is installed successfully
The Oracle XE information as follows:
Listener Host: c596n13.ppd.pok.ibm.com
Listener port: 1521
Service name: XE
Password for DBA: oracle
PCMAE database username: isf
PCMAE database password: isf
HTTP port: 9090
Oracle Database 11g Express Edition instance is already started
SQL*Plus: Release 11.2.0.2.0 Production on Wed Jul 25 17:52:14 2012
Copyright (c) 1982, 2011, Oracle. All rights reserved.
Connected to:
Oracle Database 11g Express Edition Release 11.2.0.2.0 - 64bit Production
PL/SQL procedure successfully completed.
System altered.
System altered.
User created.
Grant succeeded.
Grant succeeded.
Disconnected from Oracle Database 11g Express Edition Release 11.2.0.2.0 - 64bit Production
Creating IBM Platform Cluster Manager Advanced Edition tables...
Finished creating IBM Platform Cluster Manager Advanced Edition tables
Created default user for IBM Platform Cluster Manager Advanced Edition
Configuring IBM Platform Cluster Manager Advanced Edition to use Oracle running at ...
Verifying parameters...
Checking that the JDBC driver "/usr/lib/oracle/11.2/client64/lib/ojdbc5.jar" exists ... OK
Configuring the database...
Testing the database configuration...
The database configuration is correct. Saving the database configuration...
Configuration complete.
Success
Finished preparing the database
The installer will install the provisioning engine on the same host as your management server,
using the following installation parameters:
File path to the installation media for the RHEL 6.2 (64-bit)=/mnt
Domain for the provisioning network=itso.pok
provisioning engine NIC device that is connected to the provisioning (private) network=eth1
provisioning engine NIC device that is connected to the corporate (public) network=eth0
Init DIRs...
Installing provisioning engine and management server on a single host. Backing up /etc/hosts...
Extracting file ...
Done
Installing provisioning engine. This may take some time...
Preparing PCM installation...
******************** WARNING ********************
A partially installed PCM detected on this machine.
Proceeding will completely remove the current installation.
[ OK ]
Checking install configuration file... [ OK ]
Checking the exist of entitlement file [ OK ]
Checking hardware architecture [ OK ]
Checking for OS compatibility [ OK ]
Checking if SELinux is disabled [ OK ]
Checking for presence of '/depot' [ OK ]
Checking for presence of kusudb database [ OK ]
Checking for presence of Kusu RPMs [ OK ]
Checking for required RPMs [ OK ]
Checking for at least 2 statically configured NIC [ OK ]
Checking for the public hostname [ OK ]
Checking for md5 password encryption algorithm [ OK ]
Checking for NetworkManager service
Trying to update time with pool.ntp.org [WARNING]
Update time failed...
Probing for the language/locale settings [ OK ]
Probing for DNS settings [ OK ]
Checking if at least 2.5GB of RAM is present [ OK ]
Setting provisioning interface to eth1. [ OK ]
Setting public interface to eth0. [ OK ]
Setting provision network domain to itso.pok. [ OK ]
Checking for valid mount point for '/depot' [ OK ]
Checking for valid mount point for '/var' [ OK ]
Detecting path '/' for kusu '/depot' directory. [ OK ]
Adding Kit: 'base'... [ OK ]
Adding Kit: 'os-ofed'... [ OK ]
Adding Kit: 'pcm'... [ OK ]
Installing Operating System from media '/mnt'.
Verifying that the Operating System is a supported
distribution, architecture, version...
[rhel 6 x86_64] detected: [ OK ]
Copying Operating System media. This may take some time [ OK ]
Successfully added Operating System to repository.
Detecting additional kit media.
Finished installing additional kit media.
Refreshing the repository [rhel-6.2-x86_64].
This may take some time... [ OK ]
Installing Kusu RPMs. This may take some time... [ OK ]
Running kusurc scripts to finalize installation.
Setting up Kusu db: [ OK ]
Setting up hostname: [ OK ]
Starting initial network configuration: [ OK ]
Setting up High-Availability service: [ OK ]
Setting up httpd: [ OK ]
Setting up dhcpd: [ OK ]
Generating hosts, hosts.equiv, and resolv.conf: [ OK ]
Setting up iptables: [ OK ]
Config mail mechanism for kusu: [ OK ]
Setting up named: [ OK ]
Setting up ntpd: [ OK ]
Preparing repository for compute node provisioning: [ OK ]
Setting up rsyncd for Kusu: [ OK ]
Setting up rsyslog: [ OK ]
Setting up passwordless SSH access: [ OK ]
Setting up SSH host file: [ OK ]
Setting up user skel files: [ OK ]
Setting up xinetd: [ OK ]
Setting up yum repos: [ OK ]
Setting up network routes: [ OK ]
Setting up shared home NFS export: [ OK ]
Setting up syslog on PCM installer: [ OK ]
Set up kusu snmpd configuration.: [ OK ]
Setting up CFM. This may take some time...: [ OK ]
Post actions when failover: [ OK ]
Setting up default Firefox homepage: [ OK ]
Setting up minimum UID and GID: [ OK ]
Setting up fstab for home directories: [ OK ]
Synchronizing System configuration files: [ OK ]
Creating images for imaged or diskless nodes: [ OK ]
Setting appglobals variables: [ OK ]
Disabling unneeded services: [ OK ]
Patch kusu pxe files: [ OK ]
Starting initial configuration procedure: [ OK ]
Setting up motd for PCM: [ OK ]
Increasing ulimit memlock: [ OK ]
All existing repos in /etc/yum.repos.d have been disabled. Do re-enable any required repos manually.
The os-ofed kit installs some new kernel modules, you must reboot the installer node to load the new modules.
A complete log of the installation is available at /var/log/pcminstall.log
Run 'source /opt/kusu/bin/pcmenv.sh' to source the required environment variables for this session. This is not required for new login sessions.
Installed provisioning engine successfully. Configuring the provisioning engine...
Creating the PMTools node group...
Warning: Broken Symbolic link: /etc/cfm/installer-rhel-6.2-x86_64/etc/ssh/ssh_host_rsa_key.pub
Warning: Broken Symbolic link: /etc/cfm/installer-rhel-6.2-x86_64/etc/ssh/ssh_host_dsa_key.pub
Warning: Broken Symbolic link: /etc/cfm/compute-rhel-6.2-x86_64_PMTools/etc/ssh/ssh_host_rsa_key.pub
Warning: Broken Symbolic link: /etc/cfm/compute-rhel-6.2-x86_64_PMTools/etc/ssh/ssh_host_dsa_key.pub
Warning: Broken Symbolic link: /etc/cfm/compute-rhel-6.2-x86_64/etc/ssh/ssh_host_rsa_key.pub
Warning: Broken Symbolic link: /etc/cfm/compute-rhel-6.2-x86_64/etc/ssh/ssh_host_dsa_key.pub
Warning: Broken Symbolic link: /etc/cfm/compute-imaged-rhel-6.2-x86_64/etc/ssh/ssh_host_rsa_key.pub
Warning: Broken Symbolic link: /etc/cfm/compute-imaged-rhel-6.2-x86_64/etc/ssh/ssh_host_dsa_key.pub
Warning: Broken Symbolic link: /etc/cfm/compute-diskless-rhel-6.2-x86_64/etc/ssh/ssh_host_rsa_key.pub
Warning: Broken Symbolic link: /etc/cfm/compute-diskless-rhel-6.2-x86_64/etc/ssh/ssh_host_dsa_key.pub
Warning: Broken Symbolic link: /etc/cfm/installer-failover-rhel-6.2-x86_64/etc/ssh/ssh_host_rsa_key.pub
Warning: Broken Symbolic link: /etc/cfm/installer-failover-rhel-6.2-x86_64/etc/ssh/ssh_host_dsa_key.pub
Running plugin: /opt/kusu/lib/plugins/cfmsync/getent-data.sh
New file found: /etc/cfm/compute-rhel-6.2-x86_64_PMTools/root/.ssh/id_rsa
New file found: /etc/cfm/compute-rhel-6.2-x86_64_PMTools/root/.ssh/authorized_keys
New file found: /etc/cfm/compute-rhel-6.2-x86_64_PMTools/opt/kusu/etc/logserver.addr
New file found: /etc/cfm/compute-rhel-6.2-x86_64_PMTools/etc/passwd.merge
New file found: /etc/cfm/compute-rhel-6.2-x86_64_PMTools/etc/shadow.merge
New file found: /etc/cfm/compute-rhel-6.2-x86_64_PMTools/etc/group.merge
New file found: /etc/cfm/compute-rhel-6.2-x86_64_PMTools/etc/hosts.equiv
New file found: /etc/cfm/compute-rhel-6.2-x86_64_PMTools/etc/.updatenics
New file found: /etc/cfm/compute-rhel-6.2-x86_64_PMTools/etc/hosts
New file found: /etc/cfm/compute-rhel-6.2-x86_64_PMTools/etc/fstab.kusuappend
New file found: /etc/cfm/compute-rhel-6.2-x86_64_PMTools/etc/ssh/ssh_host_key
New file found: /etc/cfm/compute-rhel-6.2-x86_64_PMTools/etc/ssh/ssh_config
New file found: /etc/cfm/compute-rhel-6.2-x86_64_PMTools/etc/ssh/ssh_host_key.pub
New file found: /etc/cfm/compute-rhel-6.2-x86_64_PMTools/etc/ssh/ssh_host_rsa_key
New file found: /etc/cfm/compute-rhel-6.2-x86_64_PMTools/etc/ssh/ssh_host_dsa_key
Distributing 8 KBytes to all nodes.
Sending to 10.0.0.255
Sending to 10.0.0.255
Sending to 10.0.0.255
Sending to 10.0.0.255
Sending to 10.0.0.255
Creating the KVM node group...
Warning: Broken Symbolic link: /etc/cfm/installer-rhel-6.2-x86_64/etc/ssh/ssh_host_rsa_key.pub
Warning: Broken Symbolic link: /etc/cfm/installer-rhel-6.2-x86_64/etc/ssh/ssh_host_dsa_key.pub
Warning: Broken Symbolic link: /etc/cfm/compute-rhel-6.2-x86_64_PMTools/etc/ssh/ssh_host_rsa_key.pub
Warning: Broken Symbolic link: /etc/cfm/compute-rhel-6.2-x86_64_PMTools/etc/ssh/ssh_host_dsa_key.pub
Warning: Broken Symbolic link: /etc/cfm/compute-rhel-6.2-x86_64_KVM/etc/ssh/ssh_host_rsa_key.pub
Warning: Broken Symbolic link: /etc/cfm/compute-rhel-6.2-x86_64_KVM/etc/ssh/ssh_host_dsa_key.pub
Warning: Broken Symbolic link: /etc/cfm/compute-rhel-6.2-x86_64/etc/ssh/ssh_host_rsa_key.pub
Warning: Broken Symbolic link: /etc/cfm/compute-rhel-6.2-x86_64/etc/ssh/ssh_host_dsa_key.pub
Warning: Broken Symbolic link: /etc/cfm/compute-imaged-rhel-6.2-x86_64/etc/ssh/ssh_host_rsa_key.pub
Warning: Broken Symbolic link: /etc/cfm/compute-imaged-rhel-6.2-x86_64/etc/ssh/ssh_host_dsa_key.pub
Warning: Broken Symbolic link: /etc/cfm/compute-diskless-rhel-6.2-x86_64/etc/ssh/ssh_host_rsa_key.pub
Warning: Broken Symbolic link: /etc/cfm/compute-diskless-rhel-6.2-x86_64/etc/ssh/ssh_host_dsa_key.pub
Warning: Broken Symbolic link: /etc/cfm/installer-failover-rhel-6.2-x86_64/etc/ssh/ssh_host_rsa_key.pub
Warning: Broken Symbolic link: /etc/cfm/installer-failover-rhel-6.2-x86_64/etc/ssh/ssh_host_dsa_key.pub
Running plugin: /opt/kusu/lib/plugins/cfmsync/getent-data.sh
New file found: /etc/cfm/compute-rhel-6.2-x86_64_KVM/root/.ssh/id_rsa
New file found: /etc/cfm/compute-rhel-6.2-x86_64_KVM/root/.ssh/authorized_keys
New file found: /etc/cfm/compute-rhel-6.2-x86_64_KVM/opt/kusu/etc/logserver.addr
New file found: /etc/cfm/compute-rhel-6.2-x86_64_KVM/etc/passwd.merge
New file found: /etc/cfm/compute-rhel-6.2-x86_64_KVM/etc/shadow.merge
New file found: /etc/cfm/compute-rhel-6.2-x86_64_KVM/etc/group.merge
New file found: /etc/cfm/compute-rhel-6.2-x86_64_KVM/etc/hosts.equiv
New file found: /etc/cfm/compute-rhel-6.2-x86_64_KVM/etc/.updatenics
New file found: /etc/cfm/compute-rhel-6.2-x86_64_KVM/etc/hosts
New file found: /etc/cfm/compute-rhel-6.2-x86_64_KVM/etc/fstab.kusuappend
New file found: /etc/cfm/compute-rhel-6.2-x86_64_KVM/etc/ssh/ssh_host_key
New file found: /etc/cfm/compute-rhel-6.2-x86_64_KVM/etc/ssh/ssh_config
New file found: /etc/cfm/compute-rhel-6.2-x86_64_KVM/etc/ssh/ssh_host_key.pub
New file found: /etc/cfm/compute-rhel-6.2-x86_64_KVM/etc/ssh/ssh_host_rsa_key
New file found: /etc/cfm/compute-rhel-6.2-x86_64_KVM/etc/ssh/ssh_host_dsa_key
Distributing 8 KBytes to all nodes.
Sending to 10.0.0.255
Sending to 10.0.0.255
Sending to 10.0.0.255
Sending to 10.0.0.255
Sending to 10.0.0.255
Adding the PMTools/vmoAgent packages to the depot...
Adding the configKVM.sh/configPMTools.sh files to the depot...
Flushing the depot. This may take several minutes...
Refreshing repository: rhel-6.2-x86_64. This may take a while...
Updating the partition script in the depot...
The partition script lvm_example.sh was successfully added
Adding the partition/customer script to the node group...
Skipping system node group:unmanaged ...
Skipping system node group:installer-rhel-6.2-x86_64 ...
Skipping system node group:installer-failover-rhel-6.2-x86_64 ...
Skipping system node group:compute-rhel-6.2-x86_64 ...
Skipping system node group:compute-imaged-rhel-6.2-x86_64 ...
Skipping system node group:compute-diskless-rhel-6.2-x86_64 ...
Updating PMTools node group:compute-rhel-6.2-x86_64_PMTools ...
Summary of Changes:
===================
NGDESC: Template for provisioning physical machines.
OPTIONAL SCRIPTS:
(+) configPMTools.sh
Finished committing changes.
Updating KVM node group:compute-rhel-6.2-x86_64_KVM ...
Summary of Changes:
===================
NGDESC: Template for provisioning KVM hypervisor hosts.
OPTIONAL SCRIPTS:
(+) configKVM.sh
PARTITION SCRIPTS:
(+) lvm_example.sh
Finished committing changes.
Enable PRESERVE_NODE_IP
19|PRESERVE_NODE_IP|1|None
Updating the nodes by running: cfmsync -p -f -u
Warning: Broken Symbolic link: /etc/cfm/installer-rhel-6.2-x86_64/etc/ssh/ssh_host_rsa_key.pub
Warning: Broken Symbolic link: /etc/cfm/installer-rhel-6.2-x86_64/etc/ssh/ssh_host_dsa_key.pub
Warning: Broken Symbolic link: /etc/cfm/compute-rhel-6.2-x86_64_PMTools/etc/ssh/ssh_host_rsa_key.pub
Warning: Broken Symbolic link: /etc/cfm/compute-rhel-6.2-x86_64_PMTools/etc/ssh/ssh_host_dsa_key.pub
Warning: Broken Symbolic link: /etc/cfm/compute-rhel-6.2-x86_64_KVM/etc/ssh/ssh_host_rsa_key.pub
Warning: Broken Symbolic link: /etc/cfm/compute-rhel-6.2-x86_64_KVM/etc/ssh/ssh_host_dsa_key.pub
Warning: Broken Symbolic link: /etc/cfm/compute-rhel-6.2-x86_64/etc/ssh/ssh_host_rsa_key.pub
Warning: Broken Symbolic link: /etc/cfm/compute-rhel-6.2-x86_64/etc/ssh/ssh_host_dsa_key.pub
Warning: Broken Symbolic link: /etc/cfm/compute-imaged-rhel-6.2-x86_64/etc/ssh/ssh_host_rsa_key.pub
Warning: Broken Symbolic link: /etc/cfm/compute-imaged-rhel-6.2-x86_64/etc/ssh/ssh_host_dsa_key.pub
Warning: Broken Symbolic link: /etc/cfm/compute-diskless-rhel-6.2-x86_64/etc/ssh/ssh_host_rsa_key.pub
Warning: Broken Symbolic link: /etc/cfm/compute-diskless-rhel-6.2-x86_64/etc/ssh/ssh_host_dsa_key.pub
Warning: Broken Symbolic link: /etc/cfm/installer-failover-rhel-6.2-x86_64/etc/ssh/ssh_host_rsa_key.pub
Warning: Broken Symbolic link: /etc/cfm/installer-failover-rhel-6.2-x86_64/etc/ssh/ssh_host_dsa_key.pub
Running plugin: /opt/kusu/lib/plugins/cfmsync/getent-data.sh
Updating installer(s)
Sending to 10.0.0.255
Sending to 10.0.0.255
Sending to 10.0.0.255
Sending to 10.0.0.255
Sending to 10.0.0.255
Warning: Broken Symbolic link: /etc/cfm/installer-rhel-6.2-x86_64/etc/ssh/ssh_host_rsa_key.pub
Warning: Broken Symbolic link: /etc/cfm/installer-rhel-6.2-x86_64/etc/ssh/ssh_host_dsa_key.pub
Warning: Broken Symbolic link: /etc/cfm/compute-rhel-6.2-x86_64_PMTools/etc/ssh/ssh_host_rsa_key.pub
Warning: Broken Symbolic link: /etc/cfm/compute-rhel-6.2-x86_64_PMTools/etc/ssh/ssh_host_dsa_key.pub
Warning: Broken Symbolic link: /etc/cfm/compute-rhel-6.2-x86_64_KVM/etc/ssh/ssh_host_rsa_key.pub
Warning: Broken Symbolic link: /etc/cfm/compute-rhel-6.2-x86_64_KVM/etc/ssh/ssh_host_dsa_key.pub
Warning: Broken Symbolic link: /etc/cfm/compute-rhel-6.2-x86_64/etc/ssh/ssh_host_rsa_key.pub
Warning: Broken Symbolic link: /etc/cfm/compute-rhel-6.2-x86_64/etc/ssh/ssh_host_dsa_key.pub
Warning: Broken Symbolic link: /etc/cfm/compute-imaged-rhel-6.2-x86_64/etc/ssh/ssh_host_rsa_key.pub
Warning: Broken Symbolic link: /etc/cfm/compute-imaged-rhel-6.2-x86_64/etc/ssh/ssh_host_dsa_key.pub
Warning: Broken Symbolic link: /etc/cfm/compute-diskless-rhel-6.2-x86_64/etc/ssh/ssh_host_rsa_key.pub
Warning: Broken Symbolic link: /etc/cfm/compute-diskless-rhel-6.2-x86_64/etc/ssh/ssh_host_dsa_key.pub
Warning: Broken Symbolic link: /etc/cfm/installer-failover-rhel-6.2-x86_64/etc/ssh/ssh_host_rsa_key.pub
Warning: Broken Symbolic link: /etc/cfm/installer-failover-rhel-6.2-x86_64/etc/ssh/ssh_host_dsa_key.pub
Running plugin: /opt/kusu/lib/plugins/cfmsync/getent-data.sh
Distributing 2 KBytes to all nodes.
Updating installer(s)
Sending to 10.0.0.255
Sending to 10.0.0.255
Sending to 10.0.0.255
Sending to 10.0.0.255
Sending to 10.0.0.255
Setting up dhcpd service...
Setting up dhcpd service successfully...
Setting up NFS export service...
Warning: Broken Symbolic link: /etc/cfm/installer-rhel-6.2-x86_64/etc/ssh/ssh_host_rsa_key.pub
Warning: Broken Symbolic link: /etc/cfm/installer-rhel-6.2-x86_64/etc/ssh/ssh_host_dsa_key.pub
Warning: Broken Symbolic link: /etc/cfm/compute-rhel-6.2-x86_64_PMTools/etc/ssh/ssh_host_rsa_key.pub
Warning: Broken Symbolic link: /etc/cfm/compute-rhel-6.2-x86_64_PMTools/etc/ssh/ssh_host_dsa_key.pub
Warning: Broken Symbolic link: /etc/cfm/compute-rhel-6.2-x86_64_KVM/etc/ssh/ssh_host_rsa_key.pub
Warning: Broken Symbolic link: /etc/cfm/compute-rhel-6.2-x86_64_KVM/etc/ssh/ssh_host_dsa_key.pub
Warning: Broken Symbolic link: /etc/cfm/compute-rhel-6.2-x86_64/etc/ssh/ssh_host_rsa_key.pub
Warning: Broken Symbolic link: /etc/cfm/compute-rhel-6.2-x86_64/etc/ssh/ssh_host_dsa_key.pub
Warning: Broken Symbolic link: /etc/cfm/compute-imaged-rhel-6.2-x86_64/etc/ssh/ssh_host_rsa_key.pub
Warning: Broken Symbolic link: /etc/cfm/compute-imaged-rhel-6.2-x86_64/etc/ssh/ssh_host_dsa_key.pub
Warning: Broken Symbolic link: /etc/cfm/compute-diskless-rhel-6.2-x86_64/etc/ssh/ssh_host_rsa_key.pub
Warning: Broken Symbolic link: /etc/cfm/compute-diskless-rhel-6.2-x86_64/etc/ssh/ssh_host_dsa_key.pub
Warning: Broken Symbolic link: /etc/cfm/installer-failover-rhel-6.2-x86_64/etc/ssh/ssh_host_rsa_key.pub
Warning: Broken Symbolic link: /etc/cfm/installer-failover-rhel-6.2-x86_64/etc/ssh/ssh_host_dsa_key.pub
Running plugin: /opt/kusu/lib/plugins/cfmsync/getent-data.sh
Updating installer(s)
Sending to 10.0.0.255
Sending to 10.0.0.255
Sending to 10.0.0.255
Sending to 10.0.0.255
Sending to 10.0.0.255
Finished the installation of provisioning engine
Please reboot the host to finish installation
[root@c596n13 ~]#
Adding a new adapter instance
Figure 7-8 displays the required input fields to add the new adapter instance.
Figure 7-8 Pop-up window
Figure 7-9 shows the output of the provisioning engine after the adapter is added.
Figure 7-9 Provisioning Engine adapter added
Figure 7-10 shows the window to add the physical machines.

Figure 7-10 Adding physical machines
Perform a system reboot, and the system is installed with the selected template. Run kusu-boothost -l to verify that the host is provisioned successfully as shown in Example 7-2.
Example 7-2 kusu-boothost output
[root@c596n13 ~]# kusu-boothost -l
Node: c596n14 Node Group: compute-rhel-6.2-x86_64_PMTools
State: Installed Boot: Disk
UID: 429063733bbf14d90563803c093e3f22be2ef36b
Kernel: kernel-rhel-6.2-x86_64
Initrd: initrd.package.7.img
Kernel Params: text noipv6 kssendmac selinux=0
MAC: 00:1a:64:f1:38:a7 IP: 10.0.0.105
------------------------------------------------------------
|
IPMI: For power management with the Intelligent Peripheral Management Interface (IPMI) to work correctly within the IBM Platform Cluster Manager Advanced Edition framework (for example, “force reboot” on nodes that are powered off from the portal), an IPMI account with SUPERVISOR privilege using the default username and password combination that is used by kusu-power needs to be added. For IBM Platform Cluster Manager Advanced Edition Version 3.2, use username = kusuipmi and password = UMT4NRh2.
|
To add a host, find the host MAC address by using ifconfig as shown in Example 7-3.
Example 7-3 Finding the host MAC address
[root@c596n15 ~]# ifconfig eth1
eth1 Link encap:Ethernet HWaddr 00:1A:64:F1:35:3B
inet6 addr: fe80::21a:64ff:fef1:353b/64 Scope:Link
UP BROADCAST RUNNING MULTICAST MTU:1500 Metric:1
RX packets:0 errors:0 dropped:0 overruns:0 frame:0
TX packets:6 errors:0 dropped:0 overruns:0 carrier:0
collisions:0 txqueuelen:1000
RX bytes:0 (0.0 b) TX bytes:468 (468.0 b)
Memory:93220000-93240000
Managing physical machine users
These sections describe how to manage physical machine users.
Create a user
Example 7-4 shows how to create a user.
Example 7-4 Creating a user
[root@c596n13 ~]# adduser clusteruser -m
[root@c596n13 ~]# passwd clusteruser
Changing password for user clusteruser.
New password:
BAD PASSWORD: it is based on a dictionary word
Retype new password:
passwd: all authentication tokens updated successfully.
[root@c596n13 ~]# kusu-cfmsync -f
Running plugin: /opt/kusu/lib/plugins/cfmsync/getent-data.sh
Warning: Broken Symbolic link: /etc/cfm/installer-rhel-6.2-x86_64/etc/ssh/ssh_host_rsa_key.pub
Warning: Broken Symbolic link: /etc/cfm/installer-rhel-6.2-x86_64/etc/ssh/ssh_host_dsa_key.pub
Warning: Broken Symbolic link: /etc/cfm/compute-rhel-6.2-x86_64_PMTools/etc/ssh/ssh_host_rsa_key.pub
Warning: Broken Symbolic link: /etc/cfm/compute-rhel-6.2-x86_64_PMTools/etc/ssh/ssh_host_dsa_key.pub
Warning: Broken Symbolic link: /etc/cfm/compute-rhel-6.2-x86_64_KVM/etc/ssh/ssh_host_rsa_key.pub
Warning: Broken Symbolic link: /etc/cfm/compute-rhel-6.2-x86_64_KVM/etc/ssh/ssh_host_dsa_key.pub
Warning: Broken Symbolic link: /etc/cfm/compute-rhel-6.2-x86_64/etc/ssh/ssh_host_rsa_key.pub
Warning: Broken Symbolic link: /etc/cfm/compute-rhel-6.2-x86_64/etc/ssh/ssh_host_dsa_key.pub
Warning: Broken Symbolic link: /etc/cfm/compute-imaged-rhel-6.2-x86_64/etc/ssh/ssh_host_rsa_key.pub
Warning: Broken Symbolic link: /etc/cfm/compute-imaged-rhel-6.2-x86_64/etc/ssh/ssh_host_dsa_key.pub
Warning: Broken Symbolic link: /etc/cfm/compute-diskless-rhel-6.2-x86_64/etc/ssh/ssh_host_rsa_key.pub
Warning: Broken Symbolic link: /etc/cfm/compute-diskless-rhel-6.2-x86_64/etc/ssh/ssh_host_dsa_key.pub
Warning: Broken Symbolic link: /etc/cfm/installer-failover-rhel-6.2-x86_64/etc/ssh/ssh_host_rsa_key.pub
Warning: Broken Symbolic link: /etc/cfm/installer-failover-rhel-6.2-x86_64/etc/ssh/ssh_host_dsa_key.pub
Distributing 3 KBytes to all nodes.
Updating installer(s)
Sending to 10.0.0.255
Sending to 10.0.0.255
Sending to 10.0.0.255
Sending to 10.0.0.255
Sending to 10.0.0.255
7.2.3 Deploying LSF clusters
The cluster administrator provides the LSF cluster definition that can be used by the account manager to easily deploy an LSF cluster with IBM Platform Cluster Manager Advanced Edition for their account users. Furthermore, the account manager can set up the option for their account users to deploy the LSF clusters themselves.
Platform Cluster Manager Advanced Edition includes a predefined LSF cluster definition with the option to install IBM Platform Application Center (PAC). We followed the steps that are outlined in the section “Preparing and deploying the LSF cluster” in the IBM Platform Cluster Manager Advanced Edition, Version 3.2, Administration Guide, SC27-4760-00. This section highlights how we debug and modify the definition to complete the deployment of an LSF cluster with IBM Platform Computing LSF Version 8.3 Standard Edition on physical machines.
Preparing for the LSF cluster deployment
You need to copy the files that are needed for the installation on the cluster nodes (LSF master and LSF compute) to the packages directory /var/www/html/pcmae_packages on the management server.
For LSF 8.3, copy these files:
•Installation script: lsf8.3_lsfinstall_linux_x86_64.tar.Z
•Distribution file: lsf8.3_linux2.6-glibc2.3-x86_64.tar.Z
•Entitlement file: platform_lsf_std_entitlement.dat
For Platform Application Center, copy the following files:
•Distribution file: pac8.3_standard_linux-x64.tar.Z
•Entitlement file: pac.entitlement
•MySQL JDBC database driver: mysql-connector-java-5.1.21-bin.jar
The exact names of the entitlement files and the version of the MySQL Java Database Connectivity (JDBC) database are modified in the LSF cluster definition to match the files that are copied.
Modifying the predefined LSF cluster definition
Copy the predefined LSF cluster definition to create a new cluster definition. Click the Clusters tab, select Definitions, and select LSF from Cluster Definitions. Select the Copy from menu and specify a name. A new cluster definition is created as shown in Figure 7-11.

Figure 7-11 New cluster definition
Modify the unpublished cluster definition
Select the new cluster definition and select Modify in the menu to display the Cluster Designer dialog that can be used to modify the new LSF cluster definition. Click the User Variables tab and make the changes to match the environment as shown in Figure 7-12.

Figure 7-12 Modifying user variables in the cluster designer
The user variables are used in the pre-installation and post-installation scripts. For variables with multiple values, the valid values are separated by a semi-colon in the entry (see PAC_INSTALL in Figure 7-12 on page 237), The value is selected during cluster definition. We changed the values of the variables to the values that are listed in Table 7-2.
10.0.2.56 is the IP address of the provisioning network on our Platform Cluster Manager Advanced Edition management server.
Change LSF_ENTITLEMENT_FILE, PAC_DB_CONNECTOR, and PAC_LICENSE to match the names of the corresponding files that are copied to the packages directory on the management server.
Table 7-2 User variables
|
Name
|
Value
|
|
PAC_INSTALL
|
Y;N
|
|
SOURCE_URL
|
http://10.0.2.56/pcmae_packages
|
|
LSF_CLUSTER_TOP
|
/opt/lsf
|
|
LSF_CLUSTER_NAME
|
cluster1a
|
|
LSF_ADMIN_USER
|
lsfadmin1
|
|
LSF_ENTITLEMENT_FILE
|
platform_lsf_std_entitlement.dat
|
|
PAC_TOP
|
/opt/pac
|
|
PAC_DB_CONNECTOR
|
mysql-connector-java-5.1.21-bin.jar
|
|
PAC_DB_PASSWORD
|
|
|
PAC_LICENSE
|
pac.entitlement
|
Modifying the LSFMaster machine and the LSFCompute machine
Click the LSFMaster in the main panel (top portion of the window) and select the OS tab. To provision LSF clusters, we have to select the templates that included the PMTools.
Select the compute-rhel-6.2-x86_64_PMTools template to provision physical machines for the LSFMaster, as shown in Figure 7-13, and click the same template to provision the LSFCompute.
We kept the default settings for general machine definition properties (the number of machines, the number of CPUs, and memory) for both the LSFMaster and LSFCompute in this exercise. The LSF cluster requires at least two machines: one for LSFMaster and one for LSFCompute. The LSFCompute node is added as a dynamic host to the LSF cluster. Dynamic hosts can be added to or removed from the cluster in LSF without changing the LSF configuration file and restarting the master processes. Users can readily select the action in Platform Cluster Manager Advanced Edition to increase (“flex up”) or decrease (“flex down”) the number of LSFCompute nodes (as dynamic hosts) in the LSF cluster.
The new cluster definition is saved, published, and it is ready to use.

Figure 7-13 Provisioning template
Provisioning the LSF cluster with PAC
Click the Resources tab, select Cockpit from the menu, and click Machines. Ensure that at least two machines are available. In Figure 7-14 on page 240, four machines are defined that do not belong to any cluster.

Figure 7-14 Defined machines
Select the Clusters tab and click New to display the Published Definition List. On the New Instance page, choose the cluster definition and click Instantiate.
On the New Cluster page, the default settings for the cluster definition can be changed before clicking SUBMIT, including the values for the “Multiple Values” User Variables PAC_INSTALL (Y:N) and the password for PAC_DB_PASSWORD.
The requests from permitted users are automatically approved by the system. The tabs in the lower panel show the specifics of the highlighted cluster. The Machines tab shows the specifics of the machines in the cluster.
The Logs tab shows the progress and any error from the cluster deployment. For example, the Logs tab in Figure 7-15 shows that the Active (Layer Failed) is from the LSFCompute node:
“Script layer postComputeScript in tier LSFCompute current action CREATE state changed from Executing to Failed.”
“The LSFMaster node completed successfully.”
“Script layer postMasterScript in tier LSFMaster is completed on host i05q55.itso.pok.”
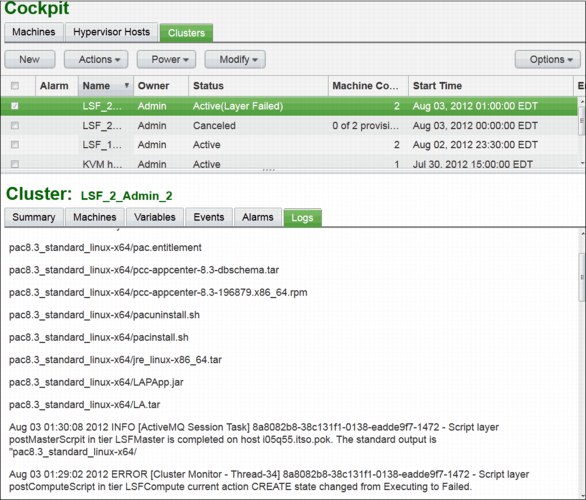
Figure 7-15 Debugging failed execution
The logs in Figure 7-16 shows successful deployment of the LSF cluster with PAC.
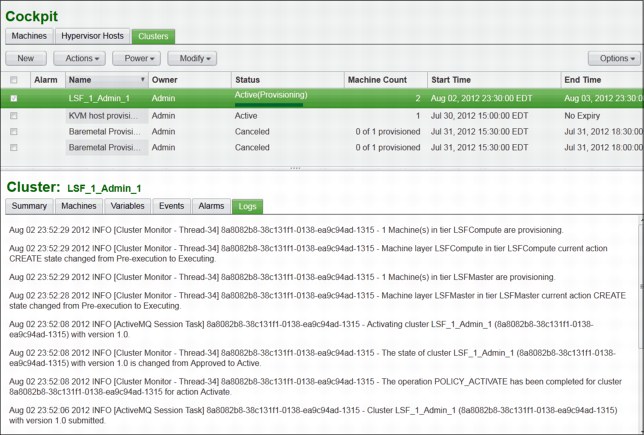
Figure 7-16 Successful deployment of LSF cluster with PAC
7.2.4 Deploying IBM Platform Symphony clusters
Although IBM Platform Cluster Advance Edition does not include a predefined cluster definition for deploying IBM Platform Symphony clusters, the cluster administrator uses the provided LSF cluster definition as a reference. With this reference, the cluster administrator can create a Symphony cluster definition easily that can be used by the account manager to deploy a Symphony cluster with Platform Cluster Manager Advanced Edition for the account users. Like the LSF cluster definition that we explained in detail in 7.2.3, “Deploying LSF clusters” on page 235, the account manager can set up the option for the account users to deploy Symphony clusters themselves.
This section highlights how we created a cluster definition to complete the deployment of a Symphony cluster with IBM Platform Computing Symphony Version 5.2 Advance Edition on physical machines. For detailed information about IBM Platform Symphony, see Chapter 5, “IBM Platform Symphony” on page 111.
Preparing for the Symphony cluster deployment
Prepare the system for deploying Symphony clusters by using the Symphony cluster definition.
Before you begin
Ensure that you have at least two physical machines added to the system. One machine is for the Symphony master host, and one machine is for the Symphony compute host. Additional machines can be used as compute nodes.
Procedure
The required files for installation on the cluster nodes (Symphony master and Symphony compute) need to be copied to the packages directory /var/www/html/pcmae_packages on the management server.
For IBM Platform Symphony 5.2, we copy the files:
•EGO management host install package:
ego-lnx26-lib23-x64-1.2.6.rpm
•EGO compute host install package:
egocomp-lnx26-lib23-x64-1.2.6.rpm
•SOAM install package:
soam-lnx26-lib23-x64-5.2.0.rpm
•Symphony entitlement file:
platform_sym_adv_entitlement.dat
Creating a Symphony cluster definition
Create a new cluster definition for deploying Symphony on your specific environment.
Modifying the predefined LSF cluster definition
We copied the predefined LSF cluster definition to create a new Symphony cluster definition.
Click the Clusters tab, select Definitions, select LSF from Cluster Definitions. Select Copy from menu and specify a name. A new cluster definition is created as Unpublished. In our environment, we created a sample cluster definition called Symphony.
Cluster Designer
All the components still refer to the LSF cluster definition. Now, we rename those components to Symphony terms to create a new cluster definition template. Here, we present the changes that need to be applied to create a working Symphony cluster definition. The copied and modified LSF cluster definition for Symphony is shown on Figure 7-17.

Figure 7-17 Modified LSF cluster definition for Symphony cluster deployment
Next, we describe the steps to create a functional Symphony cluster definition for Platform Cluster Manager Advanced Edition:
1. Use the Cluster Designer to modify the Symphony cluster definition:
a. Click the Clusters tab and select the Definitions menu item.
b. From the Cluster Definitions page, select the Symphony cluster definition and click Modify. The Cluster Designer dialog displays the Symphony cluster definition.
2. Modify the user variables as needed for your specific Symphony cluster deployment:
a. In the main canvas area, click any area that is not part of any tier. For example, click any blank area to the right of all the tiers. You selected the correct area if there are tabs in the details pane (including the User Variables tab), but there is no area that is highlighted in the main canvas. Figure 7-18 shows the User Variables tab for the global cluster definition. We changed the variable values to the values in Table 7-3.
b. Specify the master management server name as the SOURCE_URL user variable in the Symphony cluster definition. Replace the @HTTP_SERVER@ placeholder text with the host name of the master management server. Ensure that the URL matches http://managementserver/pcmae_packages, where managementserver is the host name of the master management server. In our cluster setup, 10.0.2.56 was the IP address of the Platform Cluster Manager Advanced Edition management server.

Figure 7-18 Cluster definition User Variables tab
|
Type field: The type field can be modified to provide an additional level of customization for users when deploying a cluster.
|
Table 7-3 Global cluster definition of user variables
|
Name
|
Value
|
|
SOURCE_URL
|
http://10.0.2.56/pcmae_packages
|
|
SYM_CLUSTER_TOP
|
/opt/ego
|
|
SYM_CLUSTER_NAME
|
cluster1
|
|
SYM_ADMIN_USER
|
egoadmin
|
|
SYM_BASE_PORT
|
7869
|
|
SYM_ENTITLEMENT_FILE
|
platform_sym_adv_entitlement.dat
|
|
SYM_MASTER_TIERNAME
|
SymMaster
|
|
SYM_COMPUTE_TIERNAME
|
SymCompute
|
|
SYM_OVERWRITE_EGO
|
Yes;No
|
|
SYM_SIMPLIFIED_WEM
|
Y;N
|
3. Modify the LSFMaster machine in the cluster definition:
a. In the main canvas area (in the top portion of the window), click the LSFMaster machine definition (larger rectangle). Rename the Machine layer as SymMaster.
b. In the details pane (in the bottom portion of the window), click the OS tab and select the template for the type of provisioned machine. For provisioning physical machines, select the compute-rhel-6.2-x86_64_PMTools template, as shown on Figure 7-19.

Figure 7-19 Machine layer OS selection tab
c. In the details pane, click the Network tab and select the IP assignment method. For provisioning physical machines, select External.
d. Figure 7-20 shows the machine definition properties for the SymMaster tier. For our sample template, we chose a maximum of one Master host.

Figure 7-20 General machine definition tab
4. Modify the LSFCompute machine in the Symphony cluster definition:
a. In the main canvas area, click the LSFCompute machine definition. Rename the Machine layer as SymCompute.
b. In the details pane, click the OS tab and select the same template as the SymMaster machine.
c. In the details pane, click the Network tab and select the same IP assignment method as the SymMaster machine.
5. Modify the SymMaster post-install script:
a. Figure 7-21 shows the User Variables tab for the SymMaster post script layer. To run jobs with Hadoop MapReduce or the MapReduce framework in IBM Platform Symphony, Sun Java Version 1.6.0_21 or higher is required to be installed on all hosts. The required Java is not included in the compute-rel-6.2-x86_64_PMTools template. We included the installation of Java in the post scripts of the cluster definition.

Figure 7-21 SymMaster post-install script user variables
We changed the values of the variables to the variables in Table 7-4 on page 248.
Table 7-4 SymMaster machine user variables
|
Name
|
Value
|
|
SYM_EGO_PACKAGENAME
|
ego-lnx26-lib23-x64-1.2.6.rpm
|
|
SYM_SOAM_PACKAGENAME
|
soam-lnx26-lib23-x64-5.2.0.rpm
|
|
SYM_JAVA_HOME
|
/usr/java/latest
|
|
SYM_JAVA_PACKAGENAME
|
jdk1.6.0_25.tar
|
|
SYM_HARVEST_ENTITLEMENT
|
platform_sym_server_entitlement.dat
|
b. Import the new postMasterScript and save. We modified the original post-install script that can be found in the LSF cluster definition. The post-install script can be imported and edited on the Script Layer Properties tab as shown on Figure 7-22.

Figure 7-22 Editing the post-install script
Example 7-5 shows the script that we used to provision the Symphony master host.
Example 7-5 postMasterScript.sh
#------------------------------------------------------------------
# Name: LOG
# Synopsis: LOG "$message"
# Description:
# Record message into log file.
#------------------------------------------------------------------
LOG ()
{
echo `date` "$1" >> "$LOG_FILE"
}
#---------------------------------------------------------------------------
#
# strnconcat -
# concatenates env variables if the original variable exceeds 4000 byte.
#
#---------------------------------------------------------------------------
strnconcat()
{
param=$1
total_num=$2
count=1
parsed=0
eval result=$$param
if [ "$result"X == "X" ]; then
return
fi
contains=`echo $result |awk -F';' '{for(i=1;i<=NF;i++){printf "%s ", $i}}' |wc -w`
if [ $contains -eq $total_num ]; then
echo $result
return
fi
parsed=$contains
count=`expr $count + 1`
while [ $parsed -le $total_num ]
do
eval varia=${$param'_'$count}
if [ "$varia" == "" ]; then
break;
fi
result=$result";"$varia
parsed=`echo $result |awk -F';' '{for(i=1;i<=NF;i++){printf "%s ", $i}}' |wc -w`
if [ $parsed -eq $total_num ]; then
echo $result
return
fi
count=`expr $count + 1`
done
if [ $parsed -ne $total_num ]; then
LOG "Data was corrupt!"
exit -1
fi
echo $result
}
#--------------------------------------------------------------------------
#
# log_all_deployment_variables -
# Record all deployment variables into log file.
#
#---------------------------------------------------------------------------
log_all_deployment_variables()
{
eval SymMaster_TOTAL_NUM_MACHINES=$$SYM_MASTER_TIERNAME'_TOTAL_NUM_MACHINES'
eval SymMaster_NUM_NEW_MACHINES=$$SYM_MASTER_TIERNAME'_NUM_NEW_MACHINES'
eval SymMaster_ASSIGN_IP=$$SYM_MASTER_TIERNAME'_ASSIGN_IP'
SymMaster_IP_ADDRS=`strnconcat $SYM_MASTER_TIERNAME'_IP_ADDRS' $SymMaster_TOTAL_NUM_MACHINES`
SymMaster_HOSTNAMES=`strnconcat $SYM_MASTER_TIERNAME'_HOSTNAMES' $SymMaster_TOTAL_NUM_MACHINES`
SymMaster_OP_MACHINE_HOSTNAME_LIST=`strnconcat $SYM_MASTER_TIERNAME'_OP_MACHINE_HOSTNAME_LIST' $SymMaster_NUM_NEW_MACHINES`
SymMaster_OP_MACHINE_IP_ADDR_LIST=`strnconcat $SYM_MASTER_TIERNAME'_OP_MACHINE_IP_ADDR_LIST' $SymMaster_NUM_NEW_MACHINES`
SymMaster_OP_MACHINE_ID_LIST=`strnconcat $SYM_MASTER_TIERNAME'_OP_MACHINE_ID_LIST' $SymMaster_NUM_NEW_MACHINES`
eval SymCompute_NUM_NEW_MACHINES=$$SYM_COMPUTE_TIERNAME'_NUM_NEW_MACHINES'
eval SymCompute_TOTAL_NUM_MACHINES=$$SYM_COMPUTE_TIERNAME'_TOTAL_NUM_MACHINES'
eval SymCompute_ASSIGN_IP=$$SYM_COMPUTE_TIERNAME'_ASSIGN_IP'
SymCompute_IP_ADDRS=`strnconcat $SYM_COMPUTE_TIERNAME'_IP_ADDRS' $SymCompute_TOTAL_NUM_MACHINES`
SymCompute_HOSTNAMES=`strnconcat $SYM_COMPUTE_TIERNAME'_HOSTNAMES' $SymCompute_TOTAL_NUM_MACHINES`
SymCompute_OP_MACHINE_HOSTNAME_LIST=`strnconcat $SYM_COMPUTE_TIERNAME'_OP_MACHINE_HOSTNAME_LIST' $SymCompute_NUM_NEW_MACHINES`
SymCompute_OP_MACHINE_IP_ADDR_LIST=`strnconcat $SYM_COMPUTE_TIERNAME'_OP_MACHINE_IP_ADDR_LIST' $SymCompute_NUM_NEW_MACHINES`
SymCompute_OP_MACHINE_ID_LIST=`strnconcat $SYM_COMPUTE_TIERNAME'_OP_MACHINE_ID_LIST' $SymCompute_NUM_NEW_MACHINES`
LOG "ISF_CURRENT_TIER $ISF_CURRENT_TIER"
LOG "ISF_LAYER_ACTION $ISF_LAYER_ACTION"
LOG "ISF_FLEX_TIER $ISF_FLEX_TIER"
LOG "ISF_USERNAME $ISF_USERNAME"
LOG "ISF_ACCOUNT_ID $ISF_ACCOUNT_ID"
LOG "ISF_CLUSTER_ID $ISF_CLUSTER_ID"
LOG "SymMaster_IP_ADDRS $SymMaster_IP_ADDRS"
LOG "SymMaster_HOSTNAMES $SymMaster_HOSTNAMES "
LOG "SymMaster_TOTAL_NUM_MACHINES $SymMaster_TOTAL_NUM_MACHINES"
LOG "SymMaster_NUM_NEW_MACHINES $SymMaster_NUM_NEW_MACHINES"
LOG "SymMaster_ASSIGN_IP $SymMaster_ASSIGN_IP"
LOG "SymMaster_OP_MACHINE_HOSTNAME_LIST $SymMaster_OP_MACHINE_HOSTNAME_LIST"
LOG "SymMaster_OP_MACHINE_IP_ADDR_LIST $SymMaster_OP_MACHINE_IP_ADDR_LIST"
LOG "SymMaster_OP_MACHINE_ID_LIST $SymMaster_OP_MACHINE_ID_LIST"
LOG "SymCompute_IP_ADDRS $SymCompute_IP_ADDRS"
LOG "SymCompute_HOSTNAMES $SymCompute_HOSTNAMES "
LOG "SymCompute_TOTAL_NUM_MACHINES $SymCompute_TOTAL_NUM_MACHINES"
LOG "SymCompute_NUM_NEW_MACHINES $SymCompute_NUM_NEW_MACHINES"
LOG "SymCompute_ASSIGN_IP $SymCompute_ASSIGN_IP"
LOG "SymCompute_OP_MACHINE_HOSTNAME_LIST $SymCompute_OP_MACHINE_HOSTNAME_LIST"
LOG "SymCompute_OP_MACHINE_IP_ADDR_LIST $SymCompute_OP_MACHINE_IP_ADDR_LIST"
LOG "SymCompute_OP_MACHINE_ID_LIST $SymCompute_OP_MACHINE_ID_LIST"
LOG "SYM_CLUSTER_TOP $SYM_CLUSTER_TOP"
LOG "SOURCE_URL $SOURCE_URL"
LOG "SYM_EGO_PACKAGENAME $SYM_EGO_PACKAGENAME"
LOG "SYM_SOAM_PACKAGENAME $SYM_SOAM_PACKAGENAME"
LOG "SYM_CLUSTER_NAME $SYM_CLUSTER_NAME"
LOG "SYM_ADMIN_USER $SYM_ADMIN_USER"
LOG "SYM_BASE_PORT $SYM_BASE_PORT"
LOG "SYM_ENTITLEMENT_FILE_NAME $SYM_ENTITLEMENT_FILE_NAME"
LOG "SYM_MASTER_TIERNAME $SYM_MASTER_TIERNAME"
LOG "SYM_COMPUTE_TIERNAME $SYM_COMPUTE_TIERNAME"
LOG "SYM_OVERWRITE_EGO_CONF $SYM_OVERWRITE_EGO_CONF"
LOG "SYM_JAVA_HOME $SYM_JAVA_HOME"
LOG "SYM_SIMPLIFIED_WEM $SYM_SIMPLIFIED_WEM"
LOG "SYM_JAVA_PACKAGENAME $SYM_JAVA_PACKAGENAME"
LOG "SYM_HARVEST_ENTITLEMENT $SYM_HARVEST_ENTITLEMENT"
}
#--------------------------------------------------------------------------
#
# check_baseport -
# Check whether the default port number is available or not. If it is
# not available, a new port is generated.
#
#---------------------------------------------------------------------------
check_baseport()
{
DEFAULT_SYM_BASE_PORT=7869
if [ -z $SYM_BASE_PORT ]; then
SYM_BASE_PORT=$DEFAULT_SYM_BASE_PORT
fi
TEMP=`expr "$SYM_BASE_PORT" : '[^0-9]*([0-9][0-9]*)[^0-9]*'`
if [ "$TEMP" != "$SYM_BASE_PORT" ]; then
SYM_BASE_PORT=$DEFAULT_SYM_BASE_PORT
fi
num=`echo $SYM_BASE_PORT | wc -c`
if [ $num -gt 6 ];then
SYM_BASE_PORT=$DEFAULT_SYM_BASE_PORT
fi
ORG_PORT=$SYM_BASE_PORT
index=0
while [ 1 = 1 ];do
SYM_BASE_PORT=`expr $SYM_BASE_PORT + $index`
if [ $SYM_BASE_PORT -gt 65531 ];then
SYM_BASE_PORT=$DEFAULT_SYM_BASE_PORT
index=0
continue
fi
num=`lsof -i:$SYM_BASE_PORT | wc -l`
if [ "$num" = "0" ]; then
break;
else
LOG "SYM_BASE_PORT $SYM_BASE_PORT is not available. New port will be found."
fi
let index++
continue
done
if [ "$SYM_BASE_PORT" != "$SYM_PORT" ]; then
echo "The SYM_BASE_PORT $SYM_PORT is not available; $SYM_BASE_PORT will be used."
fi
LOG "SYM_BASE_PORT is $SYM_BASE_PORT. "
}
#--------------------------------------------------------------------------
#
# fetch_packages -
# Download installation package from Management Server.
#
#---------------------------------------------------------------------------
fetch_packages()
{
# Set the URL path
_url_path="$1"
LOG "Downloading Symphony packages..."
if [ -d $DESTINATION_DIR ]; then
rm -rf $DESTINATION_DIR
fi
mkdir $DESTINATION_DIR
cd $DESTINATION_DIR
# fetch EGO rpm package
logVar=`wget $_url_path/$SYM_EGO_PACKAGENAME 2>&1`
if [ "$?" != "0" ] ; then
echo $logVar 1>&2
LOG "Failed to fetch package < $SYM_EGO_PACKAGENAME > from $_url_path."
return 1
fi
# fetch SOAM rpm package
logVar=`wget $_url_path/$SYM_SOAM_PACKAGENAME 2>&1`
if [ "$?" != "0" ] ; then
echo $logVar 1>&2
LOG "Failed to fetch package < $SYM_SOAM_PACKAGENAME > from $_url_path."
return 1
fi
# fetch license file
logVar=`wget $_url_path/$SYM_ENTITLEMENT_FILE_NAME 2>&1`
if [ "$?" != "0" ] ; then
echo $logVar 1>&2
LOG "Failed to fetch Symphony entitlement file < $SYM_ENTITLEMENT_FILE_NAME > from $_url_path."
return 1
fi
# fetch JAVA tar file
logVar=`wget $_url_path/$SYM_JAVA_PACKAGENAME 2>&1`
if [ "$?" != "0" ] ; then
echo $logVar 1>&2
LOG "Failed to fetch package < $SYM_JAVA_PACKAGENAME > from $_url_path."
return 1
fi
# fetch desktop/server harvesting entitlement file
logVar=`wget $_url_path/$SYM_HARVEST_ENTITLEMENT 2>&1`
if [ "$?" != "0" ] ; then
echo $logVar 1>&2
LOG "Failed to fetch package < $SYM_HARVEST_ENTITLEMENT > from $_url_path."
return 1
fi
LOG "All packages were downloaded successfully."
return 0
}
#--------------------------------------------------------------------------
#
# entitle_harvesting -
# Enable desktop/server harvesting feature
#
#---------------------------------------------------------------------------
entitle_harvesting()
{
LOG "Enabling Symphony Harvesting feature..."
su - $SYM_ADMIN_USER -c ". $SYM_CLUSTER_TOP/profile.platform ; egoconfig setentitlement $DESTINATION_DIR/$SYM_HARVEST_ENTITLEMENT " >>$LOG_FILE 2>&1
if [ "$?" != "0" ] ; then
LOG "Failed to enable Symphony harvesting feature."
echo "Symphony master installation failed. Refer $LOG_FILE on $LOCALMACHINE for detail information." >&2
return 1
fi
return 0
}
#--------------------------------------------------------------------------
#
# provision_master -
# Install and start Symphony master host.
#
#---------------------------------------------------------------------------
provision_master()
{
LOG "Installing Symphony ..."
#Define cluster properties as environment variables
export DERBY_DB_HOST=`hostname`
export CLUSTERNAME=$SYM_CLUSTER_NAME
export BASEPORT=$SYM_BASE_PORT
export OVERWRITE_EGO_CONFIGURATION=$SYM_OVERWRITE_EGO_CONF
export JAVA_HOME=$SYM_JAVA_HOME
export CLUSTERADMIN=$SYM_ADMIN_USER
export SIMPLIFIEDWEM=$SYM_SIMPLIFIED_WEM
export RPM_INSTALL_PREFIX=$SYM_CLUSTER_TOP
cd $DESTINATION_DIR/
yum -y install $SYM_EGO_PACKAGENAME >>$LOG_FILE 2>&1
if [ "$?" != "0" ] ; then
LOG "EGO installation failed."
echo "Symphony master installation failed. Refer $LOG_FILE on $LOCALMACHINE for detail information." >&2
return 1
fi
yum -y install $SYM_SOAM_PACKAGENAME >>$LOG_FILE 2>&1
if [ "$?" != "0" ] ; then
LOG "SOAM installation failed."
echo "Symphony master installation failed. Refer $LOG_FILE on $LOCALMACHINE for detail information." >&2
return 1
fi
if [ ! -d ${JAVA_HOME}/jre ] ; then
top_java_dir=${JAVA_HOME%/*}
mkdir -p ${top_java_dir}
cd ${top_java_dir}
tar -xf ${DESTINATION_DIR}/${SYM_JAVA_PACKAGENAME}
java_dir=${SYM_JAVA_PACKAGENAME%.tar}
ln -sf ${top_java_dir}/${java_dir} ${JAVA_HOME}
fi
return 0
}
#--------------------------------------------------------------------------
#
# config_master -
# Configue Symphony master host.
#
#---------------------------------------------------------------------------
config_master()
{
LOG "Configuring Symphony ..."
EGO_CONF="$SYM_CLUSTER_TOP/kernel/conf/ego.conf";
echo "EGO_RSH=ssh" >>$EGO_CONF
if [ "$?" != "0" ] ; then
LOG "Failed to update ego.conf."
echo "Symphony master installation failed. Refer $LOG_FILE on $LOCALMACHINE for detail information." >&2
return 1
fi
su - $SYM_ADMIN_USER -c ". $SYM_CLUSTER_TOP/profile.platform ; egoconfig join $HOSTNAME -f ; egoconfig setentitlement $DESTINATION_DIR/$SYM_ENTITLEMENT_FILE_NAME " >>$LOG_FILE 2>&1
if [ "$?" != "0" ] ; then
LOG "Failed to configure Symphony."
echo "Symphony master installation failed. Refer $LOG_FILE on $LOCALMACHINE for detail information." >&2
return 1
fi
entitle_harvesting
# Source environment for root
. $SYM_CLUSTER_TOP/profile.platform
egosetrc.sh >>$LOG_FILE 2>&1
egosetsudoers.sh >>$LOG_FILE 2>&1
if [ "$?" != "0" ] ; then
LOG "Failed to run ego config scripts."
echo "Symphony master installation failed. Refer $LOG_FILE on $LOCALMACHINE for detail information." >&2
return 1
fi
LOG "Starting Symphony ..."
su - $SYM_ADMIN_USER -c ". $SYM_CLUSTER_TOP/profile.platform ; egosh ego start" >>$LOG_FILE 2>&1
if [ "$?" != "0" ] ; then
LOG "Failed to start the Symphony cluster"
echo "Symphony master installation failed. Refer $LOG_FILE on $LOCALMACHINE for detail information." >&2
return 1
fi
}
#--------------------------------------------------------------------------
#
# add_clusteradmin_user -
# Add clusteradmin user to the system.
#
#---------------------------------------------------------------------------
add_clusteradmin_user()
{
user_id=`id $1 2>>/dev/null`
if [ "$?" != "0" ]; then
useradd $1 >/dev/null 2>&1
usermod -s /bin/bash $1 >/dev/null 2>&1
if [ ! -d "/home/$1" ]; then
mkdir /home/$1 >/dev/null 2>&1
fi
cp -R /etc/skel/.??* /home/$1
echo $1 > /tmp/JUNK
echo $1 >> /tmp/JUNK
cat /tmp/JUNK | passwd $1 >/dev/null 2>&1
rm -f /tmp/JUNK
else
LOG "User $1 exists already."
fi
user_id=`id -u $1 2>/dev/null`
group_id=`id -g $1 2>/dev/null`
chown -R $user_id:$group_id /home/$1 >/dev/null 2>&1
}
#======#
# MAIN #
#======#
PATH=/usr/bin:/bin:/usr/local/bin:/local/bin:/sbin:/usr/sbin:/usr/ucb:/usr/sbin:/usr/bsd:${PATH}
LSNULFILE=/dev/null
SETSID=`which setsid 2>/dev/null`
if test "$SETSID" = ""
then
echo "Cannot find a correct version of setsid." >&2
LOG "Exiting ... "
exit 1
fi
LOCALMACHINE=`hostname`
PROVISION_TMP=/tmp
DESTINATION_DIR=${PROVISION_TMP}/sym_package_`date +%Y%m%d`
LOG_FILE=$PROVISION_TMP/postProvisionSym.log
if [ "$ISF_CURRENT_TIER" = "$SYM_MASTER_TIERNAME" ]; then
if [ "$ISF_LAYER_ACTION" = "CREATE" ]; then
LOG "Current Action is CREATE"
add_clusteradmin_user $SYM_ADMIN_USER
log_all_deployment_variables
check_baseport
fetch_packages $SOURCE_URL
if [ "$?" != "0" ] ; then
exit 99
fi
#FIX: Need to make link to libc
ln -s /lib64/libc.so.6 /lib/libc.so.6
# Install Symphony packages on master host
provision_master
if [ "$?" != "0" ] ; then
exit 99
fi
# configure and start Symphony
config_master
if [ "$?" != "0" ] ; then
exit 99
fi
# clean up installation package
rm -rf $DESTINATION_DIR
echo "Symphony master host is ready."
elif [ "$ISF_LAYER_ACTION" = "FLEXUP" ]; then
LOG "Current Action is FLEXUP"
#TODO
else
LOG "Layer action $ISF_LAYER_ACTION is not supported."
fi
else
LOG "Tier $ISF_CURRENT_TIER is not Symphony Master tier."
echo "Since tier $ISF_CURRENT_TIER is not Symphony Master tier, this script is not executed."
fi
LOG "Script is finished successfully."
exit 0
6. Modify the SymCompute post-install script:
a. The actions that are listed in the Execution Properties tab allow the post-install scripts to take specific paths depending on the action that is being executed on the cluster. The ISF_LAYER_ACTION deployment variable indicates the current action of the running script layer (Create, Delete, Flex Up, or Flex Down). By using this variable, you can use a single script to perform different actions depending on whether the machine is being created, deleted, flexed up, or flexed down. This capability provides a deeper level of control over the actions that are executed by the scripts. Figure 7-23 shows the execution properties for the SymCompute post-install script layer.

Figure 7-23 SymCompute post-install script Execution Properties tab
b. Figure 7-24 shows the User Variables tab for the SymCompute post-install script layer.

Figure 7-24 SymCompute post-install script user variables
We changed the values of the variables to the variables in Table 7-5.
Table 7-5 SymCompute machine user variables
|
Name
|
Value
|
|
SYM_EGO_COMP_PACKAGENAME
|
egocomp-lnx26-lib23-x64-1.2.6.rpm
|
|
SYM_HARVESTHOST
|
desktop;server
|
|
SYM_JAVA_HOME
|
/usr/java/latest
|
|
SYM_JAVA_PACKAGENAME
|
jbk1.6.0_25.tar
|
7. Import the new postComputeScript and save. We modified the original post-install script that can be found in the LSF cluster definition. The post-install script can be imported and edited on the Script Layer Properties tab as shown on Figure 7-25 on page 259.

Figure 7-25 Script Layer Properties tab
Example 7-6 shows the script we used to provision the Symphony master host.
Example 7-6 postComputeScript.sh
#------------------------------------------------------------------
# Name: LOG
# Synopsis: LOG "$message"
# Description:
# Record message into log file.
#------------------------------------------------------------------
LOG ()
{
echo `date` "$1" >> "$LOG_FILE"
}
#---------------------------------------------------------------------------
#
# strnconcat -
# concatenates env variables if the original variable exceeds 4000 byte.
#
#---------------------------------------------------------------------------
strnconcat()
{
param=$1
total_num=$2
count=1
parsed=0
eval result=$$param
if [ "$result"X == "X" ]; then
return
fi
contains=`echo $result |awk -F';' '{for(i=1;i<=NF;i++){printf "%s ", $i}}' |wc -w`
if [ $contains -eq $total_num ]; then
echo $result
return
fi
parsed=$contains
count=`expr $count + 1`
while [ $parsed -le $total_num ]
do
eval varia=${$param'_'$count}
if [ "$varia" == "" ]; then
break;
fi
result=$result";"$varia
parsed=`echo $result |awk -F';' '{for(i=1;i<=NF;i++){printf "%s ", $i}}' |wc -w`
if [ $parsed -eq $total_num ]; then
echo $result
return
fi
count=`expr $count + 1`
done
if [ $parsed -ne $total_num ]; then
LOG "Data was corrupt!"
exit -1
fi
echo $result
}
#--------------------------------------------------------------------------
#
# log_all_deployment_variables -
# Record all deployment variables into log file.
#
#---------------------------------------------------------------------------
log_all_deployment_variables()
{
eval SymMaster_TOTAL_NUM_MACHINES=$$SYM_MASTER_TIERNAME'_TOTAL_NUM_MACHINES'
eval SymMaster_NUM_NEW_MACHINES=$$SYM_MASTER_TIERNAME'_NUM_NEW_MACHINES'
eval SymMaster_ASSIGN_IP=$$SYM_MASTER_TIERNAME'_ASSIGN_IP'
SymMaster_IP_ADDRS=`strnconcat $SYM_MASTER_TIERNAME'_IP_ADDRS' $SymMaster_TOTAL_NUM_MACHINES`
SymMaster_HOSTNAMES=`strnconcat $SYM_MASTER_TIERNAME'_HOSTNAMES' $SymMaster_TOTAL_NUM_MACHINES`
SymMaster_OP_MACHINE_HOSTNAME_LIST=`strnconcat $SYM_MASTER_TIERNAME'_OP_MACHINE_HOSTNAME_LIST' $SymMaster_NUM_NEW_MACHINES`
SymMaster_OP_MACHINE_IP_ADDR_LIST=`strnconcat $SYM_MASTER_TIERNAME'_OP_MACHINE_IP_ADDR_LIST' $SymMaster_NUM_NEW_MACHINES`
SymMaster_OP_MACHINE_ID_LIST=`strnconcat $SYM_MASTER_TIERNAME'_OP_MACHINE_ID_LIST' $SymMaster_NUM_NEW_MACHINES`
eval SymCompute_NUM_NEW_MACHINES=$$SYM_COMPUTE_TIERNAME'_NUM_NEW_MACHINES'
eval SymCompute_TOTAL_NUM_MACHINES=$$SYM_COMPUTE_TIERNAME'_TOTAL_NUM_MACHINES'
eval SymCompute_ASSIGN_IP=$$SYM_COMPUTE_TIERNAME'_ASSIGN_IP'
SymCompute_IP_ADDRS=`strnconcat $SYM_COMPUTE_TIERNAME'_IP_ADDRS' $SymCompute_TOTAL_NUM_MACHINES`
SymCompute_HOSTNAMES=`strnconcat $SYM_COMPUTE_TIERNAME'_HOSTNAMES' $SymCompute_TOTAL_NUM_MACHINES`
SymCompute_OP_MACHINE_HOSTNAME_LIST=`strnconcat $SYM_COMPUTE_TIERNAME'_OP_MACHINE_HOSTNAME_LIST' $SymCompute_NUM_NEW_MACHINES`
SymCompute_OP_MACHINE_IP_ADDR_LIST=`strnconcat $SYM_COMPUTE_TIERNAME'_OP_MACHINE_IP_ADDR_LIST' $SymCompute_NUM_NEW_MACHINES`
SymCompute_OP_MACHINE_ID_LIST=`strnconcat $SYM_COMPUTE_TIERNAME'_OP_MACHINE_ID_LIST' $SymCompute_NUM_NEW_MACHINES`
LOG "ISF_CURRENT_TIER $ISF_CURRENT_TIER"
LOG "ISF_LAYER_ACTION $ISF_LAYER_ACTION"
LOG "ISF_FLEX_TIER $ISF_FLEX_TIER"
LOG "ISF_USERNAME $ISF_USERNAME"
LOG "ISF_ACCOUNT_ID $ISF_ACCOUNT_ID"
LOG "ISF_CLUSTER_ID $ISF_CLUSTER_ID"
LOG "SymMaster_IP_ADDRS $SymMaster_IP_ADDRS"
LOG "SymMaster_HOSTNAMES $SymMaster_HOSTNAMES "
LOG "SymMaster_TOTAL_NUM_MACHINES $SymMaster_TOTAL_NUM_MACHINES"
LOG "SymMaster_NUM_NEW_MACHINES $SymMaster_NUM_NEW_MACHINES"
LOG "SymMaster_ASSIGN_IP $SymMaster_ASSIGN_IP"
LOG "SymMaster_OP_MACHINE_HOSTNAME_LIST $SymMaster_OP_MACHINE_HOSTNAME_LIST"
LOG "SymMaster_OP_MACHINE_IP_ADDR_LIST $SymMaster_OP_MACHINE_IP_ADDR_LIST"
LOG "SymMaster_OP_MACHINE_ID_LIST $SymMaster_OP_MACHINE_ID_LIST"
LOG "SymCompute_IP_ADDRS $SymCompute_IP_ADDRS"
LOG "SymCompute_HOSTNAMES $SymCompute_HOSTNAMES "
LOG "SymCompute_TOTAL_NUM_MACHINES $SymCompute_TOTAL_NUM_MACHINES"
LOG "SymCompute_NUM_NEW_MACHINES $SymCompute_NUM_NEW_MACHINES"
LOG "SymCompute_ASSIGN_IP $SymCompute_ASSIGN_IP"
LOG "SymCompute_OP_MACHINE_HOSTNAME_LIST $SymCompute_OP_MACHINE_HOSTNAME_LIST"
LOG "SymCompute_OP_MACHINE_IP_ADDR_LIST $SymCompute_OP_MACHINE_IP_ADDR_LIST"
LOG "SymCompute_OP_MACHINE_ID_LIST $SymCompute_OP_MACHINE_ID_LIST"
LOG "SYM_CLUSTER_TOP $SYM_CLUSTER_TOP"
LOG "SOURCE_URL $SOURCE_URL"
LOG "SYM_EGO_COMP_PACKAGENAME $SYM_EGO_COMP_PACKAGENAME"
LOG "SYM_SOAM_PACKAGENAME $SYM_SOAM_PACKAGENAME"
LOG "SYM_CLUSTER_NAME $SYM_CLUSTER_NAME"
LOG "SYM_ADMIN_USER $SYM_ADMIN_USER"
LOG "SYM_BASE_PORT $SYM_BASE_PORT"
LOG "SYM_ENTITLEMENT_FILE_NAME $SYM_ENTITLEMENT_FILE_NAME"
LOG "SYM_MASTER_TIERNAME $SYM_MASTER_TIERNAME"
LOG "SYM_COMPUTE_TIERNAME $SYM_COMPUTE_TIERNAME"
LOG "SYM_OVERWRITE_EGO_CONF $SYM_OVERWRITE_EGO_CONF"
LOG "SYM_HARVESTHOST $SYM_HARVESTHOST"
LOG "SYM_SIMPLIFIED_WEM $SYM_SIMPLIFIED_WEM"
LOG "SYM_JAVA_HOME $SYM_JAVA_HOME"
LOG "SYM_JAVA_PACKAGENAME $SYM_JAVA_PACKAGENAME""
}
#--------------------------------------------------------------------------
#
# check_baseport -
# Check whether the default port number is available or not. If it is
# not available, a new port is generated.
#
#---------------------------------------------------------------------------
check_baseport()
{
DEFAULT_SYM_BASE_PORT=7869
if [ -z $SYM_BASE_PORT ]; then
SYM_BASE_PORT=$DEFAULT_SYM_BASE_PORT
fi
TEMP=`expr "$SYM_BASE_PORT" : '[^0-9]*([0-9][0-9]*)[^0-9]*'`
if [ "$TEMP" != "$SYM_BASE_PORT" ]; then
SYM_BASE_PORT=$DEFAULT_SYM_BASE_PORT
fi
num=`echo $SYM_BASE_PORT | wc -c`
if [ $num -gt 6 ];then
SYM_BASE_PORT=$DEFAULT_SYM_BASE_PORT
fi
ORG_PORT=$SYM_BASE_PORT
index=0
while [ 1 = 1 ];do
SYM_BASE_PORT=`expr $SYM_BASE_PORT + $index`
if [ $SYM_BASE_PORT -gt 65531 ];then
SYM_BASE_PORT=$DEFAULT_SYM_BASE_PORT
index=0
continue
fi
num=`lsof -i:$SYM_BASE_PORT | wc -l`
if [ "$num" = "0" ]; then
break;
else
LOG "SYM_BASE_PORT $SYM_BASE_PORT is not available. New port will be found."
fi
let index++
continue
done
if [ "$SYM_BASE_PORT" != "$SYM_PORT" ]; then
echo "The SYM_BASE_PORT $SYM_PORT is not available; $SYM_BASE_PORT wil be used."
fi
LOG "SYM_BASE_PORT is $SYM_BASE_PORT. "
}
#--------------------------------------------------------------------------
#
# fetch_packages -
# Download installation package from Management Server.
#
#---------------------------------------------------------------------------
fetch_packages()
{
# Set the URL path
_url_path="$1"
LOG "Downloading Symphony packages..."
if [ -d $DESTINATION_DIR ]; then
rm -rf $DESTINATION_DIR
fi
mkdir $DESTINATION_DIR
cd $DESTINATION_DIR
# fetch EGO (Compute) rpm package
logVar=`wget $_url_path/$SYM_EGO_COMP_PACKAGENAME 2>&1`
if [ "$?" != "0" ] ; then
echo $logVar 1>&2
LOG "Failed to fetch package < $SYM_EGO_COMP_PACKAGENAME > from $_url_path."
return 1
fi
# fetch SOAM rpm package
logVar=`wget $_url_path/$SYM_SOAM_PACKAGENAME 2>&1`
if [ "$?" != "0" ] ; then
echo $logVar 1>&2
LOG "Failed to fetch package < $SYM_SOAM_PACKAGENAME > from $_url_path."
return 1
fi
# fetch license file
logVar=`wget $_url_path/$SYM_ENTITLEMENT_FILE_NAME 2>&1`
if [ "$?" != "0" ] ; then
echo $logVar 1>&2
LOG "Failed to fetch Symphony entitlement file < $SYM_ENTITLEMENT_FILE_NAME > from $_url_path."
return 1
fi
# fetch JAVA tar file
logVar=`wget $_url_path/$SYM_JAVA_PACKAGENAME 2>&1`
if [ "$?" != "0" ] ; then
echo $logVar 1>&2
LOG "Failed to fetch package < $SYM_JAVA_PACKAGENAME > from $_url_path."
return 1
fi
LOG "All packages were downloaded successfully."
return 0
}
#--------------------------------------------------------------------------
#
# provision_compute -
# Install and start Symphony Compute host.
#
#---------------------------------------------------------------------------
provision_compute()
{
LOG "Installing Symphony ..."
#Define cluster properties as environment variables
export CLUSTERNAME=$SYM_CLUSTER_NAME
export BASEPORT=$SYM_BASE_PORT
export OVERWRITE_EGO_CONFIGURATION=$SYM_OVERWRITE_EGO_CONF
export HARVESTHOST=$SYM_HARVESTHOST
export CLUSTERADMIN=$SYM_ADMIN_USER
export SIMPLIFIEDWEM=$SYM_SIMPLIFIED_WEM
export RPM_INSTALL_PREFIX=$SYM_CLUSTER_TOP
export JAVA_HOME=$SYM_JAVA_HOME
cd $DESTINATION_DIR/
yum -y install $SYM_EGO_COMP_PACKAGENAME >>$LOG_FILE 2>&1
if [ "$?" != "0" ] ; then
LOG "EGO installation failed."
echo "Symphony Compute host installation failed. Refer $LOG_FILE on $LOCALMACHINE for detail information." >&2
return 1
fi
yum -y install $SYM_SOAM_PACKAGENAME >>$LOG_FILE 2>&1
if [ "$?" != "0" ] ; then
LOG "SOAM installation failed."
echo "Symphony Compute host installation failed. Refer $LOG_FILE on $LOCALMACHINE for detail information." >&2
return 1
fi
if [ ! -d ${JAVA_HOME}/jre ] ; then
top_java_dir=${JAVA_HOME%/*}
mkdir -p ${top_java_dir}
cd ${top_java_dir}
tar -xf ${DESTINATION_DIR}/${SYM_JAVA_PACKAGENAME}
java_dir=${SYM_JAVA_PACKAGENAME%.tar}
ln -sf ${top_java_dir}/${java_dir} ${JAVA_HOME}
fi
return 0
}
#--------------------------------------------------------------------------
#
# config_compute -
# Configue Symphony Compute host.
#
#---------------------------------------------------------------------------
config_compute()
{
master_list="$1"
tmp_master_list=`echo $master_list | sed "s/;//g"`
array_master_list=($tmp_master_list)
master_hostname="${array_master_list[0]}"
LOG "Configuring Symphony ..."
EGO_CONF="$SYM_CLUSTER_TOP/kernel/conf/ego.conf";
echo "EGO_RSH=ssh" >>$EGO_CONF
if [ "$?" != "0" ] ; then
LOG "Failed to update ego.conf."
echo "Symphony Compute host installation failed. Refer $LOG_FILE on $LOCALMACHINE for detail information." >&2
return 1
fi
su - $SYM_ADMIN_USER -c ". $SYM_CLUSTER_TOP/profile.platform ; egoconfig join $master_hostname -f " >>$LOG_FILE 2>&1
if [ "$?" != "0" ] ; then
LOG "Failed to configure Symphony."
echo "Symphony Compute host installation failed. Refer $LOG_FILE on $LOCALMACHINE for detail information." >&2
return 1
fi
# Source environment for root
. $SYM_CLUSTER_TOP/profile.platform
egosetrc.sh >>$LOG_FILE 2>&1
egosetsudoers.sh >>$LOG_FILE 2>&1
if [ "$?" != "0" ] ; then
LOG "Failed to run ego config scripts."
echo "Symphony Compute host installation failed. Refer $LOG_FILE on $LOCALMACHINE for detail information." >&2
return 1
fi
LOG "Starting Symphony ..."
su - $SYM_ADMIN_USER -c ". $SYM_CLUSTER_TOP/profile.platform ; egosh ego start" >>$LOG_FILE 2>&1
if [ "$?" != "0" ] ; then
LOG "Failed to start the Symphony cluster"
echo "Symphony Compute host installation failed. Refer $LOG_FILE on $LOCALMACHINE for detail information." >&2
return 1
fi
}
#--------------------------------------------------------------------------
#
# add_clusteradmin_user -
# Add clusteradmin user to the system.
#
#---------------------------------------------------------------------------
add_clusteradmin_user()
{
user_id=`id $1 2>>/dev/null`
if [ "$?" != "0" ]; then
useradd $1 >/dev/null 2>&1
usermod -s /bin/bash $1 >/dev/null 2>&1
if [ ! -d "/home/$1" ]; then
mkdir /home/$1 >/dev/null 2>&1
fi
cp -R /etc/skel/.??* /home/$1
echo $1 > /tmp/JUNK
echo $1 >> /tmp/JUNK
cat /tmp/JUNK | passwd $1 >/dev/null 2>&1
rm -f /tmp/JUNK
else
LOG "User $1 exists already."
fi
user_id=`id -u $1 2>/dev/null`
group_id=`id -g $1 2>/dev/null`
chown -R $user_id:$group_id /home/$1 >/dev/null 2>&1
}
#--------------------------------------------------------------------------
#
# remove_compute -
# Remove Symphony Compute host from grid.
#
#---------------------------------------------------------------------------
remove_compute()
{
LOG "Stopping EGO..."
su - $SYM_ADMIN_USER -c ". $SYM_CLUSTER_TOP/profile.platform ; egosh ego shutdown" >>$LOG_FILE 2>&1
if [ "$?" != "0" ] ; then
LOG "Failed to trigger EGO shutdown."
echo "EGO shutdown failed. Refer $LOG_FILE on $LOCALMACHINE for detail information." >&2
return 1
fi
yum -y remove soam-lnx26-lib23-x64 >>$LOG_FILE 2>&1
yum -y remove egocomp-lnx26-lib23-x64 >>$LOG_FILE 2>&1
rm -rf $SYM_CLUSTER_TOP >>$LOG_FILE 2>&1
return 0
}
#======#
# MAIN #
#======#
PATH=/usr/bin:/bin:/usr/local/bin:/local/bin:/sbin:/usr/sbin:/usr/ucb:/usr/sbin:/usr/bsd:${PATH}
LSNULFILE=/dev/null
SETSID=`which setsid 2>/dev/null`
if test "$SETSID" = ""
then
echo "Cannot find a correct version of setsid." >&2
LOG "Exiting ... "
exit 1
fi
LOCALMACHINE=`hostname`
PROVISION_TMP=/tmp
DESTINATION_DIR=${PROVISION_TMP}/sym_package_`date +%Y%m%d`
LOG_FILE=$PROVISION_TMP/postProvisionSym.log
if [ "$ISF_CURRENT_TIER" = "$SYM_COMPUTE_TIERNAME" ]; then
if [ "$ISF_LAYER_ACTION" = "CREATE" ]; then
LOG "Current Action is CREATE"
add_clusteradmin_user $SYM_ADMIN_USER
log_all_deployment_variables
check_baseport
fetch_packages $SOURCE_URL
if [ "$?" != "0" ] ; then
exit 99
fi
#FIX: Need to make link to libc
ln -s /lib64/libc.so.6 /lib/libc.so.6
# Install Symphony packages on Compute host
provision_compute
if [ "$?" != "0" ] ; then
exit 99
fi
# configure and start Symphony
config_compute $SymMaster_HOSTNAMES
if [ "$?" != "0" ] ; then
exit 99
fi
# clean up installation package
rm -rf $DESTINATION_DIR
echo "Symphony Compute host is ready."
elif [ "$ISF_LAYER_ACTION" = "DELETE" ]; then
LOG "Current Action is DELETE"
remove_compute
if [ "$?" != "0" ] ; then
exit 99
fi
else
LOG "Layer action $ISF_LAYER_ACTION is not supported."
fi
else
LOG "Tier $ISF_CURRENT_TIER is not Symphony Compute tier."
echo "Since tier $ISF_CURRENT_TIER is not Symphony Compute tier, this script is not executed."
fi
LOG "Script is finished successfully."
exit 0
8. Save by using the icon in the upper-right corner and close the Cluster Designer window.
9. Go back to the Cluster Definitions view and click Publish to publish the Symphony cluster definition. Provide a version number and a short description and ensure that the Symphony cluster definition appears on the definitions list as Published.
10. Add the published definition to an available account. Select the Symphony published definition from the list and click Edit Publishing List → Add Account to List. We used the default SampleAccount in this example, as shown on Figure 7-26.

Figure 7-26 Add account to the Symphony cluster definition publishing list
Provisioning the Symphony cluster
The cluster definition that is published to the SampleAccount is available to all users of that account. In our case, we have an egoadmin user that belongs to SampleAccount.
Figure 7-27 shows the published cluster definition for the Symphony cluster that was made available for SampleAccount.
Figure 7-27 User view of the service catalog
The Service Catalog view displays the available cluster definition for this account. Click Symphony to open the New Cluster form.
Figure 7-28 shows the New Cluster form for the Symphony deployment. The Machine tab allows user customization of host quantity and characteristics, as predefined by the Administrator in the cluster definition. Specify or change any necessary settings for the Symphony cluster.

Figure 7-28 New Symphony cluster submission machine parameters
From the User Variables tab, specify or change the Symphony installation parameters. For example, change SYM_SYMPLIFIED_WEM and other parameters as required.
The user variables that are defined on the cluster definition appear on the submission form as shown on Figure 7-29 on page 270.

Figure 7-29 New Symphony cluster user variables
The requests from permitted users are automatically approved by the system. The tabs in the lower panel on the Clusters Management tab show the specifics of the highlighted cluster. The Machines tab shows the specifics the machines in the cluster. The Logs tab shows the progress and any errors from the cluster deployment.
Figure 7-30 on page 271 shows the Clusters Management view for the egoadmin user.

Figure 7-30 Active Symphony cluster provisioning
The installation of the IBM Platform Symphony is not completed until we run the cluster configuration wizard (see message in Example 7-7).
Example 7-7 Message from IBM Platform Symphony installation
IBM Platform Symphony 5.2.0 is installed at /opt/ego.
Symphony cannot work properly if the cluster configuration is not correct.
After you install Symphony on all hosts, log on to the Platform Management
Console as cluster administrator and run the cluster configuration wizard
to complete the installation process.
After the provisioning process is completed and all post-install scripts are run, we can access the Symphony cluster that runs on the selected machines. Example 7-8 shows the output of the command that we used to verify that the cluster is deployed successfully. This Symphony cluster is installed with advanced workload execution mode (SIMPLIFIEDWEM=N).
Example 7-8 Verifying the Symphony cluster deployment
[egoadmin@i05q60 ~]$ egosh ego info
Cluster name : cluster1
EGO master host name : i05q60.itso.pok
EGO master version : 1.2.6
[egoadmin@i05q60 ~]$ egosh service list
SERVICE STATE ALLOC CONSUMER RGROUP RESOURCE SLOTS SEQ_NO INST_STATE ACTI
purger STARTED 1 /Manage* Manag* i05q60.* 1 1 RUN 1
plc STARTED 2 /Manage* Manag* i05q60.* 1 1 RUN 2
derbydb STARTED 3 /Manage* Manag* i05q60.* 1 1 RUN 3
WEBGUI STARTED 4 /Manage* Manag* i05q60.* 1 1 RUN 4
WebServ* STARTED 8 /Manage* Manag* i05q60.* 1 1 RUN 7
MRSS STARTED 5 /Comput* MapRe* i05q60.* 1 1 RUN 8
RS STARTED 6 /Manage* Manag* i05q60.* 1 1 RUN 5
Seconda* DEFINED /HDFS/S*
NameNode DEFINED /HDFS/N*
DataNode DEFINED /HDFS/D*
Service* STARTED 7 /Manage* Manag* i05q60.* 1 1 RUN 6
[egoadmin@i05q55 ~]$ egosh resource list
NAME status mem swp tmp ut it pg r1m r15s r15m ls
i05q63.* closed 46G 2000M 8880M 0% 17 0.0 0.0 0.0 0.0 0
i05q60.* ok 45G 2000M 8516M 0% 1 0.0 0.1 0.0 0.2 1
Figure 7-31 shows the Platform Management Console for the cluster that we deployed.

Figure 7-31 The Symphony Platform Management Console on the deployed cluster
The Symphony Compute host i05q63 is a harvest-ready server host. The host is closed by the harvesting agent. You can modify the threshold values in Example 7-9 to open the harvested host to run jobs.
Example 7-9 Configuration change to open the harvested server host
[root@i05q60 tmp]# egosh ego elimrestart SA on,0,0.9,0.5 i05q63
Restart ELIM on <i05q63> ? [y/n] y
Restart ELIM on <i05q63> ...... done
[root@i05q60 tmp]# egosh resource open i05q63
Host <i05q63> is opened
[root@i05q60 tmp]# egosh resource list
NAME status mem swp tmp ut it pg r1m r15s r15m ls
i05q60.* ok 45G 2000M 8267M 0% 0 0.0 0.0 0.0 0.1 1
i05q63.* ok 46G 2000M 8856M 0% 758 0.0 0.0 0.0 0.0 0
7.2.5 Baremetal provisioning
After adding physical machines for IBM Platform Cluster Manager Advanced Edition to manage (as described in 7.2.2, “Installing the software” on page 219), you can deploy clusters that are composed of these machines. All you need is to have machines that are available for deployment (machines that do not belong to other clusters already) and a cluster definition that is ready for use.
Cluster definitions can be created or modified by administrators or account owners by using the Cluster Designer. After definitions are created, they can be published and made available for all users in the cluster (if the cluster definition creator is the administrator) or the users that have access to the account (if the cluster definition creator is an account owner). Users can then select the cluster definition and ask to create a new cluster.
Modifying the cluster definition
To modify an existing cluster definition, the administrator needs to go to the Cluster tab, Definitions view, select the cluster definition that the administrator wants to modify and click Modify (or Copy the template and then Modify the new copy). Cluster definitions can only be modified when they are in the state Unpublished. Follow these steps to use the Cluster Designer to create the cluster definition “physical cluster 1” to deploy a cluster of physical machines:
1. Click New to start the Cluster Designer that brings up a cluster definition with the Master and the Compute Nodes tiers.
2. Click the canvas area at the Cluster Designer and change the name and description of the cluster in the Cluster Definition Properties tab.
3. Only one tier is needed for the physical cluster definition. Highlight the ComputeNodes tier and click the trash bin icon in the upper-right corner of the window to remove the second tier machine definition.
4. Highlight the Master tier and change the name and description in the Machine Definition Properties tab to Baremetal.
5. On the General tab, change the Maximum value for the # of Machine (number of machines) to Unlimited.
6. On the OS tab, select the template with PMTools (compute-rhel-6.2-x86_64_PMTools) as shown in Figure 7-32 on page 274.
7. Add the post-install script by dragging and dropping the New Script Layer icon in the lower-left corner of the Cluster Designer window to layer 3 of the Baremetal tier. Edit to make changes in the script.
8. Click Save and exit the Cluster Designer.
9. Select the definition in the Definitions view and click Publish.
In this cluster definition, the selected IP assignment method is External, so IBM Platform Cluster Manager Advanced Edition uses an IP assignment method outside the system, such as Dynamic Host Configuration Protocol (DHCP). You can select the Pre-assigned Script layer method to assign IPs; although, ensure that you read about the implications of choosing this method in the “Starting the Cluster Designer” section of Platform Cluster Manager Advanced Edition, Version 3.2 Administration Guide, SC27-4760-00.
With this cluster definition, you can add an unlimited number of machines to the cluster (Layer 2, General tab). This cluster definition also enables the option to flex up the cluster (add machines to the cluster) after it is instantiated.

Figure 7-32 IBM Platform Cluster Manager Advanced Edition - Template for baremetal cluster definition
After saving the cluster definition, you can change to whom the definition is available. Click Edit Publishing List and then click either Add Account to List or Remove Account from List. A list of the existing accounts appears and you can select which accounts you want to add or remove. You need to publish the cluster definition before you can change the publishing list, although the IBM Platform Cluster Manager Advanced Edition Administrator Guide, SC27-4760-00 says otherwise.
Creating the cluster
To create the cluster as administrator, go to the Resources tab, select the Cockpit view, and select the Cluster tab. Click New, select the cluster definition that you want to use, and click Instantiate. You see a page similar to Figure 7-33 on page 275.

Figure 7-33 IBM Platform Cluster Manager Advanced Edition - New cluster creation
Select the number of machines that you want to add to the cluster, change any other variables you need, and click Submit. When you click Submit, IBM Platform Cluster Manager Advanced Edition looks for the machines that have the number of resources that you need, selects as many machines as you defined in the submission form (if available) and instantiates the cluster. This cluster definition does not have any placement policies, but you can create placement policies that restrict from which machines IBM Platform Cluster Manager Advanced Edition chooses to create your cluster. For instance, if you want your cluster in a specified location, you can create a placement policy that makes IBM Platform Cluster Manager Advanced Edition choose machines in the location that you define.
The cluster is ready for use when its state changes to Active. After that, you can modify it as needed. You can add more CPUs and memory and change the expiration date for the cluster (as long as the resources limit for the account is not reached). You can also flex the cluster up and down by clicking Modify, clicking the Clusters tab, and selecting Add/Remove Machines. Figure 7-34 shows the page to add and remove machines to the cluster.

Figure 7-34 IBM Platform Cluster Manager Advanced Edition - Add/Remove Machines
7.2.6 KVM provisioning
IBM Platform Manager Advanced Edition provides the framework to install and manage a cluster with KVM hypervisor hosts and virtual machines. This section highlights the initial steps as discussed in the IBM Platform Cluster Manager Advanced Edition Administrator Guide, SC27-4760-00, to deploy the hypervisor host and the virtual machines. However, this section is not intended as the comprehensive guide to complete the cluster implementation.
Appendix D, “Getting started with KVM provisioning” on page 341 includes additional materials about KVM virtualization if you are not familiar with creating KVM guest images in Red Hat Enterprise Linux (RHEL) 6.2.
Preparing for KVM provisioning
The host names of the management server and the VM machines that are provisioned in Platform Cluster Manager Advanced Edition need to be resolved by name for the VM machines to join the cluster and to complete the VM provisioning successfully without error. One option is to define a Private IP Pool and specify host names for the IP addresses in the IP pool. Each Private IP Pool is then assigned to be a top-level account to be used for creating machines. For further details about IP pools, see the section “Managing IP pools” in the IBM Platform Cluster Manager Advanced Edition Administrator Guide, SC27-4760-00. The KVM provisioning is completed under one of the accounts.
Creating IP pools
As the administrator, click Resources → IP Pools. Select New to display the widget “Create IP Pools”. Select Static from the IP Allocation drop-down list, and select Private IP Pool1 from the Logical IP Pool Name list and complete the mandatory fields:
•IP Pool Name: VM_static_1
•Starting IP Address: 10.0.2.201
•Ending IP Address: 10.0.2.210
•Subnet Mask: 255.255.255.0
•Gateway: 10.0.2.56
Bridge networks (without VLAN tagging) are configured in our testing. The VLAN ID is not set. Click Apply to save the Private IP Pool definition.
To assign the host name for the IP addresses in the IP pool, click the IP Range (10.0.2.201-10.0.2.210) for the IP pool VM_static_1. This selection brings up the IP Addresses for IP Pool page. Select each of the Unreserved IP addresses and assign the host name as shown in Figure 7-35.

Figure 7-35 Defining the host names for unreserved IP addresses in the IP pool
Highlight the IP pool VM_static_1. From the More Accounts list, select Assign to Top Accounts. We assign the VM_static_1 IP pool to the account test_4n.
When we log in as the account owner of the account test_4n, the VM_static_1 lists an IP pool that is assigned in the IP Pools tab (see Figure 7-36).

Figure 7-36 IP pool that is defined for KVM provisioning
After a cluster of KVM hypervisor hosts is created by the administrator, the IP addresses in the IP Pool are now available to the account test_4n to create VMs on the hypervisor hosts.
Provisioning a cluster of hypervisor hosts
Platform Cluster Manager Advanced Edition included the predefined cluster definition “KVM host provision” that can be used to deploy a cluster with KVM hypervisor hosts.
As the administrator, start with adding physical machines (as described in 7.2.2, “Installing the software” on page 219) with the template compute-rhel-6.2-x86_64_KVM, which is the template that is used in the KVM host provision cluster definition. The machines added are available for the new cluster instantiation.
We copy the cluster definition KVM host provision to KVM cluster1 and modify the cluster definition in Cluster Designer.
The cluster definition has a single KVMHostTier for the KVM hypervisor host. Ensure that in the details panel for the layer 2 KVM machine, the template compute-rhel-6.2-x86_64_KVM is selected, as shown in Figure 7-37.

Figure 7-37 Selecting the compute-rhel-6.2.x86_64_KVM template for KVM hypervisor hosts
The selected IP assignment method for this cluster definition is External (see Figure 7-38 on page 279). The IP address of the hypervisor host is assigned by DHCP, which runs on the management server.

Figure 7-38 Selecting External IP assignment method for KVM hypervisor host cluster definition
We change the default value of the private and the public network interfaces in the cluster definition to match our test environment, as shown in Figure 7-39. These values are Single Modifiable-type values that can be changed during the new cluster instantiation:
•Click the canvas area of the Cluster Designer and select the User Variables tab.
•Change the value of PRIVATE_INTERFACE to eth1.
•Change the value of PUBLIC_INTERFACE to eth0.

Figure 7-39 Modifying the network interfaces for the KVM hypervisor host definition
The RHEL KVM hypervisor hosts are configured to use the Logical Volume Manager (LVM) storage repository to store VMs and the template image files. The default value for the RHKVMSTorageType element is “LVM” in the file pcmae_install_dir/virtualization/conf/AdvancedVMOConfig.xml, which is the Red Hat hypervisor storage type configuration file.
For installation planning, see the discussion on “Managing storage repositories” in the IBM Platform Cluster Manager Advanced Edition Administrator Guide, SC27-4760-00.
The new cluster definition is saved, published, and selected to create a new cluster. Upon successful instantiation of the cluster deployment, the host is listed under Hypervisor Hosts of the KVM inventory.
As the administrator, on the Resources tab, click Inventory → KVM → Hypervisor Hosts. The KVM hypervisor host i05q54 is listed in the table, as shown in Figure 7-40.

Figure 7-40 The KVM Hypervisor Hosts tab
Clicking i05q54 provides the details of the hypervisor host. The default volume group on the hypervisor host is /dev/VolGroup00 (listed under Storage Repositories in Figure 7-41).

Figure 7-41 Summary details of the hypervisor host i05q54.itso.pok
Logging on to the hypervisor host i05q54 as root, verify that the hypervisor host i05q54 is active and the bridge network is set up, as in see Example 7-10 on page 282.
Example 7-10 Verifying the hypervisor is active
[root@i05q54 ~]# vgdisplay
--- Volume group ---
VG Name VolGroup00
System ID
Format lvm2
Metadata Areas 1
Metadata Sequence No 3
VG Access read/write
VG Status resizable
MAX LV 0
Cur LV 2
Open LV 2
Max PV 0
Cur PV 1
Act PV 1
VG Size 232.38 GiB
PE Size 32.00 MiB
Total PE 7436
Alloc PE / Size 768 / 24.00 GiB
Free PE / Size 6668 / 208.38 GiB
VG UUID cnsWmN-aeNE-2JLS-CVUl-S79L-kC8z-3RwyXj
root@i05q54:# brctl show
bridge name bridge id STP enabled interfaces
br0 8000.e41f13efa975 yes eth1
virbr0 8000.525400d4f434 yes virbr0-nic
Creating a new VM on the hypervisor host
The next step is to create a VM on the hypervisor host. The VM is then converted to a template that can be used in a cluster definition to provision VMs.
To convert the VM to a template in Platform Cluster Manager Advanced Edition, the VM must be created by using a logical volume-based storage pool. Otherwise, the operation fails. In Example 7-11, we created the VM in a directory-based storage pool. This VM fails to be converted to a template in Platform Cluster Manager Advanced Edition with the error that is reported in the LOGS panel.
Example 7-11 VM creation
215f5baf-e0e2-6bf5-80e9-4b4974451190.log:Aug 22 10:43:28 2012 ERROR [Agent Event Handler - Thread-22] 215f5baf-e0e2-6bf5-80e9-4b4974451190 - Convert VM to template failed due to: 2012-08-22 10:43:28,253 ERROR: Failed to create image path.
In Platform Cluster Manager Advanced Edition, the VMs are created in the logical volume (LV) /dev/VolGroup00/kvmVM. If there is not enough disk space, the VM fails to provision with the error that is shown in Example 7-12.
Example 7-12 VM creation error due to disk space
Aug 27 05:26:03 2012 ERROR [ActiveMQ Session Task] 8a8082b8-395d2c64-0139-67667cc9-0555 - Machine layer VM host in tier VM failed to provision due to: Could not install VM [machine_0_0827052602358]: No enough available disk space to copy the template images, 8000MB needed, 4476MB available
Log on to the KVM hypervisor host i05q54 as root to create the new VM.
Create the LV kvmVM on the default volume group VolGrgoup00 with an allocation of 30 GB, as shown in Example 7-13. This disk capacity allows the option to add up to 2 VMs (8 GB size each) on the hypervisor host.
Example 7-13 Adding additional disk space for the VM creation
[root@i05q54 storage]# lvcreate -L 15GB -n kvmVM VolGroup00
Logical volume "kvmVM" created
Start virt-manager, the virtual machine manager, on i05q54 to build the new VM by using these steps:
1. Create the logical volume-based storage pool, guest_images, on the logical volume kvmVM.
2. Create a new volume rhel62_vm (size 8 GB) on the storage pool guest_images.
3. Create a new VM kvm54v1 on the volume rhel62_vm.
For additional details about the steps to create the new VM, see Appendix D, “Getting started with KVM provisioning” on page 341.
If the network on the VM is configured to start automatically, on successfully completing the installation of the guest operating systems (RHEL 6.2 in our test) and rebooting VM, the new VM kvm54v1 is listed as Machines with KVM resource type in the Platform Cluster Manager Advanced Edition portal (as shown in Figure 7-42).
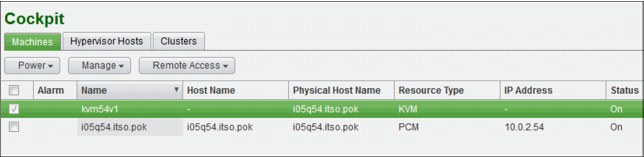
Figure 7-42 VM (to be converted to template) created on hypervisor host
Click kvm54v1 to show the details of the virtual machine (see Figure 7-43). The storage repository /dev/guest_images/rhel62_vm is the volume pool rhel62_vm in the storage pool guest_images.
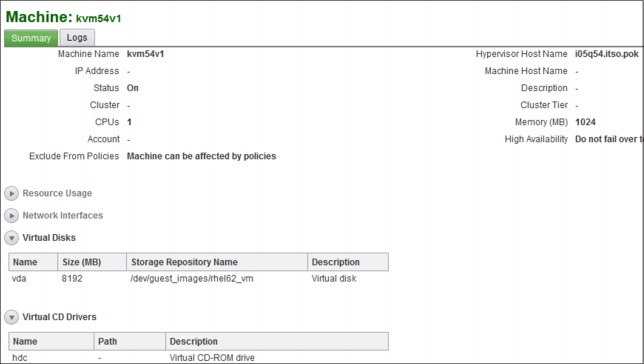
Figure 7-43 Summary of VM (to be converted to template) created on hypervisor host
The new virtual machine kvm54v1 is listed as a machine on the physical host i05q54.itso.pok in the Cockpit view of the portal, as shown in Figure 7-44.
Figure 7-44 New VM that is created listed as machines on the hypervisor host
The VMTools need to be installed on the VM before converting the VM to a template.
Log on to the new VM and copy the file pcmae_install_dir/virtualization/4.1/VMTools-linux2.6-glibc2.3-x86_64.tar from the management server to a local directory.
Install the VMTools package by using the script install.sh:
cd /usr/local/share; tar -xvf VMTools-linux2.6-glibc2.3-x86_64.tar
cd VMTools; sh install.sh
After the VM is powered off, select the Manage option to Convert to template. On the Resource tab, in the Cockpit view, under Machines, highlight the entry kvm54v1. Click Power → Force Shut Down. Click Manage → Convert to template.
After the template is saved, the VM kvm54v1 disappears from the list of Machines. The template kvm54v1_tmpl is listed under the Templates of the KVM Inventory. On the Resources tab, click KVM (under Inventory) and select the Templates panel.
This VM template can now be used by the administrator in the cluster definition (OS of the VM host) to provision VMs, as shown in Figure 7-45.

Figure 7-45 Using the VM template in the cluster definition to provision VMs
On the General tab of the cluster definition (see Figure 7-46), change the minimum and maximum values of # of CPU and “Memory (MB) to set the range that is allowed for the VMs.

Figure 7-46 Configuration of VMs in the cluster definition
The VM cluster definition KVMcluster_VM_1 is published, and the account test_4n is added to the publishing list.
When you log in as the account owner of the account test_4n, the network of the VM cluster definition is modified to use the Private IP Pool1 that is assigned to the account as shown in Figure 7-47.

Figure 7-47 Selecting the IP pool for the VM cluster definition
When the VM that is provisioned by using the kvm54v1_tmpl in the cluster definition is powered on, the VM is listed in the Platform Cluster Manager Advanced Edition portal, just as the VM that is created with virt-manager on the hypervisor host (See Figure 7-48 and Figure 7-49).

Figure 7-48 Configuration of the VM that is created from the VM template
The IP address (10.0.2.201) and the corresponding host name (i05v201) are assigned from the “Private IP Pool1”. The VM is created in the volume i05v201_1.img in the storage pool guest_images (/dev/guest_images).

Figure 7-49 VM created from the VM template
The IP addresses for IP Pool list the IP addresses that are reserved for the VM hosts as shown in Figure 7-50.

Figure 7-50 IP addresses that are reserved for KVM cluster provisioning
To plan for capacity in the storage repository, the disk space that is needed by each VM that is subsequently created by using the VM template is the total capacity of the volume on the storage pool that is built to create the VM on the hypervisor host. In our test, each new VM is 8 GB, which is the size of rhel62_vm.
Flexing up the hypervisor host cluster and the VM cluster
The hypervisor host cluster can be flexed up by the administrator to increase the number of hypervisor hosts that are available for all accounts to create VMs. All the hypervisor hosts have the same configuration (# of CPU per machine and memory per machine).
In the Cockpit view of the Clusters tab, highlight the KVM hypervisor host cluster (KVM_cluster_1_Admin_1 in our example). Click Modify → select Add/Remove Machines from the drop-down menu to display the widget (see Figure 7-51). Enter the total number of machines to be added to the initial hypervisor host cluster for On-Demand Machines.

Figure 7-51 Flexing up the KVM hypervisor host cluster
On successful completion of flexing up the cluster, the hypervisor host is listed as a machine of PCM resource type in the Machines tab of the Cockpit view of the Portal.
In Figure 7-52 on page 292, the On-Demand Machines that is added is i05q55.itso.pok.

Figure 7-52 Hypervisor host added
All hypervisor hosts in the cluster are configured with the same type of storage repository (LVM or NFS). To create additional VMs from the VM template on any of the hypervisor hosts, the initial VM (rhel62_vm in our example) must be accessible from each of the hypervisor hosts. For NFS, the VMs are accessible on the shared file system. If the LVM storage repository is used (as in our example), the VM image on the initial hypervisor host needs to be copied to all other hypervisor hosts in the cluster.
For each of the hypervisor hosts that is added (i05q55.itso.pok in our example), the LVM and the storage pool with the same capacity as the initial hypervisor host must be added (storage pool guest_images with the 8 GB volume rhel62_vm). The VM image (rhel62_vm) is then copied to each of the hypervisor hosts.
Issue the following command on the initial hypervisor host (i05q54.itso.pok in our example):
dd if=/dev/guest_images/rhel62_vm of=/shared_file/rhel62_vm.img bs=1M
The /shared_file is a shared file system that is mounted on the hypervisor hosts.
Issue the following command on the initial hypervisor host (i05q55.itso.pok in our example):
dd if=/shared_file/rhel62_vm.img of=/dev/guest_images/rhel62_vm bs=1M
The additional hypervisor host is now ready for you to create a new VM from the VM template.
The default VM placement policy is packing (see Figure 7-53). We change it to Striping to spread the VMs across the cluster (see Figure 7-53):
Click the Resource tab. Under Policies, select VM Placement Policy. Choose Striping and click Apply.
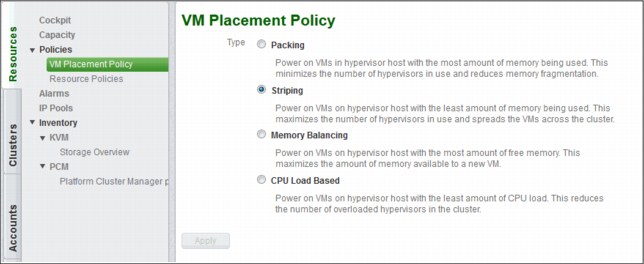
Figure 7-53 VM Placement Policy
The account owner of the accounts (test_4n in our test case) for which the VM cluster definition is published can now modify the VM clusters to flex up the total number of VMs. In Figure 7-54, the cluster KVMcluster_VM1_tmgr1_1 has a total of four VMs, two on each of the hypervisor hosts. The VMs are created by following the Striping VM placement policy.
Figure 7-54 VMs created
All the VMs are assigned IP addresses and the host name from the IP Pool that is defined in the cluster definition (see Figure 7-55).

Figure 7-55 IP addresses of the VMs
7.3 References
The IBM Platform Cluster Manager Advanced Edition documentation that is listed in Table 7-6 is available within each product and can be downloaded from IBM Publications Center:
Table 7-6 IBM Platform Cluster Manager Advanced Edition documentation
|
Publication title
|
Publication number
|
|
Release Notes for IBM Platform Cluster Manager Advanced Edition
|
GI13-1899-00
|
|
IBM Platform Cluster Manager Advanced Edition Installation Guide
|
SC27-4759-00
|
|
IBM Platform Cluster Manager Advanced Edition Administrator Guide
|
SC27-4760-00
|
..................Content has been hidden....................
You can't read the all page of ebook, please click here login for view all page.