
Chapter 10. Setting Up Your Yahoo! Store Order Settings
What You’ll Learn in This Chapter
• How to set up your store’s shipping options
• How to set up inventory management
• How to set up your merchant account
• How to set up your tax tables
Now that you’ve set up your Yahoo! store to take orders, it’s time to turn to the process of shipping them. In chapter 6, “Setting Up Your Business Accounts,” we spoke about choosing shipping companies and setting up your shipping account. Will you be using UPS (United Parcel Service), USPS (United States Postal Service), FedEx, or a combination of different services? Whichever method you choose, you will need to set up those shipping options for your Yahoo! store.
Setting Up Your Shipping Options
During the checkout process, your customers will be asked to enter their shipping address and select their shipping method. The Yahoo! store order form will calculate the shipping rates and display them based on the shipping rates you set. This will also allow your customers to see their total order amount immediately. This is important because a cardinal rule of eCommerce is “never surprise your customers.” In this case, provide them with the TOTAL amount of their order before you request their credit card numbers.
Shipping Manager
The Shipping Manger provides a set of tools to help you set up your shipping options. They are
• Shipping Methods: Add shipping methods that will be offered during the checkout process. You may add, edit, delete, or change the order of the shipping methods.
• Shipping Rates: Configure shipping rules based on geographic location, flat fee, and percentage or rate table.
• Settings: Configure general shipping calculations and UPS tools and UPS shipping settings.
• Shipping and Order Status: Configure and preview order status email and order confirmation emails.
• Shipping and Tax Test: Test shipping rules with sample data based on tax tables before publishing to the live store.
To access the Shipping Manager
- From the Manage My Services control panel, click on Store Manager.
- In Store Manager, click on Shipping Manager under the Order Settings column.
Setting Your Shipping Methods
Once you decide which shipping methods to offer, you will need to add those options to the shipping methods form. You can add general default shipping options such as Downloadable, Ground, Air, Federal Express, and First Class Mail as provided by Merchant Solutions or add your own custom method.
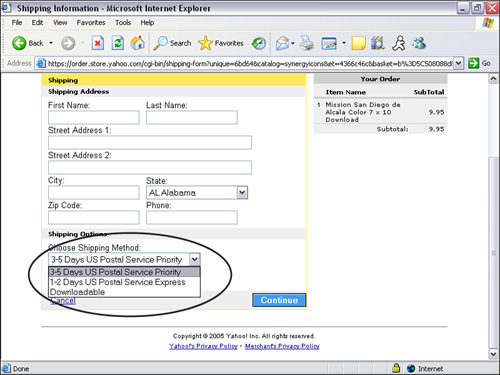
During the checkout process, a drop-down menu will display all of the shipping options you provide, as seen in Figure 10.1.
- From the Manage My Services control panel, click on Store Manager.
- In Store Manager, click on Shipping Manager under the Order Settings column.
- In Shipping Manager, click on Shipping Methods.
- Once you are on the Shipping Methods page, click on the Edit Methods button to add shipping methods.
Tip
If you are charging a flat fee for shipping, you may want to consider adding the shipping cost as part of your shipping option title. Your customers will want to know how much each shipping method costs. This will reduce phone calls, tech support emails, and customer hesitation when ordering.
Once you have finished adding your shipping methods, you will need to configure your shipping rates. To view a free online video of how to add shipping methods, go to www.MyEcommerceSuccess.com.
Figure 10.1. Shipping options are displayed in a drop-down menu during the checkout process.
Configuring Shipping Rates
To set shipping rates, you will need to create shipping rules. You can charge a flat fee, charge a percentage of the order amount, or use a rate table that is based on weight, order amount, or number of items sold. You may also include an additional fee to cover handling cost. For example, if the shipping cost for a T–shirt is $3.95 for USPS priority mail, you may want to add $1.05 for handling and charge a flat $5 for shipping.
Also, keep in mind that shipping companies such as UPS determine shipping rates based on zones. For example, it will cost more to send a package from California to New York than from New York to Boston. If you are planning on using UPS, UPS has an online tool that will allow you customers to view real–time shipping rates during the checkout process.
Once you select your shipping methods, you can create shipping rate rules. There are five sequential steps to create each rule.
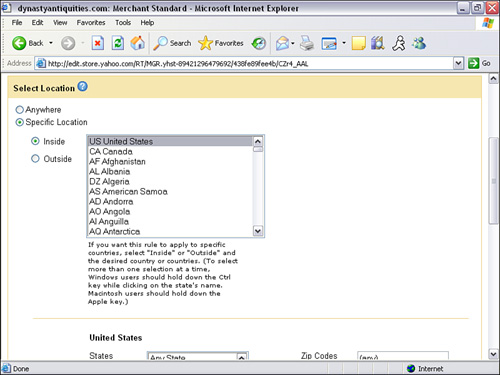
- Select Location: You can specify which country, state, and ZIP codes this rule will apply to, as shown in Figure 10.2.
- Select Method(s): Which shipping method(s) this rule will apply to.
- Rule Type: Whether the shipping charge be based on a flat rate, a percentage of order amount, or a rate table.
- Rate Details: The details and exact amount of for each rule type.
- Override Setting: The Override setting allows you to apply only one rule even though an order matches other existing rules. For example, you may have a flat shipping fee for all of the United States, but offer free shipping for all orders from California.
Figure 10.2. You can specify geographical locations by country, state, or ZIP code when adding shipping methods.
- From the Manage My Services control panel, click on Store Manager.
- In Store Manager, click on Shipping Manager under the Order Settings column.
- In Shipping Manager, click on Shipping Rates.
- Once you are on the Shipping Rates page, click on the Add Rule button to add shipping rates.
- Follow the five steps as described earlier to add your shipping rates.
Using UPS Shipping Tools
Planning on using UPS (United Parcel Service)? UPS Online Tools is integrated with Yahoo! Merchant Solutions at no extra charge. With UPS Online Tools, you can process shipments, auto–insert tracking numbers into orders, receive real–time rates and auto-populate shipping labels without leaving the Store Manager. Using UPS Online Tools will help streamline your shipping process and save you time. Your customers will also be able to track their orders anytime via the UPS website. This will reduce emails and phone calls asking, “When will I receive my order?” and improve customer service.
In order to use the UPS shipping tools, you must apply for a UPS account. To register for an account, go to the Shipping Manager in Store Manager and click the Register to Use UPS Online Tools link. This will take you through the registration process.
Using Checkout Manager to Customize the Checkout Pages
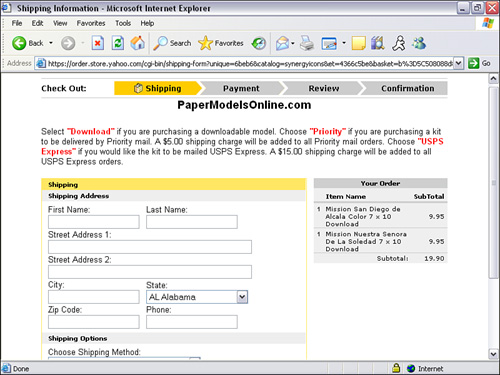
During the checkout process, customers will be taken to a page where they will be asked for their shipping info, billing info, and credit card information. Merchant Solutions provides a default generic order form as seen in Figure 10.3. But what if you would like to carry your brand and “look and feel” throughout the checkout process? You can customize the checkout pages by adding custom HTML to the header, sidebar, and footer. Checkout Manager will also allow you to upload custom CSS (Cascading Style Sheets) files. CSS will allow you to define colors, fonts, layouts, and other aspects of the document presentation. It’s extremely useful when you want to make global changes to certain styles defined by CSS. Customizing the checkout page will allow you to match the site design throughout the ordering process.
Figure 10.3. Merchant Solutions provides a generic checkout page. But, you can customize the checkout pages with your “look and feel” by using the Checkout Manager.
It’s a good idea to customize pages like this where available to give your store front the unique look or “brand” of your company. This re–enforces in the mind of your customer your uniqueness, how you differ from your competition, and a way to remember you when your customers want to buy your products or services in the future.
To access Checkout Manager
- From the Manage My Services Control Panel, click on the Store Manager link.
- In Store Manager, click on the Checkout Manager link under the Order Settings column.
Using Inventory Management
Merchant Solutions has an inventory management system that lets you set stock levels for your products. You can even use different options for different products. For example, you can set separate stock levels for a T–shirt that is available in multiple colors. You might have 35 black T–shirts and only 20 white T–shirts available. You can also set the system to send you an email alert once the inventory reaches a certain inventory threshold. The alert will give you time to restock your inventory.
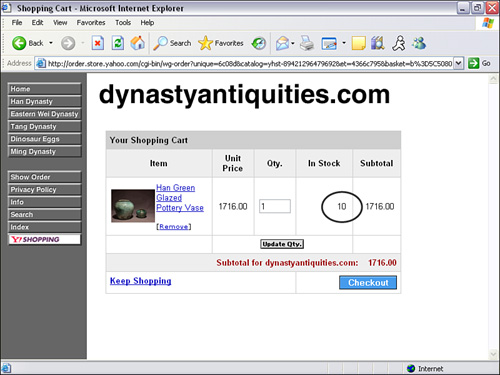
With inventory management, you can also set the shopping cart to display the number of available units when customers add the item to their shopping cart, as shown in Figure 10.4.
Figure 10.4. When inventory management is enabled, you can display the available units of a particular product when the customer adds an item to the shopping cart.
What happens when you run out of stock on a particular product before you are able to restock your inventory? You can set the shopping cart to display a message that the particular product is currently unavailable. Instead of pulling the product from the store, you can just display this message. This will let your customer know that the product is still being offered, but is currently unavailable.
Setting Up Inventory Management
- In Store Manager, click on Configure Inventory under Order Settings.
- There are three inventory option choices: None, Real–time Inventory, and Database Inventory. Real–time Inventory will use an inventory script running on your own server. For this example, we will be using Database Inventory because it can be configured using Merchant Solutions. Once you select Database Inventory and click the Modify Settings button, the page will refresh with additional configuration options.
There are two additional sections when you select Database Inventory: Alerts and Settings.
• Alerts: Send email alerts, set alert thresholds, and set the time and frequency of the alert emails.
• Settings: Allow customer to see the availability or quantity of the product, set default inventory quantity, and set whether quantity can exceed availability. If you select No for the Quantity Can Exceed Availability setting, the following message will be displayed: “None: Requested quantity not available for some items at this time.”
After you have configured all your settings, you will then need to input the inventory level for each of your product.
Setting Inventory Levels
- Click on the Inventory link under Process in Store Manager.
- Click the Edit button. The page will refresh and a Quantity field box will appear for each item.
- Enter the current inventory level for each item as shown in Figure 10.5 and click the Save button.
Figure 10.5. You can enter current inventory levels in the Quantity field box.

Setting Inventory Levels for Product Options
Inventory levels can be set for product options but will require a unique code for each option. For example, if you are selling T–shirts that are available in three different sizes, each size will require its own unique code. Once you assign each option a code, the product option will then be displayed in the inventory listing. If you do not assign a code for each option, you will only be able to set an inventory level for the product, and not the options.
Assigning Unique Codes to Product Options
- From the Store Manager, click on the Catalog Manager link under the Edit column.
- From Catalog Manger, click on the Manage Your Items link. A list of your products will be displayed. You can view up to 100 products at a time.
- Click on the product link you would like to add option codes to.
- Scroll down until you see the Options field. Your options must be defined before you can enter your option codes. Once you have defined your options, click on the Enter Individual Items Code link underneath the Options field box, as seen in Figure 10.6.
Figure 10.6. To enter options codes, click on the Enter Individual Items Code link underneath the Options field box.

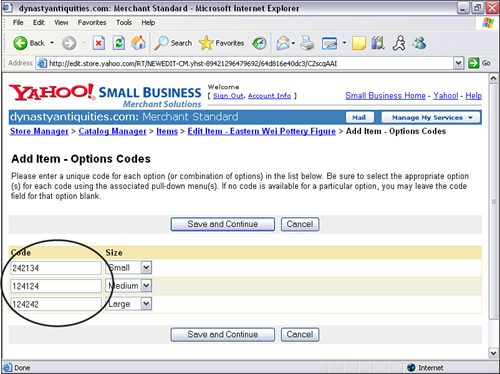
- A page will appear with blank code field boxes next to your specified options, as shown in Figure 10.7. Make sure you select the corresponding option from the drop-down menu. The drop-down menu defaults to the first product option defined in the items page. Once you enter your new options code, click on the Save and Continue button.
Figure 10.7. You can enter current inventory levels in the Quantity field box.
Once you have completed entering the options code, you can then go back to the Inventory page in Catalog Manager and enter the inventory level.
Figure 10.7 Enter product option codes in the blank fields next to each option.
Setting Up Your Merchant Account
In chapter 6, we discussed the need for a merchant account. A merchant account is required to accept all major credit cards including Visa, Master Card, American Express, and Discover. With Merchant Solutions, you can choose to apply for Paymentech (paymentech.com)—Yahoo! Merchant Solutions’s preferred provider—or any other compatible First Data Merchant Services (FDMS) merchant account (fdms.com). Yahoo! store uses FDMS as a payment gateway to process transactions from your store with your merchant account.
Applying for Paymentech
If you do not have a merchant account and would like to use Paymentech, you may apply online.
To apply online
- Go to Pay Methods under Order Settings in the Store Manager.
- Once the Payment Method page appears, click on the Apply for Paymentech link.
- Complete the online application form as shown in Figure 10.8.
Figure 10.8. Paymentech merchant account online application form.
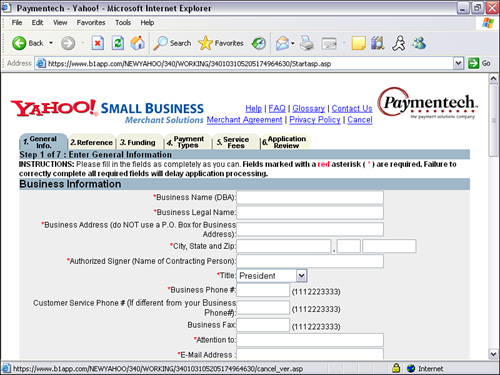
In order to apply for a Paymentech merchant account, you will need the following information.
• Business contact information
• Federal tax ID number (or Social Security # if not incorporated)
• Third–party fulfillment provider contact info (if applicable)
• Current credit card processor contact info (if applicable)
• Business owner and bank reference information
• Funding information (bank routing numbers for your business’s checking account)
• Land line based telephone number for business. A cellular telephone number will not be accepted.
• Application status will be sent via email. A valid/active email address is required to process the application.
Once you complete the online application, it will take approximately five working days to process your application. You may also email Paymentech at [email protected] to check up on your application status.
Using Your Own Merchant Account
If you already have a merchant account or would like to use a merchant account provider other than Paymentech, you will need to request the following information from your merchant account provider.
• Name of merchant bank
• Merchant number
• MID (Merchant identification)
• Terminal identification
The following instructions will show you how to set up your own merchant account with Merchant Solutions.
- From Store Manager, click on the Payment Methods link under the Order Settings column.
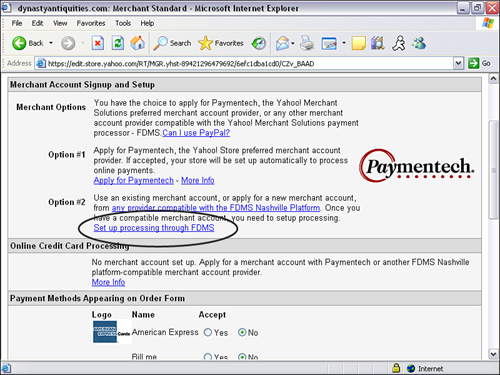
- From the Payment Methods page, click on the Payment Processing and Setup Management link as shown in Figure 10.9.
Figure 10.9. You can add your own Merchant Account via the Set up Processing Through FDMS link on the Payment Methods page.
- Click on the Setup Existing Merchant Account link.
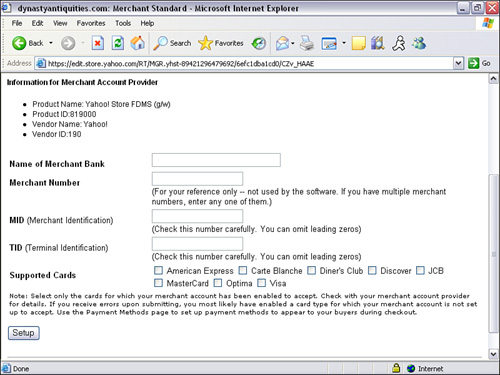
- Fill out the form with the information from your Merchant Account as shown in Figure 10.10, and then click the Setup button.
Figure 10.10. The name of the merchant bank, merchant number, merchant identification, and terminal identification are required to enable your own merchant account with Merchant Solutions.
Payment Methods
So which credit cards will you accept online? Will it be Visa, MasterCard, Discover, JCB, American Express, or another credit card? Will you accept them all or a combination? In order to accept credit cards, you first must have a merchant account. Once you obtain a merchant account, you will need to find out which credit cards the account allows you to accept. If you are using Paymentech, you will be automatically set up to accept Visa, MasterCard, and Diner’s Club payments.
Credit Card Fees
Every time an order is placed, a fee is imposed by the merchant account provider and is paid by the merchant. The fee is a percentage of the total sale, which includes any shipping and handling. As mentioned in chapter 6, the percentage can range between 2% and 3% for Visa, MasterCard, and Discover, and between 3% and 5% for American Express. So if your discount rate for a Visa card is 2%, your Merchant Bank will take 2%—or $2 of that $100 customer purchase—and deposit the remainder in your bank account. The actual percentage will depend on your type of business, average sale, and/or monthly volume.
The following is a list of a few credit card companies and their phone numbers for you to contact regarding their fees.
• American Express/Optima (americanexpress.com): (800) 528-5200
• Diners Club/Carte Blanche (dinersclub.com): (800) 525-7376
• Novus/Discover (discover.com): (800) 347-2000
• JCB (jcbcorporate.com): (800) 366-4522
Tip
Contact your merchant account provider and ask which credit card payment types their system can process. They may also have online applications on their website to apply for other credit card companies.
Accepting Other Types of Credit Cards
For all other credit cards, you will need to contact the credit card company you would like to use and apply for an account. You will then need to contact your merchant account provider once you get approval from that particular credit card. Once that is set up, you can then go into the Payment Methods form to add the new credit cards you would like to accept so that they will appear on the checkout payment form.
Accepting PayPal
What if you don’t want a merchant account or if you don’t meet the requirements for a merchant account and would like to use PayPal (paypal.com) as your payment method instead? Yahoo! Merchant Solutions is also integrated with PayPal Express. Customers to your store can have an option to pay via a PayPal account or use their credit cards to pay through PayPal. With PayPal, there are no monthly fees or setup fees. Using PayPal can be an alternative for hobbyists. It doesn’t require a corporate account or EIN. You can run PayPal off your personal debit, checking, or credit card.
PayPal, an eBay company (ebay.com), has more than 78 million members worldwide and is available in 56 countries and regions. PayPal was started as a secure and inexpensive solution to send money from one individual to another online. Now PayPal offers solutions to accept credit cards, bank transfers, and debit cards on your website and via email.
For more information, please visit store.yahoo.com.
Setting Up Tax Rates
If your product or service requires you to charge sales tax, you may set up tax rate rules in the Tax Rates page under Order Settings in the Store Manager control panel. There are two options for the type of tax rule: percentage or flat fee. Most taxes are percentage based. You may set up tax rules based on country, state, or ZIP code.
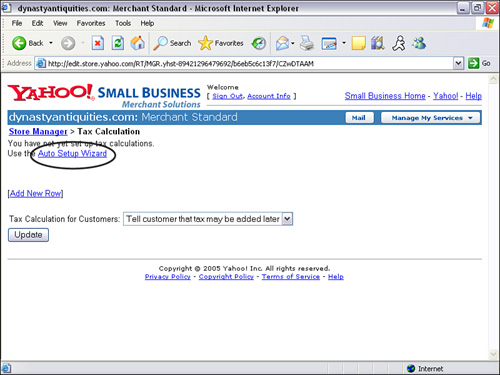
If you are setting up United States tax rules for the first time, you may want to consider using the Auto Setup Wizard. The wizard will allow you to automatically fill in the values for each state’s taxes. This will save you a tremendous amount of time by not having to find out what each state’s sales tax is and enter each rate one–by–one.
To use Auto Setup Wizard to set up tax rates
- Click on the Tax Rates link under Order Settings in Store Manager.
- Click on the Auto Setup Wizard link, as shown in Figure 10.11.
Figure 10.11. Using the Auto Setup Wizard to set up your tax rates will automatically add the rates for each state.
- After you have selected your location, click the Next button.
- In the scroll menu, highlight the states you would like to charge sales tax for and click the Done button. To select multiple states, hold down the Control button on your keyboard and click on each state.
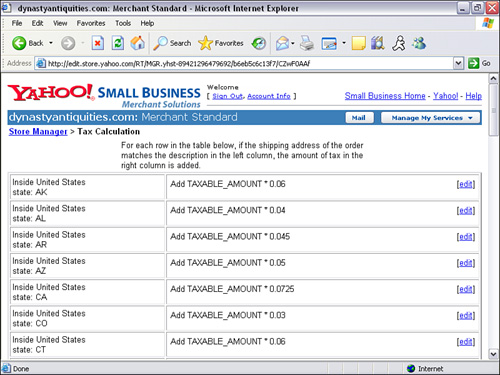
- The Tax Rate page will appear with your new tax rule(s), as shown in Figure 10.12.
Figure 10.12. Rates for each state have automatically been set using the Auto Setup Wizard.
Setting Up Your Email Accounts
Yahoo! Mail Business Edition comes with every Merchant Solutions account. Each account includes up to 100 individual email accounts. Unlike other email programs, each email account has the capability to send and receive large file attachments up to 10 megabytes.
Not only can you set up an email POP account and use your preferred email client such as Outlook, Eudora, or Entourage (on the Mac), but you can also set up a webmail Account to send and receive email via any web browser. POP is an email protocol that allows you to manage, retrieve, and compose messages using your own email client. Being able to access your email via any web browser will come in handy, especially if you are on the road. You can still receive orders, process orders, and stay in touch with your customers via an Internet kiosk or at an internet café
You can add accounts, edit accounts, set up email forwarding, and manage all email accounts via the Email Control Panel.
To add an email account:
- From the Manage My Services control panel, click on the Email Control Panel link.
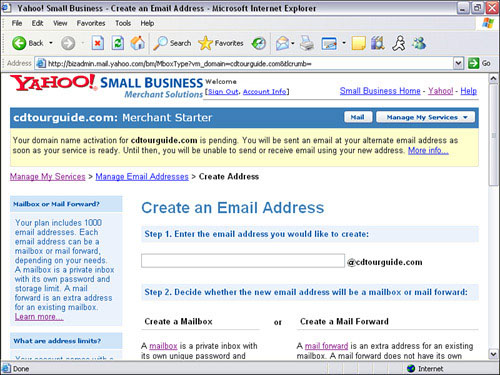
- Click on the Create Address button.
- Enter the email address you would like to create and then click on the Create Mailbox button, as shown in Figure 10.13.
- You will then be given an option to select POP and webmail access or a POP Email Only mailbox. If you would like to be able to send and receive emails via a web browser and your email software program such as Outlook, select the POP and Webmail option. Once you make your selection, click on the Continue button.
- A page will appear asking you if you would like to print the instructions on how to activate the new email account or have the instructions sent to another email address. If you are setting up an email address for another person, you can have the instruction email sent to that person if they have another email account.
Figure 10.13. You can create email accounts via the Email Control Panel.
Email Settings for POP and SMTP Setup
Incoming Mail (POP3) Server: pop.bizmail.yahoo.com
Outgoing Mail (SMTP) Server: smtp.bizmail.yahoo.com
Account Name/Sign-in Name: [email protected]
Email Address: [email protected]
Password: Your Yahoo! ID password
Receiving Orders via Email
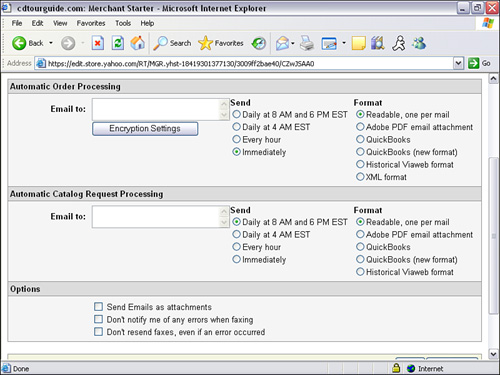
Once your email account is set up, you can receive orders via email automatically every time an order is placed. You can also have Yahoo! send a copy of your email order notifications to multiple email accounts. This comes in handy when you have more than one person involved with processing and fulfilling orders. You can have one email notification sent to the shipping department and another one to the accounting department for processing. Email order notification can be sent immediately or at a certain time, and can be sent in different formats such as plain text, Adobe PDF attachment, QuickBooks, and XML.
To access the order system settings, click on the Order Emails link under Order Settings in Store Manager. From here you can enter the email addresses you want the orders sent to, the time you want it delivered, and the format you want it in, as shown in Figure 10.14.
Figure 10.14. Order system settings control panel.
Publishing Your Order Settings
Once you have configured all your store’s order settings, you will need to publish your changes. Publishing the order settings is different from publishing your website product pages, as described in chapter 9, “Creating Your Yahoo! Store.”. Publishing the order settings will only publish the following tools:
• Checkout Manager
• Risk Tools
• Pay Methods
• Foreign Orders
• Tax Rates
• Inventory Settings
To publish order settings
- In Store Manager, click on the Publish Order Settings link under the Order Settings column.
- When the Order Settings page appears, click on the Publish button.
Now that you’ve configured and published all your Yahoo! store order settings and are ready for business, let’s take a look at basic marketing promotions, including how to generate traffic for free.