
Chapter 1
Using QuickBooks for the First Time
In this chapter:
• What to do ahead of time
• Open QuickBooks
• Create a company file
• Navigate in QuickBooks
The first time you open QuickBooks, the QuickBooks Setup window launches. From here, you can begin the process of either creating a brand-new company file or working with an existing file. The focus of this chapter is on ensuring that you have what you need to set up your new QuickBooks company file and to help you get familiar with basic navigation so that you can begin to work in the program right away.
What to Do Ahead of Time
New clients will often ask me what they can do to prepare for their QuickBooks installation. I give them a “To Do” list telling them what information they need to pull together and the decisions they have to make before their QuickBooks system is installed and launched for the first time.
That list—and the details behind why they’re important—are outlined for you in the next several sections. Later in this chapter, you’ll learn about the options you have when entering key information about your business into your new QuickBooks file.
So now would be a good time to get out that shoebox, binder, or the spreadsheet you’ve been using to keep track of your business so far, because you’ll need to have the following handy:
• Your last tax return for the business
• Your bank register and statements for the year
• Loan statements and terms
• A list of the customers that owe you money and how much they owe as of the date you want to start using QuickBooks
• A list of the suppliers that you owe money to and how much you owe them as of the date you want to start using QuickBooks
• A list of any special equipment, machinery, or computers you own, including their current value and amounts previously depreciated
• A written tally of the money you’ve put into your business
Why should you take the time to gather all this information before you start working in QuickBooks? Because you want the most accurate and complete information you have about your business to make its way into your new QuickBooks file. It’s not that you can’t change things in QuickBooks later on; it’s just that if you start with incorrect or even incomplete data, you sometimes can’t figure out what was wrong to begin with. And if you can’t find the source of a problem, you run the risk of the problem becoming permanent.
Decide on the Start Date
Your start date is the date that you begin tracking your business in QuickBooks. Even though activities may have occurred before this date, it is from this date on that your transactions will be entered into your new file.
Choosing a start date is an important decision, since the date you choose can affect how much work it’s going to be to set up your QuickBooks file. For example, a September 1 start date means that the nine months of activity that happened in your business, from January 1 through September 1, has to be reflected in your QuickBooks system before you start entering September transactions. If it’s March, this task is a lot easier because you’ll be entering transactions only from January to March.
Here’s what to think about as you make your choice.
If your goal is to have your new QuickBooks file reflect every detail of your company as of your start date, then you’ll want to have every individual transaction in the system. This includes every invoice you sent to customers and all the payments you’ve received on them, every check you wrote to vendors, every payroll check you gave an employee, and so on.
If you’re not so ambitious, the second best way to create your new QuickBooks file is to enter summary totals for each of your company’s transaction types up until the day before your QuickBooks start date. Entering monthly summary totals will allow you to run valuable reports (such as the Profit & Loss statement and Balance Sheet) with month-to-month comparisons.
If it’s the first half of the year when you read this, make your start date the first day of the year and then enter everything you’ve done so far this year. It sounds like a lot of work, but it really isn’t. When you start entering transactions in QuickBooks, such as customer invoices, you just pick the customer, enter a little information, and move on to the next invoice. Of course, you have to enter all your customers, but you’d have to do that even if you weren’t entering every transaction for the current year.
If it’s the middle of the year, you can choose either option. If you have a lot of transactions every month, you might want to enter summary totals to get you up to date and then enter real transactions as they occur, beginning with the start date.
If it’s late in the year as you read this, perhaps October or November or later, and you usually send a lot of invoices to customers, write a lot of checks, and do your own payroll, think about waiting until the new year to start using QuickBooks.
More About the Information You’ll Need
It’s a good idea to have all the information you’ll need to complete the setup of your QuickBooks together and in one place rather than trying to locate each piece of information during the setup. So in addition to your last tax return, bank registers, and the lists mentioned in the previous section, check out this section for more details about the numbers and information QuickBooks needs to get started. Step-by-step instructions on how to actually enter your starting balances and transactions into your new company file can be found in Chapter 7.
Cash Balances
You have to tell QuickBooks what the balance is for each bank account you use in your business. The balance being referred to here is the reconciled balance and not simply the balance from your check register. And it should be a reconciled balance as of your QuickBooks starting date.
If you haven’t balanced your checkbooks against the bank statements for a while, now would be a good time to do it. In addition to the reconciled balance and the statement itself, you need to have a list of the dates and the amounts (both deposits in transit and checks) of the transactions that haven’t yet cleared.
Customer Balances
If any customer owes you money as of your start date, you have to tell QuickBooks about it. Enter each unpaid customer invoice, using the real, original dates for each invoice. Those dates must be earlier than your QuickBooks start date. This means you have to assemble all the information about unpaid customer invoices, including such details as how much of each invoice was for services, for items sold, for shipping, and for sales tax. To learn how to set up a customer, refer to Chapter 3. As you enter your open customer balances, QuickBooks will automatically create the accounts receivable balance for you. Refer to Chapter 7 for additional guidance on how to enter these important balances in QuickBooks.
Vendor Balances
The money you owe as of your start date will make up your Accounts Payable. Similar to the way you entered your Accounts Receivable, each unpaid bill should be entered into QuickBooks using its original date. Chapter 4 covers what you need to know about setting up and using vendors.
Asset Balances
Besides your bank accounts, you have to know the balance of the rest of your businesses assets. For example, you’ll need to know the current value of your fixed assets (such as equipment and furniture) and any accumulated depreciation on those assets (you can likely ask your tax preparer for this information). Refer to the section in Chapter 2 titled “The Accounts that QuickBooks Uses” to learn more about how QuickBooks handles the other assets your business may own.
Liability Balances
Get all the information about your company’s liabilities (outside obligations) together. Although the open vendor bills you enter determine your accounts payable balance automatically, you’ll need to know the current balance of any loans or mortgages, for example. If there are unpaid withholding amounts from payroll, they also must be entered. Refer to the section in Chapter 2 titled “The Accounts that QuickBooks Uses” to learn more about how to identify the other liabilities your business may be responsible for.
Payroll Information
If you do the payroll yourself instead of using a payroll service, you’ll need to know everything about each employee: social security number, all the information that goes into determining tax status (federal, state, and local), and which deductions are taken for health or pension. You have all this information, of course; you just have to get it together. If your employees are on salary, you’ve probably been repeating the check information every payday, with no need to look up these items. Dig up the W-4 forms and all your notes about who’s on what deduction plan.
You also need to know which payroll items you have to track: salary, wages, federal deductions, state deductions (tax, SUI, SDI), local income tax deductions, benefits, pension, and any other deductions (garnishments, for example). And that’s not all—you also have to know the name of the vendor to whom these withholding amounts are remitted (government tax agencies, insurance companies, and so on). Running payroll in QuickBooks is covered in Chapter 20.
Inventory Information
You need to decide on the names you want to assign to every inventory item you carry, and, most importantly, how much you paid for each item and how many of each you have in stock as of the start date. QuickBooks needs these last two key pieces of information in order to keep an accurate inventory valuation for you. It is also a good time to be thinking about any other information you want to track for each of the items you carry in inventory. For example, what description do you want your customers to see on their invoices? Do you have a preferred vendor that you purchase an item from? Learn more about setting up your inventory in Chapter 15.
You’re now ready to set up and configure your QuickBooks company file! Let’s get started.
Install and Launch the Software
Whether you’re installing QuickBooks from a CD or using a download link from Intuit, the installation process is quite straightforward. Simply follow the installation wizard to where you’ll read and accept the Software License Agreement, select where on your computer you want to install the program, and tell the wizard whether you’ll be installing the program for multiple users (who will need access to the company file across a network). Refer to Appendix A to learn more about installing QuickBooks on your computer and in a networked environment as well.
Once the installation of the program is complete, QuickBooks places a shortcut to the software on your desktop, and that’s the easiest way to open the program. If you have other windows covering the desktop, you can use the Start menu, where you’ll find QuickBooks in the Programs menu. Place your pointer on the QuickBooks listing in the Programs menu and choose QuickBooks from the submenu (choose Programs | QuickBooks).
ProAdvisor Tip: For even faster access to QuickBooks, copy or move the desktop shortcut to your Quick Launch toolbar (Windows XP and Vista), which requires only a single click to open software. Right-drag the shortcut icon onto the Quick Launch toolbar, and then choose Move Here (or Copy Here, if you want a shortcut in both places). If you’re a Windows 7 or 8 user, you can pin QuickBooks to the Start menu (right-click the icon and select Pin To Start Menu).
When QuickBooks launches for the first time, the QuickBooks Setup window opens and provides links to help you get started with creating a new company file, updating an existing file, and other useful information. On subsequent launches, the Login page for the last file that you were working in opens. If you choose not to work in this particular file (maybe you want to work in another file or want to check out the sample company files), click the Cancel button on the QuickBooks Login screen. The No Company Open window opens, giving you the following options:
• Create A New Company Select this option to begin the process of creating a company file. All of the steps involved in this task are covered in the next section.
• Open Or Restore An Existing Company Select this option if you’re upgrading from a previous version of QuickBooks. Go through the windows in the Open Or Restore Company wizard to select your company file. QuickBooks offers to upgrade the file to your new version. Place a check mark in the I Understand That My Company File Will Be Updated To This New Version Of QuickBooks box to accept the offer. QuickBooks then requires that you make a backup of your file in its current version. When the backup is complete, you’ll see a message reminding you that the file is being converted to a newer version—in this case, QuickBooks Pro 2014. Click OK and you can now begin working in your updated file.
Caution: If you’re working in a network environment and you installed QuickBooks Pro 2014 as an upgrade to a previous version, upgrade QuickBooks on the computer that holds the company data file first. Then upgrade QuickBooks on the other computers.
• Open A Sample File Click this option to display a list of sample companies you can explore and play with to get familiar with QuickBooks. One company is designed for product-based businesses, the other for service-based businesses.
ProAdvisor Tip: Many QuickBooks users (especially accountants) maintain more than one QuickBooks company file. As you open and work in different files, they will automatically be listed and available for selection in the No Company File Open window. If you find that you no longer want or need a file to be listed here, use the Edit List link to hide a particular file. This action does not remove the file from your computer or network, it only hides it from the list of company files visible from this particular window. If you work in that file again on a future date, it will reappear on the list again for easy access.
Create Your Company File
For now, choose Create A New Company, because that’s what this chapter is all about. The QuickBooks Setup window opens, giving you various options to help you begin the process of creating your company file (see Figure 1-1):
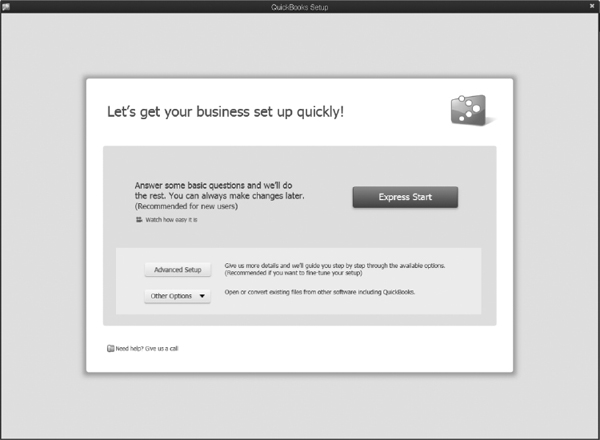
FIGURE 1-1 |
The QuickBooks Setup window gives you more than one option for creating a company file. |
• Express Start, where you need only enter some very basic information about your business.
• Advanced Setup, a wizard that moves you through several screens, answering questions and providing information to fine-tune your setup.
• Other Options, which allows you to create a new file from an existing Quicken file or from Microsoft Office Accounting and Small Business Accounting, or Peachtree Accounting. Select the Convert Other Accounting Software Data option and follow the onscreen directions to launch the QuickBooks Conversion Tool.
ProAdvisor Tip: The Accountant and Professional Bookkeeper versions of QuickBooks offer the option of creating a new QuickBooks file based on an existing one. When this option is selected, QuickBooks creates a new company file using the existing company’s Chart of Accounts, Items, Preferences, and Sales Tax Items.
Using Express Start
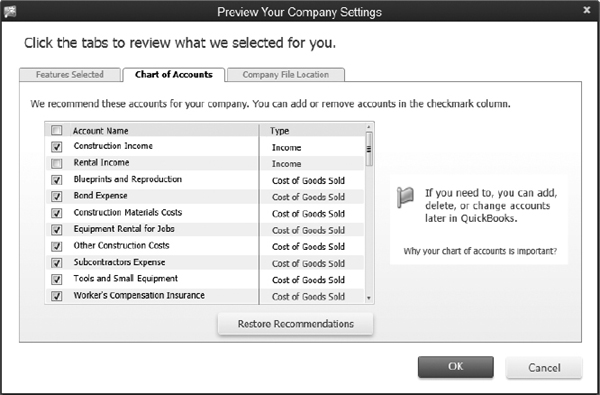
Express Start is a two-screen wizard designed to get your company file created—albeit with only basic information—in just two steps. In the first window, you’ll be required to enter your company name, the industry you’re in, and the company type. Your choice here also indicates the type of tax return you’ll likely be filing. In the second window, you’ll be required to enter your ZIP code and phone number—with the option to enter the rest of your company’s contact information. From there, you go straight to having QuickBooks create your company file. The Preview Your Company Settings window lets you preview the features that will be enabled and the accounts that QuickBooks recommends for you, based on the industry and company type you selected.
It’s a good idea to take a look at these settings. You can add or remove the accounts listed on the Chart Of Accounts tab and confirm the location where your new company file will be saved:
Using Advanced Setup
To select this setup path, click Advanced Setup on the QuickBooks Setup window. The Easy Step Interview wizard is launched, providing you with a step-by-step approach to creating your company file. You’ll click Next to move through the windows.
Entering Company Information
To begin, QuickBooks needs basic information about your company (see Figure 1-2). Notice that the information about your company name has two entry fields. The first field is for the real company name, the one you do business as. The second field, for your company’s legal name, is optional and is used only if the legal name of your company differs from the company name you use for doing business. For instance, your company may do business as Win Contracting, but your legal or corporate name might be Winchester Contracting, Inc.
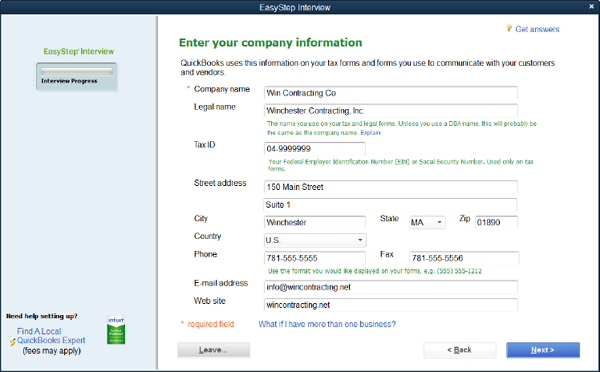
FIGURE 1-2 |
Start by entering basic information about your business. |
Enter the company tax ID number. If you have a federal employer ID number (EIN), it’s a nine-digit number in the format XX-YYYYYYY. You’ll need a tax ID number if you have employees. If you don’t have an EIN, enter your social security number.
If you are a sole proprietor using your social security number for business purposes, consider applying for a federal ID number. This can help you separate your business and personal finances by using the EIN for business transactions and maintaining a separate bank account in your business name. As your business grows and you hire subcontractors, consultants, or employees, you’ll eventually need an EIN to pay these folks.
Enter the contact information (address, telephone, and so on). This data is used on the transactions you print (such as invoices), so enter this data as you want it to appear on printed documents. Click Next when you’ve filled in your company data.
Selecting the Type of Business
In the next window, select the industry that matches the type of business you have (see Figure 1-3). If you don’t see an exact match for your business type, choose one that comes close. Alternatively, you can simply select either of the General Product/Service-based Business options that are located at the very bottom of the industry list.
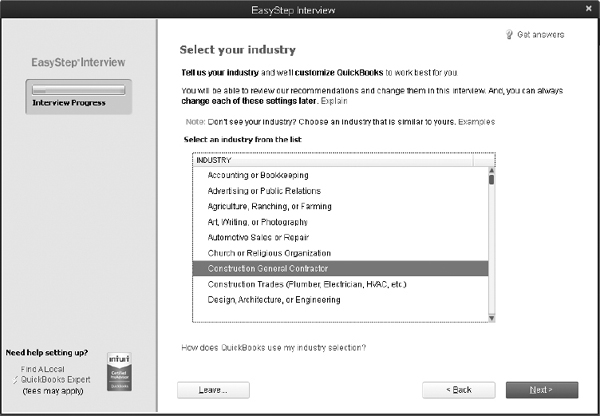
FIGURE 1-3 |
Find the type of business that matches yours. |
Selecting Your Legal Entity Type
The next window displays the various types of legal entities for businesses, such as proprietorship, partnership, corporation, and so on. Select the one that matches the way your business is organized.
If you’re not sure, ask your accountant, or find a copy of the business income tax you filed last year (unless this is your first year in business) and match the form number to the list in the window. If you can’t find the information, select Other/None. You can change it later via the My Company window, which can be accessed from the Company menu. QuickBooks uses this information to attach tax-line information to all your accounts that affect your taxes. If you use an Intuit tax preparation program, this information can then be used to prepare a tax return for your business.
Configuring Your Fiscal Year
In the next window, enter the first month of your fiscal year. QuickBooks enters January as the default entry, but if you’re not using a calendar year, select the appropriate month from the drop-down list. The month you choose here will automatically set the default year-to-date ranges for many QuickBooks reports, including the Profit and Loss report.
Setting Up the Administrator
The next window asks you for an administrator password. It’s a good idea to create a password to limit access to your company file and to prevent unauthorized access to your business’s financial information, especially if you plan on storing customer credit card information. PCI DSS (Payment Card Industry Data Security Standard) compliance standards also require a complex password if you are storing customer credit card information in QuickBooks.
If multiple users will need to work in the file simultaneously (on a network), user names are required (and each should have a password). However, you can wait until after you’ve finished the EasyStep Interview and implement the feature later, when you can concentrate on the task and make notes about the passwords.
Creating user logins and passwords that let you place restrictions on what users can do and see in QuickBooks is covered in Chapter 8.
Creating Your Company File
The next window explains that you’re about to save your company file. Click Next to see the Filename For New Company dialog, which is ready to save the file using a filename based on the company name you’ve entered. Just click Save to use that filename. Or, if you prefer, you can change the name of the file. It takes a few seconds for QuickBooks to save the company file and set up all the files for the company. By default, QuickBooks saves your company file in a subfolder under the Documents subfolder.
Consider creating a folder on your hard drive for your QuickBooks data (for instance, C:QBDataFiles). This makes it easier to find and back up your data.
ProAdvisor Tip: If you run QuickBooks on a network, or another user works in QuickBooks on your computer, make sure the folder you create for your data has permissions set properly. Specifically, the Everyone group must be given Full Control. To learn more about setting up QuickBooks in a multi-user environment, refer to Appendix A.
Customizing QuickBooks for Your Business
The remaining EasyStep Interview windows provide a series of choices and options about the way you do business. For example, you’re asked what you sell (services, products, or both), whether you charge sales tax, whether you use estimates, and so on. The questions are clearly stated and easy to answer and you won’t necessarily have to perform any setup tasks right away if you answer Yes; for example, if you answer Yes when you’re asked if you have employees, you don’t have to create employee information immediately—you can do all of that later.
Essentially, the wizard is setting configuration options for you, but you can set any of those options for yourself at any time in the future. Information about the options you need to perform certain tasks is found throughout this book, in the appropriate chapters.
Selecting a Start Date and Creating the Chart of Accounts
Before you begin the process of creating your chart of accounts, you’ll be asked to choose a QuickBooks start date. And before filling in your answer, be sure to read the section “Decide on a Start Date” earlier in this chapter. Click Next after you’ve completed this page to review the Income and Expense accounts that QuickBooks suggests you use.
The wizard displays the income and expense accounts it has established for your company, based on the responses you made to the interview question regarding your type of business (see Figure 1-4).
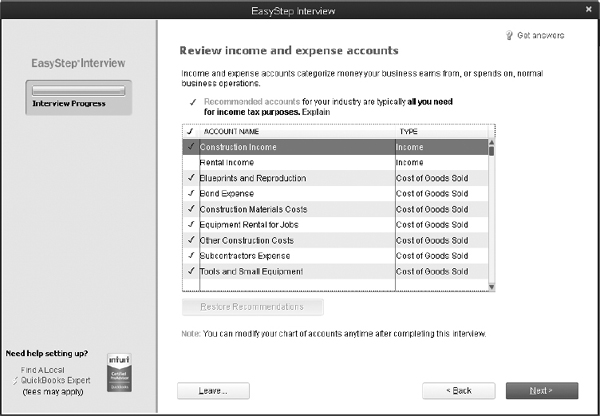
FIGURE 1-4 |
You can select or deselect accounts now, or wait until you begin using QuickBooks. |
You can select or deselect specific accounts if you know you need or don’t need any of the accounts listed. However, it may be easier to go through that process later. You’ll likely need additional accounts in your chart of accounts, but it’s easier to add them after you’ve finished this company setup task. Learn more about setting up your chart of accounts in Chapter 2.
Click Next and you’re finished with the basics of creating your QuickBooks company file. You can now continue the work of building out your file by clicking the Go To Setup button and launching the QuickBooks Setup window.
The QuickBooks Setup Wizard
The QuickBooks Setup wizard (which launches after either an Advanced or Express Setup) gives you three import options designed to help simplify the task of getting information into your new company file, as shown in the following illustration:
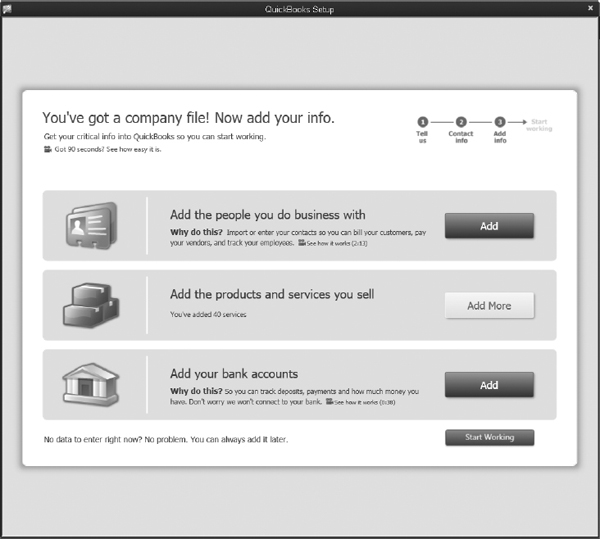
Click the Add or Add More button next to the list type that you want to enter. QuickBooks will tell you about where you can import your data from and any fixes that need to be made to the information prior to importing it.
If you prefer to start exploring your file now and work on your lists at a later time, click the Start Working button at the bottom of the window. This will bring you to the Quick Start Center. If you’re ready to start working in your new file, close this window to go to the standard QuickBooks Home page. If you’re still not ready to dive into the program on your own, you can instead work in the Quick Start Center, which offers a simplified view of the regular QuickBooks Home page. It is also where you can access training videos and other resources that will help prepare you for the important tasks you’ll be completing in your QuickBooks file.
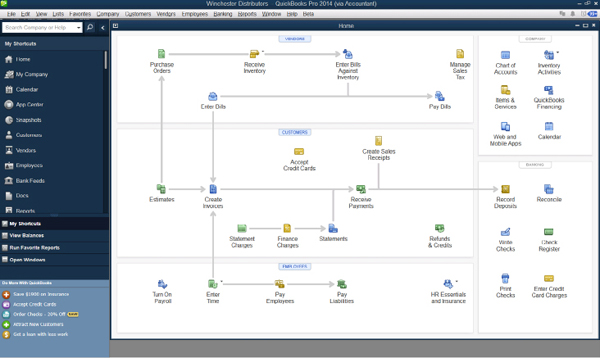
Navigate in QuickBooks
With your new file created, let’s take a look at how to get around in the software.
The Home page window shows the following elements:
• Title Bar, located at the very top of the QuickBooks window, displays the name of your QuickBooks company file.
• Menu Bar, which gives you access to all areas in QuickBooks.
• Icon Bar, which contains buttons for quick access to frequently used functions. Learn how to change the location and functions on the Icon Bar in the section “Customize the Icon Bar,” later in this chapter.
Home Page
The heart of the Home page has links and icons you can use to access the features and functions you need to run your business in QuickBooks. In addition, it’s divided into sections to make it easy to find icons and see the workflow those icons represent. Take a moment to review the Home page and identify the Vendor, Customer, Employees, Company, and Banking areas on it.
The Home page is dynamic; that is, the icons and workflow arrows it contains change as you enable the various features available in QuickBooks. For example, if you enable inventory tracking, QuickBooks adds icons in the Vendors section for inventory-related tasks, as shown next:
QuickBooks Centers
QuickBooks centers are windows in which information is displayed about specific areas of your company. Most centers have a dedicated button on the Icon Bar or directly in the middle of the Home page, while others are accessible from the menu bar. You can see current data, analyze that data, and perform tasks. QuickBooks centers include the following:
• Customer Center
• Vendor Center
• Employee Center
• Report Center
• Bank Feeds Center
• Doc Center
• App Center
• Lead Center
Customer Center
To open the Customer Center, select Customer Center from the Customers menu at the top of the QuickBooks window. This Center holds everything you’d ever need to know about your customers. It’s where QuickBooks stores your list of customers and all the information about each customer. You can also perform routine customer-related tasks using the buttons at the top of the Customer Center window. Information about using and customizing the Customer Center is in Chapter 3.
Vendor Center
Like the Customer Center, the Vendor Center makes it easy to view detailed information about your vendors and to enter transactions into QuickBooks related to them. Select Vendor Center from the Vendors menu on the menu bar to open this center. Learn how to use and customize the Vendor Center in Chapter 4.
Employee Center
Whether you process your own payroll or use a QuickBooks payroll service, the Employee Center is where you can find detailed information about each employee, your payroll liabilities, and the payroll transactions for each employee. It is accessed from the Employees menu. Refer to Chapter 20 to learn more about the ways you can process payroll in QuickBooks.
Report Center
The Report Center, seen in Figure 1-5, can be opened directly from the Icon Bar. There are three views in the Report Center: the Carousel view, the List view, and the Grid view. For each view, the major category of reports is displayed in the left pane. The first time you open the Report Center, you’ll open to the Grid view, which allows you to scroll through a visual display of the reports available for each category. The Grid view shows a sample of the actual reports available in each category in a single window and makes it easy to add a report to your Favorites reports list—just click the red heart under the sample report you want to use.
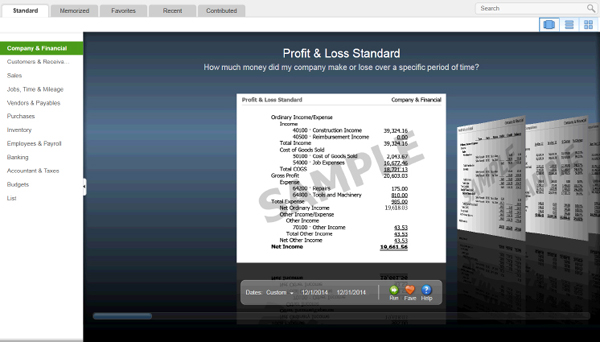
FIGURE 1-5 |
The Report Center makes it easy to choose the right report. |
To change the way you view a category, use the view icons located in the top-right corner of the Report Center window. You can also use the Report Center to access memorized reports as well as a collection of popular reports that other QuickBooks users find useful.
Bank Feeds Center
From the Icon Bar, you can also launch the Bank Feeds Center, where you can go to download and enter transactions directly from your credit card and bank accounts into QuickBooks. This QuickBooks feature is designed to save you from having to enter this information manually into your QuickBooks file. Not every QuickBooks user takes advantage of online banking—but they should.
Doc Center
The Doc Center holds documents and files on your computer that you can then “attach” to or associate with a specific transaction or record in QuickBooks. For example, a purchase order a customer sends to you via e-mail or snail mail can be saved or scanned into the Doc Center. Later, with the customer’s invoice open, click the attach (paper clip) icon at the top of the Create Invoices window and browse to the document that you’ve saved on your computer through the Doc Center. A copy of the PO will then be easily retrievable right from their invoice. To open the Doc Center, click the Docs button on the Icon Bar.
Lead Center
Unlike the other centers, the Lead Center doesn’t have a button of its own on the Icon Bar (although you can add it if you wish by customizing the Icon Bar, as explained in the next section). You access the Lead Center from the Customers menu. You can choose to enter your leads manually, one by one, or by copying and pasting multiple leads from Excel into a preformatted grid and import them all at once. Regardless of the method you choose, you’ll be able to keep track of key contact and sales lead information as well as maintain detailed notes on your progress with each prospect. Tracking your prospects in QuickBooks gives you the advantage of working in one program and makes it easy to turn a lead into a customer once the sale is closed.
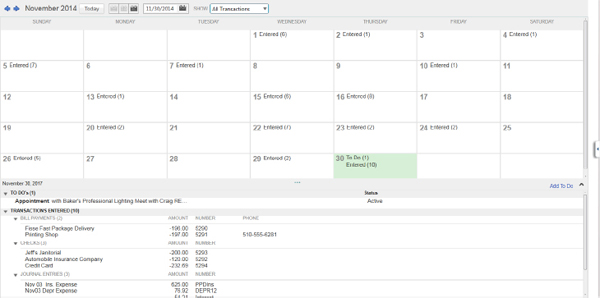
Calendar
While not a “center” per se, the QuickBooks Calendar can give you a unique view of all the important transactions and reminders you need to keep track of to keep your business running smoothly. Click the Calendar button on the Icon Bar to open your calendar for the first time. If you haven’t yet entered any transactions into your QuickBooks file, your calendar will be empty. Check back in, however, once you’ve entered some bills or invoices: your calendar will show you the dates that these bills or invoices were created and are due along with any To Do items that you’ve added, as shown here:
Customize the Icon Bar
To customize the Icon Bar, choose View from the menu. You’ll see options that let you move the default location of the Icon Bar from the left-hand side of the window to the top of the window, or you can hide it altogether.
QuickBooks put icons on the Icon Bar, but the icons QuickBooks chose may not match the features you use most frequently. Choose View | Customize Icon Bar to display a list of the icons currently occupying your Icon Bar, as shown next. From here, you can add, remove, or reorder the icons to suit you.

ProAdvisor Tip: When you log into QuickBooks with your own login name, the Icon Bar settings you establish are linked to your login name only. You are not changing the Icon Bar for other users.
Changing the Order of Icons
You can change the order in which icons appear on the Icon Bar. To move an icon, click the small diamond to the left of the icon’s listing, hold down the left mouse button, and drag the listing to a new position.
Changing the Icon Bar Display
You can change the way the icons display in many ways. These are covered in this section.
Display Icons Without Title Text
By default, icons and text display on the Icon Bar when it’s positioned at the top of the window. You can select Show Icons Only to remove the title text under the icons. As a result, the icons are much smaller (and you can fit more icons on the Icon Bar). Positioning your mouse pointer over a small icon displays the icon’s description as a Tool Tip.
Change the Icon’s Graphic, Text, or Description
To change an individual icon’s appearance, select the icon’s listing and click Edit. Then choose a different graphic (the currently selected graphic is enclosed in a box), change the Label (the title), or change the Description (the Tool Tip text).
Separate Icons
You can insert a separator between two icons, which is an effective way to create groups of icons (after you move icons into logical groups). The separator is a black vertical line. In the Customize Icon Bar dialog, select the icon that should appear to the left of the separator bar and click Add Separator. QuickBooks inserts the separator on the Icon Bar and “(space)” in the listing to indicate the location of the separator.
Removing an Icon
You can remove any icons you never use or use infrequently so that you can use the space they take up for icons representing features you use a lot. Select the unwanted icon in the Customize Icon Bar dialog and click Delete. QuickBooks does not ask you to confirm the deletion; the icon is just removed from the Icon Bar. The icon is not gone for good, though. You can add it back at any time by using the Customize Icon Bar feature.
Adding an Icon
You can add an icon to the Icon Bar in either of two ways:
• Choose Add in the Customize Icon Bar dialog.
• Automatically add an icon for a window (transaction or report) you’re currently using.
Using the Customize Icon Bar Dialog to Add an Icon
To add an icon from the Customize Icon Bar dialog, click Add to display the Add Icon Bar Item dialog:
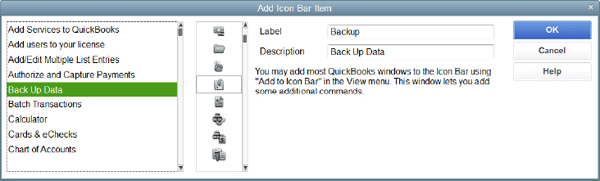
Scroll through the list to select the task you want to add to the Icon Bar. Then choose a graphic to represent the new icon. If you wish, you can change the label and/or the description (the text that appears in the Tool Tip when you hold your mouse pointer over the icon). Click OK to close this dialog when you’re done.
Adding an Icon for the Current Window
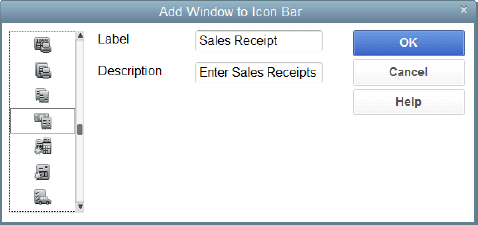
If you’re currently working in a QuickBooks window and it strikes you that it would be handy to have an icon for fast access to this window, while the window is active, choose View | Add Name Of Window To Icon Bar. A dialog appears so you can choose a graphic, name, and description for the new icon:
The Favorites Menu
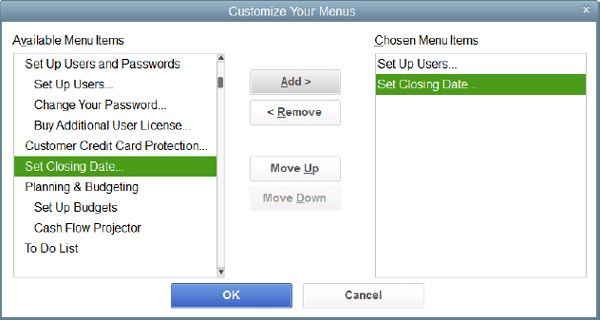
The Favorites menu (located on the menu bar) gives you the flexibility to list up to 30 of the QuickBooks tasks and lists that you use most often, saving you from having to navigate to other areas of the program to complete your most common QuickBooks tasks. To add menu items to your Favorites menu, select Favorites | Customize Favorites from the menu bar. The Customize Your Menus window opens, as shown next. Select a menu item, and then click the Add button to add it to your Favorites menu. Click OK when finished.
Closing QuickBooks
To exit QuickBooks, click the X in the top-right corner of the QuickBooks window or choose File | Exit from the menu bar. QuickBooks will ask you if you’re sure you want to exit. If you choose Yes, the company file open at the time you exit the software is the file that opens the next time you launch QuickBooks.
..................Content has been hidden....................
You can't read the all page of ebook, please click here login for view all page.