
Chapter 3
Your Customers
In this chapter:
• Build your Customers list
• The Customer Center
• Create and track customer jobs
• Edit, delete, and merge customers and jobs
• Create custom fields for customers
• Set up security for customer credit card information
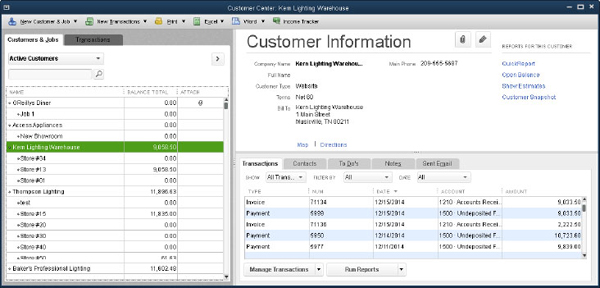
When you create a customer in QuickBooks, you not only have the ability to store basic information such as address, phone number, and e-mail, but you can also track and manage nearly everything and anything you need to know about that customer—and all your other customers—in the Customer Center, shown here:
You’ll learn more about how to navigate and work in the Customer Center later in this chapter, but first things first. You have to get your customer information into your QuickBooks company file—and there’s more than one way to do that. You can create new customers “on the fly” the first time you invoice them, import all your existing customers from a spreadsheet, or enter them manually, one by one. Regardless of the method, your goal should be to enter the most complete and consistent information you can, since this valuable data can then be used for marketing, customer service, and other activities critical to maintaining a great relationship with your customers.
Build Your Customers List
Here are the ways you can add your customers to QuickBooks: You can choose to add them one-by-one (the details for using that method are covered in this section); you can use the Add/Edit Multiple List Entries window (covered in this chapter in the section “Adding Multiple Customer Records”); or, if you’ve been storing this information in an Excel sheet or a comma-separated (.csv) file, you may want to consider using a special QuickBooks utility designed to import this information. This import utility contains a step-by-step wizard that can be accessed by choosing File | Utilities | Import | Excel Files. You can also use this utility to import your vendors, inventory items, and your chart of accounts.
To create a new customer manually, first open the Customer Center by clicking the Customers button located either on the Icon Bar or on the Home page. Next, click the New Customer & Job drop-down arrow at the top of the Customer Center window (navigating the Customer Center is covered in detail later in this chapter) and select New Customer from the submenu. This action opens the New Customer window (see Figure 3-1). Fill in the appropriate information using the guidelines in the following sections.
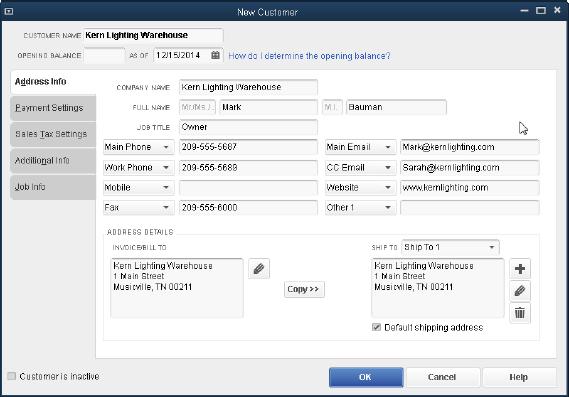
FIGURE 3-1 |
The customer record holds quite a lot of information. |
Address Info
The New Customer window opens with the Address Info tab in the foreground. The first field in which you’ll enter information is the Customer Name field. Consider this field an internal code rather than a customer name. The text you enter here doesn’t appear on printed invoices or other sales transactions; instead, what you enter in the Company Name field will appear.
Customer Name
You should create a system for how you complete the Customer Name field so that you’ll enter every customer in the same way and avoid the risk of entering the same customer multiple times. For example, if your customer is a business, you can simply enter the name of the business, as shown in Figure 3-1. If your customer is an individual, it’s a good practice to enter their last name first in the Customer Name field.
Each customer must have a unique entry in this field, so if you have a lot of customers named Johnson, for example, you may want to enter them in a way that makes it easy to determine which Johnson this listing represents. For instance, you could have customer names such as JohnsonJack, JohnsonMary, JohnsonRestaurant, and so on. If you have several Jack Johnson customers, you can use JohnsonJackMainSt for the Jack Johnson on Main Street. This field can contain up to 41 characters, so you should be able to create a naming system that works well for you.
Currency
If you’ve enabled the Multiple Currencies feature, the Currency field appears so you can select the currency for this customer. (Refer to Appendix B if you plan on using the Multiple Currencies feature.)
Opening Balance
QuickBooks makes an Opening Balance field available, along with the date for which this balance applies (by default, the current date is inserted). The field is designed to hold the amount this customer currently owes if an open balance exists for the customer. See “ProAdvisor Recommends: Customer Opening Balance.”
Customer Address Info
In the Company and Address Details sections of the window, enter the company name, a contact name (optional), and the billing address. Add any other contact information you want to track for this customer (telephone, e-mail, and so on). Be sure to enter an e-mail address if you want to be able to e-mail this customer invoices or statements in the future.
Customer Opening Balance
It’s best not to use the Opening Balance field, because if you enter an amount that includes the balance from more than one outstanding invoice, you’ll have no detailed records on how this balance was arrived at, which will then make it difficult to match payments against specific invoices. What’s more, QuickBooks posts the amount you enter in this field to Accounts Receivable and makes an offsetting entry into an account named Opening Balance Equity. Eventually, you or your accountant will need to zero-out the balance in Opening Balance Equity, and sometimes that’s a difficult job because it’s hard to tell how the balance was arrived at: Is this an opening balance you entered from past years? Is it from the current year? Is it a combination of both? Entering transactions that represent the way the customer’s current status was reached is far more accurate than using the Opening Balance field. That’s why it’s better to skip this field and then enter an invoice or multiple invoices to post this customer’s balance to your books.
Ship To Addresses
You can maintain multiple shipping addresses for your customers. Give a name of your own choosing to each Ship To address so you can select it from a drop-down list when you’re entering sales transactions. If the shipping address isn’t different from the billing address (or if you have a service business and never ship products), you can ignore the shipping address field, or click the Copy button to copy the data from the Bill To field.
To create a shipping address, click the plus sign button next to the Ship To address block to open the Add Shipping Address Information dialog:
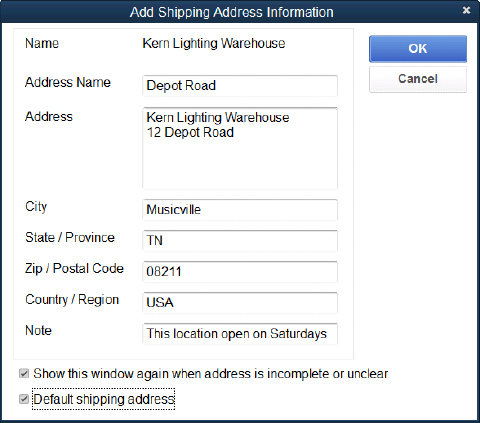
QuickBooks automatically enters the address name Ship To 1. Feel free to replace that text with a name that reminds you of the address location (such as Boston or Main Street) to make it easier to select this address from a drop-down list when you have to ship goods to this customer.
Enter the address information and specify whether this address should be the default Ship To address, and then click OK. If needed, enter another Ship To address for this customer; it will have a default name of Ship To 2.
Payment Settings
The Payment Settings tab (see Figure 3-2) puts all the important information about customer finances in one place.
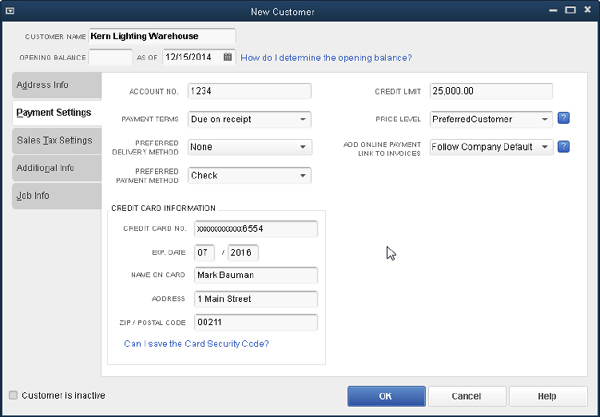
FIGURE 3-2 |
Use the Payment Settings tab to track details needed for this customer’s transactions. |
Account No.
This is an optional field you can use if you assign account numbers to your customers.
Credit Limit
A credit limit is a way to set a threshold for the amount of money you’ll extend to a customer to make “on account” purchases. If a customer places an order and the new order combined with any unpaid invoices exceeds this threshold, QuickBooks displays a warning. QuickBooks won’t prevent you from continuing to sell to and invoice the customer, but you should consider rejecting the order (or shipping it COD).
Caution: Leaving the Credit Limit field blank is not the same as entering a zero. If you want a data entry/sales person not to sell to this customer, enter a zero in this field.
Payment Terms
Click the arrow to the right of the Payment Terms field to see the list of terms that QuickBooks has already defined, or choose <Add New> to define a new one.
The terms in the Payment Terms List are for both customers and vendors, and you may need additional terms to meet your customers’ and vendors’ needs. See Chapter 6 to learn how to create different types of terms.
Price Level
Price levels are a way for you to customize your prices on a customer level—usually to offer special discounts when that customer makes a purchase. Select an existing price level or create a new one. See Chapter 6 to learn about creating and assigning price levels.
Add Online Payment Link To Invoices
Use this option to learn more about or to sign up for the Intuit Payment Network. With this service, you can allow your customers to pay their invoices online, via a link, when they receive their invoice via e-mail. You can choose to accept credit card, bank payments, or both (additional fees may apply).
Preferred Delivery Method
This field stores the default value for the way you want to send invoices, statements, or estimates to this customer (it does not refer to the method you use to send products to the customer). The choices are the following:
• E-mail You e-mail the documents. This feature lets you attach the documents as PDF files to an e-mail message. You can e-mail using Outlook or your web-based e-mail (such as Yahoo! or Gmail, for example). Chapter 14 has the details.
• Mail You use a QuickBooks service to mail the invoices. The data is reproduced on a form that has a tear-off portion your customers enclose with their payment.
• None No special features are used to send the documents. You print them and you mail them.
Regardless of the method you choose as your default, you can use any send method when you’re creating a transaction. Chapter 14 has more information on setting and using these methods.
Preferred Payment Method
This indicates the customer’s preferred method for payments—a list of payment methods is offered in the drop-down list. You can select the appropriate item from the list or add a new one by selecting <Add New> from the drop-down list. See Chapter 6 for more information on this list.
ProAdvisor Tip: The payment method you select automatically appears on the Receive Payments window when you are using this customer in the transaction. You can change the payment method at that time, if necessary.
Credit Card Information
These fields are intended to capture this customer’s credit card information, if that’s the customer’s preferred payment method. If you decide to store this information, be sure to enable QuickBooks Customer Credit Card Protection. For more information on how to turn on this feature, as well as to learn more about important credit card security issues and best practices, see the section “Secure Customer Credit Card Information” later in this chapter.
Sales Tax Settings
If you’ve configured QuickBooks to collect sales tax, there are a few fields on this tab you should complete. If the customer is liable for sales tax, select the appropriate sales tax code and item for this customer. You can also create a new sales tax item or code here if you need to. If the customer does not pay sales tax, select Non (from the Tax Code drop-down list), and in the Resale No. field, enter the resale number provided by the customer. See Chapter 5 for a complete discussion of sales tax codes and sales tax items.
Additional Info
The information you enter in the Additional Info tab (see Figure 3-3) gives you the opportunity to capture more detailed information about your customers. On this tab, you can use the available fields or create custom fields of your own. You’ll then be able to use this extra info to analyze things like buying patterns or how well your sales staff is doing. You’ll also be able to design reports based on the data captured in these fields.
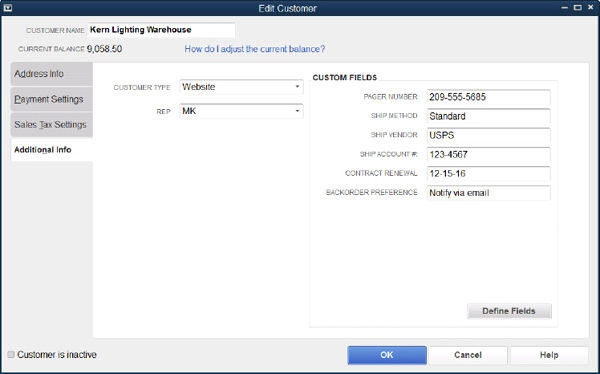
FIGURE 3-3 |
Entering additional information makes your work in QuickBooks go faster. |
Customer Type
Use the Customer Type field to sort your customers by a type you find important. For example, you may want to use customer types to distinguish between wholesale and retail customers, or to track the source of referrals. QuickBooks maintains this information in the Customer Type list (covered in more detail in Chapter 6).
To use the field, click the arrow to select a type that you already entered, or create a new type.
Rep
This field is the place to track a sales representative, and it’s useful whether you pay commissions or you just want to know who is in charge of a particular customer. Sales reps can be employees, vendors, or “other names” (which means the name is entered in the Other Names list). Select a rep from the list of reps or add a new rep by choosing <Add New> from the drop-down list. Chapter 6 has more information on how this information is used in QuickBooks.
Custom Fields
Custom fields provide an opportunity for you to create fields for tracking special information about your customers (such as contract renewal date, for example). Later, you can sort and arrange your QuickBooks lists and reports using the data from these fields. See the section “Use Custom Fields” later in this chapter.
Job Info Tab
Use the fields on this tab to help you keep track of the status of your work with a customer and to assign a job description and job type. In addition, assigning start and projected end dates will allow you to produce reports that give you feedback on your performance. More information about how this information is used, as well as how to create jobs that are attached to a customer, can be found in the “Use Jobs” section later in this chapter.
When you have finished filling out the fields, click OK.
Adding Multiple Customer Records
If you want to add multiple customers at once (or make changes to the information for existing customer records), you can use the Add/Edit Multiple List Entries window. To access this time-saving feature, open the Customer Center (by clicking the Customers button located on the Icon Bar), select the New Customer & Job drop-down arrow at the top of the Customer Center window, and then select Add Multiple Customer:Jobs (you can also access this window from the Lists menu).
The Add/Edit Multiple List Entries window opens (see Figure 3-4) with the Customers list already selected. From here, you can add new customers and jobs, change customer information, or fill in data you didn’t have when you first created the customer record. You can even copy and paste customers from an Excel sheet into the Add/Edit Multiple List Entries window.
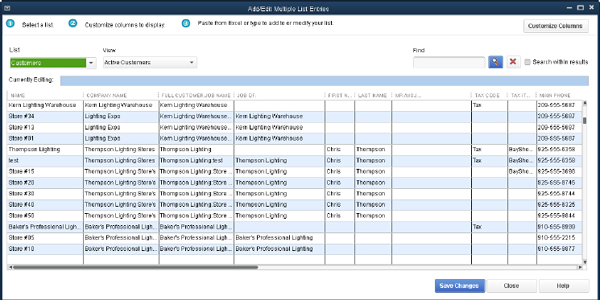
FIGURE 3-4 |
Adding and editing multiple customer records |
Here’s a list of some of the important features and functionalities that you should be familiar with to get the most benefit from using the Add/Edit Multiple List Entries window:
• List and View filters Select the List or View drop-down arrow to display only those records in your list that you want to work with.
• Find field Use this field to quickly locate and work with a specific customer record.
• Customize Columns button Click this button to open the Customize Columns window, where you can add columns for the fields within the customer record that you want to modify. For example, if you want to add a job to your Customers list (see the section “Use Jobs” later in this chapter), add the two columns Job Of and Full Customer:Job Name. When you add the Job Of column, it displays a drop-down arrow you can use to associate your new job to its parent customer. The ability to customize the columns also makes it easier to copy and paste from a spreadsheet because you can match the spreadsheet columns to the Add/Edit Multiple List Entry window.
• Copy Down Right-clicking within a field in the table allows you to select the Copy Down command, which copies the contents of a selected field to all the remaining records in the list (note, however, that you can’t use the Copy Down command with the Name field).
• Duplicate Row Right-clicking with your cursor placed on any row in the table lets you duplicate the selected record in the row below. The new duplicate record name will start with “DUP”.
The Customer Center
The QuickBooks Customer Center is where all your customers and jobs, and detailed information about those customers and jobs, are kept. It’s also where you can go to create, edit, and get reports about customers and jobs.
To open the Customer Center (shown in Figure 3-5), click the Customers button located on the Icon Bar or on the Home Page Navigator.
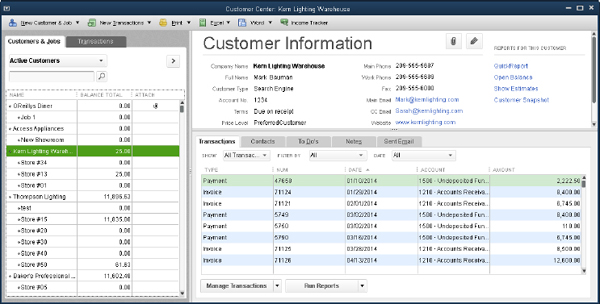
FIGURE 3-5 |
The Customer Center is your one-stop location to work with and get information about your customers. |
The left pane of the Customer Center has two tabs: Customers & Jobs and Transactions. A customer is always selected in the Customers & Jobs List (by default, the first customer in the list when you first open the Customer Center), and the right pane of the Customer Center displays information about the selected customer or job.
The Transactions tab lists all your customer transactions (invoices, sales receipts, and so on) by transaction type. Selecting a transaction type displays the current transactions of that type in the right pane. The display can be manipulated and filtered by choosing categories and sorting by column.
Customizing the Customers & Jobs List
You can customize the information displayed in the Customers & Jobs List to your own liking. By default, the list has three columns: Name, Balance Total, and Attach (learn about the Attached Documents feature in Chapter 14). The Currency column will also be visible (unless you’ve removed it) if you’ve enabled the multiple currencies feature. You don’t even have to select a customer’s listing to see the current balance, because the balances for all your customers are displayed next to their names.
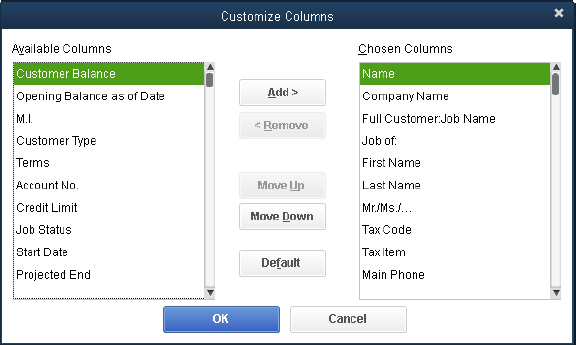
You can add more columns to the Customers & Jobs List. To do so, right-click anywhere in the list and choose Customize Columns to open the Customize Columns dialog shown in Figure 3-6. To add a column, select its label in the left pane and click Add. Alternatively, if you want to eliminate a column from your list, highlight its label in the right pane and click Remove.
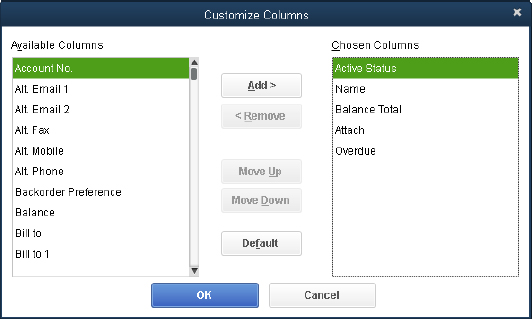
FIGURE 3-6 |
Choose what you want to see in the Customer Center’s Customers & Jobs List. |
Some users find it useful to add the Overdue column, so they know which customers have an overdue or almost due invoice. More about this feature and the Customer Collections Center in Chapter 10.
You can rearrange the left-to-right order of the columns. Select a column you want to move, and then choose Move Up to move a column to the left or Move Down to move it to the right. The order of columns displayed in the Chosen Columns pane of the dialog translates as top to bottom = left to right.
If you add columns to the Customers & Jobs List, you won’t be able to see all the information unless you widen the list’s pane and also widen each column. To maximize this pane, click the Show Full List Only button—the right-pointing arrow located on the top right-hand side of the Customers & Jobs List (see Figure 3-5).
Working in the Customer Information Pane
The Customer Information pane is where QuickBooks keeps all of the information you’ve entered for your customers, as well as each and every sales-related transaction (see Figure 3-7). From here you can quickly see the details behind a customer’s past due balance, add or update important notes or To Do’s that relate to a specific job, and even run key customer reports.
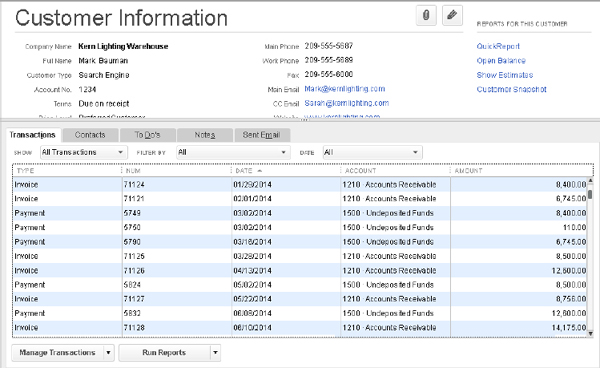
FIGURE 3-7 |
View, access, and update customer information and transactions directly in the Customer Information pane. |
The top half of the Customer Information pane displays basic contact information, along with links to maps, directions, and key reports. The bottom half of the pane is made up of five tabs that contain transaction details, contact information, To Do’s, notes, and sent e-mail information. When working in any of these tables, you can click the Manage <tab name> button at the bottom of the window to add, edit, or delete the information contained therein.
Transactions Tab
If you want to view only invoices for a particular customer, you can filter for that information on the Transactions tab. In fact, there are several different categories to choose from on the drop-down lists in the Show field. And just as with the Customers list (see previous section), you can add and remove columns of information by right-clicking anywhere on or below the column headings and choosing Customize Columns.
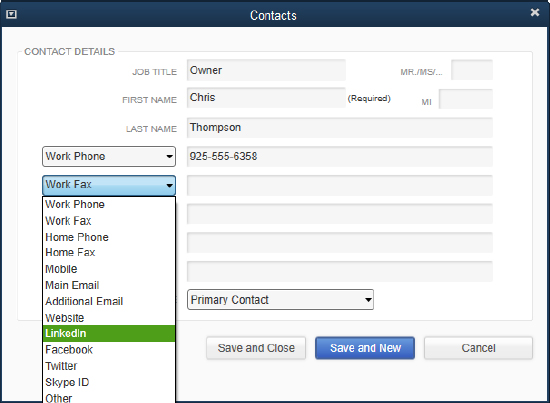
Contacts Tab
On the Contacts tab, you can store pretty much all the ways that you can keep in touch with your customers. Click the drop-down arrows in the available fields and you’ll see that there’s not only a place for phone and e-mail information but also for LinkedIn and Facebook sites:
To Do’s Tab
From the To Do’s tab, click the Manage To Do’s button and select Create New to compose a reminder specifically for this customer (see Figure 3-8). This is a very useful feature. You get to specify the date on which you want to be reminded (the Due field) and categorize your new To Do as a call or meeting in the Type field, for example. You can then view your To Do note in the Calendar (discussed in Chapter 1) or directly in the Customer Center. When the task is complete, open the reminder and change its status to Done. Click the Run Reports button on the To Do’s tab to see a detailed listing of all your To Do’s—including those for vendors and employees.
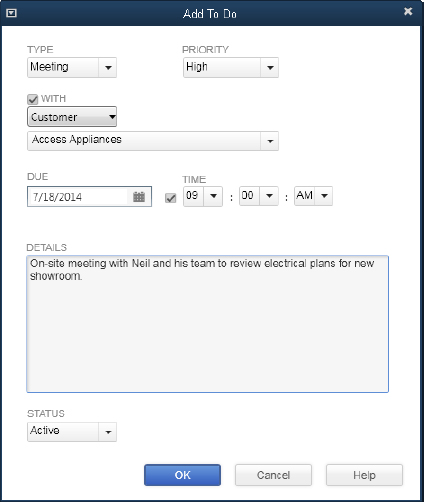
FIGURE 3-8 |
To Do’s are a useful way to keep track of important customer-related tasks. |
ProAdvisor Tip: If you want to view a list of all of your QuickBooks To Do’s, select To Do List from the Company menu. From this “global” list, you can add, edit, or delete a To Do or even print a report that shows the details of each task.
Notes Tab
From the Notes tab, click the Manage Notes button to add, edit, or delete a note. Use the Date/Time Stamp button to insert the current date and time automatically when you’re adding text to the notepad.
Sent Email Tab
This is the best way to keep track of all the sales transactions you’ve e-mailed a customer. In a single list, you can see who the e-mail was addressed to, the date it was sent, and the form that was sent (invoice, sales receipt, payment receipts, for example), including the reference number and amount.
Editing an Individual Customer Record
There may be times when you want to edit a customer record individually. You can do this from the Customer Center. Simply locate and double-click the customer’s listing in the Customers & Jobs List to open the customer record in Edit mode.
When you open the customer record, you can change any information or fill in data you didn’t have when you first created the customer entry.
ProAdvisor Tip: Take care when making changes to the Customer Name field, as it may result in some unintended consequences, such as changing the order in which that name appears in the Customers list and customer reports and causing a retroactive change to the customer’s name on all past transactions. Also, changes in the Customer Name field do not automatically change the name as it appears in the Bill To or Ship To address field—you’ll have to remember to update that manually.
Use Jobs
QuickBooks handles customers and jobs together. That gives you the option of creating a single customer and posting all the invoices to that customer, or creating multiple jobs for that customer and job-level invoices.
Some businesses don’t worry about jobs; only the customer is tracked. But if you’re a building contractor or subcontractor, an interior decorator, a consultant, or some other kind of service provider who usually sends invoices based on a project, you should track jobs. Jobs don’t stand alone; they are always attached to customers, and you can attach as many jobs to a single customer as you need to.
If you plan to track jobs, you can either enter the jobs you know about during your QuickBooks setup phase or enter them as you need to. Jobs are attached to customers—they can’t stand alone—so the customer to which the job is attached has to exist in your QuickBooks Customers & Jobs List before you can create the job.
Once the job is created, you can track its progress and keep an eye on the promised end date. If you think this will be the only job you perform for this customer, you can do the same thing for a customer without creating a job, because the customer record also has a Job Info tab. If you’re lucky enough to get another project from the customer, you can always add a new job at a later time.
Creating Jobs
To create a job, open the Customer Center and right-click the listing of the customer for whom you’re creating a job. Choose Add Job to open the New Job window, shown in Figure 3-9. Create a name for the job (you can use up to 41 characters) and make it descriptive enough for both you and your customer to understand.
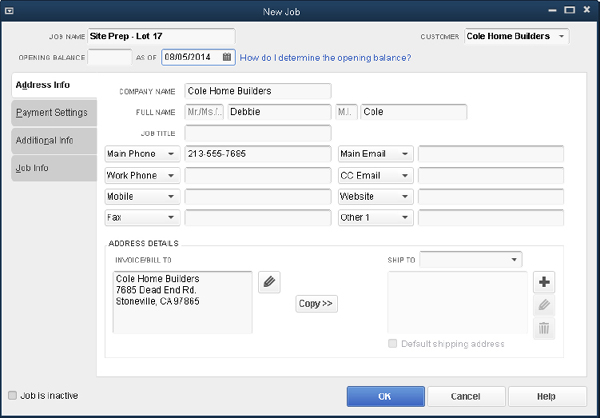
FIGURE 3-9 |
To create a new job, enter the job name—all the basic information about the customer is already filled in. |
If this job requires you to bill the customer at an address that’s different from the address you entered for this customer, or to ship goods to a different shipping address, make the appropriate changes in the job’s Address Info tab. QuickBooks maintains this information only for this job and won’t change the original shipping address in the customer record. Update the Payment Settings and Additional Info tabs as required. The sales tax settings are related to the customer rather than the job, so you won’t see the Sales Tax Setting tab.
Next, move to the Job Info tab (see Figure 3-10) to fill in the details of this job. All of the information on the Job Info tab is optional.
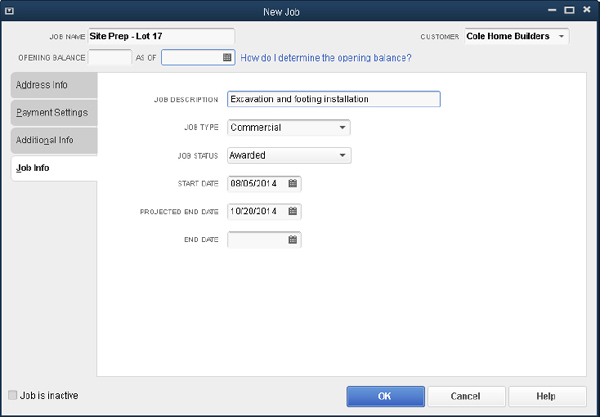
FIGURE 3-10 |
Track job details on the Job Info tab. |
The Job Status drop-down list offers choices that you can change as the progress of the job moves along. You can change the default text to reflect the way you refer to each progress level, but the changes you make for the text are system-wide and affect every job. Here’s how to change the text you use to track job status:
1. Choose Edit | Preferences to open the Preferences dialog.
2. Click the Jobs & Estimates icon in the left pane, and then click the Company Preferences tab in the right pane to see the current descriptive text for each status level (see Figure 3-11).
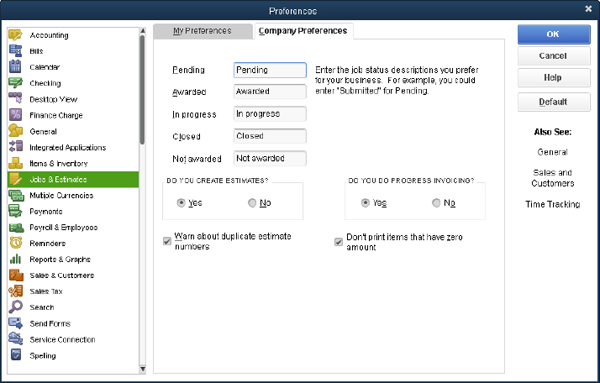
FIGURE 3-11 |
Customize the text to reflect the way you track a project’s progress. |
3. Change the text of any status levels if you have a descriptive phrase you like better. For example, you may prefer using the term “Working” instead of “In Progress.”
4. Click OK to save your changes.
The new text is used on every existing and new job in your system.
The Job Info tab also provides fields to track the start date and the projected end date of the job, as well as a field to enter the real end date (frequently not the same as the projected end date). You can also create job types to categorize jobs and select one of them in the Job Type field (covered in Chapter 6).
When you finish entering all the data about this job, click OK to close the New Job window and return to the Customers & Jobs List. The jobs you create for a customer become part of the customer listing.
Editing Jobs
It’s common to open a job record to make changes, because most people track the current status (and occasionally change the projected end date). In addition, you may want to change some of the basic data you entered for a job.
To edit a job, double-click its listing in the Customers & Jobs List. You can make changes to the appropriate fields in any tab.
Delete Customers & Jobs
From time to time, you may have the need to delete a customer or a job that you’ve created. For example, you might create a customer and then realize it’s a duplicate record for a customer that already exists in your Customers list. Deleting a job is a bit more common than deleting customers, because sometimes QuickBooks users add a job when they prepare an estimate for a client for a new project and then delete the job if the project doesn’t materialize.
You can delete a customer or a job only if it has never been used in a transaction. I hear from many users who complain that they can’t remove a customer that is essentially “dead wood” on their Customers & Jobs List. The customer has a zero balance, and there hasn’t been a sale to this customer for a long time, possibly even years. Unfortunately, a zero balance doesn’t matter; the rule is that you can delete a customer or a job only if it has never been used in a transaction.
In addition, you cannot delete a customer who has at least one job attached to it. Instead, you must first delete the jobs (if they can be deleted), and then delete the customer.
To delete a customer or job, select it on the Customers & Jobs List and press CTRL-D. QuickBooks asks you to confirm the fact that you want to delete this customer or job. Click OK to remove the customer or job.
Making Customers & Jobs Inactive (Hiding)
If you have a customer that can’t be deleted but is no longer active, you can prevent users from selecting this customer in transaction windows by making the customer inactive (hiding the customer so it doesn’t appear in drop-down lists). You can do the same thing for any job.
To make a customer or job inactive, right-click its listing in the Customers & Jobs List and choose Make Customer:Job Inactive.
Caution: If you make a customer with jobs inactive, all of the jobs are automatically made inactive. You cannot hide a customer without hiding all the jobs associated with that customer.
If your Customers & Jobs List is configured to show Active Customers (the default view), inactive customers and jobs don’t appear on the list. To see which customers and jobs are inactive, select All Customers from the drop-down list at the top of the Customers & Jobs List. Inactive customers and jobs have an “X” to the left of their listings (see Figure 3-12).
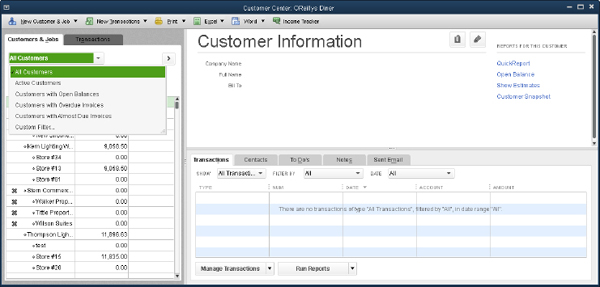
FIGURE 3-12 |
It’s easy to spot inactive customers and jobs. |
To make a customer or job active again, select All Customers as the view, and click the “X” next to the hidden customer or job to toggle the setting back to active. If you’re reactivating a customer with jobs, QuickBooks asks if you also want to make all the jobs active. If you click Yes, the customer and all jobs are activated.
If you click No, the customer is activated and all the jobs remain inactive; you can activate any of the jobs individually.
ProAdvisor Tip: Historical transactions related to inactive customers and jobs are included in reports, so you can continue to get accurate information about a customer’s past activities even if you decide to make them inactive.
Merging Customers or Jobs
Sometimes you create a customer or job and enter at least one transaction before you realize it’s a duplicate of an existing customer or an existing job for the same customer. The best thing to do in this case is to merge two customers or two jobs and move all the transaction history into one customer record. Follow these steps to do this:
1. Double-click the listing of the customer or job you do not want to keep to put it in Edit mode.
2. Change the customer or job name to match the name of the customer or job you want to keep.
3. Click OK.
4. QuickBooks displays a message telling you that the name is in use and asks if you want to merge the names.
5. Click Yes.
Merging customers works only when one of the following circumstances exists:
• Neither customer has any jobs associated with it.
• The customer name you want to get rid of has no jobs attached (it’s OK if the customer name you want to keep has jobs).
Merging jobs works only when both jobs are linked to the same customer.
Use Custom Fields
You can add your own fields to the Customer, Vendor, Employee, and Item records. Custom fields are useful if you want to track particular information but QuickBooks doesn’t provide a field for it. For example, if you want to track customer birthdays or annual renewals for a contract, you can add fields to track that information.
Custom fields for names are added to all names lists, but you can configure each field you create to limit its appearance to specific names lists. For example, you might create a custom field that you want to use in only the Customers & Jobs List or in both the Customers & Jobs and Vendors lists.
Adding a Custom Field
To add one or more custom fields to names, follow these steps:
1. Open a Center (Customers & Jobs, Vendors, or Employees).
2. Double-click any name on the list to put the record in Edit mode.
3. Move to the Additional Info tab.
4. Click the Define Fields button to open the Set Up Custom Fields For Names dialog, where you can name the field and indicate the list(s) in which you want to use the new field (see Figure 3-13).
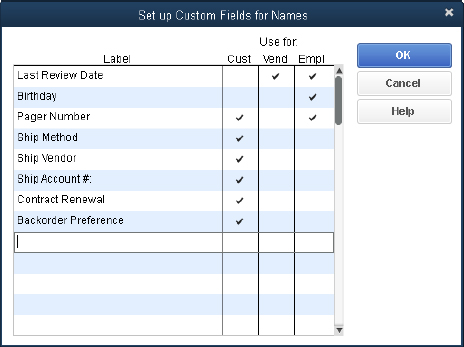
FIGURE 3-13 |
Custom fields appear on all the records of the list(s) you select. |
That’s all there is to it, except you must click OK to save the information. When you do, QuickBooks displays a message reminding you that if you customize your templates (forms for transactions, such as invoices or sales receipts), you can add these fields. Instructions for adding fields to transaction templates are found in Chapter 24.
The Additional Info tab for every name in the list(s) you selected now shows those fields.
Adding Data to Custom Fields
To add data to the custom fields for a customer, select their name from the Customer Center and double-click the name to put the record into Edit mode. Move to the Additional Info tab where the custom field you created appears (see Figure 3-14).

FIGURE 3-14 |
Add data to the custom field for each customer to which this custom field is relevant. |
Be sure you enter data in a consistent manner for each customer, or the information you retrieve won’t be as useful to you when you customize a report to include this custom information. For example, one of the custom fields shown in Figure 3-14 holds a date. In this case, the date is entered in the format: Year-Month, using a four-digit year and a three-character month.
If you use that format for all customers who have contract renewal dates (such as 2012-Jun or 2013-Jan), you can filter a customer list report to show all customers with contracts that are renewing 2012-Sep. If, however, you use Sept for some data entry, and Sep for other data entry, or if you forget to enter a dash and used a space, you won’t see all the customers with September renewal dates.
Secure Customer Credit Card Information
QuickBooks provides security features for companies that store customer credit card data in their company files. These features are designed to help you meet the requirements set by the payment card industry that are known as the Payment Card Industry Data Security Standard (PCI DSS).
If you log in to your company file as Admin, you may see a reminder about enabling credit card protection when you open the file. The first chore you face is changing your own Admin password so it matches the standards for complex passwords required by the credit card protection feature (see Figure 3-15).
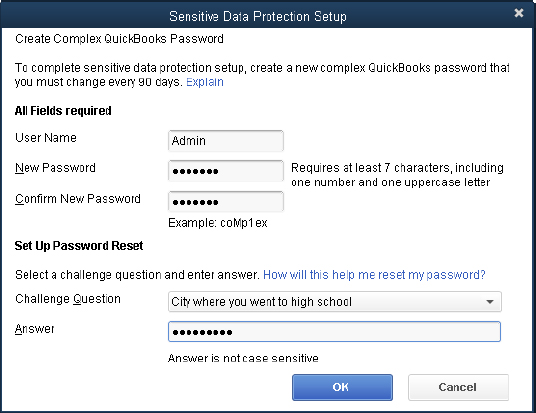
FIGURE 3-15 |
Start by setting a complex password for the QuickBooks Admin user account. |
You should enable the credit card protection feature as soon as possible, but if you don’t respond to the reminder by selecting Enable Protection, you can perform the task by choosing Company | Customer Credit Card Protection and selecting Enable Protection.
Caution: You must be logged in as the user named Admin to configure credit card protection.
The Challenge Question section is mandatory. If you forget your password, you can click the Reset Password button on the Login dialog. When you answer the challenge question correctly, QuickBooks lets you change your password to a new complex password. When you complete the dialog and click OK, QuickBooks confirms the fact that you’ve changed your password and informs you that you’ll have to repeat this task every 90 days.
ProAdvisor Tip: Although not recommended, you can disable the customer credit card protection feature: reopen the Customer Credit Card Protection window, and a dialog appears asking if you want to disable it.
More About QuickBooks Customer Credit Card Protection
Here are some important points to keep in mind when you enable Credit Card Protection:
• All users who have permission to view full credit card detail in the customer record must set up a complex password (see the next section, “About Complex Passwords”).
• The password must be changed every 90 days. Users who don’t change their passwords cannot open the file. If the Admin fails to change their password, the credit card protection feature is disabled (and you see messages about your failure to comply with the rules set for businesses that accept credit cards).
• You cannot reuse any of the last four passwords.
• If a user enters an incorrect password three times (users sometimes guess different passwords when they can’t remember their passwords), the company file closes for that user.
• Only the user named Admin can configure the functions in this feature.
• The QuickBooks credit card security audit log tracks all actions that involve credit cards (including viewing customer credit card information).
About Complex Passwords
Complex passwords (sometimes called strong passwords) are passwords that can’t easily be discovered by hacker software that uses permutations and combinations of letters and numbers to break into password-protected files.
The more complex a password is, the higher the odds are against breaking it. For example, a password that contains seven characters and includes one uppercase letter and six lowercase letters is harder to break than a password that is entirely uppercase or lowercase (the odds are somewhere in the range of one in many millions). When you mix numbers with letters, and at least one letter is in a different case than the others, the odds are even greater. If you add characters and at least two of those characters are numbers, and at least two of the letters are in a different case than the other letters, the odds of breaking it grow to pretty astronomical levels.
User Permissions for Viewing Credit Card Information
With credit card protection enabled, when you set up users and give them Full Access to the Sales and Accounts Receivable area, those users are not given permission to view customer credit card information unless you specifically select that option.
Users who do not have permission to view credit card information see only the last four numbers of the credit card when they open the Payment Info tab of a customer’s record (see Figure 3-16).
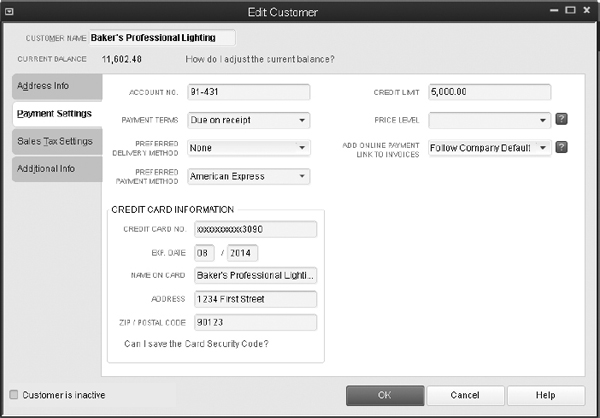
FIGURE 3-16 |
Users without the proper permissions can’t see credit card numbers. |
Users who have permission to view customer information are forced to create a complex password during their next login.
When you set up new users and give them permission to access customer information, it’s not necessary to set up a complex password for them. Provide a regular, easy to enter password, and QuickBooks will force a password change during the first login. (See Chapter 8 to learn more about setting up users and permissions.)
Viewing the Security Log
When credit card protection is enabled, QuickBooks maintains a security log called the Customer Credit Card Audit Trail. This is a special report that can be viewed only by the QuickBooks Admin user. To open the report, choose Reports | Accountant & Taxes Customer Credit Card Audit Trail.
This report is updated each time a customer’s credit card information is entered, displayed, edited, or deleted—or if any changes are made to the account information. The most recent activity is always listed at the top of the report.
..................Content has been hidden....................
You can't read the all page of ebook, please click here login for view all page.