In many of the lab exercises you have performed thus far, you have integrated both local area networks (LANs) and wide area networks (WANs) as you worked through the lab exercise steps. Now, you will delve specifically into the technologies associated with remote connections. Most networks today have at least one router connected to a WAN environment. A large organization might connect to the outside world through a dedicated line, for example. An individual might connect to a high-speed Internet link.
In these labs, you’ll examine the different technologies used for remote connectivity. These labs will include a review of WAN technologies and speeds, a closer look at the technologies that provide the “last mile” of connectivity, and exercises to configure a remote desktop to enable someone to administer a system remotely. You’ll finish up by lending a helping hand using Windows Remote Assistant.
Now’s the time to jump in and get started!
![]() 20 MINUTES
20 MINUTES
Lab Exercise 14.01: Identifying WAN Technologies
Network technicians have the responsibility of configuring, managing, and troubleshooting the various methods of connecting LANs to WANs. These connections provide Internet access to the clients on the LAN, and access to the LAN by authorized remote clients from outside the LAN.
As a network technician, you need to understand the terminology used to describe the popular WAN-related technologies, such as PSTN, T1, SONET, Frame Relay, and ATM, as well as define the various speeds associated with these WAN technologies.
Learning Objectives
At the completion of this lab, you will be able to
![]() Define the speeds of popular WAN technologies
Define the speeds of popular WAN technologies
![]() Identify key WAN-related terms
Identify key WAN-related terms
Lab Materials and Setup
The materials you’ll need for this lab are
![]() Internet access
Internet access
![]() The Mike Meyers’ CompTIA Network+ Guide to Managing and Troubleshooting Networks textbook
The Mike Meyers’ CompTIA Network+ Guide to Managing and Troubleshooting Networks textbook
![]() Pencil or pen
Pencil or pen
![]() Paper
Paper
Getting Down to Business
CJ and Maggie been very been supportive of your pursuit of the CompTIA Network+ certification. The Network Lab continues to be an excellent resource for installing, configuring, and troubleshooting various networking scenarios. They know that it is sometimes difficult to simulate all of the WAN technologies that you should be familiar with, so they recommend that you hit the books, and review the different WAN technologies you’ll need to understand to pass the CompTIA Network+ exam. They put together the following mix-and-match exercises to help you review WAN technologies and their associated speeds.
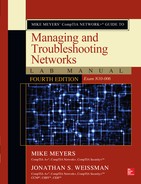
Step 1 There are basically three transmission media in use today for dedicated point-to-point services: T-carrier over copper, Optical Carrier over fiber, and Ethernet over copper or fiber. The transmission methods may vary, but the speed of the media remains fairly constant. For each of the media types listed following, place the correct letter beside the corresponding definition for the media type and speed.
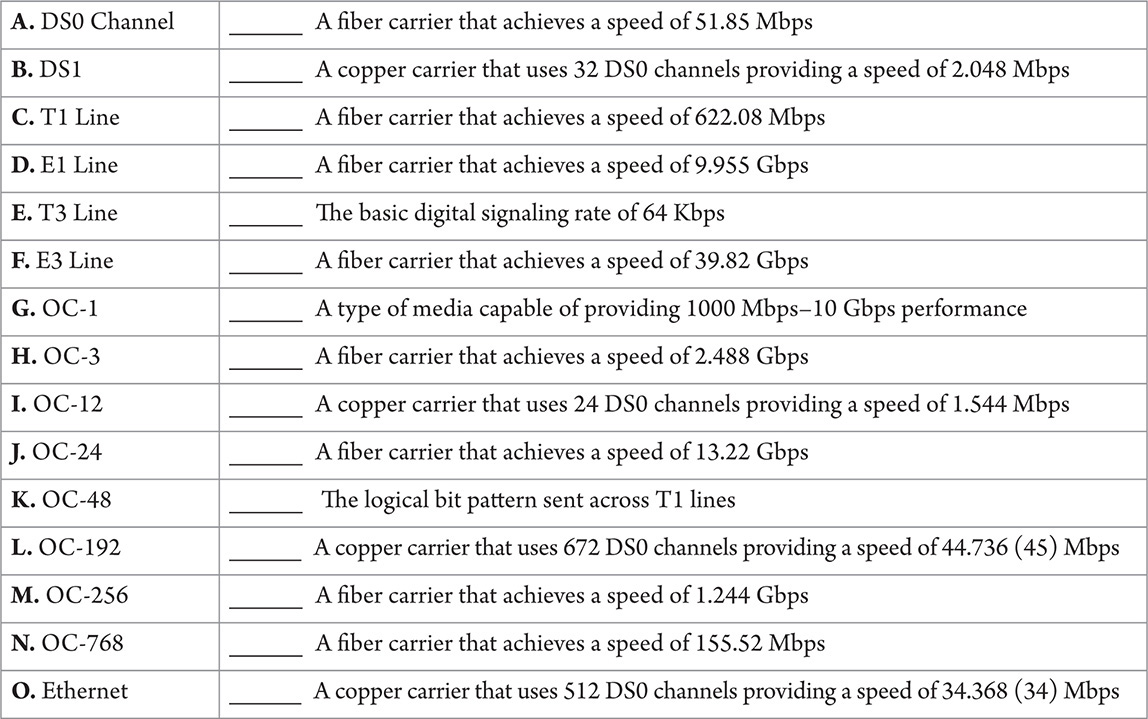
Step 2 Place the correct letter beside the corresponding definition for the following WAN technologies.
![]() 20 MINUTES
20 MINUTES
Lab Exercise 14.02: Explore the “Last Mile”
Individuals and SOHOs use numerous methods to connect to the digital outside world. For these individuals and smaller organizations, this is the connection to the central office (CO) and is known as the “last mile.” In the early days, this connection was primarily analog telephone lines. Today, you will see high-speed cable, fiber, or cellular technologies providing connectivity to residential dwellings.
You have used some form of connection to the Internet in many of the prior lab exercises, so you have some knowledge of one or two of these “last mile” technologies already. To answer some of the questions that you will encounter on the CompTIA Network+ exam comfortably, you should review these connection methods.
Learning Objectives
At the completion of this lab, you will be able to
![]() Define the “last mile” technologies
Define the “last mile” technologies
![]() Detail key specifications and features of each connection technology
Detail key specifications and features of each connection technology
Lab Materials and Setup
The materials you’ll need for this lab are
![]() Internet access
Internet access
![]() The Mike Meyers’ CompTIA Network+ Guide to Managing and Troubleshooting Networks textbook
The Mike Meyers’ CompTIA Network+ Guide to Managing and Troubleshooting Networks textbook
![]() Pencil or pen
Pencil or pen
![]() Paper
Paper
Getting Down to Business
You already have some experience with one or two of the SOHO connection methods. If you have used dial-up, DSL, cable, or fiber, you have used a “last mile” technology. Maggie will be presenting a report to CJ on the various connection technologies that ITCF will recommend to their clients. Since your clients are from all types of locales (rural farms to urban apartments), Maggie wants to cover all available technologies. She asks you to help with the preliminary information gathering.
Using the Internet and the textbook, research and review the various SOHO connection technologies and provide a definition and short summary of each.
Step 1 Start with the old standard, dial-up. Cover some of the details and requirements for both PSTN/POTS and ISDN.
![]()
![]()
![]()
![]()
Step 2 Next you will explore DSL. Make sure to include information about ADSL, SDSL, and VDSL.
![]()
![]()
![]()
![]()
Step 3 Cable Internet connectivity has been popular for a number of years and continues to vie for the highest speeds for residential and commercial service. Discuss some of the characteristics of cable Internet service.
![]()
![]()
![]()
![]()
Step 4 In rural areas, satellite Internet connectivity may be the most attractive option. What are some of the features of satellite Internet?
![]()
![]()
![]()
![]()
Step 5 With the explosive use of portable smart devices (smartphones), the cellular WAN has become the de facto standard for Internet connectivity on the go. Discuss both mobile data services and IEEE 802.16.
![]()
![]()
![]()
![]()
Step 6 The most serious competitor for cable Internet services is delivered by fiber-optic cabling right to the house. Record some of the features of fiber Internet connectivity.
![]()
![]()
![]()
![]()
Step 7 Finally, explore the experimental Broadband over Power Line (BPL) and discuss the methodology and obstacles to this technology.
![]()
![]()
![]()
![]()
![]() 30 MINUTES
30 MINUTES
Lab Exercise 14.03: Using Remote Desktop Connection (RDC)
Most businesses today support users working at remote locations or from home, and with the increase in the use of virtual servers (see Chapter 16), it is not uncommon to manage those servers from a remote client machine. To set up this capability, you can configure the remote system to enable you to use client software to connect remotely to that system when the need arises.
There are a number of remote management software solutions that you can use. One of the popular solutions is to enable Remote Desktop on Windows systems, so that you can then use the Remote Desktop client to initiate a remote session with the system. Once a Remote Desktop Connection is established, you can then fully administer the system as if you were sitting at the computer.
![]() Cross-Reference
Cross-Reference
Before tackling this lab, read over the “Remote Terminal” section in Chapter 14 of the Mike Meyers’ CompTIA Network+ Guide to Managing and Troubleshooting Networks textbook.
Learning Objectives
In this lab, you will enable Remote Desktop on a Windows server so that you can then administer it remotely. Keep in mind that you can enable Remote Desktop on any Windows system, including Windows 7, 8, 8.1, 2012, or 2012 R2. At the end of this lab, you will be able to
![]() Enable Remote Desktop
Enable Remote Desktop
![]() Remotely connect to a system using the Remote Desktop client
Remotely connect to a system using the Remote Desktop client
Lab Materials and Setup
The materials you’ll need for this lab are
![]() Two Windows systems
Two Windows systems
![]() Network switch
Network switch
![]() Cabling
Cabling
![]() Pencil or pen
Pencil or pen
![]() Paper
Paper
Getting Down to Business
ITCF has a number of customers located in remote cities. ITCF techs will occasionally travel to the customer site when the customer has a need for server changes. In a discussion with CJ, he mentions that the growing trend is to manage client servers from the ITCF office. He recommends that you explore the features of the Remote Desktop program that is built into Windows and configure a remote session in the ITCF networking lab.
![]() Tech Tip
Tech Tip
Working with your instructor, take a few moments to review the configuration of your networking lab setup. Components and configurations may have changed over time with multiple groups using the equipment, or some of the systems may still be configured for specific lab exercises. Review Administrator names and passwords and log in to the systems. Check the cabling. Explore the basic TCP/IP configuration and verify that the client systems, servers, and switches (VLANs) are all on the same network. Run some basic utilities and validate connectivity. Performing this routine now will assist in making the future lab exercises run more smoothly.
Step 1 Ensure that the system you plan to remote into is powered on, and then log on with an account that has Administrator privileges.
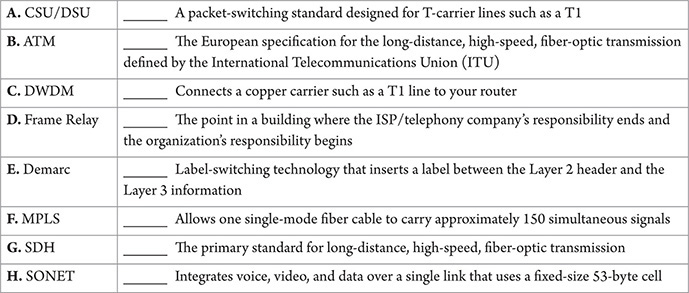
Step 2 In Windows 7, right-click Computer and select Properties from the drop-down menu. From the System window, select Remote settings from the Tasks list. This will open the System Properties window with the Remote tab selected, as shown in Figure 14-1.
FIGURE 14-1 The Remote tab of the System Properties window of a Windows 7 machine
In Windows 8, 8.1, 2012, or 2012 R2, click Windows Button | type System | click System | click Remote Settings on the left.
Step 3 Enable the Remote Desktop option by choosing Allow connections only from computers running Remote Desktop with Network Level Authentication.
![]()
![]()
Step 4 If you want to allow users to use Remote Desktop to connect to the system, click the Select Users button and add the users to the list. When you give users the capability to use Remote Desktop to connect to the system in this manner, you add them to a built-in group that has the permission to use Remote Desktop to connect to the server. What is the name of this built-in group?
![]()
![]()
Choose OK to close the System Properties window.
Step 5 Now log on to your client machine to see if you can use Remote Desktop to connect to the server. In Windows 7, choose Start | in the Search programs and files box, type Remote Desktop Connection | click Remote Desktop Connection.
In Windows 8/8.1, click the Windows Button | type Remote Desktop Connection | click Remote Desktop Connection.
This will launch the Remote Desktop Connection logon window. Type the IP address of the server you want to connect to and then click Connect. See Figure 14-2.
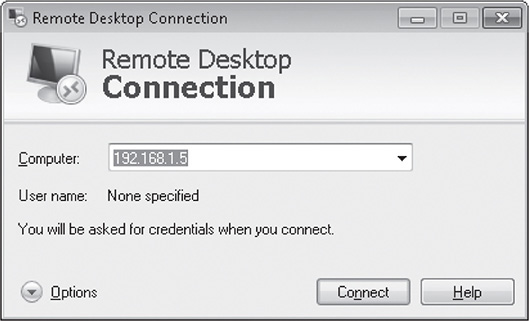
FIGURE 14-2 Remote Desktop Connection window
Step 6 When queried to Enter your credentials, enter the Administrator user name and password for the machine you are remoting into. Now you can navigate all of the applications and utilities of the target machine as if you logged on locally. Look at the System Properties to verify that you are connected to the target. What are the results?
![]()
![]()
Step 7 Notice that the Remote Desktop Connection window by default fills the entire monitor screen. In typical use, you would click Start | Log Off to log off the target machine and close the Remote Desktop Connection. You could also choose Start | Shut Down to perform a remote shutdown of the remote machine. This would be useful if you received a notice that the location where your server resides lost power and you would like to shut down the system gracefully before the UPS battery backup runs out. Go ahead and Shut Down the remote system. What is the warning message that you receive?
![]()
![]()
Step 8 If your target machine was running a server operating system, like Windows Server 2012/2012 R2, you should have noticed a warning stating that “Remote Desktop Firewall exception will be enabled.” If the firewall between the Remote Desktop client and the Remote Desktop server is enabled, how would this exception allow the Remote Desktop client to connect to the server?
![]()
![]()
Lab Exercise 14.04: “Helping Out” with Windows Remote Assistance
Remote Desktop is a great solution when you want to take control of a remote machine, but what if you would like to help someone configure his desktop settings? What can you do to help troubleshoot problems when a remote user calls for help? One of the methods you can use is to have the user invite you to “share” control of his desktop, guiding him in the steps required to resolve his issue.
Microsoft offers a unique solution known as Windows Remote Assistance. Windows Remote Assistance enables a user to invite a technician to connect to a system remotely and then share pointer movement and keystrokes of that system with the tech. This method gives you (the tech) complete access to the remote machine, but at the same time, the user can view and contribute to the session.
Windows Remote Assistance differs therefore from Remote Desktop because Windows Remote Assistance continues the user’s currently running session. The user doesn’t have to log off at all. When you log in with Remote Desktop, in contrast, you start a completely new session.
Learning Objectives
In this lab, you will negotiate a Windows Remote Assistance session on two Windows 7 systems. At the end of this lab, you will be able to
![]() Initiate a Windows Remote Assistance session
Initiate a Windows Remote Assistance session
![]() Remotely assist a Windows 7/8/8.1 client
Remotely assist a Windows 7/8/8.1 client
Lab Materials and Setup
The materials you’ll need for this lab are
![]() Two Windows client machines (Windows 7 systems were used in the lab exercise)
Two Windows client machines (Windows 7 systems were used in the lab exercise)
![]() A network switch and appropriate cabling to connect the small network
A network switch and appropriate cabling to connect the small network
![]() Pencil or pen
Pencil or pen
![]() Paper
Paper
Getting Down to Business
CJ has you wrap up your exploration of remote connectivity applications with the configuration, initiation, and use of the Microsoft Windows Remote Assistance feature in Windows 7/8/8.1.
Step 1 Power up the two Windows machines, and make sure that they are configured to communicate with each other in the small Network Lab. Log on to both machines with an administrative account. For the purposes of this lab exercise, consider one machine as the Office Tech machine and the other as the Remote Client machine.
Step 2 Start the preparation for this lab exercise on the Office Tech machine. Windows Remote Assistance begins the session by having the remote client send an e-mail request to the office tech. You probably have not set up an e-mail system or accounts in the Network Lab, so you will create an invitation and place it in a shared folder on the Office Tech machine.
a. On the Office Tech machine, open the C: drive and create a folder named Invitations.
b. Right-click the Invitations folder and choose Share with | Homegroup (Read/Write) from the drop-down menu.
c. Verify that the Invitations folder is shared by highlighting the folder and observing the information at the bottom of the window as shown in Figure 14-3.
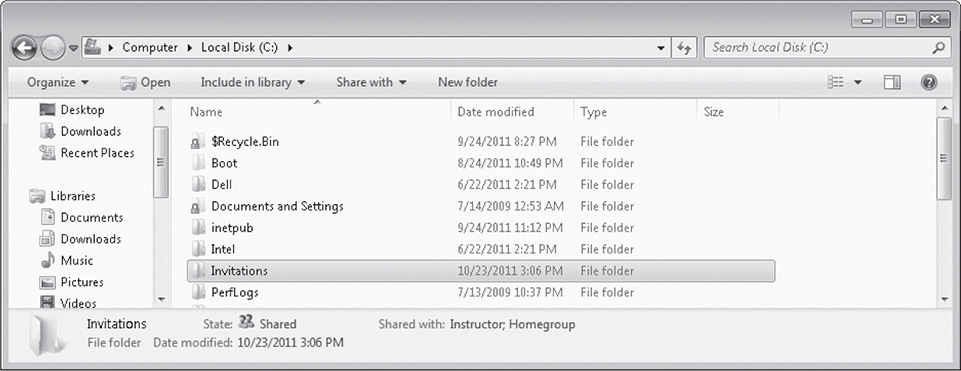
FIGURE 14-3 Verifying that the Invitations folder is shared and that the owner and Homegroup have access
Step 3 Now, on the Remote Client machine, perform the steps to configure the user to accept Remote Assistance and create an invitation:
a. Right-click Computer and select Properties from the drop-down menu. Click the System Protection option, then select the Remote tab. This will open the System Properties window with the Remote tab selected, as shown in Figure 14-4.
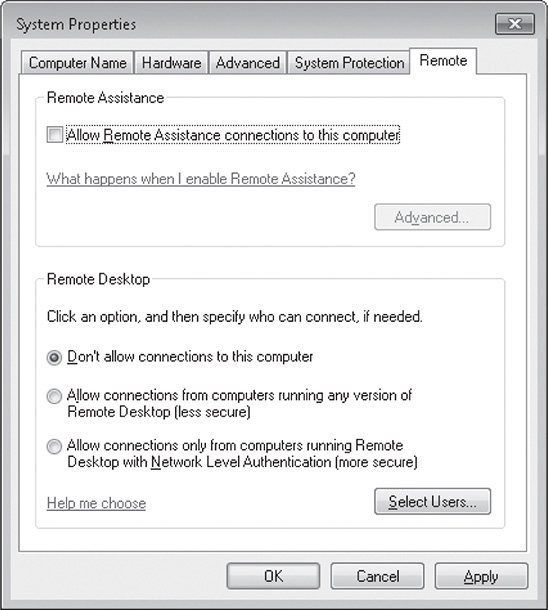
FIGURE 14-4 The Remote tab of the System Properties of the Remote Client Windows 7 machine
b. Under Remote Assistance, check the box next to Allow Remote Assistance connections to this computer. Click the Advanced button. What are the default settings?
![]()
![]()
c. Close the Remote Assistance settings by clicking OK or Cancel and then select Apply and OK to accept Remote Assistance.
d. To begin the process of requesting Remote Assistance, perform the tasks in the following steps:
![]() Click Start and enter the following line of text in the Search programs and files dialog box: Remote Assistance
Click Start and enter the following line of text in the Search programs and files dialog box: Remote Assistance
![]() Click Windows Remote Assistance in the list of programs that appears.
Click Windows Remote Assistance in the list of programs that appears.
![]() In the Windows Remote Assistance window, select Invite someone you trust to help you, as shown in Figure 14-5.
In the Windows Remote Assistance window, select Invite someone you trust to help you, as shown in Figure 14-5.
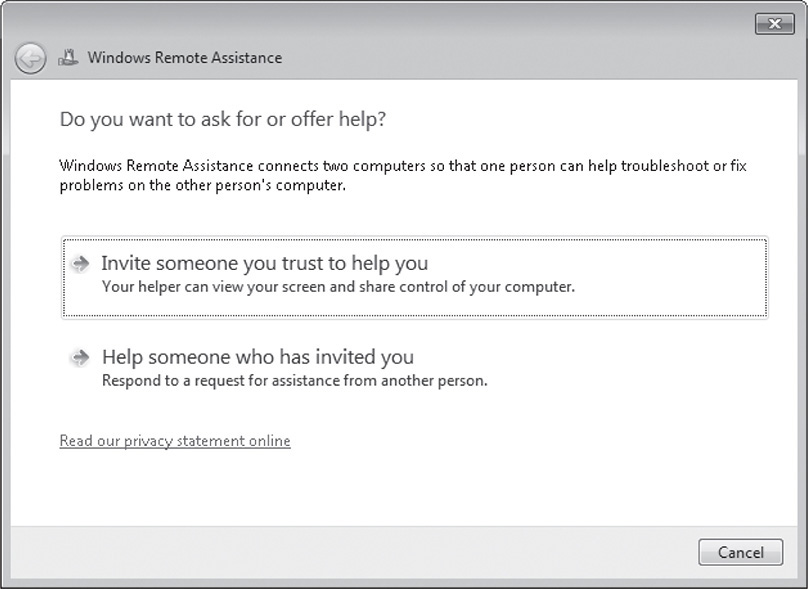
FIGURE 14-5 Inviting a tech you trust to help with system configuration or troubleshooting
![]() You probably have not configured an e-mail system for the Network Lab, so you should select Save this invitation as a file and save it in the Invitations share on the Office Tech machine.
You probably have not configured an e-mail system for the Network Lab, so you should select Save this invitation as a file and save it in the Invitations share on the Office Tech machine.
![]() This will create a password, open a Windows Remote Assistance window, and prompt you to Give your helper the invitation file and password. See Figure 14-6.
This will create a password, open a Windows Remote Assistance window, and prompt you to Give your helper the invitation file and password. See Figure 14-6.
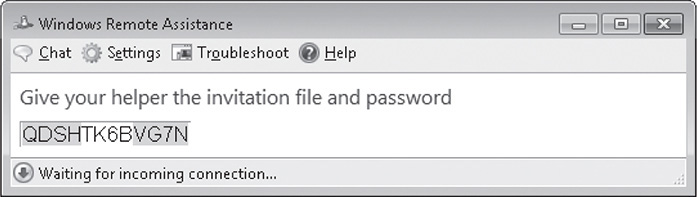
FIGURE 14-6 Windows Remote Assistance password entry screen, waiting for incoming connection
![]() To facilitate the next steps, you could copy the password to a text file and place it in the Invitation share on the Office Tech machine.
To facilitate the next steps, you could copy the password to a text file and place it in the Invitation share on the Office Tech machine.
Step 4 To complete the invitation and connect using Remote Assistance, you will now perform steps on both the Office Tech system and the Remote Client system. The step explanations will tell you which machine to use during that step.
a. On the Office Tech machine, open the C:Invitations folder and double-click the Invitation.msrc incident file. This will open the Windows Remote Assistance window and prompt you to enter the password. If you have also saved the password in a text file, you can simply open the text document and copy and paste the password into the dialog box, as shown in Figure 14-7. Click OK and then switch over to the Remote Client machine.
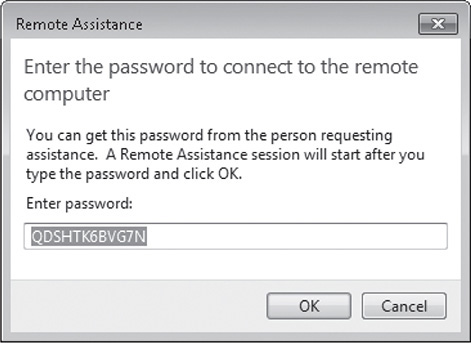
FIGURE 14-7 The password to connect to the remote computer
b. On the Remote Client machine, click the Yes button to allow the office tech to view the remote client desktop. At this point, what is the office tech able to do?
![]()
![]()
c. Now switch to the Office Tech machine and select Request Control in the upper left-hand corner of the menu bar. This will request the ability to control the keyboard and mouse of the Remote Client machine.
d. Back on the Remote Client machine, click Allow %username% to respond to User Account Control prompts, where %username% is the name of the Office Tech user account. Click Yes to allow. See Figure 14-8.
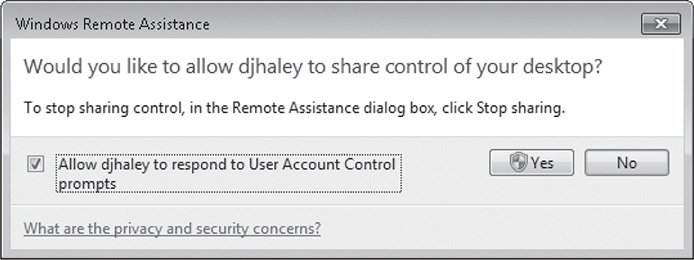
FIGURE 14-8 Windows Remote Assistance allowing Office Tech to control Remote Client while Remote Client is also able to view and control the keyboard and mouse
e. Now the Office Tech and the Remote Client should have co-control of the Remote Client machine’s keyboard and mouse functions. Verify that the Office Tech can do something on the Remote Client.
f. Once you’ve verified capability, click the Close button to close the Windows Remote Assistance window and end the Remote Assistance session.
Lab Analysis
1. Seth is running a small graphic arts business out of his home. He often transfers high-resolution images to a drop box on the Internet for his customers to access these images. What are the different types of DSL, and which would you suggest Seth use for his business?
![]()
![]()
2. Rosemary has been your lab partner for the lab exercises in this chapter. She remembers reading about Voice over IP in the textbook, but did not see any lab exercises related to this technology. She asks you to describe briefly the VoIP protocols RTP and SIP.
![]()
![]()
3. Many routers offer modules or interface cards that directly support CSU/DSU connections. Jesse asks you to explain what a CSU/DSU is and what it is used for.
![]()
![]()
4. Mike has been reading up on long-distance, high-speed WAN technologies and has noticed various terms like SONET, OC-1, OC-3, STS-256, and STS-768. What can you tell Mike about these terms?
![]()
![]()
Key Term Quiz
Use the vocabulary terms from the list below to complete the sentences that follow.
asymmetric DSL (ADSL)
Real-time Transport Protocol (RTP)
Remote Desktop Protocol (RDP)
T1
Windows Remote Assistance
1. The _______________ protocol is the VoIP protocol that defines the type of packet used to transfer voice over the Internet.
2. Remote Desktop uses the _______________ to send screen information to the remote user.
3. A(n) _______________ connection uses separate download and upload speeds over the phone lines.
4. A(n) _______________ connection has a transfer rate of 1.544 Mbps.
5. The _______________ tool enables a technician to troubleshoot a remote computer with the user able to observe and interact at the same time.