Introducing linux
Abstract
This is an introduction to the salient features of Linux and Unix-style operating systems in general. We begin with a brief tour of KDE, the K Desktop Environment. We review memory management, and describe the differences between “real mode” and “protected mode.” The Linux process model is described, followed by a detailed examination of the file system. We describe the Linux command shell and some of its more useful features, and finally cover man and info, two tools for getting help from Linux.
Keywords
KDE; memory management; protected memory; root file system; filesystem hierarchy standard; command shell; shell script
There are two major products to come out of Berkeley: LSD and Unix. We don’t believe this to be a coincidence
Jeremy S. Anderson
For those who may be new to Unix-style operating systems, this chapter provides an introduction to some of the salient features of Linux, especially those of interest to embedded developers. This is by no means a thorough introduction, and there are many books available that delve into these topics in much greater detail.
Feel free to skim, or skip this chapter entirely, if you are already comfortable with Unix and Linux concepts.
Running Linux—KDE
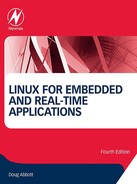
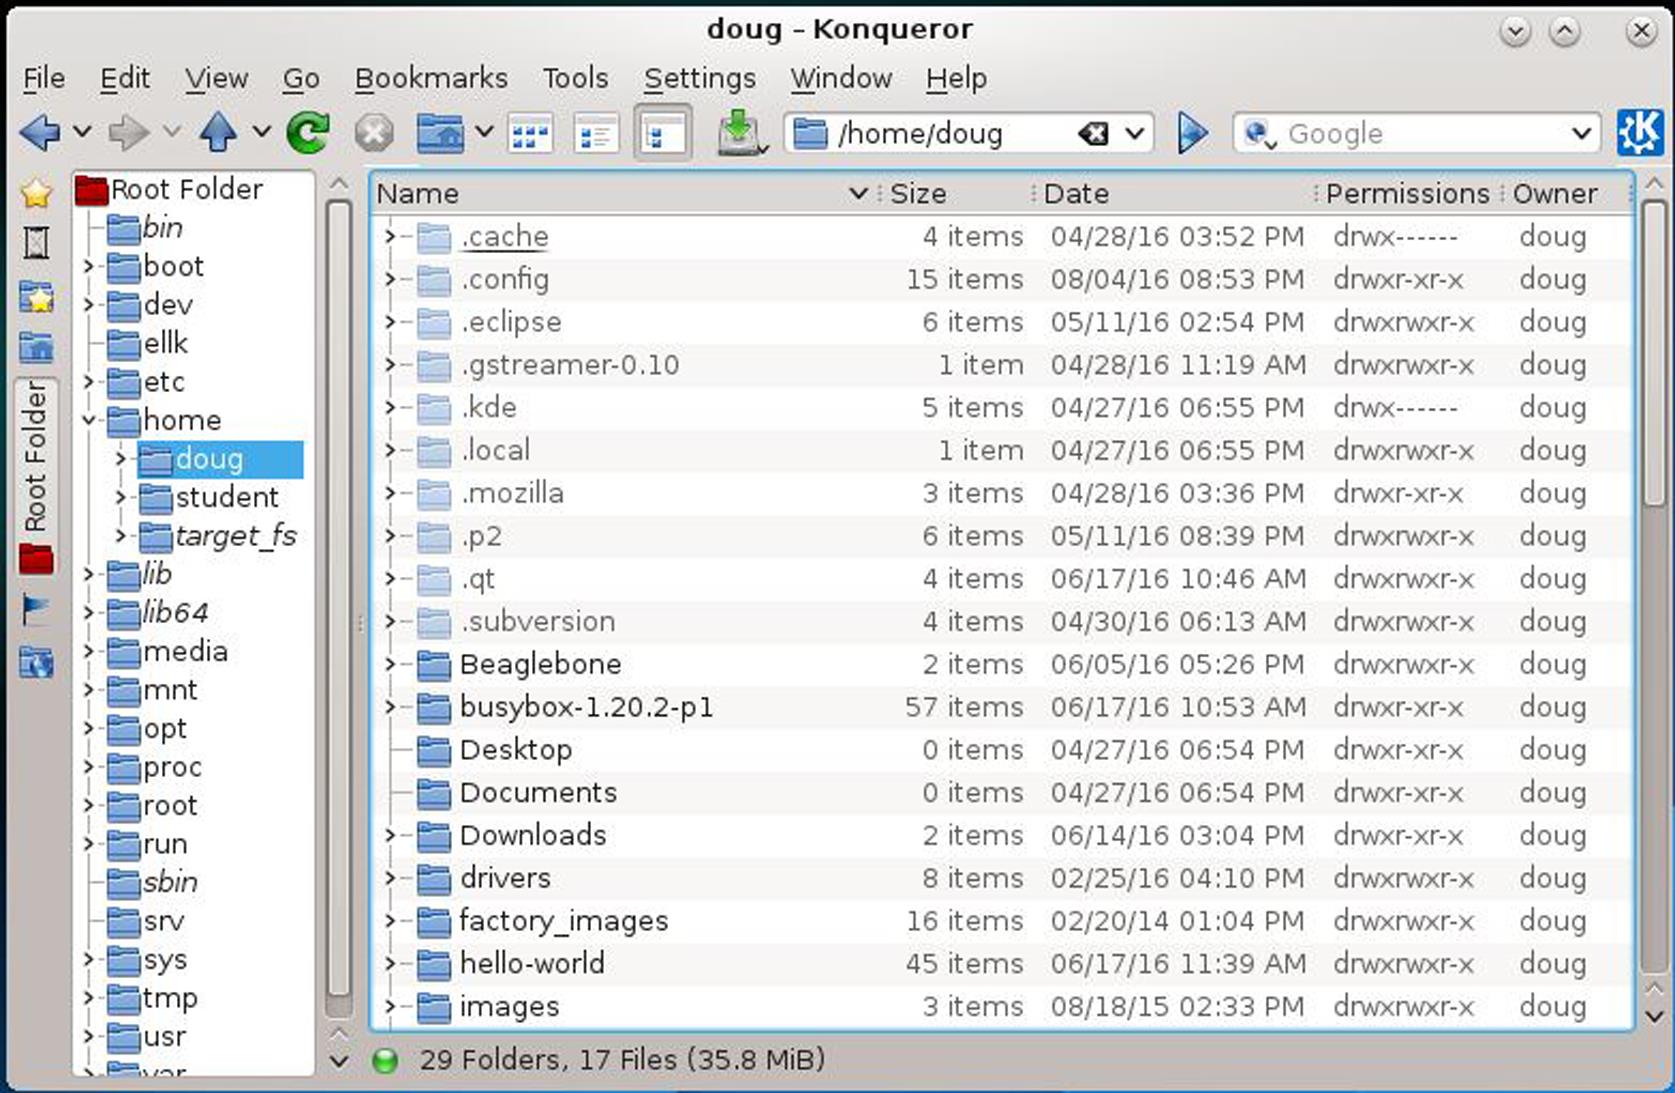
Boot up your Linux machine and log in as your normal user. If you are running the K Desktop Environment (KDE) on CentOS 7, you’ll see the screen shown in Fig. 3.1. Unless you are running VirtualBox or VMware, you won’t see the top two lines and the very bottom menu line. If you are running a different version of Linux, your screen will probably look different, but should have most of the same features.
At the bottom left is a menu icon that is the CentOS logo. It serves the same purpose as the Start Menu in Windows. KDE calls this the “Application Launcher Menu.” Initially, clicking this icon brings up a set of cutsie icon-based menus that I personally find difficult to use. Fortunately you can change it to the older list-based style. Right-click the Application Launcher and select Switch to Classic Menu Style. Recognize, of course, that this is purely a matter of personal taste.
File Manager
One of the first things I want to do with a new system is open a file manager so I can see what is on the system. Click the Application Launcher and select Home. The file manager initially displays the contents of your home directory, the place where you store all of your own files. Note that, by default, KDE uses a single click to activate items. You can change that to double click by selecting Settings > System Settings from the Application Launcher. Scroll down to Hardware and select Input Devices > Mouse.
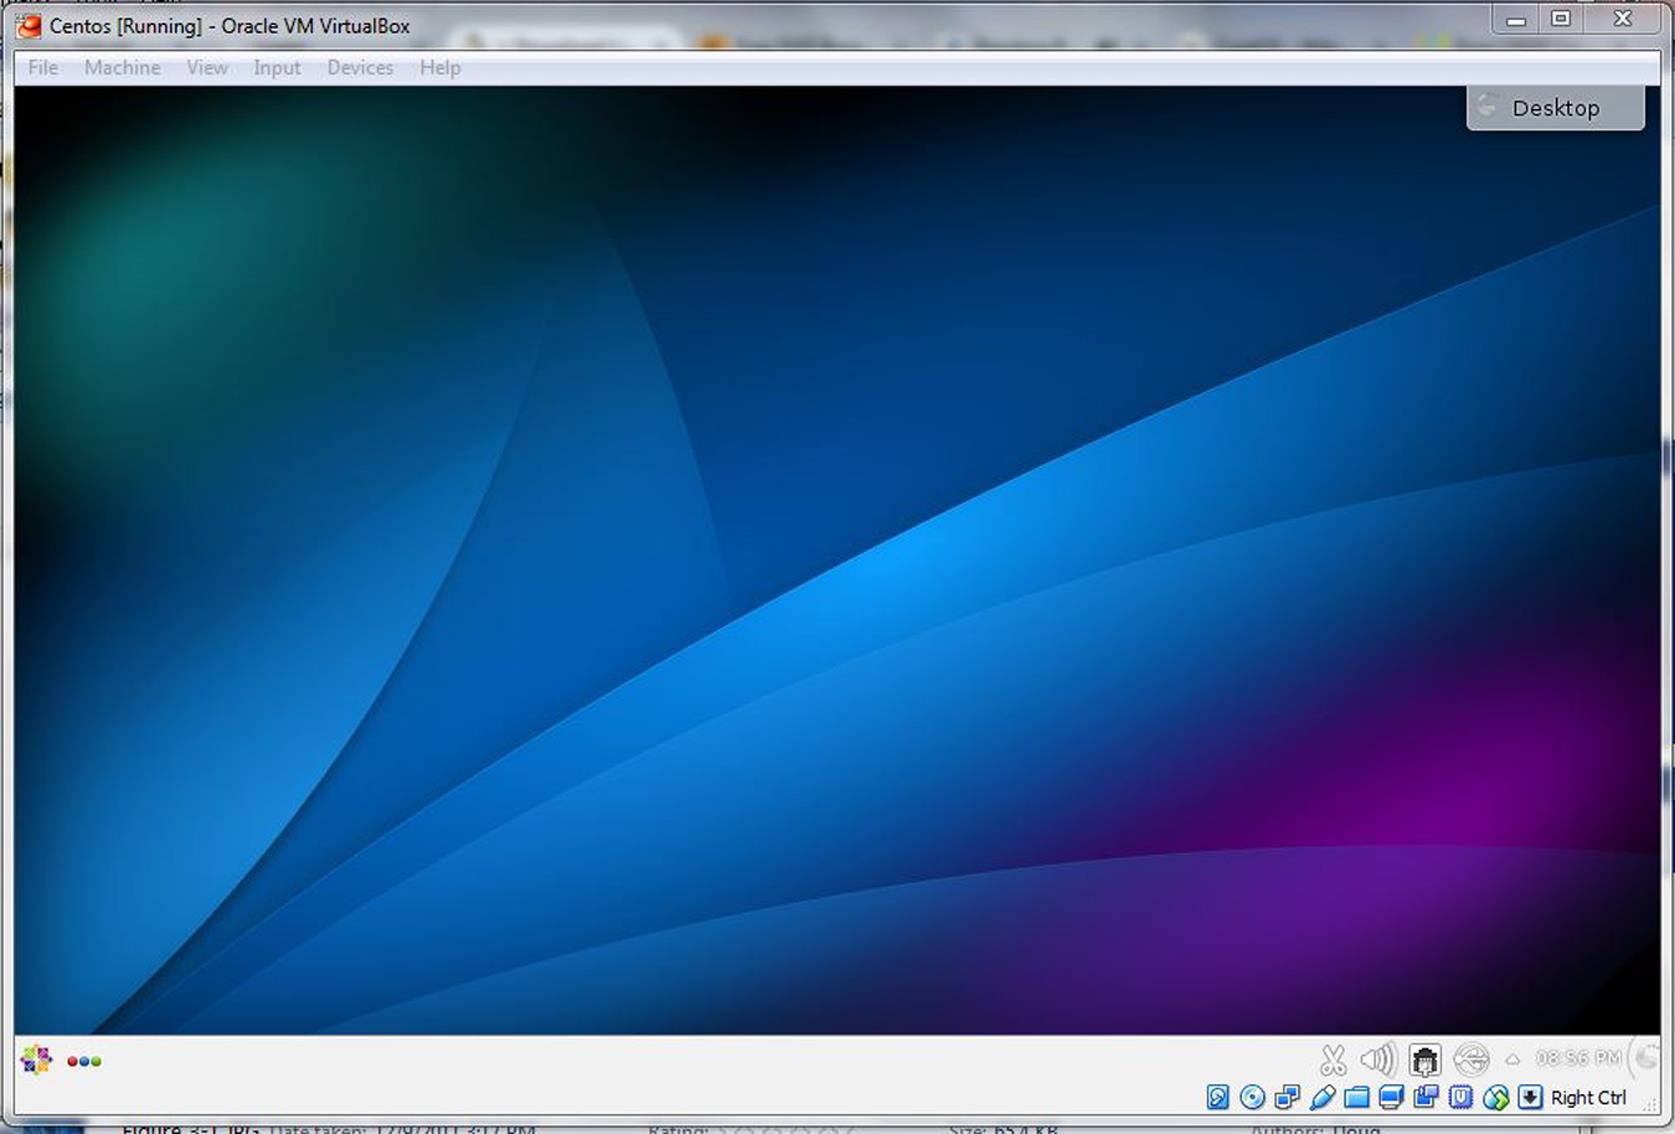
The default file manager in recent Red Hat-based releases is called Dolphin and, again, is not my cup of tea. I find the older file manager, Konqueror, to be easier to use and to provide a more useful presentation. You can change file managers by right-clicking on the Application Launcher and selecting Edit Applications… In the KDE Menu Editor, select Home and enter the Command: shown in Fig. 3.2.
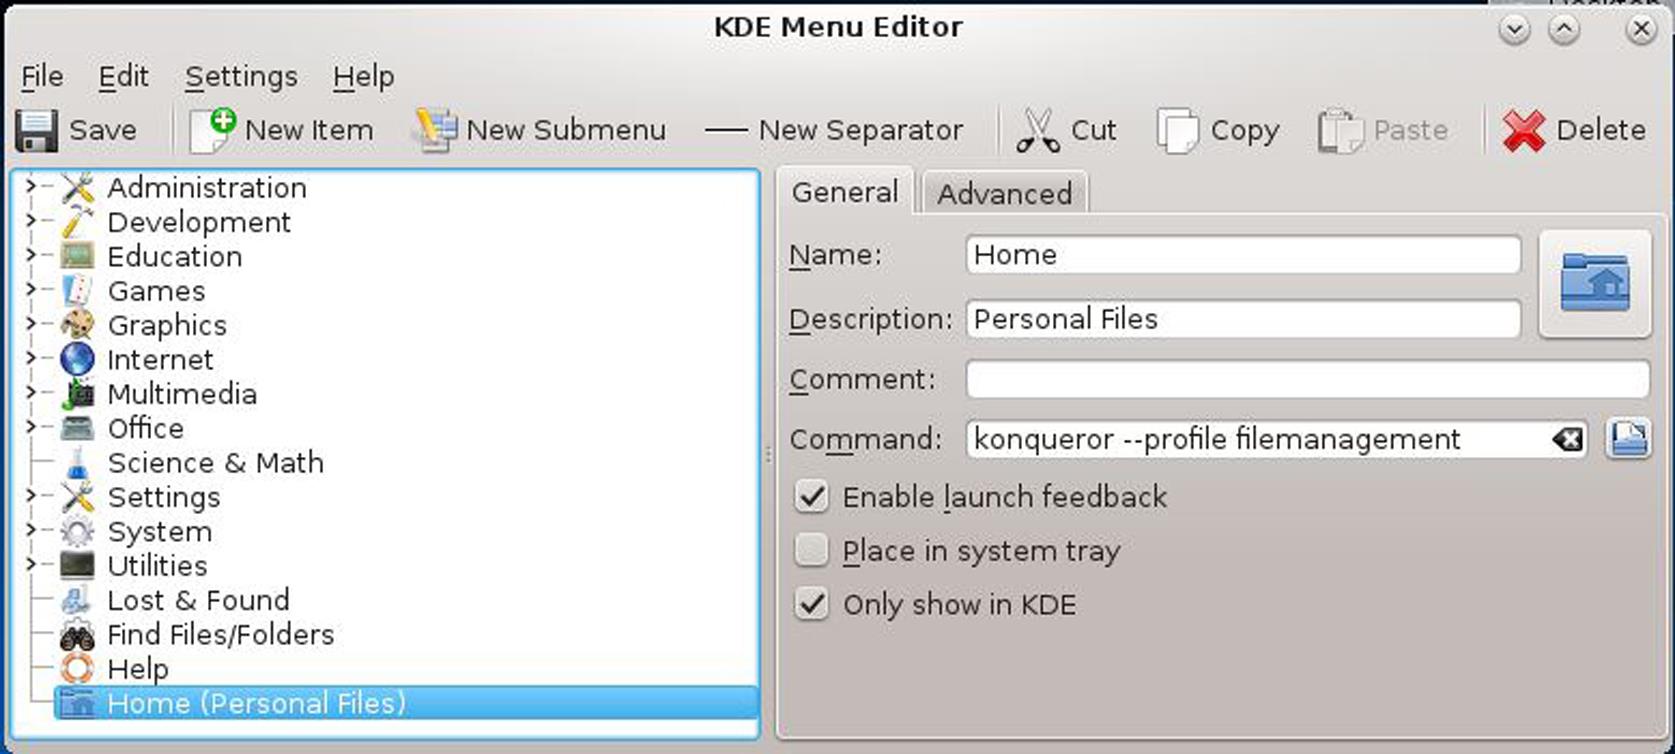
Fig. 3.3 shows Konqueror as I have it configured. Not surprisingly, that is not how it looks initially. To get the navigation panel on the left, click on the red “Root folder” icon on the far left. There are lots of options in Konqueror, so play around with it to get it exactly to your liking.
You probably won’t see much in your home directory initially. That’s partly because many of the entries are “hidden,” that is not visible to the file manager. By convention, any file or directory whose name begins with a dot is considered to be hidden. There’s an option in the View menu to Show hidden files.
Shell Window
The other window that you’ll be using a lot is the command shell that we will describe later in the chapter. From the Application Launcher Menu, select System > Konsole (Terminal). Fig. 3.4 shows how I have the shell configured. Again, there are numerous configuration options that are accessed by selecting Configure Profiles… from the Settings menu. I happen to like black text on a white background, and I set the size to 80× 25, because that matches the old serial CRT terminals that I used when I was starting out in this business.
The File menu offers options to open new shell windows and multiple tabs within a shell window. It is not unusual to have two or three shell windows open simultaneously, and to have two or three tabs in any of those windows.
Linux Features
Here are some of the important features of Linux, and Unix-style operating systems in general.
• Multitasking. The Linux scheduler implements true, preemptive multitasking, in the sense that a higher priority process made ready by the occurrence of an asynchronous event will preempt the currently running process. But while it is preemptible1, there are relatively large latencies in the kernel that make it generally unsuitable for hard real-time applications, although that has improved substantially over the years and we’ll go into that later on. Additionally, the default scheduler implements a “fairness” policy that gives all processes a chance to run.
• Multiuser. Unix evolved as a time-sharing system that allowed multiple users to share an expensive (at that time anyway) computer. Thus, there are a number of features that support privacy and data protection. Linux preserves this heritage and puts it to good use in server environments.2
• Multiprocessing. Linux offers extensive support for true symmetric multiprocessing where multiple processors are tightly coupled through a shared memory bus. This has become particularly significant in the era of multicore processors.
• Protected memory. Each Linux process operates in its own private memory space, and is not allowed to directly access the memory space of another process. This prevents a wild pointer in one process from damaging the memory space of another process. The errant access is trapped by the processor’s memory protection hardware, and the process is terminated with appropriate notification.
• Hierarchical file system. Yes, all modern operating systems—even DOS—have hierarchical file systems. But the Linux/Unix model adds a couple of nice wrinkles on top of what we are used to with traditional PC operating systems:
• Links. A link is simply a file system entry that points to another file, rather than being a file itself. Links can be a useful abstraction mechanism, and a way to share files among multiple users. They also find extensive use in configuration scenarios for selecting one of several optional files.
• Device-independent I/O. Again, this is nothing new, but Linux takes the concept to its logical conclusion by treating every peripheral device as an entry in the file system. From an application’s viewpoint, there is absolutely no difference between writing to a file and writing to, say, a printer.
Protected Mode Architecture
Before getting into the details of Linux, let’s take a short detour into protected mode architecture. The implementation of protected mode memory in contemporary Intel processors first made its appearance in the 80386. It utilizes a full 32-bit address for an addressable range of 4 GB. Access is controlled such that a block of memory may be: Executable, Read only, or Read/Write. Current Intel 64-bit processors implement a 48-bit address space.
The processor can operate in one of four Privilege Levels. A program running at the highest privilege level, level 0, can do anything it wants—execute I/O instructions, enable and disable interrupts, modify descriptor tables. Lower privilege levels prevent programs from performing operations that might be “dangerous.” A word processing application probably should not be messing with interrupt flags, for example. That’s the job of the operating system.
So application code typically runs at the lowest level, while the operating system runs at the highest level. Device drivers and other services may run at the intermediate levels. In practice, however, Linux and most other operating systems for Intel processors only use levels 0 and 3. In Linux, level 0 is called “Kernel Space” while level 3 is called “User Space.”
Real Mode
To begin our discussion of protected mode programming in the x86, it’s useful to review how “real” address mode works.
Back in the late 1970s, when Intel was designing the 8086, the designers faced the dilemma of how to access a megabyte of address space with only 16 bits. At the time a megabyte was considered an immense amount of memory. The solution they came up with, for better or worse, builds a 20-bit (1 megabyte) address out of two 16-bit quantities called the Segment and Offset. Shifting the segment value four bits to the left and adding it to the offset creates the 20-bit linear address (see Fig. 3.5).

The x86 processors have four segment registers in real mode. Every reference to memory derives its segment value from one of these registers. By default, instruction execution is relative to the Code Segment (CS), most data references (MOV for example) are relative to the data segment (DS), and instructions that reference the stack are relative to the Stack Segment (SS). The Extra Segment is used in string move instructions, and can be used whenever an extra DS is needed. The default segment selection can be overridden with segment prefix instructions.
A segment can be up to 64 Kbytes long, and is aligned on 16-byte boundaries. Programs less than 64 Kbytes are inherently position-independent, and can be easily relocated anywhere in the 1 Mbyte address space. Programs larger than 64 Kbytes, either in code or data, require multiple segments and must explicitly manipulate the segment registers.
Protected Mode
Protected mode still makes use of the segment registers, but instead of providing a piece of the address directly, the value in the segment register (now called the selector) becomes an index into a table of Segment Descriptors. The segment descriptor fully describes a block of memory including, among other things, its base and limit (see Fig. 3.6). The linear address in physical memory is computed by adding the offset in the logical address to the base contained in the descriptor. If the resulting address is greater than the limit specified in the descriptor, the processor signals a memory protection fault.

A descriptor is an 8-byte object that tells us everything we need to know about a block of memory.
Base Address[31:0]: Starting address for this block/segment.
Limit[19:0]: Length of this segment. This may be either the length in bytes (up to 1 Mbyte), or the length in 4 Kbyte pages. The interpretation is defined by the Granularity bit.
Type: A 4-bit field that defines the kind of memory that this segment describes
S 0=this descriptor describes a “System” segment. 1=this descriptor describes a code ordata segment.
DPL Descriptor Privilege Level: A 2-bit field that defines the minimum privilege level required to access this segment.
P Present: 1=the block of memory represented by this descriptor is present in memory. Used in paging.
G Granularity: 0=Interpret Limit as bytes. 1=Interpret Limit as 4 Kbyte pages.
Note that, with the Granularity bit set to 1, a single segment descriptor can represent the entire 4 Gbyte address space.
Normal descriptors (S bit=1) describe memory blocks representing data or code. The Type field is four bits, where the most significant bit distinguishes between Code and Data segments. Code segments are executable, data segments are not. A CS may or may not also be readable. A data segment may be writable. Any attempted access that falls outside the scope of the Type field—attempting to execute a data segment for example—causes a memory protection fault.
“Flat” Versus Segmented Memory Models
Because a single descriptor can reference the full 4 Gbyte address space, it is possible to build your system by reference to a single descriptor. This is known as “flat” model addressing and is, in effect, a 32-bit equivalent of the addressing model found in most 8-bit microcontrollers, as well as the “tiny” memory model of DOS. All memory is equally accessible, and there is no protection.
Linux actually does something similar. It uses separate descriptors for the operating system and each process so that protection is enforced, but it sets the base address of every descriptor to zero. Thus, the offset is the same as the virtual address. In effect, this does away with segmentation.
Paging
Paging is the mechanism that allows each task to pretend that it owns a very large flat address space. That space is then broken down into 4 Kbyte pages. Only the pages currently being accessed are kept in main memory. The others reside on disk.
As shown in Fig. 3.7, paging adds another level of indirection. The 32-bit linear address derived from the selector and offset is divided into three fields. The high-order 10 bits serve as an index into the Page Directory. The Page Directory Entry points to a Page Table. The next 10 bits in the linear address provide an index into that table. The Page Table Entry (PTE) provides the base address of a 4 Kbyte page in physical memory called a Page Frame. The low order 12 bits of the original linear address supplies the offset into the page frame. Each task has its own Page Directory pointed to by processor control register CR3.

At either stage of this lookup process, it may turn out that either the Page Table or the Page Frame is not present in physical memory. This causes a Page Fault, which in turn causes the operating system to find the corresponding page on disk and load it into an available page in memory. This in turn may require “swapping out” the page that currently occupies that memory.
A further advantage to paging is that it allows multiple tasks or processes to easily share code and data by simply mapping the appropriate sections of their individual address spaces into the same physical pages.
Paging is optional, you don’t have to use it, although Linux does. Paging is controlled by a bit in processor register CR0.
Page Directory and Page Table entries are each 4 bytes long, so the Page Directory and Page Tables are a maximum of 4 Kbytes, which also happens to be the Page Frame size. The high-order 20 bits point to the base of a Page Table or Page Frame. Bits 9 to 11 are available to the operating system for its own use. Among other things, these could be used to indicate that a page is to be “locked” in memory, i.e., not swappable.
Of the remaining control bits the most interesting are:
P Present: 1=this page is in memory. If this bit is 0, referencing this Page Directory or PTE causes a page fault. Note that when P==0 the remainder of the entry is not relevant.
A Accessed: 1=this page has been read or written. Set by the processor but cleared by the OS. By periodically clearing the Accessed bits, the OS can determine which pages have not been referenced in a long time, and are therefore subject to being swapped out.
D Dirty: 1=this page has been written. Set by the processor but cleared by the OS. If a page has not been written to, there is no need to write it back to disk when it has to be swapped out.
64-Bit Paging
The paging model thus far described is for 32-bit x86 processors. It is described as a 10-10-12 model, because the 32-bit linear address is divided into three fields of, respectively, 10 bits, 10 bits, and 12 bits. In a 64-bit machine, entries in the Page Directory and Page Table are 8 bytes, so a 4 KB page holds 512 entries, or 9 bits. Current 64-bit processors only implement 48 bits of physical addressing for a maximum of 256 TB of memory. Two more tiers of address translation are added to yield a 9-9-9-9-12 model.
The Linux Process Model
OK, back to Linux. The basic structural element in Linux is a process consisting of executable code and a collection of resources like data, file descriptors, and so on. These resources are fully protected, such that one process cannot directly access the resources of another. In order for two processes to communicate with each other, they must use the interprocess communication mechanisms defined by Linux, such as shared memory regions or pipes.
This is all well and good as it establishes a high degree of protection in the system. An errant process will most likely be detected by the system and thrown out before it can do any damage to other processes (see Fig. 3.8). But there is a price to be paid in terms of excessive overhead in creating processes and using the interprocess communication mechanisms.

A thread on the other hand is code only. Threads only exist within the context of a process, and all threads in one process share its resources. Thus, all threads have equal access to data memory and file descriptors. This model is sometimes called lightweight multitasking, to distinguish it from the Unix/Linux process model.
The advantage of lightweight tasking is that interthread communication is more efficient. The drawback, of course, is that any thread can clobber any other thread’s data. Historically, most real-time operating systems have been structured around the lightweight model. In recent years, of course, the cost of memory protection hardware has dropped dramatically. In response, many RTOS vendors now offer protected mode versions of their systems that look like the Linux process model.
The Fork() Function
Linux starts life with one process, the init process, created at boot time. Every other process in the system is created by invoking fork(). The process calling fork() is termed the parent, and the newly-created process is termed the child. So every process has ancestors, and may have descendants depending on who created who.
If you have grown up with multitasking operating systems where tasks are created from functions by calling a task creation service, the fork process can seem downright bizarre. fork() creates a copy of the parent process—code, data, file descriptors, and any other resources the parent may currently hold. This could add up to megabytes of memory space to be copied. To avoid copying a lot of stuff that may be overwritten anyway, Linux employs a copy-on-write strategy.
fork() begins by making a copy of the process data structure, and giving it a new process identifier (PID) for the child process. Then it makes a new copy of the Page Directory and Page Tables. Initially, the page table entries all point to the same physical pages as the parent process. All pages for both processes are set to read-only. When one of the processes tries to write, that causes a page fault, which in turn causes Linux to allocate a new page for that process and copy over the contents of the existing page.
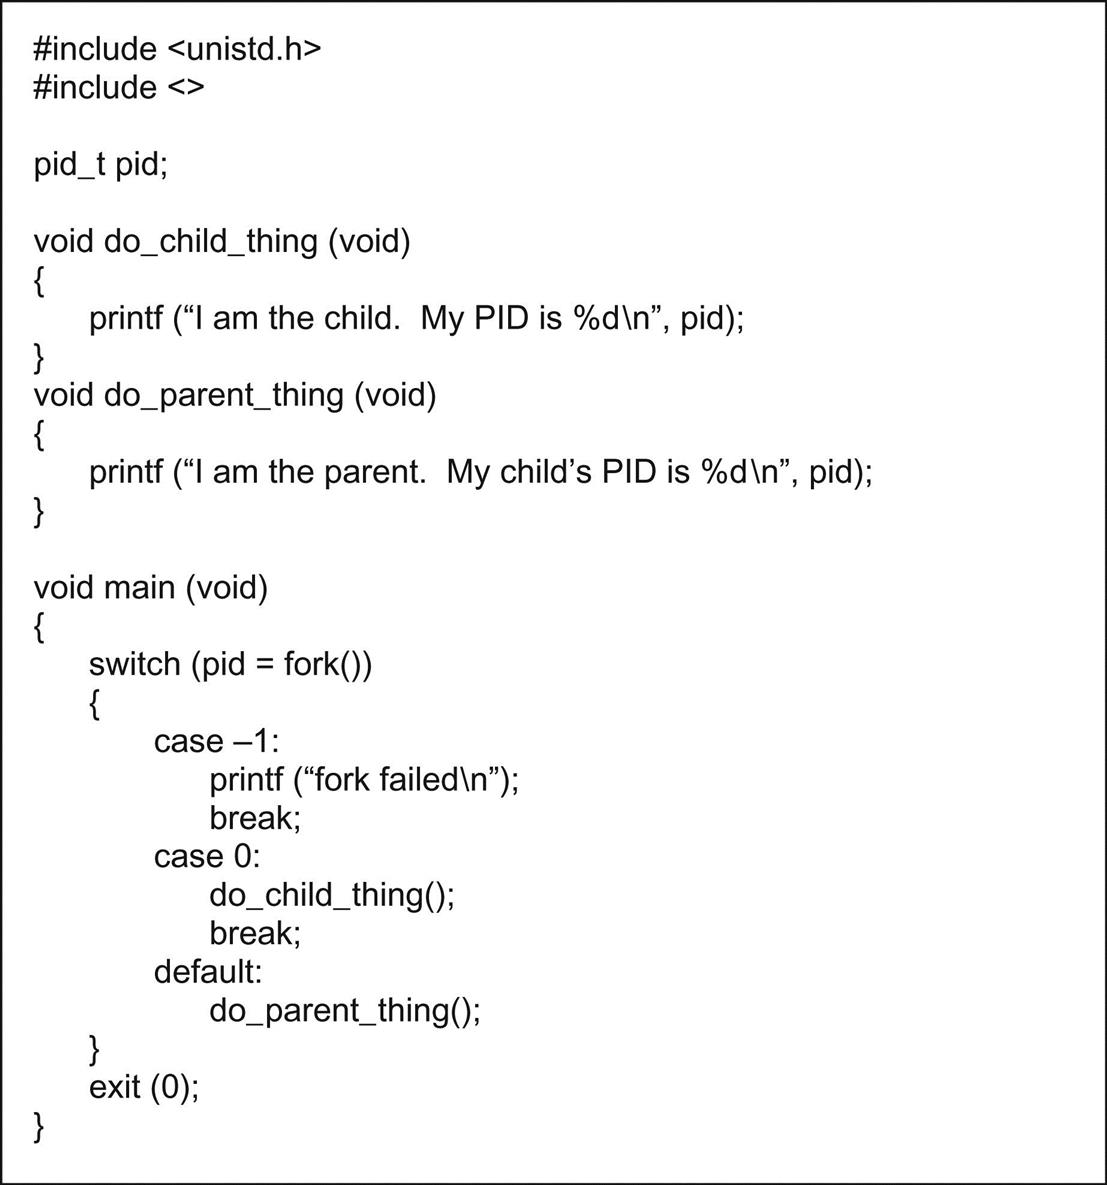
Since both processes are executing the same code, they both continue from the return from fork() (this is what is so bizarre!). In order to distinguish parent from child, fork() returns a function value of 0 to the child process, but returns the PID of the child to the parent process. Listing 3.1 is a trivial example of the fork call.
The Execve() Function
Of course, what really happens 99% of the time is that the child process invokes a new program by calling execve() to load an executable image file from disk. Listing 3.2 shows in skeletal form a simple command line interpreter. It reads a line of text from stdin, parses it, and calls fork() to create a new process. The child then calls execve() to load a file and execute the command just entered. execve() overwrites the calling process’s code, data, and SSs.
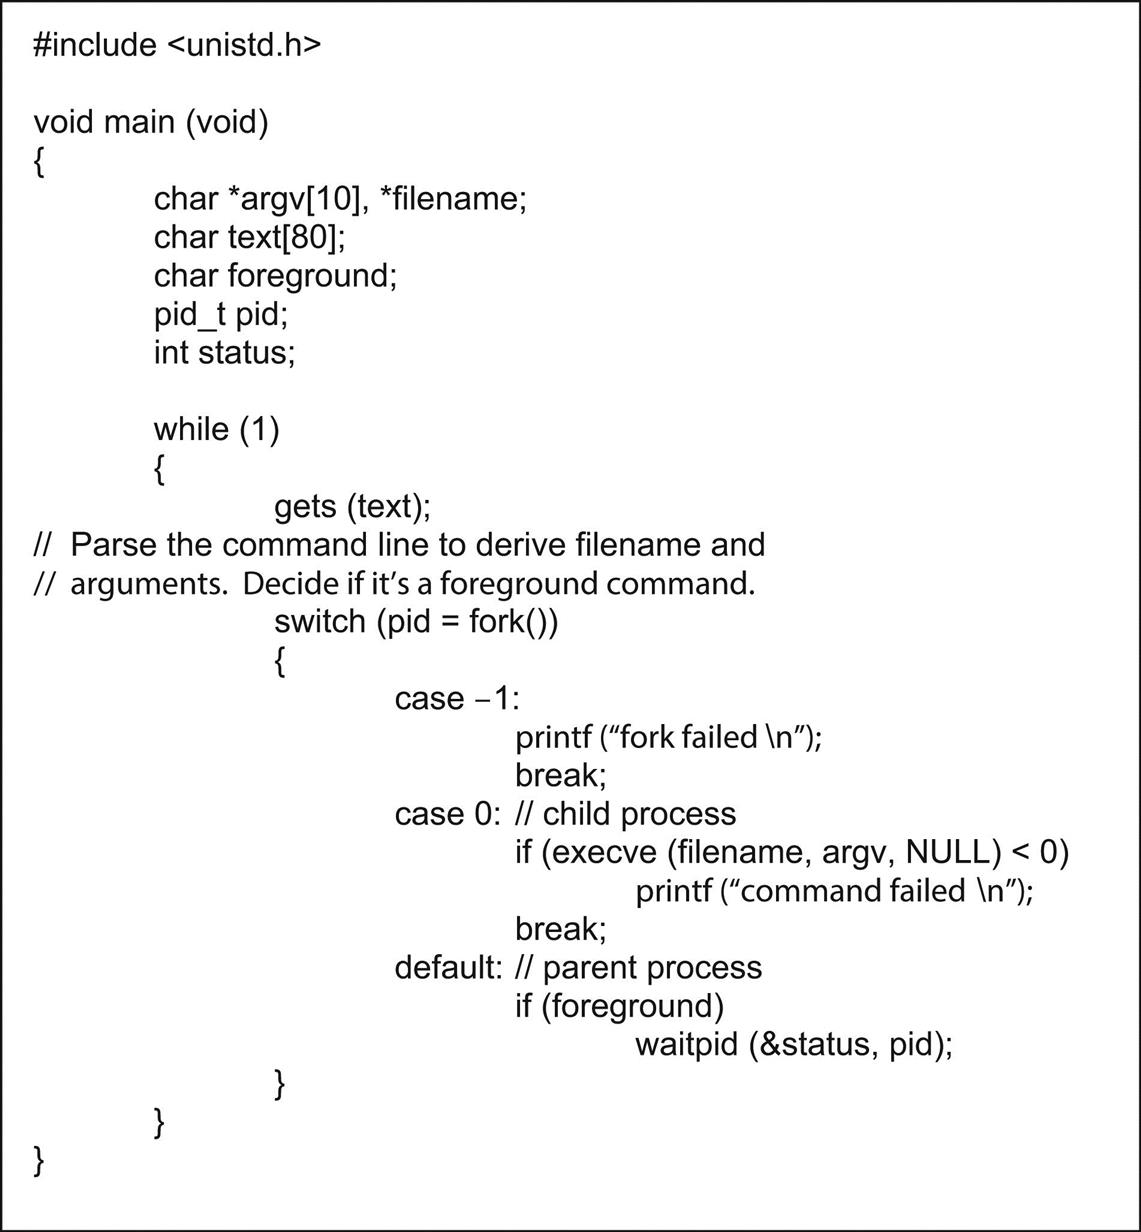
If this is a normal “foreground” command, the command interpreter must wait until the command completes. This is accomplished with waitpid() which blocks the calling process until the process matching the pid argument has completed. Note, by the way, that most multitasking operating systems do not have the ability to block one process or task pending the completion of another.
If execve() succeeds, it does not return. Instead, control is transferred to the newly-loaded program.
The Linux File System
The Linux file system is in many ways similar to the file system you might find on a Windows PC or a Macintosh. It is a hierarchical system that lets you create any number of subdirectories under a root directory identified by “/.” Like Windows, file names can be very long. However, in Linux, as in most Unix-like systems, filename “extensions,” the part of the filename following “.,” have much less meaning than they do in Windows. For example, while Windows executables always have the extension “.exe,” Linux executables rarely have an extension at all. By and large, the contents of a file are identified by a file header, rather than a specific extension identifier. Nevertheless, many applications, the C compiler for example, do support default file extensions.
Unlike Windows, file names in Linux are case-sensitive. Foobar is a different file from foobar is different from fooBar. Sorting is also case-sensitive. File names beginning with upper case letters appear before those that begin with lower case letters in directory listings sorted by name3. File names that begin with “.” are considered to be “hidden,” and are not displayed in directory listings unless you specifically ask for them.
Additionally, the Linux file system has a number of features that go beyond what you find in a typical Windows system. Let us take a look at some of the features that may be of interest to embedded programmers.
File Permissions
Because Linux is multiuser, every file has a set of permissions associated with it to specify what various classes of users are allowed to do with that file. Get a detailed listing of some Linux directory, either by entering the command ls –l in a command shell window, or with the desktop file manager. Part of the entry for each file is a set of 10 flags and a pair of names that look something like this:
In this example, Andy is the owner of the file, and the file belongs to a group of users called physics, perhaps the physics department at some university. Generally, but not always, the owner is the person who created the file.
The first of the 10 flags identifies the file type. Ordinary files get a dash here. Directories are identified by “d,” links are “l,” and so on. We will see other entries for this flag when we get to device drivers later. The remaining nine flags divide into three groups of three flags each. The flags are the same for all groups, and represent respectively permission to read the file, “r,” write the file, “w,” or execute the file if it’s an executable, “x.” Write permission also allows the file to be deleted.
The three groups then represent the permissions granted to different classes of users. The first group identifies the permissions granted the owner of the file, and virtually always allows reading and writing. The second flag group gives permissions to other members of the same group of users. In this case, the physics group has read access to the file but not write access. The final flag group gives permissions to the “world,” i.e., all users.
The “x” permission is worth a second look. In Windows, a file with the extension .exe is assumed to be executable. In Linux, a binary executable is identified by the “x” permission, since we don’t have an explicit file extension to identify it. Furthermore, only those classes of users whose “x” permission is set are allowed to invoke execution of the file. So if I am logged in as an ordinary user, I am not allowed to invoke programs that might change the state of the overall system, such as changing the network address.
Another interesting feature of “x” is that it also applies to shell scripts, which we will come to later in this chapter. For you DOS fans, a shell script is the same thing as a .bat file. It is a text file of commands to be executed as a program. But the shell won’t execute the script unless its “x” bit is set.
The “Root” User
There is one very special user, named “root,” in every Linux system. root can do anything to any file, regardless of the permission flags. Root is primarily intended for system administration purposes, and is not recommended for day-to-day use. Clearly, you can get into a lot of trouble if you are not careful, and root privileges pose a potential security threat. Nevertheless, the kinds of things that embedded and real-time developers do with the system often require write or executable access to files owned by root, and thus require you to be logged in as the root user.
In the past, I would just log in as root most of the time, because it was less hassle. One consequence of this is that every file I created was owned by root, and could not be written by an ordinary user without changing the permissions. It became a vicious circle. The more I logged in as root, the more I had to log in as root to do anything useful. I’ve since adopted the more prudent practice of logging in as a normal user, and only switching to root when necessary.
If you are logged on as a normal user, you can switch to being root with either the su, substitute user, or sudo commands. The su command with no arguments starts up a shell with root privileges, provided you enter the correct root password. To return back to normal user status, terminate the shell by typing ^d or exit.
The sudo command allows you to execute a command as root, provided you are properly authorized to do so in the “sudoers file,” /etc/sudoers. The sudoers file is, of course, owned by root, so only the root user can authorize sudoers. Once you have been authenticated by entering your own password, you may use sudo for a short period of time (default 5 minutes) without reentering your password.
For example, if I wanted to change the permissions on a file in the /dev directory, I could execute:
I would be prompted for my password and, if entered successfully, the command would be executed. I could then continue to execute sudo commands for 5 minutes without having to reenter my password. Note that sudo offers better security than su, because the root user must authorize sudoers and the root password does not need to be disclosed.
The /Proc File System
The /proc file system is an interesting feature of Linux. It acts just like an ordinary file system. You can list the files in the /proc directory, you can read and write the files, but they don’t really exist. The information in a /proc file is generated on the fly when the file is read. The kernel module that registered a given /proc file contains the functions that generate read data and accept write data.
The /proc files are a window into the kernel. They provide dynamic information about the state of the system in a way that is easily accessible to user-level tasks and the shell. In the abbreviated directory listing of Fig. 3.9, the directories with number labels represent processes. Each process gets a directory under /proc, with several directories and files describing the state of the process.

The Filesystem Hierarchy Standard
A Linux system typically contains a very large number of files. For example, a typical CentOS installation may contain upwards of 30,000 files occupying several GB of disk space. Clearly it is imperative that these files be organized in some consistent, coherent manner. That is the motivation behind the Filesystem Hierarchy Standard (FHS). The standard allows both users and software developers to “predict the location of installed files and directories”4. FHS is by no means specific to Linux. It applies to Unix-like operating systems in general.
The directory structure of a Linux file system always begins at the root, identified as “/.” FHS specifies several directories and their contents directly subordinate to the root. This is illustrated in Fig. 3.10. The FHS starts by characterizing files along two independent axes:
• Sharable versus nonsharable. A networked system may be able to mount certain directories through Network File System, such that multiple users can share executables. On the other hand, some information is unique to a specific computer, and is thus not sharable.
• Static versus. variable. Many of the files in a Linux system are executables that do not change, they are static. But the files that users create or acquire, by downloading or e-mail for example, are variable. These two classes of files should be cleanly separated.
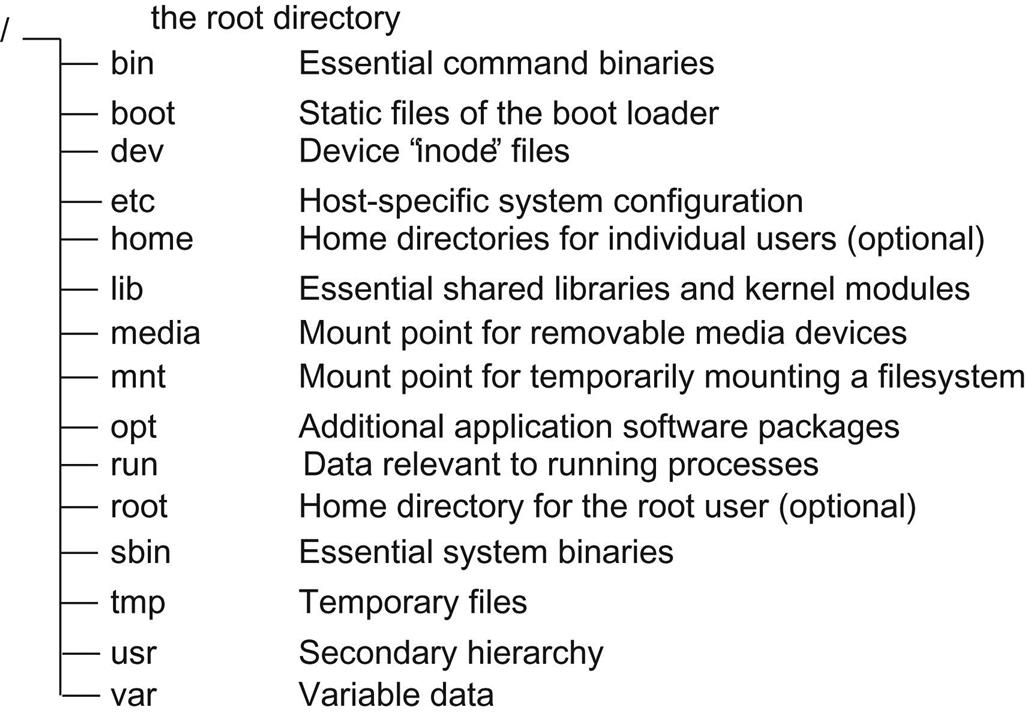
Here is a description of the directories defined by FHS:
• /bin Contains binary executables of commands used both by users and the system administrator. FHS specifies what files /bin must contain. These include, among other things, the command shell and basic file utilities. /bin files are static and sharable.
• /boot Contains everything required for the boot process except configuration files and the map installer. In addition to the kernel executable image, /boot contains data that is used before the kernel begins executing user-mode programs. /boot files are static and nonsharable.
• /etc Contains host-specific configuration files and directories. With the exception of mtab, which contains dynamic information about file systems, /etc files are static. FHS identifies three optional subdirectories of /etc:
• /opt Configuration files for add-on application packages contained in /opt.
• /sgml Configuration files for SGML and XML
• /X11 Configuration files for X windows.
In practice, most Linux distributions have many more subdirectories of /etc representing optional startup and configuration requirements.
• /home (Optional) Contains user home directories. Each user has a subdirectory under home, with the same name as his/her user name. Although FHS calls this optional, in fact it is almost universal among Unix systems. The contents of subdirectories under /home is, of course, variable.
• /lib Contains those shared library images needed to boot the system and run the commands in the root file system, i.e., the binaries in /bin and /sbin. In Linux systems /lib has a subdirectory, /modules, that contains kernel loadable modules.
• /media Mount point for removable media. When a removable medium is auto-mounted, the mount point is usually the name of the volume.
• /mnt Provides a convenient place to temporarily mount a file system.
• /opt Contains optional add-in software packages. Each package has its own subdirectory under /opt.
• /run Data relevant to running processes.
• /root Home directory for the root user5. This is not a requirement of FHS, but is normally accepted practice and highly recommended.
• /sbin Contains binaries of utilities essential for system administration such as booting, recovering, restoring, or repairing the system. These utilities are normally only used by the system administrator, and normal users should not need /sbin in their path.
• /usr Secondary hierarchy, see below.
• /var Variable data. Includes spool directories and files, administrative and logging data, and transient and temporary files. Basically, system-wide data that changes during the course of operation. There are a number of subdirectories under /var.
The /usr hierarchy
/usr is a secondary hierarchy that contains user-oriented files. Fig. 3.11 shows the subdirectories under /usr. Several of these subdirectories mirror functionality at the root. Perhaps the most interesting subdirectory of /usr is /src for source code. This is where the Linux source is generally installed. You may in fact have sources for several Linux kernels installed in /src under subdirectories with names of the form:

You would then have a logical link named linux pointing to the kernel version you are currently working with.
“Mounting” File Systems
A major difference between Windows and Linux file systems has to do with how file structured devices, hard disks, floppy drives, CDROMs, etc., are mapped into the system’s directory or hierarchy structure. The Windows file system makes devices explicitly visible, identifying them with a letter-colon combination, as in “C:.” Linux, on the other hand, emphasizes a unified file system in which physical devices are effectively rendered invisible.
The mechanism that maps physical devices into the file system’s directory structure is called “mounting”6. Removable media devices such as the CD-ROM drive are the most visible manifestation of this feature. Before you can read a CD-ROM, you must mount the drive onto an existing node in the directory structure using the mount command as in:
This command works because the file /etc/fstab has information about what device is normally mounted at /media/cdrom, and what type of file system, in this case iso9660, the device contains.
Like file permissions, mount can sometimes be a nuisance if all you want to do is read a couple files off a CD. But the real value of the mount paradigm is that it is not limited to physical devices directly attached to the computer, nor does it only understand native Linux file systems. As we will see later, we can mount parts of file systems on remote computers attached to a network to make their files accessible on the local machine. It is also possible to mount a device that contains a DOS FAT or VFAT file system. This is particularly useful if you build a “dual-boot” system that can boot up into either Windows or Linux. Files can be easily shared between the two systems. Or, if your embedded device has an SD or micro SD slot, or even USB, the ability to read VFAT file systems is extremely useful.
System Configuration
The section above on the FHS mentioned the /etc directory. Here is one place where Unix systems really shine relative to Windows. OK, there may be any number of ways that Unix outshines Windows. In any case, the /etc directory contains essentially all of the configuration information required by the kernel and applications in the form of plain text files. The syntax and semantics of these files is not always immediately obvious, but at least you can read them. The format of many of the kernel’s configuration files is documented in man pages (see section below on help).
By contrast, Windows systems have made a point of hiding configuration information in a magical place called “the Registry” (cue ominous music). Mortal users are often cautioned to stay away from the Registry, because improper changes can render the system unbootable. In fact, the registry can only be changed by a special program, regedit, and it was only a few years ago that I finally figured out where the registry physically resides.
If you have ever mustered up the courage to run regedit and actually look at the registry, you have no doubt noticed that the entries are rather obscure symbols, and the values are even more obscure numeric values. I submit that this was absolutely intentional on Microsoft’s part. They didn’t want idiot consumers mucking around with their computers, and possibly bricking7 them. Linux users, on the other hand, know what they are doing (it says here), and are entitled to see and modify configuration data to their heart’s content.
The Shell
One of the last things that happens as a Linux system boots up is to invoke the command interpreter program known as the shell. Its primary job is to parse commands you enter at the console, and execute the corresponding program. But the shell is much more than just a simple command interpreter. It incorporates a powerful, expressive interpretive programming language of its own. Through a combination of the shell script language and existing utility programs, it is quite possible to produce very sophisticated applications without ever writing a line of C code. In fact, this is the general philosophy of Unix programming. Start with a set of simple utility programs that do one thing and one thing well, and then link them together through the shell scripting language.
The shell scripting language contains the usual set of programming constructs for looping, testing, functions, and so on. But perhaps the neatest trick in the shell bag is the concept of “pipes.” This is a mechanism for streaming data from one program to another. The metaphor is perfect. One program dumps bytes into one end of the pipe, while a second program takes the bytes out the other end.
Most Linux/Unix utility programs accept their input from a default device called “stdin.” Likewise, they write output to a device called “stdout.” Any error messages are written to “stderr.” Normally, stdin is the keyboard, while stdout and stderr are the display. But we can just as easily think of stdin and stdout as two ends of a pipe.
stdin and stdout can be redirected, so that we can send output to, for example, a file or take input from a file. In a shell window, try typing just the command cat with no arguments. cat8 is perhaps the simplest of all Unix utilities. All it does is copy stdin to stdout, line by line. When you enter the command with no arguments, it patiently waits at stdin for keyboard input. Enter a line of text, and it will send that line to stdout, the display. Type Crtl-C to exit the program.
Enter a line of text. This time you do not see the line repeated because the “>” operator has redirected stdout to the file textfile. Type a few lines, then Ctrl-C to exit.
The final step in this exercise is:
Voila! The file you created with the previous command shows up on the screen because the “<” operator redirected stdin to textfile. cat actually implements a shortcut, so that if you enter a filename as a command line argument, without the < operator, it takes that as an input file. That is:
The real power of pipes though is the “|” operator, which takes stdout of one program and feeds it to stdin of another program. When I did the above exercises, I created a textfile containing:
grep, as you may have guessed, is a filter. It attempts to match its command line arguments against the input stream stdin. Lines containing the argument text are passed to stdout. Other lines are simply ignored. What happened here is that the output of cat became the input to grep.
In typical Unix fashion, grep stands for Get Regular Expression “something.” I forget what the “p” stands for. Regular expressions are in fact a powerful mechanism, a scripting language if you will, for searching text. grep embodies the syntax of regular expressions.
Shell scripts and makefiles make extensive use of redirection and piping.
Some other shell features are worth a brief mention, because they can save a lot of typing. The shell maintains a command history that you can access with the up arrow key. This allows you to repeat any previous command, or edit it slightly to create a new, similar command. There is a history command that dumps out the accumulated command history of the system or some subset. The history is maintained in the file .bash_history in your home directory.
Fig. 3.12 shows the last few lines of the history command on my system. To re-execute any command in the list, simply enter “!” followed by the command number in the history list as in:
to re-execute history.

Another really cool feature is auto-completion, which attempts to complete filename arguments for you. Say I wanted to execute:
Provided the remainder of the filename is unique in the current directory, the shell will automatically complete it, saving me the trouble of typing the whole filename. The shell beeps if it cannot find a unique match. Then you just have to type a little more until the remainder is unique.
Finally, the “~” character represents your home directory. So from anywhere in the file system you can execute cd ~ to go to your home directory.
There are, in fact, several shell programs in common use. They all serve the same basic purpose, yet differ in details of syntax and features. The most popular are:
• Bourne Again SHell – bash. bash is a “reincarnation” of the Bourne shell, sh, originally written by Stephen Bourne and distributed with Unix version 7. It is the default on most Linux distributions, and you should probably use it unless you have good reason, or strong feelings, for using a different shell.
• Korn Shell – ksh. Developed by David Korn at AT&T Bell Laboratories in the early 1980s. It features more advanced programming facilities than bash, but nevertheless maintains backward compatibility.
• Tenex C Shell – tcsh. A successor to the C shell, csh that was itself a predecessor to the Bourne shell. Tenex was an operating system that inspired some of the features of tcsh.
• Z Shell – zsh. Described as an extended Bourne shell with a large number of improvements, including some of the most useful features of bash, ksh, and tcsh.
The subject of shell programming is worthy of a book in itself, and there are many. When I searched Amazon.com for “linux shell programming,” I got 248 hits.
Getting Help
The official documentation for a Unix/Linux system is a set of files called “man pages,” man being short for manual. man pages are accessed with the shell command man as in:
to get help on the shell copy command. Try it. Type man man at the shell prompt to learn more about the man command. man presents the page a screen at a time with a “:” prompt on the bottom line. To move to the next screen, type <space>. To exit man before reaching the end of the page, type “q.” You can also page up and page down through the man page. Interestingly enough, you will not find that information in the man man page. The writing style in man pages is rather terse; they’re reference in nature, not tutorial. The information is typically limited to what the command does, what its arguments are, and what options it takes.
To make it easier to find a specific topic, the man pages are organized into sections as follows:
Section 1: User Commands entered at the shell prompt.
Section 2: The kernel API functions.
Section 3: C library functions.
Section 4: Devices. Information on specific peripheral devices.
Section 5: File formats. Describes the syntax and semantics for many of the files in /etc.
Section 8: System Administration. Shell commands primarily used by the system administrator.
Another useful source of information is “info pages.” Info pages tend to be more verbose, providing detailed information on a topic. Info pages are accessed with the info command. Try this one:
to learn more about the GCC compiler package.
In the graphical desktop environments, KDE and GNOME, you can also access the man and info pages graphically. I find this especially useful with the info pages to find out what is there.
Finally, no discussion of getting help for Linux would be complete without mentioning Google. When you are puzzling over some strange behavior in Linux, Google is your friend. One of my common frustrations is error messages, because they rarely give you any insight into what really went wrong. So type a part of the error message into the Google search box. You’ll likely get back at least a dozen hits of forum posts that deal with the error, and chances are something there will be useful.
With a good basic understanding of Linux, our next task is to configure the development workstation and install the software that will allow us to develop target applications.