Installing linux
Abstract
This chapter goes through the process of installing Linux for those readers who may not yet have Linux installed. It begins with a review of some of the more popular Linux distributions. Next we briefly review the hardware requirements, and go on to describe the three main installation scenarios: stand-alone, dual boot, and virtualization. The concept of disk partitioning is reviewed, as it becomes an issue in the dual-boot scenario. Then we go through the installation process, suggesting which options to select for compatibility with the remainder of the book. By the end of the chapter the reader has a fully functional Linux system.
Keywords
Linux distribution; dual boot; virtual machine manager; Fedora; Ubuntu; Debian; Suse; Red Hat; VMWare; VirtualBox; Live CD
If Bill Gates had a nickel for every time Windows crashed… Oh wait, he does.
Spotted on Slashdot.org
While it is possible to do embedded Linux development under Windows, it is not easy. Basic Windows lacks many of the tools and features that facilitate embedded development. And why would you want to do that anyway? So we’ll keep our focus firmly on Linux, and not delve into the process of setting up a Windows development system.
Even though this book is not an introduction to Linux, it is worth taking a little time to review the installation process and alternative configurations. If you already have a Linux installation that you’re happy with, you can probably skip this chapter unless you want to learn about virtualization or dual-booting.
The instructions and steps in this chapter are primarily oriented toward CentOS, but the general concepts apply to pretty much any Linux installation.
Distributions
Linux installation has improved substantially over the years, to the point that it is a reasonably straightforward, just about painless process. The easiest, and indeed the only sensible, way to install Linux is from a distribution, or “distro” for short. There are several hundred distributions floating around on the net, many of which address specific niches such as embedded.
A distribution contains just about everything you would need in your Linux installation, including the kernel, utility programs, graphical desktop environments, development tools, games, media players, and on and on. Most, but not all, distributions make use of a package manager, software that combines the individual components into easily managed packages. Fedora and Red Hat distributions use RPM, the Red Hat Package Manager. Debian and its derivatives such as Ubuntu use dpkg. A package contains the software for the component, i.e., the executables, libraries, and so on, plus scripts for installing and uninstalling the component, and dependency information showing what other packages this one requires.
A typical distro may incorporate several thousand packages. In fact, this becomes a marketing game among the various projects and distributors of Linux. “My distro has more packages than your distro.” Here are some of the more popular and user friendly distributions, any of which are suitable for embedded development. Web locations are given in the Resources section at the end of the chapter:
Linux Mint
According to its website, “Linux Mint is the most popular desktop Linux distribution and the 3rd most widely used home operating system behind Microsoft Windows and Apple Mac OS.” Well-known open source blogger Steven J Vaughan-Nichols claims in a July 2016 ZDNet article that Linux Mint is the “best of all Linux desktops.” “It’s not only the best Linux desktop, it’s the best desktop operating system—period.” techmint.com claims that Mint was the most popular distribution in 20151.
Mint is based on Debian and Ubuntu. The Mint team’s stated objective is “to produce a modern, elegant and comfortable operating system which is both powerful and easy to use.” It seems to be focused on the consumer desktop, with extensive support for multimedia. The latest release is 18 (Sarah), released in August 2016.
Debian GNU/Linux
The Debian Project is an all-volunteer effort comprising around 1000 active developers around the world, supported entirely by donations. The website DistroWatch.com ranks Debian as second in terms of number of page hits per day. In first place is a distro called mint. Debian is one of the oldest distributions, having been first released in 1993.
Debian is known for its “abundance of options.” The current stable release, 8.5 (Jesse), has access to online repositories with over 40,000 packages supporting 10 computer architectures, including the usual Intel/AMD 32- and 64-bit processors as well as ARM and IBM eServer zSeries mainframes. Debian claims to be one of the first distributions to use a robust package management system, which is different from RPM. Debian packages get the file extension .deb.
Debian tends to have a longer and perhaps less consistent release cycle than many of the other popular distributions, typically taking 2 years between major releases.
Ubuntu
According to its website, Ubuntu is an ancient African word meaning “humanity to others.” It also means “I am what I am because of who we all are.” It is a fork of the Debian code base first released in 2004 with the aim of creating an easy to use version of Linux. It is available in two versions, desktop and server.
Each release has a version number consisting of the year and month of release, e.g., 16.04 was released in April of 2016. Releases are made on a predictable 6 month schedule, with each fourth release getting long-term support (LTS). LTS releases have been supported for 3 years for the desktop version, and 5 years for the server version. With the pending release of version 12.04, desktop support will be extended to 5 years.
Historically, Ubuntu, like most other Linux distros, supported both the GNOME and KDE graphical desktop environments. Release 11.04 in spring 2011 introduced a new desktop environment called Unity that is a “shell interface” for GNOME. The intention is to make more efficient use of space on the limited size screens of notebooks and tablets. Some users have criticized the new interface as “too different from and less capable than GNOME,” while others find the minimalist approach more appealing than the older paradigm.
While Ubuntu emphasizes ease of use, the developers have made basic system configuration more difficult by eliminating many of the graphical dialogs that support setup and configuration in, e.g., Fedora. Furthermore, the root user account is “locked” so that it is not possible to directly log in as root. You must use the sudo command. This apparently is intentional, in the tradition of Windows, as a way of discouraging “average users” from messing around with their systems.
Difficulty in configuration will become an issue in Chapter 4, The host development environment, when we have to change some network parameters. I don’t recommend Ubuntu unless it’s your favorite distribution, and you’re very comfortable with it.
Ubuntu was the third most popular distribution in 2015.
Red Hat Enterprise Linux
Red Hat Enterprise Linux (RHEL) is specifically targeted at the commercial market, including mainframes. There are server versions for x86, x86-64, Itanium, PowerPC, and IBM System z, and desktop versions for x86 and x86-64. While RHEL derives many of its features from Fedora, it has a more conservative release schedule, with major releases appearing about every 2 years. As of late 2016, the latest stable release is 7.2.
Even though RHEL is a commercial product, it is based entirely on Open Source code. Consequently, Red Hat makes the entire source code base available for download. Several groups have taken advantage of this to rebuild their own versions of RHEL. One of the best known of these is CentOS, said to be the 8th most popular distribution, as of late 2015. These rebuilds remove any reference to Red Hat’s trademarks, and point the update systems at non-Red Hat servers. Otherwise, they are functionally identical.
While the rebuilds are free, they are of course not eligible for any kind of Red Hat support.
Fedora
The Fedora Project was started in late 2003 when Red Hat discontinued its retail line of Linux distributions to focus on enterprise software. The original Fedora release was based on Red Hat Linux 9. Red Hat continues to sponsor the Fedora Project, which serves as a launching point for releases of RHEL.
Fedora prides itself on being on the leading edge of open source software development and, as a result, it has a relatively aggressive release schedule, about every 6 months. As of July 2016, the current release is 24. Having started with Red Hat, Fedora was my favorite Linux distribution up to version 17. I tend to stay one or two major releases behind the leading edge, and only update about every two or three releases. I don’t have to have the absolute latest and greatest2. Hey, if it works, stick with it.
Fedora only runs on Intel/AMD platforms.
I have two basic complaints about new releases. This may also apply to distros other than Fedora:
1. Features tend to “move around.” I’m perhaps sensitive to this, because I’m inclined to use the graphical dialogs for configuration and setup. It seems like with each new release, the path to these dialogs changes.
2. Each successive release seems to get more “Windows-like.” That is, more menus turn into cutsie icons rather than simple, straightforward text selections. This no doubt reflects a desire to appeal to a more “consumer” audience, but as a computer professional, I find it off-putting. Fortunately, at least for now, there are ways to revert back to the classical menu styles.
I stuck with Fedora 17 long after it was officially obsolete, because I ran into problems with later versions that I never could adequately solve. I subsequently shifted over to CentOS.
CentOS
CentOS is an abbreviation for Community Enterprise Operating System. It is a free and open source version of RHEL. It is derived from the same open source code as RHEL, with Red Hat’s branding and logos changed.
In January 2014, Red Hat announced that it would sponsor the CentOS project, “helping to establish a platform well-suited to the needs of open source developers that integrate technologies in and around the operating system.” As a result of these changes, ownership of CentOS trademarks was transferred to Red Hat, which now employs most of the CentOS head developers; however, they work as part of the Red Hat’s Open Source and Standards team, which operates separately from the RHEL team.
The latest release is 7.2-1511, December 2015. As of release 7.0, CentOS only officially supports the x86-64 architecture. Unofficial ports are available for alternate architectures. Version 7 will have 10 years of support until 2024.
In July 2010, CentOS overtook Debian to become the most popular Linux distribution for web servers, with almost 30% of all Linux web servers using it, according to w3techs.com. Debian subsequently regained the lead in January 2012.
While just about everything in this book is “distribution-agnostic,” one area where distros tend to differ is in setup and configuration. We’ll confront that issue in Chapter 4, The host development environment, when we need to make some changes to networking. The descriptions there will emphasize CentOS. With that in mind, if you haven’t yet settled on a favorite Linux distribution, I would recommend CentOS, at least while you’re working through the book.
SUSE
SuSE was originally developed in Germany, with the initial release in 1994 making it the oldest existing commercial distribution. The name is a German acronym for Software und System Entwicklung (Software and Systems Development). The name was subsequently changed to SUSE, and is no longer considered an acronym.
Novell acquired SUSE Linux AG in 2003, and in 2005 announced the openSUSE project to allow outside developers to participate. SUSE Linux is available in two forms: openSUSE, driven by the openSUSE project; and SUSE Linux Enterprise, a commercial version. Much like Fedora, openSUSE is on the “bleeding edge” of Linux development with an aggressive release schedule, while SUSE Linux Enterprise sticks to a more conservative schedule.
Hardware Requirements
Having selected a distribution, you need something to run it on. Any modern PC will work just fine as a development host. Minimum requirements are: a Pentium class processor, 1 GB of RAM for graphical operation, and at least 20 Gbytes of disk for a “workstation” class Linux installation. Of course, more RAM and disk is always better.
While you can “get by” with 20 GB of disk, later we’ll be building the Yocto project, which requires more like 50 GB. I do most of my Linux work on a “virtual” machine (more about that later) running under Windows 7 on an HP laptop. The virtual machine gets 1 GB of RAM and has a 65 GB disk. I currently run CentOS 7.
You will need at least one asynchronous serial port. A USB-to-serial converter should work fine. You will also need a network interface. We’ll use a combination of serial and network ports to communicate with the target, as well as to debug target code.
Installation Scenarios
The next decision then is how you want to install Linux. There are basically three installation scenarios.
Stand-Alone
This is the obvious choice if you can dedicate a machine to Linux. You will let the installation process format the entire disk.
Dual-Booting
In many cases, though, you’ll probably want to install Linux on a machine that already runs some variant of Windows. There are a couple of approaches to that. This section describes dual-booting, the next one describes virtualization.
In the dual-boot scenario, you select at boot time which operating system to boot. That OS takes full control of the machine. The Linux installation will replace the standard Windows boot loader with GRUB, the GRand Unified Bootloader. GRUB then offers the option of selecting the OS to boot, as shown in Fig. 2.1.

While historically dual-booting has been the most popular installation scenario for average users, it is also the most complicated, because it requires reconfiguring your hard disk. The most common case is you already have a version of Windows installed on the machine, and you want to add Linux.
At this point Windows probably occupies the entire disk, and so you have to make space available for Linux. Fundamentally, this requires reducing the size of the disk partition holding Windows so you can create unallocated space for Linux. Remember that you’ll need on the order of 20 GB of disk space for Linux, so your disk must have at least that much contiguous free space. You can use the Windows defragmentation tool to put all free space at the “end” of the disk.
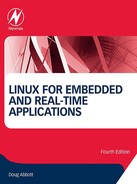
Windows 7 has a slick disk management tool that handles partitioning. From the Start menu, select Control Panel > Administrative Tools > Computer Management. In the Computer Management dialog, select Storage > Disk Management. That displays the menu shown in Fig. 2.2. This shows five partitions, the largest of which is identified as drive C:.
A little background on disk partitioning is in order here. In the DOS/Windows/PC world, a disk can have up to four primary partitions. Any of these primary partitions can be designated an extended partition, which in turn can hold several logical partitions. There’s no fixed upper limit on the number of logical partitions an extended partition can hold, but owing to the way in which Linux accesses partitions, 12 is the practical upper limit on a single disk drive.
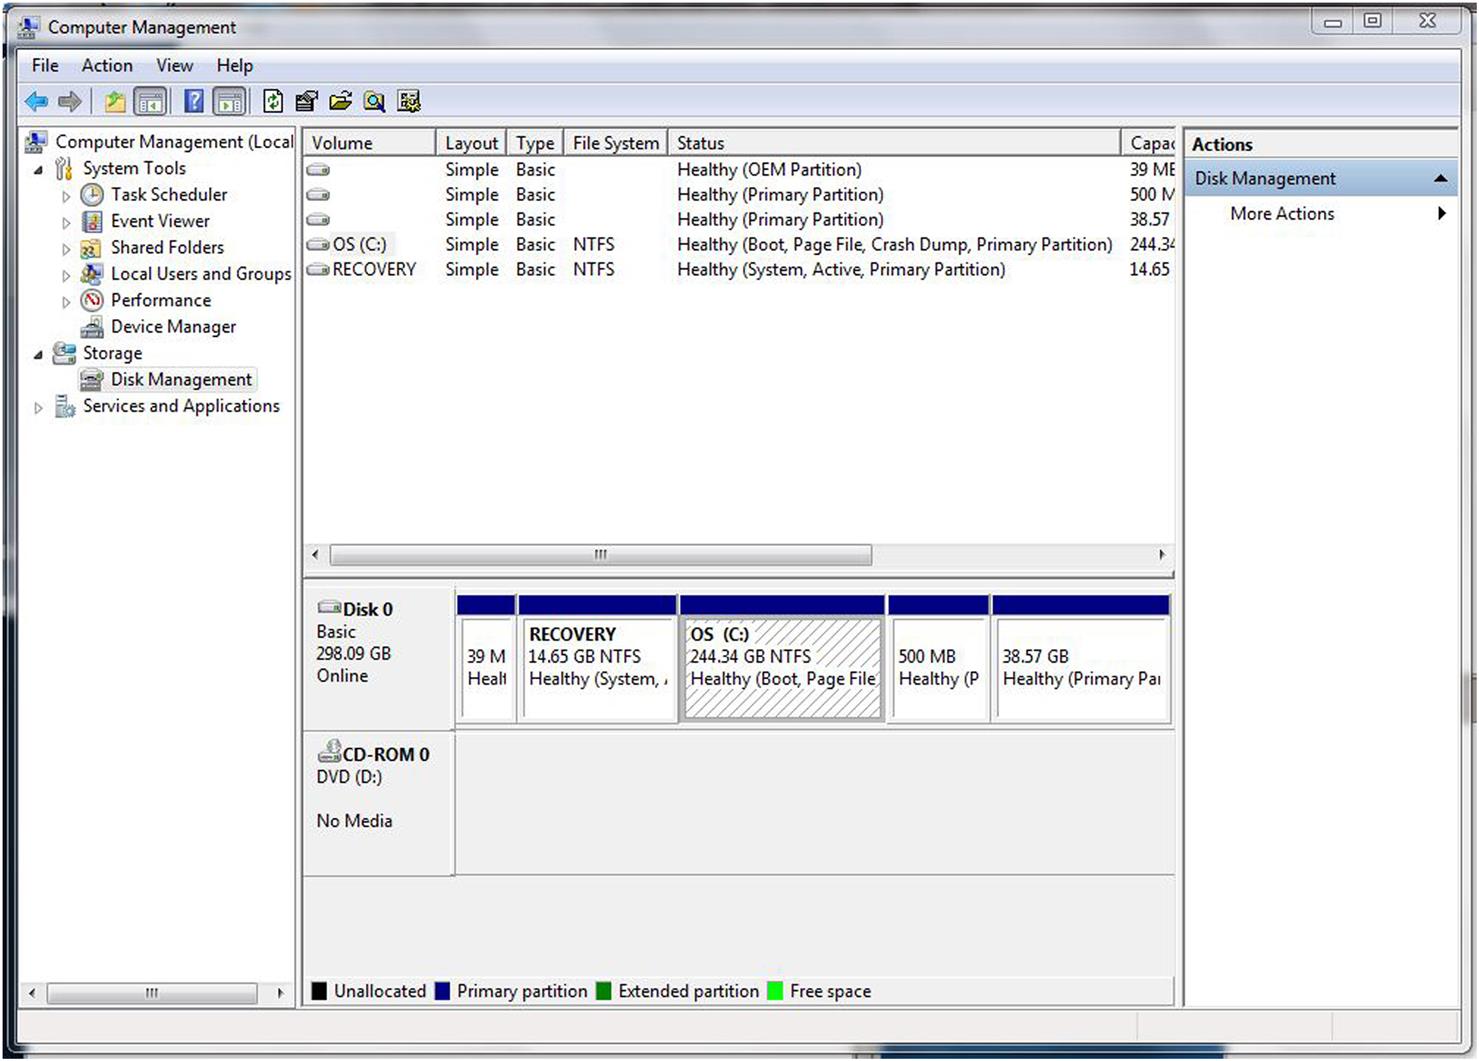
Take a look at the partition list in Fig. 2.2, and compare it with the list in Listing 2.1 derived from the Linux fdisk command on the same disk. This particular machine is already configured for dual booting. Note that fdisk reports six partitions, whereas the Windows Disk Manager only shows five. /dev/sda4 is identified as an extended partition. sda5/ and sda6/ are logical partitions within sda4/. The Disk Manager doesn’t show the extended partition.
Oddly, the Disk Manager identifies all five partitions as primary, but fdisk shows us that the two on the right of the graphic representation are in fact logical partitions within an extended partition.
With that background, it’s time to create some empty space for Linux. But first, before you make any changes to a disk drive, Always back up your data. Even though these tools are supposed to work, stuff happens. So be prepared. Right-click on the OS (C:) partition, and select Shrink volume… Note incidentally that Windows tends to call partitions volumes. The Disk Manager queries the partition to see how small it can be made. This can take a while on a large disk. Finally, the dialog of Fig. 2.3 appears. While the labels are a little confusing, this is telling us that 113 MB can be removed from the C: partition. Clearly, you want to leave some space free on the C: drive, so you wouldn’t want to take all 113 MB.

Subsequently, the Linux installation will format only the partition(s) that will be used by Linux.
Virtualization
But the big buzzword in computing these days is virtualization, the process of running one operating system on top of another. The base, or native, operating system is called the host. It runs a virtual machine manager, VMM, that in turn runs one or more virtual machines called guests. Whereas in the dual-boot scenario one or the other operating system is running exclusively, with virtualization the host and the guests are running simultaneously. You can even move files and data between them seamlessly.
There are two popular VMMs—Vmware and VirtualBox. VMware is a commercial product from a company of the same name. They offer a free version called VMware Player that runs on both Windows and Linux hosts.
VirtualBox is an open source package sponsored by Oracle (formerly Sun Microsystems). It too is available for both Windows and Linux hosts, but also supports Mac OS X and Solaris.
The two packages are fairly similar in their installation and operation. After installing the software (see Resources section for download pages), you create one or more guest machines allocating resources to them, such as disk and RAM. A “wizard” steps you through the process of creating a new machine. A disk in the guest machine is represented by a very large file in the host. Then you install an operating system on the guest, in much the same way you would install it natively.
I happen to use VirtualBox.
Installing VirtualBox
Installing VirtualBox is much like installing any Windows software. You download and run the installation executable. The default configuration is fine. You’ll be prompted if you want to install the Extension Pack. Yes, you do.
The next step then is to create a virtual “guest” machine and install Linux on it. Start the VirtualBox Manager and click the New icon in the upper left. Give the machine a name. VirtualBox will often infer the type and version from the name. Be sure they’re correct. Allocate RAM. I have 8 GB in my laptop, and allocate 2 GB to guest machines. I found that allocating more than 2 GB to the guest caused Windows to slow down.
Create a virtual hard disk. Leave the default disk file type, VirtualBox disk image (.vdi). I use dynamically allocated storage for the disk file. Your choice. By default, the disk file name is the same as the machine name. Set the size. I suggest 65 GB to have enough to comfortably build the Yocto project. When you click the Create button, the machine is created.
There are some settings you’ll want to change in the guest machine itself.
• In General > Advanced, set Shared Clipboard and Drag ‘n Drop to Bidirectional.
• In Network, change Attached to: to Bridged Adapter. Make sure the correct adapter is selected. If your workstation has both wired and wireless connections, you might want to enable the second adapter. Then you can connect the target board directly to the workstation through the Ethernet port, and use the wireless port for Internet access. Note that VirtualBox makes all network adapters appear to the guest as an Intel PRO/1000.
• If you are using a USB-to-Serial converter, plug it in. Then in USB, click the Add a USB filter icon on the right, and select your converter. This allows it to be automatically connected to the guest machine whenever it is plugged in.
• In Shared Folders you’ll probably want to set up a shared folder so that you can easily move files between the host and the guest. Click the Add a new shared folder icon on the right. Browse to the folder you want to share and give it a name. The name becomes the device you mount in the Linux guest.
• When you’re ready to boot the new guest and install Linux, go to Storage and click the optical disk icon under Controller: IDE. Then click the optical disk icon on the far right and select the ISO file for your distro, or the physical drive if you’re using a real DVD.
After you get Linux installed and booted, you’ll find there are some limitations to the display and mouse in basic VirtualBox. The display size is limited, and the mouse works either in the host or the guest, but not in both. These limitations are overcome by installing the VirtualBox Guest Additions.
If you’re new to Linux, the instructions in this section may not make much sense until you’ve read Chapter 3, Introducing linux. You’ll need the GCC compiler package installed (you’ll need that anyway as we go along) and the kernel headers package for the kernel version you’re running. The kernel headers package should be installed as part of the initial installation.
Click the VirtualBox Devices menu and select Insert Guest Additions CD Image. As root user, mount the CD image. In a shell window, cd to the just-mounted image and execute:
This script builds several kernel modules. Restart the guest machine when the script finishes. You can now set the guest display to full screen if desired, and the mouse works seamlessly between the host and guest.
DVD or Live CD?
Most Linux distributions are available in at least three forms: a DVD, a collection of CDs (up to about six these days), or a Live CD. A Live CD is a minimal bootable Linux system that gives you an opportunity to play around with a new distribution without actually installing it. Of course you can’t save any data or modify the configuration. Every time it boots it reverts to the default configuration.
One of the options the Live CD offers is to install the distribution. When you select this option, it runs through essentially the same installation process as you would with a DVD or complete set of CDs. The difference is that packages to install are pulled from the network rather than from physical media.
Installation Process
Regardless of which scenario or installation medium you choose, the installation process is pretty much the same. This section describes CentOS installation, but other distributions have a very similar process:
• Download the distribution medium (see resources section). This will be a .iso file, an exact image of either a DVD or a Live CD.
• Burn the .iso to the corresponding physical medium. You’ll need a disk burning program to transfer the .iso file(s) to physical media. In a virtual machine environment, you can mount the .iso file directly as if it were a CD or DVD.
• Boot the computer from the installation medium or click the install icon from a Live CD. You may have to configure your PCs BIOS to boot from optical media.
The installation process itself is fairly straightforward. With CentOS, you start by selecting a language, which defaults to United States English. Clicking Continue brings up the INSTALLATION SUMMARY dialog shown in Fig. 2.4.

Under SOFTWARE SELECTION, I suggest selecting KDE Plasma Workspaces as your base environment. That’s only because I happen to prefer the KDE graphical desktop environment over GNOME and, to the extent that the remainder of the book displays graphical desktop images, they will be KDE. I just happen to like the KDE presentation better. It’s more “Windows-like.” The truth is, I do most of my day-to-day computing work in Windows (hey, I’m writing this book in Word). If you’ve spent much of your career in front of a Windows screen, I think you’ll find KDE more to your liking. But if you have a strong preference for GNOME, by all means, select it or the Development and Creative Workstation. At a minimum, you should select Development Tools under Add-Ons. If you’re going with the KDE Plasma Workspace you might also want to select KDE Applications.
Under NETWORK & HOST NAME, select what may be the only network interface. Mine is called Ethernet (enp0s3). Turn it on and then click Configure… In the General tab, it’s probably a good idea to select Automatically connect to this network when it is available.
Finally, select INSTALLATION DESTINATION. Select what is probably the only disk drive visible, then click Done.
Click Begin Installation and you are asked to set the root password and create a normal user. The root user is the system administrator who can do anything. If you create a password that CentOS considers too weak, you’ll have to click Done twice. I know it’s bad practice, but I use the same password for root and my normal user. I don’t have anything sensitive on my Linux machine.
Go through the Create User dialog. You can even create a normal user without a password if you choose. Up to you. While you’ve been doing this, the installation has been proceeding apace. When the installation completes, remove the optical media and click Reboot. When CentOS boots up, you’ll be asked to accept the license. It’s pretty simple as EULAs go.
There’s one more step before CentOS finally lets you log in and start up the graphical desktop. You are asked to enable and configure Kdump, a kernel crash dumping mechanism. Your call. I’ve never used it but I leave it enabled.
Following that, you’ll have a fully functional Linux installation. Reboot it when you’re ready for the next chapter where we’ll review many of the useful features of Linux.