
Configuring and building the Linux kernel
Abstract
This chapter discusses how to build a configurable kernel to match your own requirements.
Keywords
Patch; diff; source code; testing; version; configure; boot loader
Hackito ergo sum
Anonymous
One of the neatest things about Linux is that you have the source code. You are free to do whatever you want with it. Most of us have no intention, or need, to dive in and directly hack the kernel sources. But access to the source code does mean that the kernel is highly configurable. That is, you can build a kernel that precisely matches the requirements, or limitations, of your target system.
Now again, if your role is writing applications for Linux, as we have been doing in the last few chapters, or if you are a Linux system administrator, you may never have to touch the kernel. But, as an embedded systems developer, you will most certainly have to build a new kernel, probably several times, either for the workstation or the target environment. Fortunately, the process of configuring and building a kernel is fairly straightforward. My experience has been that building a new kernel is a great confidence building exercise, especially if you are new to Linux.
The remainder of this chapter details and explains the various steps required to configure and build an executable kernel image for our target board.
Getting Started
Where’s the Source Code? Upstream versus Downstream Kernels
The mainline source code for the Linux kernel resides at www.kernel.org, where you can find the code for every version of the kernel back to Linus’ original release in 1991. The sources are available in both gzipped tar format (.tgz), the slightly smaller bzipped format (.bz2), and the newer xz format (.xz).
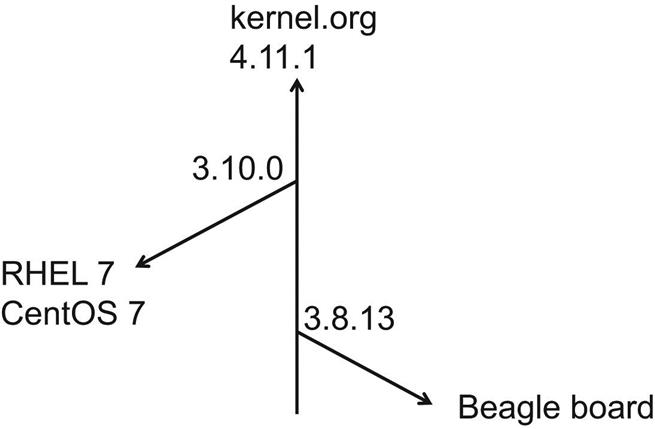
kernel.org is where all kernel development takes place. Code stored here is referred to as the upstream kernel. Development at kernel.org is continuous, with a new version of the kernel appearing about every 6 weeks to 2 months. As of May 16, 2017, the latest stable release is 4.11.1 released on May 14.
It is perfectly OK to use an upstream kernel from kernel.org, provided it supports your hardware and the features of your environment. However, Linux distributors such as Red Hat and Ubuntu, as well as groups supporting embedded development such as BeagleBoard, take an upstream kernel and modify it for their particular purposes. The resulting kernel is referred to as a downstream kernel, which is generally distributed as a set of patches to a specific upstream kernel.
The process is illustrated in Fig. 12.1, where the vertical arrow represents the ongoing development on the upstream kernel at kernel.org. At some point, the BeagleBoard developers decided on version 3.8.13, made the necessary modifications, and released their patch set, which we will be using shortly. Likewise, the Red Hat folks settled on 3.10.0 for Red Hat Enterprise Linux 7 (CentOS 7), and made their modifications to that upstream kernel.
Kernel Version Numbering
Generally, Linux sources are installed as subdirectories of /usr/src/kernels. The subdirectories usually get names of the form:
<version_number> identifies the base version of the kernel as obtained from kernel.org, and looks something like this: 3.8.13. The first number is the “version,” in this case 3. Normally, this number increments only when truly major architectural changes are made to the kernel and its APIs. The version number was 2 from 1996 until mid-2011, when Linus arbitrarily rolled the version to 3 in honor of the 20th anniversary of Linux.
The second number, 8, is used to identify releases where the kernel APIs may differ, but the differences are not enough to justify a full version change. New releases appear about every 2 to 3 months.
The final number, 13 in this example, represents bug and security fixes that do not change the kernel APIs. Applications built to a specific release should, in principle, run on any security level.
<additional_features> is a way of identifying patches made to an upstream kernel to support additional functionality. The <additional_features> field is also used by the kernel developers to identify developmental source trees known as release candidates. Starting from a stable kernel release, sufficiently stable new code is merged into the mainline to become the next release –rc1. So, for example, 3.8.13 would become 3.9-rc1. A period of 6 to 10 weeks of testing and patching ensues, with the -rc number being rolled about every week. When the new tree is deemed sufficiently stable, the –rcn is dropped and the process starts over again.
Given that you may have multiple kernel source trees in your file system, the kernel you are currently working with is usually identified by a symbolic link in /usr/src/kernels called linux.
Additional Tools
Before we actually install the kernel source tree, there are some additional tools we need to install in case they are not already on your system. You will, of course, need to execute these steps as root user.
• yum install qt-devel – This is a graphical environment used by the kernel’s make xconfig script.
• yum install lzop – A file compression program that the kernel scripts use.
• yum install sudo – This is another way to become root user, as was discussed in Chapter 3, Introducing Linux. Some of the BeagleBoard scripts make use of sudo.
You will need to edit the file /etc/sudoers (you are still root user right?) to allow your normal user to sudo. Good practice says you should only edit /etc/sudoers with visudo, a special version of vi that checks the syntax of the file before saving, because editing the file wrong could mess up your system. For what it is worth, I’ve edited /etc/sudoers with kwrite and gotten away with it.
Copy that line and change root to your user name. Save the file.
Getting and Installing the BeagleBone Kernel
Installing an upstream kernel involves little more than downloading and untarring the archive file for the desired version. Installing a downstream kernel is a little more complicated because, in addition to downloading the upstream source, we have to apply the appropriate patches.
We will use the source code control tool git to get and patch the kernel. We will go into git in more detail in a later chapter. For now, just follow these commands:
• Decide where you want to install the source tree. While the convention is /usr/src/kernels, there is nothing wrong with installing it under your home directory.
This last step can take a long time depending on the speed of your processor, and the number of cores. When it is finished, you will have the directory structure shown in Fig. 12.2. The most important subdirectory for our purposes is kernel/, which holds the actual kernel source tree.

Finally, we need to get a power management firmware file from another source:
Patching the Kernel
The mechanism for changing released source code in an orderly manner is the patch utility. The input to patch is a text file created by the diff utility that compares two files and reports any differences. So, when an Open Source programmer wants to distribute an upgrade to released source code, she does a diff between the modified code and the original code, redirecting the output of diff to a patch file. Something like this:
The .patch extension is not required, but is the convention. See the diff man page to learn what the various options represent.
Then, to apply the patch, copy the patch file to the directory containing the original code and execute:
Note that patch normally takes its input from stdin, so we have to redirect input to the file. The –p1 flag tells patch to remove one slash and everything before it from the names of files to be patched. This recognizes the usual situation that the root directory from which the patch was created is not the same as the directory in which we are applying it. Removing everything in the path before the first slash makes the directories relative.
You could have diff create one gigantic patch file for the entire kernel source tree. The BeagleBone developers chose not to do that, opting instead to create individual patches for each file that is modified. This adds up to over a 1000 files in the patches/ subdirectory. The motivation for this is that it is probably easier to distribute updates to individual files.
To get a better feel for patch files, have a look at one or more of the files under the patches/ subdirectory. Try, for example, arm/0001-deb-pkg-Simplify-architecture-matching-for-cross-bui.patch. This happens to be a patch to a shell script.
The Kernel Source Tree
Needless to say, the kernel encompasses a very large number of files—C sources, headers, makefiles, scripts, etc. The BeagleBone version 3.8.13 kernel has 48,683 files, taking up 1.7 GB. So, not surprisingly, there is a standard directory structure to organize these files in a manageable fashion. Fig. 12.3 shows the kernel source tree starting at kernel/kernel/. The directories are as follows:
.git – This hidden folder is not part of the kernel source, but rather has to do with git.
Documentation – Pretty much self-explanatory. This is a collection of text files describing various aspects of the kernel, problems, “gotchas,” and so on. There are many subdirectories under Documentation/ for topics that require more extensive explanations. While the information here is generally useful, it also tends to be dated. That is, the documentation was initially written when a particular feature was added to the kernel, but it has not been kept up as the feature has evolved.
arch – All architecture-dependent code is contained in subdirectories of arch. Each architecture supported by the kernel has a directory under arch with its own subdirectory structure. The executable kernel image will end up in arch/<architecture>/boot. An environment variable in the makefile, ARCH, points to the appropriate target architecture directory. arch/ is one of the two largest subtrees in the kernel, comprising just over 15,000 files.
block – The block layer. This is the code that optimizes transfers with block storage devices.
crypto – Code dealing with the cryptographic aspects of system security.
drivers – Device driver code. Under drivers is a large number of subdirectories for various devices and classes of device. This is the other major kernel subtree, with over 14,000 files.
firmware – Binary firmware files for devices that load firmware at boot time. Ultimately these files are to be moved to User Space, because they are, for the most part, proprietary and mixing them with the GPL’ed kernel code is “problematic.”
fs – File systems. Under fs is a set of directories for each type of file system that Linux supports.
include – Header files. The most important subdirectory of include/ is linux/ that contains headers for the kernel APIs.
init – The basic initialization code.
ipc – Code to support Unix System 5 Inter-Process Communication mechanisms such as semaphores, message passing, and shared memory.
kernel – This is the heart of the matter. Most of the basic architecture-independent kernel code that does not fit in any other category is here. This includes things like the scheduler and basic interrupt handling.
lib – Several utility functions that are collected into a library.
mm – Memory management functions.
net – Network support. Subdirectories under net contain code supporting various networking protocols.
samples – Another relatively new addition, this has sample code showing how to manage some of the kernel’s internal data structures.
scripts – Text files and shell scripts that support the configuration and build process.
security – Offers alternative security models for the kernel
sound – Support for sound cards and the Advanced Linux Sound Architecture.
tools – A performance monitor for the kernel.
usr – Mostly assembly code that sets up linker segments for an initial RAM disk.

Kernel Makefile
kernel/kernel contains a standard makefile, Makefile, with a very large number of make targets. By default, the kernel is built for the architecture on which the makefile is running, which in the vast majority of cases is some variant of the x86. In our case, we want to cross-compile the kernel for our ARM target board.
As noted above, there is an environment variable, ARCH, that can be set to select the architecture to build for. This can be set on the command line that invokes make as in:
Or, what I prefer to do, is edit the makefile to permanently set the value of ARCH. Open the makefile in kernel/kernel with your favorite editor,1 and go to line 195, which initially reads:
The next line defines the variable CROSS_COMPILE. This identifies a cross-tool chain by specifying a prefix to be added to the tool name. Our ARM cross-tool chain is identified by the prefix arm-linux-. You can enter that here or, optionally, specify it as part of the configuration process. Save the file and exit from the editor.
Now execute make help. You will see a very long list of make targets in several categories. Our specific interest at the moment is the category Architecture specific targets (arm):. Under that is a large number of target names that end with “_defconfig.” These make default configuration files for various ARM-based boards. When building a new kernel, it is always good practice to start with a known good configuration. Interestingly, the BeagleBone is not among this list of default configurations. Execute this command:
Now execute make beaglebone_defconfig. You will likely see a number of “errors” about “recursive dependency detected!” According to the forum at beagleboard.org, these are innocuous. The default configuration file .config is created.
Configuring the Kernel: make config, menuconfig, xconfig
The process of building a kernel begins by invoking one of the make targets that carry out the configuration process. make config starts a text-based script that sequentially steps you through each configuration option. For each option you have either three or four choices. The three choices are: “y” (yes), “n” (no), and “?” (ask for help). The default choice is shown in upper case.
Some options have a fourth choice, “m,” which means build this feature as a loadable kernel module rather than build it into the kernel image. Kernel modules are a way of dynamically extending the kernel, and are particularly useful for things like device drivers.
Fig. 12.4 shows an excerpt from the make config dialog.

Most options include help text that is genuinely “helpful” (see Fig. 12.5).

The problem with make config is that it is just downright tedious. Typically, you will only be changing a very few options and leaving the rest in their default state. But make config forces you to step through each and every one, and contemporary kernels have well over 2000 options. Personally, I’ve never used make config and I honestly wonder why it is still in the kernel package.
make menuconfig, based on the ncurses library, brings up the pseudo-graphical screen shown in Fig. 12.6. Here, the configuration options are grouped into categories and you only need to visit the categories of options you need to change. The interface is well explained and reasonably intuitive. But since it is not a true graphical program, the mouse does not work. The same help text is available as with make config. When you exit the main menu, you are given the option of saving the new configuration.

While most true Linux hackers seem to prefer menuconfig, my choice for overall ease of use is make xconfig. This brings up an X Windows-based menu, as shown in Fig. 12.7. Now you can see all the option categories at once, and navigate with the mouse. Of course you must be running X Windows to use this option, and you must have the g++, Qt graphics library, and Qt development tools packages installed.

In its default display mode, xconfig displays a tree of configuration categories on the left. Selecting one of these brings up the set of options for that category in the upper right window. Selecting an option then displays help for that option in the lower right window. Fig. 12.7 starts with the general setup menu. Most of the options are presented as check boxes. Clicking on the box alternates between checked (selected) and unchecked (not selected). These are termed binary options. Options that may be built as kernel modules have a third value, a dot to indicate that the feature will be built as a module. These are tri-state options. An example of that is Bus support. Click the box next to PCCard (PCMCIA/CardBus) support, and it changes to a dot. Click it again and it changes to a check mark. Click it again to leave the box unchecked.
Some options have a set of allowable values other than yes or no, and are represented by radio buttons. Select Kernel features to see a couple of examples of this: Memory split and Preemption Model. Some options take numeric values. An example of a numeric option is back up under General setup, kernel log buffer size. It is not immediately obvious how you change a numeric value. Double-clicking the option opens a dialog box between the two right-hand windows.
Options that are not available, because some other option was not selected, simply do not show up. Again, the PC Card option serves as an example. With the box unchecked, the upper right-hand window is empty. Now click the check box, and the appropriate options show up in the upper right.
make xconfig gives you additional flexibility in saving configurations. Instead of always saving it to the standard .config file, you can save it to a named file of your choice using the File->Save As option, and later load that file using File->Load for further modification or to make it the new default configuration.
Xconfig Options
The xconfig menu has several useful options in the Option menu. Show Name adds a column to the upper right panel that displays the name of each configuration variable. Show Range displays the range and current value of binary and tri-state options. In my estimation, this is only marginally useful. Another marginally useful option is Show Data. For binary and tri-state options it pretty much duplicates Show Range. It can be helpful for numeric and text options.
Show All Options is largely self-explanatory. It displays in gray all of the options that cannot be selected because some condition is not satisfied. Suppose you are pretty sure some option exists, but you cannot find it. Turn on Show All Options, then use Edit -> Find to search for the name.
There are some options that you are simply not allowed to change. These are preselected based on the architecture you are building for. These options lack a “prompt” that lets you edit them. With Show All Options turned on, you will find most of these options at the top of the menu. If you select Show Prompt Options, you will only see those options that you can change, provided the dependencies are met.
When you are finished, close the xconfig menu. You will be asked if you want to save or discard the changes.
.config File
It is probably worth mentioning that true kernel hackers tend to prefer make menuconfig over make xconfig. The end result of the configuration process, whichever one you choose to use, is a file called .config containing all of the configuration variables. Listing 12.1 is an excerpt. The first thing to notice is the comment at the top:

It is considered “bad form” to manually edit files that have been created by a tool. There is a high probability that you will mess something up.2
The options that are not selected remain in the file but are “commented out.” The selected options get the appropriate value, “y” for features to be built into the kernel image, “m” for modules, a number or an element from a list. .config is included in the Makefile, where it controls what gets built and how. Early in the build process .config is converted into a C header file, include/linux/autoconf.h, so that the configuration variables can be used to control conditional compilation.
A Problem
It turns out that the kernel we just patched and configured will not build. The file arch/arm/kernel/return_address.c does not compile, because a function it contains is also defined as an inline in arch/arm/include/asm/ftrace.h. Internet research revealed that the problem was that the kernel would not build under gcc version 6, and the solution was to drop back to gcc version 4.9.
So I built a gcc 4.9 tool chain, and had exactly the same problem. If you look at ftrace.h you can see the problem. There is a conditional based on a couple of configuration variables that ends up declaring the function return_address() as inline rather than a simple prototype. The real problem is that these configuration variables are controlled by depends and selects, and that makes it very difficult to change them using make xconfig.
My solution then was to edit ftrace.h to eliminate the conditional entirely by commenting it out, and just leave the function prototype. Listing 12.2 highlights my edits. The lines that are changed are emboldened.
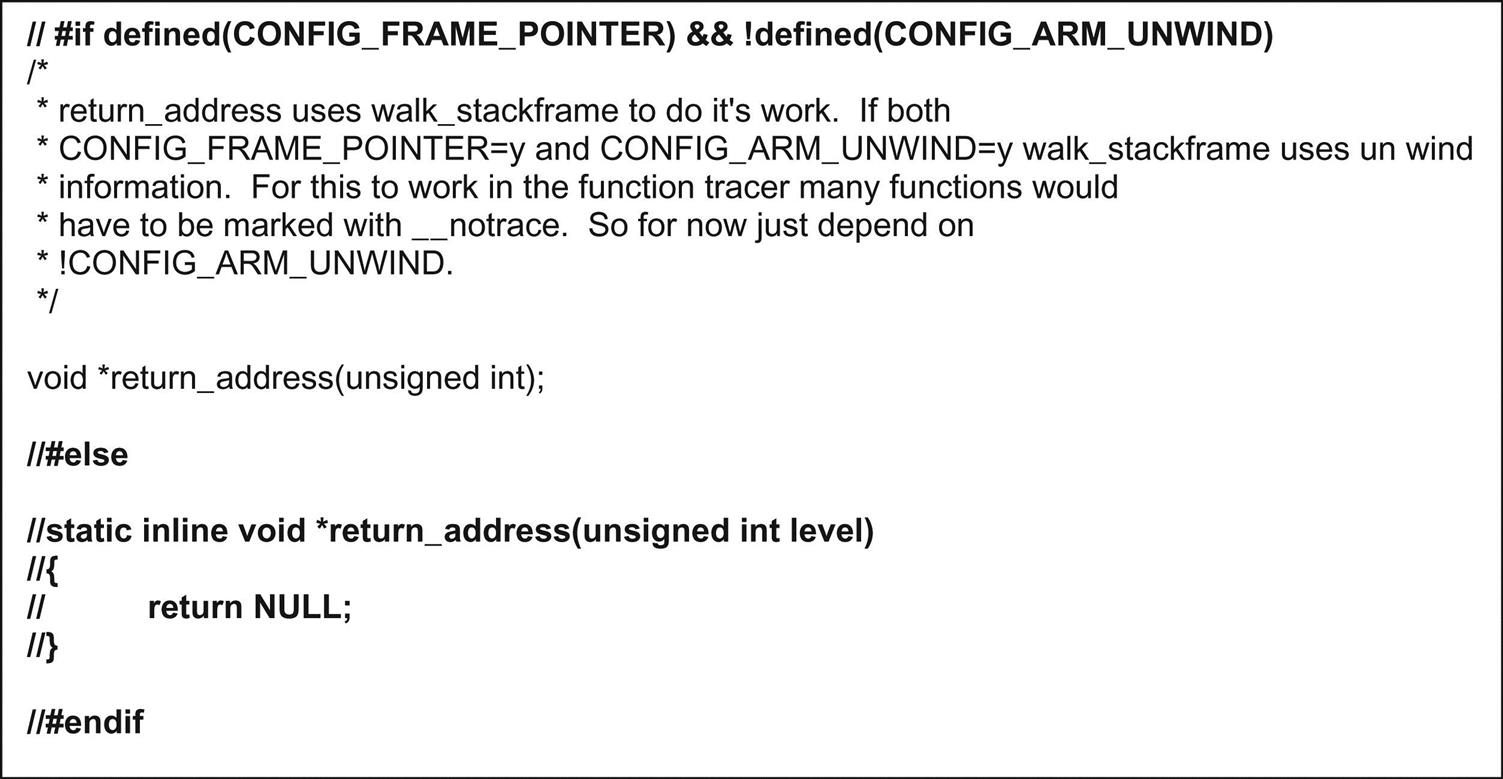
I believe this is the first time I’ve had to edit a kernel source file in order to get the kernel to build. I do not take this lightly, and neither should you. Changing kernel code is not something you do on a whim, because there is a very real possibility your changes will create some other problem down the road. In this case it seems to work.
Building the Kernel
The actual process of building the kernel varies a little depending on what you are building it for. Our primary objective is to build a kernel for the target board, so I’ll describe that first. Then I’ll describe the alternate process of building a new kernel for your workstation if you are so inclined.
The first two steps below can be executed as a normal user.
make clean. Deletes all intermediate files created by a previous build. This ensures that everything gets built with the current configuration options. You will find that virtually all Linux makefiles have a clean target. Strictly speaking, if you are building for the first time, there are no intermediate files to clean up, so you do not have to run make clean.
make This is the heart of the matter. This builds the executable kernel image and all kernel modules. Not surprisingly, this takes a while. The resulting compressed kernel image is arch/$(ARCH)/boot/zImage.
The following step requires root user privileges.
make modules_install INSTALL_MOD_PATH=/export/rootfs. Copies the modules to $(INSTALL_MOD_PATH)/lib/modules/<kernel_version> where <kernel_version> is the string identifying the specific kernel you are building. Note that when building for the target board, you must explicitly specify the root file system. Otherwise, the modules will go into /lib/modules of your workstation’s file system. Strictly speaking, this step is not necessary in this case, because none of the modules are required to boot the kernel.
That is it. Note, incidentally, that the build process is recursive. Every subdirectory in the kernel source tree has its own Makefile dealing with the source files in that directory. The top level Makefile recursively invokes all of the sub Makefiles.
The process for building a kernel for your workstation differs in a couple of details. Do make modules_install without the INSTALL_MOD_PATH argument, and then execute this step, also as root:
make install. This does several things. It copies the kernel executable, called vmlinuz for x86 builds, to /boot along with System.map, the linker map file. It adds a new entry to /boot/grub/grub.conf, so the GRand Unified Bootloader can offer the new kernel as a boot option. Finally, it creates an initial ramdisk, initrd, in /boot.
Workstation Digression
Before we move on to loading and testing our new kernel, the last two items mentioned above deserve a passing explanation. Most workstation installations these days incorporate a boot loader called GRUB (GRand Unified Bootloader) to select the specific kernel or alternate operating system to boot. There is a very good reason for having the ability to boot multiple kernel images. Suppose you build a new kernel and it fails to boot properly. You can always go back and boot a known working image, and then try to figure out what went wrong in your new one. If you are curious, have a look at the file /boot/grub2/grub.cfg on your workstation. You will need to be root user to get into the grub2 directory.
Most Linux kernels are set up to use initrd, which is short for initial ramdisk. An initial ramdisk is a very small Linux file system loaded into RAM by the boot loader and mounted as the kernel boots, before the main root file system is mounted. The usual reason for using initrd is that some kernel modules need to be loaded before mounting the root partition. Usually, these modules are required to support the file system used by the root partition, ext3 for example, or perhaps the controller that the hard drive is attached to, such as SCSI or RAID.
Booting the New Kernel
Now that we have a new kernel, how do we test it? We could, of course, load the new image into flash, either in addition to, or in place of, the kernel image presently there.
The other alternative is to boot the new image over the network using TFTP. This is particularly advantageous in a development environment, because we can quickly test a new kernel image without the time-consuming process of burning flash.
Move arch/arm/boot/zImage to /var/lib/tftpboot, or wherever else you chose as the TFTP directory. Probably the simplest way to accomplish this is with a minor change to uEnv.txt. Copy uEnv.txt to uEnvnet.txt, and open with an editor. Note the line near the bottom that starts out netboot=. This command loads the kernel image into memory over TFTP. This is the equivalent of loadkernel that is presently used to load the kernel image from eMMC flash. So, in the uenvcmd, just replace loadkernel with netboot.
As we did back in Chapter 6, The hardware when bringing up the BBB, save uEnvnet.txt to the boot partition of the eMMC. Boot the board into the u-boot prompt, change bootenv to uEnvnet.txt, and execute boot. After the kernel boots, execute the command uname –a and note that the kernel image has a timestamp corresponding to when you built it.
Congratulations! You can pat yourself on the back. You are now a Linux hacker.
Behind the Scenes: What’s Really Happening
The information in this section is not essential to the process of building a kernel, and you are free to ignore it for now. But when you reach the point of developing device drivers or other kernel enhancements (or perhaps hacking the kernel itself), you will need to modify the files that control the configuration process.
All the information in the configuration menus is provided by a set of text files named Kconfig that are scattered throughout the source tree. These are script files written in Config Language, which looks suspiciously like a shell scripting language but isn’t exactly. The main Kconfig file is located in linux/arch/$(ARCH), where ARCH is the variable in Makefile identifying the base architecture.
Go to kernel/arch/arm and open Kconfig. Find the line that reads menu “System Type” down around line 249. Compare the structure of the file with the configuration menu starting at System Type, and the pattern should become fairly clear. Each configuration option is identified by the keyword config followed by the option’s symbolic name, for example config MMU. Each of these gets turned into a Makefile variable, or macro, such as CONFIG_MMU. The Makefiles then use these variables to determine which components to include in the kernel and to pass #define symbols to the source code.
The option type is indicated by one of the following keywords:
• bool – The option has two values, “y” or “n.”
• tristate – The option has three values, “y,” “n,” and “m.”
The type keyword usually includes a prompt, which is the text displayed in the configuration menu. Alternatively, the prompt keyword specifies the prompt. There are also “hidden” options that have no displayable prompt. At the top of Kconfig is a set of options that do not show up in the menu, because no prompt is specified. These are the options you see when you select Show All Options in xconfig.
Other keywords within a configuration entry include help to specify the help text, and depends, which means that this option is only valid, or visible, if some other option that it depends on is selected. There is also select, which says that if this option is selected, then of necessity some other option must also be turned on.
Just above the menu “System Type” line is the line:
The source keyword is how the configuration menu is extended to incorporate additional, modular features. It is effectively the same thing as #include in C. You will find source lines scattered throughout the main Kconfig file.
Config Language is actually much more extensive than this simple example would suggest. For more detail, look at linux/Documentation/kbuild/kconfig-language.txt.
In the next chapter, we will look at integrated build environments, open source projects that attempt to do everything for you to build an embedded Linux system.