
6 Phase 2: Scanning
After the reconnaissance phase, the attacker is armed with some vital information about the target infrastructure: a handful of telephone numbers, domain names, IP addresses, and technical contact information—a very good starting point. Most attackers then use this knowledge to scan target systems looking for openings. This scanning phase is akin to a burglar turning doorknobs and trying to open windows to find a way into a victim’s house.
Unfortunately, this phase very much favors the attackers. Our goal as information security professionals is to secure every possible path into our systems; the attackers just have to find one way in to achieve their goals. Time also works in the attackers’ favor during the scanning phase. While we scramble to secure our systems in a dynamic environment supporting actual users, attackers have the luxury of spending huge amounts of time methodically scanning our infrastructures looking for holes in our armor. Once attackers select their prey, many of them spend months looking for a way in, slowly but surely scanning systems looking for the big kill. This chapter describes these scanning techniques and presents defensive strategies for dealing with this sadly unfair situation.
War Driving: Finding Wireless Access Points
An incredibly popular scanning technique involves searching a target organization for accessible and unsecured Wireless Local Area Networks (WLANs), a process known as war driving. Attackers utilize war driving to find wireless access points they can use for free Internet connectivity or even as an entryway into a tempting target organization. As we discussed in Chapter 2, Networking Overview, WLAN deployment is in high gear, based on the 802.11a, b, and g standards. Wireless networks using each of these technologies are a growing security problem because clueless users sometimes deploy wireless access points without understanding the major security implications they bring. These users typically get addicted to the technology by installing a WLAN at home so they can roam around their homes in their pajamas surfing the Internet. After growing accustomed to the wireless lifestyle at home, they bring a cheap access point into the office so they can meander the office cubicle corridors while remaining connected (hopefully not still in their pajamas). Sadly, because they often never consider the security implications, these employees usually employ no security or only rudimentary protection of these office WLANs, giving attackers a major avenue into the environment.
War driving originally got its name based largely on the work of Peter Shipley, who drove around Silicon Valley in 2001 to find hundreds of access points. Although somewhat esoteric at the time, war driving is now a mainstream activity among computer attackers. The original war driving terminology has lead to spin-off phrases such as war walking (that is, walking around to find WLANs), war biking (riding a bike while discovering WLANs), war flying (employing small airplanes flying at low altitudes), and even war chalking (writing on pavement with chalk to indicate WLANs discovered in an area). Collectively, however, all of these methods for finding WLANs are still called war driving, and aficionados of the practice have created a Web site devoted to their obsession at www.wardriving.com. Go there for the latest news snippets, tools, and social interactions of the war driving community.
Of course, because WLANs are based on radio transmissions, the further away the attacker is located from the access point, the harder it is to detect as radio signal strength diminishes. However, some people are quite surprised at the great distance various 802.11 protocols will travel. Although a reliable WLAN connection with a standard access point typically requires a user to be within approximately 100 meters or less to send traffic across a LAN, war-driving attackers don’t have to reliably send traffic; they merely need to detect the LAN. Using a high-gain antenna, various wireless researchers have conducted war-driving exercises at distances of more than two kilometers! Using high-gain antennas on both ends, 802.11 signals have been transmitted over 100 kilometers. Therefore, you cannot assume that your WLANs are safe from attackers merely because the visitor parking spaces in your office lot are more than 100 meters from your buildings. In a crowded city, 802.11 wireless signals seep everywhere, into other floors of the same building, across the street, and even to that curious man with a laptop laughing maniacally on a park bench a block away.
Most war-driving attackers use omnidirectional antennas because they capture signals from all over, letting the attacker harvest a large number of possible wireless targets. However, some attackers are focused on specific targets in specific buildings. These folks typically use a directional antenna, focusing their wireless reception. Although omnidirectional antennas cast a wider net, directional antennas get better reception over larger distances. The best attackers choose suitable antenna types based on their mission.
A war driver’s immediate goal is to locate WLANs and determine their Extended Service Set Identifier (ESSID), an up-to-32-character name of a given WLAN. Some people think that the ESSID is a security feature like a password, but it is not. The ESSID is transmitted across the air in clear text by access points and all wireless cards using the access points. Compounding the problem, the 802.11 protocol family supports a probe request message, whereby a client can ask an access point for certain information. Probe requests are supposed to include the ESSID, but many access points with a default configuration accept probes that have an ESSID with the value of “Any.” What’s more, by default, these access points send a probe response that includes the appropriate ESSID, even if the probe request only said “Any.” Therefore, an attacker can spew out a bunch of probe requests with an ESSID of “Any” and wait for these access points to send responses with their configured ESSIDs. Although some access points can be configured to ignore probe requests with the “Any” ESSID, such a configuration doesn’t solve the war-driving problem because of another aspect of the 802.11 protocols.
Access points automatically transmit beacon packets approximately every 100 milliseconds to synchronize timing and frequency information. These beacons, which are sent in clear text, carry the ESSID in most default configurations. Thus, a war-driving attacker can retrieve the ESSID quite easily by just listening for the beacons. Some access points can be configured to omit the ESSID from beacon packets, operating in a more clandestine mode. In such configurations, the beacons themselves are still sent, but the ESSID is omitted from them. However, as we shall see, disabling ESSID transmission in beacon packets provides only a tiny increase in security, as the attacker can still locate the access point and determine the ESSID. The bottom line here is that relying on the ESSID for security is a fool’s errand.
Now, ESSIDs are not the only way of referring to a WLAN or its constituent elements. Service Set Identifiers (SSIDs) come in two flavors: ESSIDs and BSSIDs. The ESSID refers to the name of a WLAN configured into the access point. The Basic SSID (BSSID) is set to the hardware address (that is, the Media Access Control [MAC] address) of a wireless access point or a client. The collective term SSID is used to refer to either or both types of SSID.
Attackers can choose from a wide variety of tools to perform war driving, but each tool tends to center around one of three specific techniques for finding wireless access points and determining their ESSIDs. These techniques include the following:
- Active scanning
- Passive scanning
- Forcing deauthentication
War Driving Method 1: Active Scanning—Sending Probe Packets with NetStumbler
One of the most straightforward methods for war driving involves broadcasting 802.11 probe packets with an ESSID of “Any” to see if any nearby access points or clients send a probe response containing the ESSID of the WLAN. This approach is akin to running down the street shouting “Who’s there?” and listening for people to respond with their names. NetStumbler, a free (but closed-source) war-driving tool written by Marius Milner (www.netstumbler.com), employs this active scanning approach. NetStumbler is, by far, the most popular tool today for discovering WLANs. Its popularity is largely due to its simple user interface, and the fact that it runs on Microsoft Windows 2000 and later. For WLAN fans with a PocketPC-based Personal Digital Assistant (PDA), Milner released MiniStumbler with many of the same features.
NetStumbler detects 802.11a, b, and g networks and clients, optionally tying in Global Positioning System (GPS) data from a GPS receiver attached to the wardriving computer to determine the physical location of the NetStumbler machine using geosynchronous satellites when it discovers each WLAN. With the latitude and longitude of each discovered access point recorded by NetStumbler, an attacker can plot the location of access points on a map and return later to the discovered LANs. Figure 6.1 shows the results of one of my war-driving exercises in New York City using a taxi cab, an IBM Thinkpad laptop, an ORiNOCO antenna, a GPS receiver, and, of course, NetStumbler. In one hour, we found 455 access points, a fairly typical result.
Figure 6.1 NetStumbler in action in Manhattan.
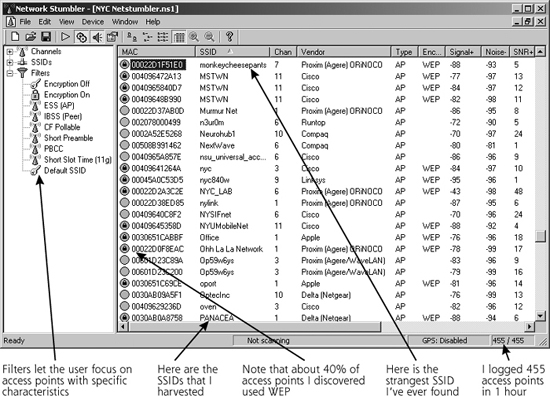
As you can see, NetStumbler gathers the MAC address, ESSID, wireless channel, and relative signal strength of each access point it discovers. Going further, if the attacker configures the wireless interface of the Windows machine running NetStumbler to obtain an IP address automatically, NetStumbler also records the IP address associated with the target network based on the underlying operating system sending out a Dynamic Host Configuration Protocol (DHCP) request and receiving a response. Finally, NetStumbler marks with a small lock icon those target networks that are using some form of Wired Equivalent Privacy (WEP), the flawed encryption protocol that tries to protect the WLAN. Numerous tools, such as AirSnort, attack WEP traffic by sniffing encrypted packets from the LAN and applying various cryptanalysis techniques to unravel them. Because of cryptographic flaws in WEP, an attacker sniffing enough encrypted traffic (typically about 100 to 800 MB) can determine the WEP key and then access the network using a wireless card configured with that key. Alternatively, an attacker who cracks a WEP key can just decrypt all of the traffic sent using that key, thereby recovering potentially sensitive data from the WLAN.
Unfortunately, NetStumbler can sometimes be very picky about wireless card hardware and won’t work with some of the more esoteric card types, although this situation has been improving. For a rather up-to-date compatibility list, check out the hardware list at www.stumbler.net/compat.
Because NetStumbler works solely by sending out probe requests with “Any” as an ESSID, access points configured to ignore such probes are invisible to NetStumbler. Another major limitation of NetStumbler involves its sheer noisiness. By sending probe requests every second with that obvious “Any” ESSID, a wireless monitoring device or even an access point on the target network can detect the attacker’s presence and alert security personnel. However, for attackers wanting a quick and dirty Windows-based war-driving solution and willing to overlook these limitations, NetStumbler is a fine solution.
War Driving Method 2: Listening for Beacons and Other Traffic with Wellenreiter
A far stealthier and more reliable way of discovering WLANs involves putting the wireless card into so-called rfmon mode, also known as monitor mode, so that it sniffs all wireless traffic from the air, a more passive way of discovering wireless systems. With wireline Ethernet networks, most sniffers place an interface into promiscuous mode to gather all packets, grabbing them without regard to their destination hardware address. Although wireless interfaces also support promiscuous mode, that mode only grabs packets for a single WLAN the machine is already associated with when running promiscuously. The rfmon mode goes further, grabbing all wireless packets, including various management frames, from all WLANs without associating with any of them. Thus, war-driving tools are better off using rfmon mode so that they can intercept beacons and extract SSIDs from them. Furthermore, if the access point is configured to omit SSIDs from beacons, the tool in monitoring mode could even just grab any wireless traffic and pilfer ESSID information from it. Even if the wireless connection is encrypted, the ESSID information itself is still sent in clear text, so the attacker can nab the ESSID from any user transmitting data across the WLAN. Wellenreiter, an amazingly useful WLAN detection tool, does just that.
Written by Max Moser and the crew at www.remote-exploit.org, Wellenreiter runs on Linux and supports Prism2, Lucent, and Cisco wireless card types.
It sniffs wireless traffic, capturing all data sent, including the entire wireless frames of all packets with their associated SSIDs. The user can also configure Wellenreiter to dump all captured wireless packets into a tcpdump or Ethereal packet capture file. That way, the output of Wellenreiter can be easily parsed and displayed using tcpdump or Ethereal, a very powerful sniffer we discuss in more detail in Chapter 8, Phase 3: Gaining Access Using Network Attacks. Like NetStumbler, Wellenreiter also interfaces with GPS devices, storing the physical location of the war-driving computer when each WLAN is detected.
Wellenreiter first harvests ESSIDs using rfmon mode. Once it discovers a wireless access point or client, Wellenreiter then listens for Address Resolution Protocol (ARP) or DHCP traffic to determine the MAC and IP addresses of each discovered wireless device. Thus, unlike NetStumbler, Wellenreiter runs in an entirely passive mode, not relying on the broadcast probes that make NetStumbler so noisy or DHCP requests that could get the attacker noticed. However, if an access point is configured to omit its ESSID from its beacons, and no other users are sending traffic to the access point, Wellenreiter will not be able to determine the ESSID. Sure, Wellenreiter will know that an access point is present based on the ESSID-less beacons, but it won’t know its name. As shown in Figure 6.2, Wellenreiter’s screen temporarily displays a red icon and a name of “Non-broadcasting” for such systems. Later, when a user begins sending traffic to or from the access point, Wellenreiter extracts the ESSID from those frames and displays it on the screen.
Figure 6.2 Wellenreiter’s screen shows both broadcasting and nonbroadcasting access points, and indicates which items are sending traffic.

Another very useful wireless tool is the fantastic free Kismet, a wireless sniffer by Mike Kershaw (www.kismetwireless.net). Like Wellenreiter, Kismet can identify the presence of wireless networks and record their traffic on an entirely passive basis. However, whereas Wellenreiter is optimized for war driving, Kismet is designed for detailed packet capture and analysis. When conducting wireless assessments, I include both tools in my arsenal.
War Driving Method 3: Forcing Deauthentication with ESSID-Jack
So NetStumbler focuses on active scanning, whereas Wellenreiter (and other wireless sniffers) opt for a passive approach. There is also a third way to get the SSIDs from WLANs, implemented in a tool called ESSID-Jack, part of the AirJack toolkit written by Mike Lynn. Suppose we have a WLAN that is configured to ignore probes with an ESSID of “Any” and to omit ESSID information from beacons. What’s more, the access point is not currently sending traffic with any ESSID information in it, although there are currently quiet clients that have previously authenticated to the access point. This access point’s ESSID is invisible to NetStumbler (because it ignores probe requests with an “Any” ESSID) and Wellenreiter (until the clients or access point start sending traffic with the ESSID). So, is the attacker out of luck, having to wait for a transmission? Hardly.
With ESSID-Jack, as illustrated in Figure 6.3, the attacker first sends a wireless deauthenticate message to the broadcast address of the LAN in Step 1, spoofing the MAC address of the access point. The attacker must obtain this MAC address for the attack to work, typically grabbing it from various beacon, management, or data frames using a wireless sniffer such as Wellenreiter or Kismet. These are the access points labeled as Non-broadcasting by Wellenreiter. Because wireless clients accept wireless control messages from access points without any authentication, the attacker can force the clients off the WLAN by merely spoofing the access point’s MAC address in the deauthenticate message. After being knocked off the WLAN, in Step 2, the clients then automatically try to reassociate themselves to the access point, using the appropriate ESSID for the access point. The clients send an association frame with the intention of joining the wireless network. This association frame contains the ESSID, in clear text. In Step 3, the attacker sniffs the air for the association frame and collects the ESSID information. In essence, the attacker is injecting traffic into the LAN (the deauthenticate message) to get useful information out of it (the ESSID). Voila! The attacker now has harvested the ESSID.
Figure 6.3 ESSID-Jack in action.
War-Driving Defenses
How can you defend your network against these nefarious war-driving attacks? A multipronged approach to this significant problem is best. Let’s look at the various aspects of a solid wireless security program.
Setting the ESSID
First, set the ESSID to a value that doesn’t bring unwanted attention to your network. Establish a standard for naming WLANs in a way that doesn’t include your organization’s title in the SSID. A WLAN name like 1234 is far better than an attention-grabbing ESSID of Freakishly_big_bank. One way to accomplish this goal is simply to set the ESSID of each access point in your environment to some obscure string employees can still recognize, followed by the access point’s serial number. Of course, you’ll have to train your employees to know which access points to use. Keep in mind that even with obscure ESSIDs, your WLANs aren’t secure. Attackers can still find them, but the bad guys will have less information about them initially.
Configuring Access Points and Using Wireless Security Protocols
Next, configure your access points to ignore probe requests that don’t include the ESSID, and set them up to omit the ESSID from beacon packets. As we’ve seen, an attacker can still obtain your SSIDs, but you’ll at least foil the casual war-driving riffraff. Note that some of the cheaper access points don’t have the option of omitting the SSID from beacons. Still, this useful option is being more widely implemented in modern access points.
Next, require some form of stronger authentication to your access points. It’s crucial to note that wireless card MAC addresses are not a good form of authentication at all. Although some access points, even cheaper ones, can be configured to allow only certain registered MAC addresses through, wireless MAC addresses can be spoofed, trivially bypassing MAC address filtering. On most Linux and UNIX systems, administrative users can set the MAC address of a wireline or wireless interface to any value they choose, using the ifconfig command as follows:
# ifconfig [interface_name] hw ether [desired_MAC_address]
Alternatively, the interestingly named SirMACsAlot tool written by Roamer (www.michiganwireless.org/tools/sirmacsalot) can automatically change a wireless MAC address on Linux, FreeBSD, OpenBSD, and Mac OS X systems. Changing your wireless MAC address on a Windows machine is trickier business, as many of the Windows drivers don’t allow such shenanigans. Still, it’s crucial that you not rely solely on MAC addresses for WLAN security! I am currently working a case in which a large company used a MAC-filtering approach for wireless protection and suffered a massive attack, costing them dearly. The bad guys simply sniffed wireless traffic to grab SSIDs and MAC addresses, and then configured their Linux machine with that information. They then explored the entire internal network, stealing major amounts of sensitive information used to commit fraud.
Instead of MAC addresses, require a stronger form of authentication, based on cryptographically sound protocols. The original 802.11 cryptographic solution, WEP, was found to be significantly flawed, with a variety of cryptographic mistakes in its implementation, including problems with the reuse of cryptographic initialization vectors and crypto key management. WEP by itself is not secure enough for transmitting sensitive information or keeping bad guys off of WLANs in a hostile environment. Instead, you should rely on a stronger solution than plain old WEP. In 2002, the original creators of the 802.11 family, the Institute of Electrical and Electronics Engineers (IEEE), began working on a new security protocol for WLANs called 802.11i. However, because of the lengthy standards process, various vendors created the Wi-Fi Protected Access (WPA) protocol as a stopgap measure to improve security over standard WEP using existing hardware while the IEEE continued work on 802.11i. WPA avoids many of WEP’s flaws, utilizing a protocol called Temporal Key Integrity Protection (TKIP) to lower the chance of attackers harvesting packets and cracking keys. In mid-2004, the newer 802.11i protocol standard was completed. It is far stronger than earlier fare, but requires new hardware. Both WPA and 802.11i are vast improvements over standard WEP, and you should carefully consider using them in your wireless deployments.
Going All the Way with a VPN
Better yet, you can add another far stronger layer of security on top of your WPA and/or 802.11i infrastructure: a good Virtual Private Network (VPN) devoted to securing your wireless network. In addition to improving authentication, most VPNs provide a layer of encryption to prevent interlopers from grabbing traffic and violating users’ confidentiality. This VPN encryption applies a layer of protection on top of the wireless protection inherent in WPA and 802.11i. Most organizations have deployed a VPN for employee access across the big, scary Internet. Well, with wireless attacks on the rise, the radio frequencies around your buildings are nothing more than big, scary internetworks. Thus, the solutions we used to secure traffic across the Internet can be repurposed to help secure our wireless access. Deploy VPN clients to each of your wireless users, and educate your personnel to set up a VPN connection before sending any traffic to your organization wirelessly. Make sure you deploy access points so that all wireless traffic is directed through a VPN gateway before entering your organization’s network. The VPN device should be configured to drop all unauthenticated and unencrypted traffic. When a user accesses your network through a wireless access point, all traffic will be encrypted at the user’s machine by the VPN client, transmitted across the wireless hop in a strongly authenticated and encrypted fashion, received by the access point, and then directed to the VPN gateway, where it can be authenticated and decrypted before entering your network.
When setting up your VPN for wireless use, be very careful with its configuration. Remember, with wireless, an attacker might be able to grab all encrypted data from the WLAN and try to crack it, an option they often don’t have when going after an Internet-based VPN infrastructure. With wireless, the bad guys are on the same LAN as your users! Thus, in configuring your wireless VPN, it’s crucial to disable Aggressive Mode Internet Key Exchange (IKE), because tools such as IKE Crack and Cain can break preshared keys sent via that mode, as we discuss in more detail in Chapter 7, Phase 3: Gaining Access Using Application and Operating System Attacks. Although IKE Crack and Cain are not wireless-specific, they can be used very well against WLANs, provided they are implemented with preshared IKE keys and use Aggressive Mode IKE. Aggressive Mode IKE is far weaker cryptographically and should be disabled in your VPN gateways.
Detecting the Bad Guys
Additionally, there are several solutions to identify wireless attackers in your midst. Wireless Intrusion Detection Systems (IDSs) and services, marketed by AirDefense, AirMagnet, and IBM, look for unusual messages sent by intruding wireless clients (including ESSID-less probe broadcasts and unexpected deauthenticate messages) by deploying wireless sensors throughout your environment. Kismet, the great free wireless sniffer, also includes detection capabilities for telltale war-driving packets and wireless intrusion attempts.
Furthermore, Cisco and a handful of other access point vendors offer built-in capabilities in their existing access point product lines to detect renegade access points that suddenly show up in your environment. When one of your Cisco access points detects an unregistered renegade in your environment, it can alert you. In a sense, you use your existing access point infrastructure, configured with a list of your own valid access points, to police your environment looking for rogue access points. Additionally, Cisco provides features that attempt to jam the renegade access point by automatically launching a DoS flood against it. I strongly recommend that you avoid this DoS feature, as its legal implications could be dire! Still, the renegade detection capability is wonderful.
A Little Physical Protection Never Hurt Anyone
Finally, to help limit the possibility of attacks against your wireless infrastructure, you might want to turn down the transmit power for access points near your buildings’ perimeters, such as near exterior walls or top floors. Similarly, you should consider deploying directional antennas to control signal bleed out of the building from these perimeter wireless devices, in effect bathing only trusted areas in wireless signal. There will always be a small amount of signal bleed, but you can help minimize it with these approaches. Finally, we’re starting to see a few products that thwart wireless attacks by controlling signal propagation using metal shielding. A handful of companies have begun selling wallpaper with a thin layer of embedded copper wires, and others are marketing paint with tiny metal fibers. Both solutions are designed to act as a Faraday cage, breaking up wireless signals at the walls of your environment. Although such solutions might sound extreme to some people, they certainly help dampen the propagation of wireless signals in sensitive environments. Keep in mind, though, that you might have to paint or wallpaper your windows, floors, and ceilings to block wireless signals thoroughly.
War Dialing: Looking for Modems in All the Right Places
Although hacking WLANs is a popular sport today, don’t ignore the still widely used attack vector of unsecured modems in your infrastructure, discovered through a process called war dialing. You remember the movie War Games, right? Released in 1983, this movie is a classic in the hacker/techno-thriller genre. When I first saw it, it both terrified and fascinated me. In the movie, Matthew Broderick’s character attempts to break into a computer game company, Protovision, to play their games. Unfortunately, he accidentally triggers a thermonuclear war, but we all have our bad days. As you might recall, Broderick’s character broke into his target by dialing telephone numbers looking for modems. This is a classic example of a war-dialing attack, searching for a modem in a target’s telephone exchange to get access to a computer on their network. A war-dialing tool automates the task of dialing large pools of telephone numbers in an effort to find unprotected modems. An attacker can scan in excess of 1,000 telephone numbers in a single night using a single computer with a single phone line. More computers and phone lines make the scan even faster.
You might be asking, “Why are we talking about war dialers now? A couple decades ago, they were included in a major motion picture. Surely they are not a problem these days!” Sadly, war dialers are still one of the easiest and most often used methods for gaining access to a target network.
A Toxic Recipe: Modems, Remote Access Products, and Clueless Users
Often, unaware users connect a modem to their desktop computer in the office so they can access the machine from home without having to mess with finicky VPNs or limiting firewalls. These users sometimes employ PC remote control products, such as RealVNC’s Virtual Network Computing (VNC) software, Symantec’s pcAnywhere, DameWare’s Mini Remote Control, or Laplink’s Gold program so they can have complete control of the machine from home. These products allow the user to access all resources on his or her office machine, including files, network shares, and even the screen, keyboard, and mouse. If not configured properly, these remote control products offer an excellent opening for attackers to gain access to the network. Users set up a modem and remote control product because they simply want to get more work done. However, if they aren’t careful, they could jeopardize the most carefully designed security controls on your network.
Many users configure these tools with very easy-to-guess passwords, allowing an attacker to run an automated password-guessing tool (which we discuss in Chapter 7) to gain access. We have frequently conducted war-dialing exercises, and gained wide open access to a network. To gain complete access to the target machine, all the attacker has to do is find the modem on the given telephone line using a war dialer, recognize the connect string from the remote control product, and connect using the appropriate remote control client. After guessing the password, the attacker has total control over that machine, and can then try to attack the network to which the victim machine is connected.
SysAdmins and Insecure Modems
Clueless users are not the only offenders here. Frustratingly, system administrators, vendors, and service providers sometimes leave systems connected to modems with little or no security. Most organizations give modem access to vendors and service providers so they can troubleshoot devices remotely via telephone, even if the existing IP network goes down. Again, when we conduct war-dialing exercises, we sometimes discover modems connected to servers and routers that either request no password, or have a trivial-to-guess password. A couple years ago, we conducted a penetration test against a customer that had spent several hundred thousand dollars on a secure Internet gateway, including a firewall, IDSs, and secure servers. We spent several weeks bashing our heads against the firewall and servers, but couldn’t gain access. We fired up our handy war dialer, though, and started to search for insecure modems on the telephone exchanges of the company. Within two hours, we found an open modem on a router. Boom! From that router, we were able to gain access to the entire network, going around the expensive firewall and Internet gateway.
After discovering this renegade modem, we searched the building for the associated router to which it was connected. We found it tucked into a closet with about an inch of dust on top. Interestingly, the only connectivity the router had was the modem and one network interface! The router wasn’t even routing on the network; administrators had scavenged it for parts, leaving only one network interface and forgetting about this “unimportant” machine that gave us complete access to the network. When we told the company about our discovery, the network administrator said, “That darn Charlie! He quit about three years ago and never told me about that router.” To this day, I don’t know if Charlie really existed or was merely a useful scapegoat.
Finding Telephone Numbers to Feed into a War Dialer
War dialers require a range or series of numbers to dial, usually a telephone exchange associated with a particular target network. So where does an attacker get the phone numbers for war dialing? There are many options for determining the phone numbers of a target organization, including the following:
- The Internet. The Internet is a treasure trove of phone numbers for an organization. As we saw in Chapter 5, Phase 1: Reconnaissance, Google includes phone book functionality with its phonebook directives. Furthemore, your users’ queries to mailing lists and newsgroups are very helpful, because many users include their phone numbers in their signature line at the end of their e-mails.
- Whois databases. These highly useful databases have telephone numbers for network contacts, as we saw in Chapter 5.
- An organization’s Web site. Most organizations have contact information or even phone books with employee phone numbers on their Web sites.
- Social engineering. An attacker can call users and dupe them into giving out information about phone numbers. The attacker could say, “I’m from the phone company, and I need to verify what phone numbers you folks are using.”
Attackers scour these sources looking for individual telephone numbers. They then war dial all telephone numbers in a range centered around the discovered numbers, trying 1,000 numbers before and after to find modems.
THC-Scan 2.0
THC-Scan is one of the most full-featured, free war-dialing tools in widespread use. Written by the very prolific van Hauser and released in late 1998, THC-Scan 2.0 runs on Microsoft Windows platforms. THC-Scan was released through The Hacker’s Choice group, from which it derives the three-letter acronym in its name. You can find THC-Scan 2.0 at www.thc.org. Even though it does not have a GUI, THC-Scan’s clean interface is very well organized and easy to use, as shown in Figure 6.4.
Figure 6.4 The THC-Scan 2.0 user interface.
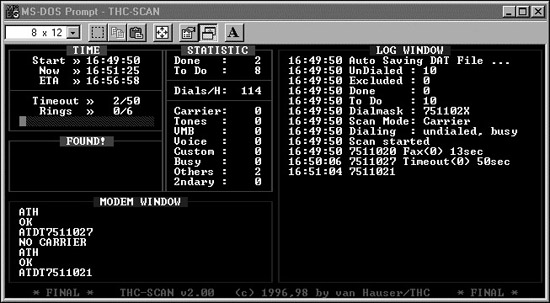
On the THC-Scan screen, the modem window on the left shows the commands sent from THC-Scan to the system modem, in Hayes-compatible modem lingo with its familiar ATDT syntax. The all-important log window shows what types of lines are discovered, the time of discovery, and other important messages from the system. In the statistics portion of the THC-Scan screen, the tool displays a nice real-time summary of detected lines, including the number of carriers (discovered modems) and other types of lines. A convenient statistic is the number of lines dialed per hour. With a single machine and a single modem, we typically dial approximately 100 lines per hour in our war-dialing penetration tests. This is a useful metric in determining how long it will take to dial large numbers of lines. Additional features of THC-Scan are shown in Table 6.1.
Table 6.1 THC-Scan 2.0 Features
When THC-Scan is running, it can rely on the local modem on the war-dialing machine to determine whether the dialed line has a modem, is busy, or times out because a pesky human answered the phone. Whoever answers the phone dialed by the war dialer will hear nothing on the line. After a time-out interval configured in the war dialer passes (typically several seconds), the war dialer hangs up and moves on to the next line. The person answering the phone hears the familiar and rude click of a hang-up. If the war dialer discovers a busy signal, it passes up this number, and can be configured to redial it again later. If a modem carrier is discovered, the telephone number of that modem is recorded in the log file.
The War Dialer Provides a List of Lines with Modems: Now What?
After the scan, the war dialer logs contain a list of the phone numbers with modems and the results of nudging each modem. The nudging function of the war dialer often reveals a warning banner or login prompt. The attacker carefully looks through the logs searching for systems requiring no password (now there’s an easy way in!) and familiar connection strings. Many systems’ prompts explicitly state what platform they are running (e.g., “Hi, I’m Linux!”). For others, the attacker can determine this information from the nature of the prompt. UNIX boxes and Cisco router prompts are particularly easy to identify. Additionally, some packages respond to a nudge with a string of characters the attacker can recognize as a particular tool running on the target machine. For example, pcAnywhere sends back a telltale sequence of characters.
THC-Scan relies on the attacker to go through the logs and recognize the types of system running at target numbers. It does not automatically identify the system type, instead relying on the attacker’s own knowledge or a database of known system types. Attackers often compile and share long lists of various types of systems’ nudge behavior, ranging from variants of UNIX to mainframes to remote access products. A commercial war-dialing tool, Sandstorm Enterprises’ PhoneSweep, includes automated system identification, eliminating the need for a list of system nudge behaviors for those users willing to pay for PhoneSweep.
Based on the war-dialer output, the attacker might find a system or two without passwords. The attacker can connect to such systems, look through local files, and start to scan the network (we discuss more about scanning and exploring networks later in this chapter). If the discovered modem requires a special client for a connection, such as a remote control program like pcAnywhere, the attacker uses this special client to connect.
If all of the discovered systems with modems are password protected, the attacker will then resort to password guessing, firing password after password at the target in an attempt to log in. We cover various automated password-guessing tools in detail in Chapter 7.
Defenses Against War Dialing
So, how do you defend your network against war-dialing attackers? As with most solid defenses, a strong policy is the best place to start.
Modem Policy
A clear, documented modem and dial-up line policy is a crucial first line of defense against war dialers. Tell your user population that they cannot use modems on desktop machines in your office facilities. All dial-up remote access must use a centralized modem pool, which is subject to audit to ensure its security. Better yet, avoid modems altogether, relying on a secure VPN instead. Train users regarding the modem policy and the use of secure remote access services, such as your corporate modem bank or VPN.
Of course, some users might have a specific, demonstrable business need for having a modem. For example, a business partner relationship could require a modem, resulting in new revenues or improved profits for your organization. As much as we security personnel might hate to admit it, our companies exist to service customers, constituents, or other users, not to be impregnable fortresses with which no one can do business. Your modem policy should include the possibility of a deviation when there is an important business need requiring a modem. Your policy should state that a deviation request must include a business justification and be filed and signed by a person responsible for the modem. All deviations should be subject to approval by the security organization, which is responsible for ensuring the modem line has difficult-to-guess passwords, or uses an authentication token for access. These deviations are essentially a method for forcing users to register modems.
These deviations should then be used to create an inventory of known modem lines in your organization. You can use a war-dialing tool to audit this list periodically to ensure the modems on it conform to your security standards for authentication.
Dial-Out Only?
If a user has a business need for a modem to dial out of your network only, you can configure the PBX so that a particular telephone line supports outgoing calls only. No incoming calls will be allowed to that line, preventing an attacker from discovering the modem and gaining access. Although this technique works quite well, some users have a business need that requires incoming dial-up modem access.
Find Your Modems Before the Attackers Do
In addition to a strong modem policy and modem registration, you should periodically conduct a war-dialing exercise against your own telephone numbers. If you find the renegade modems before an attacker does, you can shut them down and prevent an attack. I recommend doing these exercises fairly frequently, every three to six months, depending on the size of your organization and the personnel you have available to do the scan. You can conduct the exercise using your own personnel, because war-dialing tools require little special expertise. You could use a free tool like THC-Scan to conduct the war-dialing exercise. Alternatively, you can use a commercial war dialer such as PhoneSweep from Sandstorm Enterprises (www.sandstorm.net). You could also outsource war-dialing scans, but you must be sure to use a reputable company when searching for security vulnerabilities on your network.
When war dialing against your own network, how do you determine which telephone numbers to dial? At a minimum, you should get a list of all analog lines from your PBX. You might also want to consider scanning digital PBX lines and even VoIP connections, because a user can buy a digital-to-analog line converter from Radio Shack for under $100.00 or string an acoustic coupler to a VoIP line.
A major concern in finding all of your incoming telephone lines involves those lines not accessible through your PBX. A user might have called the telephone company and requested a phone line to be installed directly to one of your buildings. These direct lines from the telephone company that do not go through your PBX can be a nightmare to find. The best, although not ideal, approach for finding such lines is to follow the money: Get the bills from the telephone company. Ask your telephone company to give you a copy of all bills being mailed to a given address, or, if possible, all bills for lines at a certain address. You should conduct war-dialing exercises of these extra incoming lines, plus your analog and digital PBX lines, on a regular basis.
If you are into writing scripts for managing your Windows-based infrastructure, there’s another option for finding modems on Windows machines besides actually war dialing the phone number range. You could turn to Windows Management Instrumentation (WMI). Microsoft provides this Application Programming Interface (API) for script writers to access and manage numerous aspects of Windows machines remotely, including installed hardware, software, and operating system settings. In particular, the Win32_POTSModem class in this API can be called from a VBScript or Perl script to interrogate target machines in a domain, determining whether a modem is installed and its configuration. Such access is far less intrusive than launching a war-dialing exercise, but it only applies to Windows machines in your domain. Microsoft has created a handy little primer on WMI Scripting, available for free at http://msdn.microsoft.com/library/default.asp?url=/library/en-us/dnclinic/html/scripting06112002.asp.
Desk-to-Desk Checks
A final way to prevent attacks through renegade modems (as well as unauthorized wireless access points) is to find deviations from your policy by conducting desk-to-desk checks. Your system administrators or security organization should plan periodic evening pizza parties. Order a few pies (a legitimate business expense), and after a hearty meal, scour the building, checking users’ desktop machines to see if they have modems with dial-up lines attached or unauthorized wireless access points. Because it’s hard to see internal modems, look for the telephone wires attached to the computer. Even if you do your own war dialing, you might still find extra modems connected to desktops by walking around from desk to desk. When you conduct desk-to-desk checks, you should always employ the two-person rule (also known as the buddy system). With a two-person team checking for unwanted and unregistered modems, you will not be subject to claims of unfairness or, worse yet, theft from people’s desks. If a single person checks for modems late at night, and something winds up missing from someone’s desk, you could have significant problems. The buddy system minimizes the chance of such accusations.
Network Mapping
So far, we have focused on scanning targets, looking for WLANs or unsecured modems. At this stage of the attack, the bad guys sit in one of three places:
- On the other side of the Internet, staring at the target DMZ discovered via thorough reconnaissance
- Hanging off of a WLAN, identified through war driving
- Connected to a system with a modem, found during a war-dialing attack
At this point, most attackers want to scope their prey, determining the addresses of additional targets and gaining an understanding of the network topology from where they sit. A clever attacker will carefully map your network infrastructure, trying to get into the mind of the network architect to discover critical hosts, routers, and firewalls.
Where will the attackers point their tools when mapping and scanning your network? They will aim them at whichever systems they can reach. If the attackers have no access to your internal network, they will begin by mapping and scanning your Internet gateway, including your DMZ systems, such as Internet-accessible Web, mail, File Transfer Protocol (FTP), and DNS servers. They will methodically probe these systems to gain an understanding of your Internet perimeter. After conquering your perimeter, the attackers will attempt to move on to your internal network.
Alternatively, if the attackers have internal access to your network already, including successful war-dialing or war-driving attackers as well as malicious employees, they will start scanning and mapping your internal network right away.
Regardless of where the attacker sits, the same tools and overall methodology are used to map a target network. Let’s analyze some of the techniques used by attackers in mapping and scanning networks, particularly for finding live hosts and tracing your network topology.
Sweeping: Finding Live Hosts
To build an inventory of accessible systems, attackers sometimes attempt to ping all possible addresses in the target network to determine which ones have active hosts. As described in Chapter 2, ping is implemented using an ICMP Echo Request packet. The attacker could send an ICMP Echo Request packet to every possible address in your network determined during the reconnaissance phase, discovered through sniffing wireless traffic, or found on the system with an insecure modem. After sending the ping packet, the attacker looks for an ICMP Echo Response message in return. If a reply comes back, that address has an active machine. Otherwise, the address might not be in use (or, pings and ping responses have been filtered). Of course, most attackers don’t want to ping an entire network by hand, so they use automated tools to sweep the entire target address space looking for live hosts.
Because many networks block incoming ICMP messages, an attacker could alternatively send a TCP packet to a port that is commonly open, such as TCP port 80 where Web servers typically listen. If the port is open, the system at the target address responds with a SYN-ACK packet, indicating that there is a machine at that address. Or, an attacker could send a UDP packet to an unusual port on the target system. With UDP, if the port is closed, many machines respond with an ICMP Port Unreachable message, another good indicator that a system is located at the given target address. However, if nothing comes back, there might or might not be a machine there. So, in essence we have three methods for identifying whether a host is alive: ICMP pings, TCP packets to potentially open ports, and UDP packets to likely closed ports.
Traceroute: What Are the Hops?
Once attackers determine which hosts are alive, they want to learn your network topology. They use a technique known as tracerouting to determine the various routers and gateways that make up your network infrastructure. Tracerouting relies on the Time-to-Live (TTL) field in the IP header. According to the Request for Comments (RFC) that defines IP, this field is decremented by each router that receives the packet based on the number of seconds the router takes to route the packet or one, whichever is more. Because modern routers send packets in considerably less than one second, this field is typically just decremented by one for each hop between the source and destination.
So how does the TTL field work? When a router receives any incoming IP packet, it first decrements the value in the TTL field by one. For example, if the incoming packet has a TTL value of 29, the router will set it to 28. Then, before sending the packet on toward its destination, the router inspects the TTL field to determine if it is zero. If the TTL is zero, the router sends back an ICMP Time Exceeded message to the originator of the incoming packet, in essence saying “Sorry, but the TTL wasn’t large enough for this packet to get to its destination.” The ICMP Time Exceeded message originates at the router that dropped the packet, which transmits it to the original sender. The TTL field was created so that packets would have a finite lifetime, and we wouldn’t have phantom packets caught in routing loops, circling the Internet for eternity.
We can use this TTL feature to determine the paths that packets take across a network. By sending a series of packets with various low TTL values and waiting for the Time Exceeded responses, we can trace all routers from a given source to any destination. That’s what tracerouting is all about. As shown in Figure 6.5, I’ll start out by sending a packet from my source machine with a TTL of one. The first router receives the packet, decrements the TTL to zero, and sends back an ICMP Time Exceeded message. What is the source address of the ICMP Time Exceeded message? It’s the IP address of the first router on the path to my destination. Bingo! I know the address of the first router on the way to my destination. Next, I’ll send out a packet with a TTL of two. The first router decrements the TTL to one and forwards the packet. The second router in the path decrements the TTL to zero and sends an ICMP Time Exceeded message. I now have the address of the second hop. This process continues as I send packets with incrementally higher TTLs until I reach my destination. At that point, I’ll know every hop between me and my target.
Figure 6.5 Tracerouting to discover the path from source to destination.
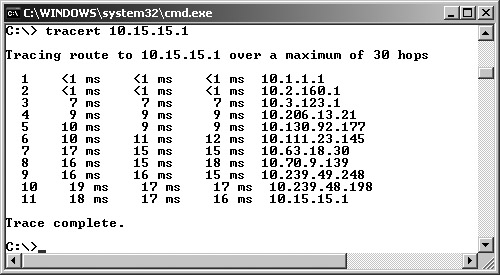
To automate this process, most UNIX varieties include a version of the traceroute command, which sends UDP packets with incremental TTL values, while looking for the ICMP Time Exceeded message in return. Modern Windows systems also include the same type of tool, but it is named tracert, to conform to the ancient eight-character naming structure from MS-DOS, back when dinosaurs roamed the earth. Just to be different, tracert sends out ICMP packets (not UDP packets like UNIX) with incremental TTL values, waiting for the ICMP Time Exceeded message to come back. Figure 6.6 shows the output from the Windows tracert command. Note that each of the 11 hops between my machine and the destination are shown on the right side of the screen.
Figure 6.6 The Windows tracert command output.
Attackers use traceroute to determine the path to each host discovered during the ping sweep. By overlaying the results from tracerouting to each target and reconciling the various routers and gateways, an attacker can re-create the target network topology. Using this information, the attacker will create a network diagram, as shown in Figure 6.7, perhaps on the back of an envelope. The attacker will not know the purpose of every system and network element, but a basic picture of the network infrastructure will begin to develop as the attacker methodically deconstructs the architecture.
Figure 6.7 A network diagram created by hand with an attacker using ping and traceroute.
An attacker can use the basic ping and traceroute functionality built into most operating systems to determine the network topology by hand. However, doing all of this pinging, tracerouting, and reconciling is a lot of work. To simplify the process, clever system administrators and individuals in the computer underground have developed several automated ping sweep and traceroute tools.
Cheops-ng, a free tool available at http://cheops-ng.sourceforge.net, is one of the most capable and easiest to use network-mapping tools. Written by Brent Priddy, Cheops-ng runs on Linux and automates the process of developing a network inventory and topology using pings and traceroute. As shown in Figure 6.8, Cheops-ng draws pretty pictures based on information obtained from ping sweeps and tracerouting throughout a target network. The tool also associates an icon with each type of operating system, and includes the appropriate system types in its screen. Note the little demon icon indicates a BSD machine, the machine with a cross logo shows a Windows box, the globes are routers, and the machines labeled QNX are running the QNX Realtime Operating System.
Figure 6.8 The Cheops-ng display.

Cheops-ng couldn’t identify the machine with the question mark, because none of its system fingerprints matched this box.
In addition to its automated ping sweep and traceroute capabilities, Cheops-ng includes a variety of other features. It allows a system administrator to automatically make FTP or Secure Shell (SSH) connections to access machines across the network conveniently by including an FTP and SSH client in its GUI. Additionally, Cheops-ng supports remote operating system identification using active operating system fingerprinting (a great technique we discuss later in this chapter during our analysis of the Nmap port scanner).
Defenses Against Network Mapping
How do you prevent an attacker from mapping your network using ping, traceroute, Cheops-ng, and related network-mapping tools? You need to filter out the underlying messages that these tools rely on by using firewalls and the packet filtering capabilities of your routers. At your Internet gateway, you should block incoming ICMP messages, except to hosts that you want the public (including attackers) to be able to ping. Does the public need to ping your Web server? Maybe. Do they really need to ping your DMZ mail servers? Probably not. Do they need to ping your internal network hosts? Definitely not. In some cases, your ISP will want to ping a machine on your side of the Internet connection to make sure the connection is alive. To support this need, you should configure your router filters to allow incoming ICMP Echo Request packets only from the ISP’s management systems, and only let them reach one of your systems.
Additionally, you might want to filter ICMP Time Exceeded messages leaving your network to stymie an attacker using traceroute. Although this filtering inhibits users and network management personnel who want to use traceroute, it also limits the information an attacker can discern about your environment. Have you ever done a traceroute and noticed that some of your hops are identified with just a bunch of stars (***) and not an IP address? That’s because that hop isn’t responding with an ICMP Time Exceeded message. What’s more, if you see all stars starting at one hop and going for all hops after that, in all likelihood, that first hop with the stars is filtering the ICMP Time Exceeded messages trying to come back to you. Such filtering certainly limits the attacker’s ability to perform network mapping.
Determining Open Ports Using Port Scanners
At this point in the attack, the attacker knows the addresses of live systems on the target network and has a basic understanding of the network topology. Next, the attacker wants to discover the purpose of each system and learn potential entryways into the machines by analyzing which ports are open. As described in Chapter 2, the active TCP and UDP ports on the machines are indicative of the services running on those systems.
Each machine with a TCP/IP stack has 65,536 TCP ports and 65,536 UDP ports. Every port with a listening service is a potential doorway into the machine for the attacker, who carefully takes an inventory of the open ports using a port-scanning tool. For example, if you are running a Web server, it’s most likely listening on TCP port 80. If you are running a DNS server, UDP port 53 will be open. If the machine is hosting an Internet mail server, TCP port 25 is likely open. Of course, any service can be configured to listen on any port, but the major services listen on a variety of “well-known” port numbers, so the client software knows where to connect for the service. With a list of open ports on a target system, the attacker can then get an idea of which services are in use by consulting the official source of such information, the Internet Assigned Numbers Authority (IANA) up-to-date port list located at www.iana.org/assignments/port-numbers.
If the 65,536 TCP and 65,536 UDP ports are like doors on each of your machines, port scanning is akin to knocking on each door to see if anyone is listening behind it. If someone (that is, a service) is behind the door, the knock on the door will get a response. If no one is behind the door (that is, no service is listening on that port), no answer will come back. Using a port scanner, the attacker sends packets to various ports to determine if any service is listening there.
Most port-scanning tools can scan a list of specific ports, a range of ports, or all possible TCP and UDP ports. In an attempt to avoid detection by sending fewer packets, the attacker might choose to scan a limited set of ports, focusing on the ones associated with common services like telnet, FTP, e-mail, Web traffic, and various Windows file and print sharing services. Alternatively, the attacker might develop a complete inventory of ports to determine every possible way into a system.
Nmap: A Full-Featured Port-Scanning Tool
Nmap, the most popular port-scanning tool in the world, was created and is maintained by a skilled software developer named Fyodor. Freely available at www.insecure.org/Nmap, the tool offers lots of options and is widely used within the computer underground and by computer security professionals. Nmap runs on most varieties of UNIX, Linux, and Windows. Showing its great popularity, Nmap was even briefly displayed in the movie The Matrix Reloaded in 2003, where the much-beloved character Trinity used Nmap to help save Neo and, by extension, the entire human race. That’s a pretty good showing for a port-scanning tool!
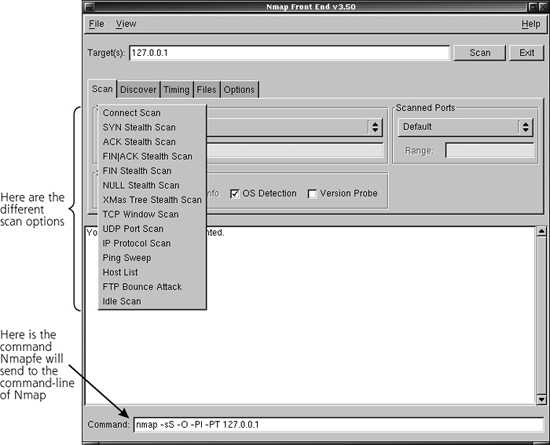
Most users activate Nmap and control it directly from the command line. However, a very capable GUI front end has been created, called, appropriately enough, the Nmap front end (Nmapfe). Nmapfe, also available at www.insecure.org/Nmap, is shown in Figure 6.9. Nmapfe offers a simple-to-use, point-and-click interface that automatically generates the appropriate command-line option to feed to the Nmap executable. The Command: line at the bottom of the Nmapfe screen shows the options that will be fed into the Nmap command line. Although not revolutionary, Nmapfe makes interacting with Nmap and its myriad options even easier. For most users, Nmapfe works like training wheels. When starting with Nmap, you get a feel of the tool using Nmapfe. After a day or two of experimentation, most users then move to the command line to run Nmap directly.
Figure 6.9 Nmapfe: A nice GUI for Nmap.
When scanning for open ports, the scanning system sends packets to the target to interact with each port. What type of packets does the scanning system send and how does the interaction occur? The types of packets and modes of interaction depend on the type of scan being conducted. The numerous types of scanning supported by Nmap are summarized in Table 6.2 and explained in more detail later in this section. It is important to note that some of these scan types could cause the target system to become flooded or even crash under the load of strange and unusual packets. For that reason, be careful running any scanning tool against a target, getting appropriate permission from the target owners and warning them that there is a chance the system could be impaired by the scan.
Table 6.2 Scan Types Supported by Nmap
Types of Nmap Scans
Let’s analyze the most useful scan types supported by Nmap in more detail. To better understand how Nmap’s scanning options operate, it is important to recall how TCP and UDP work. As described in Chapter 2, all legitimate TCP connections (for example, HTTP, ssh, ftp, and so on) are established using a three-way handshake. The TCP three-way handshake, shown in Figure 6.10, allows for establishing sequence numbers between the two systems. These sequence numbers are used so that TCP can deliver the packets in the proper order on a reliable basis. All TCP-based services utilize this three-way handshake. For example, in Figure 6.10, System A might be your Web browser and System B your favorite e-commerce Web site.
Figure 6.10 The TCP three-way handshake.
In the three-way handshake, the initiating system sends a packet with some initial sequence number (ISNA) and the SYN TCP control bit set. If a service is listening on the port, the destination machine responds with a packet that has both the SYN and ACK control bits set, an acknowledgment of ISNA + 1, and an initial sequence number for responses (ISNB). On receiving this SYN-ACK packet, the initiator finishes the three-way handshake by sending an ACK packet, including an acknowledgment of the recipient’s sequence number, ISNB + 1. At this point, the three-way handshake is complete. All subsequent packets going from Machine A to Machine B have a series of increasing sequence numbers based on the number of data octets transmitted from A to B, starting at ISNA + 1. All packets going from Machine B to Machine A will have a separate set of sequence numbers, starting at ISNB + 1. Using these sequence numbers, the TCP stacks of each system retransmit lost packets and reorder packets that arrive out of sequence.
Given this understanding of TCP, we next analyze some of the scan types supported by Nmap.
The Polite Scan: TCP Connect
TCP Connect scans, sometimes called “plain vanilla” scans, attempt to complete the TCP three-way handshake with each target port on the system being scanned. Because they are the most polite scan, adhering to the defined TCP specifications, there is little chance a Connect scan will crash the target system. However, an out-of-control Connect scan launched from a fast system on a high-bandwidth connection could result in a flood of a target. To conduct a Connect scan, the attacker’s system sends out a SYN and awaits a SYN-ACK response from the target port. If the port is open, the scanning machine completes the three-way handshake with an ACK, and then gracefully tears down the connection using FIN packets.
If the target port is closed, the target returns no SYN-ACK response. For closed ports, the attacker’s system receives no response, a RESET packet, or an ICMP Port Unreachable packet, depending on the system type and the target network configuration. Any of these messages means the port is closed.
Unfortunately for the attacker, however, Connect scans are really easy to detect. A complete connection is made to the end system, which might record the connection in its logs if full connection logging is activated. For example, if the attacker scans a Web server, the Web server’s log file indicates that a connection was opened from the attacker’s IP address. Because this evidence can be rather inconvenient for attackers, they often use stealthier scan techniques.
A Little Stealthier: TCP SYN Scans
Whereas Connect scans follow the TCP three-way handshake completely, SYN scans stop two-thirds of the way through the handshake. Sometimes referred to as half-open scans, SYN scans involve the attacking machine sending a SYN to each target port. If the port is open, the target system sends a SYN-ACK response. The attacking machine then immediately sends a RESET packet, aborting the connection before it is completed. In a SYN scan, only the first two parts of the three-way handshake occur.
If the target port is closed, the attacker’s system receives no response, a RESET packet, or an ICMP Port Unreachable packet, again depending on the target machine type and network architecture.
SYN scans have two primary benefits over Connect scans. First, SYN scans are stealthier, in that most end systems do not record the activity in their logs. With a SYN scan, a true connection never occurs, because it is torn down before it is established. Therefore, in our previous example, the Web server’s logs won’t display a connection from the attacker’s IP address if the attacker uses a SYN scan. It is important to note, however, that routers, firewalls, network-based IDSs, and network-based Intrusion Prevention Systems (IPSs) that have logging enabled on the target network record the SYN packet. Therefore, although the target host does not log the connection, the infrastructure of the target network can record the scan, including the IP address of the attacker.
A second advantage of a SYN scan is its speed. Connect scans require sending more packets and waiting for the entire three-way handshake and connection tear down to complete. SYN scans require sending only SYN packets, and waiting only for the SYN-ACK. Because it is simpler and involves less waiting, SYN scanning can be quite fast.
One area of concern with SYN scans is the possibility that the target system could become flooded with outstanding SYNs, resulting in an accidental DoS attack. SYN floods are described in more detail in Chapter 9, Phase 3: Denial-of-Service Attacks. If the target system is running an old, unpatched operating system, the attacker could take it offline by doing a simple SYN scan. Of course, Nmap quickly sends a RESET packet to help to avoid flooding the target with outstanding incoming SYNs. Despite this precaution, however, a feeble system could be overwhelmed by a simple SYN scan.
Violating the Protocol Spec: TCP FIN, Xmas Tree, and Null Scans
Connect scans followed the TCP specification perfectly; TCP SYN scans followed them two-thirds of the way. The FIN, Xmas Tree, and Null scans all violate the protocol by sending packets that are not expected at the start of a connection.
A FIN packet instructs the target system that the connection should be torn down. However, during a FIN scan, no connections are set up! The target system just sees a bunch of packets arriving saying to tear down nonexistent connections. According to the TCP specification, if a closed port receives an unexpected FIN when no connection is present, the target system should respond with a RESET. Therefore, a RESET indicates that the port is closed. If the port is open and an unexpected FIN arrives, the port sends nothing back. Therefore, if nothing comes back, there is a reasonable chance the port is open and listening (although a firewall might have blocked the incoming packet or the response). In this way, FIN scans can be used to determine which ports might be open and which are closed.
In a similar manner, an Xmas Tree scan sends packets with the URG, ACK, PSH, RST, SYN, and FIN control bits set. Its unusual name comes from the observation that all these control bits set in a TCP header resemble a strand of Christmas tree lights. It takes a pretty twisted mind to make that observation, but the name persists and is widely used. If a router or firewall is looking for specific control bits set before it allows packets in, it’ll find them in an Xmas Tree scan, because they’re all lit up with a value of 1. Furthermore, because this combination of bits is not a valid setting according to the RFC that defines TCP, some older IDSs ignore such packets. Newer IDS tools have signatures that indicate an Xmas Tree scan. A Null scan involves sending TCP packets with no control bits set. Again, Xmas Tree and Null scans expect the same behavior from the target system as a FIN scan: A closed port sends a RESET, and a listening port sends nothing.
Unfortunately, this technique does not work against Windows-based systems, which don’t follow the RFCs regarding when to send a RESET if a FIN, Xmas Tree, or Null packet comes in. For other platforms, though, these scan types are very useful.
Kicking the Ball Past The Goalie: TCP ACK Scans
Like FIN, Xmas Tree, and Null scans, an ACK scan also violates the protocol specification, allowing an attacker to be stealthier and get through some packet filtering devices. To understand how ACK scanning benefits an attacker, recall our discussion of packet filtering from Chapter 2. Packet filters, which can be implemented in routers or firewalls, allow or deny packets based on the contents of their packet headers, both the IP header and the TCP or UDP header. By looking at the source and destination IP addresses, source and destination ports, and TCP control bits, a packet filter determines whether it should transmit a packet or drop it.
In a common architecture, many networks are configured to allow internal network users to access an external network (most often, the Internet). In this scenario, shown in Figure 6.11, an external packet-filtering device allows outbound traffic so that the internal machines can access servers on the external network. This packet-filtering device could be a router or firewall supporting traditional packet filtering. The top arrow in Figure 6.11 shows the allowed outbound traffic. For example, if we want to allow outbound Web access (HTTP), users need to make connections from high-numbered source ports on internal machines to destination TCP port 80 on external systems. We define a rule allowing such traffic on the packet-filtering device.
Figure 6.11 Allowing outgoing sessions (and responses), while blocking incoming session initiation.
However, when an internal user accesses the external network, we have to handle the response traffic. We allow outgoing Web requests to destination TCP port 80, but how do the Web pages get back in? Using a traditional packet filter, we can only filter based on information in the packet headers: the IP addresses, port numbers, and control bits. We can’t just allow packets to come in if they start at a given source port (for example, TCP port 80), because then attackers could simply set their port scanners to use a source TCP port of 80 and scan our entire network.
The resolution implemented in many traditional (nonstateful) packet filters involves checking the TCP control bits of the incoming packets. We will drop all incoming connections that don’t have the ACK control bit set. All of the responses to internally initiated traffic, which we want to allow, will have the ACK bit set. That way, no sessions can be initiated from the external network, because they would have a SYN control bit. The middle arrow in Figure 6.11 shows these incoming ACK packets. These packets with the ACK bit set are often referred to as established connections, because they are responses to connections already established using packets from the inside. Many routers are configured with filtering rules that allow outgoing traffic and support the responses by admitting these established connections. This is a common solution for filtering at border routers, some DMZ systems, and internal network routers.
So we’ve solved the problem of allowing incoming responses to our outgoing sessions, right? Well, not exactly. In Chapter 2, we discussed the analogy of a firewall as a goalie in a game of soccer. Is there any way an attacker can kick a ball past this simple packet-filtering goalie to get it into the net? An attacker wanting to scan our internal network can simply send packets with the ACK control bit set. The packet-filtering device allows these packets into the network, because it thinks they are responses to outgoing connections given that the ACK control bit is set.
Figure 6.12 shows how an attacker can conduct an ACK scan to determine which ports through the firewall allow established connection responses. In an ACK scan, Nmap sends an ACK packet to each of the target ports. If a RESET comes back from the target machine, we know that our packet got through the packet-filtering device, and that there appears to be a system at the given address that we scanned. When this happens, Nmap classifies the target port as unfiltered in its output, because the packet-filtering device allows established connections to that target port on the internal network. If no response or an ICMP Port Unreachable message is returned, Nmap labels the target port as filtered, meaning that it appears something is obstructing the response, likely a packet filter. In this way, ACK scanning can be used to determine what kind of established connections a packet filter device, such as a firewall or router, will allow into a network. A list of ports allowing established connections into a network is interesting stuff for an attacker. Another tool discussed later in this chapter, Firewalk, offers an even more powerful technique for discovering packet filter firewall rules. More important, the ACK scan (and the accompanying RESET packet) have confirmed for the attacker that there is a machine at the target address the attacker scanned.
Unfortunately, different operating systems respond in different manners to ACK packets sent to open or closed ports. Some operating systems send a RESET if the port is open, whereas others send it if the port is closed. Thus, ACK scanning is not useful in determining if a port is open or closed; it is useful in measuring filtering capabilities of simple routers and firewalls, as well as determining which addresses are in use.
Obscuring the Source: FTP Bounce Scans
Attackers typically do not want to get caught. The last thing they want is for their source IP address to show up in the logs of a target system or network, because an investigator will be able to find the system used to launch the scan. For particularly nasty attacks, the investigator might call law enforcement, diligent police officers might then show up with handcuffs, and the attacker would have a very bad day indeed. Therefore the bad guys have a vested interest in making sure that their scanning machine’s IP address does not show up at the target. To obscure their location on the network, attackers sometimes use Nmap’s FTP Proxy Bounce scan option, which utilizes an old feature of FTP servers. FTP servers supporting this old option allow a user to connect to them and request that the server send a file to another system. Normally, of course, an FTP client requests a file from a server to be sent back to that same client. However, with this FTP file-forwarding feature, an FTP client can request that a file be forwarded to another machine. This feature was intended to allow a user to connect to an FTP server over a low-bandwidth connection, and rapidly transport a file to another machine over a faster link. Today, most FTP servers have disabled this file-forwarding feature, but some machines on the Internet and on internal networks still support it. In particular, many printers that support FTP transfer of files to be printed have this option enabled by default. Some individuals in the computer underground actively trade addresses of FTP servers supporting these forwarding capabilities because of their usefulness in obscuring the source of a scan.
Using this feature, an attacker can bounce an Nmap TCP scan off of an innocent FTP server to help obscure the source of the attack. As shown in Figure 6.13, Nmap opens an FTP control connection to the FTP server configured to support the file-forward feature. Then, the attacker’s tool requests that the innocent FTP server forward a file to a given port on the target system. If the port on the target is closed, the FTP server tells the attacker’s tool that it couldn’t open the connection. If the target port is open, the FTP server tells the attacker it opened the connection, but couldn’t communicate with the listener using FTP. Either way, the attacker now knows the status of the port, open or closed, on the target system.
The attacker’s tool can scan every port of interest this way. The target system’s logs, as well as the firewalls and routers associated with the target’s network infrastructure, will all show that the scan came from the innocent FTP server. Only by analyzing the FTP server’s logs can the true source of the scan be identified. To avoid this type of bounce from your FTP servers, you should make sure that your FTP server does not support this forwarding capability. CERT has released a guideline for checking your FTP servers for this bounce capability, available at www.cert.org/advisories/CA-1997-27.html.
Idle Scanning: An Even Better Way to Obscure the Source Address
Now, suppose the attacker cannot find an FTP server supporting this bounce capability, but still wants to obscure the source of a scan so the target doesn’t know the attacker’s IP address. Nmap supports another more widely applicable source-obscuring option called Idle scanning. To understand the Idle scan, we have to revisit the IP header format that we discussed in Chapter 2. As shown in Figure 2.11, the IP header includes a field named IP Identification (also known as IP ID for short). This fairly esoteric field is used to group together a bunch of packet fragments that all belong to one larger packet. In other words, when a big packet is broken into smaller fragments, all of the fragments get the same IP ID value to tell the end system that they should all be reassembled together into a larger IP packet. IP supports this fragmentation option because some network links have better performance with smaller packets, so we let router or other gateway devices fragment packets to achieve better speed and link utilization.
For each packet a system sends, its IP stack must assign a unique number in the IP ID field. That way, if the packet gets fragmented, all of the little piece-part fragments will have IP headers with the same IP ID value, telling the end system that they should be assembled back together. If a machine were to generate two different packets with the same IP ID value and send them across the network at the same time, and if both of those packets get fragmented, the end system will try reassembling them together into a single packet, seriously mangling the information.
Many operating systems achieve a unique number for the IP ID field by just incrementing the field by one for each packet that they send. So, the first packet that gets sent will have an IP ID value of X. The next packet will have the value of X + 1. The next will have X + 2. You can probably guess the next value in this highly complex algorithm. Windows machines are one of the most common systems with these incremental IP ID values.
Now, you might be thinking, “Thanks for that stroll down IP fragmentation memory lane, but what does this have to do with port scanning?” After all, port scanning is a concept at the TCP layer, and IP ID fields are in the IP header. The two seem totally unrelated, right?
Well, remember the attacker’s goal: to determine which ports are open on a target, without the target finding out the attacker’s IP address.
To achieve this goal, the attacker first picks a machine to blame for the attack. The Idle scan makes it appear that this blamed machine launched the scan against the target, from the target’s perspective. This blamed machine could be any system on the Internet that the attacker can send packets to and receive packets from, such as a popular Web server, a client machine hanging off of a cable modem, or someone’s mail server. Additionally, this blamed machine must have two highly related characteristics. First, the blamed system must have a predictable IP ID field (ideally, incrementing by one for each packet it sends). Most Windows systems will do nicely. Second, the blamed machine cannot send much traffic; it has to be idle, which gives this scan type its name. These two characteristics are related in that, if the blamed machine weren’t idle, it would send traffic incrementing the IP ID field. The IP ID field wouldn’t then be very predictable because it would keep changing for each packet that the blamed system spews out.
Now, assuming the blamed system has these characteristics, consider Figure 6.14, which shows how the attacker gets ready to launch an Idle scan.
Figure 6.14 Getting ready for an Idle scan.
In Step 1, the attacker sends a SYN packet to the blamed machine. The attacker gets back a SYN-ACK in Step 2. This response includes an IP header, with an IP ID field value we’ll call X. In Step 3, the attacker remembers X. The bad guy might run through Steps 1 through 3 a dozen or more times, just to make sure X changes in a predictable fashion.
Now, on to the scan. As shown in Figure 6.15, in Step 4, the attacker selects a port that is going to be tested on the target machine. The attacker sends a SYN packet to the target’s destination port. The attacker spoofs the source IP address in this SYN packet so that it appears to be coming from the blamed machine.
Figure 6.15 Running the Idle scan.
If the target port is listening, in Step 5, the target sends a SYN-ACK response back to the apparent source address of the SYN packet. That is, the target sends a SYNACK to the blamed machine if the port is listening. When the blamed machine receives a SYN-ACK out of the blue, it won’t understand why the target sent a response for a never-initiated connection. In Step 6, the blamed machine therefore responds with a RESET. Because it sent a RESET packet, the IP ID field on the machine that gets blamed will be incremented, to X + 1, if the port is listening.
Now, if the target port is closed, Step 5 either has no traffic going from the target to the blamed machine, or it sends something like a RESET message. Either way, if the target port is closed, no traffic is sent in Step 6! Therefore, the IP ID field will remain at X if the port is not listening.
In Step 7, the attacker needs to measure the IP ID field on the blamed machine by sending a SYN packet to it. In Step 8, the blamed machine responds with a SYNACK. Of course, this SYN-ACK response itself increments the IP ID field by one.
Now, by analyzing the IP ID field from Step 8, the attacker can determine if the port is open or closed on the target. If the IP ID value is X + 2, the attacker knows that it was incremented once because of Step 7. Therefore, it must have been incremented another time. Because the blamed machine is idle, it was likely incremented because Step 6 occurred and included a RESET packet. Well, Step 6 would only include a RESET if Step 5 occurred with a SYN-ACK. A SYN-ACK in Step 5 means that the port is therefore open! Cha-ching!
The logic is even more compelling if the port is closed. If, in Step 8, the IP ID value is X + 1, the blamed machine could not have sent a RESET in Step 6. Of course, if it didn’t send a RESET, no SYN-ACK could have occurred in Step 5. Without a SYN-ACK, the port must have been closed. We should note that Idle scanning only works for TCP and not UDP ports, because only TCP has the RESET behavior necessary to increment the IP ID value.
From the target’s perspective, the whole scan appears to be coming from the blamed machine, leaving the attacker stealthy and happy. Now, this might look very complicated, but it really isn’t all that bad. All the attacker is doing is measuring the IP ID value of the blamed machine (Steps 1–3). Then, the bad guy is spoofing a SYN packet trying to cause the target and the blamed machine to talk to each other (Step 4–6). Then, the attacker measures the IP ID value again (Steps 7–8) to see if they did have an exchange. In fact, the attacker using Nmap doesn’t even have to understand any of this or know what an IP ID field is. Nmap’s Idle scan option only requires the attacker to say, in effect, “Launch an Idle scan at this target, and blame him.” Nmap does all of the work for the attacker, checking if the IP ID value on the blamed machine is predictable, and then running all of the steps for each port to be measured.
Now, of course, if the blamed machine isn’t truly idle, the attacker will run into some problems. For example, suppose that the blamed machine shoots out a packet sometime in between Step 3 and Step 7. Because the IP ID value got an extra increment, Nmap might label a port as open that is really closed, yielding a false positive. This occurs sometimes when an attacker is trying to blame a scan on a Windows machine, which sends one of those annoying NetBIOS packets every so often. Still, for short periods of time, the Idle scan works just great. An attacker can launch the same Idle scan three or four times. If a given set of ports is listed as consistently open across all of those scans, they are, in all likelihood, really open.
Don’t Forget UDP!
So far, every one of the scans we’ve discussed is based on TCP. Unlike TCP, UDP does not have a three-way handshake, sequence numbers, or control bits. Packets can be delivered out of order, and are not retransmitted if they are dropped. Because UDP is so much simpler, Nmap has far fewer options for UDP scanning, and UDP scans from any port-scanning tool are inherently less reliable. When scanning TCP services, the control bits of the response are very helpful in determining whether a port is open or closed. TCP provides the helpful SYN-ACK or RESET to let the attacker know the status of ports.
For UDP scans, on the other hand, Nmap generates a UDP packet destined for each target port. If the target system returns an ICMP Port Unreachable message, Nmap interprets the port as being closed. If the target responds with a UDP packet, Nmap labels the port as open. Those are the two easy and reliable conditions. However, quite often, the port is open, but the service won’t respond with a UDP packet unless the requesting UDP packet has a specific payload. In such cases, Nmap won’t get anything back, and will call such ports open|filtered, a sign that it doesn’t really know the answer for the given port. You see, this effect could arise from a whole bunch of conditions: A listening UDP service only responding to requests with specific payloads, a closed port not responding with an ICMP Port Unreachable message, a firewall filtering out the response from an open or closed port, or a packet having been lost from an open or closed port. Nmap isn’t sure, and open|filtered UDP ports are a big unknown from the attacker’s perspective. Still, Nmap gives the attacker a rough approximation of which UDP ports are open. Based on the output from Nmap, the attacker can then use the client associated with the discovered UDP service to verify that the server is listening on the target port. For example, if Nmap tells the attacker that UDP port 53 appears to be listening, the attacker will try to interact with it using a DNS tool such as nslookup or dig, described in Chapter 5, to launch DNS interrogations. If Nmap indicates that UDP port 7070 is open, the attacker might use the Real-Player client to connect to the server to verify the use of RealAudio/Video.
Version Scanning
Nmap also includes a Version-scan feature that allows the attacker to detect which ports are open and also the particular service and software version listening on those ports. You see, not all services listen on their “official” ports. An administrator can configure a Web server to listen on some high-numbered port, like 35567, in an attempt to obscure the fact that it is a Web server. However, Nmap’s Version-scan capability will still smoke out the Web server, even detecting applications that are running over Secure Sockets Layer (SSL).
When an attacker uses the Version-scan option, Nmap starts with a normal port scan and gathers a list of all the open ports on a target. For TCP ports, Nmap completes the three-way handshake and waits for the application to present its banner. Many services automatically present their banners once a connection is established, indicating the service type and version number. If Nmap receives a banner, its version scanning functionality matches the banner against an internal version-scan database and attempts to find a matching application to display for the attacker. If the target presents no banner, Nmap then sends some probing traffic to elicit a response from the host to identify the target service listening on that port. These probe responses are also matched in the database for identification. For SSL-enabled ports, Nmap connects to the SSL service, completes the SSL handshake negotiation, and then runs the detection scan to determine the actual service behind the SSL encryption, such as HTTP or FTP over SSL.
UDP traffic goes through a similar process, except there is no session (with a three-way handshake) to be established before listening for a banner and sending probes. Nmap sends a UDP packet, waits for a UDP response, and then matches the data in any UDP responses with its version-scan database.
With this Version-scan feature, the old security-by-obscurity trick of “hiding” services from attackers by running them at obscure ports just doesn’t provide any major benefits anymore. Even if your SSH service is running at TCP port 65534, the script kiddies will still be able to identify it with the Version-scan feature of Nmap.
Oh Yes, Ping Sweeps, Too
Nmap’s Ping scan capability supports identifying live hosts on the target network. Like Cheops-ng or other network-mapping tool, Nmap sends an ICMP Echo Request packet to all addresses on the target network to determine which have listening machines. Furthermore, Nmap can conduct a sweep of addresses using TCP packets, instead of ICMP. If incoming ICMP is blocked, the attacker can do a sweep of the target network, looking to see which addresses respond to packets sent to TCP port 80, 25, 135, or any other port of the attacker’s choosing. Although these network-sweeping features to find in-use addresses are not really port scanning, they are a useful inclusion, helping round out Nmap’s feature set.
Find Those Insecure RPC Programs
Nmap also supports an application-level scanning option focused on RPCs, which are a convenient tool for software developers creating distributed systems. As shown in Figure 6.16, an RPC program takes the software developer’s concept of a procedure call and extends it across a network. Code executes on one computer until it needs information from another system. Then, the originating program calls an RPC program on another machine, where processing continues. When the remote system has finished the procedure, it returns its results and execution flow to the original machine.
Figure 6.16 RPC programs: The arrows show the flow of execution through the program.
Many companies have developed extensive applications based on RPCs, and numerous network tools distributed with operating systems have been developed using RPCs. Familiar RPC services on UNIX and Linux environments include the following:
- Rpc.rstatd, a service that returns performance statistics from the server’s kernel.
- Rwalld, a service allowing messages to be sent to users logged into a machine.
- Rup, a service displaying the current up time and load average of a server.
- Sadmind, an older service used to administer Solaris systems.
- Rpc.statd, a service associated with locking files and sending reboot notification for the Network File System (NFS) service.
Unfortunately, many well-known and widely used RPC programs have significant security vulnerabilities.
Because of the vulnerabilities found in many RPC services, an inventory of the RPCs running on the target network is highly useful information for the attacker. Nmap’s RPC scanning option creates just such an inventory. The RPC scanner uses the port list discovered during any of the TCP or UDP scans offered by Nmap, and connects to each of them searching for RPC services. Similar to its Version-scan, Nmap sends empty (null) RPC commands to each open port, in an effort to determine which RPC service is running. If attackers determine that a vulnerable RPC service is running on the target machine, they will download an exploit for the discovered vulnerability to attempt to gain access on the target.
But Wait ... There’s More!
In addition to all of these scan types, Nmap includes a variety of other features that help make it even more useful in the hands of a skilled attacker.
Setting Source Ports for a Successful Scan
To improve the chances that the packets generated by the scanner will get through routers and firewalls protecting the target network, attackers typically choose specific TCP and UDP source ports for the packets transmitted during a scan. Remember, the scanner sends the packets to the target system, varying the destination port to determine which ones are open or closed. The source port is also included in the header, and might be used by the target network to determine whether the traffic should be allowed. The goal here is to set the source port so that the packets appear like normal traffic, thereby increasing the chance they’ll be allowed into the network and lowering the potential for detection. To accomplish this goal, an attacker can configure Nmap to use various source ports for all packets in the scan.
TCP port 80 is a popular choice for a source port during a scan, as the resulting traffic might appear to be coming from a Web server. Attackers also widely use source TCP port 25, which appears to be traffic from an Internet mail server using the Simple Mail Transfer Protocol (SMTP). For any of these TCP services, combining a source port of 25 or 80 together with an ACK scan will make the TCP header information look like responses to Web traffic or outgoing e-mail.
Another interesting option involves using a TCP source port of 20, which will look like an FTP data connection. Just as with FTP Proxy Bounce scans, some of the quirkiness of the seemingly innocuous FTP is immensely helpful for attackers. As shown in Figure 6.17, when you FTP a file, you actually have two connections: an FTP control connection and an FTP data connection.
Figure 6.17 Standard FTP control and data connections.
The FTP control connection is opened from client to server, and carries commands to the server, such as logging in, requesting a file list, and so on. After receiving a request for a file, the FTP server opens a connection back to the FTP client. That’s what makes standard FTP somewhat harder for simple routers and firewalls to handle—the FTP data connection starts from the server and comes back to the client. It is an incoming connection. Most networks today deal with this problem by using a stateful packet filter or proxy firewall that can check for the accompanying outbound FTP control connection when an inbound data connection request is received. Some older networks without these stateful or proxy technologies are configured to allow incoming FTP data connections, so users can transport files into the network. Alternatively, some networks force users to rely on Passive-mode FTP, which reverses the flow so the data connection goes from the client to the server. For those networks that allow standard inbound FTP data connections, some attackers try to take advantage by conducting a port scan using a TCP source port of 20, as shown in Figure 6.18.
Figure 6.18 Scanning using TCP source port 20 to impersonate FTP data connections.

Similarly, for scanning UDP services, a source port of 53 might look like DNS responses, and is much more likely to be allowed into the target network than other arbitrary UDP source ports. That’s why attackers quite frequently use UDP port 53 for a source port when UDP scanning.
Decoys Aren’t Just for Duck Hunters Any More
No attacker wants to get caught in the act of scanning your network. In addition to the FTP Bounce and Idle scans, Nmap can help hide the attacker’s address by inserting spoofed decoy source addresses in various scans. When configuring Nmap with decoys, the attacker enters a complete list of IP addresses that will be used as the apparent source of the packets. For each packet that it sends during a scan, Nmap generates a copy of the packet appearing to originate at each decoy address. So, if the attacker enters four decoys, Nmap generates five packets for each port to be checked—one with a source of the attacker’s actual IP address, and one from each of the four decoys. Nmap randomizes the order of the actual source and decoy packets sent out. Note again that these decoys are totally independent of FTP Bounce and Idle scans; they are merely designed to confuse the target with a bunch of traffic from innocent sources.
When using decoys for scans other than the FTP Bounce and Idle options, the attacker’s actual address must be included in each barrage of packets, or the attacker will not be able to get the results from the scan. One set of the SYNACK, ICMP Port Unreachable, or RESET packets must be returned to the attacker’s machine, or Nmap will not be capable of determining the results. The only way to get the results back is to include the valid source address in one packet; all the others are decoys.
A victim network being scanned with decoys will not know where the packets really originate, as the attacker’s address is blended in with all of the decoys. If the attacker uses 30 decoys, the victim network will have to investigate many different sources for the attack. Therefore, decoys impede the investigation, allowing the attacker more time to conduct a scan without being successfully traced back.
A Critical Feature: Active Operating System Fingerprinting
In addition to finding out which ports are open on a system, an attacker also wants to determine which underlying operating system the target machine is running. By determining the operating system type, the attacker can further research the machine to determine particular vulnerabilities for that type of system. By knowing the open ports and operating system type together, the attacker can search the Internet looking for well-known vulnerabilities of the target system. A more sophisticated attacker might even set up a lab environment similar to the target network in an effort to discover new vulnerabilities in the infrastructure.
So how does Nmap determine the underlying operating system type? It uses a technique called active operating system fingerprinting. The RFCs defining TCP specify how a system should respond during connection initiation (the three-way handshake). The RFCs do not define, however, how the system should respond to the various illegal combinations of TCP control bits. That’s totally reasonable, because the RFCs say how the protocol should work, and don’t define how it shouldn’t work with every freakishly bizarre twist of the attackers’ imaginations. Because of this lack of a coherent standard in the face of illegal combinations, different implementations of TCP stacks respond differently to unexpected flags. For example, a Windows TCP stack responds differently from a Linux machine to illegal control bit sequences. Likewise, a Cisco router and a Solaris box have different responses as well. Nmap uses this inconsistency to determine the operating system type of the target machine by sending out a series of packets to various ports on the target, including the following:
- SYN packet to open port
- NULL packet to open port
- SYN|FIN|URG|PSH packet to open port
- ACK packet to open port
- SYN packet to closed port
- ACK packet to closed port
- FIN|PSH|URG packet to closed port
- UDP packet to closed port
Further, Nmap measures the predictability of the initial sequence number returned by an open port in the SYN-ACK response (that is, the ISNB from Figure 6.10). By sending several SYN packets to open ports and analyzing how the sequence number in the SYN-ACK packets change with time, Nmap determines whether a predictable pattern of the sequence numbers can be determined. This technique helps to further identify the operating system type because some operating systems have more predictable sequence numbers than others. Additionally, as we discuss in Chapter 8, TCP sequence number predictability can help in IP spoofing attacks.
This overall process of sending traffic to measure the operating system type is called active operating system fingerprinting because the attacker interacts with target, sending packets to make the operating system measurement. In Chapter 8, we look at passive operating system fingerprinting techniques, which involve sending no traffic to the target, in our discussion on sniffers. Nmap includes a database describing how various systems respond to the illegal control bit combinations and the sequence number prediction check. This database of operating system fingerprints includes information for detecting more than 1,000 platforms, including the following:
- Win2000/XP/2003
- Solaris
- Linux
- BSD
- VAX/VMS, Open VMS
- HP-UX
- AIX
- Cisco IOS
- MacOS X
- HP printers
Users can easily update the growing database of Nmap system fingerprints to include new system types.
Another tool totally independent of Nmap that focuses just on active operating system fingerprinting is Xprobe2, available at www.sys-security.com/html/projects/X.html, by Ofir Arkin and Fyodor Yarochkin (who is no relation to Nmap’s author, Fyodor, by the way). Like Nmap, Xprobe2 also sends several test packets to a target machine. In measuring a target, though, Xprobe2 sends fewer packets than Nmap because of its embedded tightly coded logic tree. Working its way through this logic tree in its code, the tool first sends a packet to determine certain characteristics of the target. Then, based on the response that comes back, Xprobe2 specifically crafts a second packet to step down the logic tree of target operating system types. The process continues, typically for only four packets, each constructed to narrow down the operating system type based on earlier responses. Nmap, on the other hand, always sends the same packets in the same order when measuring the operating system type.
Also unlike Nmap, Xprobe2 applies fuzzy logic to calculate the probabilities of its operating system type. The attacker gets a result that says, in effect, “There is an 80 percent chance the target is a Windows XP machine, but a 40 percent chance that it is a Linux box.” Nmap just says, “Based on my closest match, this looks like a Windows XP box,” without any indication of other possibilities. In my experience, Xprobe2 gives more accurate overall results than Nmap, although Nmap has a larger signature base. Therefore, in my own penetration-testing regimen, I run both active fingerprinting tools, Nmap and Xprobe2, against each target to get a second opinion of the target operating system type.
Useful Timing Options
An attacker might want to send packets very slowly to a target to help spread out the appearance of log entries resulting from the scan. Furthermore, if a scan occurs too quickly against a slow target, it is possible for open ports to be missed, or the target system could even crash in a flood of packets. Alternatively, an attacker might be in a significant hurry, and wants to conduct a scan as quickly as possible. To support these disparate needs, Nmap includes different timing options for scans. These timing options have wonderfully descriptive names, such as:
- Paranoid. Sends one packet approximately every five minutes resulting in a super-slow scan.
- Sneaky. Sends one packet approximately every 15 seconds.
- Polite. Sends one packet approximately every 0.4 seconds.
- Normal. Runs as quickly as possible without missing target ports.
- Aggressive. Waits a maximum of 1.25 seconds for any response.
- Insane. Waits a maximum of 0.3 seconds for any response. You will lose traffic in this mode, getting false negatives listing open ports as closed because you were too impatient to wait for their responses.
These six options are quite well tuned, but an attacker with more fine-grained timing needs can even customize the timeouts and wait periods associated with packets. When I scan systems, I tend to use the Normal mode. If the system has particularly sensitive performance characteristics, and I want to avoid a potential flood, I use Polite mode. I’ve never had the need to run in Aggressive or Insane mode, but it’s nice knowing that they are there should I need to use them some day.
A Little Bit of Fragmentation Never Hurt Anyone
Nmap also supports basic IP packet fragmentation, slicing IP packets into smaller chunks, a technique that can be used to foil some network-based IDSs and IPSs. We discuss how IDS and IPS evasion works using packet fragmentation later in this chapter.
Defenses Against Port Scanning
Harden Your Systems
Although it might sound axiomatic, the best way to prevent an attacker from discovering open ports on your machine is to close all unused ports. If you do not need an FTP, telnet, mail, or Web server on the machine, for goodness sakes, shut it off! Unless there is a defined, approved business need for a given network service, it should be disabled.
When you bring a new system online, you should be very familiar with the ports that are open on the box and why they are required. All unneeded ports and their related services must be shut off. You should also create a secure configuration document that describes how a new machine should be securely hardened.
Also, check periodically to see which TCP and UDP ports are in use on your machine, either from across the network (using a port scanner like Nmap) or locally. The procedure for checking locally listening ports and shutting off unneeded ones varies between Windows and Linux/UNIX.
On Windows, you can run netstat -na from a command prompt to see which ports are in use. To be even more specific and look for just listening ports, you can type
C:> netstat -na | find “LISTENING”
Unfortunately, Windows 2000 netstat gives very little information; it simply shows the protocol (TCP/UDP), the Local and Remote IP address, and the Local and Remote port number, as well as the state of the connection (LISTENING/ESTABLISHED).
Windows XP and Windows 2003 have another command flag, which gives a bit more info. The -o flag, as in netstat -nao, shows the listening ports, as well as the Process ID (PID) of the listening process. Armed with this information, you can then hunt for the PID and shut it off if you don’t want the port to be listening. In Windows XP Service Pack 2, Microsoft added another flag to netstat, the -b option, which shows all TCP and UDP ports, the process listening on those ports, the associated executable’s name, and any dynamic link libraries (DLLs) the executable has loaded. That’s a treasure trove of information, but watch out for the performance hit of running netstat -naob, which usually drives my CPU to 80 percent utilization or more for about 30 seconds.
Alternatively, rather than relying on the limited tools built into Windows, you could also use third-party tools that give you far more useful information about port listeners on Windows. My favorites are the free command-line tools Open-Ports by DiamondCS (http://diamondcs.com.au/openports) and Fport by Foundstone (www.foundstone.com). If you prefer a GUI tool for analyzing TCP and UDP ports, check out Active Ports (free at www.protect-me.com/freeware.html) and TCPView (also free at www.sysinternals.com). OpenPorts, Fport, Active Ports, and TCPView show the executable file that was run to create the port listener. The output from TCPView is shown in Figure 6.19.
Figure 6.19 TCPView shows a list of TCP and UDP ports in use.
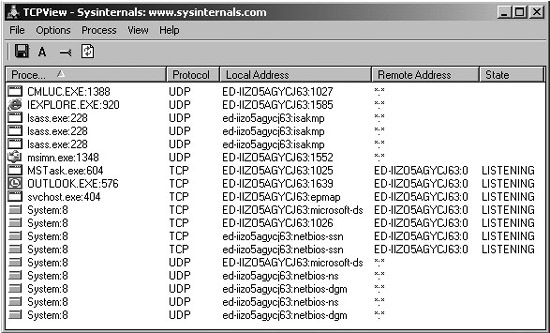
Once you find listening ports, you need to evaluate whether the given network service is required on the box. If the service is not needed, you can disable it temporarily, abruptly, and unsmoothly by killing the associated process in Task Manager. Be careful with this maneuver, as it could make your system highly unstable. Also, the process will likely return when you reboot the machine.
A cleaner way to disable a listening port, if the listening process was started as a Windows service, involves disabling the service itself. You can do this by running the services control panel, easily invoked by going to Start ![]() Run... and typing
Run... and typing services.msc. Then, double-click the offending service, click Stop, and set its Startup Type to Disabled.
If you are more of a command-line person, you can do the same thing using the Service Controller command, sc, built into Windows XP and Windows 2003, or available from Microsoft as a separate download for Windows 2000. To get a list of services and their status, type sc query. To stop a service temporarily, until the next reboot, type sc stop [service]. To permanently disable a service, type sc config [service] start= disabled. Be careful with that space between the start= and disabled. It must be start-equals-space-disabled, or else the command won’t work properly.
Finally, please be careful with shutting down services willy-nilly. If you disable a crucial service, you could make your system highly unstable or crash it altogether.
By default, Linux and UNIX give us far more detail about listening TCP and UDP ports using built-in tools. As with Windows, we could use the netstat command with the -na options to get a simple list of in-use ports. On Linux, the additional -p flag shows PIDs and program names, as in netstat -nap.
We can get even more detail about processes listening on ports using the lsof command, which I find absolutely essential in analyzing my own Linux and UNIX boxes. I run the lsof command with the -i flag to list all TCP and UDP ports in use. Then, using the PID of the listening process that I got from lsof, I review a lot more detail by typing lsof -p [pid]. As illustrated in Figure 6.20, that command shows all files associated with the listening process, including the associated executable, any libraries the program uses, all configuration files that it has opened, as well as numerous other juicy tidbits.
Figure 6.20 The lsof command, with the -i and -p options.
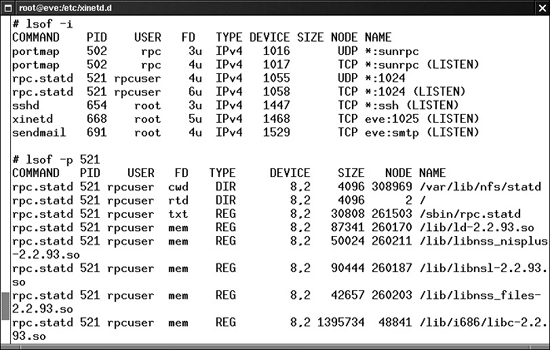
To stop a process on Linux or UNIX, you can use the kill [pid] command. Of course, be careful with killing processes, as it could make your system unstable. Also, this only temporarily disables the process. It might restart automatically or during the next boot.
The procedure for disabling a service listening on a port permanently depends on whether the service is invoked by inetd, xinetd, or one of the service initialization scripts.
If the service is started by inetd, you can comment out its line in /etc/inetd.conf by placing a # at the beginning of the line.
If the service is started by xinetd, you can delete the file /etc/xinetd.d/[service] or edit that file so that it contains a line that says disable=yes.
If the service is started by one of the service initialization scripts, it will have a link called S[Number][Service] in the directory /etc/init.d. You can shut off such services by editing the rc.d directory for each runlevel on your system, removing the S links for that runlevel. Such editing of links can be a real pain in the neck. More easily, you could use the chkconfig command, which is built into RedHat and Mandrake Linux distributions as well as some other flavors. It is also available as a separate download for Debian Linux, and there is a port for Solaris. To get a list of services installed on the machine, as well as their configuration for startup, run the command chkconfig --list. To disable a service, you can type chkconfig [svc_name] off. That service is automatically disabled in all of the appropriate rc.d directories and won’t come back the next time you reboot. It will, however, continue to run until you reboot or shut its service off.
Furthermore, for critical systems, you might want to delete the program files associated with the unneeded service. Even if the service software is not actively running on the machine, it could allow a malicious user with access to the system to do nasty things. Even worse, if an attacker still gains access to the machine even though you’ve hardened the operating system, the attacker could use the programs on the machine against you and the rest of your network.
For example, suppose you have a UNIX-based Internet Web server that is managed using a command-line interface. The server does not require a GUI at all, so you disable the X Window system on the machine (good move!). However, you leave all of the X Window software installed but disabled on the system. An attacker who has taken over the machine could still use the various X Window client programs, such as xterm, to simplify access to the system. Another example involves compilers on critical production systems. I have been involved with numerous penetration tests in which we gain access to a Web server, only to discover a C-compiler on the box. A production Web server usually has no need for a compiler, but an attacker gaining access to the system can use the compiler to simplify his or her attacks against the rest of your infrastructure.
By leaving these tools on the system, you’ve just made the attacker’s job easier. It’s best to have a secure configuration that minimizes all services and tools installed on the system so that only items with production business needs remain. Of course, the intruder could simply download the missing tools, but you’ve made the attacker’s job more difficult, thereby raising the bar for the attackers to jump over. Furthermore, if the attacker starts installing additional items, you’ll have a better chance of detecting such activities in your environment, making the bad guys less stealthy.
Always try potential changes first on a test infrastructure mimicking your production environment to make sure your systems operate properly. Only when the hardened configuration has been tested satisfactorily on a laboratory network should it be rolled into production.
Find the Openings Before the Attackers Do
As with war driving and war dialing, you should scan your systems before an attacker does to verify that all ports are closed except those that have a defined business need. You could use Nmap to scan each of your Internet-accessible systems, as well as critical internal machines. Because you don’t need stealth capabilities when scanning your own systems, you can use the simple TCP Connect scan. When you get your list of open ports, reconcile them to the business needs of the machine. Is there a business need for having TCP port 25 (the SMTP port for Internet e-mail) open on your Web server? Probably not. How about those other ports besides TCP port 80 and 443? Close them down and update your system hardening guidelines appropriately.
Be Careful: Don’t Shoot Yourself in the Foot!
It is critical to note that you could very easily cause mayhem on your network by running any one of the scanning tools described in this chapter against your systems. Network mappers, port-scanning tools, and the other scanners we discuss later all could cause significant problems on your network if they are not used properly. These tools actively send packets to their targets, formatting some of the packets in various ways not anticipated by the developers of your system code. These packets will certainly consume network bandwidth, which could slow performance for other users. Additionally, it is possible that the target system could be configured in such a way that it crashes when it receives a strangely formatted packet.
Because of the potential for crashing the target systems, if you use these tools against your own network, you should monitor network performance and system availability while the tool is running. A periodic ping to the target machine can help you verify that it is alive while scanning occurs. Better yet, you could set up a script to try to access its business-critical services periodically while your scan runs. If a critical machine crashes during the scan, you will find out quickly and can restart the service or reboot the system if necessary.
Add Some Intelligence: Use Stateful Packet Filters or Proxies
Scans using the FTP data source port and ACK scans, along with other techniques supported by Nmap, take advantage of limitations in traditional packet filters. These filters make decisions based on the contents of a packet’s header, a very limited view of what’s really happening on the network. If you use a router or firewall with only traditional packet-filtering capabilities, an attacker can scan past your defenses.
To defend against such scans, you should use a more intelligent filtering device on your network, such as a stateful packet filter or a proxy-based firewall. Stateful packet filters can remember earlier packets and allow new packets through a barrier if they are associated with earlier packets. This capability is tremendously helpful in protecting against ACK scans and the FTP data source port scans. Using stateful packet filtering, an ACK packet will be allowed into a network only if it comes from the proper address and ports used by an earlier SYN packet that was allowed out of the network. The stateful packet filter remembers all outgoing SYNs in a connection table, and checks incoming packets to verify their association with an earlier SYN. If the incoming ACK does not have a previous SYN, it will be dropped. Likewise, a stateful packet filter can remember the outgoing FTP control connection and allow an incoming FTP data connection only if the FTP control connection is in place.
Alternatively, as described in Chapter 2, a proxy-based firewall operates at the application level, so it knows when a session is present. An incoming ACK packet will be dropped because there is not an outgoing session at the application level. Furthermore, an FTP data connection will only be allowed if the proxy has an established FTP control connection.
Stateful packet filtering and proxy-based firewall techniques are strong tools to prevent a variety of scanning shenanigans. You should consider using such tools on your Internet gateway, business partner connections, and even on critical internal networks. Most organizations are using stateful packet filters and proxies to defend their main internal network. However, we still frequently see Internet-accessible servers separate from a corporate DMZ, such as stand-alone Web servers, mail servers, and DNS servers, protected by only a traditional packet-filtering router. Also, we often see a satellite network supporting a small, remote office protected by only a router with traditional packet filters. With powerful tools like Nmap in widespread use, intelligent network-level controls, such as stateful packet filtering or proxy-based firewalls, are quite important even in these circumstances.
Determining Firewall Filter Rules with Firewalk
Additional port-scanning techniques give an attacker even more information about the target network infrastructure. In particular, Firewalk allows an attacker to determine which packets are allowed through a packet-filtering device, such as a router or firewall. Firewalk was written by David Goldsmith and Michael Schiffman, and is available at www.packetfactory.net/Projects/firewalk. Knowing which ports are open through your firewall is incredibly useful information for an attacker. You might be thinking, “You already discussed how to find open ports using Nmap. Why are we discussing this again?” Good question.
There is a crucial difference between the capabilities of Nmap and Firewalk. Remember, Nmap is used to send packets to an end system to determine which ports are listening on that given target machine. If you Nmap a firewall, it will show you the ports listening for packets sent to the firewall itself, not what the firewall is allowing through. Firewalk is used to send packets through a packet filter device (firewall or router) to determine which ports are open through it. Nmap cannot differentiate between what is open on an end machine and what is being firewalled. Firewalk, on the other hand, can determine if a given port is allowed through a packet-filtering device. With this information, Firewalk allows an attacker to determine your firewall rule set.
As we have seen, Nmap’s ACK scanning capability allows an attacker to determine a packet-filtering firewall’s rule set regarding which ports allow established connections. That is, the firewall will allow responses back into the internal network if they are destined for these given ports.
Firewalk goes much further than ACK scanning. Firewalk allows an attacker to determine which ports are allowed through a firewall for opening new connections, not just sending data along established connections with the ACK bit set. Suppose an Nmap ACK scan shows that the firewall allows established connections to TCP port 1026 on the internal network. Although this might be interesting to attackers, they cannot instantly start making connections to TCP port 1026, because all of the SYN packets in their connection initiation would be dropped. If the attacker sends ACK packets, the target system likely just sends RESETs, not allowing any connection to be started. Firewalk, on the other hand, tells the attacker that the firewall allows new connection initiations to various TCP and UDP ports from where the attacker sits. Using Firewalk’s output, an attacker knows where to send SYN packets to try to open a new connection. Therefore, the information from Firewalk is often much more useful than the results of an ACK scan.
Attackers use the information provided by Firewalk to probe target DMZs and internal systems through the proper ports. For example, if you allow TCP port 2391 through your firewall, but nothing is listening on your DMZ on TCP port 2391, you might feel safe. The firewall will let these packets in, but there is nothing on the protected systems to answer these requests. Using Firewalk, an attacker can discover the open port through your firewall, even though nothing on your DMZ has that port open. An attacker can use this information to augment his or her map of your network, knowing now where filtering occurs and how it is configured.
How Firewalk Works
Similar to the traceroute tool discussed earlier in this chapter, Firewalk utilizes the TTL field of the IP header. Because TTL is part of the IP header, an attacker can use Firewalk to determine which ports are filtered for either UDP or TCP, both of which ride on top of IP.
Firewalk requires the attacker to enter two IP addresses to start its scan. The first IP address belongs to the network hop before filtering takes place, typically the external address of the packet-filtering device itself, which might be your firewall or border router. The second IP address is associated with a destination machine on the other side of the packet-filtering device. Based on this input, Firewalk gathers its data by conducting two phases: network discovery and scanning.
During the network discovery phase shown in Figure 6.21, Firewalk sends a series of packets with incrementing TTLs to determine how many network hops exist between the tool and the firewall. First, a packet with a TTL of one is sent. Then, Firewalk sends a packet with a TTL of two, and so on, incrementing the TTLs until the packet-filtering device is reached. This is essentially the same function as traceroute, except that the output of this phase is not a list of the routers between source and destination, but a simple count of the number of hops between the attacker and the filtering function. Once this hop number is determined, Firewalk can conduct the scanning phase.
Figure 6.21 The Firewalk network discovery phase counts the number of hops to the firewall.

For the scanning phase, shown in Figure 6.22, Firewalk creates a series of packets with a TTL set to one greater than the hop count to the filtering device. The destination address of the packets in this phase is the protected server on the other side of the packet-filtering device. This type of scan even works if the filtering device is configured for one-to-one Network Address Translation (NAT) to hide the protected server. Such a filter merely changes the IP address of packets that traverse it from some externally viewable address to the protected inside address and vice versa. In such instances, the attacker just inserts a target address of the outside viewable address of the protected server behind the one-to-one NAT.
Figure 6.22 Firewalk scanning phase determines open ports through the firewall.
When doing the scan of the target address with a TTL of one greater than the hop count to the filter, these packets will get to the filtering device, and potentially one hop beyond it. If a packet gets through the filter, an ICMP Time Exceeded message will be sent by the system immediately on the other side of the filter (possibly a router). Or, the protected server itself might receive the packet, if it is the next hop, and respond with an ICMP Port Unreachable or even a SYN-ACK response. If any response message comes back, regardless of the type, Firewalk knows that the port is open through the firewall, because the packet lived through enough hops to make it through the firewall to trigger that response message. If nothing comes back, the port is most likely filtered by the firewall. By sending these packets with incrementing TCP and UDP port numbers, the attacker can get a very accurate idea of the filtering rules applied to inbound traffic into the target network. Note that the attacker cannot directly determine the outbound rules with this method. For that, the attacker would have to conquer a target on the protected network, and Firewalk outward.
Firewalk Focuses on Packet Filters, Not Proxies
For Firewalk to work properly, the packet-filtering device must transmit packets without clobbering the TTL field. Sure, it can decrement the TTL by one, but it cannot totally reset the TTL to some higher value. Therefore, Firewalk can determine the filtering rules associated with packet-filtering devices, such as firewalls or routers. Firewalk even works against both traditional and stateful packet filters, which both just decrement the TTL by one. However, Firewalk does not work against proxy-based firewalls, because proxies do not forward packets. Instead, a proxy application absorbs packets on one side of the gateway and creates a new connection on the other side, destroying all TTL information in the process. Packet filters actually forward the same packets, after applying filtering rules, keeping the TTL relatively intact (albeit decremented by one). So, although Firewalking is a highly effective technique against packet filter firewalls, it does not work at all against proxy firewalls. For services that the firewall is proxying, Firewalk reports that the associated ports are closed.
Firewalking even works against the so-called Layer 2 or bridging firewalls and IPS tools. These devices don’t have an IP address themselves, and don’t decrement the TTL of packets that go through them. With such a device, the attacker configures Firewalk to scan that last hop before the filtering takes place, the router before the Layer 2 firewall or IPS device. From the attacker’s perspective on the network, the filtering capabilities of this firewall or IPS are merged with the routing functionality of that last hop before it.
Layered Filtering
Additionally, many networks today apply a series of filters on their inbound traffic, perhaps a router with access control lists (ACLs) up front, followed by a packet-filtering firewall or two before reaching a DMZ. The attacker can Firewalk such networks as well, configuring the tool to look for the filtering rules for each hop near the end of the network, one by one. Now, with Firewalk, the attacker will be able to see the exact inbound filter on the first layer the attacker has access to (such as the outmost border router). Then, for the second layer (behind the first), the attacker will only be able to see those ports allowed through the first layer AND second layer (that’s a logical AND, meaning that it has to be allowed through both the first and second layers to be visible.) This process is rather like looking through a series of screened doors to see if openings line up all the way through. If a port is allowed through the second layer but is blocked by the first layer, the attacker won’t be able to see it.
Putting Firewalk Output to Use
So how can an attacker use a list of the ports allowed through a firewall? If attackers place nasty software on an internal system listening for connections from the outside world (techniques we discuss in more detail in Chapter 10, Maintaining Access), they’ll need to know which ports are open so they can communicate with their nasty internal programs. The output from Firewalk tells the attacker the ports that are allowed into the target network. They can then find some other exploit to set up a listening service on the internal network, and communicate with their listener using one of these open ports. Nasty stuff, indeed!
Furthermore, having discovered the open ports allowed through your firewall, an attacker can easily set up a script to check if any DMZ systems suddenly have new services enabled on those ports. I have seen some instances of an attacker learning that TCP port 22 (the SSH destination port) was open through the firewall using Firewalk. No internal systems were running sshd because the administrator used a Web admin interface for these boxes, so the attacker couldn’t use this knowledge to gain immediate access to the systems. The attacker then set up a script that tried to SSH to all systems on the protected network every 15 minutes every day for months. Of course, this almost always failed.
However, the unsuspecting administrator activated an SSH server briefly on an internal system to troubleshoot some problems with the Web admin interface. SSH was only enabled on the server for an hour, but during this hour, the attacker’s script informed the attacker that SSH was accessible on a system. The attacker then successfully launched a buffer-overflow attack against the unpatched SSH server. Because the SSH service was seldom used, the administrator didn’t keep it patched properly. Firewalk had told the attackers that they could get SSH past the firewall. Once an SSH server was activated on an internal host, gaining access was very straightforward. Although we have focused on SSH, an attacker could employ this technique against any service allowed through your firewall.
Firewalk Defenses
There are several options in defending against Firewalk-type attacks. The first option is to just accept that such attacks are possible and harden your firewall. The idea is that Firewalk is based on the fundamental building blocks of TCP/IP and an attacker can determine your firewall rule set using those building blocks. Therefore, make sure your firewall is configured with a minimum set of ports allowed through it, and accept the fact that an attacker could determine your firewall rules. This option is followed by most organizations, given that it is easiest to implement.
Another option for defending against Firewalk is to replace your packet-filtering devices with proxy-based firewalls. Because proxies do not transmit TTL information, an attacker cannot Firewalk through a proxy. Although a proxy firewall solution does address this particular problem, it could introduce other problems. Particular vendor products vary, but proxy firewalls tend to have somewhat lower performance characteristics than packet filters. Therefore, your solution to Firewalk might slow down the network. Furthermore, there might be particular features of your packet-filtering firewall that you rely on for various network services. Getting rid of your packet filter might limit the services you can offer.
Vulnerability-Scanning Tools
Let’s review the information gathered by the attacker so far. Table 6.3 summarizes what the attacker has learned about the target using the IP-based tools discussed in this chapter.
Table 6.3 What the Attacker Has Learned So Far Using Scanning Tools
Clearly, the attackers’ scanning has proven fruitful—they have a lot of useful information about the target. But they still don’t know about how to get into the target systems. The next class of tools provides that information: a list of vulnerabilities on the target systems that an attacker can exploit to gain access.
Vulnerability scanners are really based on a simple idea: automating the process of connecting to a target system and checking to see if vulnerabilities are present. By automating the process, we can quickly and easily check the target systems for many hundreds of vulnerabilities. A vulnerability-scanning tool has an inventory of many system vulnerabilities and goes out across the network to check to see if any of these known vulnerabilities are present on the target. Most vulnerability-scanning tools automatically check across the network for the following types of vulnerabilities on target systems:
- Common configuration errors. Numerous systems have poor configuration settings, leaving various openings for an attacker to gain access.
- Default configuration weaknesses. Out of the box, many systems have very weak security settings, sometimes including default accounts and passwords.
- Well-known system vulnerabilities. Every day, volumes of new security holes are discovered and published in a variety of locations on the Internet. Vendors try to keep up with the onslaught of newly discovered vulnerabilities by creating security patches. However, once the vulnerabilities are published, a flurry of attacks against unpatched systems is inevitable.
For example, a vulnerability-scanning tool can check to see if you are running an older, vulnerable version of the SSH server that allows an attacker to take control of your machine. It will also check to see if you’ve misconfigured your Windows system to allow an attacker to gather a complete list of users. These are only two examples of the hundreds or thousands of checks a vulnerability-scanning tool will automatically conduct. Many vulnerability scanners also include network-mapping programs and port scanners. Although particular implementations vary, most vulnerability-scanning tools can be broken down to the following common set of elements, illustrated in Figure 6.23:
Figure 6.23 A generic vulnerability scanner.
- Vulnerability database. This element is the brain of the vulnerability scanner. It contains a list of vulnerabilities for a variety of systems and describes how those vulnerabilities should be checked.
- User configuration tool. By interacting with this component of the vulnerability scanner, the user selects the target systems and identifies which vulnerability checks to run.
- Scanning engine. This element is the arms and legs of the vulnerability scanner. Based on the vulnerability database and user configuration, this tool formulates packets and sends them to the target to determine whether vulnerabilities are present.
- Knowledge base of current active scan. This element acts like the short-term memory of the tool, keeping track of the current scan, remembering the discovered vulnerabilities, and feeding data to the scanning engine.
- Results repository and report generation tool. This element generates pretty reports for its user, explaining which vulnerabilities were discovered on which targets and possibly recommending remedial actions for dealing with the discovered flaws.
A Whole Bunch of Vulnerability Scanners
A large number of very effective commercial vulnerability scanners are available today, including the following:
- Harris STAT Scanner (www.stat.harris.com)
- ISS’s Internet Scanner (www.iss.net)
- GFI LANguard Network Security Scanner (www.gfi.com/lannetscan)
- E-eye’s Retina Scanner (www.eeye.com)
- Qualys’ QualysGuard, a subscription-based scanning service that scans their customers’ systems across the Internet on a regular basis (www.qualys.com)
- McAfee’s Foundstone Foundscan, another subscription-based scanning service (www.foundstone.com/products/ondemandservice.htm)
It is important to note that each of these commercial tools is highly effective, and also includes technical support from a vendor. Although all of these tools have their merits, my favorite vulnerability-scanning tool is the free Nessus, because of its great flexibility and ease of use. In addition, commercial variants of Nessus are available, along with support, from the folks who created Nessus, via Tenable Network Security (www.tenablesecurity.com). Another high-quality free, open source scanner similar to Nessus is the Attacker Tool Kit (ATK), available at www.computec.ch/projekte/atk/. Because it is a superb illustration of vulnerability-scanning tools, let’s analyze the capabilities of the free version of Nessus in more detail.
Nessus: The Most Popular Free Vulnerability Scanner Available Today
The Nessus vulnerability scanner was created by the Nessus Development Team, lead by Renaud Deraison. Nessus is incredibly useful, including some distinct advantages over other tools in this genre (including some of the commercial tools). Its advantages include the following:
- The freedom to write your own vulnerability checks and incorporate them into the tool.
- The knowledge that a large group of developers is involved around the world creating new vulnerability checks.
- The price is right. It’s free!
Nessus Plug-Ins
Nessus includes a variety of vulnerability checks, implemented in a modular architecture. Each vulnerability check is based on a small program called a plug-in. One plug-in conducts one check of each target system. Together, these plug-ins comprise the Nessus vulnerability database. Nessus sports more than 1,000 distinct plug-ins that check for a variety of vulnerabilities. The plug-ins are divided into the following categories:
- Backdoors. These checks look for signs of remote control and backdoor tools installed on the target system, including Virtual Network Computing (VNC) and some of the more common bots.
- CGI abuses. These checks look for vulnerable CGI scripts, and related Web technologies, including Active Server Pages (ASPs), Java Server Pages (JSPs), Cold Fusion scripts, and more. These various types of scripts are run on Web servers, and are used to implement Web applications.
- Cisco. This category of plug-ins looks for various flawed versions and common misconfigurations in Cisco products, especially the Internetwork Operating System (IOS) router software and VPN concentrator products.
- Default UNIX accounts. This set looks for various common UNIX accounts with easily guessed passwords, including “guest” and “demos.”
- DoS. These attacks look for vulnerable services that can be crashed across the network. Many of these tests will actually cause the target system to crash, but some merely check version numbers of the services.
- Finger abuses. These checks all center around the Finger service that was historically used on UNIX machines to get a list of current users.
- Firewalls. These checks look for misconfigured firewall systems.
- FTP. This category includes a very large number of checks for misconfigured and unpatched FTP servers.
- Gain a shell remotely. This category of plug-ins looks for vulnerabilities that allow an attacker to gain command-line access to the target system.
- Gain root remotely. These plug-ins look for the holy grail of vulnerabilities—the ability to have super-user access on the target system across the network.
- General. This catch-all category includes a variety of checks, such as gathering the server type and version number for Web servers, FTP servers, and mail servers.
- Miscellaneous. This is another catch-all category of plug-ins, including tracerouting and system fingerprinting.
- Netware. This small number of plug-ins looks for flaws in Novell Netware servers.
- NIS. These checks look for vulnerabilities in the Network Information Service (NIS) used by UNIX machines to share account information and other system data.
- Peer-to-peer file sharing. These plug-ins look for the presence of various filesharing applications, such as KaZaA and Gnutella, as well as common misconfigurations in these tools.
- Remote file access. These checks look for vulnerabilities in file sharing, including the Network File System (NFS) and Trivial File Transfer Protocol (TFTP).
- RPC. These plug-ins scan for vulnerable RPC programs, rather like the Nmap RPC scanning capability we discussed earlier in this chapter.
- SMTP problems. These plug-ins look for vulnerable mail servers.
- SNMP. This category of plug-ins looks for vulnerable systems managed via the Simple Network Management Protocol (SNMP) and attempts to extract sensitive system configuration information using it.
- Windows. This category focuses on attacks against Windows systems, ranging from Window 9x to Windows 2003 and later.
- Useless services. These checks determine whether the target is running any services that have doubtful functional value, including the daytime and chargen services.
Whew! That’s quite a list of categories, with each group including between two and more than 100 different vulnerabilities to be tested. Nessus also includes Nmap as a built-in port-scanning tool, increasing its usefulness tremendously.
The Nessus Architecture
Nessus is based on a classic client–server architecture, where the client hosts a user configuration tool, results repository, and report generation tool. The Nessus server includes a vulnerability database (the set of plug-ins), a knowledge base of the current active scan, and a scanning engine. The Nessus client–server architecture is shown in Figure 6.24.
Figure 6.24 The Nessus architecture.
Nessus supports strong authentication for the client-to-server communication, based on public key encryption. Furthermore, the confidentiality and integrity of all communication between clients and servers are supported using strong encryption. The separation of client and server can be useful in some network architectures, particularly with remote locations connected via low-bandwidth links. The client can configure the server over the low-bandwidth link, and the server at a remote location can scan the targets at that location over a faster short-range network. The most common use of the tool, however, involves running the client and server on a single machine. For my own scanning adventures, I carry a Linux laptop that includes both the client and server.
The Nessus server runs on a variety of UNIX and UNIX-like platforms, including Linux, Solaris, Mac OS X, and FreeBSD. Tenable Network Security has released a Windows version of the Nessus server called NeWT with two licensing options. The free NeWT is limited so that it can scan only the local network on which it is running. The commercially licensed NeWT doesn’t have this limitation, but you’ll have to buy it from the folks at Tenable. The Nessus client runs on Linux, Solaris, Mac OS X, and FreeBSD. A free Windows client called NessusWX is available, but requires a server (either a UNIX/Linux server or NeWT).
Configuring Nessus for a Scan
Nessus includes an easy-to-use GUI that allows for the configuration of the tool. Via the GUI, a user can configure the following:
- Which plug-ins to run
- Target systems (network ranges or individual systems)
- Port range and types of port scanning (all Nmap scan types are supported)
- The port for Nessus client–server communication
- Encryption algorithms for client-to-server communication
- E-mail address for sending the report
Write Your Own Attack Scripts!
One of the best features of Nessus is the ability to write your own plug-ins, a capability not supported in many major commercial scanners. Nessus allows its users to write plug-ins in the C language or a custom Nessus Attack-Scripting Language (NASL). These custom plug-ins can interface with a defined Nessus API, supporting interaction of various plug-ins with the knowledge base of the current active scan. The customizability offered by NASL really makes Nessus shine, and allows an active community of developers to create numerous plugins quickly and easily.
Tenable Network Security releases its own plug-ins, of course, but keeps them exclusively for registered, paying customers for a period of seven days after a new plug-in set is released. After the seven-day lag, the plug-ins are available for free to all Nessus users.
Reporting the Results
Nessus includes a reporting tool that allows for viewing and printing results, as shown in Figure 6.25. I’m not a big fan of the built-in Nessus reporting tool, which can be cumbersome to use. However, the reports can be exported to a file in a variety of formats, including Hypertext Markup Language (HTML), LaTeX, ASCII, and XML, a really nice feature. Graphical HTML reports are also supported, creating fancy pie charts of the results. The reports also include specific recommendations for fixing each discovered vulnerability. Furthermore, numerous developers have released Perl scripts for massaging Nessus output. Some of the best were written by Sami O. Koskinen and are available for free at http://users.tkk.fi/~tossu/nessus-tools.html. Dozens of others can be found by simply searching the Web for the terms nessus output perl script.
Figure 6.25 The built-in Nessus report viewer shows a list of vulnerabilities, sorted by TCP and UDP port number.
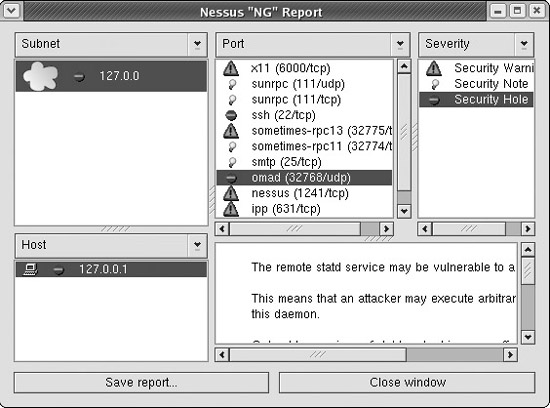
The reporting tool displays the relative sensitivity of each discovered vulnerability, categorized as high, medium, and low risk. The developers of a given plug-in assign these risk levels to the vulnerability when they create the plug-in itself. However, these risks typically vary for particular networks. For example, the same medium-risk vulnerability on my run-of-the-mill server could pose a high risk to your mission-critical system. Likewise, Nessus might rank a vulnerability as high risk that has little impact on your sacrificial server. Therefore, these vulnerability levels in Nessus, or any other scanning tool, should be taken as an approximation of the actual vulnerability. You need to interpret the results in accordance with your own network policies and security stance.
So, What Does an Attacker Do with These Results?
At this point of the scan, the attacker now has a list of vulnerabilities on the target systems discovered by the vulnerability-scanning tool. What next? Most attackers take this list of vulnerabilities and search for particular exploits based on them, a process we discuss in detail at the beginning of the next chapter.
Vulnerability-Scanning Defenses
Close Unused Ports and Keep Your Systems Patched (You Knew I’d Say That!)
A recurring theme throughout this chapter, and indeed the whole book, is that you must close all unused ports and apply patches to your systems. This is not rocket science, yet it does require a significant amount of time and effort. Make sure you have a patching process in place that lets you quickly acquire new patches, test them in a quality assurance environment, and move them to production in a quick yet controlled fashion.
Run the Tools Against Your Own Networks
Just as we did with war driving, war dialers, and port scanners, you should run a vulnerability-scanning tool against your own network on a periodic basis to identify vulnerabilities before an attacker does. You can use any one of the free or commercial tools described in this section to find vulnerabilities and get recommendations for fixing the holes. You should use your vulnerability-scanning tool to scan for vulnerabilities as frequently as possible. Given the dynamic nature of the information security environment, with new vulnerabilities being discovered every day, I recommend that you scan your own network every month and after every significant upgrade to your infrastructure. If you have the resources and a very dynamic network, you might even want to scan more frequently. Analyze the results of your vulnerability-scanning tool, and make sure you implement fixes to all of the significant vulnerabilities in a timely fashion.
Be Careful with Denial of Service and Password Guessing Tests!
When you run vulnerability scanners against your own network, make sure you understand what you are doing! You could damage your systems if you misconfigure the tools. Nessus includes the concept of “dangerous plug-ins,” and can be configured to run tests with or without these potentially scary checks. The dangerous plug-ins are specific checks that could impair or even crash the target machine, indicated by a little triangle-shaped yield sign in the plug-in selection screen, as shown in Figure 6.26. Some of the DoS checks are dangerous, but others aren’t.
Figure 6.26 Some Nessus DoS plug-ins are dangerous; others aren’t.
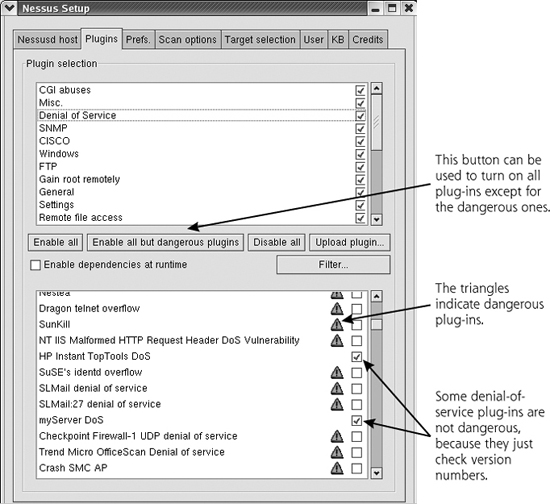
A few of these plug-ins connect to the target, send a packet or two, and then based on a version number in the response, report whether or not the target is vulnerable. Such plug-ins aren’t dangerous, of course. Other DoS plug-ins work this way: They ping the target machine to see if it is alive. They then launch the DoS attack. Then, they ping the target again. If they don’t get a ping response, the target is vulnerable ... but it’s also dead! Launching such tests in a vulnerability scan against your employer could be a major career-limiting move, so please be careful.
Also, watch out with password-guessing modules included in most major vulnerability scanners, including the ones in Nessus that are listed as dangerous. These modules attempt to log in to various accounts as a variety of users, guessing common passwords along the way. Unfortunately, they might lock out legitimate users by supplying three or four incorrect passwords in the space of a few seconds. If account lockout is activated on the target machine, the system will not allow the legitimate user to log in after the vulnerability-scanning tool is run. I’ve seen several instances of security personnel running a vulnerability scanner and accidentally locking out hundreds of users. You might want to disable these password-guessing modules from running across the network, and instead use the password cracking techniques discussed in Chapter 7 to determine the strength of your system passwords.
Unfortunately, even if you configure Nessus or another vulnerability scanner to omit dangerous plug-ins from your scan, the target could still crash. Each of these tools is generating some unusual packets, and you could have a really strangely configured service, or a particularly weak machine that the tool will knock over, even on its best behavior. Therefore, always warn management in advance of the possibility of target network and system impairment when running a scan.
Be Aware of Limitations of Vulnerability-Scanning Tools
Vulnerability-scanning tools are extremely useful because they automate security checks across a large number of systems over the network. However, please understand their limitations. A major limitation is that these tools only check for vulnerabilities that they know about. They cannot find vulnerabilities that they don’t understand. You must be sure to keep the vulnerability database up to date, or you will miss vulnerabilities on your network that the attackers will be able to find.
Before you run a scanner against your own systems, download the latest vulnerability database to ensure you are as up to date as your tool allows. For this very reason, that seven-day lag time between the release of Nessus plug-ins for paying Tenable customers versus users of the free version of the tool was purposely designed to help encourage people to subscribe to the commercial service.
Another major limitation of vulnerability-scanning tools involves the fact that they look for vulnerabilities on the target addresses that you configure and don’t really understand the network architecture. A real attacker will apply a great deal of intelligence to try to reverse engineer the target network. Instead of just looking at the outside interfaces like a vulnerability scanner, intelligent attackers try to understand what’s going on behind them.
A final limitation of the tools is that they only give their user a snapshot in time of the system security. As new vulnerabilities are discovered and the configuration and topology of the network changes, so too does its exposure to vulnerabilities. Unfortunately, the vulnerability scan you ran last week (and perhaps even yesterday!) might no longer indicate all of your vulnerabilities accurately today.
Don’t get me wrong. Although these limitations are very real, I strongly recommend that you include vulnerability scanning in your own information security program. Despite their limitations, vulnerability scanners are one of the best methods of determining the true security stance of your network. Sure, they don’t comprise your entire security defense program. However, vulnerability-scanning tools can really help you defend your network by finding fundamental security holes before the attackers do.
Intrusion Detection System and Intrusion Prevention System Evasion
Thus far in the attack, the bad guys have had great success in gathering sensitive information about the security secrets of the target computing infrastructure. Not only do they have lists of target systems, platform types, knowledge of open ports, and a vulnerability inventory, but they are also poised to take over machines on the target network. Not bad.
One factor, however, greatly jeopardizes the attacker’s success. All of the scanning tools we’ve discussed in this chapter, ranging from network mappers to vulnerability scanners and everything in between, are incredibly noisy. A port scanner sends tens of thousands of packets or more. A robust vulnerability scanner could send hundreds of thousands or millions of packets to the target network. Depending on the network load of the target, a diligent system administrator might notice this traffic. Even worse for the attacker, all of the tools described in this chapter can be detected by a network-based IDS or blocked by a network-based IPS. An IDS could sit on the target network, listening for attacks and warning administrators of the attacker’s activities. Based on warnings from the IDS, the administrators of the target systems could improve their security stance or even start an investigation, foiling the attacker’s ability to gain access. What’s more, a vigorous investigation by the target network could result in a criminal case. If the target network is defended by a network-based IPS, the actual attack itself might be blocked as the attack traffic matches the signatures of the IPS tool for known attacks. All of the attacker’s scanning work would then be for naught. Clearly, the attackers want to evade detection by IDS and IPS tools.
How Network-Based IDS and IPS Tools Work
Network-based IDS and IPS tools gather packets associated with normal use of the network and attacks alike. The network-based IDS and IPS must sort through this mountain of data to determine if an actual attack is underway. Today, many network-based IDSs and IPSs have a database of attack signatures that they try to match against network traffic. Increasingly, we are seeing more behavior-based IDS and IPS tools, which look for attacker activity based on what the attacker does (such as stealing important data or configuration files). Still, most of today’s IDS and IPS tools focus on matching specific bits in packets against the known attack signatures in their database. When an attack is discovered, the IDS warns an administrator by sending e-mail, calling a pager, sending a message to a network management system, or otherwise ringing bells and blowing whistles to put administrators on red alert. An IPS, when it discovers an attack, not only triggers an alert, but typically drops the attack packets, blocking the attack before it reaches its target.
Figure 6.27 shows a typical network-based IDS installation, where we have a network-based IDS probe looking for signs of an attack. This probe includes a signature that tries to detect the theft of a password file from a UNIX system, by searching the arriving network traffic for the string “cat /etc/shadow,” the common location of encrypted passwords on a UNIX machine.
Figure 6.27 A network-based IDS is configured to warn administrators when traffic matches an attack signature.
How Attackers Can Evade Network-Based IDSs and IPSs
The attackers want to fly under the radar screen of the IDS and IPS. How can this very important attacker goal be accomplished? Attackers will take advantage of the interaction of the following related factors to avoid detection:
- Mess with the appearance of traffic so that it doesn’t match the signature. The attackers work hard to make sure their attacks don’t look like the signatures checked by common IDS and IPS tools. Sometimes this means using a new attack that the IDS or IPS doesn’t know about yet. Most often, however, it means using a standard attack, but altering the packet structure or syntax in a way that the IDS or IPS does not anticipate.
- Mess with the context. Network-based IDS and IPS tools do not have complete context of how the packets they are capturing will be interpreted by the end system. They are peering in on someone else’s conversation, and don’t really know what the end system will do with the packets they are monitoring.
These methods associated with manipulating the attack data to avoid detection are known collectively as IDS and IPS evasion techniques. Such evasion is a very active area of research in the computer underground right now. The evolution in IDS and IPS evasion is definitely an area to keep close tabs on, and can function at the network level or application level, or both. Let’s look at each in turn.
IDS and IPS Evasion at the Network Level
As described in Chapter 2 and earlier in this chapter, IP offers the ability for network devices to fragment packets to optimize the packet length for various transmission media. A large IP packet (and its contents, which can be a TCP, UDP, or other type of packet) is broken down into a series of fragments, each with its own IP header. The fragments are sent one by one across the network, where the destination host reassembles them.
When these fragments pass by a network-based IDS or through a network-based IPS, all of them must be captured, remembered, and analyzed to determine if an attack is underway. A large number of disparate fragment streams, spread out over a long time, means that the IDS or IPS must have considerable long-term buffers to store all of this data. These so-called virtual fragment reassembly buffers are typically loaded into RAM and populated with fragments as they arrive. Thus, gathering and analyzing fragments requires a great deal of memory and processing power on the IDS and IPS’s part.
Furthermore, to analyze the communication reflected in the fragments, the IDS or IPS must reassemble all of these packets in the same way that the target system performs reassembly. Unfortunately, different operating system types have various inconsistencies in the way they handle fragment reassembly. Given this knowledge of how an IDS or IPS interacts with fragments, attackers might be able to evade them using any of the following approaches:
- Just use fragments. Perhaps the IDS or IPS cannot handle fragment reassembly at all. Older implementations (vintage 2000 and 2001) could not handle fragments well, although most modern IDS tools can handle some form of fragmented packet analysis with varying degrees of success, as we discuss later.
- Send a flood of fragments. The attacker might try to tie up all of the memory capacity of the IDS or IPS system by sending in so many fragments that the system saturates. On saturation, the IDS or IPS might not be able to detect a new attack, because it cannot gather the packets with its incoming packet queue flooded.
- Fragment the packets in unexpected ways. The attacker can fragment the packets in a variety of unusual ways to avoid detection. If the IDS does not understand how to reassemble the packet properly, it will not discover the attack.
The impact of these techniques on IDS and IPS systems varies greatly from vendor to vendor. Snort will behave differently from the Cisco Secure Network IDS, which will handle things differently than the ISS RealSecure tool. To properly avoid detection, attackers will become intimately familiar with these various products.
The Tiny Fragment Attack and the Fragment Overlap Attack
Let’s explore a couple of examples of how an attacker might fragment packets to evade an IDS and IPS. Although there are thousands of ways to fragment packets, two examples are quite illustrative: the tiny fragment attack and the fragment overlap attack. There are many other more elaborate examples, but by focusing on the basics of fragmentation attacks, we can get a good understanding of how they work.
The tiny fragment attack, shown in Figure 6.28, is designed to fool the IDS and IPS by creating two fragments, neither of which includes enough information to trip the signature on the IDS or IPS. The packet is sliced in the middle of some data that would otherwise trigger the IDS or IPS. As we discussed before, suppose the signature is looking for cat /etc/shadow. Because the IDS or IPS is looking for this string to make alerting or blocking decisions, it might ignore the tiny initial fragment as it passes. After all, the first fragment doesn’t match the signature. Likewise, the IDS might not alert on the second fragment. You see, it’s just part of the original packet associated with the first fragment, which didn’t trigger the signature. In this way, the attacker has sent in two packets that avoid detection by the IDS or blocking by the IPS.
Figure 6.28 The tiny fragment attack.
Most modern IDS and IPS tools can detect the tiny fragment attack using virtual fragment reassembly buffers. They just have to make sure to gather all of the fragment streams and assemble them in memory quick enough to detect this attack and alert on it.
A far more insidious fragmentation example is the fragment overlap attack, which is based on manipulating the fragment-offset field of the IP header. The fragment-offset field tells the destination system where the given fragment fits in the overall bigger packet that was sliced apart into fragments. For this scenario, shown in Figure 6.29, the attacker creates two (or more) fragments for each IP packet. One fragment has the TCP header, and a piece of innocuous-looking data that doesn’t trigger the signature, like cat /etc/fred. The second fragment has an offset value that is a lie. The offset is too small, so that when the fragments are reassembled, they overlap. The second fragment is designed to overwrite part of the first fragment with the text shadow, making it evil when the two parts are brought together. The IDS or IPS doesn’t detect any malfeasance in the first fragment (after all, it’s totally benign). The device then might ignore the second fragment (because it’s just a fragment of the previous packet that appeared innocuous, and doesn’t in and of itself do anything evil). When the two fragments arrive at the targeted protected server, they are reassembled. The reassembly overwrites part of fragment 1 (fred) with the data from fragment 2 (shadow), and the TCP/IP stack passes the packet to the application, which receives cat /etc/shadow. The attacker has evaded the IDS or IPS.
Figure 6.29 A fragment overlap attack.
Now, I know what you are thinking: “Why can’t the IDS sensor or IPS product just reassemble all of the packets before it makes filtering decisions, including the overlapped fragments?” Unfortunately, different operating systems reassemble fragmented packets differently. On some operating systems, the earliest fragment (the one received first in time) can’t be overlapped. It sticks in the end system’s reassembly buffer and won’t be overwritten. On other operating system types, the fragment with the lowest offset will overwrite others, regardless of when it arrives in time. Also, in various operating systems, complete overlap and partial overlap are handled differently on the end system, thereby confusing the IDS and IPS. In a sense, the IDS and IPS don’t know how the end system is going to reassemble the packet, so they can’t be sure what impact these unusually overlapped fragments will have there. In our example, the end system might receive different results if the fragments are sent out of order, depending on its operating system type (getting cat /etc/shadow or perhaps even cat /etc/fredow if the packet order is reversed in time). Sure, the IDS or IPS can alert that it received overlapped or misaligned packets. As an attacker, I’d much rather have you see an innocuous sounding “unaligned fragment” alert than an alert that says someone just stole your encrypted password file!
This whole overlap works because most of today’s IDS and IPS tools have a single method of reassembling the fragment before making their decisions about whether an attack is occurring. For example, the Cisco Secure IDS has one setting so an administrator can choose to reassemble with the behavior of Windows, Solaris, IOS, or BSD. Once you choose a setting, you’ll miss attacks against other operating systems. Older versions of Snort (running the frag-2 reassembly routine) always reassembled in the same manner as Linux machines, regardless of the system type Snort runs on. It would be blind to some fragmentation attacks specifically crafted for other operating systems. Newer versions of Snort run the frag-3 reassembly routine, which includes multiple fragment reassembly buffers running simultaneously, each one with behavior tuned for Windows, Solaris, IOS, or BSD.
FragRouter: A Nifty Tool for Conducting Fragmentation Attacks to Evade IDS and IPS Tools
As stated earlier in this chapter, the Nmap port scanner includes a limited packet fragmentation option. In Nmap, tiny fragments are sent, in the hope that the target network IDS or IPS will not be able to understand them properly. Although useful in a pinch, the Nmap fragmentation routine is not overwhelmingly powerful. There are far better ways to create fragment attacks for evasion.
FragRouter, created by Dug Song, implements a variety of fragmentation attacks. Available at www.packetstormsecurity.org/UNIX/IDS/nidsbench/fragrouter.html, FragRouter runs on BSD, Linux, and Solaris. It supports more than 35 different ways of slicing and dicing packets to manipulate the flow of data between a source and destination, including the options shown in Table 6.4.
Table 6.4 Some of the Many Fragmentation Options Offered by FragRouter
The beauty of FragRouter is that it separates the attack functionality from the fragmentation functionality. As its name implies, it really is a router, implemented in software. As displayed in Figure 6.30, attackers install it on one of their own systems and then use any attack tool to send packets through the machine with FragRouter installed.
Figure 6.30 Using FragRouter to evade a network-based IDS.
In using FragRouter, the attacker first chooses a particular attack tool to launch against a target. This tool generates attack packets. These packets are funneled through FragRouter, which slices and dices the packets according to any one of its 35 fragmentation and scrambling options. Then, FragRouter forwards these packets across the network to their ultimate destination, the target. The separation of the fragmentation function from the particular attack tool allows an attacker to choose any tool, such as a network mapper (like Cheops-ng), port scanner (such as Nmap), firewall rule scanner (such as Firewalk), or vulnerability scanner (like Nessus). Using FragRouter, any of these tools now can be used while evading IDS with packet fragmentation.
Dug Song released a follow-up tool called FragRoute (note that the latter tool doesn’t have an “r” at the end of its name). The FragRoute tool makes creating mystifying fragmentation schemes even more flexible for the attacker.
FragRoute differs from the older FragRouter tool in that it doesn’t route. The attack tool has to sit on the same machine as FragRoute itself. That’s not a huge change, but it’s worth noting.
The biggest difference in FragRoute, however, is the inclusion of a new language for creating brand new fragmentation schemes. The old FragRouter tool had a limited number of predefined methods for creating fragments according to 35 different recipes. The newer tool can have an arbitrary number of fragmentation recipes, limited only by the imagination and creativity of the attacker. As of this writing, a few of the FragRouter options (specifically, the F2 and T1 options) can be used to penetrate popular network-based IPS tools. In experiments in our lab, we found that a significant majority of commercial IPS products were susceptible to at least one of the FragRouter evasion tactics.
IDS and IPS Evasion at the Application Level
Although FragRouter and FragRoute allow an attacker to manipulate a data stream at the network level, application-level IDS and IPS evasion techniques let the bad guy modify particular application-level syntax to confuse an IDS or IPS. Whisker, a tool written by Rain Forest Puppy, was the first free tool to implement some application-level IDS and IPS evasion tactics. Not only were these ideas implemented in Whisker itself, but the best free Web-specific scanner available today, Nikto, also includes these same techniques for avoiding detection by altering HTTP syntax.
Nikto: A CGI Scanner That’s Good at IDS and IPS Evasion
Nikto, created by a developer named Sullo, is an actively updated Web server scanner with a multitude of features, freely available at www.cirt.net/code/nikto.shtml. It provides similar base functionality to the older Whisker tool, but has been extended to do much more.
Nikto scans for more than 2,500 potentially vulnerable Web scripts and related material and understands version-specific configuration problems for more than 230 different Web server version types.
Most Web applications use some sort of active scripting technology running on the Web server, such as CGI, ASP, JSP, and PHP scripts. A user might supply information to a CGI script through a form on his or her browser. When the form’s data is sent to the Web server, the CGI script runs on the Web server, makes calculations, gathers appropriate data, and generates a response for the user. Common CGI functions include searching a Web site for a particular term, entering user contact information, or constructing online calculators. Really, most Web-based applications are written using CGI, or related technologies, such as Microsoft’s ASPs, Sun Microsystems’ JSPs, PHP pages, and several others. Many Web servers, such as the open source Apache or the commercial Internet Information Server from Microsoft, are distributed with example CGI and ASP programs to teach coding techniques and offer a head start to developers creating applications for the Web.
Unfortunately, a large number of these default CGI/ASP/JSP/PHP Web scripts have major vulnerabilities. Remember, these scripts run on the Web server and are activated by a user across the network. Most of these Web scripts must process user input, a dangerous thing to do when some of the users might be trying to attack the Web server. Given that it executes on the Web server, a vulnerable Web script could allow an attacker to take over the Web server, executing arbitrary commands on the machine. Many widely used scripts include flaws that allow an attacker to send escape sequences in the user-supplied input. By escaping from within a running Web script, an attacker can send data directly to the command line of the target system for execution. A large number of vulnerable Web scripts are widely known, including older versions of the AWStats CGI script (used for analyzing Web server logs), the phpBB environment (used to implement bulletin board discussion groups), and numerous others. Flawed, older versions of these scripts allow an attacker to execute commands on a target Web server. Attackers scan systems far and wide looking for these well-known flawed Web scripts in an attempt to take over their targets.
Nessus includes a specific category of plug-ins devoted to checking for well-known vulnerable CGI scripts and other Web server problems. However, Nikto is the best general-purpose Web vulnerability scanner available today and includes a generous feature set. It supports scanning virtual Web servers all hosted on a single machine, allows an attacker to perform automated guessing of user ID and passwords for Web authentication, and can even use the output from an Nmap scan to target Web servers listening on TCP ports 80 and 443. Certainly, all of these are incredibly useful features to folks looking for vulnerabilities on Web servers. However, one of the most interesting aspects of Nikto is its application-level IDS and IPS evasion techniques, originally borrowed from the earlier Whisker scanning tool.
Most IDS and IPS systems have signatures for attacks against known weak Web scripts, and alert an administrator if someone attempts to activate the vulnerable script. Nikto tries to evade IDS and IPS tools by subtly changing the format of the requests it sends to scan for flawed scripts on the target machine. To see how this works, suppose there is a hypothetical vulnerable CGI script, called broken.cgi. When asking if this vulnerable GCI script is present on a Web server, a browser sends an HTTP request across the network with the following format:
GET /cgi-bin/broken.cgi HTTP/1.0
Similar requests are composed for ASP, JSP, PHP, and other environments. This basic request implements an HTTP GET method, trying to activate a program called broken.cgi, located in the cgi-bin directory, using the HTTP version 1.0 protocol. A Web server scanner like Nikto will likewise send this request to check if the vulnerable broken.cgi script is present. Nikto checks for thousands of real, known vulnerable scripts, not just our hypothetical broken.cgi. A network-based IDS and IPS tool scans all packets traversing the network looking for any signatures that match requests for known vulnerable Web scripts. Nikto evades these tools by manipulating the requests that it sends so that they do not match the signatures exactly, but still run appropriately on the target Web server. Nikto includes ten different mechanisms for manipulating the HTTP request to avoid detection, as shown in Table 6.5.
Table 6.5 Nikto and Whisker’s IDS and IPS Evasion Tactics
As you can see, Nikto includes numerous ingenious techniques for avoiding detection. It is important to note that all of these techniques are focused on Web server scanning for CGI and related technologies via HTTP and HTTPS. Whereas FragRouter could be applied to any attack tool, Nikto’s techniques are used only in a Nikto scan.
Most modern IDS and IPS tools have detection capabilities for each individual evasion technique described in Table 6.5. However, note that an attacker can formulate hundreds of different combinations of these techniques, morphing a single HTTP GET request in multiple ways at the same time. By combining three or more of these techniques together in the same attack, a bad guy can fool even many modern IDS and IPS tools.
IDS and IPS Evasion Defenses
Don’t Despair: Utilize IDS and IPS Where Appropriate
As we have seen, numerous techniques dodge network-based IDS and IPS tools. So, should you avoid deploying IDS and IPS on your network? Let’s not throw out the baby with the bath water. Intrusion detection and prevention are a valuable part of securing a network. Even though there are a variety of methods to fool IDS and IPS machines, most vendors work hard to ensure that they can detect the latest attacks despite various evasion tactics. A well-deployed IDS infrastructure can give you an important heads up that a determined attacker is targeting your network. Properly maintained IPS tools will block large numbers of the most common attacks.
Keep the IDS and IPS Systems and Signatures Up to Date
It is absolutely critical that you have a defined process for keeping the signatures of your IDS and IPS tools up to date. Because new attacks are constantly being developed, you must update your IDS and IPS platforms on a weekly basis, or more often as the vendor releases new signatures. Just as you keep your antivirus tools up to date on your end hosts because of the rapid development and spread of viruses, worms, and bots, so too must you keep your IDS and IPS systems up to date. If your IDS or IPS tools fall behind, you will definitely suffer some significant attacks.
Utilize Both Host-Based and Network-Based IDS and IPS
Whereas a network-based IDS and IPS listen to the network looking for attacks, host-based IDS and IPS tools run on the end system that is under attack. For example, you might install a host-based IDS or IPS agent on a sensitive Web, DNS, or mail server. These host-based technologies are less subject to evasion tactics, as they run on the end host itself, as shown in Figure 6.31. Many of the IDS and IPS evasion techniques focus on fooling network-based tools because they do not understand the full context of how a series of packets will appear on the end system. This concept fueled the techniques used by FragRouter, FragRoute, and Nikto. Host-based IDSs and IPSs address this concern by running on the end system. They have more complete context information of the communication and can make more realistic decisions about what is happening on the end system. A host-based IDS and IPS can look at the logs, the system configuration, and the system’s behavior to see what an attacker has actually done, rather than trying to interpret what is going on by looking at packets.
Figure 6.31 Host-based IDS versus network-based IDS.
For example, the fragmentation attacks implemented in FragRouter target network-based IDS and IPS systems by trying to fool them with unusually overlapping fragments. A host-based IDS or IPS tool analyzes the attacker’s tracks on the end system, after packets have been reassembled by the target’s TCP/IP stack. Similarly, many of Nikto’s application-level evasion techniques are less effective against host-based IDSs and IPSs than network-based tools because the host-based tool can watch for changes made by the attacker on the end system. Host-based defensive tools, including commercial IDS and IPS products such as Cisco’s Security Agent (CSA) and McAfee’s Entercept, can detect nefarious activity at a much finer grained level than can network-based tools.
Does this mean that network-based IDS and IPS should be avoided? Absolutely not. Network-based tools serve a valuable role in monitoring network traffic. Whereas a host-based IDS or IPS only defends the host it is installed on, a network-based IDS or IPS can monitor a whole LAN. Consider this analogy: The host-based tool acts like a police officer stationed in particular houses looking for burglars. A network-based tool operates like a police helicopter flying above a neighborhood looking for burglars. Sure, a burglar can dress up in a disguise and fool the helicopter, and a police officer in your house will notice someone stealing your family jewels even if the crook is disguised. Still, it’s awfully expensive to put a police officer in every house. As in this analogy, you get economies of scale with a network-based IDS and IPS that you just can’t achieve with host-based IDSs and IPSs. In the end, a sound IDS and IPS deployment usually utilizes both network- and host-based tools.
Conclusion
When we started this chapter, the attackers had a list of contacts, a handful of IP addresses for your network, and list of domain names. Using a variety of scanning techniques, the attackers have now gained valuable information about the target network, including a list of phone numbers with modems, a group of wireless access points, addresses of live hosts, network topology, open ports, and firewall rule sets. Indeed, the attacker has even gathered a list of vulnerabilities found on your network, all the while trying to evade detection. At this point, the attackers are poised for the kill, ready to take over systems on your network. In the next chapter, we explore how attackers, armed with information from a detailed network scan, can compromise systems on the target network.
Summary
After gathering information during the reconnaissance phase, attackers often turn to scanning systems to gather further information about their target. The scanning phase favors attackers, because they only have to find one way in to achieve their goals, and often have the luxury of time.
War driving is the process of finding wireless access points on a target network and determining their SSIDs, which act as network names. The most popular wardriving tool is NetStumbler, which runs on Windows. To detect a wireless network, NetStumbler sends probe packets with an SSID field set to “any.” With their default configuration, most access points respond to this request. Wellenreiter is a passive war-driving tool, in that it sniffs the wireless frequencies to see if WLANs are present. Because most WLANs send their SSID in beacon packets, Wellenreiter can discover them quickly using its rfmon mode. For those access points configured not to include SSIDs in beacon packets, the attacker can either sniff the traffic directly or use ESSID-Jack to force the targets to reveal their SSIDs. To defend against war driving, make sure you find the weak access points in your environment before attackers do, and consider using a stronger wireless authentication protocol, such as WPA or 802.11i.
Unsecure modems are one of the easiest ways into a target network. To locate such modems, attackers employ war dialing, a technique that dials telephone number after telephone number looking for modem carrier tones. For war dialing, attackers use telephone number ranges found on Web sites, employee postings to newsgroups, and registration records. After discovering modems, attackers look for systems without passwords, or machines with easily guessed passwords. THC-Scan is one of the most popular war-dialing tools in the computer underground today. Defenses against war dialing include a strong modem policy requiring registration for modems in use, as well as periodic war dialing to find renegade modems before attackers do.
Attackers use network-mapping techniques to discover an inventory of target machines and the overall topology of the network architecture. By sweeping the target network range, the attacker determines which hosts are present. Using traceroute, the attacker can determine how systems, routers, and firewalls are connected together. Cheops-ng is a useful tool that includes sweeping and traceroute capabilities, among other useful functions. To defend against network mapping, you should consider blocking some of the ICMP messages used by the network-mapping tools, at least to sensitive hosts.
Port scanners are used to determine which ports have listening services on a target network. By interacting with various ports on the target systems, a port scanner can be used to develop a list of running services. One of the most fully featured port scanners is Nmap. Nmap supports a huge number of scanning types, including TCP SYN scans, TCP ACK scans, UDP scans, and so on. Nmap also includes operating system fingerprinting capabilities to determine the underlying operating system of target machines based on their protocol behavior. To defend against port scans, you must harden your operating systems, shutting down all unneeded services and applying appropriate filtering.
Attackers can determine the rules implemented on a packet filtering firewall using the Firewalk tool to scan the target network. To defend against Firewalking, make sure your firewall configuration allows only services with a defined business need.
Vulnerability-scanning tools have the ability to check a target network for hundreds or thousands of vulnerabilities. They employ a database of known configuration errors, system bugs, and other problems. A variety of free and commercial vulnerability scanners are available. Nessus is one of the best, and it’s free. To defend against vulnerability scanners, you must apply system patches on a regular basis, and periodically conduct your own vulnerability scans.
When conducting scans, attackers employ a variety of techniques to avoid detection by IDSs and IPSs. Evasion techniques operate at the network and at the application level. FragRouter and FragRoute implement network-level IDS and IPS evasion by using packet fragments. Nikto (and the earlier Whisker tool) implement application-level IDS and IPS evasion for Web server targets. To foil IDS and IPS evasion techniques, keep your IDS and IPS systems up to date, and utilize both network- and host-based IDSs and IPSs.