Chapter 3. Planning and Preparing

Commercial photographers and illustrators are often hired to express someone else’s ideas, and depending on the client, they may get explicit sketches and directions or be given free rein to develop the concept. In contrast, fine artists express their own ideas and concerns. But fine artists as well as commercial Adobe Photoshop users benefit greatly from planning the image, which includes everything from concept, to photography, to working in Photoshop, and finally to outputting the image.
You’ve all seen the cut-and-paste composites where the elements don’t make visual sense; for example, where the people are too big, the buildings don’t match in perspective, or the lighting of the elements conflicts. To create photorealistic images, even if they are fantastical or surreal, it is essential to put down the camera, turn off the studio lights, pick up a pencil and paper, and take the time to plan the image. The more care you put into planning, including casting, styling, discussing, brainstorming, and visualizing the final image, the smoother the photo shoot and the more successful your Photoshop compositing work will be.
The success of a composite image relies on a variety of factors: First and foremost, you need to have a good (hopefully great) idea. Second, the quality and production of the original photography that makes up the component parts must be exceptional. And third, the execution of the digital work that brings it all together must be meticulous and seamless. You can vastly improve your success rate by investing the proper amount of time in the planning stages to prepare your work. This chapter concentrates on the execution of the concept in terms of planning the photography for compositing. In this chapter you’ll learn:
• How to plan the photography for a successful composite
• The sequence of events involved in professional production
• How to match light and perspective to create a photorealistic composite
• How to follow the development of a complex image from a sketch to a final composite
Planning the Image
Before you go on a long trip, you plan it. Depending on where you’re going and for how long, you may pack differently. And if you’re like us, you might make a checklist that includes a passport, tickets, the amount and type of clothing, photography equipment, and so on. We do this to be safe, prepared, and comfortable, which lets us concentrate on and enjoy the trip.
Planning an image is just as important as planning for a long trip to an exotic or remote location. More important, the more you plan the imaging process, the fewer compromises you’ll have to make later. Good planning always results in better images.
Creating the Road Map
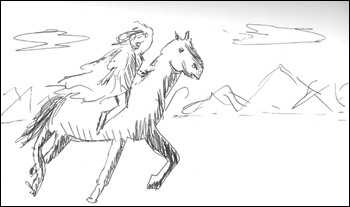
The primary question to address when planning your image is: What will it take to achieve the image goal? The practical aspects of this answer include all of the various constraints that are part of the project. It’s fundamental to have a visual reference for your idea, because this becomes the road map or blueprint for your composite. This blueprint is also called a comp or layout. When Jim is forming an idea for an image, he starts with the simplest of tools—a sketchbook and a pen or pencil. Even if you are not great at drawing, simply plotting out the basic composition, the scale, and the relationship of the various elements on paper will show you whether that crazy concept you have in your head even fits within the confines of a still two-dimensional rectangle. If you want to make a more elaborate blueprint, consider doing low-resolution scans of references, location scouting shots, or some of the actual backgrounds or images that may end up in the final composite. You can do a rough composite in Photoshop to test the viability of your concept and sketch the missing elements onto blank layers. Regardless of how you arrive at your comp, not only is it incredibly useful for previsualizing your finished image, but it also helps in planning the various stages of the production. Jim made the sketch of “Runaway Beauty” in FIGURE 3.1 for an idea involving a moderate level of production, and we’ll refer to it in this chapter to illustrate its usefulness.
© JP
Figure 3.1. Pencil sketch for “Runaway Beauty.”
Grab a pen and paper or sketchbook, and make a sketch of an idea you have for a composite image. Use this as your guide to plan the production of your image.
Take as much time doing your sketch as you need to in order to get a sense of the desired image. Include all the elements that you intend to incorporate in the final. The sketch doesn’t have to be a masterpiece, just a visual reference for the planning stage of your production.
Determining Look, Feel, and Style
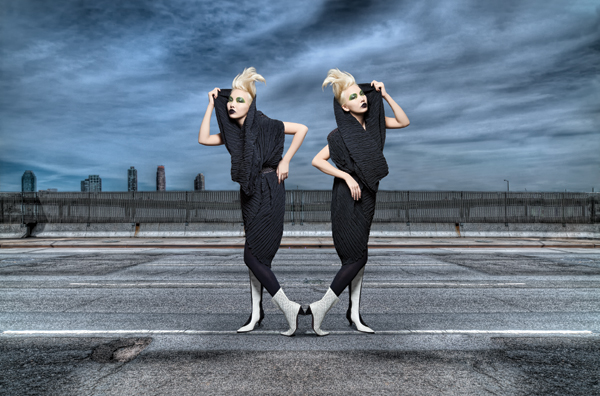
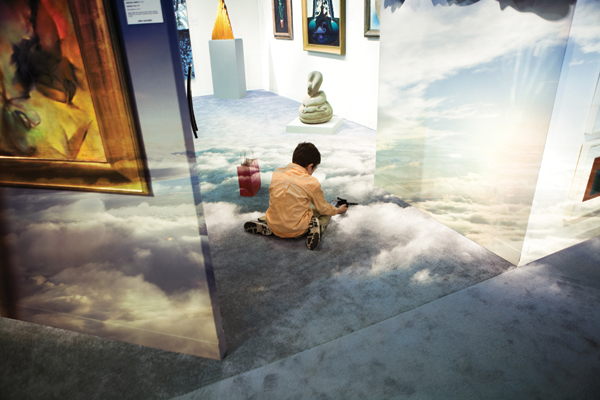
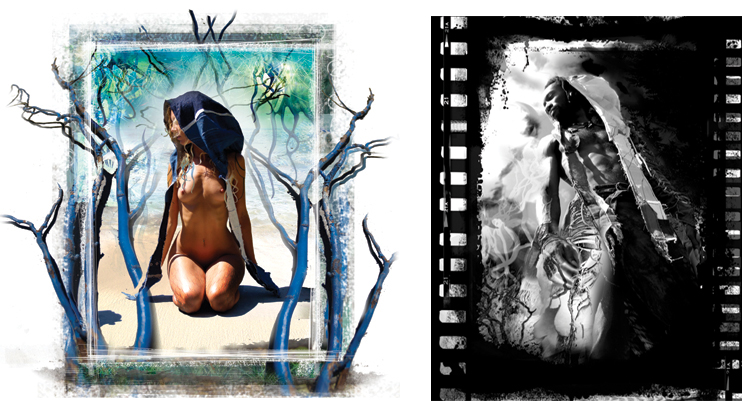
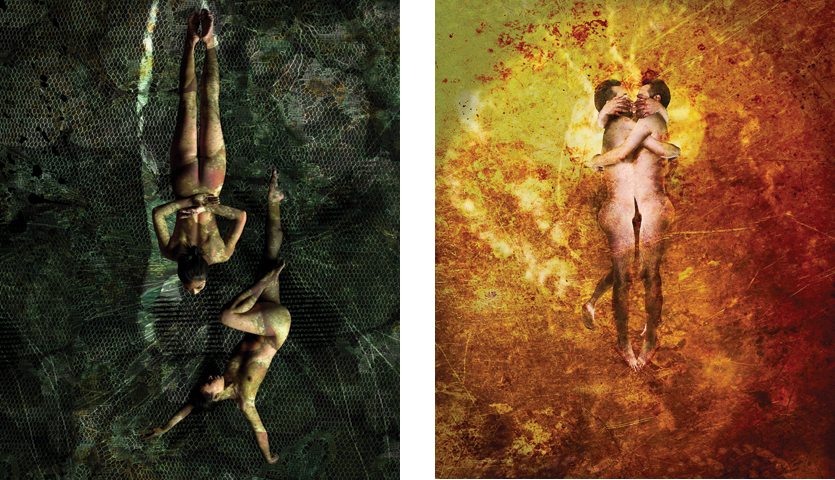
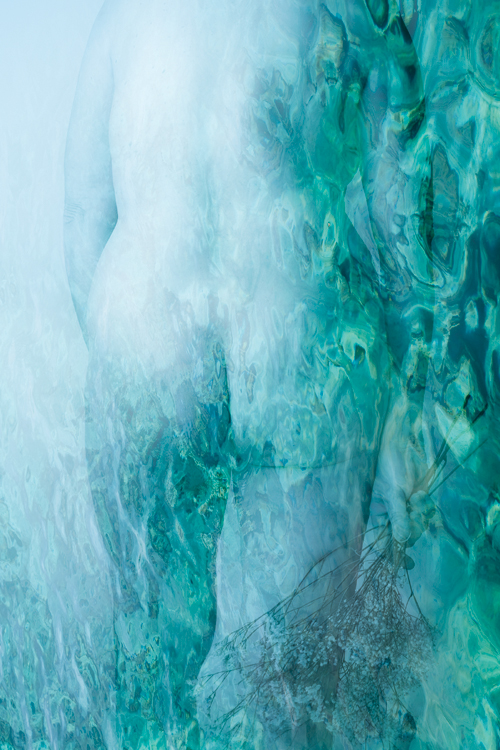
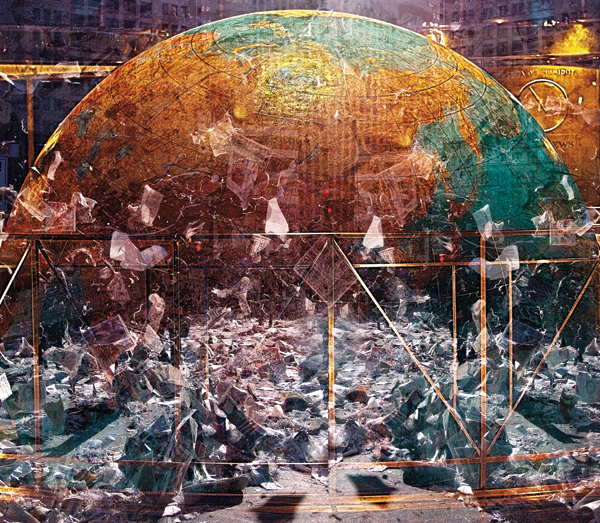
Once you have an image idea sketched out, the next step is to imagine the feeling you want the image to evoke. What will the final image(s) look like? The subject and look of the image needs to express the concept. Is it dark, mysterious, and austere? Is it bright, colorful, and inviting? Do you want an illustrated, grungy, science fiction, dreamlike, or painterly look, or something purely photographic (FIGURES 3.2 through 3.7)? Or, do you want to play with a few different looks and see which serves the idea best? For the “Runaway Beauty” composite, Jim wanted the image to convey the powerful energy of the running horse, the precariousness of the beautiful woman riding bareback, a feeling of dangerous speed, and an unusual sense of place—not where you would expect to see such an event. He decided on a photo-realistic look to give the image a sense of believability and drama.
© Daniel Bolliger (www.danielbolligerstudio.com)
Figure 3.2. In this image Daniel Bolliger employs his surreal, photographic style in a mirror-image fashion illustration.
© Hye-Ryoung Min (www.hyeryoungmin.com)
Figure 3.3. Hye-Ryoung Min says of her work, “‘In-between Double’ is a layering of place and experience in an effort to explore the transient and evanescent nature of our passage through the world.”
© Opie Snow (www.opiesnow.com)
Figure 3.4. Opie Snow’s hybridized illustrations combine drawing, painting, and photography to realize these portraits.
© Rocio Segura (www.rociosegura.es)
Figure 3.5. Rocio Segura blends overlaid images to create images of dreams where “the human brain creates a state of being in which our hidden fears and desires come to the surface.”
© Judith Monteferrante (www.judithmphotography.com)
Figure 3.6. Judith Monteferrante created this watery, nude artwork using overlaid, blended images.
© Karli Cadel (www.karlicadel.com)
Figure 3.7. Karli Cadel combines seemingly unrelated images in a collage-like style for this art piece.
Production Considerations
Although it’s not necessary to commit to the style in the preparation stage, it’s wise to at least set an intention for your desired look because this may alter or determine production considerations. Production considerations are all the various practical and logistical components that are necessary to accomplish your photographic goal. Usually, these are broken down into the following stages:
• Preproduction. All the preparation that takes place before the shoot
• Production. The actual execution of the photography
• Postproduction. The editing, compositing, and retouching of your final image
Because this chapter is about planning, we’ll discuss the preproduction stage in great detail.
Preproduction
Preproduction is a term that is used to describe the complete planning stages of a photographic production. It refers to all the decisions, arrangements, agreements, schedules, budgets, and details that must be considered for your photo shoot. Whether you’re doing a very simple still-life shoot or an elaborate full-scale production with actors, locations, and animals, your photo shoot will benefit from thoughtful, methodical, and precise planning.
Managing the Preproduction Stage
With the idea sketched out and a general concept for the stylistic look you want to achieve, you enter the essential preproduction phase. At this point, you evaluate the sketch you’ve made and make a plan to execute every aspect of the image from main subject and environment to the lighting, perspective, and color. Although all photographers have their own method of planning their shoots, there are several commonalities that are present in almost all productions. You will have to consider at least some of these factors before beginning:
• Should you shoot on location or in studio?
• Do you need models?
• What size crew do you need with what specialties?
• How much is this going to cost?
• Do you need props and wardrobe?
• What are the logistical considerations?
• Do you need food and beverages for crew and talent?
Various software programs or apps are designed expressly to manage all these details. Many photographers will use one of these or create their own database for managing their estimates, invoices, contacts, calendars, and research.
In the example of “Runaway Beauty,” Jim took the time to search his library for possible backgrounds, researched where and how he could access horses and the required trainers, worked on casting the model and styling the model, chose a makeup artist, scouted locations for either the right background or a place to shoot the horses, placed a holding time at the studio, determined which special equipment he needed to rent, created a budget that he had to adhere to, and fleshed out a myriad of other details specific to each part of the project.
Creating a Budget
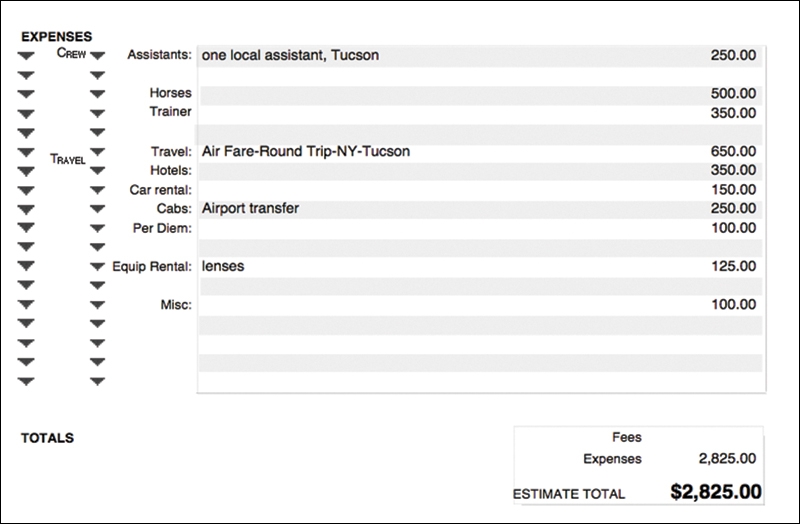
If we are working on an assignment for a paying client, we will make an estimate of fees and expenses based on the intended image usage and the anticipated expenses for the production. The expense estimate must be accurate, so we verify every cost involved in the project before we present the estimate to the client. This involves contacting all of the vendors we intend to hire, showing them the project, and getting a commitment and a firm estimate for their contribution. To properly do an estimate, you must pre-produce or problem solve the entire job so that you are absolutely certain the budget you present is not too high, which could result in you losing the job to your competitor, or too low, which would mean you would have to make up the difference from your fee. The client must approve this estimate in writing, and it is usually cast in stone unless the client changes the requirements after the initial estimate. This is sometimes referred to as a change of spec. For self-financed composites, such as an experimental test image, a portfolio image, an art piece—or as is the case with “Runaway Beauty”—a collaboration with other artists where everyone donates their time and their own expenses to the project, a budget will also be created and adhered to as a way of controlling costs (FIGURE 3.8). As you can well imagine, our self-financed projects are done with the strictest cost controls, and being resourceful is essential for everyone involved.
Figure 3.8. This sample estimate provides a budget to adhere to for the location portion of the self-generated assignment “Runaway Beauty.”
There are many ways to approach a production, and it helps to think of multiple strategies before you commit to one. For instance, you can estimate the costs to hire a model from an agency, but that could be quite expensive. Instead, you could put an ad on Craigs-list or at a local theatrical college to find talent that is just starting out and is not with an agency yet. Think of various ways to accomplish your goal, and strategize the best, most cost-effective solution.
Choose an advertisement from a magazine and make your own estimate for what it would cost to photograph it. Or, make a budget for a personal image that you want to make. Aim for precise accuracy.
To Composite or Not to Composite
The first question you should consider when embarking on the execution of any image is if the image can be made without doing a composite. This may sound rather odd, considering that this book is all about compositing, but if you can get the shot in-camera without breaking the bank or doing an absurd amount of work, that is the way to go. You should only resort to compositing if what you’re trying to create is impossible, impractical, or too expensive to do in a single shot, or if there is something stylistically that can only be achieved by addressing each component separately.
At first glance, it seems quite possible that “Runaway Beauty” can be captured in a straight shot. But when you look at the details, would you really want to put a model in an expensive couture gown, who may or may not be able to ride, on a galloping horse, without a saddle, in the snow? We don’t think so! Therefore, compositing the image elements together makes more sense, will most likely be a lot less risky for all involved, and most important, will give us more control to capture, refine, and combine every detail. As we look at the sketch for “Runaway Beauty,” we can make a list of the principal elements for the final image: We’ll need a sky, a landscape (both foreground and background), a running horse without a bridle or saddle, and a beautiful model wearing great clothes.
Shooting on Location
One of the first considerations for the photography is which elements must be captured on location and which can be captured in the studio. If you’ve been photographing for years and have a library of images to choose from, it is good to start to see whether you have a landscape or landscape elements you can blend together to serve as an environment for your vision. Some might think, oh, I’ll just grab a great image off the Internet. We couldn’t more strongly discourage thinking of or doing this. First, much of the imagery is copyrighted, so using it would put you in violation of international copyright laws. Second, if you did find an appropriate image that was in the public domain, it would not have sufficient resolution for a hi-res composite. Third, do you really want to put a lot of work into an image that you don’t have the rights for? So rather than right-clicking your way into copyright infringement, our recommendation is to add landscapes, clouds, horizons, and so on to the list of items to be shot whenever you’re traveling or on location.
You can’t just decide to shoot anywhere. Numerous rules and regulations are in place for photographing on public or private property, and it is better to research the rules before showing up with a crew, lighting equipment, or in some public places, even a tripod. When in doubt, ask permission first and photograph second. Also, consider whether the shot will require travel, immunizations, or visas. All of these issues must be addressed before you pack your toothbrush and camera bag. For “Runaway Beauty,” Jim had to shoot the horse element on location, because he didn’t have that element in his library. To get the shot, Jim had to begin by researching facilities that rent horses with trainers and had an open space to perform the photography.
Whenever you have the opportunity, build up your own library of landscapes, backgrounds, cityscapes, surfaces, or anything else that interests you as a photographic element. Make sure you shoot high-resolution raw files for all captures to keep a consistent level of quality throughout your library. These images will be invaluable for future composites.
Shooting in the Studio
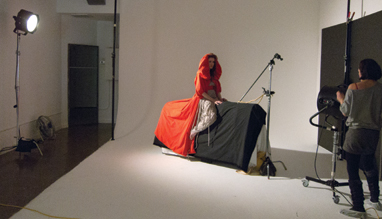
Although background landscapes are by necessity shot on location, photographing elements for composites in the studio is ideal because it gives you complete creative control over how the element will appear in the final image. For the model in “Runaway Beauty,” it made sense to handle that part of the composite in the studio. A studio environment gives you the most control over all of the variables, such as the flow of the clothing, hair, makeup, perspective, lighting, and possibly the use of a fan to simulate wind and movement in her hair and dress. Jim built a rig with proportions similar to a horse for the model to straddle. This not only put her in the perfect position to composite her onto the horse, but with the wind machine blowing on her, it created the sensation that she’s riding and maximized the potential for an authentic gesture, expression, and pose.
Location Scouting
Location scouting is the process of doing exactly what the term implies, exploring the world for the best possible background and environment for your shoot. The chosen location should not only have the appropriate physical attributes for your idea, but also needs to be logistically accessible to you, your crew, equipment, and vehicles. When scouting outdoor locations, pay attention to light direction based on compass points of north, south, east, and west, so you can anticipate the light quality throughout the day. You need to clear permissions for your chosen location and in some instances pay a fee for the usage and/or get permits from the town or city to shoot in your desired location. If you are working on an assignment with a decent budget, you might even hire a professional location scout who knows of many locations and quite often will have a library of suitable locations that have already been cleared for permissions. You can browse the professional scout’s library to find the perfect venue without leaving your desk.
Casting
Casting models for a professional shoot involves calling modeling agencies and describing what you’re looking for in regard to body type, age, gender, and talent. The agency will then send plenty of great people for you to do a quick casting call shot. And, of course, they need to be compensated according to how the image will be used, for example, editorial, commercial, stock, fine art, and so forth. If you’re just starting out, contact local acting and modeling schools to find people who are also beginning their careers and are hoping to secure headshots and photographs for their portfolios. Actors and models are usually less inhibited about striking a requested pose or portraying an emotion or attitude. You’ll need a signed model release that states you have the right to each model’s likeness. Make sure the release covers all your intended usages.
For self-financed projects, it’s ideal to find models who need pictures for their portfolio so you can work with one another by exchanging services. For example, young designers and up-and-coming models and stylists always need new content for their own portfolios and promotional materials. Working together, especially when you’re just starting out, is a great way to learn and experiment. If the images are successful, you’ll be the one they want to work with when they are more established. For the main character of “Runaway Beauty,” Jim wanted the woman protagonist to be strong and confident, and embody a romantic and mysterious heroine. For this image, Jim first reached out to Hannah Thiem. Hannah is a violinist, performer, model, and photographer, and happens to be a classically beautiful redhead that he has collaborated with in the past.
Styling
Working on composites allows your creative mind to wander as you finesse the details. Who is this beauty charging through the snow on a mighty stallion? What is she wearing? For wardrobe, the protagonist in this image had to be wearing something compelling, flowing, and stylish. Never underestimate how important a visionary stylist or clothing designer can be to bring a dynamic energy to the heroine’s clothes. Hannah shared Jim’s enthusiasm for the idea and suggested he connect with Lily Blue Designs (lilybluedesigns.com) for the clothing and have Kayla Jo do the hair and makeup. Lily Blue makes unique, one-of-a-kind designs (FIGURE 3.9) and was excited to collaborate. Kayla Jo is a hair and makeup artist who works on many of Hannah’s projects. All of the contributors donated their time in exchange for usage of the final image. There are many ways to entice people to become subjects of your photographs outside of the model agencies. Friends, people you meet, or even total strangers, when approached with enthusiastic energy for a project, may surprise you with their willingness to work with you. A designer you admire, an actress you see in a play, a sculptor whose work moves you—all of these people may possibly become partners in your creative endeavor given the right circumstances and if you can entice them with your proposal.
© JP
Figure 3.9. Our model, Hannah Thiem, is shown wearing some of Lily Blue’s designs. Jim thought the flow of these fabrics would augment the speed of the horse.
Photography for Compositing
Mechanically speaking, photography is the act of rendering three dimensions onto a two-dimensional surface. The decisions a photographer makes influence whether or not that flattening process is successful. These decisions include what lens, shutter speed, and f-stop are used; where the camera is positioned; the quality of light; and the environment the picture is taken in.
Photoshop is a 2D application in which you work on the X (horizontal) and Y (vertical) axes of an image. The third dimension, which is not in Photoshop, is the Z dimension—the depth dimension in which camera, light, and position can be changed. Once an image is photographed and is in Photoshop, you cannot change a great many of these important visual properties. So you need to carefully plan and photograph with these considerations in mind before launching Photoshop.
Planning the image and choreographing the photography for the masking and compositing process will result in files that are easier to work with and more successful final images. Understanding the fundamental photographic issues to consider when planning a composite, which include the types of backgrounds, lenses to use, your point of view, and lighting considerations, will help you create quality composites. Each of these components is addressed and illustrated in Chapters 4 and 5. The advantage of doing the photography for a specific composite rather than trying to finagle existing files into place is almost immeasurable.
The Deciding Factors
Before you get your camera out and clean the lens, you have to identify and create a hierarchy of the deciding factors, which are any aspects of the shoot that will impact the sequence of tasks or events that lead to a successful composite. Some of these factors are location access, season, weather, light, talent availability, crew availability, and studio access. When we are in the preproduction phase of a project, we’ll examine all these variables from every conceivable angle to arrive at the best, most efficient, and cost-effective solution. So let’s consider the deciding factors for “Runaway Beauty.”
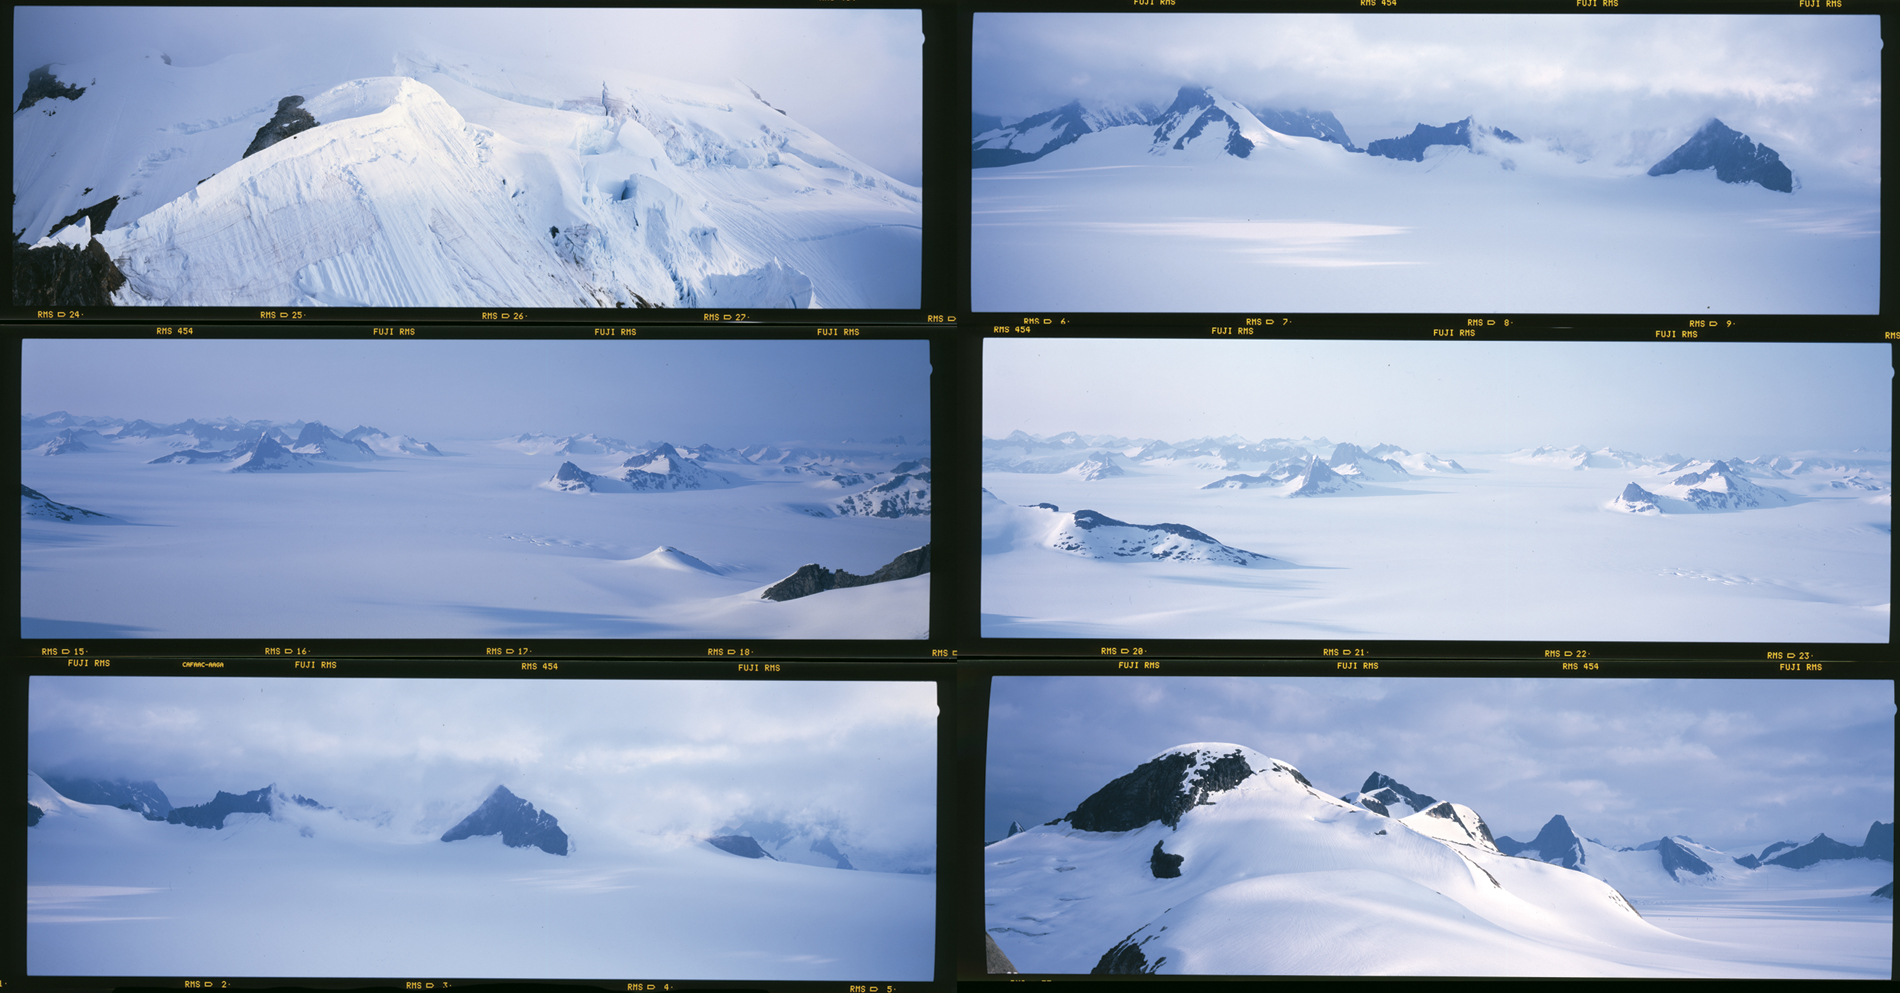
The obvious location for a running horse would be an open Western landscape with cacti and a brown dirt surface. But in this case Jim wanted to create a more unusual image that was set in a place where you would not necessarily expect to see a horse and a beautiful rider. Looking through his library of landscape images, Jim decided on snowy landscapes from Alaska (FIGURE 3.13) to serve as the primary environment. It’s ideal if you have a definite background that you want to use, but it’s also possible to consider several options and decide in which direction you want to go while the project is in process. You may also want to shoot the background in a specific location, waiting for the perfect light, or even shoot an appropriate background in and around the location of the running horse shoot.
© JP
Figure 3.13. Jim took these photographs from a helicopter over the Juneau ice field in Alaska on 6×17-cm film with the Fuji 617 panoramic camera.
With several background options from his Alaska photographs, Jim reconciled the background and environment for the composite, making this factor one of the lesser deciding factors. Having also decided on Hannah Thiem as the model and with the styling team in place, it became apparent that the heroine couldn’t be shot until the horse and background had been established.
So, with a general idea of the background, and some of the variables decided upon, what’s was his next move? As our friend and professional photo illustrator Mark Beckelman once said, “Start with the attribute you have the least control over, such as location, perspective, props, and lighting.” This attribute is known as the controlling factor.
The Controlling Factor
Once you’ve identified the factor you have the least amount of control over, all other components of the image will follow the rule of light and perspective dictated by that element of the composite.
To successfully execute “Runaway Beauty,” we found the most challenging element was the galloping horse. Why is the horse element so difficult to control? Well, there’s the element of motion and the need to stop the action, which dictates that a lot of light is needed to shoot at a high shutter speed and at least at f/11. This means shooting with direct sunlight hitting the speeding subject. Working with animals requires flexibility, patience, insurance, wranglers or trainers, and a well-trained and cooperative animal. For this image, Jim researched ranches and horse farms not only in his own local area, the New York tri-state region, but in other areas around the country. He found out which ranch could rent him not just any horse but a photogenic beauty and also which ranch had a trainer who could run the horse repeatedly until he got the ideal shot. Once you know where you will be photographing your subject, you can decide if that location will be suitable for the landscape environment. Our assumption is usually that it won’t be suitable, which is one of the prime benefits of compositing; it doesn’t have to be. By shooting each element separately, you can capture the ideal photograph for each detail of the composition.
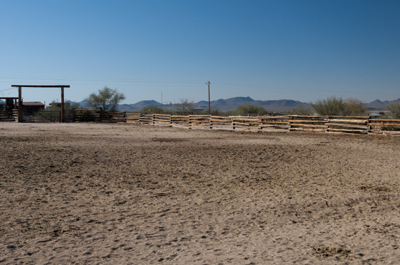
After extensive research, Jim decided to shoot the horse at Red Ranch just outside of Tucson, Arizona. The ranch has a complete facility for animals, trainers, and wide open spaces to shoot a horse in full gallop (FIGURE 3.14). As mentioned earlier, location shoots can be fairly expensive depending on where you’re based and what accommodations you’ll need to make. Jim is based in New York so this shoot involved flying to Tucson, renting transportation, reserving a hotel, and paying the fees for the horse rental and trainer, as well as a local assistant. Working in midwinter is the ideal time to photograph in Tucson, because the weather and light are better at that time of year in the desert. Local New York options were available as well, but the horses looked a bit drab and shoddy compared with those that Red Ranch offered.
© JP
Figure 3.14. A basic scouting shot of the area Jim shot at Red Ranch.
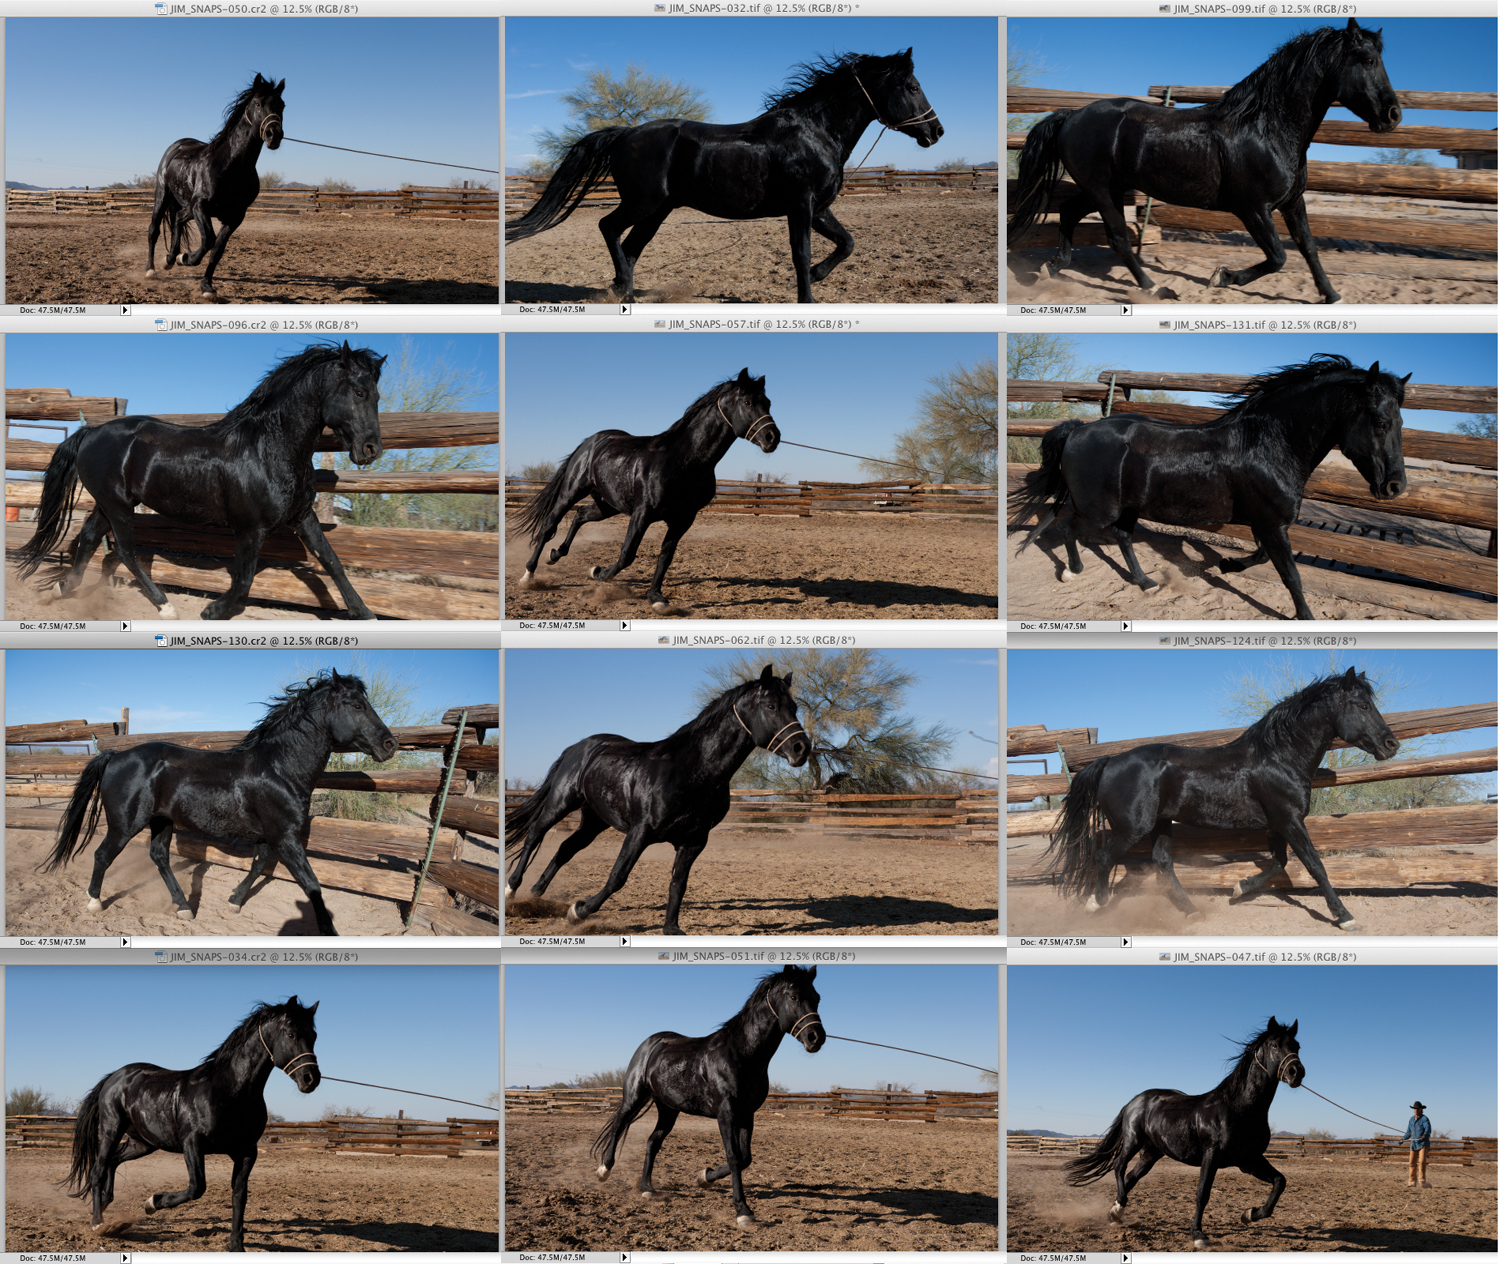
Jim mapped out an area at Red Ranch in which he could photograph the hero horse being led by a trainer (FIGURE 3.15). With his Alaska backgrounds in mind, he shot the horse choosing a light direction that was consistent with the snowscapes. Once Jim captured the horse—so to speak—he then had all the information he needed to light and shoot the studio components for the composite image. While Jim was on location photographing the horse, he realized that even though the horse was galloping at high speed, many of the shots didn’t appear to show the desired dynamic motion he was aiming for. But he kept shooting, knowing that he would combine several captures to form the mythical stallion in his imagination.
© JP
Figure 3.15. A selection of some of the shots taken of the galloping horse.
Shooting to Match
When you have your controlling shot, you can begin to address all the other elements required for the composition. The controlling shot establishes the light direction, the light quality, the shadows, the camera angle, the focal length of the lens, and the perspective of the entire composite. Remember that with photorealistic composites, such as “Runaway Beauty,” you want the final image to look like a single photograph. This means that every component has to match perfectly, or you’ll give away the fact that you are combining images, and the result will look more like a mismatched collage than a single unified photograph. So for each remaining element in the composite, you must match all of these factors as faithfully as possible to keep the correct consistency and enable all the elements to fit together. We’ll go into great detail as to how to accomplish this in Chapters 4 and 5, but for now we’ll address the concept of matching light and perspective in a general manner.
Jim first went through the horse captures and found that there was no single capture that embodied the heroic animal in his imagination. He then set about choosing several images and combining them to form a more perfect beast for the heroine to ride (FIGURE 3.16).
© JP
Figure 3.16. A composite “hero” horse. Can you determine which horse images from Figure 3.15 were used to create the hero?
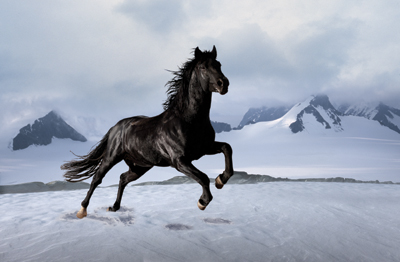
When he finally had the key element of the mythic horse, Jim combined it with the Alaska background, making sure that the chosen background matched the light direction of the horse (FIGURE 3.17).
© JP
Figure 3.17. The initial composite with the horse in a possible snowy background.
This rough composite became the blueprint for how to light and shoot the studio image of Hannah riding the horse. Jim used the rig he constructed for her to sit (FIGURE 3.18), and it matched the proportions of the horse. He then selected the lens and camera angle that made her appear to fit on the horse perfectly. To light her, Jim used a light source that simulates direct sunlight and, using the original horse captures as a guide, he positioned it to match the light direction.
© JP
Figure 3.18. This figure shows the rig Jim used to simulate Hannah riding. Note the position of the light, which matches the sun direction from the horse shoot.
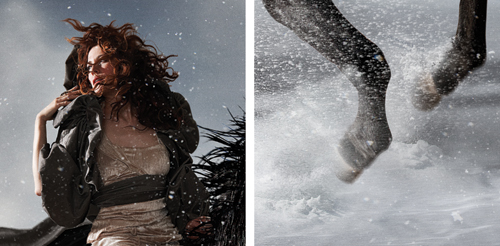
Jim photographed Hannah in a whole range of poses and expressions, styled in several different ways. He then had most of the principal elements for the composite. However, the success of these images resides in the details that you infuse into the composition and which serve to reinforce the reality of the vision—for instance, hoof prints in the snow, bursts of snow where the hooves hit, accurate shadows, a slight blur to the background and to the hooves to create a feeling of speed, flowing fabrics, and extra shots of Hannah’s hair to add as needed (FIGURE 3.19).
© JP
Figure 3.19. Attention to minute details greatly improves the realism of your composite.
The junctions where two elements meet are always great places to incorporate details that will help the transition between those two elements and reinforce the realism of your final image.
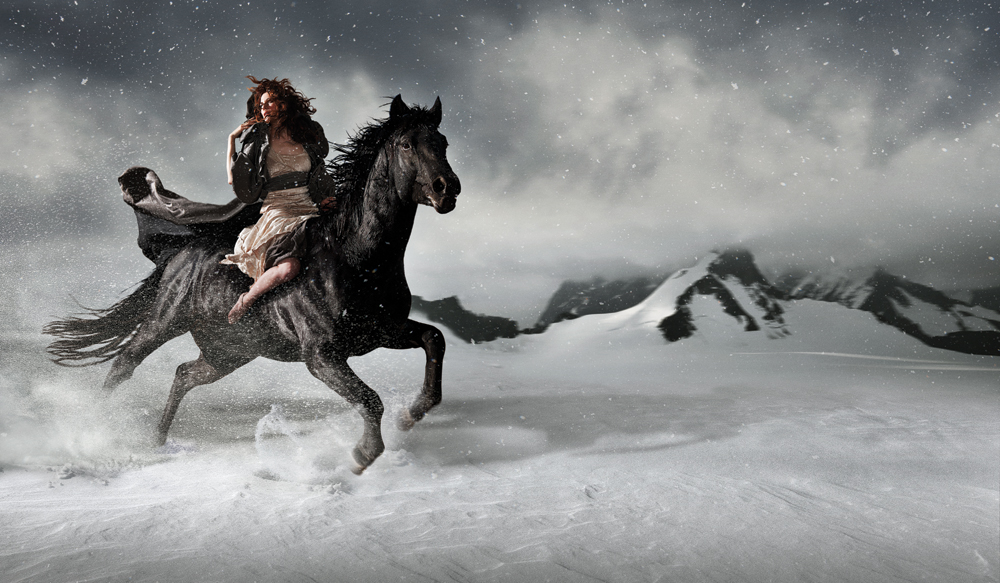
When you have thoughtfully produced all the original photography, you can finally proceed with the final composite. In the chapters that follow we’ll examine in detail all of the steps to build a professional, fully retouched, composite image (FIGURE 3.20).
© JP
Figure 3.20. The finished composite for “Runaway Beauty.”
Creative Reverse Engineering
In this section you’ll look at two finished composite images and follow along as Jim reverse-engineers their production to help you determine how to resolve certain photographic challenges.
Calling the Capitol
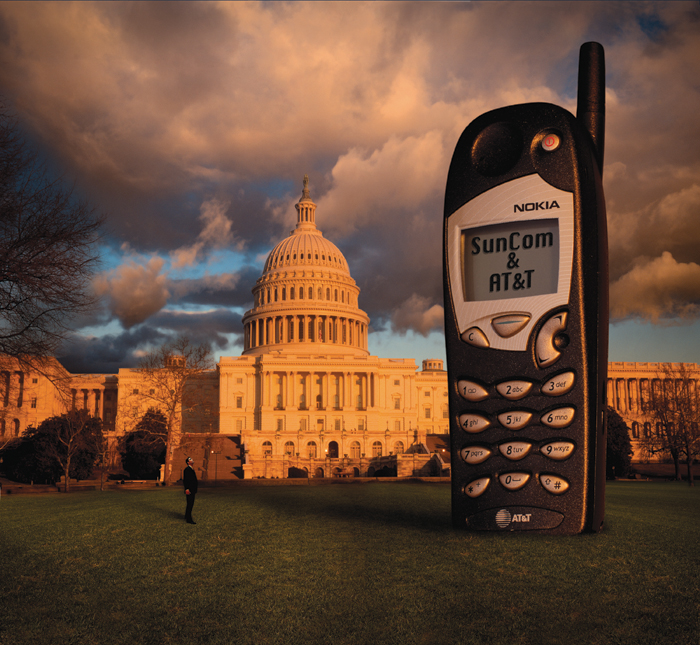
In an ad for Nokia (FIGURE 3.21) the client wanted a giant phone and a male figure in front of the U.S. Capitol building. Because Jim couldn’t move the building, it was the controlling factor. How it was lit and shot would determine how the other elements needed to be captured to successfully come together. So Jim’s first task was to jump on the train to Washington and photograph the Capitol building with lighting that would also look great on the (now ancient-looking) cell phone.
© JP
Figure 3.21. An ad for Nokia using composite techniques.
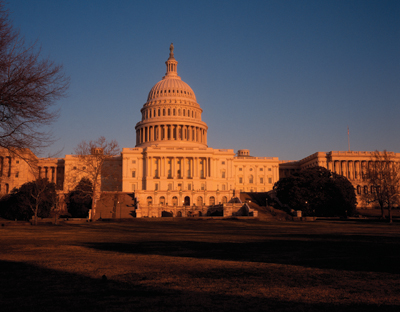
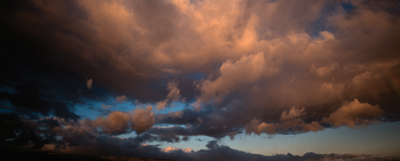
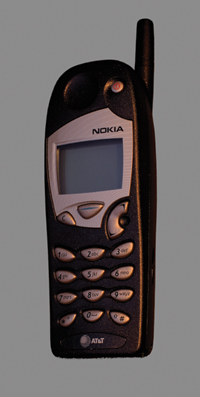
Jim shot through the evening golden hour, shooting various angles of the Capitol. But as you can see in the original (FIGURE 3.22), the foreground had lots of dark shadows and was not suitable to stage in the other elements. But this was not a problem. With his library of outdoor surface images, he quickly found an expansive, grassy field (FIGURE 3.23) for the foreground and a spectacular sky image (FIGURE 3.24). His next step was to photograph the product matching the light direction and color of the background lighting. Another challenge was to choose an angle and a lens that would make the phone appear gigantic in scale when placed into the scene (FIGURE 3.25). By treating the Capitol as a miniature building and choosing a low angle and a wide lens, he achieved that effect. The male figure had to be shot from a distance, also with matching light. The final stage was compositing all the elements. You’ll learn more about how to match light, scale, and perspective in Chapters 4 and 5.
© JP
Figure 3.22. The original photograph of the U.S. Capitol building in Washington.
© JP
Figure 3.23. A grassy field element.
© JP
Figure 3.24. A dramatic sky element.
© JP
Figure 3.25. The client’s product is shot with light matching the Capitol.
Toilet-trained Pigeons
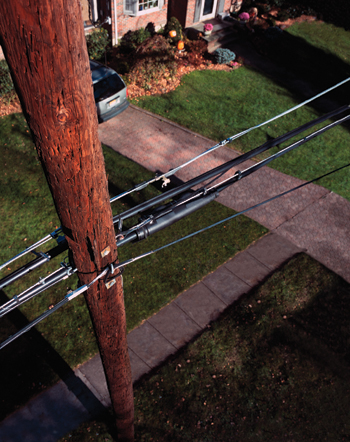
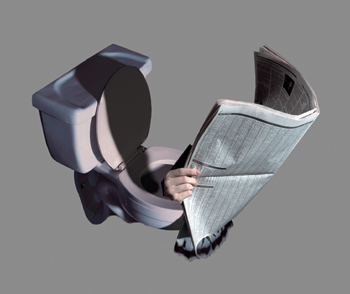
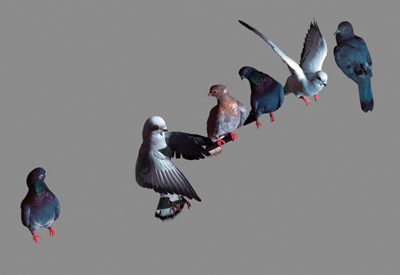
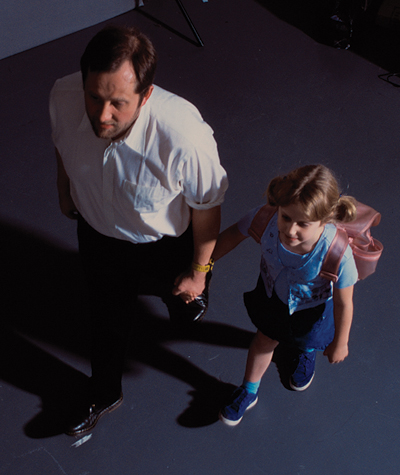
In a humorous ad campaign for a paper towel product, the art director wanted to do a spoof on pigeons on a telephone line with the smart one in the bunch sitting on a mini pigeon toilet reading the paper while the rest curiously look on and unsuspecting victims pass below (FIGURE 3.26). This composite posed quite a challenge. Where do you begin with something like this? The element that you have least control over is not the birds but rather the aerial photograph of the telephone pole. It’s almost impossible to scout locations and get that angle, so you have to scout from the street and imagine what it would look like from up there. You then have to commit to a location, get the necessary permits, rent an aerial lift, and hope that it looks as good from the aerial vantage as you thought it would. Oh, and you have to have good weather too. Well, it all worked out. The pole was captured from that angle (FIGURE 3.27) as well as various details and additional shots of the yards below. With the controlling factor complete, we returned to the studio to photograph the toilet and newspaper (FIGURE 3.28), the pigeons (FIGURE 3.29), and the two people (FIGURE 3.30), and then finalized the composite.
© JP
Figure 3.26. An ad for a paper towel company with an unusual point of view.
© JP
Figure 3.27. The original photograph of the telephone pole shot from an aerial lift.
© JP
Figure 3.28. The original photograph of the toilet and newspaper shot in the studio.
© JP
Figure 3.29. The original photographs of the pigeons shot in the studio.
© JP
Figure 3.30. The original photograph of the father and daughter shot from a ladder in the studio.
Go through magazines and choose an advertisement that shows a composite image with an elaborate production. Try to identify the controlling factor and break down the sequence of steps you would use to produce the image.
Closing Thoughts
Often, when you are inspired to make an image, your impulse might be to immediately embark on the photography. Resist that impulse. We recommend taking the time to plan all the details of the shoot and analyze all the possible options before taking action. Effective, efficient preproduction will save you countless hours of postproduction or reshoots and is well worth the time spent, even if it means delaying the gratification of pressing your shutter release.

