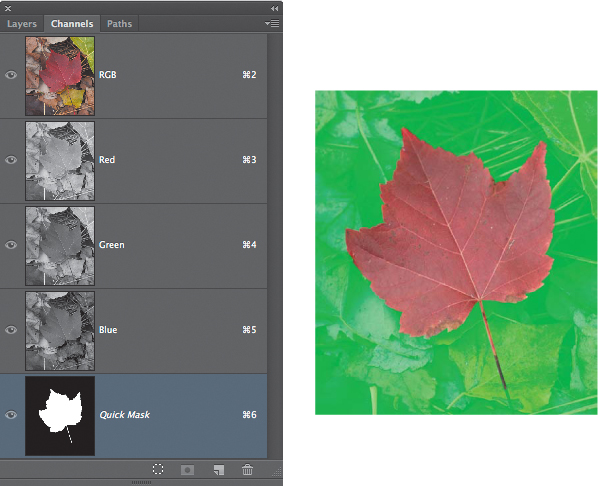
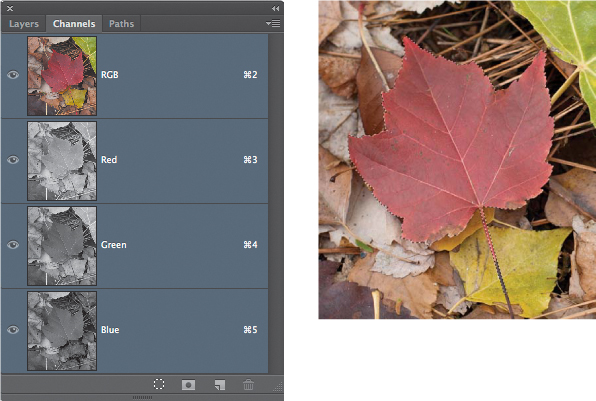
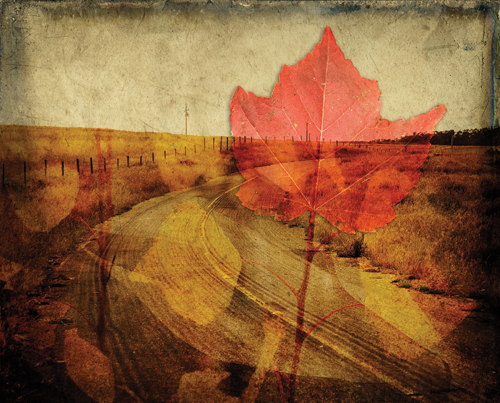
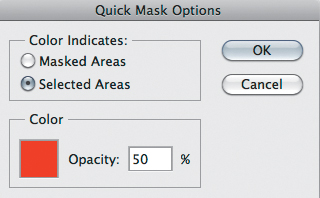
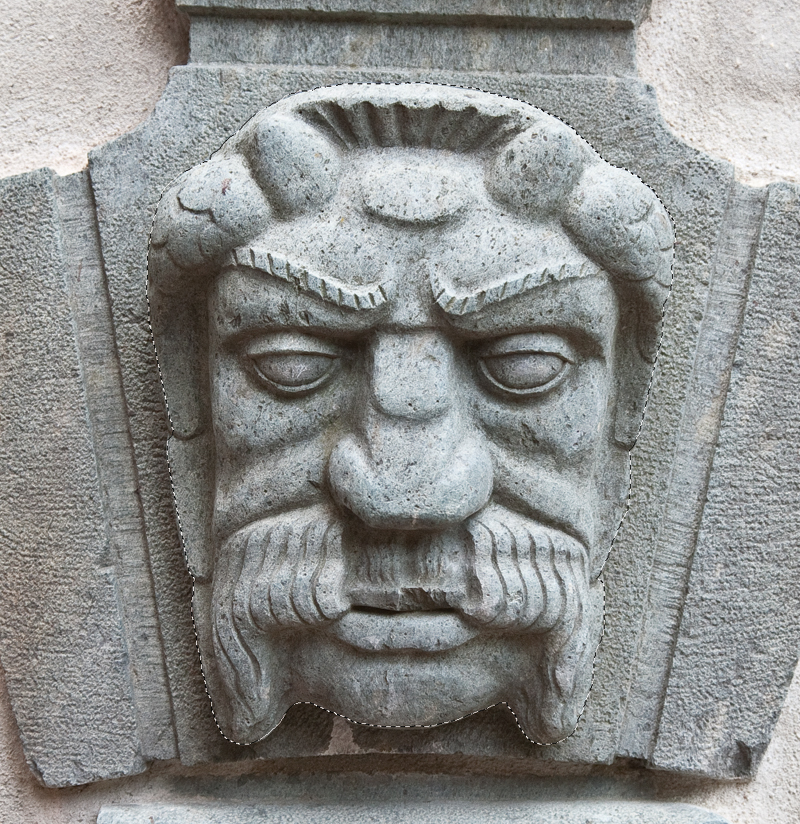
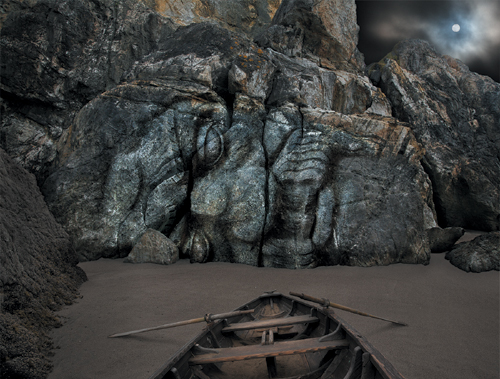
Chapter 6. Selection Fundamentals

An oft-repeated line about Photoshop is that there are usually three to five ways of accomplishing anything in the program. In addition to being a Photoshop “in joke,” there is more than a grain of truth to this statement. We love the fact that there are often multiple ways to approach a task because it provides flexibility in how we work with our images. This flexibility means we can approach each image with a variety of tools and techniques to create intricate selections or seamlessly combine images. But until you learn the pros and cons of each approach, that flexibility can be very frustrating when you’re working under a deadline or trying out something new. You can avoid the frustration by developing a selection strategy.
In this chapter, you’ll learn:
• How Photoshop sees and handles selections
• To analyze an image to determine the best selection method
• To work with a variety of selection tools and techniques
• To modify and refine selections
• The value of combining tools and techniques
The great majority of image composites are based on masking, and masking is based on selections. So before you can venture too far into masking and compositing, it is essential to master the art of making accurate selections.
What Is a Selection?
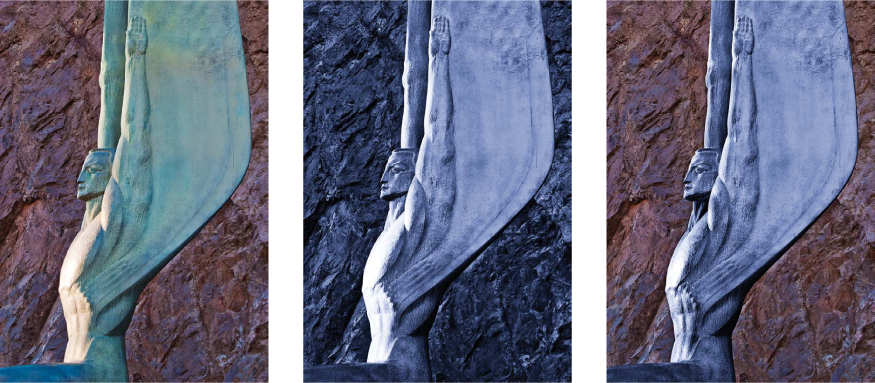
A selection is a way of isolating a specific “local” area of an image so that the changes you make are only applied to that area. In broad strokes, the work you do in Photoshop consists of global edits or local edits. The global approach affects the entire image or active layer. Working locally begins by creating a selection of the part of the image you want to modify. FIGURE 6.1 shows examples of both. Without a selection that targets a change to a specific part of the image, the edit in the figure that adds a blue tone will be applied globally and affect the entire image, or all the pixels in the active layer. By using a selection, you “tell” Photoshop exactly where the change should take place. The changes you make can be used to modify the tonal or color qualities in a photo, such as lightening part of a landscape or changing a section of a color image to black and white to control where a filter effect is applied, as in sharpening eyes or softening skin. Or, you can use selections and masks to blend different images together to create a variety of composites.
© SD
Figure 6.1. Original (left); color effect applied globally (center); and color effect applied locally (right).
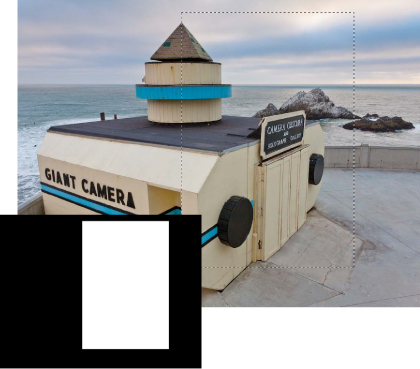
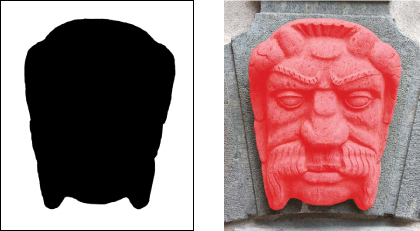
So how does Photoshop “see” a selection? The visible edges of a selection, which are also known as dancing ants or marching ants, signify an active selection. Under the hood, selections are temporary grayscale files that Photoshop references to designate active and inactive image areas. If you want to change a specific image area, you start by selecting it; but internally, Photoshop sees that the active area is white and the inactive, or protected, area is black, as shown in FIGURE 6.2.
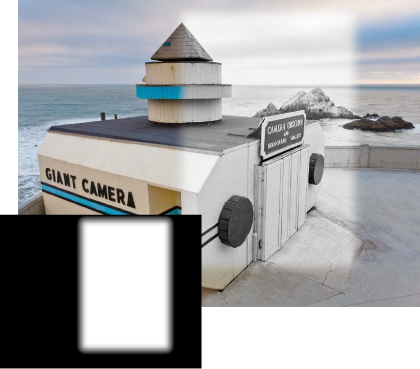
A selection with an abrupt transition from selected (white) to unselected areas (black) will result in a change in the image that has hard, distinct edges. To create a soft and gradual transition around a subject, you can feather a selection to soften the edges. Feathering a selection creates a gradual transition of gray values from white to black. Lighter shades of gray are more selected, and darker shades of gray are less selected. Feathering creates this tonal transition from the white/active to the black/inactive area by blurring the internal grayscale file to create softer edges and subtle transitions (FIGURE 6.3). We’ll address a number of methods to feather or soften a selection and mask in Chapter 7, “The Essential Select Menu” and Chapter 9, “Layer Masks.”
© SD
Figure 6.2. The active selection, and the internal grayscale file that Photoshop creates to record the active (white) and inactive (black) areas.
Figure 6.3. The internal grayscale file that Photoshop creates when a feather of 25 is applied to the active selection. Notice the soft transitions from the modified to unmodified areas in the image.
Types of Selections
Making a good selection—whether it’s selecting a geometric street sign or a finely detailed dandelion seedpod—doesn’t begin with the mouse. Rather, a good selection involves assessing the image and the subject first and then, based on that assessment, deciding on the best selection tool(s) or technique(s) to use. Once you’ve made a good selection of the subject, the fun begins. You can change its color, replace it completely, or add it to another photo to create fantastic images that are uniquely yours.
In the following sections, we introduce the five primary types of selections and explain which tools and techniques to use, as listed in TABLE 6.1. The five primary types of selections are based on shape and form, tone and color, edges and detail, translucency and light, and opposites and differences. To make life interesting, images or elements within images that you want to select often combine more than one of these potential selection characteristics, and you may need to use more than one tool or technique to make the best selection.
Table 6.1. Types of Selections
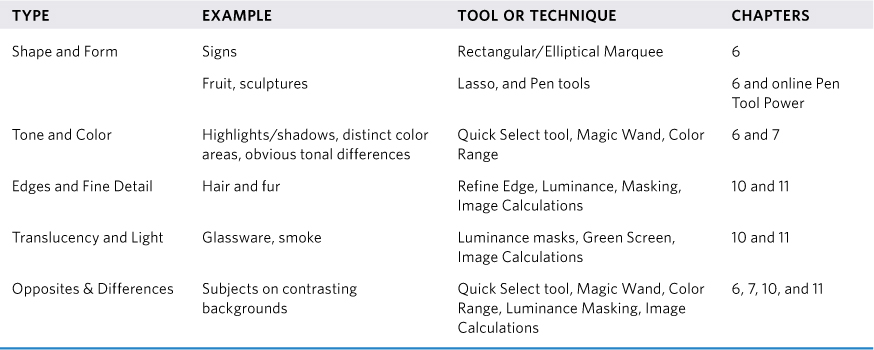
Shape and Form
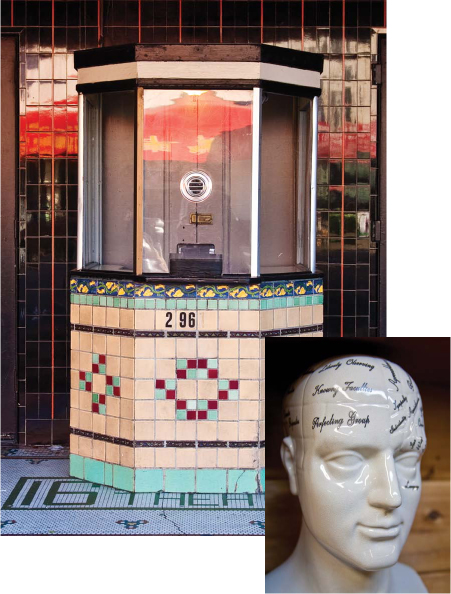
Shape-based and form-based subjects are the easiest to recognize because the subject is usually a clearly defined object. Shape selections are typically geometric and human-made, whereas form selections often have curved and more organic lines. Both shape-based and form-based selections have hard edges and smooth contours (FIGURE 6.4). In addition to shape, you need to study the edge characteristics of the subject—for instance, even though both apples and kiwis are round fruit, the smooth apple is a good example of a form-based selection but the fuzzy kiwi isn’t. Other examples of shape-based selections include buildings, automobiles, and sculptures; other examples of form-based selections include nudes; planets; and sea life, such as fish, porpoises, and whales. We’ll be working with a variety of shape-based and form-based selections later in this chapter and in the online chapter, “Pen Tool Power,” which can be found at the companion website for this book.
Figure 6.4. The old theater box office is a shape-based subject, whereas the curved ceramic head is a form-based subject.
Tone and Color
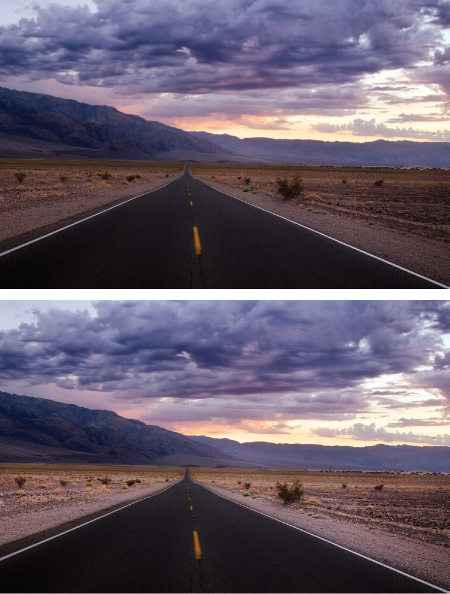
Photographs are a collection of tonal values that combine to create a specific image. For the purposes of making adjustments or for making selections, those tonal values can be divided into three tonal regions: shadows, midtones, and highlights. Photographers often need to select a specific tonal region to improve certain values in an image to perhaps darken a sky or lighten a dark landscape. For example, to make the desert highway stand out more in FIGURE 6.5, Seán used a selection with an adjustment layer to lighten the area on either side of the road.
© SD
Figure 6.5. Lightening the area on either side of the road makes it stand out more and strengthens the strong perspective element in the image.
Color selections can be based on regions that are distinct due to a clear difference in color between the area you are selecting and the rest of the image, or by selecting all instances of a specific hue throughout the entire image. Although they may seem straightforward, working with color selections requires a keen eye and an understanding of how light bounces and reflects onto the image subject and the image environment. Making selections based on color and tone is addressed later in this chapter, and in Chapter 10, “The Power of Channel Masking.”
Fine Detail and Complex Edges
For some images, photographers may need to select fine detail and intricate edges, but when they try to select a model’s hair, they often feel like tearing out their own! Some of the more challenging subjects to select are people (FIGURE 6.6) or animals with fine hair; winter tree branches; soft-edged objects, such as motion-blurred automobiles; and images with a shallow depth of field, as shown in FIGURE 6.7. No matter what the purpose is for the selection or mask that you are creating, the key to creating a selection of fine edges is to preserve the look and feel of the original edges in the image. The Refine Edge dialog, one of the most useful tools for perfecting the selection of a complex and delicate edge, is covered in Chapter 7, and additional coverage of making detailed selections using channels is also found in Chapter 10.
© KE
Figure 6.6. Selecting the intricate edges of fine hair can be challenging.
© SD
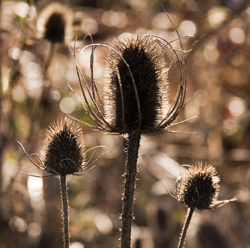
Figure 6.7. Maintaining accuracy on selections that include hard and soft edges requires a good eye and careful attention to detail.
Translucency and Light
Translucency and light are also challenging selections to make. The flowing veil of a bride’s wedding dress, a wisp of smoke, or the transparency of a beautiful crystal glass all need to be selected while maintaining the delicate characteristics of the subject, as well as the areas of the scene that are often visible behind the subject. FIGURE 6.8 is a beautiful composite by Mark Beckelman that illustrates the refreshing quality of natural spring water. Can you see how the water is flowing in and around the bottle? We’ll be working with making similar selections and images in Chapters 10 and 11.
© Mark Beckelman
Figure 6.8. Working with clear objects and translucent materials presents a number of selection and masking challenges.
Opposites and Differences
Opposites and differences are selections in which you select the parts of the image you don’t want, and then inverse the selection to change it to a selection of the items you do want. For example, look at FIGURE 6.9: Would it be easier to select the complicated palace roof with all of its little towers and spires or to select the blue sky? In this case, you can achieve a more precise selection quicker by selecting the smooth blue sky and then inversing the selection. Working with opposites and differences is just one example of learning to think like Photoshop, and we’ll address this later in this chapter and also in Chapter 7.
© SD
Figure 6.9. Selecting the opposite is often quicker than selecting the actual object.
You may be wondering why we’re spending so much time and so many pages on selections when the book is called Photoshop Masking and Compositing. Well, it really should be titled Photoshop Selections, Masking, and Compositing, but that is simply too many words to fit onto the spine of the book. And when you get right down to the heart of the matter, a selection is a mask, just in a different form. Making appropriate and accurate selections is an essential Photoshop skill that may not seem as exciting as creating a surreal illustration, but the great majority of composites start with the artist isolating and selecting the individual image elements before bringing them together.
How you take the original photograph can make or break the ease and quality of the selection. Planning the lighting and background are essential considerations, as addressed in the “Expose: Photography for Compositing” section of this book.
Browse through some of your own images, or a photography sharing or portfolio website, such as Flickr or 500px, and study the images you see. Imagine that you need to make selections of objects or areas in these photos, and then try to identify which of the five categories the hypothetical selections fit into: Shape and Form, Tone and Color, Fine Detail and Complex Edges, Translucency and Light, or Opposites and Differences.
Essential Selection Tools
There are many ways to make selections in Photoshop. Exploring and explaining those methods in detail is one of the goals of this book, because a good mask often begins with a good selection. The selection tools, which are found near the top of the Tools panel, are the most straightforward way to begin a selection. They offer a range of functionality that can be adapted to a variety of selection tasks. In this section we’ll discuss the Rectangular and Elliptical Marquee tools; the Standard, Polygonal, and Magnetic Lasso tools; the Quick Selection tool; and the Magic Wand. The Pen tool is another important selection tool found in the Tools panel, but because it is such a precise and specialized selection tool, we’ve dedicated an entire web-based chapter to it. Check out the book’s companion website at www.photoshopmasking.com.
Rectangular and Elliptical Marquee Tools
The Rectangular and Elliptical Marquee selection tools have been in the Photoshop toolbar since version 1.0. Although their functionality is limited in just what you can select with them, they are ideal tools to use when selecting geometrically shaped objects, such as circles, balls, and ovals, and simple rectangular shapes, such as certain signs, doors, and windows (FIGURE 6.10).
© SD
Figure 6.10. Geometric-shaped signs are ideal objects to select with the Rectangular and Elliptical Marquee tools.
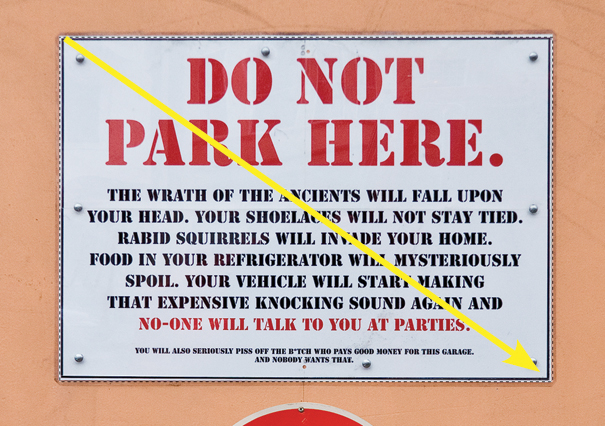
The Rectangular and Elliptical Marquee tools work by establishing an origin point where you click with the mouse and then expand the selection from that point as you drag. With no keyboard shortcut modifiers (more on those shortly), the click point becomes one of the “corners” of the selection. For example, to make a selection of a rectangular sign with the Rectangular Marquee tool, click in the upper-left corner and hold the mouse button while dragging diagonally down and over to the bottom-right corner, as illustrated in FIGURE 6.11. Starting in the same corner every time can help establish a consistent way for using the tool, allowing you to concentrate on the selection.
Figure 6.11. Clicking and dragging from the upper-left corner to the lower-right corner to select the sign.
Here are the essential keyboard commands for the Rectangular and Elliptical Marquee tools:
• To create a perfect square or circle, press the Shift key while dragging.
• Press Option (Alt) to start the selection from the center.
• Press Option+Shift (Alt+Shift) to draw a square or circle from the center of an object.
• Press the spacebar while dragging out a selection to temporarily pause the selection so you can reposition it (keep the mouse button down as you do this). Release the spacebar to resume the selection.
Fine-tuning a Marquee selection
If you miss the exact area you want to select, you have a number of options:
• Click either inside or outside the inexact selection to deselect it and try making the selection again. Pressing Command+D (Ctrl+D) also deselects the active selection.
• As long as you still have a selection tool active, you can use the arrow keys on the extended keyboard to nudge the active selection into position one pixel at a time. Pressing Shift+arrow keys moves it in ten-pixel increments.
• Transform the selection to fit the position, shape, and angle by choosing Select > Transform Selection, which adds a transform boundary with eight handles and a center point:
![]() ch6_no_parking.jpg
ch6_no_parking.jpg
1. Grab a handle to pull or push the selection outline into place.
2. To rotate the selection, move the mouse outside of the Transform bounding box by any corner until the cursor becomes a curved arrow icon, hold down the mouse button, and pull in the direction in which you want the selection to rotate.
3. By default, the rotation pivot point is in the center of the Transform bounding box. You can click and drag on this point to move the rotation point elsewhere inside or outside the bounding box. This is useful for more precise rotation moves. To return the rotation pivot point to the center again, drag it back to the center. When it gets close to the original center, it will automatically snap back into place.
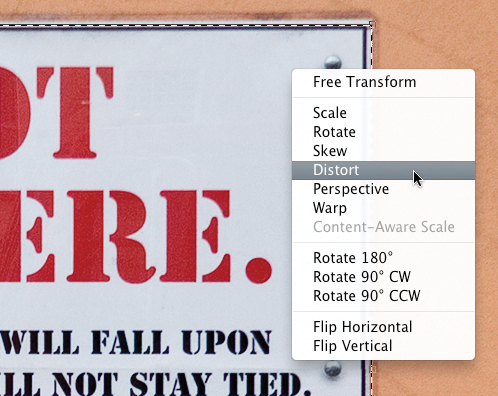
4. Control-click (right-click) near any of the handles to bring up the context menu (FIGURE 6.12) to scale, rotate, skew, distort, apply perspective, rotate in exact increments, or flip the selection.
Figure 6.12. The context menu gives you access to all the controls of the Transform Selection command.
5. When you are satisfied with the transformed selection, press Return (Enter) to apply the Transform Selection.
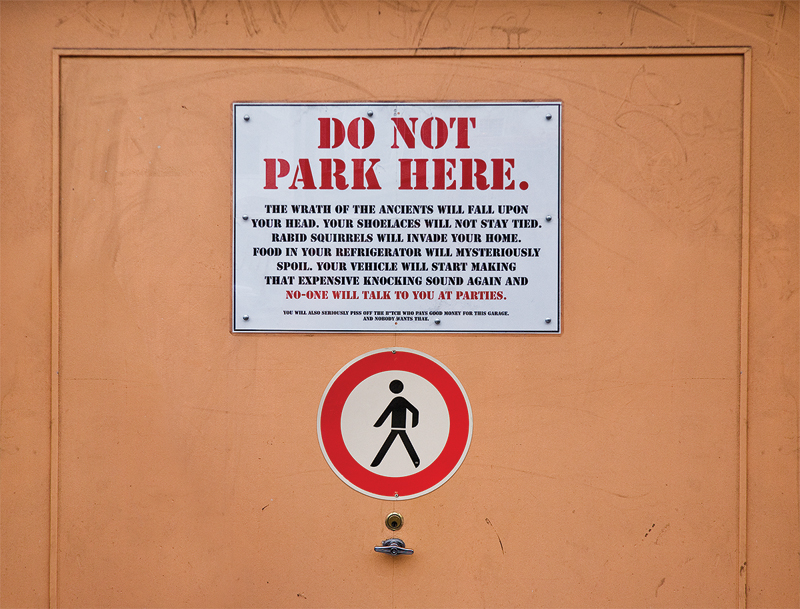
In the example of the no parking sign, Seán used the Distort controls to make the selection fit the slightly uneven angle and shape of the sign. To further refine selections, see “Adding, Subtracting, and Intersecting Selections,” later in this chapter.
If your Marquee selections have unwanted rounded corners or are not shaped correctly, check the Options bar. Often, a previously dialed-in Feather value, Fixed Ratio, or Fixed Size style can interfere with making rectangular selections.
The secret identity of the Elliptical Marquee tool
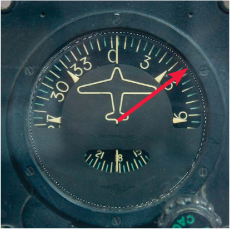
The Elliptical Marquee tool, which is grouped with the Rectangular Marquee tool, is the undercover agent of the selection tools. Despite its outward appearance as an elliptical tool, it is really the Rectangular Marquee tool in disguise. The reason we’re blowing its cover here is to help you understand it better. Treating it like the Rectangular Marquee with extremely rounded corners makes it easier to use. Complete the following two exercises using the altimeter and globe images to better understand how the Elliptical Marquee tool works.
![]() ch6_altimeter.jpg
ch6_altimeter.jpg
1. Select the Elliptical Marquee tool, position the mouse at the center of the altimeter just below the plane’s tail, press Shift+Option (Shift+Alt), and then click and drag straight up toward the top center part of the gauge. Notice how small and tight the circle is and that you’re pushing without a lot of results.
2. Release the mouse first (and then the Shift and Option [Alt] keys), and click outside the selection to deselect it.
3. With the Elliptical Marquee tool, position the mouse at the center of the altimeter, press Shift+Option (Shift+Alt), and then click and drag up and over to the upper-right or upper-left corner (FIGURE 6.13). Notice how quickly and easily you can draw the circle.
© SD
Figure 6.13. Starting in the center and dragging diagonally toward the “invisible” corners with the Elliptical Marquee tool lets you make a round selection very easily.
When using the Elliptical Marquee tool, work diagonally from corner to corner, or from center to corner, for the best results.
Selecting circles and ovals without the guesswork
Sometimes, placing guides in the image can help you create more precise selections of certain objects. Here’s an example of how to do this.
![]() ch6_globe.jpg
ch6_globe.jpg
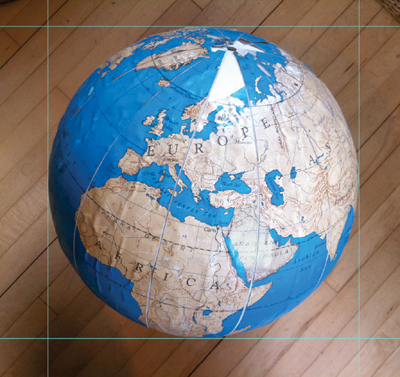
1. Choose View > Show Rulers. Click in the rulers and drag out four guides that just touch the four outermost curves of the elliptical object you want to select (FIGURE 6.14). If you need to reposition the guides after you have placed them, use the Move tool to drag them into position.
© SD
Figure 6.14. Framing the circle or oval with guides can help to make an accurate selection fast and easy.
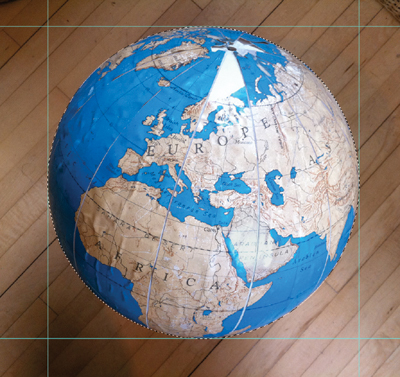
2. With the Elliptical Marquee tool, click the upper-left intersection of the guides and drag down to the lower-right intersection (FIGURE 6.15). (To see a more precise cursor that is easier to line up with the guides, press the Caps Lock key on the keyboard.)
Figure 6.15. Start at the upper-left intersection of the guides and drag down toward the lower-right intersection.
3. If necessary, fine-tune the selection by choosing Select > Transform Selection to scale and shape the selection outline. Control-click (right-click) any of the handles to show the context menu and access all of the possible controls. Press Return (Enter) or click the check mark button in the Options bar to apply the transformation.
When using the Elliptical Marquee tool with guides, choose View > Snap to > Guides to help keep the selection within the boundary defined by the guides.
Rectangular and Elliptical Marquee tool options
The Options bar (FIGURE 6.16) contains all the settings for controlling the active tool. The three state-change buttons on the left side of the Options bar are addressed in “Adding, Subtracting, and Intersecting Selections,” later in this chapter. Here we’ll discuss the options that are relevant to the Rectangular and Elliptical Marquee tools—Feather, Anti-alias, and Style.
Figure 6.16. Before using a tool, check the Options bar to see if the settings are right for the task.
The choices in the Options bar affect the next selection you create. They have no effect on a selection that is already active in the image.
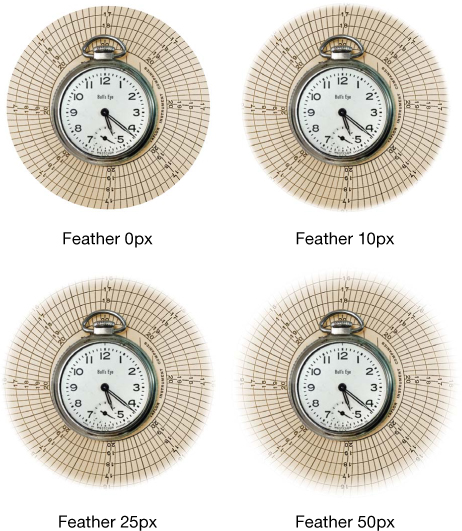
Feather. Feathering softens a selection edge on the inside and outside of the initial selection boundary. As discussed earlier in this chapter, Photoshop sees all selections as grayscale channels: Black represents unselected areas, shades of gray are partially selected areas, and white areas are fully selected. Feathering creates a transition between the white and the black areas. The lower the feather value, the smaller the transition; the higher the feather value, the larger the transition. The file resolution also affects the visual effect a feather has. For example, if you apply a feather of 10 to a selection on a low-resolution, web-graphicsized file, it will have a very visible effect. If you use a 10-pixel feather on a high-resolution 100 MB or larger file, that feathering will have much less visual impact.
In FIGURE 6.17 four different oval-shaped cutouts of a still life were made with the Elliptical Marquee tool with Feather settings of 0, 10, 25, and 50. The higher the feather value, the softer and more gradual the transition is to transparency.
© SD
Figure 6.17. By changing the Feather value, you influence the edge quality of selections. The Feather values in these examples are 0, 10, 25, and 50.
To feather or not to feather? When using the Marquee tools, we recommend you don’t use the Feather control in the Options bar because you cannot see the actual effect of the feathering on the selection. All you can do is guess at what the correct value might be. When you gain some experience with this option, you’ll develop a sense for how much is enough (and, as stated earlier, this is always influenced by the image size and resolution), but in essence you are flying blind. It is best to use the Refine Edge command to visually control the amount of feather that is applied. You can access the Refine Edge dialog through the Select menu or via a button that appears in the Options bar for the selection tools. We’ll discuss the Refine Edge dialog in more detail in Chapter 7. Once you have turned a selection into a layer mask, you can use the Masks panel to quickly and easily apply a feather to the mask. We’ll look at the Masks panel in Chapter 9.
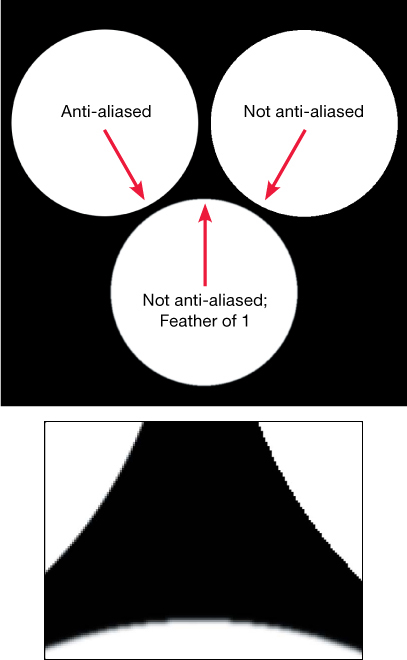
Anti-alias. When using the Elliptical Marquee and Lasso tools, the Anti-alias check box is selected by default. Anti-aliasing adds a subtle transition between pixels when working with these tools. Without this subtle transition, curved or diagonal edges will appear hard and jagged. It’s important to understand that anti-aliasing is not the same as applying a feather. FIGURE 6.18 illustrates this with three circular shapes created with the Elliptical Marquee tool. The left circle was made with Anti-alias turned on and a feather value of 0. The right circle was made with Anti-alias turned off. The bottom circle was made with Anti-alias deselected but with a 1-pixel feather applied after the selection was made. As you can see in the close-up in Figure 6.18, the initial anti-aliased selection is smooth, the second selection is jaggy, and the feathered selection is quite soft, but it still reveals some of the original jagged qualities of the aliased selection. For photographic images, it is definitely best to leave the Anti-alias option turned on. The only time we turn off Anti-alias is when we’re working on tiny image icons or thumbnails, or when designing web or multimedia graphics that require precise color placement for extremely low-resolution files.
Figure 6.18. With careful examination, you can see the differences in edges when anti-aliasing or feathering is applied.
Style. When the Rectangular or Elliptical Marquee tool is active, you have a choice of three styles—Normal, Fixed Ratio, and Fixed Size—to control the shape and size of the next selection. Normal lets you freely draw a rectangular or elliptical selection of any shape or size. When you change the style to Fixed Ratio, the default is set to a width of 1 and a height of 1, which is a perfect square or circle. By changing the aspect ratio to 3 for width and 2 for height, you will create a selection with that aspect ratio when you click and drag the Rectangular Marquee. This may seem a bit obscure, but many photographers know that 3:2 is the aspect ratio for both 35mm film and the image proportions for many digital cameras that are based on 35mm SLR designs. To select the area for an 8×10-inch print, set the width to 10 and the height to 8 (or use the lowest common dominator of 5 and 4). The small arrows between the numeric fields let you switch the values for width and height.
Fixed Size is very useful for creating a precisely sized selection. For example, if you need a rectangular selection that is exactly 4×5 inches, you would enter 4 in and 5 in. With the Marquee tool active, click the mouse in the image and a selection will be created that is exactly 4×5 inches in size. The Fixed Size width and height will default to the same unit measurements (e.g., pixels, inches, centimeters) that are currently set for the ruler unless you type the abbreviations after the number value, as shown in TABLE 6.2.
Table 6.2. Fixed Size Terms and Abbreviations

An easy way to change the ruler units is to click the plus symbol next to the X, Y coordinates section in the Info panel. If a ruler is visible, you can also double-click in the ruler to open the Ruler Preferences, where you can change the measurement units.
The Lasso Tools
Although the Rectangular and Elliptical Marquee tools are certainly useful for creating selections of simple shapes, such as rectangles, squares, circles, and ovals, not all items that need selecting fall within those parameters. For dealing with irregular shapes or straight-sided objects, the three versions of the Lasso tool offer selection functionality that is more versatile.
The standard Lasso tool allows for the creation of freeform selections, and the Polygonal Lasso is ideal for creating straight-sided selections of objects with those characteristics. Although the standard Lasso comes first in the Tools panel, we’ll begin our exploration of these tools with the Polygonal Lasso to continue our journey of making geometric selections. The Magnetic Lasso can detect differences in edge contrast that make it well suited for defining a selection where there is a clear color, brightness, or contrast difference between the area you want to select and the rest of the image. Because the Magnetic Lasso is a selection tool that relies on tonal and color values to make selections, we’ll discuss it later in this chapter in the section “Tone and Color Selections.”
Selecting straight-sided objects with the Polygonal Lasso
The Polygonal Lasso tool is nested under the standard Lasso in the Tools panel. It allows you to create selections by making straight lines between clicks of the mouse. When you click the mouse, it anchors the line at the present point, letting you change directions. If the object you are selecting has a combination of straight and curved or irregular edges, press and hold Option (Alt) to temporarily change the Polygonal Lasso to the standard Lasso tool (be sure to keep this key pressed for as long as you want the standard Lasso functionality). To return to the Polygonal Lasso tool, release the Option (Alt) key. Apart from creating straight-sided selections, the biggest difference between the Polygonal Lasso tool and the standard Lasso tool is that if you let go of the mouse, the Polygonal Lasso doesn’t race back to your starting point; instead, it stays connected to the last place where you clicked to anchor the lasso line. To close the selection, you can either return to the point where you began and click on the origin point (look for the small circle that appears on the cursor icon) or double-click anywhere in the image; Photoshop will close the selection by drawing a straight line between the first and last points. If you want to cancel the current selection process, just press the Esc key.
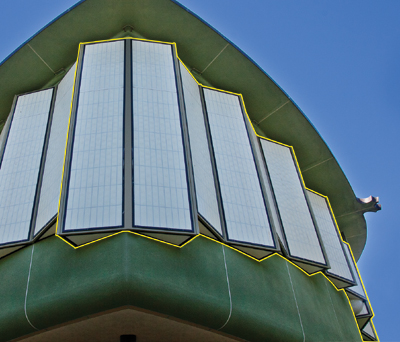
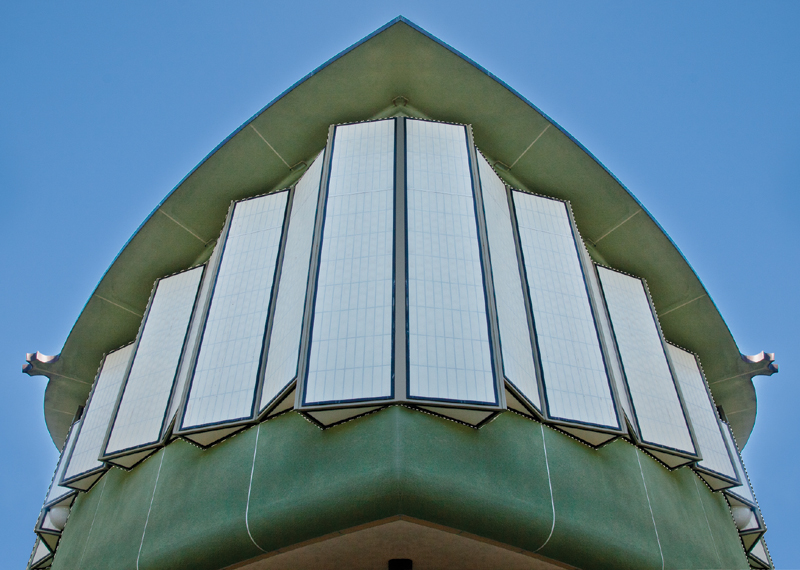
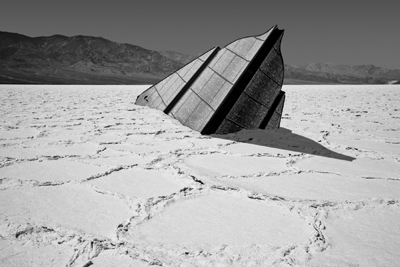
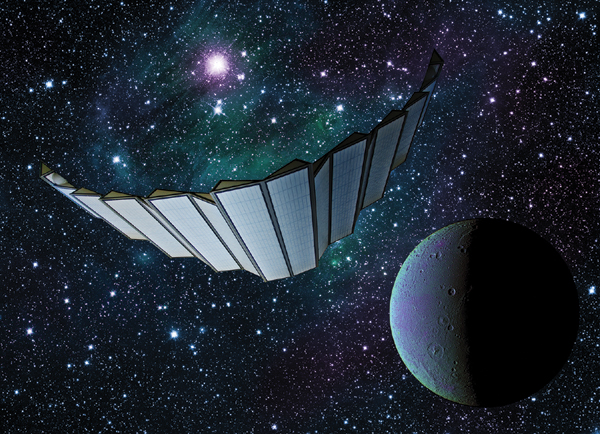
FIGURE 6.19, a photograph of the Japanese Art Pavilion at the Los Angeles County Museum of Art, shows an ideal use for the Polygonal Lasso tool. The objective here is to make a selection of the outer area of the window structure. This part of the building is designed to resemble shoji screens, but when removed from the context of the original architectural image, it also works in composites with a definite science fiction theme, either as a spacecraft or a mysterious desert portal (FIGURE 6.20). That’s one of the fun parts of making composite images—transforming elements from photographs into something entirely different.
© SD
Figure 6.19. The Japanese Pavilion and the isolated window structure.
© SD
Figure 6.20. The window from the Japanese Pavilion image repurposed as a spacecraft and a mysterious portal in the desert.
In the next exercise you’ll use the Polygonal Lasso to trace a selection along the outer gray edges of the window structure and save the selection as an alpha channel. You’ll separate this into two different selections. This exercise provides a good example of additional selection and alpha channel functionality, such as how to make additive and subtractive corrections, as well as combining two alpha channels into a single selection. If you make a mistake along the way in terms of accurately selecting the edge of the window frames, just keep going. When the selection is complete, you can return to fix the areas where the selection still needs work.
To work efficiently with the Polygonal Lasso:
• Press Command+Option+0 (Ctrl+Alt+0) (zero) to view the image at 100%. Command+0 (Ctrl+0) will fit the entire image on the screen.
• To see more detail, press Command++ (Ctrl++) to zoom in further.
• Press Caps Lock to switch to a precise, crosshair cursor (turn off Caps Lock to restore the standard tool cursor).
• If a part of the image that you need to see is not visible on the screen, press the spacebar to temporarily turn the Polygonal Lasso into the Hand tool and drag the image toward the center of the monitor to see more of the photo. Releasing the spacebar returns to the previously active tool.
• Pay attention to the angles of the lines you are tracing. Whenever a straight line has a change in direction, even if it is very slight, you will need to click to anchor the lasso line at that point before following the new angle.
• If you accidentally lose a selection, you can choose Edit > Undo or Select > Reselect, or the History panel to restore the selection.
![]() ch6_japanese_pavilion.jpg
ch6_japanese_pavilion.jpg
1. Place the image into a screen mode that centers the image on a field of gray (this is not vital to the selection process for this particular photo, but it does present an uncluttered view of the Photoshop interface; for some selection tasks, it is an important part of the process). Pressing F on the keyboard will cycle through the three screen modes, or you can choose View > Screen Mode > Full Screen Mode with Menu Bar). Select the Polygonal Lasso tool, and in the Options bar, make sure that the Feather value is set to zero.
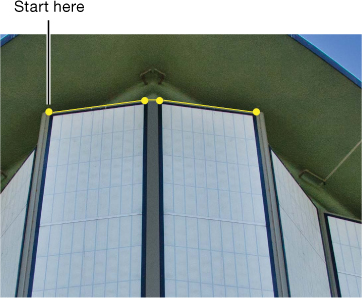
2. Click in the upper-left corner of the right panel of the center window. Release the mouse button, and move the cursor to the center of the right and left panels where there is a slight change in direction. Click once, move the cursor a short distance to span the gray center border, and click again. See FIGURE 6.21 for a diagram of these opening moves.
Figure 6.21. The yellow dots show the first four click points for the Polygonal Lasso selection of the window structure.
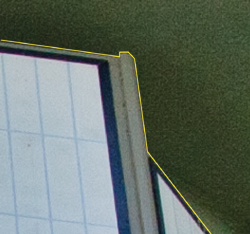
3. Continue to the upper-right corner of the center-right window panel, and click again to anchor the line. Proceed up and over the small bump at the top of this corner, down the next edge, and then down diagonally to the right (FIGURE 6.22). Zoom in for a closer view if you need to; zooming in and out will not affect the in-progress selection. If part of the image is off the screen, press the spacebar to turn the Polygonal Lasso into the Hand tool and drag the image toward the center of the monitor so that you can see more of the image in the direction that you need to go.
Figure 6.22. The yellow line shows the path of the Polygonal Lasso tracing around the small bump at the top of the center-right panel.
4. Continue in this way until you have brought the lasso line down to the edge of the image at the far lower-right corner of the window structure. To finish this first part of this selection, trace along the lower edge of the window structure and then back up along the left side of the center-left panel until you reach the point on the upper-left edge where you started. Position the cursor directly over the starting point, and click to close the lasso line and create the selection (FIGURE 6.23).
Figure 6.23. The initial selection includes the two center panels and the right side of the window screen structure.
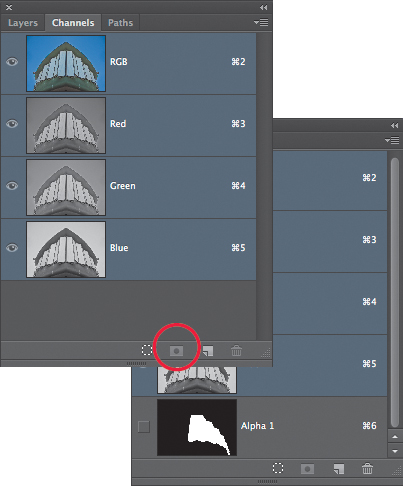
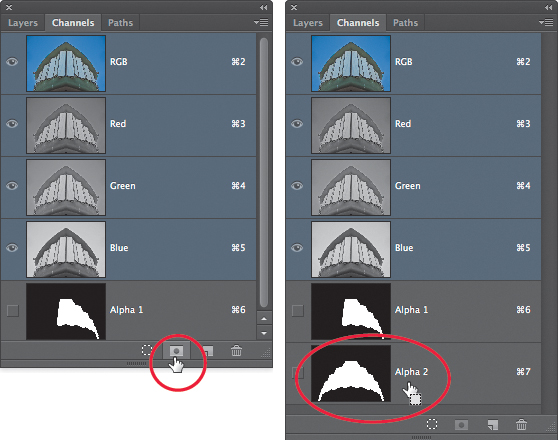
5. Before you continue to add the rest of the window structure into the initial selection, it’s best to save it, which will convert the active selection into an alpha channel that can be used and refined later. Saving a tricky or complicated selection as an alpha channel is an insurance policy against having to redo the selection work. Click the Save Selection as Channel button at the bottom of the Channels panel (you can also choose Select > Save Selection) and name it. If you do not give it a specific name, the saved selection appears as Alpha 1 in the Channels panel. White indicates the area that is selected, and black shows the area that is not selected (FIGURE 6.24). Saving an alpha channel of the selection at this point is not strictly necessary, but it does provide a handy backup should you accidentally lose the selection or need to take a break and resume work at a later time.
Figure 6.24. Click the Save Selection as Channel button at the bottom of the Channels panel to create an alpha channel of the active selection.
Adding to and subtracting from selections
Now it’s time to add the left side of the window structure to the first selection.
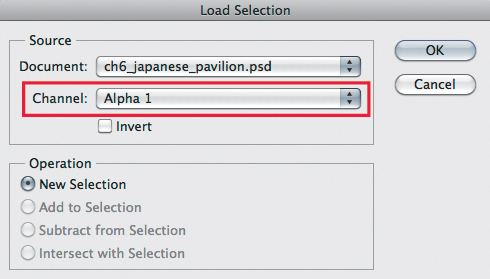
1. The selection of the right side of the window structure should still be active in the image. If it is not, choose Select > Load Selection, and in the Load Selection dialog, choose Alpha 1 from the drop-down Channel menu, and then click OK (FIGURE 6.25). In the Channels panel, the RGB channels should be active, not the saved alpha channel.
Figure 6.25. The Load Selection dialog allows you to restore a saved selection.
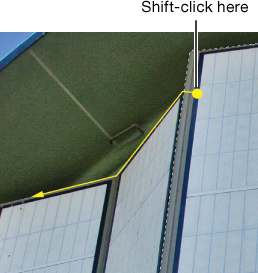
2. To add a new area onto an existing selection, hold down the Shift key and click inside the first selection near the top-left corner to begin adding to it (FIGURE 6.26). The Shift key must be down before you click with the mouse, but once you’ve started the new selection, you can release the Shift key. Use the Polygonal Lasso tool to trace around the area that you want to add until you have selected all of the left side of the window structure. When you get back to the bottom part of the center panel where the first selection is already active, run the lasso line up inside this selection to the top to connect with the origin point of the second selection. When you release the mouse, Photoshop adds the newly selected area to the active selection (FIGURE 6.27).
Figure 6.26. Shift-click inside the active selection to begin adding the rest of the window area to the selection.
Figure 6.27. The finished selection of the entire window area.
3. Double-check the edges to see if any corrections need to be made. Zoom in for a close view (at least 200%), press the spacebar to switch to the Hand tool, and click and drag to move through the image. Inspect all of the edges to see if there are any errors.
If parts of the selection include unwanted areas, use either the standard or the Polygonal Lasso tool to correct this. Hold down the Option (Alt) key to invoke the subtract functionality, and draw a lasso line around the areas to be removed from the existing selection. When you release the mouse, the unwanted area will be subtracted from the selection (FIGURE 6.28). If you see areas that need to be added to the selection, use the Shift key and lasso around the areas that need to be added (keep in mind when modifying a selection that you need to press the modifier shortcut key before you begin clicking and dragging with the mouse). Adding, subtracting, and intersecting selections are explained in greater detail later in this chapter.
Figure 6.28. Correcting an error by subtracting from the selection.
4. When you’ve completed any edits to the selection, save it as an alpha channel by clicking the Save Selection as Channel button at the bottom of the Channels panel. Now when you close the file and save it as a PSD or TIF file, the alpha channel will remain with the image, and you can reactivate it by choosing Select > Load Selection or by Command-clicking (Ctrl-clicking) on the name or thumbnail of the alpha channel (FIGURE 6.29). With a selection of the window structure, you are one step away from copying it and pasting it into another image as a new collage element.
Figure 6.29. Two essential selection shortcuts are clicking the Save Selection as Channel button and Command-clicking (Ctrl-clicking) on the name or thumbnail of a channel to load it as a selection.
In this exercise, you used alpha channels to save the selection at an intermediate step and when the final selection was done. Working with alpha channels is an important part of the masking and compositing process. Whenever you have a selection that is complex, time-consuming to make, or one that you’ll need to access again, it is best to save it as an alpha channel for future use. We’ll cover alpha channels in greater detail later in this chapter and also in Chapters 7 and 10.
Using the Lasso tool
On its most basic level, the standard Lasso is a very straightforward tool to use. Click and hold the mouse button and draw around the object you want to select. When you reach the starting point, let go of the mouse button and Photoshop closes the loop to complete the selection. If you let go of the mouse button before returning to the point of origin, a straight line will be drawn from the current cursor position back to the starting point.
The Lasso tool is perfect for selecting form-based objects with shapes and outlines that are more organic and irregular. Depending on the detail and edge complexity of the object we are selecting, we often regard selections made with the Lasso tool as preliminary selections that will be refined using additional techniques. But for some tasks, the Lasso can create an accurate selection with little need for further tweaking. For the most precision and accuracy for a form-based selection, especially for an object with smooth edges, the primary tool we use most often is the Pen tool, which we explain in the additional web chapter “Pen Tool Power.” The Lasso tool, however, can also be very useful to make and refine form-based selections as described in this section.
Combining straight and irregular Lasso selections
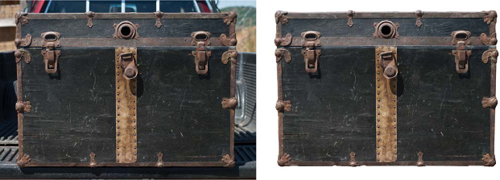
One of the most useful features of the Lasso tool is that you can temporarily access the Polygonal Lasso functionality by using a simple keyboard shortcut. Once you have begun a lasso selection, press Option (Alt) to turn on the Polygonal Lasso feature of clicking point to point to create straight lines. To return to the standard Lasso functionality, click and hold down the mouse button while tracing around the object’s edge. Release the mouse button to return to the Polygonal Lasso behavior. Be sure to keep the Option (Alt) key pressed for the entire operation. With this method, you can use the Lasso tool to select objects that have both straight edges and curved or irregular contours, like the trunk in FIGURE 6.30.
© SD
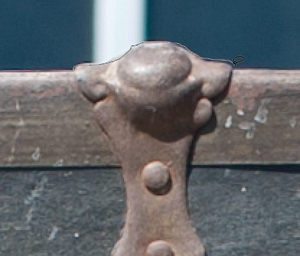
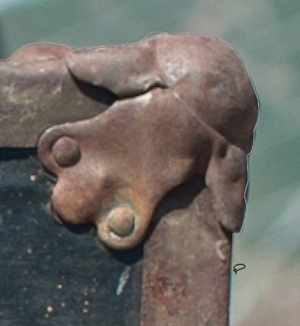
Figure 6.30. The old travel trunk has straight as well as curved or irregular edges.
![]() ch6_oldtrunk.jpg
ch6_oldtrunk.jpg
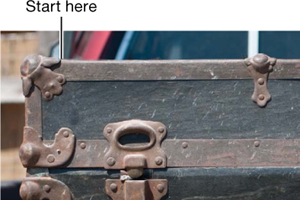
1. Select the standard Lasso tool, and in the Options bar, make sure the Feather value is set to zero. Zoom in to at least 100% (View > Actual Pixels). Press Option (Alt) and click the upper-left corner at the top edge of the trunk, just to the right of the metal corner guard. While keeping the Option (Alt) key pressed, release the mouse button to switch to the Polygonal Lasso, move the mouse to the first edge guard, and click once to anchor the line (FIGURE 6.31). Because this edge of the trunk is not entirely level, you can also trace along it by clicking and dragging in short segments.
Figure 6.31. Start at the upper-left edge of the trunk and work toward the right. Pressing Option (Alt) changes the standard Lasso to the Polygonal Lasso.
2. To trace the rounded edge of this first edge guard, press the mouse button to switch to regular Lasso functionality. When you reach the right side of this edge guard (FIGURE 6.32), release the mouse button to return to the Polygonal Lasso (remember to keep the Option (Alt) key pressed for the entire selection process). Now drag a straight line to the next edge guard on the top, and repeat the procedure until you reach the top-right corner guard.
Figure 6.32. Pressing the mouse button lets you switch back to the standard Lasso to more easily trace around curved or irregular edges.
3. Click and hold down the mouse button, and trace along the curved edge of the top corner guard (FIGURE 6.33), as well as the right edge of the trunk’s lid and down to the first significant straight-edged section on the right side of the trunk. Whenever you reach a section of the edge that has a straight side, release the mouse button to turn on the Polygonal Lasso tool and drag out a straight line. Whenever you reach an irregular or curved area, press and hold down the mouse button, and trace the desired contour with the standard Lasso functionality.
Figure 6.33. Tracing around the upper-right corner guard of the trunk.
4. Continue tracing around the trunk and switching between the Polygonal and standard Lasso functionality as needed. When you reach the point where you began the selection on the top edge of the upper-left corner, release the Option (Alt) key first and then the mouse button to close the lasso loop and create the selection.
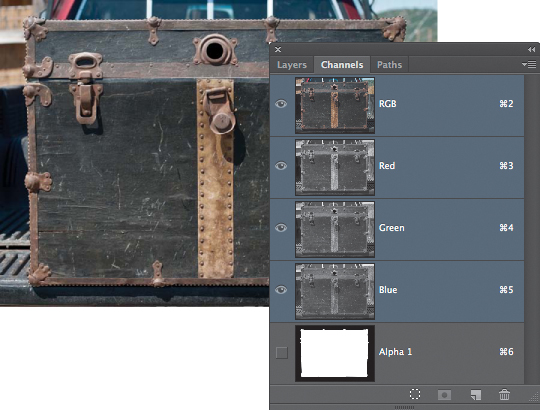
5. Save this selection as an alpha channel by clicking the Save Selection as Channel button at the bottom of the Channels panel or by choosing Select > Save Selection (FIGURE 6.34).
Figure 6.34. The final selection is saved as an alpha channel.
When making a selection that requires careful tracing around a large area, as with the photo of the old trunk, don’t worry about minor mistakes in terms of edge accuracy. Those errors can be corrected after the initial selection is complete. It’s best to get the basic shape selected and then concentrate on perfecting the selection thereafter.
When using the Polygonal Lasso tool, whether directly or by toggling to it from the Lasso tool, you can use the spacebar to access the Hand tool to move the image around the monitor. Additionally, as you reach the edge of the monitor, gently nudge the cursor to the edge of the image and the view will scroll in that direction, revealing more of the image.
Adding, Subtracting, and Intersecting Selections
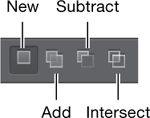
No matter how careful you are following an edge with the Lasso or dragging with the Marquee tool, selections are rarely perfect the first time. To make the best selection, you’ll often need to add or subtract from the existing selection to touch up minor mistakes, or add in additional areas using other selection tools. You can do this by either turning on the corresponding button in the Options bar (FIGURE 6.35) or by using the modifier keys, which is what we prefer to do. We’ve already had a quick look at adding and subtracting with the Japanese Pavilion image, but now we’ll take a closer look at these essential selection techniques.
Figure 6.35. The modifier buttons on the left side of the selection tool Options bar.
With some selections, it is (even for us!) easy to get confused about what’s selected and what isn’t. To see whether an area is selected, move any selection tool into the area in question. If the tool cursor changes to a small white arrow with a dashed rectangle next to it, you are inside the active selection. If the tool icon doesn’t change and looks exactly like it does in the Tools panel, you are outside the active selection.
To avoid inadvertently deselecting the active selection (also referred to as dropping the selection) when modifying a selection, always press the modifier key first, use the tool, release the mouse, and then release the key.
Adding to a selection
If an area you want to be included in the selection is not selected, press the Shift key, draw along the missing contour that you want to add to the selection with the Lasso or Marquee tool, and generously draw into the active selection (FIGURE 6.36). When using the Magic Wand, hold down the Shift key while clicking the areas that are not selected to add them to the selection.
Figure 6.36. To add to a selection, hold down the Shift key, start in the selection, and trace along the desired contour and back into the active selection. The same shortcut key also works for adding to a selection using the other selection tools.
Subtracting from a selection
To subtract from an active area, press the Option (Alt) key while using any selection tool. With the Lasso tool, hold down the Option (Alt) key, draw along the correct contour, and generously encircle the area that is incorrectly selected (FIGURE 6.37). With the Magic Wand, press Option (Alt) while clicking the area to be subtracted.
© SD
Figure 6.37. To subtract from a selection, hold down the Option (Alt) key and circle the unwanted active areas with the Lasso tool. The same shortcut key also works for subtracting from a selection using the other selection tools.
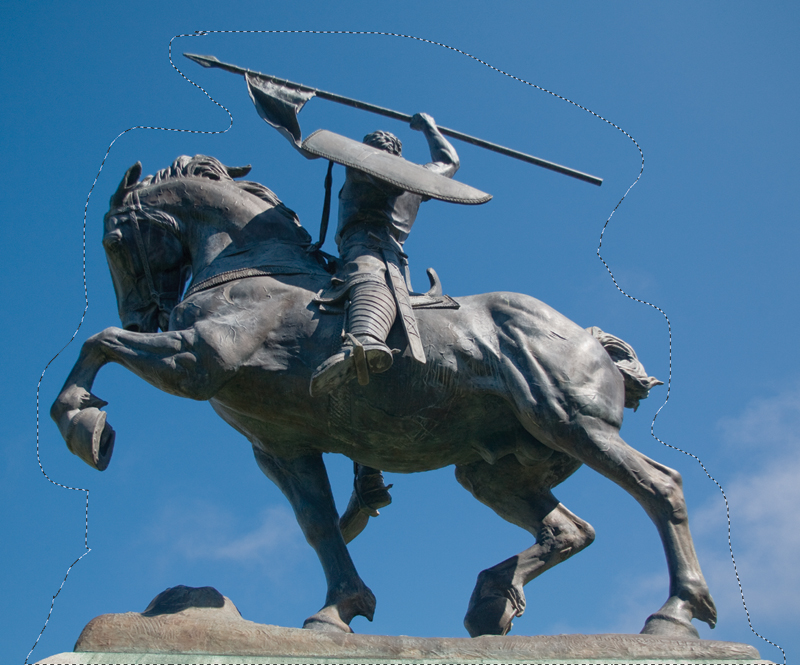
For some types of selections, it is easiest to start off by making a very general selection and then removing the parts you do not want. Consider FIGURE 6.38, which shows a statue in San Francisco. You can quickly isolate this from the sky by roughly outlining the statue with the Polygonal Lasso tool. Then, to subtract the sky but leave the statue selected, switch to the Magic Wand. In the Options bar deselect the Contiguous check box and press the Option (Alt) key while clicking inside the selection on the sky areas (FIGURE 6.39). With only a few clicks, the result is a very accurate selection of the statue. This is a great method to quickly lift and separate objects from uniform and uncluttered backgrounds.
© SD
Figure 6.38. Roughly outline the statue with the Lasso tool.
Figure 6.39. Refining the initial Lasso selection to an accurate selection of just the statue is fast and easy by subtracting the sky using the Magic Wand.
Deselecting the Contiguous check box for the Magic Wand options lets the tool quickly target areas that may not be touching the area where you established the initial sample click, such as in the warrior statue in Figure 6.39.
Intersecting with a selection
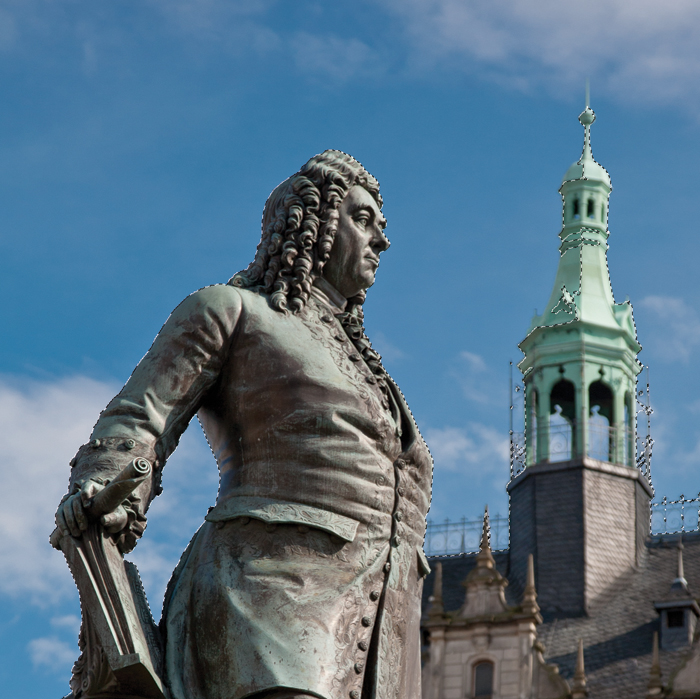
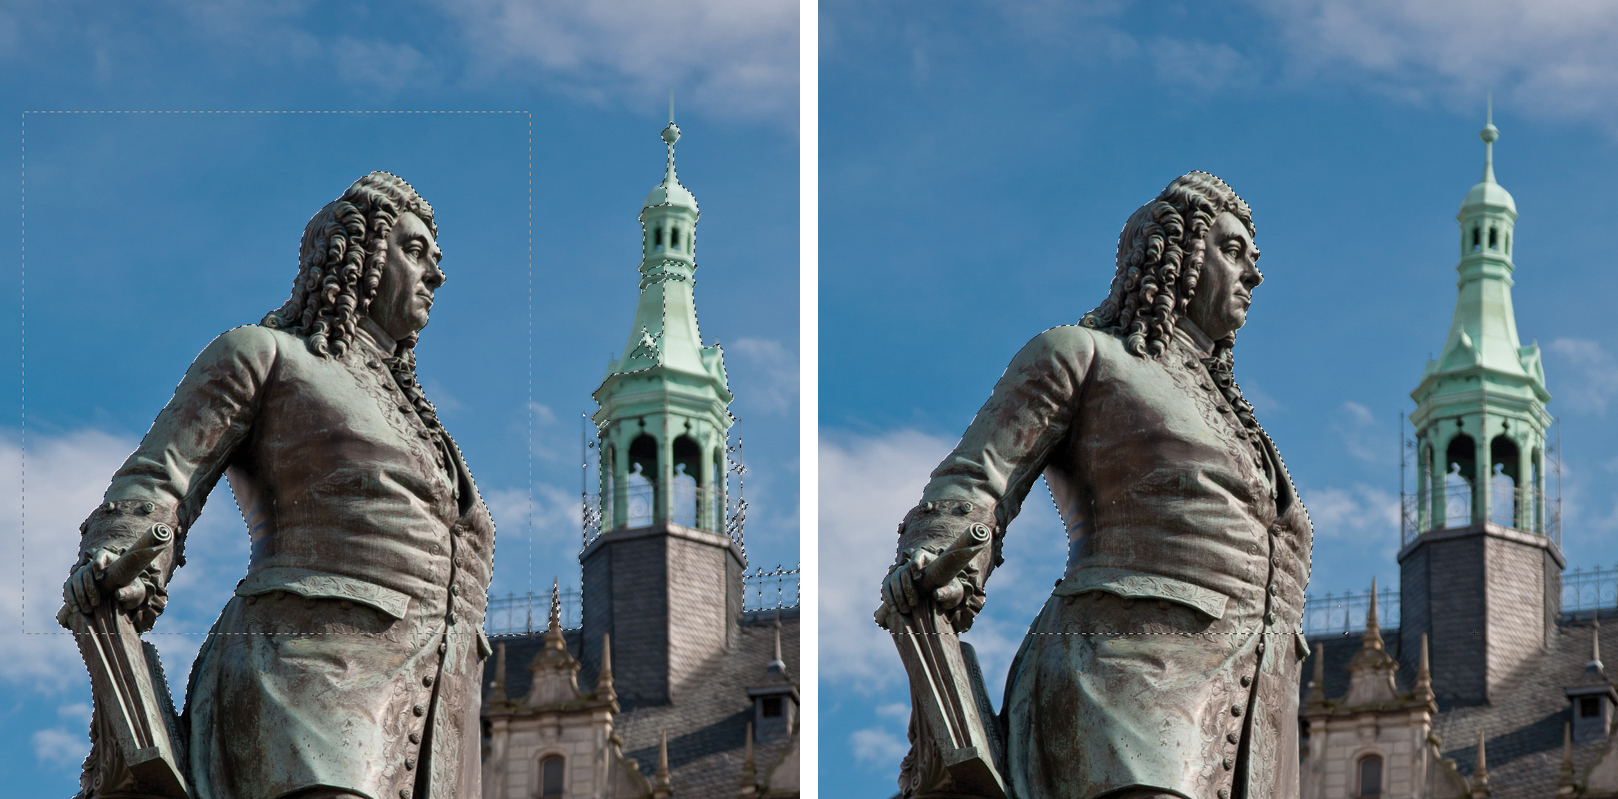
You probably won’t use intersect as often as add or subtract, but it can come in handy to select part of a selection. It allows you to create a new selection over a portion of an existing selection, and the result will only be the areas where the two selections intersect, or overlap. For example, FIGURE 6.40 shows a statue of the composer Georg Frederic Handel in Halle, Germany. Seán needed to select just the upper part of the statue. He began by selecting the sky with the Magic Wand. This took several clicks while holding down the Shift key to add to the initial selection. Then he inversed the selection (Select > Inverse), switched to the Rectangular Marquee tool, pressed Shift+Option (Shift+Alt), and used the Marquee tool to frame just the top area of the statue that he needed (FIGURE 6.41).
© SD
Figure 6.40. The original photo.
Figure 6.41. Press Shift+Option (Shift+Alt) to intersect a selection and isolate it.
![]() ch6_handel.jpg
ch6_handel.jpg
Additional methods exist to modify and refine a selection, and using add, subtract, and intersect is only the beginning. As discussed later in this chapter, you can combine any selection tool with Quick Mask to paint in selection modifications. And as we discuss in the online chapter, “Pen Tool Power,” the Pen tool is a fantastic tool to add, subtract, or intersect an active selection without running the risk of deselecting an active selection.
When using the Marquee or Lasso tools to add, subtract, or intersect a selection, make certain the Feather value in the Options bar is the same as the Feather setting on the original selection tool. For example, if you use the Marquee tool to make the initial selection and then add to the selection with the Lasso tool, the selection edge quality will not be the same if the Lasso tool has a different Feather setting than the Marquee tool. Better yet, make all your initial selections with a Feather value of zero and only apply a Feather once the selection has been turned into a layer mask.
Tone and Color Selections
So far, most of the selection methods we’ve discussed have been based on a by-hand approach, meaning that you manually outline an area that you want to select. In many instances, it is easiest to leverage color and tonal characteristics in the image to help you create an accurate selection. Understanding how to use color and tone to assist in the selection process is an important concept in masking and compositing. It affects the tools and methods that you use to create selections and makes Photoshop easier to use.
Making good color- and tone-based selections ranges from very straightforward to intricate and complex. You can make the simpler color-based selections with the Quick Selection tool and the Magic Wand. The Magnetic Lasso tool is a good choice for images in which the color or tone of the subject is too similar to the image background for the Magic Wand to be useful. You can also combine the edge-detection capabilities of the Magnetic Lasso with the occasional manual override. For more intricate color- and tone-based selections, especially those with subtle edge transitions, use the Color Range command in the Select menu, as discussed in Chapter 7. We’ll delve into additional methods for using color and tone in masking in Chapter 10.
The Magic Wand
The Magic Wand has been in Photoshop for a long time, and its simplicity makes it a go-to favorite selection tool for many people. We suspect much of this is due to the instant gratification factor: Just click in an area with the tool and presto-chango, you get a selection! Whether or not it is a good selection or one that you can use without extensive fine-tuning is another question. Our primary complaint with the Magic Wand is that it can be unpredictable. Usually, when we want to make an accurate selection based on color or tone, we gravitate toward the Color Range command, which we like to think of as the “magic wand with brains” (not to mention a preview). Just to be clear, we do use the Magic Wand for specific purposes, but we tend to think of it more as a way to make a starter selection or modify an existing one, as you saw with the warrior and Handel statues in the previous section.
But there’s no getting around the fact that the Magic Wand is one of the bread-and-butter selection tools, so we’ve included technical and practical information to help you master the tool. You can draw your own conclusions about its usefulness.
Four settings found in the Options bar influence the Magic Wand’s behavior: Tolerance, Contiguous, Use All Layers, and oddly enough, the Sample Size value for the Eyedropper tool.
The Tolerance setting
When you click on an area with the Magic Wand, a selection is created based on the brightness value of the pixel you clicked on and the Tolerance setting.
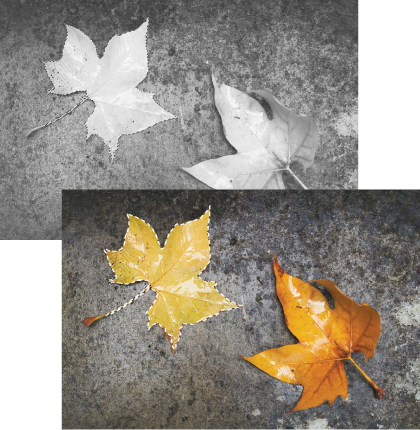
Tolerance refers to how many shades of tonal brightness the Magic Wand includes in a selection. The values range from 0 to 255: A value of 0 selects only one tonal value, the default value of 32 selects 32 shades above and below the pixel you click on, and 255 selects all the shades of the image (basically, the entire image). The Magic Wand stops the selection where the tonal difference is higher than the Tolerance setting. Note that we refer to shades of brightness instead of color because the Magic Wand doesn’t really recognize color. Rather, it looks at the image channels, which in an RGB image are three grayscale images—each representing red, green, and blue—stacked on top of one another.
When working with grayscale images, the Tolerance setting is straightforward. In FIGURE 6.45, we used the Magic Wand with a Tolerance setting of 16 and clicked once in the center of the grayscale ramp, which selected 16 shades of gray above and 16 shades of gray below where we clicked. After choosing Select > Deselect, we increased the Tolerance to 32 and clicked on the identical spot shown in the figure, which selected 32 shades above and 32 shades below the point we clicked.
When working with color images, predicting what the Magic Wand tool will select becomes a complicated mathematical calculation, making its behavior much more difficult to foretell. The Magic Wand looks at all three channels in an RGB image or four channels in a CMYK image and selects the average of the Tolerance setting. That’s why the Magic Wand sometimes works as expected and sometimes seems to have a mind of its own; it is then frustratingly referred to as the Tragic Wand.
Helping the Magic Wand
Because the Magic Wand is easiest to control and predict when working with grayscale images, you can first inspect the three channels by pressing Command+3, 4, or 5 (Ctrl+3, 4, or 5) and then use the single channel with the greatest tonal difference to make your selection. FIGURE 6.46 shows a comparison of the three RGB channels. As you can see, the red channel offers the greatest tonal difference between the leaves and the background. To make the selection, we activated the red channel by clicking the word red in the Channels panel and used the Magic Wand with a Tolerance setting of 40. The selection of the leaf on the left in FIGURE 6.47 was created with just one click. After returning to the composite view by pressing Command+2 (Ctrl+2) or clicking the word RGB in the Channels panel, the selection is still active.
© KE
Figure 6.46. Inspect the grayscale channels and use the Magic Wand tool on the channel with the greatest brightness difference between the area you want to select and the rest of the image.
Figure 6.47. The final selection of the left leaf in the red channel and in the composite image.
Additional Magic Wand Controls
The best way to control the Magic Wand is to understand the parameters that affect how it creates selections. The first three parameters are found in the Options bar for the Magic Wand; the last one is an option for a completely different tool:
• Anti-alias smoothes the edge transitions between what is selected and what isn’t. Unless you are selecting flat graphic colors, such as for a web graphic, we suggest you leave this on at all times.
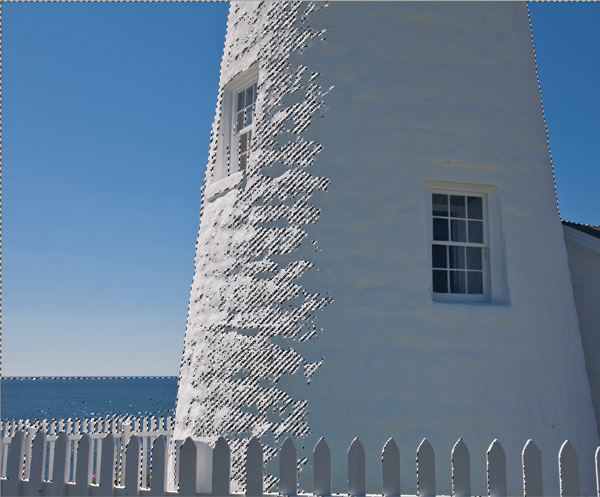
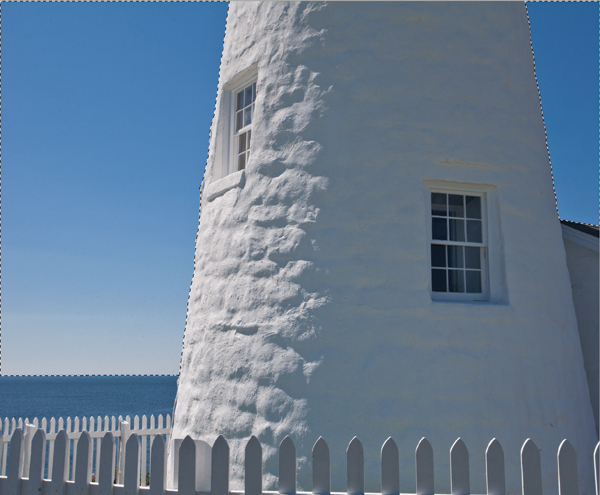
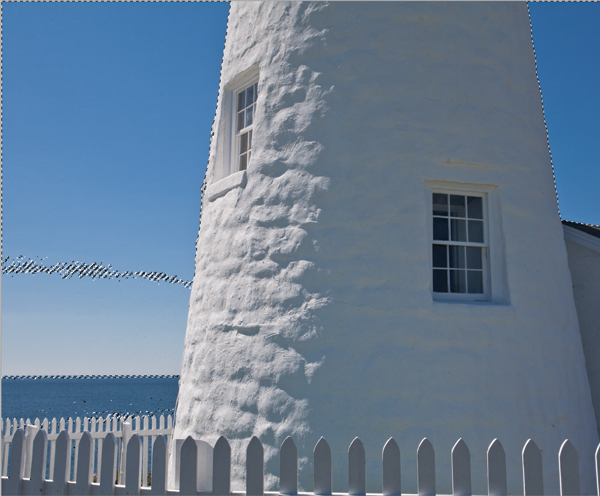
• Contiguous is on by default, and it tells the Magic Wand to select only tonal areas that are directly connected to the point you click. If you want all similar tones in an image to be selected, deselect Contiguous. Although deselecting Contiguous can be useful for selecting similar tones, it can also be unpredictable and lead to selections that require substantial editing (FIGURE 6.48). Sometimes the best way to select noncontiguous areas is simply by adding them to the initial selection by Shift-clicking with the Magic Wand (FIGURE 6.49).
© SD
Figure 6.48. Using a Tolerance of 32 and Contiguous turned off, the first click fails to select the lower, lighter part of the sky. Shift-clicking with the same settings to add in the lower sky results in large areas of the shaded part of the lighthouse being selected.
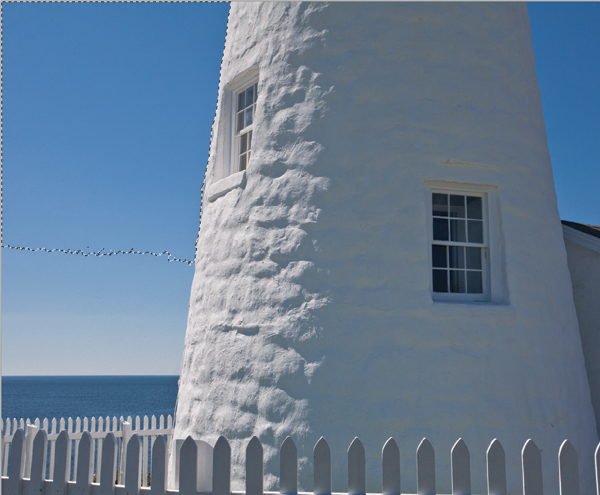
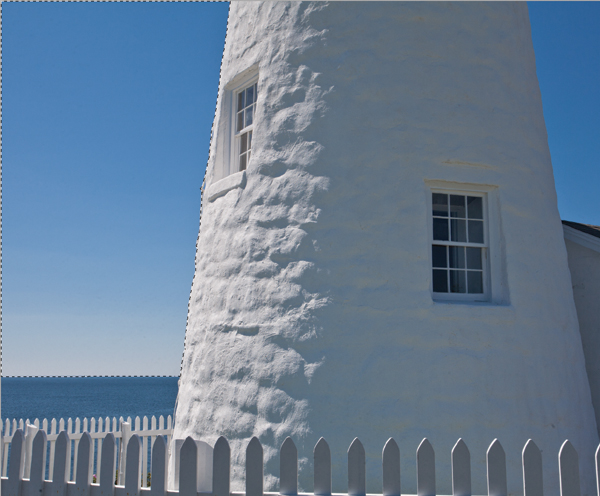
Figure 6.49. Using a Tolerance of 32 and the Contiguous option turned on requires just two additional Shift-clicks to create an accurate selection of the entire sky in this image.
• Use All Layers determines whether the Magic Wand looks only at the active layer or considers the tonal values on all visible layers in a document. This can be very useful if you are trying to change a specific color or tone that exists on multiple layers.
• Oddly enough, the Sample Size setting on the Eyedropper tool influences the size of the sample area that the Magic Wand uses for its calculations. Point Sample uses the exact pixel you click; 3×3 Average uses a nine-pixel square; and 5×5 Average uses 25 pixels to start the Magic Wand calculations. We usually set the Eyedropper Sample size to 3×3, because that is the most useful setting for color and tonal corrections. It also works well for the Magic Wand because it prevents the initial selection sample from being influenced by “rogue pixels,” such as a speck of dust or a small bird flying off in the distance. Modifying the Sample Size may be useful at times for some types of selections you are trying to create with this tool, but just be sure to set it back to 3×3 when you are done.
The Quick Selection Tool
Some professionals poo-poo at tools with Magic or Quick in their names, but this attitude doesn’t make sense when it comes to the Quick Selection tool, which is a very useful selection tool. Like the Magic Wand, the Quick Selection tool creates selections based on similarities in color and tone. In many ways it is a simpler tool than the Magic Wand because there is no Tolerance setting and no options for Contiguous selections. In addition to the standard buttons for adding to and subtracting from a selection, there is also a check box for sampling all the layers in a file and an Auto-Enhance option (FIGURE 6.50). The Auto-Enhance option reduces roughness along the selection boundary and is generally a good option to leave selected.
Figure 6.50. The Options bar for the Quick Selection tool contains the standard add to and subtract from buttons, as well as options for targeting all the layers in a file and enhancing the edge of the selection.
Instead of you having to click to create a selection, the Quick Selection tool uses a brush metaphor. Click and drag over an area of the image, and the selection will be generated as you move the cursor across the image. In keeping with the brush metaphor, you can change the size of the brush tip for the Quick Selection tool, making it very easy to use a big brush to select large areas and smaller brushes for smaller areas and fine-tuning the selection.
As you click and drag over an area, the Quick Selection tool measures the value of the pixels, and like the Magic Wand, it will try to select similar pixels that are adjacent to the area you are sampling. Just make sure that the circular brush cursor stays on pixels that you want to select. After the initial click, the tool automatically switches to an “add to” mode so you can click in other areas that were not selected at first. The same add to and subtract from buttons are available on the left side of the Options bar for the tool, and the standard add and subtract selection keyboard shortcuts also work for this tool. As you add to an existing selection, the Quick Selection tool spreads out the selection based on the pixels you drag over until it is stopped by an “edge” of obviously different brightness or color values.
The importance of brush size
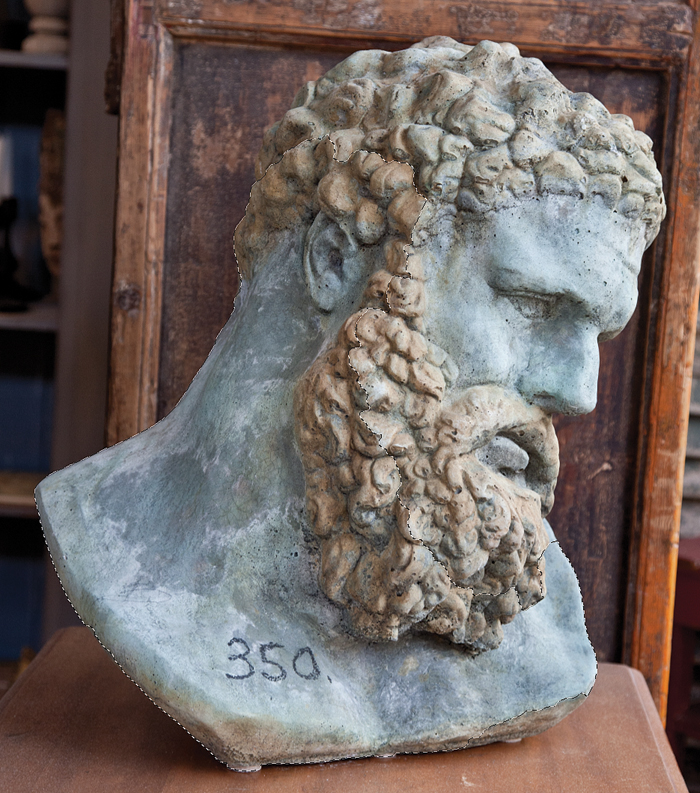
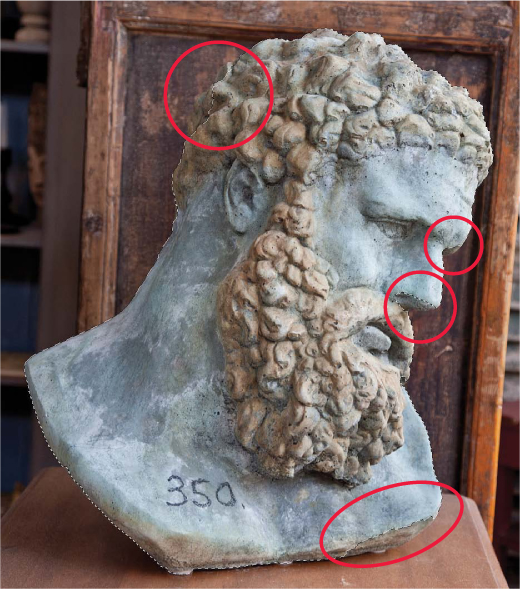
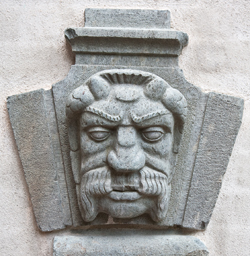
The size of the brush that you use affects how large of an initial selection the tool makes or how much is added to an existing selection. To select large areas (for example, the sky), a large brush and a more expansive selection “brush stroke” work well. If you need to define a smaller, more complex area, zoom in for a closer view, switch to a smaller brush, and use more controlled clicks or smaller strokes to create or gradually add to the selection. This practice also works if you need to subtract areas from the selection. The smaller the brush size, the more control you will have in how areas are added to or subtracted from the selection. To see how this works on an actual image, you’ll use the Quick Selection tool with different size brushes to create a selection of the Neptune head (FIGURE 6.51).
![]() ch6_blue_neptune.jpg
ch6_blue_neptune.jpg
1. To select the blue Neptune head, start with a large brush size of about 250 pixels. Start on the ear, drag down the back of the neck, and down under the beard. You’ll end up selecting about half of the head (FIGURE 6.52).
© SD
Figure 6.51. The original Blue Neptune image and an example of a finished composite that integrates the head into a seascape.
Figure 6.52. The selection after the first brush stroke with the Quick Selection tool.
2. After you initially drag across the face of the image, the Quick Selection tool automatically switches to add-to mode. Drag over the rest of the head that is not yet part of the selection. You don’t have to use one continuous drag but can use small click-and-drag motions to add more of the head to the selection. Small areas along the edges may not be selected, but we’ll deal with those using a much smaller brush size (FIGURE 6.53).
Figure 6.53. After the second Quick Selection tool brush stroke, most of the head is selected, but there are still a few areas along the edge that need to be added.
3. In the Options bar, change the brush size to 30. Zoom to 100% by double-clicking the Zoom tool or by choosing View > Actual Pixels. Press the spacebar to scroll around the image and see the areas on the edge of the head that still need to be added to the selection. In the version we worked on, small sections on the eyebrow, under the nose, on top of the head, and the base of the head were not selected. Click on these areas to add them to the selection (FIGURE 6.54).
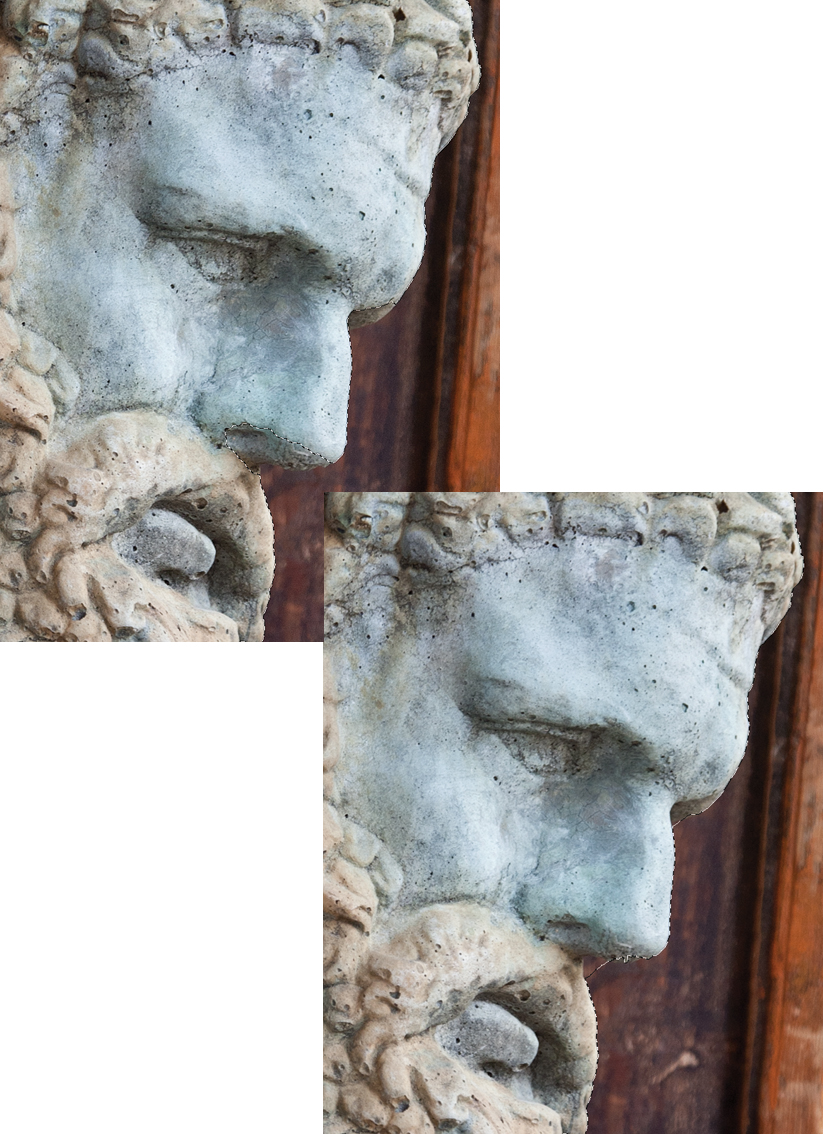
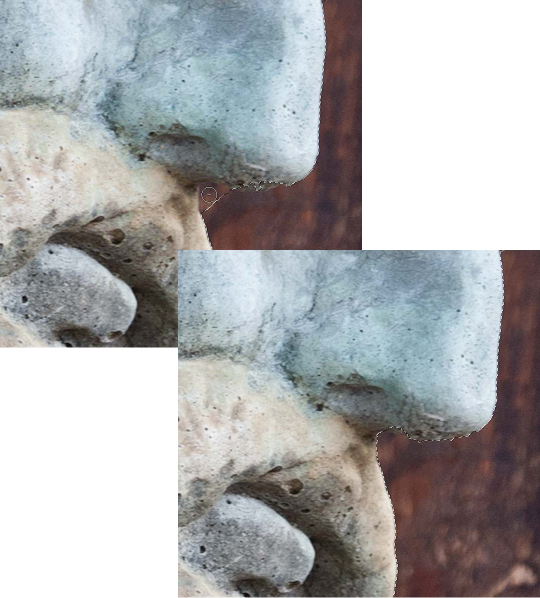
4. If other areas need to be subtracted, hold down the Option (Alt) key and click on those areas. If you see a very small area, remember to use an even smaller brush size. The smaller the brush size, the more control you have over what is added or subtracted. For the subtraction shown in FIGURE 6.55, the brush size was 15 pixels.
Figure 6.54. Adding the area by the nose and the brow into the selection.
Figure 6.55. A 15-pixel Quick Selection tool brush was used to subtract the area under the nose from the selection.
Figure 6.56. The Options bar for the Magnetic Lasso.
Sometimes the Quick Selection tool may select parts of the image you don’t want. Instead of starting over again and again trying to get it right, it is often more effective to subtract those areas with the Quick Selection tool.
The Magnetic Lasso Tool
The Magnetic Lasso combines the ability to create selections based on color and tonal differences with the more directed functionality of the Lasso tools. Because it can “see” contrast edges and differences between tonal regions, it is a great tool for selecting image elements that are similar to their surrounding environments and for images in which the Magic Wand would have difficulty. Although it’s not as straightforward to use as the standard Lasso or Polygonal Lasso tools, it is well worth it to understand its settings in the Options bar (FIGURE 6.56).
The Magnetic Lasso tool has six primary parameters that influence how it works. You can adjust them depending on how close the subject and its environment are in tone, color, and contrast:
• Feather and Anti-alias work the same way in the Magnetic Lasso tool as they do with the other selection tools. And as with the other selection tools, we recommend leaving Anti-alias selected and make the initial selection with Feather set to zero. Afterwards, use other means to apply a feather to soften the selection edge.
• Width tells the Magnetic Lasso how far from its center point (between 1 and 256 pixels) to detect a contrast edge. In some ways this is similar to the brush tip size used by the Quick Selection tool. When you use the highly recommended precise cursor view (press the Caps Lock key), the Magnetic Lasso cursor is a circle with a center crosshair just like the Quick Selection tool. Use lower settings when the edge you need to select is tonally and visually very close to areas you don’t want to include in the selection.
• Edge Contrast tells the Magnetic Lasso tool how much difference there needs to be between the object and the surrounding area. The default is 10%. Use higher settings (30% or more) to select images or objects that are well defined from the background, and use a lower edge-contrast setting for images or areas that are less defined or similar in tone to the background.
• Frequency controls the number of anchor points the Magnetic Lasso creates. The default setting is 57. A higher Frequency lends itself to a higher-resolution image or to make a more accurate selection.
• Pen Pressure is important if you work with a pressure-sensitive tablet. When the option is selected, pressing harder with the stylus decreases the Edge Contrast setting.
![]() ch6_metalroof.jpg
ch6_metalroof.jpg
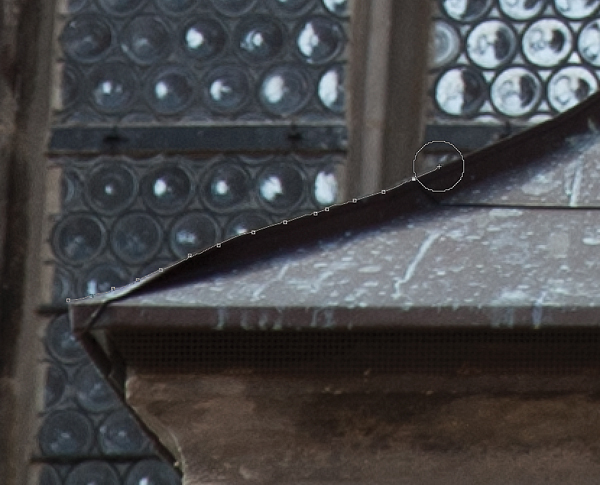
The photo of a section of metal roof on a cathedral in FIGURE 6.57 presents a selection challenge for the Magic Wand due to the speckled pattern of discoloration on the metal roof plates. The Quick Selection tool works well for most of the shape, but it fails to include the outer dark edge on the top section, and trying to gradually add it in is a very tedious and inaccurate process. The unique qualities of guided edge detection that the Magnetic Lasso offers, however, make it the ideal tool for creating an accurate selection of this element.
© SD
Figure 6.57. The metal roof structure is an ideal subject for the Magnetic Lasso.
The goal of this exercise is to select the metal roof structure. When you have completed the selection and are satisfied with it, you can save it as an alpha channel. However, before you dive into making the selection, be sure to review the useful tips in the sidebar “Magnetic Lasso Tips.”
The edge of the metal roof structure is fairly well defined. For the most part, the Magnetic Lasso will be able to quickly find this edge and anchor the selection line to it. There are some areas outside the edge, however, where the tool will have trouble finding the correct edge.
1. Start with a Width setting of 15 pixels and an Edge Contrast setting of 10%. To see the size of the Width setting, press Caps Lock so that the Magnetic Lasso cursor is shown as a circle with a crosshair. To really see in detail what you are selecting, zoom to 200% (you can use the drop-down Zoom menu in the Application bar).
2. Start at the pointed tip of the structure in the lower-left corner of the image. Click on the tip, release the mouse, and drag diagonally up to the right, following the curved edge and keeping the center crosshair close to that edge. Notice how the Magnetic Lasso lays down a wire-like line that follows the tonal contours of the edge (FIGURE 6.58).
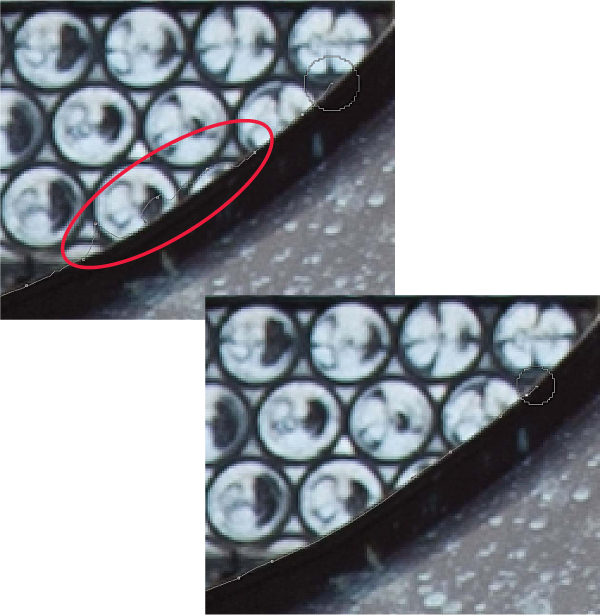
3. As you near the circular parts of the window, the Magnetic Lasso is likely to be “distracted” by the higher levels of contrast there (FIGURE 6.59). If the lasso line becomes attracted to those areas outside the edge you are tracing, back up over the points it has put down on the window and press Delete for each point that is in the wrong place (an “active” point is solid; nonactive points are a hollow outline). Then manually click the locations on the roof edge where you want to make sure the Magnetic Lasso lays down a point. You can also try making the brush circle smaller by tapping the left bracket key ([). After you get past the circular pieces of glass, the selection should get easier, and tracing the rest of the curved section should go fairly quickly.
Figure 6.58. The Magnetic Lasso starts at the pointed tip of the roof structure and continues up to the right.
Figure 6.59. Adjacent areas of higher contrast, such as the circular window glass, can sometimes distract the contrast edge detection of the Magnetic Lasso. By using a smaller brush of 8 pixels and manually placing anchor points, you can create a more accurate line for this part of the roof edge.
4. After the curved section, the edge of the roof is composed mainly of straight edges. You should be able to trace along this edge at a good pace. Or, you can also try switching to the Polygonal Lasso functionality by pressing the Option (Alt) key and tracing the edge that way. Don’t be too concerned about total perfection at this point; the main objective is to learn the nuances of how this tool works.
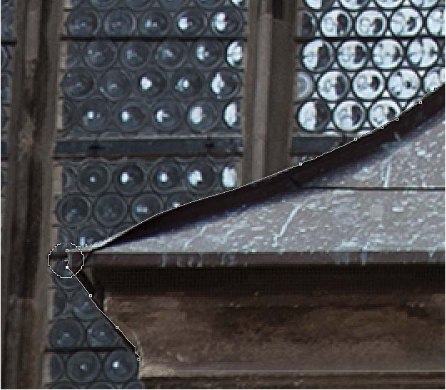
5. Continue tracing around the top edge and down the right side of the roof structure. When you get to the lower-left corner, move the cursor a little more than halfway between the dark horizontal edge of the metal roof and the bottom of the image. Press the Option (Alt) key, and then stretch a straight line all the way over to the left edge, just below where you began the selection. Click and release the Option (Alt) key at the curved edge of the stone section just below the metal edge, and then trace up to the point where you started. Close the selection loop by clicking directly over your starting point or double-clicking when you are right next to it (FIGURE 6.60).
Figure 6.60. Returning to the point where you began to complete the selection.
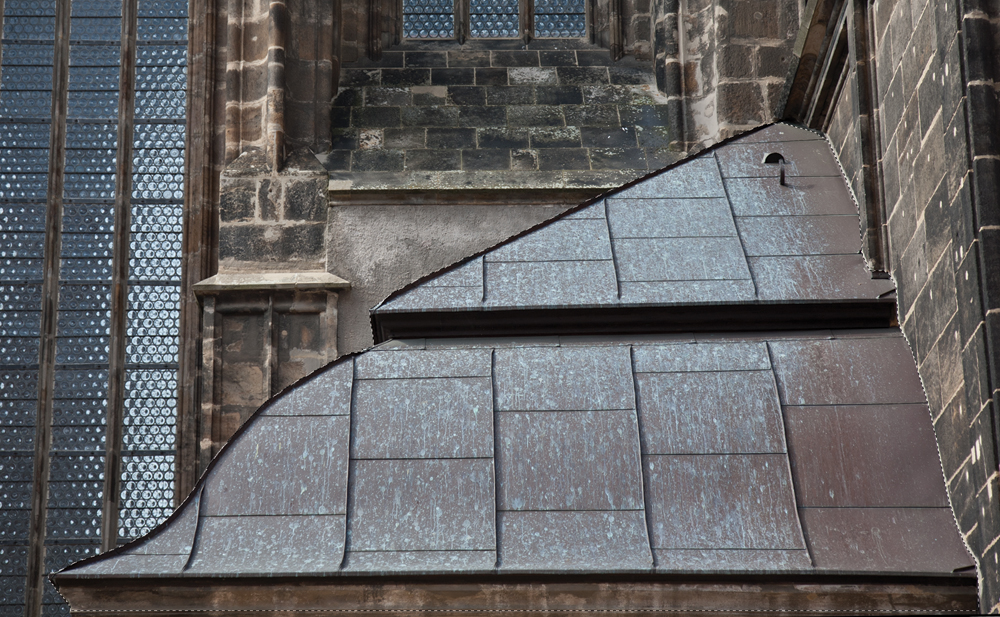
6. You should now have a selection that includes all of the metal roof structure as well as a thin section of the stone ledge underneath it (FIGURE 6.61). Inspect the selection edges and use the standard Lasso or Magnetic Lasso tool to refine the selection as described previously in the “Adding, Subtracting, and Intersecting Selections” section of this chapter. We’ll cover some additional selection refinement techniques later in this chapter and in the following chapter.
Figure 6.61. The finished selection of the roof structure.
To really understand how the Magnetic Lasso tool works, change the tool settings one at a time to see how the change impacts tool behavior. Taking a few minutes to experiment with these settings is well worth it. Katrin likes the Magnetic Lasso because it is easy on her wrist. By just clicking once and then casually dragging around an object, her hands are relieved of the tension required to click, hold, and drag with the standard Lasso tool to make a good selection.
We often use the Magnetic Lasso tool to make a quick selection of a subject when we’re in the planning or exploring proof-of-concept stage of an image: Rather than spending a lot of time on a complex selection or a path with the Pen tool, we’ll do a quick rough of an image composite to see whether the idea is working (FIGURE 6.62). If it is, we’ll return to the image elements and take the time to make a perfect selection (and in this example, the Pen tool would give us that required precision). If the composite isn’t working, we haven’t wasted a lot of time finessing a selection of an element that we ended up not using.
Take a photo (or use an existing one) of an object that has hard edges and an obvious tonal or color difference from the area surrounding it. Make selections of this object using the Magic Wand, the Quick Selection tool, and the Magnetic Lasso. Determine which tool was the quickest to use and which tool created the most accurate selection. Sometimes the same tool will be the quickest and most accurate, whereas other times the fastest tool won’t be as accurate as the tool that took more time. Noticing the characteristics of the image where the tool had problems will help you to choose the best selection method in the future. Remember that often the best method may be a combination of more than one approach.
© SD
Figure 6.62. Seán used the Magnetic Lasso tool to make the selection of the roof structure for the initial proof-of-concept version of this composite.
Combining Tools
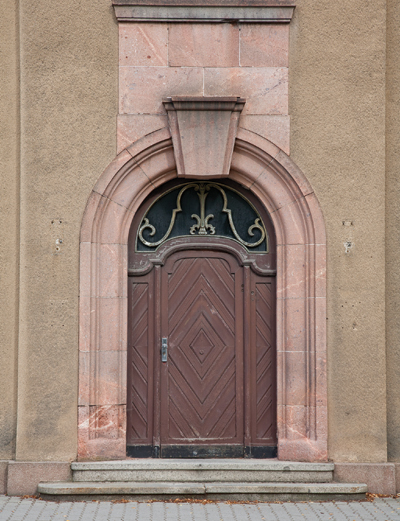
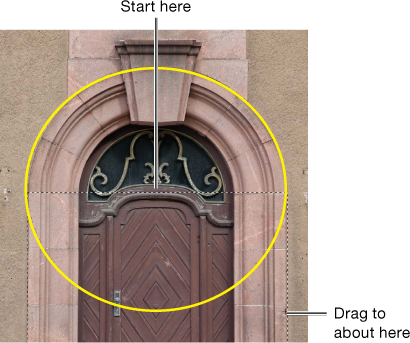
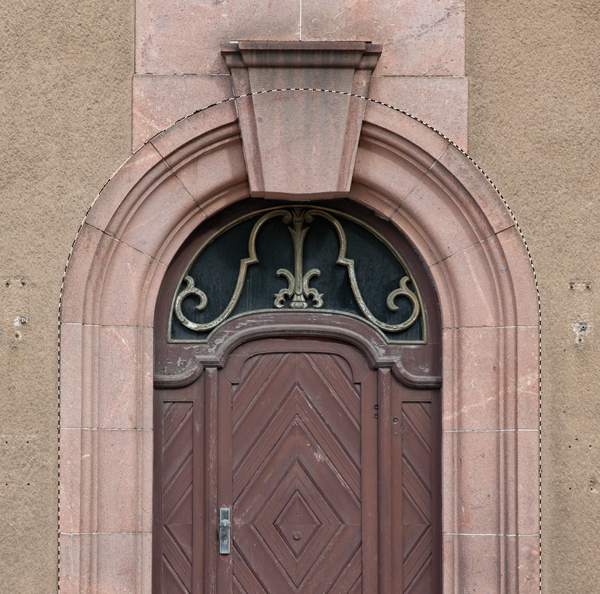
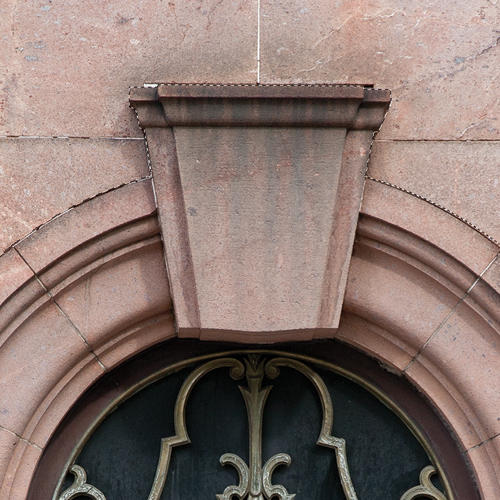
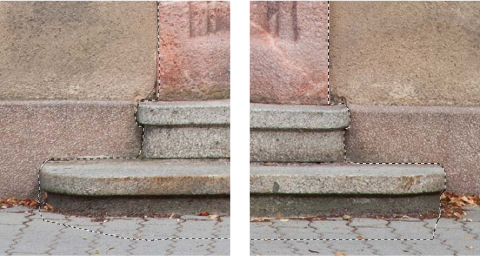
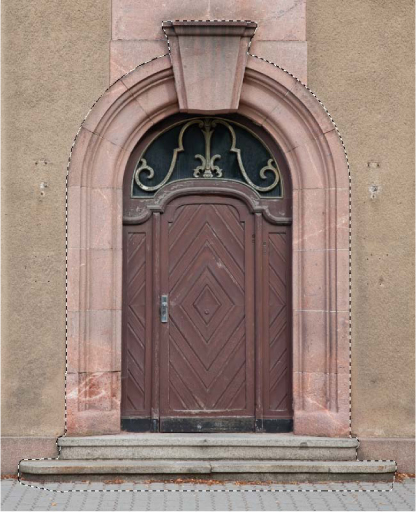
Making a good selection often requires that you mix and match tools and techniques. A good strategy is to start the selection process by making the initial selection with the tool that will grab the largest area of the object or image. Then choose additional tools that will best refine the selection. In FIGURE 6.63, the challenge is to select the doorway and include the rounded archway above the door, the large accent stone at the top of the arch, and the steps at the bottom. For this exercise, you’ll use the Rectangular and Elliptical Marquees and the Polygonal Lasso tool to create the selection.
![]() ch6_browndoor.jpg
ch6_browndoor.jpg
© SD
Figure 6.63. Using different tools lets you easily combine the different shape components of the brown door into a single selection.
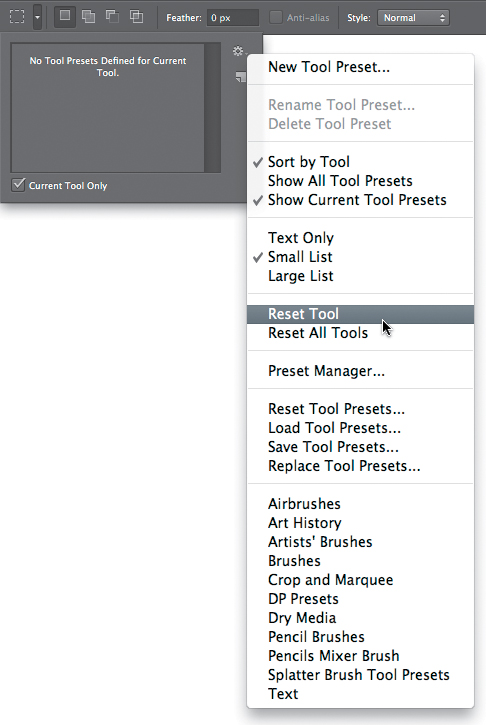
1. Verify that the Rectangular Marquee tool is set to its default settings—something you can quickly do by clicking the small triangle next to the Marquee icon in the Options bar and highlighting Reset Tool (FIGURE 6.64).
Figure 6.64. Resetting the Marquee tool is useful to avoid style or feathering surprises or irritations.
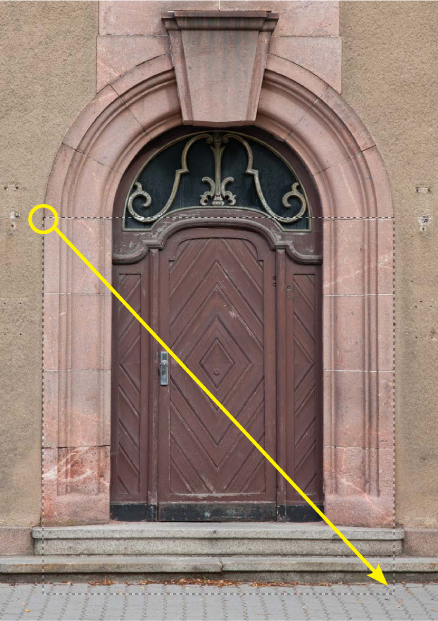
2. Select the lower part of the doorway with the Rectangular Marquee tool. Start your selection on the left side of the rose-colored arch at the top of the stone block where the edge begins to transition from a straight vertical line to the curve that creates the arch. Drag diagonally down to the lower-right corner so that the right side of the marquee lines up with the right edge on the stone border surrounding the door. It’s OK to extend the bottom of the selection down onto the sidewalk (FIGURE 6.65).
Figure 6.65. The Rectangular Marquee tool is used to make the first and largest selection of the door.
3. Switch to the Elliptical Marquee tool and make sure that it is also set to the default settings. Position your cursor in the center of the wooden area that is just above the door and below the decorative metal-work. Press and hold the Shift key to turn on the add-to feature, and then click and begin to drag out a selection. Release the Shift key, press the Option (Alt) key to create the selection from the center of your origin click point, drag out an oval, and fit it as best you can to the top curve of the arch. Try dragging the cursor down to just below the middle of the door on the right edge of the stone arch (FIGURE 6.66). Release the mouse button before the Option (Alt) key to add the oval to the rectangle selection (FIGURE 6.67).
Figure 6.66. Using the Elliptical Marquee tool to add a rounded selection to the top of the initial rectangular selection.
Figure 6.67. The rounded selection added to the rectangular selection.
4. Select the Polygonal Lasso tool. Starting inside the existing selection near the top of the arch, Shift-click to add on a new section, and click around the top of the large ornamental stone at the top of the arch (FIGURE 6.68). Loop back inside the existing selection and double-click to complete the Polygonal Lasso selection.
Figure 6.68. The stone at the top of the arch is added with the Polygonal Lasso.
5. Press and hold the spacebar, and click and drag to reposition the file so you can see the bottom of the image. Use the Polygonal Lasso tool to add the left and right sides of the steps (FIGURE 6.69) to complete the selection of the entire door and steps (FIGURE 6.70).
As with many functions in Photoshop, there are different ways and tools to make this selection. Experiment with various tools and techniques to get a better sense of which methods and tools work best for certain types of images. For example, instead of using the three tools you did in the preceding exercise, you could use the Quick Selection tool, which does a decent job of making the same selection. But it does take many additional clicks to select the entire door. And a close inspection would reveal numerous small edge errors that would need to be dealt with. If you are proficient with the Pen tool, it too is an obvious candidate for making a such a selection. (The Pen tool is covered in depth in the web-based chapter “Pen Tool Power.”)
Figure 6.69. The Polygonal Lasso is used to add in the steps on the left and right sides of the door.
Figure 6.70. The completed selection of the arched door and steps.
Settings for Combined Tool Selections
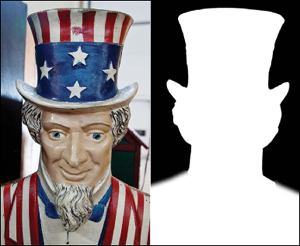
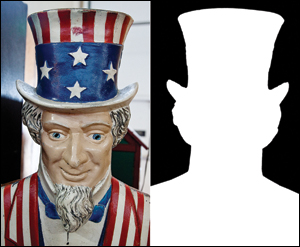
Many times you’ll start a selection with one tool and then use a different selection tool or technique to refine it. As mentioned earlier in the “Adding, Subtracting, and Intersecting Selections” section, when combining tools, you need to verify that the settings between the tools match up. The main aspect to be concerned about is that the Feather setting is the same. For example, if you start a selection with the Magic Wand (which doesn’t have a Feather setting) and then continue the selection with a Lasso tool that does have a Feather setting applied, the two edges won’t match up and may cause problems in your final composite. FIGURE 6.71 shows what happens if you mix and match selection tools without checking the settings. The initial selection of Uncle Sam was made with the Quick Selection tool. The Polygonal Lasso with a 10-pixel feather was used to add to the selection. As you can see, the quality of the edges varies widely: The top part of the figure has smooth, accurate edges, but the shoulders are much too soft and fuzzy. FIGURE 6.72 shows the results of selecting the figure using the Quick Selection tool and no feather with the Polygonal Lasso tool. As mentioned earlier, we recommend making most selections with a Feather of zero and then modifying the edge using techniques where you can see what the effect of a feather will be. We’ll cover edge refinements in the next chapter.
© SD
Figure 6.71. When combining selection tools, you need to pay attention to the settings for each tool to avoid mismatched edges.
Figure 6.72. Consistent selection tool settings will create selections with similar edges.
Working with Quick Mask
Quick Mask combines the qualities of a selection with painting and filtering, allowing you to venture beyond the marching ants to view and edit your selections. Use Quick Mask to create and refine selections as well as to verify the quality and accuracy of selections that were made using the standard selection tools discussed previously in this chapter. When you view and edit a selection in Quick Mask mode, you see which image areas are active (selected) and which are inactive (not selected) via a transparent colored overlay. Quick Mask is tremendously flexible and powerful; you can use it with or without an existing selection; you can use many painting tools and filters on it; and you can also save a Quick Mask as an alpha channel for future use.
To practice working with Quick Mask in the exercises that follow, make sure you’re using the default settings for Quick Mask. You can do this by double-clicking the Quick Mask button under the color picker in the toolbar and making sure the settings you see match the settings shown in FIGURE 6.73. After you verify those settings and click OK, be sure to click the Quick Mask icon once more to turn it off.
Figure 6.73. Double-click the Quick Mask icon in the Tools panel to bring up the Quick Mask Options dialog. The settings shown here are the defaults.
Starting with a Selection
After making an initial selection with any selection tool, click the Quick Mask icon under the color picker in the toolbar or press Q. Photoshop displays the image using a red transparent overlay to cover the inactive (unselected) areas, leaving the selected areas unaffected. Notice that the marching ants that normally define a selection border have disappeared.
Quick Mask turns the selection into a temporary mask and lets you modify and refine the selection without inadvertently deselecting it. Best of all, you can easily see which areas are selected and which aren’t, and work back and forth by painting with black and white to create more accurate selections.
Separating image elements
In the following exercise, the goal is to separate the red leaf from the background.
![]() ch6_redleaf.jpg
ch6_redleaf.jpg
1. Create a selection of the red leaf with the Quick Selection tool. The initial selection will not be large enough, and you will probably have to click and drag to add in areas until the entire leaf is selected. Use a smaller brush size when adding in smaller areas like the tips of the leaf (FIGURE 6.74). It’s OK if there are some inaccurate edges or small bits of the background selected; you’ll fix those in the next step.
© SD
Figure 6.74. The initial selection of the leaf, created with the Quick Select tool, includes some areas where the edges are not totally accurate.
2. Press Q to enter Quick Mask mode (FIGURE 6.75). Everywhere you see the red overlay the selection is inactive, or not selected. Everything that is not covered by the red overlay is selected, or active. In most cases, the default red overlay color works well for Quick Mask. In this case, because the leaf is red, the red overlay could be a bit confusing. Fortunately, you can change it.
Figure 6.75. The selection viewed in Quick Mask mode with the default red overlay.
3. Double-click the Quick Mask icon at the bottom of the toolbar (the Quick Mask may return to a standard selection; that’s OK). Click in the color swatch to bring up the color picker, and choose a color that will contrast well with the red leaf: We used a charming shade of neon green (FIGURE 6.76). Click OK in both dialogs to close them. If you need to switch back to Quick Mask mode, press Q again.
Figure 6.76. Changing the color of the Quick Mask overlay.
4. Zoom in to 100% (View > Actual Pixels) and inspect the edges for errors that need to be fixed. Choose the Brush tool and press D to set the default colors for working on a mask, which will make black the foreground color. In the Brush options, set the brush hardness to 100% and choose a brush size that will enable you to fill in the small details along the edge (FIGURE 6.77). By painting with black over the image areas that should not be selected, you are subtracting from the selection (even though you are painting with black, it will show up as the color of the overlay). Note that using a hard-edged brush will maintain edge consistency.
Figure 6.77. Painting with black on the Quick Mask adds to the colored overlay and subtracts those areas from the selection.
5. If your selection includes areas that still need to be selected, paint on the Quick Mask with white (press X on the keyboard to exchange the colors and make white the foreground color). For example, if you want to add the stem of the leaf, painting with a very small brush (ours was 15 pixels) set to 100% hardness adds the stem to the selection (FIGURE 6.78).
Figure 6.78. Painting with white on the Quick Mask removes the colored overlay and adds those areas to the selection.
6. When you are satisfied with the selection, press Q again. Photoshop converts the Quick Mask into an active selection (FIGURE 6.79) that you can use to copy and paste the leaf to another image.
Figure 6.79. The edited selection in Quick Mask view and Selection view.
As soon as you enter Quick Mask mode, Photoshop resets the color picker to the default colors of white foreground and black background. While you’re painting, press X on the keyboard to switch the foreground and background colors to black or white as needed. Use the left bracket key to make the brush smaller and the right bracket to enlarge the brush as needed.
Checking Selections in Quick Mask
No matter which tool you use to make a selection, it is often a good idea to check your selection in Quick Mask mode to verify that it is accurate and the edges are smooth, and to determine if any telltale artifacts will interfere with the planned composites or effects. This is a very useful way to proof your selections, especially when using a tool like the Magic Wand, because with some images it can be difficult to know what is selected and what isn’t.
1. With an active selection of the red leaf, press Q to enter Quick Mask mode.
2. Often, the color and transparency of the mask makes it difficult to accurately access the selection. To see the selection in black and white, open the Channels panel and click the eye icon in the View column next to the word RGB. This turns off the view of the image and shows you the mask in black and white, making it easier to see any defects (FIGURE 6.80).
Figure 6.80. Viewing the Quick Mask as black and white in the Channels panel can reveal artifacts and imperfections that may not be visible in the color overlay view.
3. Viewing the selection of the red leaf in black and white clearly shows a very thin white line extending out from the upper part of the leaf that needs to be cleaned up before continuing with the selection. The easiest way to handle this particular artifact is to use a small Brush tool to paint over it with black (FIGURE 6.81).
Figure 6.81. Cleaning up the imperfections in the mask with the Brush tool.
4. After cleaning up the artifact, click on the RGB view column again to see the image with the Quick Mask overlay (FIGURE 6.82), and press Q to exit Quick Mask mode to create an active selection (FIGURE 6.83).
Figure 6.82. Click on the RGB view column to see the colored Quick Mask overlay.
Figure 6.83. The fine-tuned selection.
© SD
Figure 6.84. “Autumn Road”: The leaf image used in a composite.
Once the selection has been perfected using Quick Mask mode, the red leaf can be copied (Edit > Copy) and pasted into a new document to become an element in a composite image. The Autumn Road image is a composite that Seán made using the red leaf and three other images (FIGURE 6.84).
Checking selections in Quick Mask mode is very easy and fast. We’ve often caught noise or mistakes that would have caused problems if we hadn’t fixed the mask before continuing with the composite.
Starting Without a Selection
Some people are very comfortable with the Photoshop painting tools and prefer to use them to make their initial selections rather than the standard selection tools. With a simple change to the Quick Mask options, you can start without a selection and paint on the areas you want to select.
When using Quick Mask in painting mode—that is, starting without an active selection—it is useful to change the defaults in the Quick Mask Options dialog so that Selected Areas in the Color Indicates section is selected (FIGURE 6.85).
Figure 6.85. If you want to use Quick Mask without an active selection, change the Quick Mask options so that the color overlay represents the selected areas.
If the object you are trying to select is red, choose a contrasting color for the mask by clicking the color swatch in the Quick Mask Options dialog and choosing a different color in the color picker. Use the color that is the opposite of the image or subject to make it easier to see through the Quick Mask. If you’re not sure what the opposite color is, choose a color that could not be mistaken for part of the image, such as neon green, hot pink, and so on.
To select the carved stone face in FIGURE 6.86, painting in Quick Mask mode to define the edges is just as workable a selection method as using the Lasso or Quick Selection tools.
© SD
Figure 6.86. The original image.
![]() ch6_carved_face.jpg
ch6_carved_face.jpg
1. Make sure there is not an active selection by choosing Select > Deselect (if the menu command is grayed out, no selection is present). Also, double-click the Quick Mask icon to open the options and make sure that Color Indicates is set to Selected Areas, as shown in Figure 6.85.
2. Press Q to enter Quick Mask mode; the image will be unchanged because there was not an active selection. Even though the appearance of the image has not changed, the title bar or tab of the image will tell you that you are in Quick Mask mode (FIGURE 6.87).
Figure 6.87. The document window title and the title tab of the file will show that you are in Quick Mask mode.
3. Choose the Brush tool and use the Brush tip panel on the left side of the Options bar to set the Hardness to 100% (FIGURE 6.88). The brush size should be small enough to allow for accurately tracing the edge of the face (we used a 25-pixel brush). Make sure that the brush opacity is set to 100% and that the foreground color is set to black.
Figure 6.88. A hard-edged brush works best when using Quick Mask to paint in a selection.
4. Zoom in for a closer view and trace along the inside of the stone face (FIGURE 6.89). Instead of trying to laboriously trace along the edge with a single long brush stroke, it is best to cover the outline with shorter strokes. If you make a mistake, shorter brush strokes make it easier to undo a section without losing all of the work you’ve already done. If you do need to clean up an error, exchange the colors by pressing X on the keyboard so that white is the foreground color, and paint over the mistake. Switch back to black to continue outlining the edge of the stone face.
Figure 6.89. Paint around the inside edge of the stone face with black using a small, hard-edged brush.
5. After completely encircling the blossom, choose a larger hard-edged brush and quickly paint the entire inside of the face with black (FIGURE 6.90).
Figure 6.90. Fill in the interior of the stone face with black to complete the selection.
6. After filling the interior area of the stone face with black—which in this case will look red if that is the color of the overlay—press Q to exit Quick Mask mode and switch back to the selection. Only the stone face should be selected (FIGURE 6.91).
Figure 6.91. The selection of the stone face.
7. If you notice areas where the selection is still not accurate, you can return to Quick Mask mode for further edits. When you are satisfied with the selection, save it as an alpha channel by choosing Select > Save Selection. If you look at the Channels panel, you’ll see that this alpha channel is different than the other ones you created in this chapter. The selected area is represented by black (FIGURE 6.92). The reason is that when we began the exercise, we set up Quick Mask so that the color indicated the selected areas. The selection will still load correctly, even though this alpha channel is the opposite of what a saved selection usually looks like.
Figure 6.92. An alpha channel created from a Quick Mask selection where the color is set to represent the selected areas will appear the opposite of what an alpha channel usually looks like.
8. Save the file in the TIF or Photoshop format (JPEG does not support alpha channels). Make a note of where you save it because we’ll be using this image in a composite later in the book, and you might as well take advantage of the selection work you’ve already done!
Creating selections by starting in the Quick Mask mode and using the Brush tool to paint an outline as you did with the stone face image is not necessarily better or faster than other methods. But for some people it may be a more intuitive approach than using some of the other selection tools. The important factor is to become familiar with all of the ways that selections can be made and then choose the ones that work the best for a particular image.
And keep in mind that if you’re just trying out different photographs for a composite to see what works, it’s better to create a quick and dirty selection just so you can see if your idea is working well enough to pursue it further. Seán used the stone face from the previous exercise in a composite made from five different photos (FIGURE 6.93). The minor edge errors in the stone face would not matter for this image because it was heavily masked to blend it in with the rocks. For the rowboat, the initial selection was also a bit sloppy on the edges during the initial proof-of-concept stage. Don’t waste time on making super accurate selections until you know you’re going to use them. Once you know that the image will work in the composite, you can go back and spend the time to make the best selection possible.
© SD
Figure 6.93. The stone face used as an element in a composite made from five images.
Closing Thoughts
Many procedures in Photoshop are based on the concept of selecting a portion of the scene and applying a change just to that area, or placing an element from one photograph into another image. If your imaging workflow requires these techniques, it is not an exaggeration to say that the final quality of the image depends in large part on the quality of the initial selections and masks.
Making good selections takes practice and patience—and an occasional dose of frustration. But learning the selection tools and how to use them is well worth it. Although rough selections are fine for trying out ideas for a collage, once you settle on the images you’re going to use and begin the real compositing work, creating a good selection will prevent you from having to spend time retouching ragged edges or tell-tale transition halos that poor selections cause when combining images. In the next chapter we’ll continue exploring how to manage and refine selections via the Select menu.

